Free Panda Crochet Pattern for a Cuddly Panda Snuggler Lovey
By Jan Bay
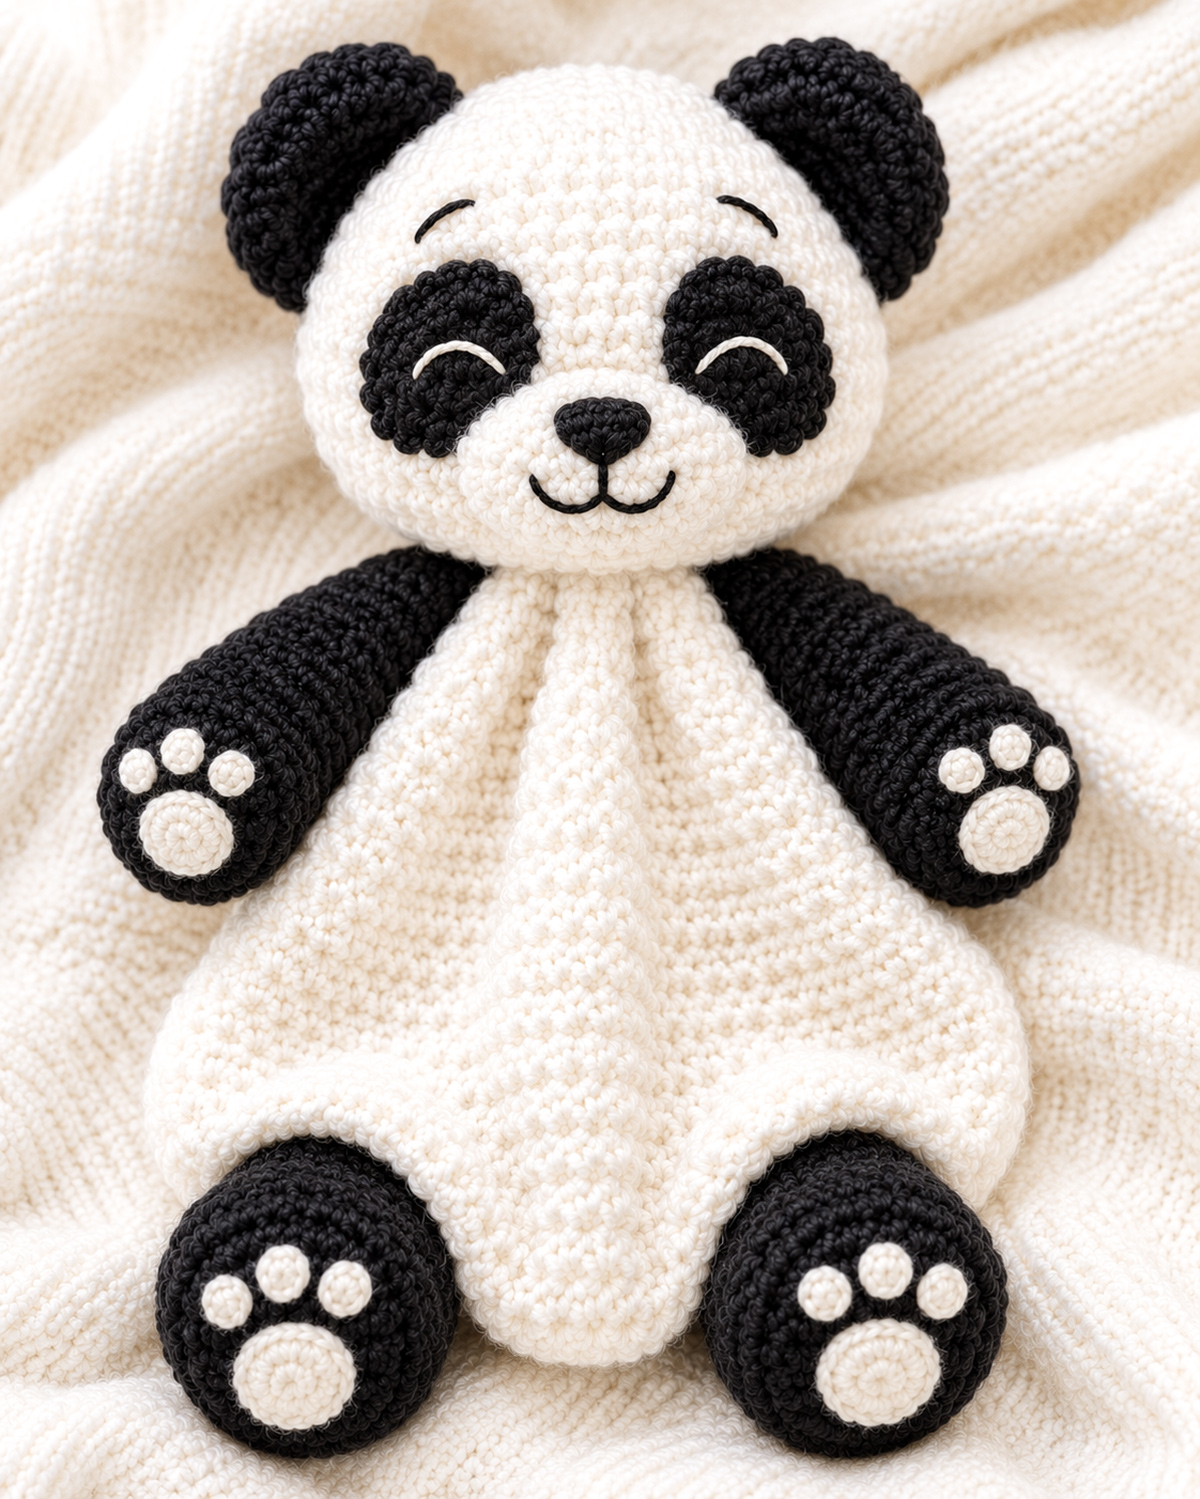
This free panda crochet pattern makes a cuddly black-and-white panda snuggler lovey with an embroidered face, rounded ears, floppy black arms, and a loose white floppy body that folds easily for cuddling. Four adorable paws with white pads adds to this little panda bear's personality. The pattern keeps the construction straightforward, making it a lovely handmade baby shower gift or nursery keepsake.
Explore More Free Crochet Baby Patterns
See Supplies for This Project Here.
Jump to the Free Panda Crochet Pattern
- Yarn, Supplies, and Tools
- Finished Size and Gauge
- Stitches, Abbreviations, and Pattern Notes
- Crochet the Panda Head and Ears
- Embroider the Panda's Face
- Crochet the Floppy White Body
- Make the Black Arms and Hand Pads
- Make the Black Feet and White Paw Pads
- Assemble and Finish the Panda Snuggler
- Panda Crochet Pattern FAQs
Yarn and Supplies for the Free Panda Crochet Pattern
You won't need a long list of colors for this panda. Cream and black do nearly all the work, and the little white paw pads give him plenty of personality without adding a lot of decoration.
I'd choose a plush bulky yarn that feels nice in your hands but still lets you see where each stitch goes. You want the head and paws to hold their shape while the body stays loose enough to fold.
Materials
- Cream bulky-weight yarn (#5): Allow approximately 220–260 yards for the head, muzzle, body, paw pads, and embroidered eyes.
- Black bulky-weight yarn (#5): Allow approximately 120–160 yards for the ears, eye patches, arms, feet, and facial details.
- 5.0 mm crochet hook: Or the hook size needed to make firm stitches with your selected yarn.
- Polyester fiberfill: Approximately 2–3 ounces for the head and rounded paw ends.
- Yarn needle: For joining the pieces and embroidering the face.
- Stitch markers: At least three are helpful.
- Scissors and measuring tape.
- Optional: A few straight pins or removable stitch markers for checking the position of the ears, arms, and feet before sewing.
The yarn amounts are generous estimates. Your actual yardage will depend on the yarn, hook, and tension. If you're using a yarn sold in short skeins, check the yardage on the label before you begin.
A note about the face: This design uses embroidered eyes instead of plastic safety eyes. The cream eyelids sit right on the black eye patches, giving the panda the sleepy little expression shown in the finished example.
Use yarn that does not shed easily, and make each embroidered feature and paw detail part of a firmly secured stitch. For a baby gift, avoid buttons, beads, or glued-on pieces.
Panda Crochet Pattern: Finished Size and Gauge
This panda is designed to have a generously rounded head, wide floppy arms, a flexible white body, and little black feet that peek out beneath the lower edge.
At the target gauge, expect a finished length of about 14–16 inches from the top of the head to the bottom of the feet. The white body should spread to approximately 10–11 inches wide when flattened.
Expected Finished Measurements
- Overall length: Approximately 14–16 inches.
- Head diameter: Approximately 5 1/2–6 inches.
- Body length: Approximately 8–8 1/2 inches from the neckline to the lower edge.
- Body width: Approximately 10–11 inches when flattened.
- Arms: Approximately 3 1/2 inches long, excluding their attachment seams.
- Feet: Approximately 3–3 1/2 inches long, with the upper sections partly hidden behind the body.
Gauge
Head and limb gauge: Approximately 12 single crochet stitches and 16 rounds = 4 inches.
Body gauge: Approximately 11 half double crochet stitches and 13 rounds = 4 inches.
These are target measurements for the completed crochet fabric, not a promise that every yarn will produce exactly the same size.
Make a small single crochet gauge sample before starting the head. A 24-stitch sample gives you plenty of room to measure the middle 4 inches without counting the edge stitches.
For the body, make a second sample in half double crochet if your yarn behaves differently with that stitch.
If your stitch count is too low across 4 inches, try a smaller hook. If you have too many stitches, try a slightly larger one.
Don't sacrifice firm head stitches just to reach an exact measurement. If stuffing shows between the stitches, reduce the hook size and allow the finished panda to be a little smaller.
Measurements to Check as You Crochet
- Head after Round 9: 54 stitches around the widest part.
- Head after Round 19: 30 stitches around the remaining opening.
- Head after Round 23: 6 stitches before closing.
- Body after Round 12: 42 stitches around.
- Body after Round 21: 60 stitches around.
- Body after Round 28: 60 stitches around the finished hem.
- Each arm after Round 7: 12 stitches around.
- Each foot after Round 11: 12 stitches around.
Those checkpoints make it much easier to catch an extra increase or a missed decrease before it changes the finished shape.
Crochet Stitches, Abbreviations, and Pattern Notes
Skill level: Confident beginner. You'll need to know basic single crochet and half double crochet stitches and be comfortable working in rounds. The pattern also includes increases, invisible decreases, simple embroidery, small surface puffs, and sewing pieces together. Each technique is explained in the instructions.
Abbreviations: U.S. Crochet Terms
- MR: Magic ring
- Ch: Chain
- Sc: Single crochet
- Hdc: Half double crochet
- Sl st: Slip stitch
- Inc: Work 2 sc in the same stitch
- Hdc inc: Work 2 hdc in the same stitch
- Inv dec: Invisible single crochet decrease
- St/Sts: Stitch/Stitches
- Rnd/Rnds: Round/Rounds
- RS: Right side
- YO: Yarn over
How to Work the Special Stitches
Single crochet increase: Work 2 single crochet stitches into one stitch. You have added one stitch to the round.
Half double crochet increase: Work 2 half double crochet stitches into the same stitch.
Invisible decrease: Insert your hook into the front loop of the next stitch, then into the front loop of the following stitch. Yarn over and pull through both front loops. Yarn over again and pull through the remaining two loops on your hook. Two stitches become one.
Magic ring: Make an adjustable yarn loop, work the required stitches into the loop, and pull the starting tail to close the center. Secure that tail before the opening becomes inaccessible.
Pattern Notes
- The head, ears, arms, feet, and small oval pieces are crocheted in continuous rounds unless stated otherwise.
- Use a stitch marker to mark the first stitch of each continuous round.
- The white body is crocheted in joined rounds. Slip stitch to the first hdc to close each round, then chain 1 before beginning the next round.
- The joining slip stitch and beginning chain do not count as stitches.
- Numbers in parentheses at the end of instructions give the completed stitch count.
- Do not turn your work unless an instruction specifically tells you to.
- Keep the right side of all pieces facing outward when assembling.
- Work the paws and head tightly enough that stuffing stays inside.
- Do not stuff the floppy body.
- The beginning of the head is its crown. The beginning of each arm or foot is its rounded paw end.
Keep the yarn tails you need for sewing. On pieces that will be attached to the panda, leave a tail about 18 inches long unless another length is specified. That's easier than joining a new piece of yarn later.
One more little tip: mark the front center of the head and the body before assembly. It's much easier to keep the face, arms, and feet balanced when everything is lined up from the middle.
Crochet the Panda Head and Rounded Black Ears
Let's start with the head. It's the most important shaped piece, so keep your stitch counts even and take your time with the decreases.
We're making one round cream head, then adding two separate black ears. The eyes and muzzle come next, while there's still an opening at the bottom of the head.
Make the Cream Panda Head
Use cream yarn and your 5.0 mm hook. Work in continuous rounds, starting at the top of the head.
- Round 1: Make a magic ring and work 6 sc into it. (6 sts)
- Round 2: Inc in every stitch around. (12 sts)
- Round 3: *Sc in next st, inc in next st.* Repeat 6 times. (18 sts)
- Round 4: *Sc in next 2 sts, inc in next st.* Repeat 6 times. (24 sts)
- Round 5: *Sc in next 3 sts, inc in next st.* Repeat 6 times. (30 sts)
- Round 6: *Sc in next 4 sts, inc in next st.* Repeat 6 times. (36 sts)
- Round 7: *Sc in next 5 sts, inc in next st.* Repeat 6 times. (42 sts)
- Round 8: *Sc in next 6 sts, inc in next st.* Repeat 6 times. (48 sts)
- Round 9: *Sc in next 7 sts, inc in next st.* Repeat 6 times. (54 sts)
- Rounds 10–15: Sc in every stitch around for 6 complete rounds. (54 sts per round)
- Round 16: *Sc in next 7 sts, inv dec.* Repeat 6 times. (48 sts)
- Round 17: *Sc in next 6 sts, inv dec.* Repeat 6 times. (42 sts)
- Round 18: *Sc in next 5 sts, inv dec.* Repeat 6 times. (36 sts)
- Round 19: *Sc in next 4 sts, inv dec.* Repeat 6 times. (30 sts)
Stop here. Don't close the head yet. We'll attach the black eye patches, muzzle, and embroidered features before working the final four decrease rounds.
The rounded part should measure approximately 5 1/2–6 inches across when shaped at the target gauge. It may look a little uneven before stuffing, and that's fine.
Make Two Rounded Black Ears
Use black yarn. These ears are made as small, shallow crochet cups. They aren't stuffed. Folding them before sewing gives them a nicely rounded outline without making them too heavy.
- Round 1: Make a magic ring and work 6 sc. (6 sts)
- Round 2: Inc in every stitch. (12 sts)
- Round 3: *Sc in next st, inc in next st.* Repeat 6 times. (18 sts)
- Round 4: Sc in every stitch. (18 sts)
- Round 5: Sc in every stitch. (18 sts)
Flatten the opening so the front and back edges line up. The 18 stitches should form two matching layers of 9 stitches.
Work 9 sc across the flattened opening, inserting your hook through one stitch from each layer for every sc. This closes the base of the ear.
Fasten off, leaving an 18-inch tail for sewing. Make a second ear the same way.
Position the Ears
- Lay the panda head with the beginning magic ring at the crown.
- Choose the front center of the face and mark it with a removable marker.
- Place one ear on each upper side of the head, with the ear bases crossing approximately Rounds 5–8.
- Angle the ears slightly outward rather than pointing them straight up.
- Check that both ears are the same distance from the front center.
- Using the long tails, sew the flattened ear bases securely to the head. Catch the stitches along the full 9-stitch base, not just the two corners.
- Bring the remaining yarn tails into the open head and secure them on the inside.
The ears should sit near the top corners of the panda's face and show clearly when you look at him straight on. They don't need extra shaping or decoration.
Make the Panda's Eye Patches and Embroidered Face
This panda gets his sleepy expression from two black eye patches with little cream embroidered eyelids. No plastic eyes, no beads, and no extra eye pieces.
I'd keep the expression simple. Two matching eye patches, a small black nose, and a tiny smile are enough to give him a face worth falling in love with.
Crochet Two Black Oval Eye Patches
Use black yarn. Each patch begins with a short foundation chain, then grows into a flat oval worked on both sides of that chain.
- Foundation: Ch 5.
- Round 1: Work 2 sc into the second chain from the hook. Sc in each of the next 2 chains. Work 4 sc in the final chain. Rotate the work and crochet along the unused underside of the foundation chain. Sc in the next 2 chains, then work 2 sc into the underside of the first chain you used. (12 sts)
- Round 2: Inc in each of the next 2 sts, sc in next 2 sts, inc in each of the next 4 sts, sc in next 2 sts, and inc in each of the last 2 sts. (20 sts)
Fasten off, leaving a 12-inch sewing tail. Make two matching patches.
Lay them flat and gently shape them into ovals with your fingers. The longer direction runs from the panda's forehead toward his cheeks.
Sew the Eye Patches to the Head
- Place the head facing you, with the bottom opening pointing down.
- Find the center front of the head.
- Position the black ovals upright on opposite sides of that center line. They should cover approximately Rounds 10–15, with a visible cream space between them.
- Space the patch centers approximately 8–9 stitches apart along the curved front surface of the head, measuring between their centers around Rounds 11–13. Keep the two patches equally spaced on either side of the face's center line, with a clear cream gap between them.
- Check that the bottoms of the patches line up and neither patch sits noticeably higher than the other.
- Use the black sewing tails to stitch all the way around each oval, catching the outer loops without pulling the edges into a ridge.
- Secure the yarn tails inside the head.
Before you embroider the eyelids, look at the face from directly in front. The black ovals should be separate, balanced, and slightly taller than they are wide.
Embroider the Closed Eyes
Thread your yarn needle with a short length of cream yarn.
- On the first black patch, mark two points approximately 3–4 black stitches apart across the upper-middle area.
- Bring the cream yarn up through the first point.
- Lay the yarn in a shallow upward curve, like a little smile turned upside down.
- Take the needle down at the second point.
- Catch the middle of the curved strand with one tiny cream couching stitch to hold the arch in place.
- Repeat on the second black patch, keeping both curves at the same height.
- Secure the ends inside the head and trim away any loose strands.
Each finished eye should look like an obvious little line of hand embroidery against the black patch. Don't fill the patches with white circles or add black plastic eyes. The curved cream stitches are the eyes in this design.
Make the Cream Muzzle
Use cream yarn. The muzzle is a small, gently raised oval positioned below the eye patches.
- Foundation: Ch 6.
- Round 1: Work 2 sc into the second chain from the hook. Sc in each of the next 3 chains. Work 4 sc in the last chain. Rotate and work on the unused underside. Sc in the next 3 chains, then work 2 sc into the underside of the first chain used. (14 sts)
- Round 2: Inc in each of the next 2 sts, sc in next 3 sts, inc in each of the next 4 sts, sc in next 3 sts, and inc in each of the last 2 sts. (22 sts)
- Round 3: Sc in every stitch around. (22 sts)
Fasten off, leaving a 15-inch tail. The final round adds just enough depth to make the muzzle stand out without looking like a long snout.
Embroider the Nose and Smile
Position the muzzle on the lower middle of the head, centered between the black eye patches. It should cover approximately Rounds 15–19, with the top edge slightly overlapping the lower inner corners of the patches if necessary.
Before sewing it in place, embroider the nose and mouth:
- Use black yarn to make a small inverted triangle in the upper middle of the muzzle. Work several short horizontal satin stitches to form the wider top.
- Make the lower point with one or two shorter stitches, keeping the nose approximately 1/2 inch wide.
- From the bottom of the nose, stitch a short vertical black line downward.
- Add a small curved line to the left and another to the right, creating a neat, two-sided smile.
- Secure the black yarn ends on the wrong side of the muzzle.
Pin the finished muzzle to the head. Sew around its outer edge with cream yarn. Before closing the final inch, tuck in a very small amount of fiberfill if the muzzle needs a little lift. Don't pack it firmly.
Finish the seam and secure the yarn tail inside the head.
Add the Two Small Eyebrows
Use black yarn to embroider one short, gently curved eyebrow above each eye patch, around Rounds 8–10 of the head.
Each eyebrow should be only about 1/2 inch long. Keep the lines thin and give them the same angle so the panda has a relaxed expression.
That's the whole face. No pink cheeks, eyelashes, bow, or additional trim.
Stuff and Finish the Head
Now return to the open bottom of the head. Round 19 ended with 30 stitches.
Add small pieces of fiberfill, pressing them evenly against the inside of the head. Fill the cheeks and forehead first, then the back. Keep the embroidered face smooth as you work.
Continue crocheting in cream:
- Round 20: *Sc in next 3 sts, inv dec.* Repeat 6 times. (24 sts)
- Round 21: *Sc in next 2 sts, inv dec.* Repeat 6 times. (18 sts)
- Round 22: *Sc in next st, inv dec.* Repeat 6 times. (12 sts)
- Round 23: Inv dec 6 times. (6 sts)
Before the last decrease round, check the stuffing. The head should be rounded and full, but the stitches should not spread apart.
Cut the yarn, leaving a 10-inch tail. Thread that tail through the front loops of the remaining 6 stitches and pull the opening closed. Secure the tail and bury it inside the head.
Head checkpoint: You now have one completed cream head, two attached black ears, two black eye patches, embroidered cream eyes, two eyebrows, and one cream muzzle with a black nose and smile.
Set the head aside while you work on the white body.
Crochet the Floppy White Panda Body
Here's what gives our panda his cuddly shape. Instead of making a firm stuffed belly, we're crocheting a widening white body that hangs loosely beneath the head.
It's made in one piece, and you won't need to sew together a stack of separate blanket panels. Once it's finished, the white fabric can fall into broad folds, with the black paws peeking out at the sides and bottom.
Keep the body completely unstuffed.
Begin the Neckline
Use cream yarn and your 5.0 mm hook. Leave a 40-inch starting tail for attaching the neckline to the head later. This gives you enough yarn for two complete sewing passes around the 18-stitch neckline, plus a little extra for securing and weaving in the end.
Foundation: Ch 18. Join with a sl st in the first chain to form a ring, making sure the chain isn't twisted.
Chain 1. Work the following rounds in joined hdc. At the end of each round, slip stitch into the first hdc. Chain 1 before beginning the next round. The slip stitch and beginning chain do not count toward the stitch total.
- Round 1: Hdc in every chain around. (18 sts)
- Round 2: Hdc in every stitch around. (18 sts)
- Round 3: *Hdc in next 2 sts, hdc inc in next st.* Repeat 6 times. (24 sts)
- Round 4: Hdc in every stitch. (24 sts)
- Round 5: Hdc in every stitch. (24 sts)
- Round 6: *Hdc in next 3 sts, hdc inc in next st.* Repeat 6 times. (30 sts)
- Round 7: Hdc in every stitch. (30 sts)
- Round 8: Hdc in every stitch. (30 sts)
- Round 9: *Hdc in next 4 sts, hdc inc in next st.* Repeat 6 times. (36 sts)
- Round 10: Hdc in every stitch. (36 sts)
- Round 11: Hdc in every stitch. (36 sts)
- Round 12: *Hdc in next 5 sts, hdc inc in next st.* Repeat 6 times. (42 sts)
- Round 13: Hdc in every stitch. (42 sts)
- Round 14: Hdc in every stitch. (42 sts)
- Round 15: *Hdc in next 6 sts, hdc inc in next st.* Repeat 6 times. (48 sts)
- Round 16: Hdc in every stitch. (48 sts)
- Round 17: Hdc in every stitch. (48 sts)
- Round 18: *Hdc in next 7 sts, hdc inc in next st.* Repeat 6 times. (54 sts)
- Round 19: Hdc in every stitch. (54 sts)
- Round 20: Hdc in every stitch. (54 sts)
- Round 21: *Hdc in next 8 sts, hdc inc in next st.* Repeat 6 times. (60 sts)
- Rounds 22–27: Hdc in every stitch around for 6 complete rounds. (60 sts per round)
Finish the Lower Edge
Round 28: After joining Round 27 and making the usual beginning ch 1, work 1 sc in each of the 60 stitches around. Do not make an additional beginning chain. Join with a sl st to the first sc. (60 sts)
Hem checkpoint: Before cutting the yarn, lay the white body flat. The finished edge should lie smoothly without pulling the bottom inward. If it gathers, first check that you have exactly 60 sc in Round 28. If the count is correct, the single crochet stitches may be too tight. Undo only Round 28 and work the same 60 sc a little more loosely, using a slightly larger hook for this final round if needed. Don't add extra stitches. Check that the hem lies smoothly before fastening off.
Fasten off and weave in the ending tail. Leave the long starting tail at the neckline for assembly.
The final single crochet round gives the hem a neat edge without adding a separate border or decorative trim.
Check the Body Shape
Lay the body flat with the neckline at the top and the wider opening at the bottom.
At the target gauge, it should measure approximately 8–8 1/2 inches long. The 60-stitch lower opening should flatten to about 10–11 inches wide.
You'll have two layers of crochet when the body is flattened, but the layers aren't sewn together. That open construction is intentional. It gives the white fabric room to fall into natural folds.
Count checkpoint: The neckline has 18 stitches, the widest part has 60 stitches, and the entire body has 28 completed rounds.
How the White Body Should Hang
Hold the neckline in one hand and let the lower body hang freely. It should drape rather than stay stiff.
Lay it down again and arrange the front into three broad folds. Let the middle fold hang a little lower than the two outer ones. That gives the white section the relaxed look in our finished panda.
Don't sew the folds into permanent pleats. The idea is to let the body stay flexible. The feet will be attached behind the lower edge so they appear beneath the white folds.
If the body flares out into a stiff cone, check your half double crochet gauge and make sure you haven't accidentally added increases in the plain rounds.
If the lower edge gathers tightly, recount Round 21. It should have 60 stitches before the final straight rounds begin.
There's no separate belly patch, bamboo decoration, or second color in the body. Just cream yarn from the neck to the hem.
Crochet the Black Panda Arms and White Hand Pads
The arms are one of my favorite details on this panda. They're rounded at the ends, with enough length to hang comfortably beside the white body.
We'll start at each black paw and work toward the shoulder. Only the rounded end gets a little stuffing. Leave the rest flexible so the arms don't stick straight out.
Make Two Black Arms
Use black yarn. Work in continuous single crochet rounds.
- Round 1: Make a magic ring and work 6 sc. (6 sts)
- Round 2: Inc in every stitch. (12 sts)
- Round 3: *Sc in next st, inc in next st.* Repeat 6 times. (18 sts)
- Round 4: Sc in every stitch. (18 sts)
- Round 5: Sc in every stitch. (18 sts)
- Round 6: Sc in every stitch. (18 sts)
- Round 7: *Sc in next st, inv dec.* Repeat 6 times. (12 sts)
- Rounds 8–14: Sc in every stitch for 7 complete rounds. (12 sts per round)
Do not close the arm yet. Leave the yarn attached while you add the white paw details.
Crochet the Round White Hand Pads
Use cream yarn. Make one round main pad for each hand.
- Round 1: Make a magic ring and work 6 sc. (6 sts)
- Round 2: Inc in every stitch. (12 sts)
Fasten off, leaving an 8-inch sewing tail.
The pad should be a small, flat cream circle. Lay it over the front of the rounded black end, centered around Rounds 2–5.
Sew around all 12 outer stitches using the cream tail. Don't pull the sewing stitches too tightly, or the circle will cup.
Bring the yarn tail into the open arm and secure it on the inside.
Add Three Raised White Toe Dots to Each Hand
Above the large cream circle, add three little raised white dots in a shallow curve. These are part of the panda's paw design, so we won't need to sew on three separate tiny circles.
Each dot is a small surface puff worked directly into the black crochet fabric.
- Cut a 24-inch length of cream yarn for the first dot. Leave approximately 5 inches at the starting end for securing the yarn later.
- With the large cream paw pad facing you and the black paw still open at the top, choose a black single crochet stitch just above the main pad, around Rounds 5–6. Locate a visible horizontal strand of that stitch that you can pass your hook beneath.
- Make a slip knot with the cream yarn and place it on your hook. Insert your hook beneath the chosen black stitch strand from front to back. Catch the cream working yarn held behind the fabric and draw it through the black strand and the loop on your hook, making one anchored surface slip stitch.
- Yarn over, insert the hook beneath the same black stitch strand, yarn over again, and draw up a loop to approximately half double crochet height. Repeat this movement two more times in the same place. You should now have 7 loops on the hook.
- Yarn over and draw through all 7 loops. Chain 1 to secure the puff.
- Cut the cream working yarn, leaving a 5-inch ending tail, and pull that tail through the final loop. Use your yarn needle to bring both cream tails to the inside of the still-open black paw. Weave each tail through several black stitches on the wrong side, reversing direction to secure it. Do not leave loose loops.
- Make two more dots, one on either side of the first, using a fresh 24-inch cream strand for each dot. Repeat the complete anchoring, puff, fastening-off, and weaving-in sequence for each one. Keep the three dots separate and evenly spaced in a shallow curve above the large cream pad.
You should now have one large cream circle with three smaller cream dots above it.
Repeat for the other hand, positioning the pads so both face forward when the arms hang beside the body.
Stuff and Close the Arms
- Add a small amount of fiberfill to each rounded black paw, filling approximately Rounds 1–6.
- Leave Rounds 7–14 completely unstuffed.
- Gently flatten the open end of the arm. The 12 stitches should form two layers of 6 stitches.
- Chain 1, then work 6 sc through both layers to close the opening.
- Fasten off, leaving an 18-inch tail for assembly.
- Repeat with the second arm.
Lay the two arms together and check their length. They should be approximately 3 1/2 inches long at the target gauge.
The rounded ends should have the same fullness, and the upper sections should bend easily.
Arm checkpoint: You should have two matching black arms, each with one cream main pad and three raised cream dots. Each arm finishes with a six-stitch flattened shoulder seam.
Crochet the Panda's Black Feet and White Paw Pads
The feet are a little larger than the hands, with short flexible upper sections that will tuck behind the lower edge of the white body.
I like the big rounded feet on this design. They're easy to recognize, and the matching white pads give the finished panda a tidy look from head to toe.
Make Two Black Feet
Use black yarn. Start at the rounded end and work toward the narrow upper section.
- Round 1: Make a magic ring and work 6 sc. (6 sts)
- Round 2: Inc in every stitch. (12 sts)
- Round 3: *Sc in next st, inc in next st.* Repeat 6 times. (18 sts)
- Round 4: *Sc in next 2 sts, inc in next st.* Repeat 6 times. (24 sts)
- Round 5: Sc in every stitch. (24 sts)
- Round 6: Sc in every stitch. (24 sts)
- Round 7: Sc in every stitch. (24 sts)
- Round 8: *Sc in next 2 sts, inv dec.* Repeat 6 times. (18 sts)
- Round 9: Sc in every stitch. (18 sts)
- Round 10: Sc in every stitch. (18 sts)
- Round 11: *Sc in next st, inv dec.* Repeat 6 times. (12 sts)
- Round 12: Sc in every stitch. (12 sts)
- Round 13: Sc in every stitch. (12 sts)
Keep the opening accessible while you add the white paw pads.
Crochet the Two Large Foot Pads
Make one cream circle for each foot using the same method as the hand pads.
- Round 1: Make a magic ring and work 6 sc. (6 sts)
- Round 2: Inc in each stitch. (12 sts)
Fasten off, leaving an 8-inch sewing tail.
Lay each foot with its rounded end facing you. Position the cream circle on the front of the rounded end, approximately across Rounds 3–6.
Sew the circle down around its entire edge. Keep it centered and flat.
Add the Three Small Toe Dots
Use the same surface puff instructions given for the hands.
Work three small cream puff dots above the main circle, spacing them in a gentle arc across the black foot around Rounds 6–7.
Keep the dots close enough to look like one group, but not so close that they merge into a single white patch.
Secure all cream yarn tails inside the foot before adding the fiberfill.
Repeat on the second foot.
Stuff and Close the Feet
- Add small pieces of fiberfill to the rounded foot, mainly in Rounds 1–8.
- Shape the foot into a rounded, slightly flattened oval with your fingers.
- Keep Rounds 9–13 flexible, adding no stuffing to that upper section.
- Flatten the 12-stitch opening into two layers of 6 stitches.
- Chain 1 and work 6 sc through both layers to close the opening.
- Fasten off, leaving an 18-inch tail for attaching the foot to the body.
Make sure both feet have their white pads facing the same direction when laid side by side.
Foot Size Check
Each foot should be approximately 3–3 1/2 inches long at the target gauge, with the wider rounded end measuring roughly 2–2 1/2 inches across.
Don't overfill them. If the white pads begin to bulge outward or the black stitches spread apart, take out a little fiberfill.
Foot checkpoint: You now have two rounded black feet, each with one large cream circle and three small cream toe dots. Both have narrow, flexible upper sections for assembly.
Assemble and Finish the Panda Crochet Snuggler
Now we can put our panda together. I'd lay out all the pieces first and pin them in place before making any permanent seams.
The head belongs directly above the narrow neckline. The arms sit high, just below the head, while the two black feet peek out from beneath the lower white body.
Keep the face and all four paw pads pointing toward the front.
Step 1: Attach the Head to the White Body
Find the 18-stitch foundation edge at the top of the white body. This opening was made specifically to fit around the lower portion of the head.
- Place the completed panda head faceup, with the embroidered smile centered.
- Mark the center front of the white body.
- Insert the closed lower end of the head into the neckline until the 18-stitch foundation ring rests around Round 21 of the head.
- Line up the front marker on the body with the middle of the panda's face.
- Thread the long cream starting tail from the body onto your yarn needle.
- Working around the neckline, sew each of the 18 foundation stitches to the corresponding 18 stitches of Head Round 21.
- Pass the needle through both pieces at every stitch. Keep the seam even, but don't gather the fabric.
- Make a second pass around the neckline, catching the head and body stitches again to reinforce the seam.
- Secure the tail inside the neck opening and weave it through several stitches.
The head should sit directly above the white body, without a long visible neck. Hold the panda upright and check that the head doesn't lean to either side.
If it leans, correct the placement before adding the arms.
Step 2: Attach the Two Black Arms
Place the panda faceup. Flatten the white body gently so you can see its front and back layers.
- Find the center front of Body Round 3, just below the head.
- Mark two shoulder positions approximately 5–6 stitches to either side of that center point.
- Place the flattened six-stitch upper edge of one arm against the left shoulder position, across approximately Body Rounds 3–5.
- Angle the arm outward and slightly downward, with the cream hand pad facing forward.
- Sew all six stitches of the closed arm edge firmly to the white body.
- Make a second pass across the shoulder seam so the arm is attached along its full width.
- Repeat for the opposite arm, matching the first arm's height and angle.
- Secure the black yarn tails inside the body or beneath the shoulder attachments.
Check the panda from the front. Both arms should hang outward from the shoulders, with the rounded hands pointing slightly down.
They don't need to be stiff or perfectly straight. A little natural bend is exactly what gives the panda his cuddly appearance.
Step 3: Position the Feet Beneath the Body
Lay the panda flat with the face and paw pads toward you.
Flatten the lower opening of the white body so approximately 30 stitches form the front edge and 30 stitches form the back edge. Keep the front center aligned with the nose.
The feet attach behind the front layer of the white body, rather than directly to its bottom edge. That lets the white hem hang down over their narrow upper sections.
- Count the 30 stitches along the flattened front edge of the body, from left to right.
- Mark front-edge stitch positions 4–9 for the left foot and positions 21–26 for the right foot.
- Move upward to approximately Body Round 25. These marks identify the intended attachment areas behind the lower front body. Keep both foot positions at the same height, with the rounded black paws extending below the white hem.
- Place the flattened six-stitch upper seam of the first black foot behind the left marked area.
- Let the rounded part of the foot hang below the white hem, with its cream pads facing forward.
- Sew the six-stitch foot seam securely to the inside of the front body layer around Round 25. Do not sew through the back body layer. Keep the upper attachment flat so the white hem can hang naturally over it.
- Make a second pass through the same attachment area to secure the foot.
- Repeat for the right foot, using the matching six-stitch position.
- Check that approximately 2 1/4–2 1/2 inches of each black foot remains visible below the white hem when the body is resting naturally. Both cream paw pads should face forward and remain fully visible. The narrow upper sections should be mostly hidden behind the cream body.
- Secure and weave in both black tails.
If the feet look too far apart, move both inward by the same number of stitches before sewing. Don't move just one foot, or the panda will look lopsided.
Step 4: Arrange the Floppy White Body
With the panda lying faceup, spread the white body gently between the arms and feet.
Arrange the fabric so the front falls into three broad folds, with the middle fold dipping lower between the two feet.
You don't need to stitch those folds down. The fabric is meant to bend and move, so the exact folds will change a little when the panda is picked up or laid down.
The lower edge should look relaxed, not stretched tight from one foot to the other.
Step 5: Check Every Attachment
Before calling the panda finished, check the following:
- The head is securely attached around the entire neckline.
- Both ears are firmly sewn along their full bases.
- The black eye patches lie flat against the head.
- The embroidered eyes, eyebrows, nose, and smile have no loose yarn ends.
- Both arms have reinforced shoulder seams.
- Both feet have reinforced attachment seams.
- All four large cream paw pads are sewn around their full edges.
- All twelve small cream toe dots are firmly secured.
- No stuffing is showing between the head or paw stitches.
- The body remains unstuffed and flexible.
- There are no loose loops or dangling yarn tails.
- All temporary positioning pins and removable stitch markers have been removed from the finished panda.
Give each attached piece a firm, gentle tug to check the seams. If anything shifts, reinforce that area before the panda is handled.
Step 6: Final Measurements and Finishing
Lay the panda flat and measure from the top of the head to the lowest black foot. At the target gauge, the expected length is approximately 14–16 inches.
The head should remain round, the white body should spread wider toward the bottom, and the black arms and feet should frame the cream section.
Weave in any remaining ends, keeping them hidden inside the stuffed pieces or along the inside of the white body.
If the white body has curled slightly, smooth it gently with your hands. There's no need to stretch or steam the stuffed head and paws.
And that's your panda! No extra accessories needed.
If you enjoy making these soft floppy animals, you might also like the free bear snuggler crochet pattern. It uses a different body construction and makes a nice companion project.
Panda Crochet Pattern FAQs
Is this panda a lovey or an amigurumi?
It's a panda snuggler that borrows a little from both. The head and paws are made with amigurumi techniques, but the white body stays unstuffed so it can fold and drape.
A traditional panda lovey usually has an animal head attached to a separate blanket. Our panda has attached arms and feet, giving it more of a stuffed-animal appearance.
Can I make the panda without plastic safety eyes?
Yes. In fact, this pattern is written specifically for embroidered eyes. The little cream curves on the black patches are the finished eyes, so you won't need plastic parts at all.
Why does the panda have white pads on both the hands and feet?
They're part of the finished design and help the black paws stand out against the white body. Each paw has one larger cream circle and three smaller raised cream dots.
The small dots are worked directly onto the black crochet, so you don't need to crochet twelve separate little circles and sew them on one at a time.
Why is the white body open at the bottom?
That's intentional. The body is a widening, unstuffed crochet tube rather than a filled toy torso. Leaving the bottom open gives the fabric its flexible drape.
Don't sew the bottom opening shut or fill the body with fiberfill. Either change would make the panda look different from the finished example.
What should I do if the panda's head is too heavy?
First, check that you haven't overstuffed it. The head needs enough fiberfill to keep its round shape, but it doesn't need to be packed firmly.
Also check the neckline seam. It should attach all 18 neckline stitches evenly around the lower head. If the head tips to one side, reinforce the seam while keeping the face centered.
Can I make this panda with smaller yarn?
Yes, but you'll get a smaller panda. Use a hook that produces firm stitches with your chosen yarn, and keep the same stitch counts throughout the pattern.
Changing the yarn can also change the way the white body hangs. A lighter yarn may produce a flatter drape, while a heavier plush yarn may make deeper folds.
Is a panda snuggler suitable for a baby's crib?
This panda is intended as a handmade gift, nursery keepsake, or an item for supervised play, not as something to leave in a baby's sleep space.
The NIH Safe to Sleep guidance recommends keeping stuffed toys, soft objects, and loose bedding out of an infant's sleep area.
Check all embroidery and sewn attachments regularly, especially when the panda is handled frequently.
How can I keep the panda looking like the finished example?
Pay attention to three things: the rounded head, the matching four paw pads, and the way the white body hangs between the arms and feet.
Keep the eye patches evenly spaced, don't overstuff the paws, and avoid pulling the white body into a tight triangle.
Those small details make more difference to the finished look than adding extra decorations ever would.
Once the panda is finished, you can explore more projects in my free crochet baby snuggler patterns collection.
When you click on links to various merchants on this site and make a purchase, this may result in this site earning a commission. This does not affect the price you pay.

UBGI Gold Standard 2026
Reviewed under the site's
editorial checklist.
Photos, decorating ideas, party setups and reader submissions are shared for inspiration unless a page is specifically presented as a pattern, tutorial, reference guide or step-by-step project. Follow the instructions, measurements, safety guidance and manufacturer directions provided for the particular project or product.
About Jan | Contact | Baby Nursery Ideas (Blog) | Site Map | Privacy Policy | Disclosure Policy | Disclaimer | Affiliate Disclosure | Earnings Disclosure | Facebook | Pinterest
I am a participant in the Amazon Services LLC Associates Program, an affiliate advertising program designed to provide a means for us to earn fees by linking to Amazon. As an Amazon Associate I earn from qualifying purchases.
Copyright © 2006-2026. All Rights Reserved.