How to Make a Halloween Diaper Cake Step by Step
By Jan Bay
A Halloween diaper cake makes a useful baby shower gift and a centerpiece at the same time. This tutorial shows you how to make a three-tier Halloween diaper cake step by step, from arranging and securing the diapers to adding ribbon, a topper and cute seasonal decorations without making the finished cake look cluttered.
More Diaper Cake & Halloween Baby Shower Ideas
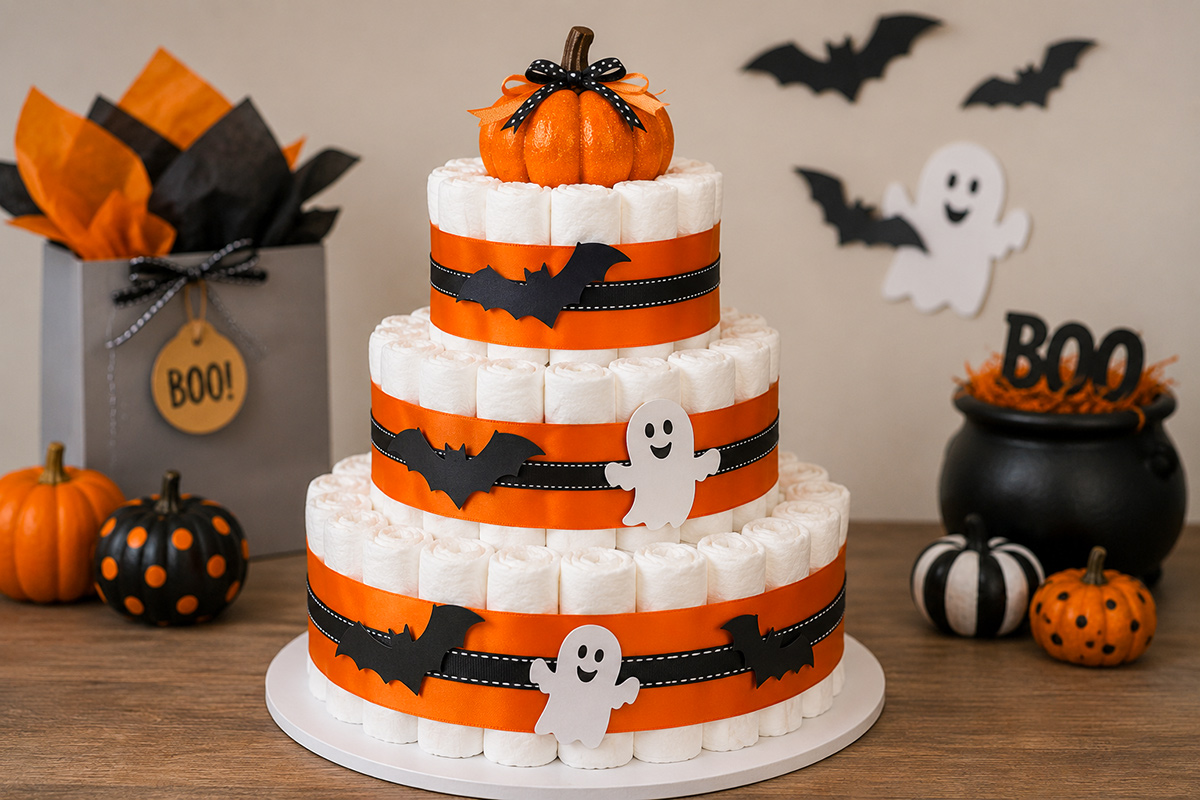
Diaper Cake Supplies and Wide Ribbon
Jump to:
Halloween Diaper Cake Supplies
Step-by-Step Halloween Diaper Cake Instructions
How to Decorate the Diaper Cake
Halloween Diaper Cake Supplies for This Three-Tier Project
For this project, I am using one specific plan rather than giving you a range of sizes and leaving you to work out the proportions. The finished cake has three round tiers and uses 60 size 1 disposable diapers. That gives you enough diapers for a substantial centerpiece without making the top tier look tiny compared with the base.
If you already have different diapers on hand, you can still use them. Just remember that changing the diaper size can change the finished diameter of each tier. For the easiest first build, use diapers that are all the same brand, style and size so the rolls are close to the same thickness.
You will need:
- 60 clean size 1 disposable diapers
- 60 small clear or neutral rubber bands or hair elastics, one for each rolled diaper
- 3 large rubber bands that will fit securely around the completed tiers
- 1 sturdy 14-inch round cake board or covered cardboard base
- 1 cardboard paper-towel tube or similar lightweight center support
- About 3 yards of 2 1/2- to 3-inch-wide burnt-orange ribbon
- About 3 yards of 1- to 1 1/2-inch-wide black ribbon
- Removable double-sided tape or small removable adhesive dots for ribbon and paper decorations
- Black cardstock for bats
- White cardstock for simple ghost shapes
- Plain white printer paper and access to a printer
- Pencil for tracing the templates
- 1 small lightweight pumpkin decoration for the topper
- Scissors
- Ruler or measuring tape
The diaper count for this tutorial is simple: 30 diapers for the bottom tier, 20 for the middle tier and 10 for the top tier. Set them into three groups before you start. That small bit of preparation keeps you from reaching the top tier and wondering where half your diapers went.
I prefer wide ribbon on a diaper cake because it does two jobs at once. It covers the large rubber band around each tier, and it creates a clean band of color without requiring dozens of little decorations. For this Halloween version, burnt orange gives the cake its seasonal color while black adds enough contrast to make the bats and ghosts feel intentional.
You do not need to fill the cake with Halloween trinkets. A few recognizable details are enough. The white diapers already give you a bright background, so orange ribbon, black bats, simple white ghosts and one pumpkin topper can carry the theme without hiding the shape of the cake.
A crooked diaper tier does not become straighter because you add more pumpkins to it. Get the structure neat first. Save every decorative piece until all three tiers are round, secure and centered.
Keep glue, staples and pins off the diapers themselves. Attach ribbon and decorations to other ribbon, cardstock or the cake base whenever possible so the diapers can still be taken apart and used afterward. Small decorative pieces should also be removed and kept away from the baby when the cake is dismantled.
If you want to compare the basic construction with another method before you begin, my step-by-step diaper cake instructions explain the general principles for building even tiers and keeping a diaper cake balanced. You will not need to leave this Halloween tutorial to complete the project, though. The exact measurements and diaper counts for this cake are included below.
How Many Diapers You Need
This three-tier Halloween diaper cake uses 60 size 1 disposable diapers. Divide them before you begin so you have 30 diapers for the bottom tier, 20 for the middle tier and 10 for the top tier.
Size 1 diapers are a practical choice for a gift because they are small enough to make tidy tiers but are not limited to the earliest newborn days. If the shower host or parents have requested another size, use that instead. The construction method stays the same, although the finished cake may be a little wider or narrower.
Do not worry if your tier diameters differ slightly from the example. Diaper brands vary in thickness, and some roll more tightly than others. What matters is the proportion: the bottom tier should clearly be the widest, the middle tier should step inward, and the top tier should be noticeably smaller.
Before rolling anything, look at the diapers and decide which side you want visible. Many disposable diapers have printed waistbands or colored designs. If you prefer a mostly white cake, roll each diaper so the plainest portion faces outward.
Roll the diapers one at a time. Start at the waistband and roll toward the opposite end, keeping the edges as even as you can. Secure each roll around its center with a small elastic. The elastic only needs to keep the roll closed. Do not pull it so tightly that it leaves a deep crease in the diaper.
Try to make all 60 rolls roughly the same diameter. A few uneven rolls are not a problem, but place the plumpest ones toward the center of each tier and save the neatest, most uniform rolls for the outside edge. The outside row is what gives the cake its finished shape.
If you are tempted to decorate each diaper as you roll it, wait. Build all three tiers first. It is much easier to correct the shape while the cake is still plain.
Step-by-Step Halloween Diaper Cake Instructions
Step 1: Set Up the Base
Place the 14-inch cake board on a flat work surface. Stand the cardboard tube upright in the center. You do not need to glue the tube to the board. The diapers in the bottom tier will hold it in position once they surround it.
If your cake board has a printed or shiny surface that competes with the Halloween colors, cover it before you start. Plain white, black or kraft paper works well. Keep the covering smooth so the diaper cake sits level.
Step 2: Build the Bottom Tier With 30 Diapers
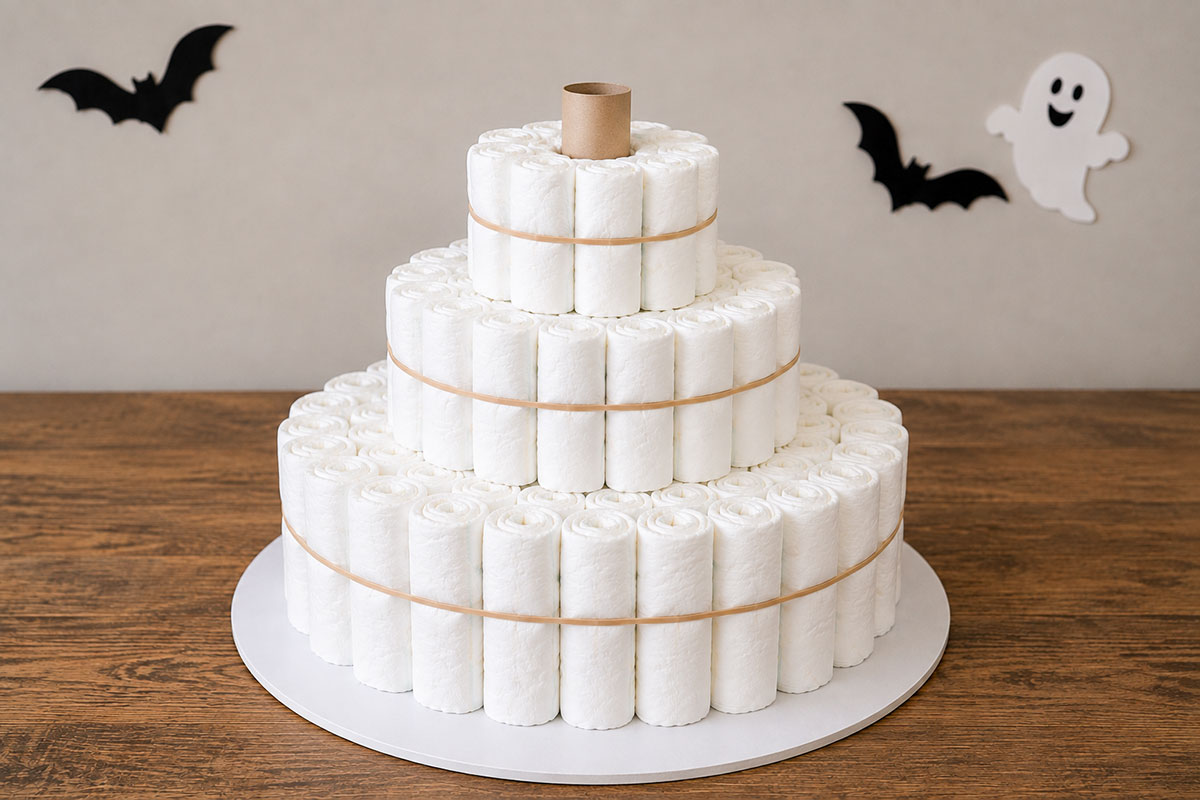
Place several rolled diapers upright around the cardboard tube. Keep the rolls close together and wrap one large rubber band around the group to hold them temporarily.
Add more diaper rolls around the outside of that first group. Work around the circle instead of filling only one side at a time. Continue until all 30 diapers assigned to the bottom tier are inside the large band.
Now look at the tier from above. Gently move individual rolls until the outside edge forms an even circle. If one diaper sticks farther out than the others, push it inward. If you see a hollow spot, shift the nearby rolls rather than adding another diaper.
The bottom tier carries the visual weight of the cake, so spend a minute getting it round. A neat base makes the next two tiers much easier to center.
Step 3: Build the Middle Tier With 20 Diapers
Place the 20 middle-tier diapers upright on top of the bottom tier, around the same center support. Secure them with another large rubber band.
Arrange these rolls into an even circle. The middle tier should sit well inside the edge of the bottom tier so you have a visible step between the two levels.
Check the cake from the front and both sides. If the middle tier appears to lean, correct it now by shifting the rolls slightly. Do not depend on ribbon to hold a crooked tier in place.
Step 4: Build the Top Tier With 10 Diapers
Arrange the final 10 diaper rolls in a compact circle and secure them with the third large rubber band.
Depending on the height of your cardboard tube, the top tier may sit above it. That is fine. The tube is mainly there to keep the larger lower tiers aligned while you assemble the cake.
Center the top tier over the middle tier. Step back and look at the entire cake rather than concentrating on one diaper at a time. The three levels should taper evenly from bottom to top.
Step 5: Straighten All Three Tiers
Turn the cake board slowly and check the outside edge of every tier. Move any roll that sits too high, too low or too far outward.
Keep the diaper tops at roughly the same height within each tier. They do not need to be perfectly identical. A clean circular outline matters more than tiny differences between individual diapers.
At this stage you should have a plain white three-tier diaper cake with visible rubber bands around the center of each level. Do not add the small Halloween decorations yet.
Step 6: Add the Burnt-Orange Ribbon
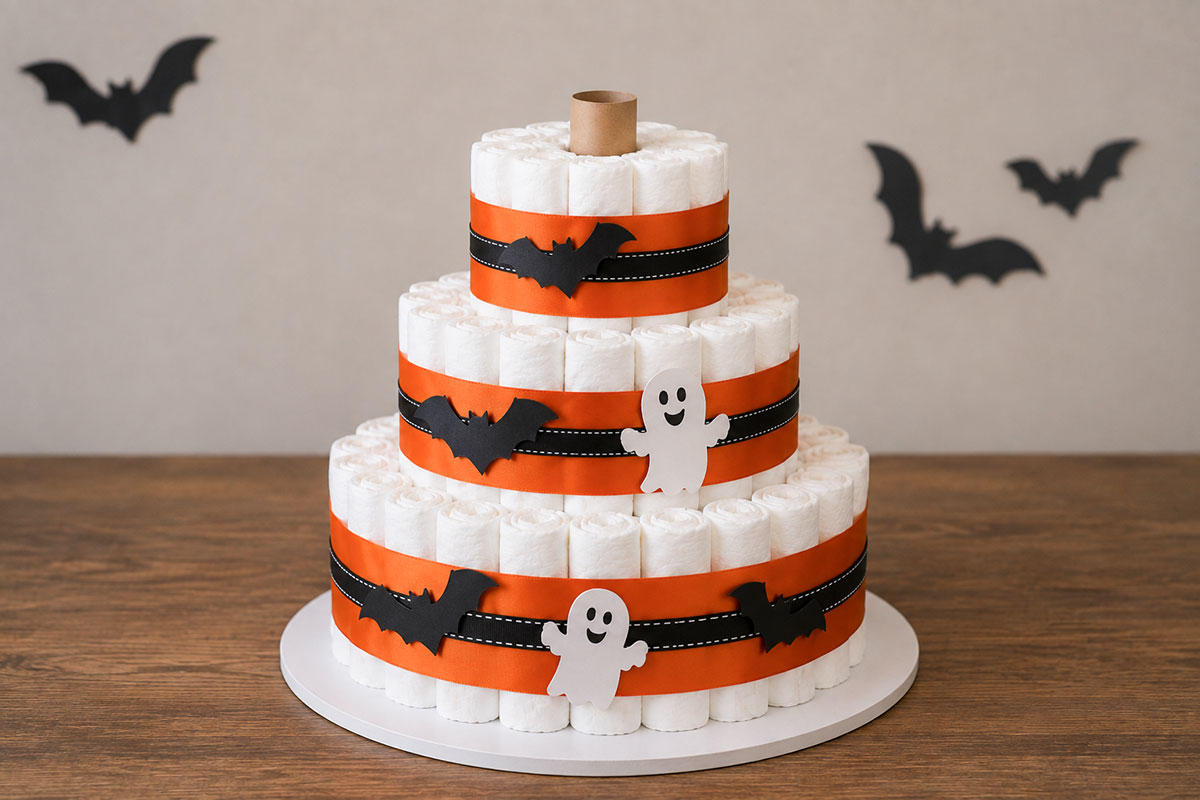
Measure the circumference of the bottom tier and cut a piece of wide burnt-orange ribbon long enough to overlap slightly at the back. Wrap it around the center of the tier so it completely hides the large rubber band.
Join the ribbon ends to each other with removable double-sided tape or an adhesive dot. Do not attach the adhesive directly to the diapers.
Repeat the process on the middle and top tiers.
Before adding black ribbon, check that all three orange bands sit at approximately the same height. That little detail makes the cake look much more finished.
Step 7: Layer the Black Ribbon
Center the narrower black ribbon over each orange band. Leave enough orange visible above and below it to create a clear border.
Attach the black ribbon to the orange ribbon at the back. Again, keep adhesive away from the diapers themselves.
The combination should give you one clean horizontal band around each tier. You do not need bows on every level. For this project, the color contrast does more for the design than a row of oversized bows would.
Step 8: Check the Cake Before Decorating
Turn the cake around once more. Make sure the ribbon seams are toward the back and the three tiers remain centered.
Now decide which side will be the front. Once you begin placing bats, ghosts and the topper, keep returning to that front view. Otherwise it is easy to decorate all the way around the cake and discover that no single side looks complete.
How to Decorate the Diaper Cake
The Halloween theme comes from a few well-placed details rather than from covering every diaper. The white diapers already give you a clean background, and the orange-and-black ribbon establishes the season before you add a single bat.
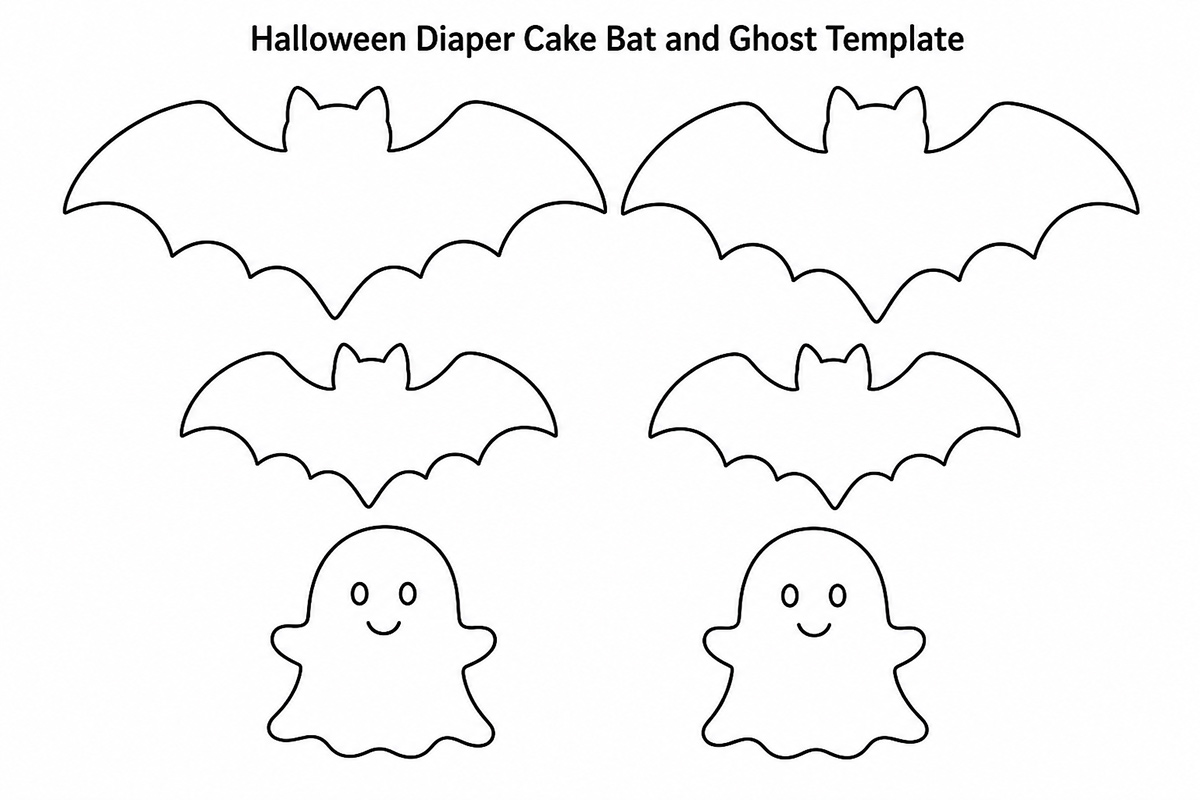
Open the printable bat and ghost template
How to Print and Use the Bat and Ghost Template
Print the template on plain white paper with the entire image set to fit on the page without cropping. The exact printed size is not critical for this project. The bats and ghosts only need to fit comfortably across the ribbon bands without covering most of the diapers.
Cut out the paper shapes, place them on the appropriate cardstock and trace around the edges with a pencil. Trace the four bats onto black cardstock and the two ghosts onto white cardstock, then cut out the cardstock shapes.
If the decorations print larger or smaller than you want, adjust the printer scale and print the sheet again. Keep the two larger bats for the bottom tier and use the smaller bats on the middle and top tiers. The two ghost shapes can be the same size or you can trim one slightly smaller for the bottom tier.
For the ghost faces, draw simple eyes and a smile with a black marker or cut the features from small scraps of black cardstock. Keep the shapes uncomplicated so they are easy to trace, cut and attach.
Add the Bats First
Use the four black cardstock bats you cut from the template. Attach one bat to the ribbon on the top tier, one to the middle tier and two to the bottom tier. Offset the two lower bats instead of lining all four decorations up vertically. That keeps the finished cake playful without making the front look like a repeated border.
Attach cardstock to the ribbon, not to the diapers. A small removable adhesive dot is enough.
Add Simple White Ghosts
Use the two white cardstock ghosts you prepared from the template. Before attaching them, check that the black facial features are easy to see against the white diapers.
Keep the expressions friendly rather than frightening. A Halloween baby shower can be playful without turning the centerpiece into haunted-house decor.
Attach one ghost to the middle tier and the second near the front of the bottom tier. Leave the top tier without a ghost so the pumpkin topper remains the focal point.
Add a Small Pumpkin Topper
If the cardboard center support extends above the top tier, mark it just below the tops of the diaper rolls. Lift off the top tier, trim the excess support away from the diapers, then replace and recenter the top tier.
Place one lightweight decorative pumpkin at the center of the top tier. Choose one that can rest securely without pressing into or damaging the diapers.
If the pumpkin needs support, make a small cardstock platform that sits on top of the diaper rolls. Attach the pumpkin to the platform instead of gluing it to the diapers.
The topper should look like the finishing detail, not another entire tier. If the pumpkin is so large that the top diapers disappear beneath it, choose a smaller one.
Keep the Front Easy to Read
Stand several feet away and look at the finished arrangement. You should see three clear diaper tiers first, then the orange and black ribbon, and then the Halloween details.
If all you see is a pile of bats, pumpkins and ghosts, remove something.
A Halloween diaper cake can turn silly fast when every available space gets its own character. I prefer to let some of the white diapers show. They remind everyone that the centerpiece is also a useful baby gift.
If the diaper cake will be displayed at a themed shower, you can carry the same colors into the table without making the cake more elaborate. My Halloween baby shower ideas include other ways to bring the seasonal theme into the party.
Halloween Diaper Cake Ideas for Different Baby Shower Styles
Once you know how to build the basic three-tier cake, you can change the decorations without changing the construction. Keep the 30-20-10 diaper arrangement and use a different ribbon, topper and two or three themed accents.
Little Pumpkin Diaper Cake
Use burnt orange ribbon with a narrower brown or dark green accent ribbon. Replace the bats and ghosts with small pumpkin shapes and finish the top with one pumpkin.
This version can work especially well when the shower is more autumn than spooky. It also fits naturally with other fall baby shower decorations if the party uses pumpkins, warm colors and seasonal table decor.
Cute Ghost Diaper Cake
Keep the cake mostly white and use black ribbon with a small amount of orange. Add two or three simple white ghost decorations with black faces.
The restraint is useful here. Because the diapers already provide so much white, you do not need to cover the cake in ghost cutouts to make the theme recognizable.
Bat Halloween Diaper Cake
Use orange ribbon on all three tiers and scatter a few black cardstock bats across the front and sides. Vary the bat sizes slightly so the arrangement does not look like a repeated border.
A small black bow at the base of the topper can work, but I would skip large bows on the tiers. The bat silhouettes already give the cake plenty of movement.
Black Cat Diaper Cake
Use black and orange ribbon, then make a simple black cat face as the topper. Cardstock ears, embroidered-look paper whiskers and a small round nose are enough to suggest the theme.
Keep the cat decoration on the topper rather than trying to turn each diaper tier into part of the animal. The cake should still look like a diaper cake when the theme decorations are removed.
Orange, Black and White Halloween Diaper Cake
If you prefer Halloween color without characters, skip the ghosts and bats completely. Use orange ribbon, a narrow black center band and a white or orange pumpkin topper.
This is the version I would choose for a more polished shower table because it photographs well beside other decorations and does not compete with the food, flowers or gifts around it.
Spooky-Cute Diaper Cake
For a slightly more playful version, add a few tiny paper stars, crescent moons or friendly monster faces to the ribbon bands. Keep the palette limited to orange, black and white so the cake still feels like one project rather than several Halloween themes combined.
You can also browse the site's baby diaper cake ideas if you want to adapt a different cake shape or decorating approach to Halloween colors.
Tips for a Neat, Stable Diaper Cake
Build on the Board From the Beginning
Do not assemble a large diaper cake on the table and plan to move it onto the cake board afterward. Build the bottom tier directly on its final base. Once the tiers are stacked, moving the entire cake becomes much more awkward.
Use the Outside Diapers to Shape Each Tier
If a tier looks lumpy, you do not need to rebuild it immediately. Hold the large rubber band in place and gently rotate or shift the outside diaper rolls until the circle looks more even.
The inner rolls are mostly structural. Save your neatest rolls for the visible edge.
Do Not Overtighten the Large Bands
The large rubber bands need enough tension to keep the diapers together, but they should not squeeze the tier into an oval. If the cake starts to pinch inward, use a larger band or loosen the arrangement slightly.
Keep the Ribbon Seams at the Back
Choose the front of the cake before attaching decorations. Turn all ribbon overlaps toward the back. Small construction details disappear quickly when they are placed consistently on one side.
Attach Decorations to Ribbon Whenever Possible
A diaper cake is more useful when the diapers can be removed without peeling off glue, tape or stickers. Put adhesive on cardstock, ribbon or the cake board instead of directly on the diapers.
If you add a baby item such as socks, a bib or a washcloth, secure it gently with ribbon rather than pins or staples.
Keep Small Decorations Away From the Baby
The finished diaper cake is a shower centerpiece and gift, not a baby toy. Before any diaper is used, remove the pumpkin topper, cardstock decorations, ribbon, adhesive dots, every small and large elastic and the cardboard center support, then lift the diapers off the cake board. Keep all of those loose pieces out of a baby's reach. The U.S. Consumer Product Safety Commission explains the choking risk from small parts for young children.
Transport It Upright
Put the finished cake on a flat vehicle floor or another level surface rather than balancing it on a car seat. If you use a large box, choose one with enough room that the sides do not crush the ribbon or decorations.
Take the pumpkin topper off during transport if it is only resting on the top tier. It takes a few seconds to put back and removes one more thing that can fall sideways.
Make It Ahead, but Keep It Clean
You can assemble the diaper cake before the shower as long as the diapers stay clean and dry. Store the finished cake in a clean area away from pets, smoke, food preparation and moisture.
If you cover it for storage, use a clean container or loose protective covering that does not press the decorations into the diaper tiers.
There is no prize for using every Halloween decoration you bought. Stop when the cake looks finished. The diapers, ribbon and topper should still have room to be seen.
Frequently Asked Questions About Halloween Diaper Cakes
How many diapers do I need for a three-tier Halloween diaper cake?
The project on this page uses 60 diapers: 30 in the bottom tier, 20 in the middle tier and 10 in the top tier. The exact finished size can vary because diaper brands and sizes do not all roll to the same diameter.
What size diapers should I use?
This tutorial uses size 1 diapers. They make tidy rolls and are useful beyond the earliest newborn stage. You can substitute another size if the parents have requested it, but expect the diameter of the tiers to change slightly.
Will rolling the diapers ruin them?
Rolling diapers gently and securing them with small elastics should not prevent them from being used later. Do not crease them sharply, pierce them with pins or staples, or apply glue directly to them.
Can I make the diaper cake without rolling every diaper?
Yes. Diaper cakes can also be made by arranging diapers in a circular or spiral formation. This particular Halloween diaper cake uses individually rolled diapers because the method makes it easy to divide the cake into exact 30-, 20- and 10-diaper tiers.
How far ahead can I make a Halloween diaper cake?
You can make it well before the shower if you have a clean, dry place to store it. Protect the diapers from dust, moisture, pets and food preparation areas. Add fragile cardstock decorations and the topper closer to the shower if they are likely to bend during storage.
What can I use instead of a pumpkin topper?
A lightweight ghost, bat, black cat or Halloween-themed cardstock topper can replace the pumpkin. Keep the topper small enough that it does not hide the top tier or make the cake unstable.
Can I add baby gifts to the diaper cake?
Yes. Baby socks, washcloths, bibs and other lightweight items can be tucked into the ribbon bands. Do not pack so many gifts onto the tiers that they distort the shape of the cake. Attach removable items with ribbon rather than pins, staples or glue.
Can I make this for a fall baby shower instead of Halloween?
Yes. Keep the three-tier construction and replace the bats and ghosts with pumpkins, leaves or simple autumn ribbon. The same diaper cake can move from clearly Halloween to general fall with only a few decorative changes.
How do I keep the diaper cake from leaning?
Start with a level cake board, keep the lower tier round, center each smaller tier before decorating and use the cardboard tube to stabilize the lower portion of the cake. If the cake leans before the ribbon goes on, correct the diapers rather than expecting decorations to hide the problem.
Should I wrap the finished diaper cake in cellophane?
You can, but it is not necessary. If you wrap it, use clean wrapping material and keep it loose enough that it does not crush the topper or bend the cardstock decorations. For a shower centerpiece that will be displayed immediately, leaving the cake unwrapped usually shows the details more clearly.
When you click on links to various merchants on this site and make a purchase, this may result in this site earning a commission. This does not affect the price you pay.

UBGI Gold Standard 2026
Reviewed under the site's
editorial checklist.
Photos, decorating ideas, party setups and reader submissions are shared for inspiration unless a page is specifically presented as a pattern, tutorial, reference guide or step-by-step project. Follow the instructions, measurements, safety guidance and manufacturer directions provided for the particular project or product.
About Jan | Contact | Baby Nursery Ideas (Blog) | Site Map | Privacy Policy | Disclosure Policy | Disclaimer | Affiliate Disclosure | Earnings Disclosure | Facebook | Pinterest
I am a participant in the Amazon Services LLC Associates Program, an affiliate advertising program designed to provide a means for us to earn fees by linking to Amazon. As an Amazon Associate I earn from qualifying purchases.
Copyright © 2006-2026. All Rights Reserved.