Free Crochet Scarecrow Pattern
By Jan Bay
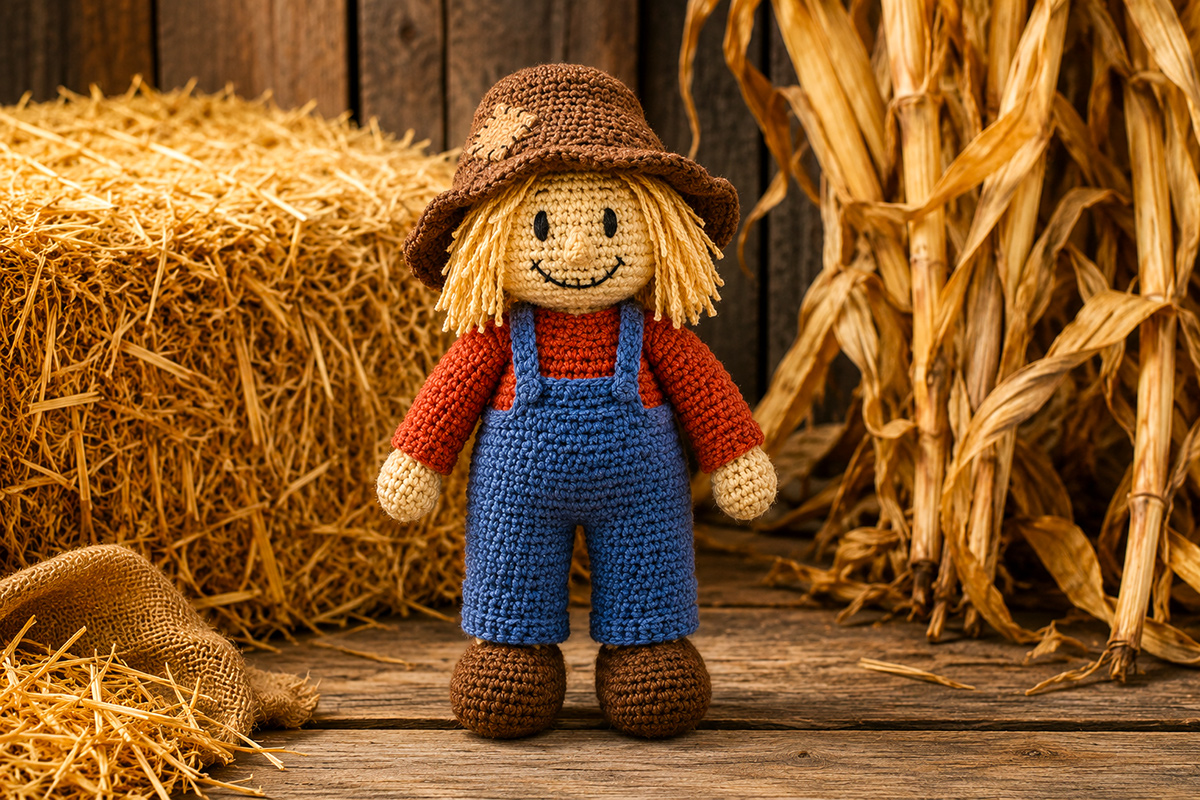
This free crochet scarecrow pattern makes a classic stuffed fall scarecrow doll with a floppy patched hat, straw-colored hair, overalls and an embroidered face. The separate body, arms, legs, clothing details and hat are worked in manageable pieces, then assembled so the finished scarecrow has the loose, slightly rumpled shape that makes a harvest scarecrow recognizable instead of looking like an ordinary crochet doll.
Explore More Free Fall Crochet Patterns
Scarecrow Crochet Supplies
Jump to the Crochet Scarecrow Pattern
Crochet Scarecrow Pattern Supplies
This scarecrow is made with worsted weight yarn and a fairly small hook so the fabric stays firm enough to hold the stuffing. The colors can change without affecting the pattern. Keep the contrast clear enough that the hat, shirt, overalls, hands and straw hair remain easy to distinguish.
- Worsted weight yarn, size 4
- Allow about 120 yards tan or light brown for the head, hands and nose
- Allow about 150 yards medium blue for the overalls and legs
- Allow about 100 yards rust, brick red or muted orange for the shirt and sleeves
- Allow about 150 yards medium brown for the hat and shoes
- Allow about 10 yards golden yellow or straw-colored yarn for the hair
- Small amount of a contrasting color for the hat patch
- Small amount of black yarn or embroidery floss for the eyes, eyebrows and mouth
- 4 mm crochet hook
- Polyester fiberfill
- Yarn needle
- Embroidery needle if using embroidery floss
- Scissors
- Removable stitch marker
- Measuring tape
- Straight pins or locking stitch markers for positioning pieces before sewing
I prefer an embroidered face for this scarecrow rather than plastic safety eyes. The stitched features suit the handmade look of the doll, and there are no hard eye pieces to interrupt the soft crocheted surface.
Choose a yarn with enough stitch definition that you can see where the rounds begin and end. Very fuzzy yarn can hide the decrease stitches and makes it harder to place the face evenly.
The straw hair does not need a specialty fiber. Ordinary golden worsted yarn works well once the strands are cut, attached and separated into small groups beneath the hat. A few uneven lengths make the hair look more like straw than a perfectly trimmed fringe.
The overalls are built into the color placement of the body and legs, then finished with a separate bib and straps. This keeps the doll recognizable as a scarecrow without requiring removable clothing or tiny fasteners.
Finished Size and Gauge
Expected finished height: approximately 11 to 12 inches from the bottoms of the shoes to the top of the hat when made at the stated gauge. This is a calculated estimate from the written round counts rather than a physically measured sample dimension. Yarn, tension, stuffing and hat position can change the final height.
Gauge: approximately 16 single crochet stitches and 18 rows = 4 inches.
Exact gauge is less important than making a firm fabric that does not show the stuffing. Use the same yarn weight and hook size for all of the main pieces so the head, body, arms and legs stay in proportion.
The scarecrow is meant to have a slightly relaxed shape. Do not pack the arms and legs until they become rigid. A little softness at the shoulders and hips helps the doll look like a cloth scarecrow rather than a stiff figure.
The hat is deliberately wider than the head. That extra width gives the brim enough room to bend and tilt once the doll is assembled.
Abbreviations and Pattern Notes
- ch = chain
- sc = single crochet
- inc = work 2 single crochet stitches in the same stitch
- dec = single crochet 2 stitches together
- sl st = slip stitch
- st = stitch
- sts = stitches
- MR = magic ring
- BLO = back loop only
- FLO = front loop only
Skill level: Advanced beginner. This pattern uses U.S. crochet terminology. The ch 1 at the beginning of a row is a turning chain and does not count as a stitch. Do not work into that turning chain on the following row.
Unless an instruction says otherwise, work the head, body, arms, legs, nose and hat in continuous rounds. Do not join at the end of each round. Place a removable stitch marker in the first stitch and move it up as you work.
The number in parentheses at the end of each round is the number of stitches you should have after completing that round.
Stuff as you go, but add small amounts at a time. The head and body should be firm enough to keep their shape. The limbs should remain softer, especially near the openings that will be sewn to the body.
Color changes are made in the last yarn-over of the stitch before the new color begins. Cut and secure the previous yarn unless the pattern tells you to carry it.
Keep the beginning of each round toward the back whenever possible. That keeps the small jog created by color changes away from the front of the finished scarecrow.
Free Crochet Scarecrow Pattern Instructions
Scarecrow Head
Use tan or light brown yarn.
Round 1: Work 6 sc into an MR. (6)
Round 2: Inc in each stitch around. (12)
Round 3: [Sc in next stitch, inc in next stitch] 6 times. (18)
Round 4: [Sc in next 2 stitches, inc in next stitch] 6 times. (24)
Round 5: [Sc in next 3 stitches, inc in next stitch] 6 times. (30)
Round 6: [Sc in next 4 stitches, inc in next stitch] 6 times. (36)
Rounds 7 through 13: Sc in each stitch around. (36)
Round 14: [Sc in next 4 stitches, dec] 6 times. (30)
Round 15: [Sc in next 3 stitches, dec] 6 times. (24)
Round 16: [Sc in next 2 stitches, dec] 6 times. (18)
Begin stuffing the head. Fill the upper part first, then add smaller amounts around the sides so the head stays rounded.
Round 17: [Sc in next stitch, dec] 6 times. (12)
Add the remaining stuffing.
Round 18: Dec 6 times. (6)
Fasten off. Thread the tail through the front loops of the remaining 6 stitches and pull the opening closed. Secure the yarn and weave in the end.
Scarecrow Body
Begin with blue yarn for the lower overall section.
Round 1: Work 6 sc into an MR. (6)
Round 2: Inc in each stitch around. (12)
Round 3: [Sc in next stitch, inc in next stitch] 6 times. (18)
Round 4: [Sc in next 2 stitches, inc in next stitch] 6 times. (24)
Round 5: [Sc in next 3 stitches, inc in next stitch] 6 times. (30)
Round 6: [Sc in next 4 stitches, inc in next stitch] 6 times. (36)
Rounds 7 through 10: Sc in each stitch around. (36)
Change to the shirt color.
Rounds 11 through 14: Sc in each stitch around. (36)
Round 15: [Sc in next 4 stitches, dec] 6 times. (30)
Round 16: [Sc in next 3 stitches, dec] 6 times. (24)
Round 17: [Sc in next 2 stitches, dec] 6 times. (18)
Stuff the body firmly at the bottom and more lightly near the shoulders.
Round 18: [Sc in next stitch, dec] 6 times. (12)
Fasten off, leaving a long tail for sewing the head to the body. Leave the 12-stitch neck opening unclosed.
Make Two Legs
Begin each leg with brown yarn for the shoe.
Foundation: Ch 7.
Round 1: Sc in the second chain from the hook and in the next 4 chains. Work 3 sc in the last chain. Rotate the foundation chain so you can work along the unused loops on the opposite side. Sc in the next 4 unused loops. Work 2 sc in the remaining unused loop at the heel end, in the same foundation chain where the first sc was worked. (14)
Round 2: Inc in the first stitch, sc in the next 4 stitches, inc in each of the next 3 stitches, sc in the next 4 stitches, inc in each of the final 2 stitches. (20)
Round 3: Working in BLO, sc in each stitch around. (20)
Round 4: Sc in each stitch around. (20)
Round 5: Sc in the next 6 stitches, dec 4 times, sc in the final 6 stitches. (16)
Round 6: Sc in each stitch around. (16)
Stuff the shoe firmly enough to hold the toe shape.
Change to blue yarn.
Rounds 7 through 15: Sc in each stitch around. (16)
Lightly stuff the leg, leaving the top inch softer so the leg can sit naturally against the underside of the body.
Flatten the 16-stitch opening so 8 stitches lie along the front and 8 lie along the back. Do not add another round. Fasten off, leaving a long tail for sewing through the flattened opening during assembly. Make the second leg the same way.
Make Two Arms
Begin each arm with tan yarn for the hand.
Round 1: Work 6 sc into an MR. (6)
Round 2: Inc in each stitch around. (12)
Rounds 3 through 5: Sc in each stitch around. (12)
Lightly stuff the hand.
Change to the shirt color.
Rounds 6 through 13: Sc in each stitch around. (12)
Round 14: [Sc in next 4 stitches, dec] 2 times. (10)
Round 15: Sc in each stitch around. (10)
Add a little stuffing to the lower arm, but leave the upper 1 to 1 1/2 inches unstuffed.
Flatten the opening so 5 stitches lie along the front and 5 along the back. Fasten off, leaving a long sewing tail. Make the second arm the same way.
Overall Bib
Use blue yarn.
Foundation: Ch 9.
Row 1: Sc in the second chain from the hook and across. (8)
Rows 2 through 7: Ch 1, turn, sc in each stitch across. (8)
Fasten off, leaving a long tail for sewing.
Make Two Overall Straps
Use blue yarn.
Ch 14.
Beginning in the second chain from the hook, sc in each chain across. (13)
Fasten off, leaving a sewing tail at each end.
Make the second strap the same way.
Scarecrow Nose
Use tan yarn or a slightly darker shade if you want the nose to stand out from the face.
Round 1: Work 4 sc into an MR. (4)
Round 2: Sc in each stitch around. (4)
Round 3: [Sc in next stitch, inc in next stitch] 2 times. (6)
Round 4: Sc in each stitch around. (6)
Fasten off, leaving a long tail. Add only a tiny amount of stuffing. The nose should keep a small cone shape without becoming bulky.
Floppy Scarecrow Hat
Use brown yarn.
Round 1: Work 6 sc into an MR. (6)
Round 2: Inc in each stitch around. (12)
Round 3: [Sc in next stitch, inc in next stitch] 6 times. (18)
Round 4: [Sc in next 2 stitches, inc in next stitch] 6 times. (24)
Round 5: [Sc in next 3 stitches, inc in next stitch] 6 times. (30)
Round 6: [Sc in next 4 stitches, inc in next stitch] 6 times. (36)
Rounds 7 through 10: Sc in each stitch around. (36)
Round 11: Working in FLO, [sc in next 5 stitches, inc in next stitch] 6 times. (42)
Round 12: [Sc in next 6 stitches, inc in next stitch] 6 times. (48)
Round 13: [Sc in next 7 stitches, inc in next stitch] 6 times. (54)
Round 14: Sc in each stitch around. (54)
Fasten off and weave in the end.
Do not try to make the brim perfectly flat. A little bend at one side and a slight dip over the forehead help the hat look like something a scarecrow would actually wear.
Hat Patch
Use a contrasting yarn color.
Ch 5.
Row 1: Sc in the second chain from the hook and across. (4)
Rows 2 through 4: Ch 1, turn, sc in each stitch across. (4)
Fasten off, leaving a sewing tail.
Set the patch aside for assembly. Do not sew it to the hat yet.
Straw Hair
Cut 24 strands of straw-colored yarn, each about 7 inches long.
Fold one strand in half. Insert the crochet hook beneath a stitch on the head, catch the folded center and pull up a loop. Draw the two loose ends through that loop and tighten gently.
Attach the strands from one temple, around the back of the head and to the opposite temple. Keep the center of the face clear.
Do not trim the hair yet. Final trimming is easier after the hat is in position.
How to Assemble the Crochet Scarecrow Doll
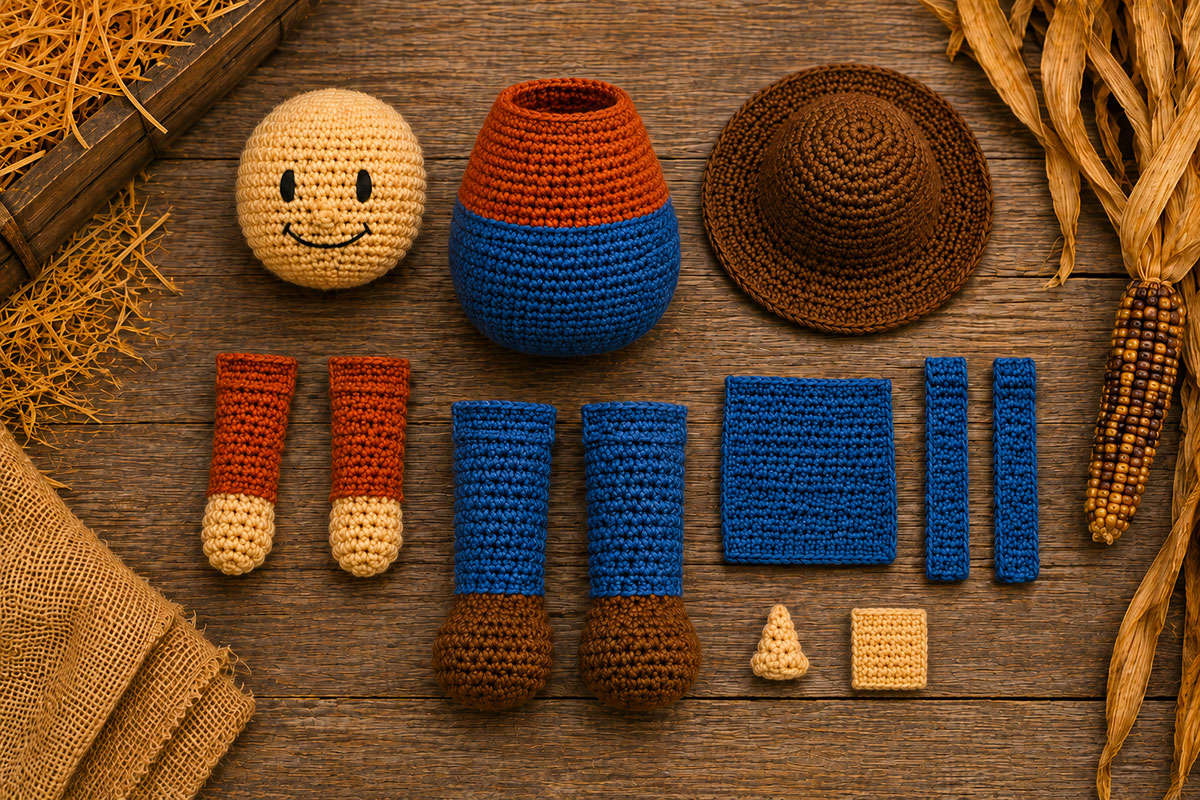
Lay out every crocheted piece before you begin sewing. You should have 12 crocheted pieces total: one head, one body, two arms, two legs, one overall bib, two straps, one nose, one hat and one hat patch. The 24 straw-hair strands are attached separately and are not included in the 12-piece count.
1. Attach the Head
Center the body's 12-stitch neck opening around the closed base of the head so the opening sits against Head Round 17, the 12-stitch round immediately above the final closure.
Start at the back of the neck. Use the long body tail to sew each of the 12 body-neck stitches to one corresponding stitch of Head Round 17. Continue one stitch for one stitch around the full neck until you return to the starting point. Make a second pass through the same 12 attachment positions.
Before securing the yarn, look at the doll from the front and side. The head should sit directly above the body without leaning sharply forward or backward. Adjust the position if necessary, then secure the yarn.
2. Attach the Legs
Place the two legs against the underside of the body with the shoe toes pointing forward.
Leave approximately 4 body stitches between the inner edges of the legs. Pin or hold both legs in place before sewing either one permanently.
Start at one end of the first flattened leg opening. Sew through both layers of each of the 8 paired stitch positions and into the underside of the body, working across the full opening to the opposite end. Return across the same 8 attachment positions to the starting point, then secure the yarn. Attach the second leg the same way.
Check that both shoes point in the same general direction. They do not need to be perfectly parallel. A small amount of unevenness suits the character of the scarecrow.
3. Attach the Arms
Position one arm on each side of the body near Rounds 13 through 15.
The flattened top of each arm should lie against the body with the hands pointing downward or slightly forward.
Start at one end of the flattened arm opening. Sew through both layers of each of the 5 paired stitch positions and into the body, working across the entire flattened edge. Return across the same 5 attachment positions to the starting point, then secure the yarn. Attach the second arm the same way.
Do not pull the arms tightly against the torso. Leaving a little movement at the shoulder gives the doll a softer outline.
4. Add the Overall Bib
Center the blue bib on the front of the body. Place its lower edge over the blue overall section near the color change at Round 10. The upper portion of the bib should extend onto the shirt-colored area.
Sew the lower edge and both sides of the bib to the body. Leave the top edge neat and flat.
Attach one strap to each upper corner of the bib. Take the straps over the shoulders and sew the opposite ends to the blue section at the back of the body.
The straps should lie flat without pulling the bib upward. If your tension has made a strap slightly long, overlap a little more of the end at the back rather than cutting the crocheted strap.
5. Position the Face
Center the face before sewing the nose. The front of the head should be opposite the round-change line whenever possible.
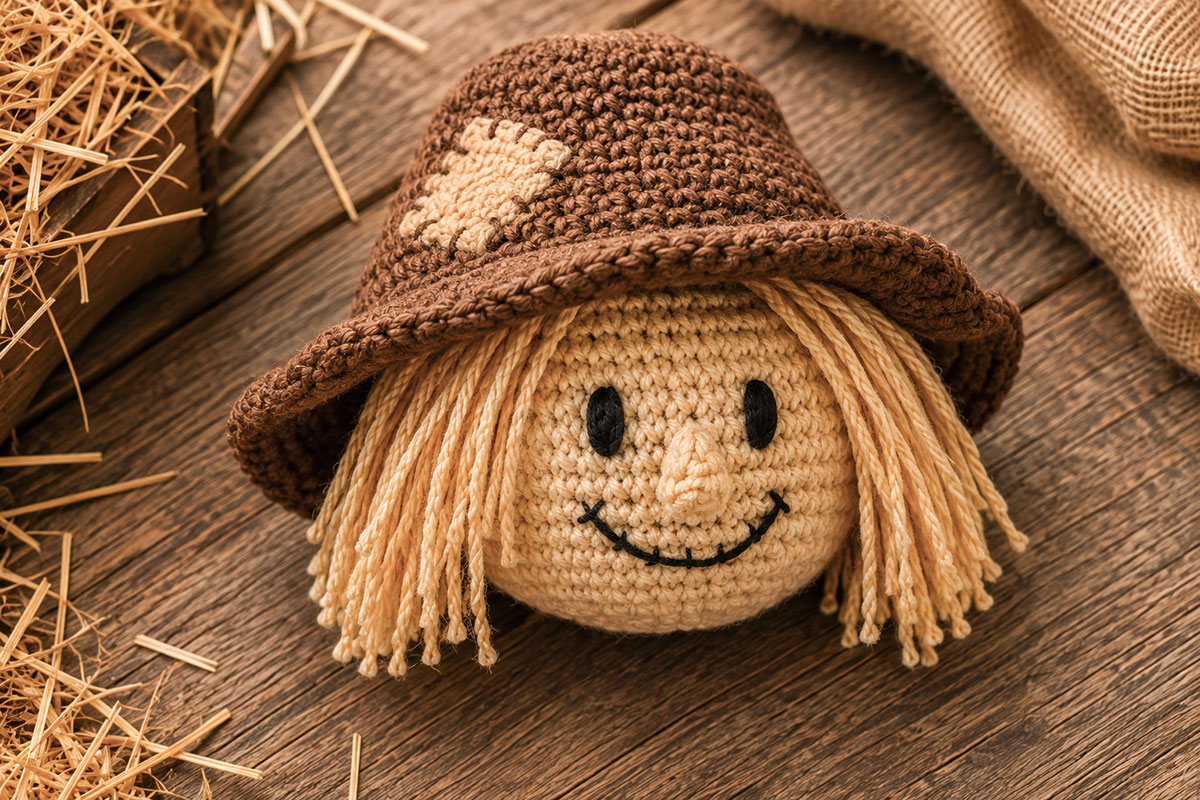
Place the embroidered eyes across Rounds 9 and 10. Make each eye with several short vertical satin stitches. Leave about 5 to 6 stitches between the inner edges of the eyes.
Pin the nose between and slightly below the eyes, with its wider base close to Round 11. Sew around the base with the remaining yarn tail.
Embroider a small smile across approximately Rounds 12 and 13. A slightly curved mouth looks friendlier than a long straight line.
If desired, add two short eyebrow stitches one round above the eyes. Keep them subtle. The face should still read clearly from several feet away.
6. Arrange the Straw Hair
Spread the attached hair around the sides and back of the head. Put the hat on temporarily before trimming.
Trim the visible hair to varied lengths of approximately 2 1/2 to 3 1/2 inches. Leave a few strands longer near the ears and back.
Perfectly even hair makes the scarecrow look more like a doll in a wig. The uneven ends are useful here.
7. Position and Secure the Hat
Position the patch slightly off center on the hat rather than placing it perfectly square. Sew around all four edges with small stitches.
Place the patched hat over the head with the patch slightly to one side. Let a few strands of straw hair escape beneath each side of the brim.
Tip one part of the brim slightly downward if you like the relaxed look shown by the pattern. Do not fold the entire brim into a sharp crease.
Once the position looks right, use brown yarn to make several discreet anchoring stitches through the hat and head. Secure the back and both sides so the hat cannot lift away easily.
The hat, straw hair and blue bib do much of the visual work. If those three details are clear, the finished figure reads as a scarecrow before anyone has to study the stitches.
Finishing and Final Check
Before weaving in the final yarn ends, place the scarecrow upright and look at the entire figure rather than checking one piece at a time.
- Confirm that the head is centered over the body.
- Check that both legs are firmly attached and the shoes face forward.
- Check both arm seams for loose stitches.
- Make sure the overall bib lies flat and both straps are attached securely.
- Confirm that the nose cannot lift away from the face.
- Check every embroidered facial stitch for loose loops.
- Make sure all straw-hair strands are firmly attached.
- Check the hat patch around all four edges.
- Confirm that the hat is anchored to the head at several points.
- Remove every straight pin, removable stitch marker and locking stitch marker used during construction or positioning.
- Weave in or secure every remaining yarn end.
Give the body a gentle squeeze and redistribute the filling if one side looks fuller than the other. Do the same with the head. Small adjustments made through the crocheted fabric can correct minor lumps without opening a seam.
Do not keep adding stuffing just because the doll can hold more. The scarecrow should keep its shape, but the finished figure should still look soft.
If this scarecrow will be handled by a child, choose materials appropriate for the child's age and securely attach every seam, yarn strand and separate piece. In the United States, the U.S. Consumer Product Safety Commission provides current toy-safety guidance. A crochet scarecrow is fall décor, not something to place inside a baby's crib or other sleep space; the CPSC's safe-sleep guidance says an infant sleep space should contain only a fitted sheet.
For another seasonal project after you finish the scarecrow, browse the Halloween crochet patterns. The scarecrow can stay out through the broader fall season, while pumpkins, bats, ghosts and spiders can take the project collection closer to Halloween.
Ways to Change the Scarecrow Without Changing the Pattern
The construction does not depend on one exact color combination. You can keep every stitch count the same and change the yarn colors to make the scarecrow look more rustic, brighter or more traditional.
For a harvest look, try faded denim blue, rust, mustard, brown and straw yellow. For a lighter version, use soft blue overalls with a muted red shirt and medium brown hat. The important part is contrast. The overalls need to remain distinct from the shirt, and the hair needs to remain visible beneath the hat.
You can also change the hat patch color without changing its size. A patch made from leftover yarn is enough. I would resist covering the hat with several patches, bows or extra decorations. A scarecrow already has plenty going on.
The mouth can be straight, gently curved or slightly crooked. Keep it embroidered and relatively simple so it does not compete with the nose and eyes.
If you prefer shorter hair, trim the strands after the hat is secured. Do not shorten the original 7-inch strands before attaching them because folding each strand in half reduces the visible length considerably.
Frequently Asked Questions About the Crochet Scarecrow
Can I use a different yarn weight?
Yes, but the finished size will change. Use a hook that makes a firm fabric with the yarn you choose. Use the same yarn weight for all of the major pieces so the proportions stay consistent.
Do I have to match the gauge exactly?
No. This is a stuffed crochet project rather than a fitted garment. A small gauge difference is acceptable as long as the fabric is tight enough to contain the stuffing and all pieces are made at the same tension.
Can I use plastic safety eyes instead of embroidery?
The pattern is designed with embroidered eyes. They suit the stitched scarecrow face and eliminate separate hard eye pieces. If the finished scarecrow might be handled by a young child, I would keep the embroidered version.
Why are the overall bib and straps separate?
The blue lower body establishes the overall base, while the separate bib and straps make the clothing recognizable from the front. This gives the look of overalls without requiring removable clothes, buttons or complicated garment construction.
Should the scarecrow be able to stand by itself?
No. The pattern does not contain wire or an internal support. Depending on stuffing and leg placement, the doll may balance briefly, but it is designed as a soft stuffed scarecrow rather than a freestanding figure.
Can I make the hat removable?
You can leave the hat unsecured if the scarecrow is intended only as adult seasonal decoration. For a finished piece that will be handled, sewing the hat to the head is the better choice because it keeps the hair and brim in their intended positions.
How can I tell whether I stuffed the doll too firmly?
Look at the stitches. If large gaps begin to open between them or the limbs become rigid, there is probably too much filling. The head and body can be firm, but the upper arms and upper legs should still flex slightly.
Before You Call the Scarecrow Finished
A good final check is simple: cover the face with your hand and look at the rest of the figure. The hat, straw hair, overalls and brown shoes should still make the character recognizable. Then uncover the face. The embroidered eyes, small nose and stitched smile should add personality without becoming the entire design.
That balance matters on a scarecrow. He can be a little crooked. His hair can stick out. His hat can tilt. Those details make sense for the character. Loose seams, unevenly attached limbs and unsecured pieces do not.
Once every temporary marker is removed and every yarn end is secured, the scarecrow is ready for fall decorating, gifting or adding to a handmade seasonal collection.
When you click on links to various merchants on this site and make a purchase, this may result in this site earning a commission. This does not affect the price you pay.

UBGI Gold Standard 2026
Reviewed under the site's
editorial checklist.
Photos, decorating ideas, party setups and reader submissions are shared for inspiration unless a page is specifically presented as a pattern, tutorial, reference guide or step-by-step project. Follow the instructions, measurements, safety guidance and manufacturer directions provided for the particular project or product.
About Jan | Contact | Baby Nursery Ideas (Blog) | Site Map | Privacy Policy | Disclosure Policy | Disclaimer | Affiliate Disclosure | Earnings Disclosure | Facebook | Pinterest
I am a participant in the Amazon Services LLC Associates Program, an affiliate advertising program designed to provide a means for us to earn fees by linking to Amazon. As an Amazon Associate I earn from qualifying purchases.
Copyright © 2006-2026. All Rights Reserved.