Free Crochet Scarecrow Doll Pattern: Mrs. Scarecrow for Fall
By Jan Bay
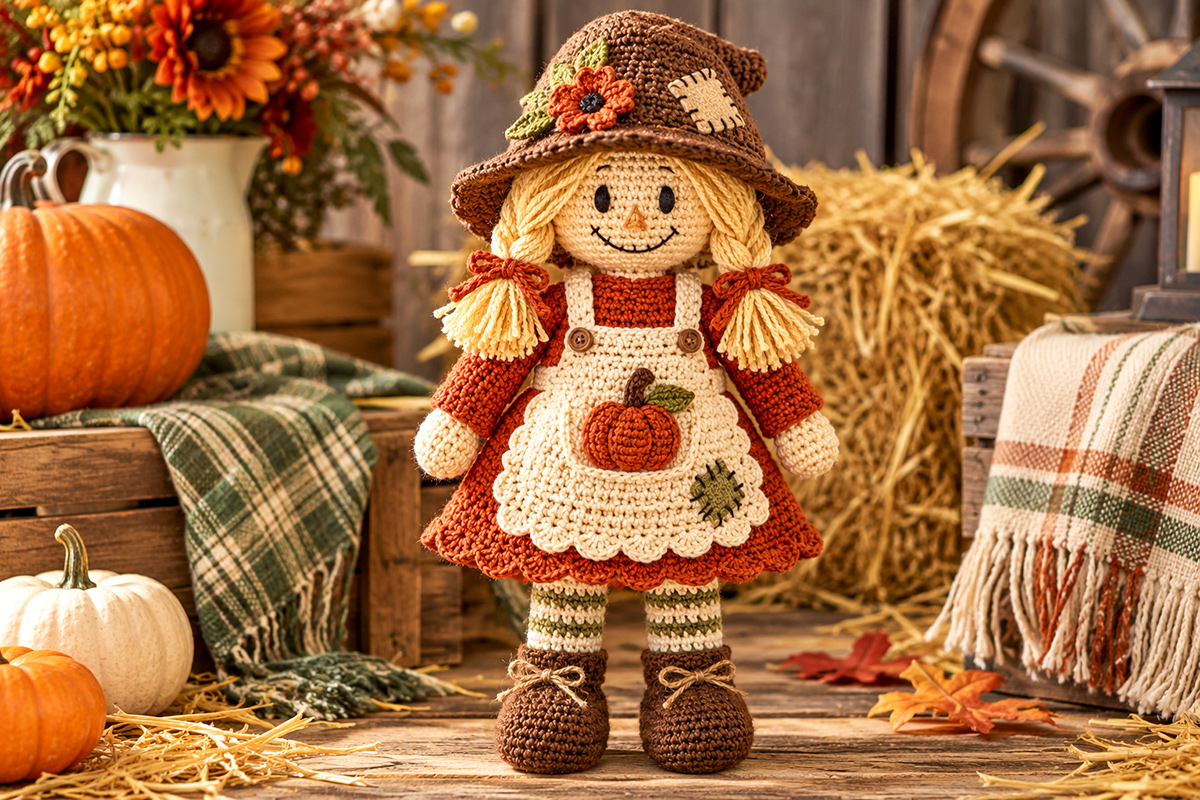
This free crochet scarecrow doll pattern makes Mrs. Scarecrow as a companion to my Mr. Scarecrow pattern. Mrs. Scarecrow is a fall-themed country-style doll wearing a floppy patched hat, straw-colored yarn hair, embroidered facial features and a distinctly feminine harvest outfit. She’s a perfect fit for Mr. Scarecrow.
Explore More Free Crochet Patterns
Free Crochet Scarecrow Pattern
Jump to a Section
Crochet Scarecrow Doll Pattern Materials
Mrs. Scarecrow is worked mostly in tight single crochet with worsted-weight yarn. I’d stay with matte yarns rather than anything shiny. The rust, cream, olive and brown are what give her that old-fashioned harvest look, and I wouldn’t add extra colors just because you have them in the yarn basket.
Yarn: Worsted weight #4 acrylic or cotton-blend yarn in the following approximate amounts:
Warm tan: 90 yards for the head, nose and hands
Rust: 150 yards for the dress, sleeves, hair ties, hat flower and pumpkin
Cream: 135 yards for the apron, apron straps and leg stripes
Brown: 110 yards for the floppy hat, boots and pumpkin stem
Straw gold: 85 yards for the hair
Olive green: 30 yards for the leg stripes, apron patch and leaves
Black embroidery floss: a small amount for the embroidered eyes, smile and patch stitching
Dark brown embroidery floss: a small amount for the decorative apron fasteners
Hook: US G/6 (4 mm) crochet hook, or the size needed to make a firm fabric that does not show stuffing
Stuffing: approximately 8 to 10 ounces of polyester fiberfill
Other supplies: yarn needle, embroidery needle, locking stitch markers, scissors, straight pins or removable markers for positioning pieces, and a row counter if you use one
No plastic safety eyes are needed. Her eyes and smile are embroidered, and the small round details at the top of the apron are embroidered rather than attached buttons.
Because Mrs. Scarecrow has long yarn hair, bows and sewn-on decorative pieces, do not place the doll in a crib, bassinet or play yard with a sleeping baby. Keep infant sleep spaces free of dolls and other soft objects.
Finished Size
Using worsted-weight yarn and a 4 mm hook at the gauge below, Mrs. Scarecrow is expected to measure about 9 to 10 inches tall from the bottoms of her boots to the top of her hat. Her exact finished height will depend on tension, stuffing and how the hat is shaped.
The finished skirt is expected to measure about 6 1/2 to 7 inches across at its widest point. The floppy hat brim is expected to measure about 5 1/2 to 6 inches across, depending on your tension and how you shape the brim.
Those measurements are calculated from the stitch and row counts in this pattern rather than taken from a physically test-made sample, so your exact finished size may vary a little with yarn, tension and stuffing.
Gauge
About 16 single crochet stitches and 18 rounds = 4 inches in firmly worked single crochet.
Exact gauge is less important than getting a dense fabric. If you can see obvious gaps between stitches after stuffing, move down a hook size. If the fabric is so tight that your hook is difficult to insert, move up slightly.
Crochet Abbreviations
This pattern uses standard U.S. crochet terminology. The abbreviations below follow the commonly used terminology published by the Craft Yarn Council crochet abbreviation standards.
ch = chain
sc = single crochet
hdc = half double crochet
dc = double crochet
sl st = slip stitch
st/sts = stitch/stitches
MR = magic ring
inc = work 2 single crochet stitches in the same stitch
sc2tog = single crochet 2 stitches together
BLO = back loop only
FLO = front loop only
RS = right side
WS = wrong side
Pattern Notes Before You Begin
Work the head, arms, legs and most of the body in continuous rounds unless the instructions specifically tell you to join. Place a marker in the first stitch of every round and move it up as you work.
Count the stitches at the end of every increase or decrease round. Mrs. Scarecrow has several fitted pieces that need to line up later, especially the striped legs, boots, apron and hat. A missed stitch early on can show up several sections later.
Stuff gradually rather than waiting until a piece is almost closed. Keep the head and boots firm enough to hold their shape, but don’t pack the arms so tightly that they stick straight out from the body.
The two lower legs are an intentional design feature. Keep the stripe sequence identical on both legs: cream, olive, cream, olive, cream from top to bottom before the brown boots begin. Don’t reverse the order on the second leg.
The apron is another locked part of Mrs. Scarecrow’s design. It has a cream scalloped lower edge, one centered pumpkin pocket and one olive square patch on the lower-left side as you look at the finished doll.
Her face is embroidered after the head is stuffed but before the hair and hat are permanently attached. The two black eyes are vertical satin-stitched ovals. The mouth is a curved black stitched smile with short crossing stitches at each end.
The straw-colored hair is divided into two matching side sections and tied with rust yarn. Keep the hair long enough to fall below the shoulders but short enough that the ends do not cover the apron bib.
Leave long sewing tails on pieces that will be attached later. Pin the major components in place before sewing. I would especially check the legs, arms, apron and hat from the front before committing to the final placement.
Crochet Scarecrow Doll Pattern: Head
Use warm tan yarn. Work in continuous rounds and keep the beginning-of-round marker toward the back of the head.
Round 1: Work 6 sc into an MR. (6)
Round 2: Inc in each stitch around. (12)
Round 3: [Sc in next stitch, inc in next stitch] 6 times. (18)
Round 4: [Sc in next 2 stitches, inc in next stitch] 6 times. (24)
Round 5: [Sc in next 3 stitches, inc in next stitch] 6 times. (30)
Round 6: [Sc in next 4 stitches, inc in next stitch] 6 times. (36)
Rounds 7 through 13: Sc in each stitch around. (36)
Round 14: [Sc in next 4 stitches, sc2tog] 6 times. (30)
Round 15: [Sc in next 3 stitches, sc2tog] 6 times. (24)
Round 16: [Sc in next 2 stitches, sc2tog] 6 times. (18)
Begin stuffing the head. Add the fiberfill in small amounts and work it outward toward the sides before filling the center. You want a rounded face rather than a hard ball.
Round 17: [Sc in next stitch, sc2tog] 6 times. (12)
Add the remaining stuffing and check the shape from the front and side.
Round 18: Sc2tog 6 times. (6)
Fasten off. Thread the yarn tail through the front loops of the remaining 6 stitches, pull the opening closed and secure the end.
Do not add the hair or hat yet. Embroider the face first so you can work without the hair getting in your way.
Body and Rust Crochet Dress
The body and dress use the same rust yarn. The fitted body is stuffed. The skirt is added afterward to the unused front loops at the waist, which lets the lower edge flare without stuffing the dress itself.
Round 1: Work 6 sc into an MR. (6)
Round 2: Inc in each stitch around. (12)
Round 3: [Sc in next stitch, inc in next stitch] 6 times. (18)
Round 4: [Sc in next 2 stitches, inc in next stitch] 6 times. (24)
Round 5: [Sc in next 3 stitches, inc in next stitch] 6 times. (30)
Round 6: [Sc in next 4 stitches, inc in next stitch] 6 times. (36)
Round 7: Working in BLO, sc in each stitch around. (36)
The unused front loops from Round 7 form the attachment line for the skirt. Put a second marker into one of those loops so you can find the round easily later.
Rounds 8 through 11: Sc in each stitch around. (36)
Round 12: [Sc in next 4 stitches, sc2tog] 6 times. (30)
Round 13: [Sc in next 3 stitches, sc2tog] 6 times. (24)
Round 14: [Sc in next 2 stitches, sc2tog] 6 times. (18)
Stuff the body firmly through the lower half and a little more softly toward the shoulders.
Round 15: [Sc in next stitch, sc2tog] 6 times. (12)
Fasten off, leaving a long tail for attaching the head. Leave the 12-stitch neck opening unclosed.
Flared Dress Skirt
Hold the body upright with the neck at the top. Join rust yarn to one of the unused front loops from Body Round 7. Work around the waist in the same direction as the body rounds.
Skirt Round 1: Sc in each unused front loop around. (36)
Skirt Round 2: [Sc in next 5 stitches, inc in next stitch] 6 times. (42)
Skirt Round 3: Sc in each stitch around. (42)
Skirt Round 4: [Sc in next 6 stitches, inc in next stitch] 6 times. (48)
Skirt Round 5: Sc in each stitch around. (48)
Skirt Round 6: [Sc in next 7 stitches, inc in next stitch] 6 times. (54)
Rounds 7 and 8: Sc in each stitch around. (54)
Round 9: [Sl st in next stitch, skip next stitch, work 5 dc in next stitch, skip next stitch, sl st in next stitch, sc in next stitch] 9 times.
Fasten off and weave in the end on the wrong side of the skirt.
The scalloped rust edge should sit below the cream apron when the doll is finished. Don’t hide all of it. That little rust border is part of the locked design.
Make Two Arms
Begin with warm tan yarn for the hands.
Round 1: Work 6 sc into an MR. (6)
Round 2: Inc in each stitch around. (12)
Rounds 3 through 5: Sc in each stitch around. (12)
Lightly stuff the hand.
Change to rust yarn in the final yarn-over of the last stitch of Round 5.
Rounds 6 through 13: Sc in each stitch around. (12)
Round 14: [Sc in next 4 stitches, sc2tog] 2 times. (10)
Round 15: Sc in each stitch around. (10)
Add a small amount of stuffing to the lower arm. Leave the upper 1 to 1 1/2 inches soft so the arms can hang beside the dress instead of sticking straight out.
Flatten the opening so 5 stitches lie along the front and 5 along the back. Fasten off, leaving a long sewing tail.
Make the second arm the same way.
Striped Cream and Olive Legs
The striped legs are one of Mrs. Scarecrow’s fixed design details. Make both legs exactly alike and keep the color-change jog toward the back.
With cream yarn, leave a starting tail about 18 inches long, then ch 16. Without twisting the chain, join with a sl st to the first chain to form a ring. This foundation edge will become the top of the leg, and the long starting tail will be used later to sew the leg to the body.
Work the entire leg in joined rounds. The beginning ch 1 does not count as a stitch. At the end of every round, join with a sl st to the first sc.
Rounds 1 and 2: Ch 1, sc in each stitch around. Join with a sl st. (16)
Change to olive yarn.
Rounds 3 and 4: Ch 1, sc in each stitch around. Join with a sl st. (16)
Change to cream yarn.
Rounds 5 and 6: Ch 1, sc in each stitch around. Join with a sl st. (16)
Change to olive yarn.
Rounds 7 and 8: Ch 1, sc in each stitch around. Join with a sl st. (16)
Change to cream yarn.
Rounds 9 and 10: Ch 1, sc in each stitch around. Join with a sl st. (16)
Fasten off at the lower edge and weave in this ending tail. Keep the long cream starting tail at the upper edge for attaching the leg to the body later.
Lightly stuff the leg. Keep both ends fairly flat. The lower end will fit inside the boot and the upper end will be sewn to the underside of the body.
Make the second leg the same way. Before moving on, place them side by side and check the stripe sequence from top to bottom: cream, olive, cream, olive, cream.
Brown Crochet Boots
Make two. The boots are worked separately so they can have the rounded, oversized shape shown on Mrs. Scarecrow without making the striped legs bulky.
Use brown yarn.
Work the boot in continuous rounds. Place a marker in the first stitch of Round 1 and move it to the first stitch of each new round, keeping the round-start line at the heel. The toe shaping in Round 5 depends on this placement.
Foundation: Ch 7.
Round 1: Sc in the second chain from the hook and in the next 4 chains. Work 3 sc in the last chain. Rotate the foundation chain and work along the unused loops on the opposite side. Sc in the next 4 loops. Work 2 sc in the remaining loop at the heel end, in the same foundation chain where the first sc was worked. (14)
Round 2: Inc in the first stitch, sc in the next 4 stitches, inc in each of the next 3 stitches, sc in the next 4 stitches, inc in each of the final 2 stitches. (20)
Round 3: Working in BLO, sc in each stitch around. (20)
Round 4: Sc in each stitch around. (20)
Round 5: Sc in the next 5 stitches, sc2tog 4 times, sc in the final 7 stitches. (16)
Rounds 6 through 8: Sc in each stitch around. (16)
Stuff the toe and lower part of the boot firmly enough to keep the rounded shape. Leave the top open.
Insert the lower end of one striped leg about 1/2 inch into the boot opening. Keep the leg’s color-change seam toward the back and the rounded toe of the boot toward the front, then pin the two pieces together.
With brown yarn, sew through each of the 16 stitches around the boot opening and through the corresponding leg fabric directly behind it. Work completely around the opening, keeping the 1/2-inch overlap even so the leg stays centered inside the boot.
Repeat for the second boot and leg.
Boot Bow Detail
Cut a short length of cream yarn and lace it across the front of the boot shaft in two small crossing stitches. Tie the yarn into a small bow at the center front. Use a yarn needle to weave each loose end securely through several nearby brown crochet stitches, then trim the excess. You do not need to reopen the boot or reach the inside.
Repeat on the second boot. Keep the bows small. They are an accent, not a second focal point.
Cream Scalloped Apron
The cream apron is another feature I would keep exactly as shown. It gives Mrs. Scarecrow a recognizable front view and separates her from a generic scarecrow doll in a dress.
Apron Skirt
Use cream yarn.
Foundation: Ch 21.
Row 1: Sc in the second chain from the hook and across. (20)
Row 2: Ch 1, turn. Inc in the first stitch, sc in the next 18 stitches, inc in the final stitch. (22)
Row 3: Ch 1, turn. Sc in each stitch across. (22)
Row 4: Ch 1, turn. Inc in the first stitch, sc in the next 20 stitches, inc in the final stitch. (24)
Rows 5 through 8: Ch 1, turn. Sc in each stitch across. (24)
Row 9, scalloped lower edge: Ch 1, turn. [Skip next stitch, work 5 dc in next stitch, skip next stitch, sl st in next stitch] 6 times. (6 lower scallops)
Fasten off and weave in the end.
Side scallops: With the right side facing, join cream yarn at the upper corner of one side of the apron skirt. Working only into the side edges of Rows 1 through 8, [sl st into the end of the next row, work 4 hdc into the end of the following row] 4 times. Sl st into the base of the nearest lower scallop to anchor the final side shell. Fasten off.
Repeat the same side edging on the opposite side, beginning at the upper corner and working toward the lower scalloped edge. You should have 4 small scallops along each side and 6 larger scallops across the bottom.
Apron Bib
Use cream yarn.
Foundation: Ch 11.
Row 1: Sc in the second chain from the hook and across. (10)
Rows 2 through 6: Ch 1, turn. Sc in each stitch across. (10)
Fasten off, leaving a sewing tail.
Center the lower edge of the bib over the 20-stitch top edge of the apron skirt. You should have approximately 5 apron stitches extending beyond each side of the bib.
Sew the bib securely to the apron skirt.
Make Two Apron Straps
Use cream yarn.
Leave a starting tail about 10 inches long, then ch 16.
Beginning in the second chain from the hook, sc in each chain across. (15)
Fasten off, leaving an ending tail about 10 inches long. You now have one sewing tail at each end of the strap.
Make the second strap the same way.
Sew one end of each strap to an upper corner of the apron bib. Leave the opposite ends loose until the apron is positioned on the doll.
With dark brown embroidery floss, make a small filled circle where each strap meets the bib. These embroidered circles give the look of the little brown fasteners in the example without using actual buttons.
Lower-Left Olive Patch
Use olive yarn.
Ch 6.
Row 1: Sc in the second chain from the hook and across. (5)
Rows 2 through 5: Ch 1, turn. Sc in each stitch across. (5)
Fasten off, leaving a sewing tail.
Place the patch on the lower-left portion of the apron as you look at the finished doll. Keep it clear of the scalloped edge and far enough to the side that it does not crowd the centered pumpkin pocket.
Sew the patch in place. Use black or very dark brown embroidery floss to add several visible crossing stitches around the edge.
Centered Pumpkin Pocket
The pumpkin sits in the center of the apron and is sewn as a tiny pocket rather than simply disappearing into the background as another appliqué.
Use rust yarn.
Round 1: Work 6 sc into an MR. Join with a sl st. (6)
Round 2: Ch 1. Inc in each stitch around. Join. (12)
Round 3: Ch 1. [Sc in next stitch, inc in next stitch] 6 times. Join. (18)
Round 4: Ch 1. [Sc in next 2 stitches, inc in next stitch] 6 times. Join. (24)
Fasten off, leaving a long sewing tail.
Shape the circle gently into a shallow rounded pumpkin rather than pressing it completely flat. With a length of slightly darker rust or brown yarn, make three vertical shaping stitches from the upper edge toward the lower edge. Draw each stitch snug enough to create the shallow raised lobes visible in the finished pumpkin, but not so tightly that the piece folds or closes up. The pumpkin should remain flexible enough to use as the front of the small pocket.
Pumpkin Stem
With brown yarn, ch 4. Sl st in the second chain from the hook and in each of the remaining 2 chains. Fasten off, leaving a sewing tail.
Pumpkin Leaf
With olive yarn, ch 5.
Beginning in the second chain from the hook, work sl st, sc, hdc, then 3 hdc in the final chain. Working back along the unused loops on the opposite side of the foundation chain, work hdc, sc and sl st.
Fasten off, leaving a sewing tail.
Sew the stem to the upper center of the pumpkin and place the olive leaf beside it.
Center the pumpkin on the apron. Sew around the sides and lower edge, but leave approximately 6 stitches across the upper edge unsewn. That small opening makes it a real pocket while keeping the finished front view almost identical to the example image.
Floppy Brown Hat with Patch and Rust Flower
Use brown yarn. Work the crown in continuous rounds.
Round 1: Work 6 sc into an MR. (6)
Round 2: Inc in each stitch around. (12)
Round 3: [Sc in next stitch, inc in next stitch] 6 times. (18)
Round 4: [Sc in next 2 stitches, inc in next stitch] 6 times. (24)
Round 5: [Sc in next 3 stitches, inc in next stitch] 6 times. (30)
Round 6: [Sc in next 4 stitches, inc in next stitch] 6 times. (36)
Rounds 7 through 11: Sc in each stitch around. (36)
The brim begins now. Working in FLO on the first brim round helps the brim turn outward instead of continuing straight down the head.
Round 12: Working in FLO, [sc in next 5 stitches, inc in next stitch] 6 times. (42)
Round 13: [Sc in next 6 stitches, inc in next stitch] 6 times. (48)
Round 14: [Sc in next 7 stitches, inc in next stitch] 6 times. (54)
Round 15: [Sc in next 8 stitches, inc in next stitch] 6 times. (60)
Round 16: [Sc in next 9 stitches, inc in next stitch] 6 times. (66)
Round 17: [Sc in next 10 stitches, inc in next stitch] 6 times. (72)
Round 18: Sc in each stitch around. (72)
Fasten off and weave in the end.
Finger-shape the brim instead of trying to make it perfectly flat. Give one side a slight upward bend and let the opposite front edge dip a little. The hat should look soft and floppy, not like a rigid disk.
Cream Hat Patch
Use cream yarn.
Ch 5.
Row 1: Sc in the second chain from the hook and across. (4)
Rows 2 through 4: Ch 1, turn. Sc in each stitch across. (4)
Fasten off, leaving a sewing tail.
Sew the patch to the front-right side of the hat crown as you look at the finished doll. Use several visible dark brown crossing stitches around the edge so it looks deliberately mended.
Rust Hat Flower
Use rust yarn.
Work 5 sc into an MR and join with a sl st.
For each petal, work [sl st in next stitch, ch 2, 2 hdc in the same stitch, ch 2, sl st in the same stitch]. Repeat once in each of the 5 stitches.
Fasten off, leaving a sewing tail.
Using black embroidery floss, work several short satin stitches over the center of the flower to form the small dark round center shown in the finished doll. Keep the center flat and contained inside the five rust petals.
Make Two Olive Leaves
With olive yarn, ch 5.
Beginning in the second chain from the hook, work sl st, sc, hdc and 3 hdc in the final chain. Work back along the opposite side of the foundation chain with hdc, sc and sl st.
Fasten off, leaving a sewing tail.
Make the second leaf the same way.
Place the rust flower on the front-left side of the hat as you look at the finished doll, opposite the cream patch on the front-right. Tuck the two olive leaves partly behind the flower. Sew all three pieces securely to the crown rather than the loose outer edge of the brim.
Straw Yarn Hair and Embroidered Face
Embroidered Face
Mark the center front of the head before you begin. The beginning-of-round seam should remain at the back.
Using black embroidery floss, make two narrow vertical satin-stitched oval eyes between approximately Rounds 9 and 11. Space the eye centers about 6 to 7 stitches apart.
Keep both eyes the same height and width. Mrs. Scarecrow does not have plastic safety eyes, eyelashes or eyebrows.
Using the same black floss, embroider a shallow curved smile below the eyes, centered across the face. Add a few short crossing stitches along the smile and one small crossing stitch near each end to give it the handmade scarecrow look shown in the example.
Using warm tan yarn, embroider the small raised triangular nose at the center of the face between the eyes and smile. Make 4 to 6 short horizontal satin stitches, placing the widest stitch along the lower part of the nose and making the stitches slightly shorter as you work upward. Stack them gently so the nose has the small raised triangular shape shown in the finished doll. Keep it subtle. The eyes and smile remain the only dark facial features.
Straw-Colored Hair
Cut 24 strands of straw-colored yarn approximately 10 inches long and 8 additional strands approximately 6 inches long.
Fold a long strand in half. Insert the hook beneath a stitch on the side of the scalp, catch the folded center and pull up a loop. Draw both cut ends through the loop and tighten gently.
Attach 12 long strands along the left side of the head and 12 along the right side. Keep most of the attachment points beneath the area that will be covered by the hat.
Gather the hanging yarn on one side into one loose side bunch. Give the bundle a gentle twist so the strands sit together, but do not braid them. Tie the bunch with rust yarn approximately 2 1/2 to 3 inches below the hair attachment points, leaving the lower yarn ends loose and slightly uneven like a straw tassel.
Repeat on the other side. Check both tied pigtails from the front before trimming anything. The rust ties and loose lower ends should finish at about the same level on both sides.
Use the 8 shorter strands around the temples and front hairline to soften the edge beneath the hat. Trim only enough to keep them out of the embroidered eyes.
Don’t cut every strand to exactly the same length. A little unevenness helps the hair read as straw instead of a perfect yarn wig.
Assembly and Finishing
Lay all of the finished pieces in front of you before you start sewing. This is the point where a few minutes spent checking placement will make a bigger difference than another decorative detail.
Before assembly, you should have 21 crocheted pieces or components: 1 head, 1 body with attached dress skirt, 2 arms, 2 striped legs, 2 boots, 1 apron skirt, 1 apron bib, 2 apron straps, 1 olive apron patch, 1 pumpkin pocket, 1 pumpkin stem, 1 pumpkin leaf, 1 hat, 1 cream hat patch, 1 rust flower and 2 olive hat leaves. The straw-colored hair strands and embroidered facial details are added separately and are not included in this piece count.
1. Attach the Legs
Position the two striped legs beneath the body with approximately 3 to 4 stitches of space between them. Keep both color-change seams toward the back and both rounded boot toes pointing straight forward.
Pin the legs in place. Stand the body upright while supporting it with your hand and check that the legs are the same length.
Using the long cream starting tail left at the upper edge of each leg, sew the leg securely to the underside of the body. Stitch completely around the upper edge of each leg, passing through both the leg edge and the body fabric. Work around the attachment a second time if needed for a firm join, keeping the stitches hidden beneath the skirt.
2. Position the Apron
Complete the pumpkin pocket and olive patch before attaching the apron to the doll.
Center the apron skirt over the front of the rust dress. The scalloped cream edge should sit above the rust scalloped dress edge so both remain visible.
Pin the apron around the waist. Sew the upper edge of the apron skirt securely to the dress.
Lay the bib flat against the center front of the torso. Bring each cream strap over a shoulder and sew the free end to the back waistline.
Keep the straps fairly straight rather than crossing them. Check from the front that the bib remains centered.
3. Attach the Arms
Position one arm on each side of the body just below the shoulder shaping. The rust sleeves should begin close to the torso and the tan hands should fall beside the upper portion of the apron.
Pin both arms before sewing either one permanently.
Sew through the flattened upper edge of each arm and the body stitches beneath it. Keep the attachment flexible enough that the arms hang naturally.
4. Attach the Head
Center the stuffed head over the 12-stitch neck opening. Make sure the face points directly toward the center of the apron and centered pumpkin pocket.
Use the long body tail to sew the neck opening to the underside of the head. Work completely around the neck once, check the alignment, then work around a second time for strength.
Secure the yarn and weave the end into the body.
5. Position the Hat
Place the floppy brown hat over the finished hair. The cream patch and rust flower should remain visible from the front.
Tilt the brim slightly rather than centering it like a rigid cap. Keep both embroidered eyes fully visible.
Once you like the angle, tack the hat to the head in four places: front, back and both sides. Add two or three extra hidden stitches beneath the flower side if the wider brim wants to shift.
6. Final Shape Check
Set Mrs. Scarecrow upright beside your free crochet scarecrow pattern doll if you are making the pair.
Check the fixed details before weaving in the last ends: two matching straw-colored tied pigtails with loose tassel ends, rust dress, cream scalloped apron, centered pumpkin pocket, olive lower-left patch, identical cream-and-olive striped legs, rounded brown boots and the floppy patched hat with one rust flower and olive leaves.
If one boot twists sideways or the apron has shifted off center, fix it now. Those details are much easier to correct before every yarn end has been buried.
Once you are satisfied with the final placement, securely knot or anchor any remaining sewing and embroidery tails as appropriate, then weave all remaining yarn ends into the nearest matching-color crochet fabric and trim the excess.
Before you call her finished, remove every straight pin, locking stitch marker and other temporary positioning marker. Check the head, hat, apron, arms, legs and boots with your fingers as well as your eyes so nothing used during assembly is left inside or attached to the doll.
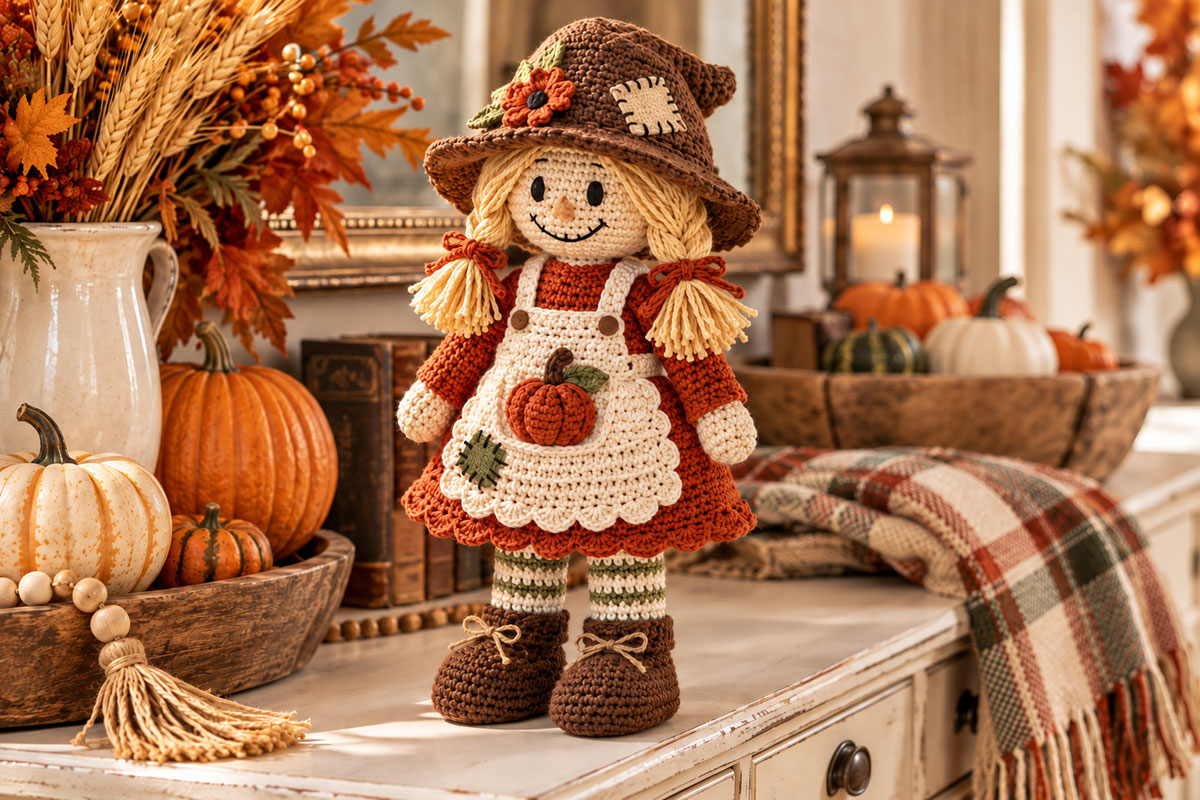
Mrs. Scarecrow’s signature details: The scalloped apron, centered pumpkin pocket, lower-left olive patch and matching striped legs are meant to stay consistent whenever you make this design.
Keeping Mrs. Scarecrow True to the Finished Design
You can certainly change the yarn colors if you want her to coordinate with your own fall decorations, but I’d keep the actual construction details intact. The apron, pumpkin pocket, patched flowered hat and striped legs are what make this Mrs. Scarecrow rather than a general crochet scarecrow doll.
If you change one of the main colors, keep enough contrast between the dress, apron and leg stripes for the individual pieces to remain easy to see. I’d also keep the hair in a straw-like shade. It ties her back to Mr. Scarecrow even though their clothing is completely different.
Mrs. Scarecrow Pattern Questions
Can I make Mrs. Scarecrow in different fall colors?
Yes. The rust, cream, olive and brown palette matches the example, but changing the colors will not change the construction. I would keep the apron lighter than the dress and use two contrasting colors for the striped legs so those signature details don’t disappear.
Can I use safety eyes instead of embroidery?
The pattern is designed around embroidered black eyes, and I’d keep them that way if you want the finished doll to match the example. The satin-stitched eyes also avoid adding hard plastic eye pieces to the design.
Is the pumpkin an appliqué or a pocket?
It is sewn as a tiny pocket. The sides and lower edge are attached to the apron while a small opening remains at the top. You could sew the entire edge closed if you prefer, but the pocket construction is part of this version of Mrs. Scarecrow.
Will she be the same size as Mr. Scarecrow?
They are designed at the same general yarn, hook and gauge scale. Mrs. Scarecrow may look a little wider because of her flared dress, scalloped apron and broader hat, but the two dolls should look like they belong together when displayed side by side.
Does this pattern require buttons?
No. The two small brown details at the top of the apron are embroidered. The face is embroidered as well, so no buttons are required anywhere on Mrs. Scarecrow.
Make Mr. and Mrs. Scarecrow as a Fall Pair
Mrs. Scarecrow was designed to look as though she belongs right beside Mr. Scarecrow without simply repeating his pattern in different colors. They share the same rustic fall character and general scale, but her flared rust dress, scalloped apron, pumpkin pocket, tied straw-yarn pigtails and striped legs give her a completely different silhouette.
If you're making both, start with my free crochet scarecrow pattern for Mr. Scarecrow and keep the yarn weights and hook sizes consistent between the two. That will help the finished dolls look like a matched pair when they're displayed together.
I wouldn't try to make every color match. Let Mrs. Scarecrow keep her rust, cream and olive harvest palette while Mr. Scarecrow keeps his own clothing details. The connection should come from their scale, straw-colored hair, stitched faces and patched country styling rather than identical outfits.
And keep those striped legs. They're one of the little details that makes Mrs. Scarecrow immediately recognizable.
When you click on links to various merchants on this site and make a purchase, this may result in this site earning a commission. This does not affect the price you pay.

UBGI Gold Standard 2026
Reviewed under the site's
editorial checklist.
Photos, decorating ideas, party setups and reader submissions are shared for inspiration unless a page is specifically presented as a pattern, tutorial, reference guide or step-by-step project. Follow the instructions, measurements, safety guidance and manufacturer directions provided for the particular project or product.
About Jan | Contact | Baby Nursery Ideas (Blog) | Site Map | Privacy Policy | Disclosure Policy | Disclaimer | Affiliate Disclosure | Earnings Disclosure | Facebook | Pinterest
I am a participant in the Amazon Services LLC Associates Program, an affiliate advertising program designed to provide a means for us to earn fees by linking to Amazon. As an Amazon Associate I earn from qualifying purchases.
Copyright © 2006-2026. All Rights Reserved.