Free Crochet Reindeer Rattle Pattern
By Jan Bay
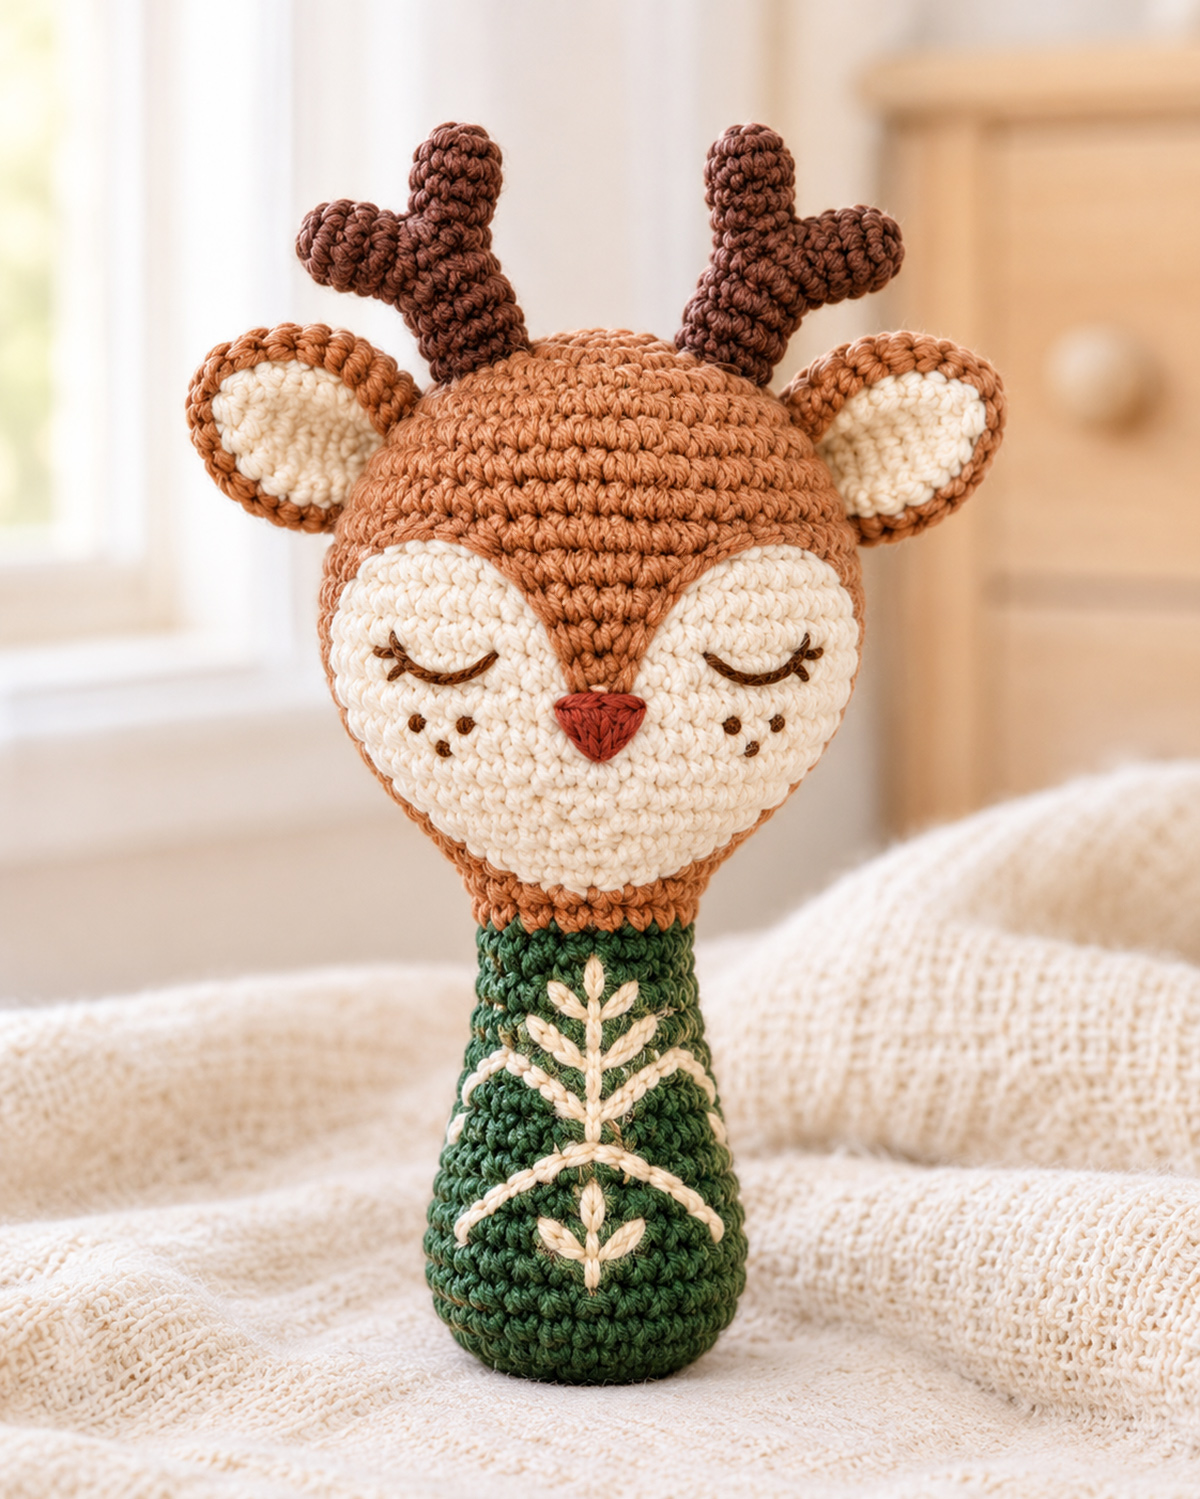
This free crochet reindeer rattle pattern features a match to my woodland winter reindeer lovey with sleepy embroidered eyes, a cream-colored face, little brown antlers and a short forest-green handle decorated with ivory stitching. The little reindeer has lots of Christmas charm and works with woodland nursery colors in every season. The pattern includes instructions for making the reindeer shown in my example image, along with the construction details that need special attention when making a baby rattle.
Explore More Free Crochet Baby Patterns
Crochet Reindeer Snuggler Lovey
Free Crochet Bear Rattle Pattern
See Supplies for This Project Here.
Jump to a Section
- Materials and Supplies
- Finished Size and Gauge
- Stitches and Abbreviations
- Crochet the Short Woodland Handle
- Crochet the Reindeer Head
- Make the Cream Facial Markings
- Crochet the Reindeer Ears
- Crochet the Branched Antlers
- Embroider the Face and Woodland Details
- Add the Rattle Insert and Assemble
- Finishing and Baby Toy Checks
- Frequently Asked Questions
Free Crochet Reindeer Rattle Pattern Materials and Supplies
I'd stick with cotton yarn for this little reindeer. It gives the stitches a neat appearance and helps the embroidered details stand out. You don't need six different shades of brown, either. One warm cinnamon color for the head and ears, plus a darker brown for the antlers, is plenty.
Yarn Colors
- Cinnamon brown DK or light worsted cotton yarn: approximately 45 yards for the head, ears and neck.
- Forest green cotton yarn: approximately 25 yards for the handle.
- Warm ivory cotton yarn: approximately 25 yards for the face, ear centers and woodland embroidery.
- Dark chocolate brown cotton yarn: approximately 15 yards for the antlers and facial embroidery.
- Terracotta or muted brick-red cotton yarn: a small amount for the embroidered nose.
These yarn amounts are estimates. Have a little extra available, especially if your gauge runs larger.
Other Supplies
- 2.75 mm crochet hook, or the size needed to meet the gauge with tightly closed stitches.
- Polyester toy stuffing.
- One factory-sealed rattle insert, approximately 20 to 24 mm across, with documentation appropriate to its intended use.
- Two 3-inch squares of closely woven cotton fabric for an enclosed insert pocket.
- Hand-sewing needle and matching sewing thread.
- Blunt yarn needle and a longer embroidery needle.
- Removable stitch markers.
- Scissors and measuring tape.
Don't use loose bells, beads, dried beans, rice or separate pellets as the sound-making material. A contained insert is the better construction choice, although the finished rattle still needs the required product testing.
I also wouldn't add plastic safety eyes, buttons, a hanging loop, a scarf or a ribbon. The little embroidered face and woodland handle give this reindeer plenty of character without those extras.
Before you begin: This is an engineered pattern for the decorative reindeer prototype shown in the example image. The rounded, flared handle end may not meet the shape requirements for an infant rattle. The finished construction has not been physically tested for attachment strength, choking hazards or infant use. Keep completed prototypes out of babies' reach. A version intended for infant play may need a revised handle and must undergo the applicable testing and compliance evaluation.
Finished Size and Gauge
The shorter handle is an important part of this design. I don't want the reindeer's head sitting on top of a long, skinny crocheted tube that bends as soon as you pick it up.
We're making the handle and head in one continuous piece, with no separate neck seam. The handle widens toward the bottom and narrows gradually beneath the head.
Expected Finished Measurements
- Overall height, including antlers: approximately 7.5 to 8.5 inches.
- Head width without ears: approximately 3.2 inches.
- Head height: approximately 3.7 inches.
- Handle length: approximately 2.9 inches.
- Handle width at its rounded lower section: approximately 1.6 inches.
- Handle width near the neck: approximately 1.1 inches.
- Antler height above the head: approximately 1 to 1.3 inches.
These dimensions are calculated from the stitch counts and target gauge, not measured from a finished sample.
Gauge
Target gauge: 24 single crochet stitches and 28 rounds measure 4 inches.
Use tight single crochet stitches, with no visible gaps when the fabric is gently stretched. A smaller hook is preferable to simply packing in extra stuffing.
Gauge and Size Checkpoints
- After handle Round 5, you should have 30 stitches. At the target gauge, the circumference is approximately 5 inches.
- After handle Round 20, you should have 21 stitches. This is the neck circumference and should measure approximately 3.5 inches around.
- At head Round 9, you should have 60 stitches. The expected circumference is approximately 10 inches.
- When the head is complete, its expected maximum width is approximately 3.2 inches after stuffing and shaping.
If the fabric has stuffing gaps, use a smaller hook and begin again. If the measurements are noticeably different, make a gauge sample before continuing.
Neck check: Once the head is stuffed, hold the handle horizontally and observe whether the head bends sharply at the neck. If it does, check the stitch density and stuffing distribution. A loose or unstable neck means the construction needs revision and retesting. Don't add a dowel, wire or plastic support.
Stitches and Abbreviations
We'll use US crochet terms throughout. Most of the rattle is worked in single crochet, so you don't need any fancy stitches. The shaping comes from carefully placed increases and decreases.
- ch = chain
- sc = single crochet
- inc = increase, work 2 sc in the same stitch
- dec = invisible single crochet decrease over the next 2 stitches
- sl st = slip stitch
- MR = magic ring
- st(s) = stitch(es)
- rnd = round
- FO = fasten off
- rep = repeat
- BLO = back loop only
How to Read the Rounds
A direction such as (8 sc, dec) 3 times means work 8 single crochet stitches, decrease over the next 2 stitches, and repeat that sequence three times.
The stitch count at the end of every numbered row or round appears in parentheses.
Work the handle, head, ears and antlers in continuous rounds unless the instructions say otherwise. Don't join those rounds with slip stitches.
The cream facial panels are worked in turned rows because their shapes need to taper independently.
Turning-chain note: The ch 1 at the end of a row does not count as a stitch. After turning, work your first sc into the first actual sc of the previous row, not into the turning chain. Work the last stitch into the final sc of the row. If your stitch count increases unexpectedly or one edge begins to lean, check that you haven't worked into the turning chain.
Markers Used in This Pattern
I'll call the handle rounds G1 through G20 and the head rounds B1 through B26. The letters are only there to make assembly and embroidery placement easier.
Keep one marker at the beginning of each round. Position the beginning-of-round line toward the back of the reindeer so the front of the face and handle stay clear.
Remove every temporary marker before finishing.
Crochet the Short Woodland Handle
Start at the rounded green bottom and work upward. There's no separate handle piece to sew on later. Once we reach the neck, we'll change to cinnamon brown and continue straight into the head.
Use forest-green yarn.
Handle Rounds
- G1: Make a magic ring. Work 6 sc into the ring. (6 sc)
- G2: Inc in every st around. (12 sc)
- G3: (1 sc, inc) 6 times. (18 sc)
- G4: (2 sc, inc) 6 times. (24 sc)
- G5: (3 sc, inc) 6 times. (30 sc)
- G6: Sc in every st around. (30 sc)
- G7: Sc in every st around. (30 sc)
- G8: Sc in every st around. (30 sc)
Check the handle base: The bottom should be rounded, with the sides beginning to rise into a shallow cup. A little cupping is expected. Deep folds or a wavy outer edge aren't. Count G5 through G8 to make sure each round contains exactly 30 stitches. If you added an extra stitch, go back to that round and correct it before starting G9. If the counts are right but the fabric looks loose or floppy, check your gauge and hook size now, before working the tapered section.
- G9: (8 sc, dec) 3 times. (27 sc)
- G10: Sc in every st around. (27 sc)
- G11: Sc in every st around. (27 sc)
- G12: (7 sc, dec) 3 times. (24 sc)
- G13: Sc in every st around. (24 sc)
- G14: Sc in every st around. (24 sc)
- G15: (6 sc, dec) 3 times. (21 sc)
- G16: Sc in every st around. (21 sc)
- G17: Sc in every st around. (21 sc)
- G18: Sc in every st around. (21 sc)
- G19: Sc in every st around. (21 sc)
- G20: Sc in every st around. (21 sc)
Stop here and check the shape. The bottom should be gently rounded, with the sides narrowing toward the top. It shouldn't look like a long straight tube.
Stuffing the Handle
Begin filling the lower section with small amounts of polyester stuffing. Use your fingers or a blunt stuffing tool to spread it evenly.
Don't force a large lump of stuffing into the bottom. You want a smooth rounded contour, not a hard ball at the end of a skinny handle.
Work additional stuffing up toward the neck, leaving room to begin the head. Check that the fabric remains dense enough to contain the filling.
Don't cut the working yarn until you're ready to change colors.
Handle Construction Checkpoint
You should have exactly 21 stitches at the top of G20.
The neck is part of the same crocheted fabric as the handle. Do not close it. We'll continue through this opening to build the head directly on top.
The ivory woodland embroidery comes later. It's easier to align after you can see the front of the finished reindeer.
Crochet the Reindeer Head
Now we'll make the reindeer's brown head. We're keeping the lower neck fairly broad and then increasing in stages to form the rounded cheeks.
Change from forest green to cinnamon brown at the beginning of the next round. Secure the color change within the crocheted fabric. We'll call this next round B1.
Head Rounds
- B1: Sc in every st around. (21 sc)
- B2: Sc in every st around. (21 sc)
- B3: (6 sc, inc) 3 times. (24 sc)
- B4: (3 sc, inc) 6 times. (30 sc)
- B5: (4 sc, inc) 6 times. (36 sc)
- B6: (5 sc, inc) 6 times. (42 sc)
- B7: (6 sc, inc) 6 times. (48 sc)
- B8: (7 sc, inc) 6 times. (54 sc)
- B9: (8 sc, inc) 6 times. (60 sc)
- B10: Sc in every st around. (60 sc)
- B11: Sc in every st around. (60 sc)
- B12: Sc in every st around. (60 sc)
- B13: Sc in every st around. (60 sc)
- B14: Sc in every st around. (60 sc)
- B15: Sc in every st around. (60 sc)
- B16: Sc in every st around. (60 sc)
- B17: Sc in every st around. (60 sc)
Position the Rattle Insert
Stop here while the head still has its full 60-stitch opening. It's much easier to position the insert and spread the stuffing evenly before we start decreasing the upper part of the head.
The sound-making insert belongs near the center of the head, surrounded by stuffing. It should not sit against the outside crochet fabric.
Prepare its enclosed fabric pocket as follows:
- Place two 3-inch cotton fabric squares together with their right sides facing.
- Sew around the squares with a 1/4-inch seam allowance, leaving an opening large enough for the sealed insert.
- Turn the pocket right side out.
- Place the sealed insert inside.
- Fold the opening edges inward and close with small, closely spaced stitches.
- Sew a second line around the closed pocket, keeping the insert inside the fabric layers and away from the needle.
- Inspect the completed pocket for loose threads, gaps or damaged seams.
This pocket is an additional containment layer, not a substitute for the testing required of an infant rattle. Don't use an insert that is cracked, leaking or lacking appropriate product information.
Add small amounts of stuffing inside the lower portion of the brown head. Place the enclosed insert pocket near the center, then arrange more stuffing around it.
Keep the pocket centered as you add stuffing. It shouldn't touch the outer crochet fabric or slip down into the green handle.
Check before B18: Gently feel around the outside of the head. You shouldn't feel the hard insert or see the corners of its fabric pocket pushing against the crochet stitches. If a fabric corner creates a lump, fold that corner inward without opening the pocket seam or pressing against the insert. Redistribute the stuffing around it. Check the head from the front and both sides. It should look rounded, without square corners or stretched stitches. Correct any lumps now, while the opening is still wide enough to reach inside.
Leave enough room at the upper opening to work the remaining decrease rounds without catching the pocket or stuffing in your stitches.
Finish Shaping the Head
Continue with cinnamon-brown yarn. Keep the enclosed insert centered as the opening becomes smaller.
- B18: (8 sc, dec) 6 times. (54 sc)
- B19: (7 sc, dec) 6 times. (48 sc)
- B20: (6 sc, dec) 6 times. (42 sc)
- B21: (5 sc, dec) 6 times. (36 sc)
- B22: (4 sc, dec) 6 times. (30 sc)
- B23: (3 sc, dec) 6 times. (24 sc)
Pause before closing the head. Check the shape and gently distribute the stuffing through the remaining opening. Add a small amount if needed, but don't pack the head so tightly that the stitches spread apart.
The enclosed insert should remain near the center, with stuffing between the pocket and every outside surface.
Close the Head
Continue with cinnamon-brown yarn.
- B24: (2 sc, dec) 6 times. (18 sc)
- B25: (1 sc, dec) 6 times. (12 sc)
- B26: Dec 6 times. (6 sc)
Fasten off, leaving a 12-inch tail. Thread the tail through the front loops of the remaining 6 stitches and pull the opening closed. Weave the tail through several nearby stitches of the brown crochet fabric, changing direction to secure it. Keep the needle close to the outer crocheted surface. Don't push it through the center of the stuffed head, where the enclosed rattle insert pocket sits. Once the tail is secured, trim it close to the fabric.
Check the Head Shape
The head should be rounded and a little wider than it is deep. The lower section narrows into the handle without a separate sewn neck seam.
Before adding the face, find the front center. The beginning-of-round line should be toward the back. Mark the front of the head with a removable length of contrasting yarn.
Don't skip this. The center mark helps you line up the cream facial panels, eyes and nose.
Make the Cream Facial Markings
The cream face is what makes this reindeer different from the usual round-headed Christmas rattles. Instead of adding a little round snout, we're giving it two rounded upper cheek panels and a wide cream lower muzzle.
The brown center between the upper panels will form a narrow, downward-pointing wedge. That detail needs to stay visible.
We'll make three flat cream pieces. Don't stuff them. The face in the example image is fairly smooth, with the cream sections following the shape of the brown head.
Part A: Lower Cream Muzzle
Using ivory yarn, ch 11.
- Row 1: Sc in the second ch from the hook and in each remaining ch. Ch 1, turn. (10 sc)
- Row 2: Inc, 8 sc, inc. Ch 1, turn. (12 sc)
- Row 3: Inc, 10 sc, inc. Ch 1, turn. (14 sc)
- Row 4: Inc, 12 sc, inc. Ch 1, turn. (16 sc)
- Row 5: Sc across. Ch 1, turn. (16 sc)
- Row 6: Dec, 12 sc, dec. Ch 1, turn. (14 sc)
- Row 7: Dec, 10 sc, dec. Ch 1, turn. (12 sc)
- Row 8: Dec, 8 sc, dec. (10 sc)
Fasten off, leaving an 18-inch tail for sewing.
The lower muzzle should be about 2.7 inches wide at its widest point and approximately 1.1 inches tall at the target gauge.
Gently smooth the piece into a rounded oval. The row ends form the side edges.
Position the Lower Muzzle
- Find the center front of the brown head.
- Position the narrow starting edge of the muzzle near head Round B4, leaving approximately three brown rounds visible above the green handle.
- Spread the widest rows across the front of the head around B7 and B8.
- Position the upper narrow edge around B11.
- Check that both sides extend the same distance from the center front.
- Pin or temporarily tack the muzzle in place. Keep its lower edge centered and smooth against the narrowing brown head.
Use the long ivory tail to sew around the edge with small mattress stitches, catching the outer crochet stitches without pulling the panel into a puckered shape.
The muzzle should lie flat against the head. Don't add stuffing behind it.
Part B: Left Cream Cheek Panel
Using ivory yarn, ch 5.
- Row 1: Sc in the second ch from the hook and across. Ch 1, turn. (4 sc)
- Row 2: Inc, 2 sc, inc. Ch 1, turn. (6 sc)
- Row 3: Inc, 4 sc, inc. Ch 1, turn. (8 sc)
- Row 4: Inc, 6 sc, inc. Ch 1, turn. (10 sc)
- Row 5: Sc across. Ch 1, turn. (10 sc)
- Row 6: Sc across. Ch 1, turn. (10 sc)
- Row 7: Sc across. Ch 1, turn. (10 sc)
- Row 8: Dec, 6 sc, dec. Ch 1, turn. (8 sc)
- Row 9: Sc across. Ch 1, turn. (8 sc)
- Row 10: Dec, 4 sc, dec. (6 sc)
Fasten off, leaving an 18-inch sewing tail.
Part C: Right Cream Cheek Panel
Make a second cheek panel exactly like the first, following Rows 1 through 10 above.
You'll have two matching cream panels. Each should measure approximately 1.7 inches across its widest row and 1.4 inches tall.
Now we'll position them as mirror images, rather than pointing them in the same direction.
Position Both Upper Cheeks
- Place the narrow Row 1 end of the left cheek over the left side of the cream muzzle around head Rounds B7 and B8, with its outer edge resting against the brown head.
- Angle the cheek upward and slightly outward.
- Position its upper Row 10 end around head Rounds B17 and B18.
- Repeat on the right side, reversing the angle so the two cheek panels match.
- Keep the upper inner edges of the cheek panels approximately four head stitches away from the center front on their respective sides. This leaves the wider brown portion of the forehead visible between them.
- As the inner edges approach B11 and B12, bring them gradually closer together so the brown forehead wedge narrows toward the nose.
- Below B11, overlap the lower portions of both cheek panels onto the cream muzzle. Do not leave an exposed brown gap beneath the nose.
Look at the face before sewing. You should see a brown wedge between the cream upper cheeks, wider toward the forehead and narrowing toward the nose.
Move the pieces a stitch or two if needed to get the same shape on both sides. That's better than sewing everything down and discovering that one eye is higher than the other.
Sew each cheek panel around its complete outer edge with small ivory stitches. Where the panels overlap the muzzle, catch both cream layers without leaving a raised seam.
Keep the brown wedge exposed. Don't stitch the upper inner edges together.
Facial Shape Checkpoint
Before adding the eyes, make sure:
- The cream face is centered on the brown head.
- The two upper cheek panels look like matching rounded lobes.
- The brown wedge remains visible between them.
- The lower muzzle forms a broad rounded chin, not a ball-shaped snout.
- The panels lie flat, without loose edges or heavy ridges.
The nose will sit at the lower end of the brown wedge, where the cream sections come together.
Crochet the Reindeer Ears
We're making two little oval ears with cream centers and cinnamon-brown borders. They should sit out to the sides of the head, just below the antlers.
Keep the ears fairly flat. You don't need to stuff them.
Brown Outer Ear: Make Two
Using cinnamon-brown yarn, ch 7.
- Round 1: Starting in the second ch from the hook, work 1 sc in each of the next 5 chains. Work 3 sc in the last chain. Turn the work to crochet along the unused underside of the foundation chain. Work 1 sc in each of the next 4 chains, then 2 sc in the final chain. (14 sc)
- Round 2: Inc in the first st, sc in each of the next 4 sts, inc in each of the next 3 sts, sc in each of the next 4 sts, and inc in each of the final 2 sts. (20 sc)
Fasten off, leaving a 15-inch tail.
Make a second brown outer ear the same way.
Cream Inner Ear: Make Two
Using ivory yarn, ch 5.
- Round 1: Starting in the second ch from the hook, sc in each of the next 3 chains. Work 3 sc in the last chain. Turn to the underside and sc in each of the next 2 chains, then work 2 sc in the final chain. (10 sc)
- Round 2: Inc in the first st, sc in each of the next 2 sts, inc in each of the next 3 sts, sc in each of the next 2 sts, and inc in each of the final 2 sts. (16 sc)
Fasten off, leaving a 12-inch tail.
Make a second cream inner ear.
Assemble Each Ear
- Place one cream inner ear on top of one brown outer ear.
- Center the cream piece so the brown stitches remain visible around the outside.
- Use the ivory tail to sew the inner ear to the brown piece around its complete edge.
- Repeat for the second ear.
- Gently pinch together about three stitches at the narrow base of each brown ear to form a shallow fold.
- Secure that fold with several small stitches using the brown sewing tail.
The finished ears should have a little curve, with the cream center facing forward. Don't pull the base into a tight point.
Attach the Ears
Position the ears on opposite sides of the head around Rounds B18 through B20.
The left and right ear bases should sit approximately one quarter of the way around the head from the center front, in opposite directions.
Angle both ears slightly upward. Their cream centers should be visible when looking directly at the reindeer's face.
Sew each folded ear base firmly across approximately four head stitches, passing through the folded base and head fabric in several directions. Secure the sewing tail inside the head.
Repeat on the other side, checking that the ears are level.
Don't leave any long yarn ends outside the head.
Crochet the Branched Reindeer Antlers
I prefer these short, dark-brown antlers to the long, thin cream antlers seen on quite a few reindeer rattles. They give our reindeer a different silhouette and don't compete with the cream face.
Each antler has one upright stem and one short branch pointing outward. We'll make two matching stems and two branches, then attach one branch to the outside of each stem to match the example image.
Use dark chocolate-brown yarn throughout.
Antler Main Stem: Make Two
Begin at the rounded upper tip of the antler and crochet downward toward the head.
- Round 1: MR, 6 sc. (6 sc)
- Round 2: Sc around. (6 sc)
- Round 3: (1 sc, inc) 3 times. (9 sc)
- Round 4: Sc around. (9 sc)
- Round 5: Sc around. (9 sc)
- Round 6: Sc around. (9 sc)
- Round 7: Sc around. (9 sc)
- Round 8: Sc around. (9 sc)
- Round 9: Sc around. (9 sc)
- Round 10: Sc around. (9 sc)
Fasten off, leaving an 18-inch sewing tail. Leave the bottom of the stem open.
Make a second matching stem.
Each stem should be approximately 1.4 inches long before attachment. The top is rounded and slightly narrower than the lower section.
Short Antler Branch: Make Two
Each branch is a small rounded tube. We only need one branch for each antler.
- Round 1: MR, 6 sc. (6 sc)
- Round 2: Sc around. (6 sc)
- Round 3: Sc around. (6 sc)
Fasten off, leaving a 15-inch sewing tail. Do not close the open end.
Make two matching branches.
These branches are intentionally short, approximately 0.4 inch long at the target gauge. They don't need separate stuffing.
Join the Antler Branches
- Lay both antler stems side by side with their rounded tips pointing upward and their open bases pointing downward.
- Decide which stem will be the left antler and which will be the right antler when looking directly at the reindeer's face.
- Place one short branch against the outside of the left stem around stem Rounds 4 and 5. The branch should point toward the reindeer's left, away from the center of the forehead.
- Angle the branch outward and slightly upward, matching the short horizontal projection shown in the example image.
- Sew the entire six-stitch opening of the branch to the stem with small, closely spaced stitches.
- Pass the sewing yarn through the branch base and into the stem several additional times, changing direction to reinforce the connection.
- Attach the second branch to the outside of the right antler stem around Rounds 4 and 5, reversing the direction so it points toward the reindeer's right.
- Check both antlers from the front. Each should have one upright rounded tip and one shorter branch extending outward. There should be no branch pointing inward toward the other antler.
- Secure the branch sewing tails within the stems.
The finished antlers should form a matching pair, with two upright tips and two outward-pointing side branches altogether, as shown in the example image.
Gently shape the stems with your fingers. If they collapse, a small amount of polyester stuffing may be added through the open stem base before attachment, but don't pack loose fiber into the tiny branches.
No wire, pipe cleaners, wooden sticks or plastic supports should be used.
Attach the Antlers to the Head
- Find the closed top of the brown head.
- Locate head Round B23, which contains 24 stitches.
- Position one antler base approximately five stitches to the left of the front center, with its open base resting across Rounds B22 through B24.
- Position the second antler the same distance to the right.
- Check the front view. The antlers should stand above the ears, leaving the plain brown forehead visible between them.
- Sew the complete nine-stitch opening of each stem to the head.
- Reinforce the base by working additional stitches through the stem and head fabric in different directions.
- Secure and bury every sewing tail within the head.
The antlers should not twist freely at their bases.
Attachment checkpoint: Gently flex each antler and branch in several directions while inspecting every seam. Any opening, shifting attachment or loose yarn means the component needs reworking. This inspection does not replace the mechanical testing required for an infant toy.
Embroider the Reindeer Face and Woodland Details
Now comes the part that gives our little reindeer its personality. The sleepy eyes, little nose, cheek freckles and ivory woodland stitching make a big difference, so I'd take my time getting them lined up.
You don't need plastic eyes, buttons or separate decorations. Everything in this section is made with yarn embroidery.
Embroider the Sleepy Eyes
Use dark chocolate-brown yarn threaded through an embroidery needle.
- Locate the center of the left cream cheek panel, approximately across its Rows 6 and 7.
- Mark a gently curved eye line spanning about five crochet stitches, with the outer end slightly higher than the inner end.
- Bring the embroidery needle through the cream fabric at the inner end of the marked line.
- Make two or three short, overlapping embroidery stitches to form a smooth curved eyelid.
- At the outer end, add two very short downward lashes. Each should span no more than one crochet stitch.
- Repeat on the right cream cheek, mirroring the shape and position.
- Check the face from directly in front before securing the yarn ends.
The eyes should curve gently downward in the middle. Keep the lines small and close to the crocheted surface rather than making long loops.
If one eye looks noticeably different, redo that eye before continuing. Small changes in the angle make a surprising difference to the expression.
Embroider the Terracotta Nose
Thread a needle with terracotta or muted brick-red yarn.
- Find the center front where the brown forehead wedge narrows into the cream muzzle, around head Rounds B11 and B12.
- Mark a small upside-down triangle approximately three crochet stitches wide and two rounds tall.
- Work short satin stitches across the triangle, beginning along its upper edge.
- Shorten the stitches as you move downward so the triangle ends in a small centered point.
- Pass the needle through the crocheted fabric to secure the end and bury the tail.
The finished nose should be small and fairly flat. We're not adding a separate stuffed nose or a bright red pom-pom.
Add the Little Cheek Freckles
Using dark-brown yarn, embroider three small dots on each cream cheek below the eye.
Place the freckles in a loose triangle:
- One dot toward the outside of the cheek, approximately at cheek Row 4.
- One dot slightly inward and one row lower.
- One dot slightly outward and one row lower.
Make each dot with two short stitches through the crochet fabric. Keep the dots close to the surface and avoid loose knots.
Repeat on the opposite cheek, arranging the dots as a mirror image.
Embroider the Woodland Design on the Handle
Now for the green handle. We'll make three small groups of ivory stitching: a leafy sprig near the neck, a curved chevron in the middle, and a smaller leaf motif toward the bottom.
Lay the reindeer with its face pointing toward you. The front center of the handle should line up directly below the nose.
Upper Leafy Sprig
- Using ivory yarn, mark the center front of handle Rounds G13 through G19.
- Work a narrow vertical stem from G13 upward through G19, using one short embroidery stitch between each pair of rounds.
- At G14, add two diagonal leaf stitches, one extending approximately two stitches left and one two stitches right, with both pointing upward.
- Repeat at G16, making the leaves slightly shorter.
- At G18, add one final small leaf pair, approximately one stitch outward on each side.
- Keep the leaves evenly spaced and mirror the stitches from left to right.
Each leaf can be made with two adjacent straight stitches to give it a little more width. Keep the embroidery flat against the handle.
Middle Curved Chevron
- Locate the center front of handle Round G9.
- Using ivory yarn, work short diagonal stitches upward and outward toward G12, extending approximately four stitches to the left.
- Return to the center at G9 and repeat toward G12 on the right.
- Use short connecting stitches rather than one long strand across the surface.
- Keep both sides of the chevron the same length.
You'll have an open, upward-facing V with a gentle curve, similar to the ivory marking shown on the example image.
Lower Leaf Motif
- At the center front of handle Round G5, begin a short vertical ivory stem.
- Extend it upward through approximately G8.
- At G6, add one diagonal leaf to each side.
- At G7, add another slightly smaller pair.
- Finish with a short vertical stitch at the top.
Keep this lower motif smaller than the upper sprig.
Embroidery Checkpoint
Stand the reindeer upright and compare the front of the handle with the example image.
The cream markings should be centered beneath the face. The leafy sprig should be the main feature near the neck, followed by the curved chevron and smaller lower leaves.
If the white stitches pull the green fabric inward, remove and redo them with less tension.
Finally, secure all embroidery tails by weaving them through several stitches of the crocheted fabric. Don't leave loops, dangling ends or bulky exterior knots.
Add the Rattle Insert and Assemble the Reindeer
Most of the assembly is already done if you've followed the sections in order. The green handle and brown head were crocheted as one continuous piece, and the enclosed rattle insert was placed inside the head before the opening was closed.
Now let's check all the separate pieces and make sure everything matches the finished example image.
Complete Component Checklist
- One continuous green handle and brown head.
- One cream lower muzzle panel.
- Two cream upper cheek panels.
- Two brown outer ears.
- Two cream inner ears.
- Two dark-brown antler stems.
- Two short antler branches, one for each stem.
- One enclosed rattle insert pocket inside the head.
- Embroidered eyes, freckles, nose and three ivory handle decorations.
That's 12 crocheted construction pieces in all, counting the continuous handle and head as one piece.
Final Assembly Order
- Confirm that the green handle and brown head are continuous and the top of the head is completely closed.
- Check that the enclosed rattle insert sits inside the head, surrounded by stuffing, without touching the outside fabric.
- Confirm that the cream lower muzzle is centered and firmly attached.
- Check that the two upper cream cheek panels are level and that their inner edges leave the brown forehead wedge visible.
- Inspect the embroidered eyes, nose and freckles. Their stitches should lie flat against the cream face.
- Check the ear centers and the attachment seams at both sides of the head.
- Inspect the two antler stems and their two outward-pointing branches, especially the small branch-to-stem seams.
- Confirm that the front woodland embroidery lines up beneath the nose.
- Remove every temporary pin, tacking stitch and stitch marker. Check the muzzle, cheeks and ears for anything left from positioning the pieces. Weave in all remaining yarn ends and inspect the finished project once more.
Check the Finished Proportions
Hold the reindeer upright by its handle.
The head should be the largest part of the design, with the ears extending outward and the dark antlers rising above them.
The green handle should be shorter than the head-and-antler section. It should widen gradually toward the lower end.
The ivory woodland embroidery belongs on the front of the handle, not wrapping around both sides.
Compare the finished shape with the example image. If your head is too elongated or the handle noticeably thinner than expected, check your gauge and the round counts before making another sample.
Listen to the Rattle
Gently move the completed prototype and listen for the enclosed insert.
It should produce the sound expected of the selected insert without any rattling caused by loose exterior components.
If you can feel the hard insert pressing against the outer crochet fabric, the stuffing placement needs correction. Don't use the finished object as an infant toy while that condition remains.
The rattle's sound level and the integrity of its internal components also need evaluation under the applicable toy requirements.
Finishing and Baby Toy Checks
I don't want to skip the checks just because our little reindeer looks finished. A decorative crochet project and a toy intended for an infant aren't quite the same thing.
The crochet instructions provide a complete construction draft, but the finished rattle has not been physically tested. That matters when we're using a sound-making insert and adding parts such as antlers and ears.
Check the Crochet Fabric
- Inspect the entire head, especially the widest rounds and the decrease rounds near the top.
- Gently stretch the fabric and check for openings that could expose stuffing.
- Inspect the green handle along its decrease rounds.
- Check that the neck does not have any weakened or stretched stitches.
- Make sure every yarn tail is securely woven into the construction.
If stuffing shows through the stitches, don't try to hide the problem with extra embroidery. The crochet fabric needs to be remade at a tighter gauge.
Check the Handle and Neck
The handle needs special attention because it supports a relatively large crocheted head.
- Hold the prototype by the lower part of the handle.
- Turn it gently from vertical to horizontal and watch the connection between the brown head and green neck.
- Check for excessive bending or twisting at the narrowest part.
- Inspect the neck stitches for gaps or stretching.
- Check that the handle stuffing remains evenly distributed.
If the handle bends too easily, first check for loose stuffing and an oversized crochet gauge. A smaller hook and tighter, even stuffing may improve a revised sample.
If that doesn't correct the problem, the neck or handle proportions need to be redesigned. Don't add wire, wooden rods or rigid internal supports to force it upright.
Check Every Sewn Attachment
Inspect the two ears, two antler stems and two outward-pointing antler branches individually.
Gently move each piece while watching its attachment seam. No branch should pull away, leave an opening or loosen at the base.
Don't assume that a seam is suitable for an infant toy merely because it survives a gentle hand inspection. The finished construction needs the applicable mechanical testing.
Check the Rattle Insert
The insert must remain fully enclosed, and its containment pocket must remain intact.
Check that the outer crochet fabric does not have any openings where the insert, pocket or loose filling could become exposed.
If the insert or pocket is damaged, the prototype needs to be opened and corrected. Don't continue using it with a damaged internal component.
Infant Rattle Standards Information
In the United States, infant rattles are subject to specific product requirements, including 16 CFR Part 1510 and applicable toy standards under 16 CFR Part 1250.
The rules address matters such as rattle shape, choking and suffocation hazards, and other toy requirements. The rounded lower handle on this particular design must be checked using the required rattle test fixtures. The antlers, branches and other attachments also need appropriate evaluation.
You can read the U.S. Consumer Product Safety Commission's rattle requirements and testing overview for details.
A handmade crochet rattle is not automatically compliant because it uses cotton yarn, embroidered eyes or a sealed insert. Applicable testing and certification requirements must be addressed before a finished product is represented as a compliant infant toy.
Until the finished design has been evaluated, treat it as a decorative prototype rather than a toy for a baby to hold, mouth or play with.
Final Pattern Verification Checkpoints
For the first physical sample, record the following measurements and observations:
- Actual overall height.
- Actual maximum head width.
- Actual handle length and neck circumference.
- Whether the head remains supported when the handle is held horizontally.
- Whether the cream facial panels lie flat.
- Whether the antler branches remain in position.
- Whether any crochet gaps appear after stuffing.
- Whether the rattle insert remains properly enclosed.
- Whether the rounded handle end passes the applicable rattle-shape testing.
Compare the actual measurements with the calculated pattern measurements. If a structural change is needed, revise the affected stitch counts and recheck the example image before finalizing the pattern.
Frequently Asked Questions About the Crochet Reindeer Rattle
Why does this reindeer have a short handle instead of a long one?
The original design had a longer, narrower handle, and I didn't like the possibility of the head bending forward. We shortened the handle and widened the neck for this version. The head and handle are also crocheted continuously, so there's no separate neck seam. The finished construction still needs a physical stability check.
Can I use a wooden teething ring instead?
That would be a different pattern. The design shown here has a fully crocheted green handle with ivory woodland embroidery. A wooden ring would change the proportions, assembly method and testing requirements, so I wouldn't substitute one without redesigning the project.
How do I keep the cream face from looking too puffy?
Don't put stuffing behind the cream panels. Sew them directly against the brown head, keeping the edges smooth. Let the lower ends of the upper cheek panels overlap the top of the muzzle slightly. You want the face to look like a continuous cream marking, with the brown wedge showing between the eyes.
Can I leave out the rattle insert?
Yes. Without the sound-making insert, you'll have a crocheted reindeer figure rather than a working rattle. That can be useful if you're making a decorative woodland Christmas piece. Don't assume it is suitable for infant play without evaluating the finished construction.
Can I give this handmade rattle to a newborn?
Not on the basis of this pattern alone. The prototype has not been tested against the applicable infant-rattle and toy requirements. The rounded handle end, antlers, attachments, materials and internal insert all need appropriate evaluation before the finished item can be treated as an infant toy.
I like that this reindeer doesn't depend on a red nose or Christmas scarf to look festive. The cinnamon-brown head, sleepy cream face and little ivory woodland details give it a winter look that doesn't have to be put away as soon as Christmas is over.
If you enjoy making animal-themed crochet projects, take a look at my crochet animal lovey patterns for more ideas.
When you click on links to various merchants on this site and make a purchase, this may result in this site earning a commission. This does not affect the price you pay.

UBGI Gold Standard 2026
Reviewed under the site's
editorial checklist.
Photos, decorating ideas, party setups and reader submissions are shared for inspiration unless a page is specifically presented as a pattern, tutorial, reference guide or step-by-step project. Follow the instructions, measurements, safety guidance and manufacturer directions provided for the particular project or product.
About Jan | Contact | Baby Nursery Ideas (Blog) | Site Map | Privacy Policy | Disclosure Policy | Disclaimer | Affiliate Disclosure | Earnings Disclosure | Facebook | Pinterest
I am a participant in the Amazon Services LLC Associates Program, an affiliate advertising program designed to provide a means for us to earn fees by linking to Amazon. As an Amazon Associate I earn from qualifying purchases.
Copyright © 2006-2026. All Rights Reserved.