Free Crochet Gingerbread Heart Ornament Pattern
By Jan Bay
This free crochet gingerbread heart ornament pattern makes a little Christmas decoration with stitched cream icing, two matching frosting swirls, and a red bow with tiny holly leaves and berries. Hang it on your Christmas tree with the crocheted loop, or leave the loop off and sew the heart onto a stocking, gift bag, or holiday quilt. I designed it to go with our gingerbread man, girl, and house appliqués, so you can make all four pieces as a matching Christmas set.
Explore More Christmas Crochet Patterns
Free Gingerbread Crochet Appliqué Patterns
Free Christmas Crochet Patterns
Crochet Candy Cane Ornament Pattern
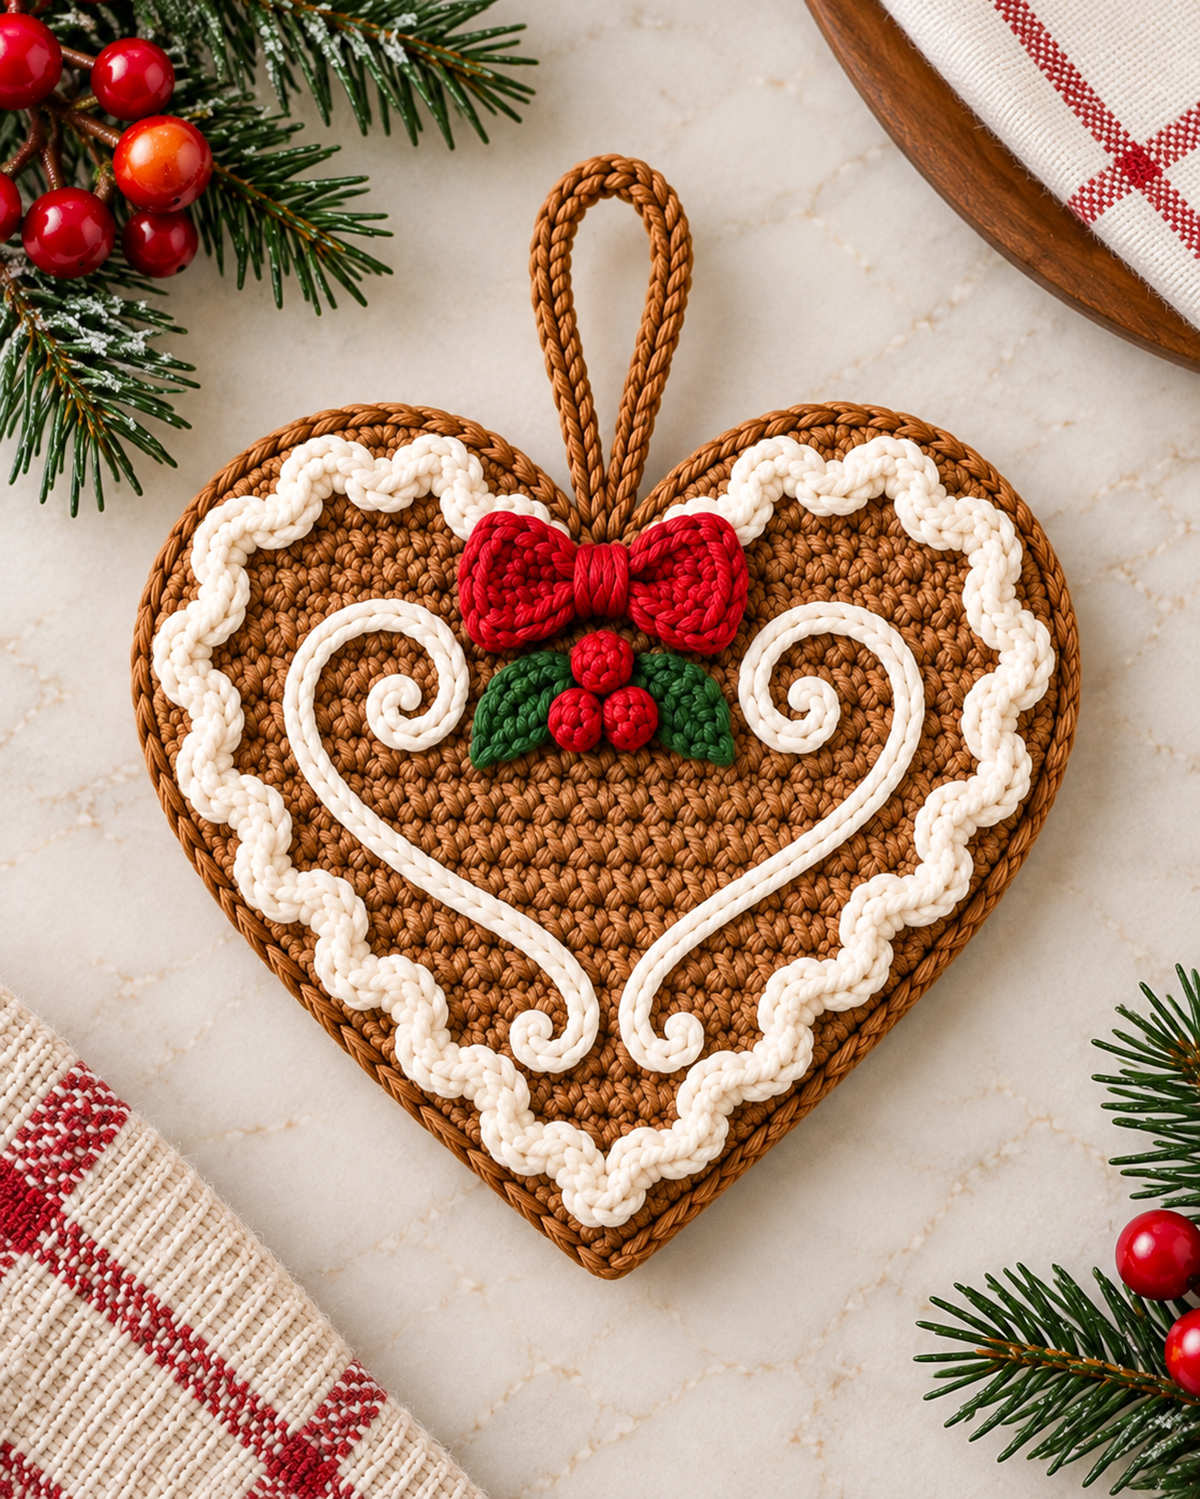
See Crochet Supplies for This Project Here.
Jump to the Crochet Pattern
Materials, Gauge and Crochet Abbreviations
Crochet the Gingerbread Heart Base
Add the Scalloped Icing Border
Make the Two Matching Frosting Swirls
Crochet the Holly Leaves and Berries
Free Crochet Gingerbread Heart Ornament Pattern Materials and Gauge
I'd use the same gingerbread brown and warm cream yarn as the other gingerbread appliqués. That way, if you're making a Christmas set, the heart won't look as though it came from an entirely different collection. A smooth cotton or cotton-blend yarn also makes it easier to see where each stitch goes.
Yarn: Medium-weight #4 yarn in the following colors. These amounts are planning estimates, not measured yarn usage from a physically completed sample:
- Gingerbread brown: approximately 45 yards
- Warm cream: approximately 20 yards
- Christmas red: approximately 8 yards
- Evergreen: approximately 5 yards
Other supplies:
- 3.5 mm crochet hook
- Yarn needle with a large eye
- Scissors
- Flexible measuring tape or small ruler
- Removable stitch markers
- Blocking mat and rustproof pins, optional
Finished size: Approximately 5 1/4 inches wide and 4 3/4 inches tall, not including the hanging loop.
Gauge: 20 single crochet stitches and 22 rows = 4 inches.
Skill level: Advanced beginner to intermediate.
Construction: One flat brown heart with two shaped upper lobes, a crocheted icing border, two separate frosting cords, a small red bow, two holly leaves, three berries and a hanging loop.
Pattern note: The stated gauge is a working target. The brown heart's expected width and height are calculated from its stitch and row counts, while the finished measurements, including edging, are estimates. The example images illustrate the intended finished design, not a physically test-crocheted sample. Check your measurements as you work, and adjust the decoration placement slightly if needed for your yarn and tension.
If you're using yarn from another project, check the weight before you begin. The Craft Yarn Council yarn weight system explains the different yarn-weight categories.
US crochet abbreviations:
- ch = chain
- sc = single crochet
- hdc = half double crochet
- dc = double crochet
- sl st = slip stitch
- st = stitch
- sts = stitches
- inc = work 2 sc in the same stitch
- dec = single crochet 2 stitches together
- MR = magic ring
Unless a row says otherwise, chain 1 before turning. The turning chain does not count as a stitch.
Keep your brown stitches firm but not so tight that you have trouble inserting the hook. This heart needs to lie flat. We're not making two stuffed sides or joining separate pieces around the outside.
Crochet the Gingerbread Heart Base
We'll start at the bottom point and work upward. The heart grows wider through the lower rows, then divides into two rounded lobes at the top. I prefer this construction because it gives us one flat piece without a seam down the middle.
The widest row contains 25 stitches. Count carefully whenever you make an increase. If you accidentally add an extra stitch near one side, the heart can start leaning before you've even reached the top.
Bottom point and lower body
With gingerbread brown, ch 2.
Row 1: Work 3 sc in the second ch from the hook. (3 sts)
Row 2: Ch 1, turn. Inc in first st, sc in next st, inc in last st. (5 sts)
Row 3: Ch 1, turn. Inc in first st, sc in next 3 sts, inc in last st. (7 sts)
Row 4: Ch 1, turn. Sc across. (7 sts)
Row 5: Ch 1, turn. Inc in first st, sc in next 5 sts, inc in last st. (9 sts)
Row 6: Ch 1, turn. Inc in first st, sc in next 7 sts, inc in last st. (11 sts)
Row 7: Ch 1, turn. Sc across. (11 sts)
Row 8: Ch 1, turn. Inc in first st, sc in next 9 sts, inc in last st. (13 sts)
Row 9: Ch 1, turn. Inc in first st, sc in next 11 sts, inc in last st. (15 sts)
Row 10: Ch 1, turn. Sc across. (15 sts)
Row 11: Ch 1, turn. Inc in first st, sc in next 13 sts, inc in last st. (17 sts)
Row 12: Ch 1, turn. Inc in first st, sc in next 15 sts, inc in last st. (19 sts)
Row 13: Ch 1, turn. Sc across. (19 sts)
Row 14: Ch 1, turn. Inc in first st, sc in next 17 sts, inc in last st. (21 sts)
Row 15: Ch 1, turn. Inc in first st, sc in next 19 sts, inc in last st. (23 sts)
Row 16: Ch 1, turn. Sc across. (23 sts)
Row 17: Ch 1, turn. Inc in first st, sc in next 21 sts, inc in last st. (25 sts)
Row 18: Ch 1, turn. Sc across. (25 sts)
Row 19: Ch 1, turn. Sc across. (25 sts)
Stop and lay the piece flat. You should have a pointed lower section that spreads into a broad upper body. Both sides should look alike. The top edge should contain exactly 25 stitches.
First upper heart lobe
The two lobes will use 12 stitches each, with one unused stitch between them. Place a marker in the 13th stitch of Row 19 so you can see the center.
Continue with the brown yarn already attached.
Lobe Row 20: Ch 1, turn. Sc in the first 12 stitches. Leave the remaining stitches unworked. (12 sts)
Lobe Row 21: Ch 1, turn. Sc across. (12 sts)
Lobe Row 22: Ch 1, turn. Dec over first 2 sts, sc in next 8 sts, dec over last 2 sts. (10 sts)
Lobe Row 23: Ch 1, turn. Dec over first 2 sts, sc in next 6 sts, dec over last 2 sts. (8 sts)
Lobe Row 24: Ch 1, turn. Dec over first 2 sts, sc in next 4 sts, dec over last 2 sts. (6 sts)
Lobe Row 25: Ch 1, turn. Dec over first 2 sts, sc in next 2 sts, dec over last 2 sts. (4 sts)
Fasten off and weave in the end. Don't pull the upper edge tightly closed. Those four stitches form the top of the rounded lobe.
Second upper heart lobe
With the same side of the work facing you as when you began the first Lobe Row 20, locate the marked center stitch of Body Row 19. Skip that center stitch. The 12 stitches on the opposite side of the marker form the second lobe.
Lobe Row 20: Join brown yarn with a sl st in the first stitch immediately beyond the marked center stitch. Ch 1. Work 1 sc in the same stitch as the join, then 1 sc in each of the next 11 stitches toward the outside edge. The joining slip stitch and chain 1 do not count as stitches. (12 sc)
Lobe Row 21: Ch 1, turn. Sc across. (12 sts)
Lobe Row 22: Ch 1, turn. Dec, sc in next 8 sts, dec. (10 sts)
Lobe Row 23: Ch 1, turn. Dec, sc in next 6 sts, dec. (8 sts)
Lobe Row 24: Ch 1, turn. Dec, sc in next 4 sts, dec. (6 sts)
Lobe Row 25: Ch 1, turn. Dec, sc in next 2 sts, dec. (4 sts)
Fasten off and weave in the end.
Heart shape checkpoint
You should now have one brown heart with two upper lobes and a small indentation between them. Each lobe has six rows above the main body and ends with four stitches across its top.
The row-end corners will look a little squared off before the border goes on. That's normal for this construction. Don't add random stitches to round them. The outline round will soften those edges, and light blocking can help even out the curves.
At the stated gauge, the brown heart should be close to 5 inches across its widest row and about 4 1/2 inches tall before edging. Check those measurements before continuing. If it's much larger or smaller, check your gauge now rather than trying to fix the size with the icing.
Add the Scalloped Icing Border
The white icing is what makes this look like a decorated gingerbread cookie instead of an ordinary brown crochet heart. I want the brown edge to remain visible, with a raised cream line just inside it.
We'll make one brown outline round first. That gives the icing a regular set of stitches to follow and helps smooth the heart's outer shape.
Brown outline round
Place the heart with your chosen front facing you. Join brown yarn at the original starting chain at the bottom point.
Work around the complete outside edge as follows:
- Work 3 sc into the original starting chain at the bottom point. (3 sts)
- Working upward along one lower side, place 1 sc into each exposed row end from Body Rows 2 through 19. (18 sts)
- Continue up the outside edge of the first upper lobe, placing 1 sc in each of its 6 row ends. (6 sts)
- Work 1 sc in each of the 4 stitches across the top of that lobe. (4 sts)
- Work 1 sc in each of the 6 row ends down its inner edge. (6 sts)
- Work 1 sc into the single unused center stitch of Body Row 19 at the bottom of the indentation. (1 st)
- Work upward along the other lobe's inner edge, placing 1 sc in each of its 6 row ends. (6 sts)
- Work 1 sc in each of the 4 stitches across its upper edge. (4 sts)
- Work 1 sc into each of the 6 row ends along its outer edge. (6 sts)
- Work down the remaining lower side, placing 1 sc into each exposed row end from Body Rows 19 through 2. (18 sts)
Join with a sl st to the first sc. (72 sts)
Fasten off and weave in the end.
Count the outline before adding cream. You should have 72 stitches. If you have an extra stitch or two, check the row ends and the center indentation before starting over. Don't try to hide a counting mistake by crowding the cream stitches together.
Raised cream scalloped icing
With the front of the heart facing you, join warm cream yarn with a slip stitch in the front loop of the first brown outline stitch at the bottom point. This joining slip stitch counts as the first stitch of the first scallop. Continue working into the front loops of the brown outline stitches.
First scallop: The joining slip stitch is already complete. Work 1 sc in the next brown stitch, 1 hdc in the following stitch and 1 sc in the next stitch. (4 brown stitches used)
Remaining scallops: [Sl st in next brown stitch, sc in next stitch, hdc in next stitch, sc in next stitch] 17 times.
You should now have 18 gently raised scallops, using exactly 72 brown outline stitches and producing 72 cream stitches. Join with a slip stitch into the first cream joining slip stitch. Do not work into another brown outline stitch. Fasten off and weave in the end.
The half double crochet forms the raised part of each little scallop, while the shorter stitches make the dips between them. This gives the icing a gently wavy edge without adding extra stitches that could make it flare outward.
Add the raised icing ridge
To make the cream icing look fuller, add a second layer of slip stitches over the scalloped edging. This extra layer follows the 18 existing scallops without adding stitches to the brown heart.
With the front of the heart facing you, join warm cream yarn with a slip stitch through both top loops of the first cream edging stitch at the bottom point. This joining slip stitch counts as the first stitch of the raised ridge.
Working loosely, make 1 sl st through both top loops of each of the next 71 cream edging stitches, following the entire scalloped border. Work into the cream stitches, not the brown outline. (72 raised slip stitches)
Join with a sl st into the first raised slip stitch without adding another stitch. Fasten off and weave the yarn end into the back.
Check that the raised ridge follows the little rises and dips of the cream scallops. It should create a thicker icing line without pulling the heart inward. If the ridge feels tight, remove it and work the slip stitches more loosely.
Continue with the instructions below for folding the cream icing inward and tacking the scallops to the front of the brown heart. Place the tacking stitches beneath the raised ridge so the thicker icing stays visible.
Lay the heart flat with the front facing up. Fold the cream edging inward so it rests against the brown heart, leaving the brown outline visible around the outside. Thread a separate length of cream yarn onto your needle and tack the top of each scallop to the brown fabric immediately beneath it. Keep the sewing stitches small and hidden between the crochet stitches. Secure the cream edging at the bottom point and inside the upper indentation as well. Don't pull the tacking stitches tightly enough to flatten the raised icing.
The icing should be decorative, not a wide ruffle sticking out from the heart. If the border becomes noticeably wavy or won't lie flat, check the brown outline count first. If the count is correct, try a slightly tighter tension on the cream stitches.
Don't pull the yarn tight at the bottom point or between the two lobes. Those are the two places where the outline needs a little room to keep its shape.
Make the Two Matching Frosting Swirls
I kept both frosting swirls because I like the way they frame the bow without filling the whole heart with decorations. The two sides should mirror each other, with a small curl near the top and another near the bottom.
Instead of asking you to work the curves directly into the brown heart, we're going to crochet two narrow cream cords and sew them in place. That's much easier to control. You can pin them exactly where you want them before making a single permanent stitch.
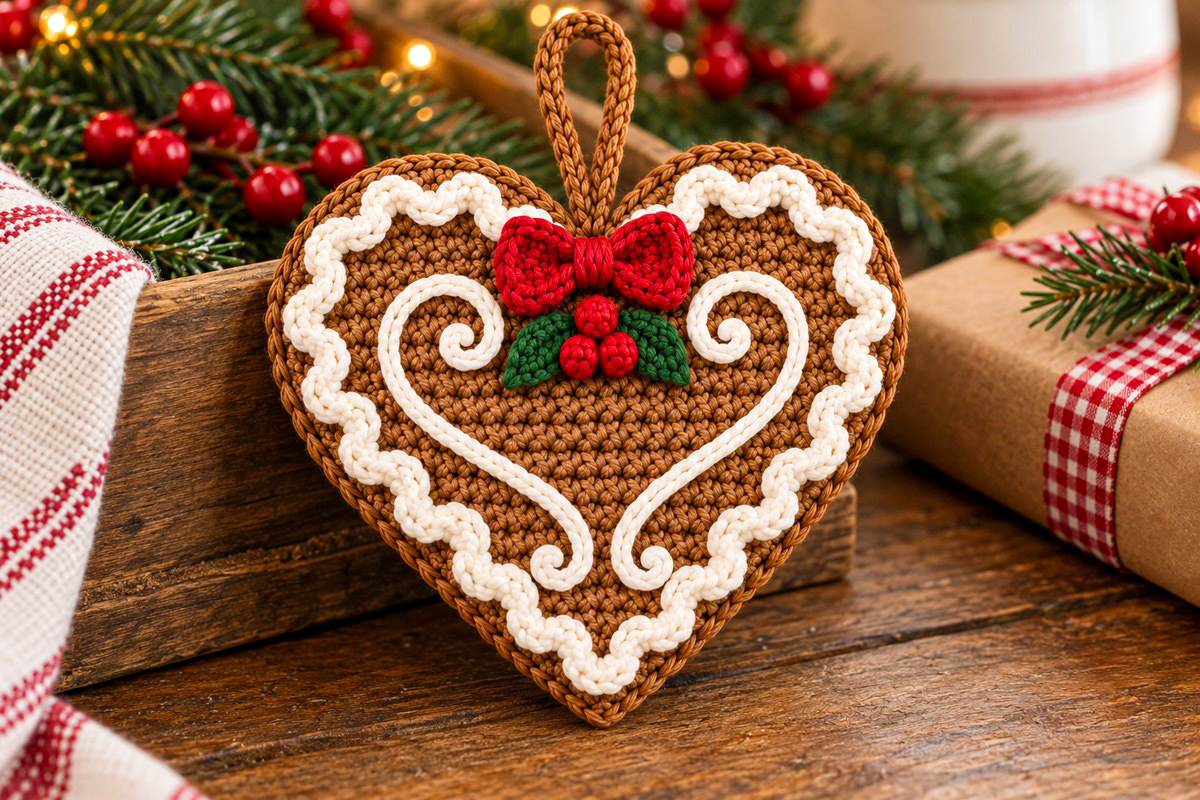
Cream frosting cords, make 2
With warm cream, leave a 12-inch starting tail before making your slip knot. Ch 34.
Beginning in the second chain from the hook, work 1 sl st into the back bump of each chain across. (33 sl sts)
Fasten off, leaving a 12-inch ending tail. You should now have one narrow cream cord with a sewing tail at each end.
Make a second cord exactly the same way.
Do not pull the slip stitches tightly. The cord needs to bend smoothly. It should look like a narrow raised line of frosting, not a stiff strip of crochet.
Before attaching either cord, mark the frosting positions on your brown heart. On each side, place the upper curl approximately over Body Rows 14 through 16, about four stitches to the left or right of the center of those rows. Place the lower curl approximately over Body Rows 5 through 7, about two stitches to either side of the center. These are placement guides, not extra crochet stitches.
Use a spare length of yarn to trace one complete frosting path, including the upper spiral, long outside curve and lower spiral. Measure that length without stretching it. Compare it with your finished cream cord.
The starting cord uses 34 chains and 33 slip stitches. Its actual finished length depends on your chain and slip-stitch tension, which the single-crochet gauge does not establish. If the cord is too short or too long, remake both cords with the same adjusted number of foundation chains, working one fewer slip stitch than the chain count. Check the length again before sewing. Both finished cords should follow their marked paths without stretching or bunching.
Position the upper frosting curls
Lay the heart flat with the upper lobes pointing away from you and the bottom point facing toward you.
Find the center line running from the notch between the lobes to the bottom point. The two cords should sit on opposite sides of that imaginary line.
For the left swirl, begin with one end of the cord approximately 1/2 inch below the future bow and about 3/4 inch to the left of the heart's center line.
Coil that end into a small inward-facing spiral about 1/4 to 3/8 inch across. The curled tip should face toward the middle of the heart.
From the spiral, guide the cord upward and outward into a shallow curve that reaches toward the left lobe, staying approximately 1/4 inch inside the cream border.
This upper curve should sit comfortably below the scalloped icing. Leave a visible strip of brown crochet between the two cream lines.
Shape the long lower sweep
From the upper outer curve, continue guiding the cord down the left side of the heart.
Keep the middle section roughly 1/4 to 3/8 inch inside the cream border, then let it turn gradually toward the heart's center as it approaches the bottom.
About 3/4 inch above the bottom point, curl the loose end back into a second small spiral. Keep this lower curl approximately 1/2 inch to the left of the center line.
Both ends of the cord should now form little frosting curls, with a long curved section connecting them.
Make the matching right swirl
Take the second cream cord and arrange it on the right side of the heart as a mirror image of the first.
The upper curl should sit at the same height as the left upper curl. The widest part of the long curve should sit the same distance from the cream border. The lower curl should finish at the same height above the point.
Turn both upper curled tips toward the center. The lower curls should turn back toward their own long curved sections, as shown in the finished example.
If one cord makes a beautiful curve and the other looks cramped, don't sew either one yet. Lift them both and adjust the shapes until the pair looks balanced.
Sew the frosting cords in place
Once you're happy with the arrangement, use removable pins to hold the upper curls, lower curls and widest outer bends in position.
Cut a separate 30-inch length of warm cream yarn for attaching each frosting cord. Thread it onto your yarn needle. Begin at the upper curl and sew through the center of the cord and the brown heart beneath it. Keep the stitches small and hidden between the cream crochet stitches.
Continue along the entire frosting path, securing the cord every two to three crochet stitches and adding closer stitches around the tight curls. If you need more sewing yarn, fasten off the first length securely on the back and begin another. Use the original starting and ending tails to secure the two curled tips before weaving them into the back.
Repeat for the opposite side.
Check both curls again after removing the pins. They should keep their shape without needing the pins to hold them in place.
Don't stitch across the exposed brown area between the two long frosting curves. That open space is part of the design. The bow and holly will fill the upper center, and the rest can stay simple.
Crochet the Red Christmas Bow
The red bow sits at the top center, just below the hanging loop. It should cover the small indentation between the two upper heart lobes without hiding the cream frosting curls.
I would keep this bow fairly small. If it's too big, it becomes the first thing you see and the icing design gets lost.
Red bow
With Christmas red, make a magic ring.
First bow loop: Ch 2, work 3 dc into the ring, ch 2, sl st into the ring.
Second bow loop: Ch 2, work 3 dc into the ring, ch 2, sl st into the ring.
Pull the magic ring closed. Fasten off, leaving a long sewing tail.
Use the tail to wrap around the middle of the bow three or four times. Pull just firmly enough to pinch the center and separate the two loops.
Secure the tail on the back of the bow, leaving enough yarn to sew the bow onto the heart later.
The finished bow should be approximately 1 to 1 1/4 inches wide, depending on your yarn and tension. It should lie flat rather than looking like a stuffed bow.
Bow placement
Set the bow across the upper center indentation. The two red loops should extend over the inner portions of the brown lobes, with the wrapped center directly beneath the hanging loop.
Leave the bow loose for now. We'll attach it after the holly pieces have been positioned, so the leaves can tuck neatly underneath.
Crochet the Holly Leaves and Berries
The little holly cluster is made from two green leaves and three red berries. I want it tucked under the bow, not hanging halfway down the heart. That leaves plenty of room for the frosting swirls on either side.
Green holly leaves, make 2
With evergreen yarn, ch 5.
First side: Beginning in the second ch from the hook, work sl st in next ch, sc in next ch, hdc in next ch and sc in final ch. (4 sts)
Ch 1 at the base of the leaf. Rotate the piece halfway around, keeping the same side facing you. Do not flip it over as you would when beginning a new row. Work along the unused loops on the opposite side of the foundation chain, moving from the base toward the tip.
Second side: Work sc in the first unused loop, hdc in the next loop, sc in the next loop and sl st in the final loop. (4 sts)
Fasten off, leaving a sewing tail.
Repeat to make the second leaf.
Gently pinch the two ends of each leaf to make a narrow, pointed shape. Keep the center slightly rounded. Each leaf should be small enough to sit beneath one side of the red bow.
Red holly berries, make 3
With Christmas red, make a magic ring.
Round 1: Work 4 sc into the ring. Pull the ring closed and join with a sl st to the first sc. (4 sts)
Fasten off, leaving a sewing tail.
Flatten the little circle between your fingers. Do not stuff it.
Make two more berries using the same instructions, for three berries total.
Arrange the holly cluster
Place the two green leaves immediately beneath the center of the red bow.
Angle one leaf toward the lower left and the other toward the lower right. Their inner ends should overlap slightly beneath the bow.
Arrange the three red berries in a small triangle over the inner leaf ends, with one berry at the top and two beneath it.
The cluster should stay centered between the upper frosting curls without touching them.
Sew the leaves flat against the heart using their yarn tails. Then sew each berry securely around its edge. Weave in every end on the back.
Finally, sew the red bow over the upper part of the holly cluster. Its center should conceal the leaf joins without completely hiding the berries.
Take a look at the whole heart before tightening the final bow stitches. You should still see both upper frosting curls clearly. If a bow loop covers one, shift the bow slightly toward the center.
Make the Ornament Hanging Loop
A simple brown crocheted hanging loop finishes the ornament. Using the same brown yarn keeps the loop from competing with the red bow and white icing.
Brown hanging loop
With gingerbread brown, leave an 8-inch starting tail before making your slip knot. Ch 18.
Fasten off, leaving an 8-inch ending tail. You now have a chain with a sewing tail at each end for attaching the loop to the back of the heart.
Fold the chain in half to form a loop. Keep it flat and untwisted.
Turn the heart over. Place both ends of the chain behind the upper center indentation, directly above the middle of the red bow.
Sew both ends securely through several stitches of the brown heart, spreading the attachment stitches across the back of the two lobes near the center.
Weave the tails through several additional brown stitches before trimming them.
The loop should stand approximately 1 1/2 inches above the heart when the ornament is hanging, although the exact height will depend on your chain tension.
If you're making this heart as a sew-on appliqué instead of an ornament, skip the hanging loop. You don't need it on a stocking, gift bag or quilt block.
Gingerbread Heart Ornament Assembly and Finishing
Once you've crocheted the pieces, lay everything out before making the final attachment stitches. I would rather spend a few minutes moving the decorations around now than discover later that the bow is crooked or one swirl is lower than the other.
Assembly order
- Finish the brown heart and check that both upper lobes are the same size.
- Work the brown outline and cream scalloped edging.
- Lightly block the heart if the sides or lobes need shaping. Let it dry completely before proceeding.
- Pin the two frosting cords into matching curves and sew them in place.
- Position and attach the two holly leaves.
- Arrange the three red berries over the leaves and sew them securely.
- Center the red bow above the holly and sew it flat.
- Attach the brown hanging loop behind the upper center.
- Weave in all remaining yarn ends and check the finished ornament from the front and back.
Check the finished heart shape
The two rounded upper lobes should be close in size, with the red bow centered between them. The bottom point should fall directly below the bow.
The cream scallops should follow the heart's outline without twisting or pulling the brown fabric out of shape.
The two frosting swirls should match in height and general shape. They don't have to be perfect copies of one another, but the upper and lower curls should look intentional.
From the front, you should see a little brown crochet between the outer cream scallops and the inner frosting lines. Don't fill that space with more decorations. The brown stitches are part of the gingerbread-cookie look.
Blocking and final shaping
If the heart curls at the edges, lightly dampen it and lay it flat on a blocking mat. Smooth the upper lobes into rounded shapes and keep the lower point centered.
Use rustproof pins if needed, placing them around the brown outline rather than pulling through the raised cream icing.
Let the heart dry completely. Remove every blocking pin and removable stitch marker. Check the front and back for loose yarn ends, unsecured frosting curls, and temporary threads before hanging or attaching the ornament.
Using the heart as an appliqué
You can also leave off the loop and use the gingerbread heart as a flat decoration on a Christmas stocking, fabric gift bag or holiday wall hanging.
For fabric appliqué use, sew around the full outer brown edge with small matching stitches. Also secure the inside of the upper indentation and any raised decoration that could catch on another fabric surface.
If the project is intended for a baby item, keep the decorations firmly attached and follow the appropriate product-use guidance. Don't put a decorated blanket or loose ornament into an infant sleep space.
For a matching Christmas set, you can make the gingerbread man, woman and house appliqués in the same yarn colors. Add hanging loops to those pieces, too, and you'll have four coordinating gingerbread Christmas decorations.
Gingerbread Heart Pattern Tips and Troubleshooting
My heart leans to one side.
Check the increases in Rows 2, 3, 5, 6, 8, 9, 11, 12, 14, 15 and 17. Each of those rows adds exactly two stitches, one at each end. The other body rows keep the stitch count unchanged.
If the stitch counts are correct, check whether you've consistently turned the work the same way. You can often straighten a small lean with light blocking, but blocking won't correct a missing increase.
My top lobes are different sizes.
Each lobe begins with 12 stitches. Both use the same six row counts: 12, 12, 10, 8, 6 and 4.
Check that you skipped exactly one center stitch between them and didn't accidentally work into it when starting the second lobe.
The upper lobes look too square.
Check that the decreases in Lobe Rows 22 through 25 are worked at both ends of each row. Don't gather the four upper stitches together into a tight point.
The brown outline helps round the corners. If the lobes still look slightly uneven, gently shape them while damp-blocking.
My scalloped icing is too ruffled.
Count the brown outline first. The planned edging contains 72 stitches, divided into 18 groups of four.
Check that you're working into the front loops of the brown outline and using only one half double crochet for the raised part of each four-stitch repeat. Each scallop should use four brown stitches and produce four cream stitches. After completing the round, tack the cream edging lightly against the front of the heart without stretching it.
If the icing is still too loose after checking the count, tighten your tension slightly. You can also try a smaller hook for the cream edging, provided the scallops still sit comfortably on the heart.
One frosting swirl looks different from the other.
Lay both cords on the heart before sewing either one. Match the height of the upper spirals first, then the outer curves, and finally the lower spirals.
If one cord is visibly longer, check its chain and slip-stitch counts. Both should have 34 foundation chains and 33 slip stitches before any adjustment for gauge.
Don't pull one cord tight just to make it match. A stretched cord may pull the brown heart out of shape.
The red bow looks too bulky.
Keep the bow flat and reduce the number of center wraps if necessary. The example uses two compact loops and a narrow wrapped center.
If your bow is much wider than 1 1/4 inches, try tighter tension rather than adding more stitches. The bow should sit between the two frosting curls, not cover them.
The holly berries look too large.
Each berry contains only four single crochet stitches worked into a magic ring. Pull the ring closed, flatten the little circle and sew it directly against the leaves.
Don't stuff the berries or add extra rounds. They should remain small, with all three fitting beneath the bow.
The finished heart won't lie flat.
First check that no assembly stitches are pulling the cream cords or holly pieces too tightly against the brown fabric.
Lay the heart flat and reshape it while slightly damp. If needed, pin the outside edges without stretching them. Let everything dry before removing the pins.
My finished measurements are different.
The expected size is based on 20 single crochet stitches and 22 rows per 4 inches. If your stitches are larger, your heart will be larger. If they're smaller, the ornament will be smaller.
A little variation is fine, especially for a handmade Christmas ornament. What matters most is that the heart lies flat, the lobes match, and the icing details have enough room to keep their shape.
That's your finished gingerbread heart. Keep the decorations just as they are, or leave the loop off and turn it into an appliqué. Either way, the matching swirls and little holly-trimmed bow are what give this heart its character.
When you click on links to various merchants on this site and make a purchase, this may result in this site earning a commission. This does not affect the price you pay.

UBGI Gold Standard 2026
Reviewed under the site's
editorial checklist.
Photos, decorating ideas, party setups and reader submissions are shared for inspiration unless a page is specifically presented as a pattern, tutorial, reference guide or step-by-step project. Follow the instructions, measurements, safety guidance and manufacturer directions provided for the particular project or product.
About Jan | Contact | Baby Nursery Ideas (Blog) | Site Map | Privacy Policy | Disclosure Policy | Disclaimer | Affiliate Disclosure | Earnings Disclosure | Facebook | Pinterest
I am a participant in the Amazon Services LLC Associates Program, an affiliate advertising program designed to provide a means for us to earn fees by linking to Amazon. As an Amazon Associate I earn from qualifying purchases.
Copyright © 2006-2026. All Rights Reserved.