Free Crochet Christmas Tutu Diaper Cover Pattern with Holly
By Jan Bay
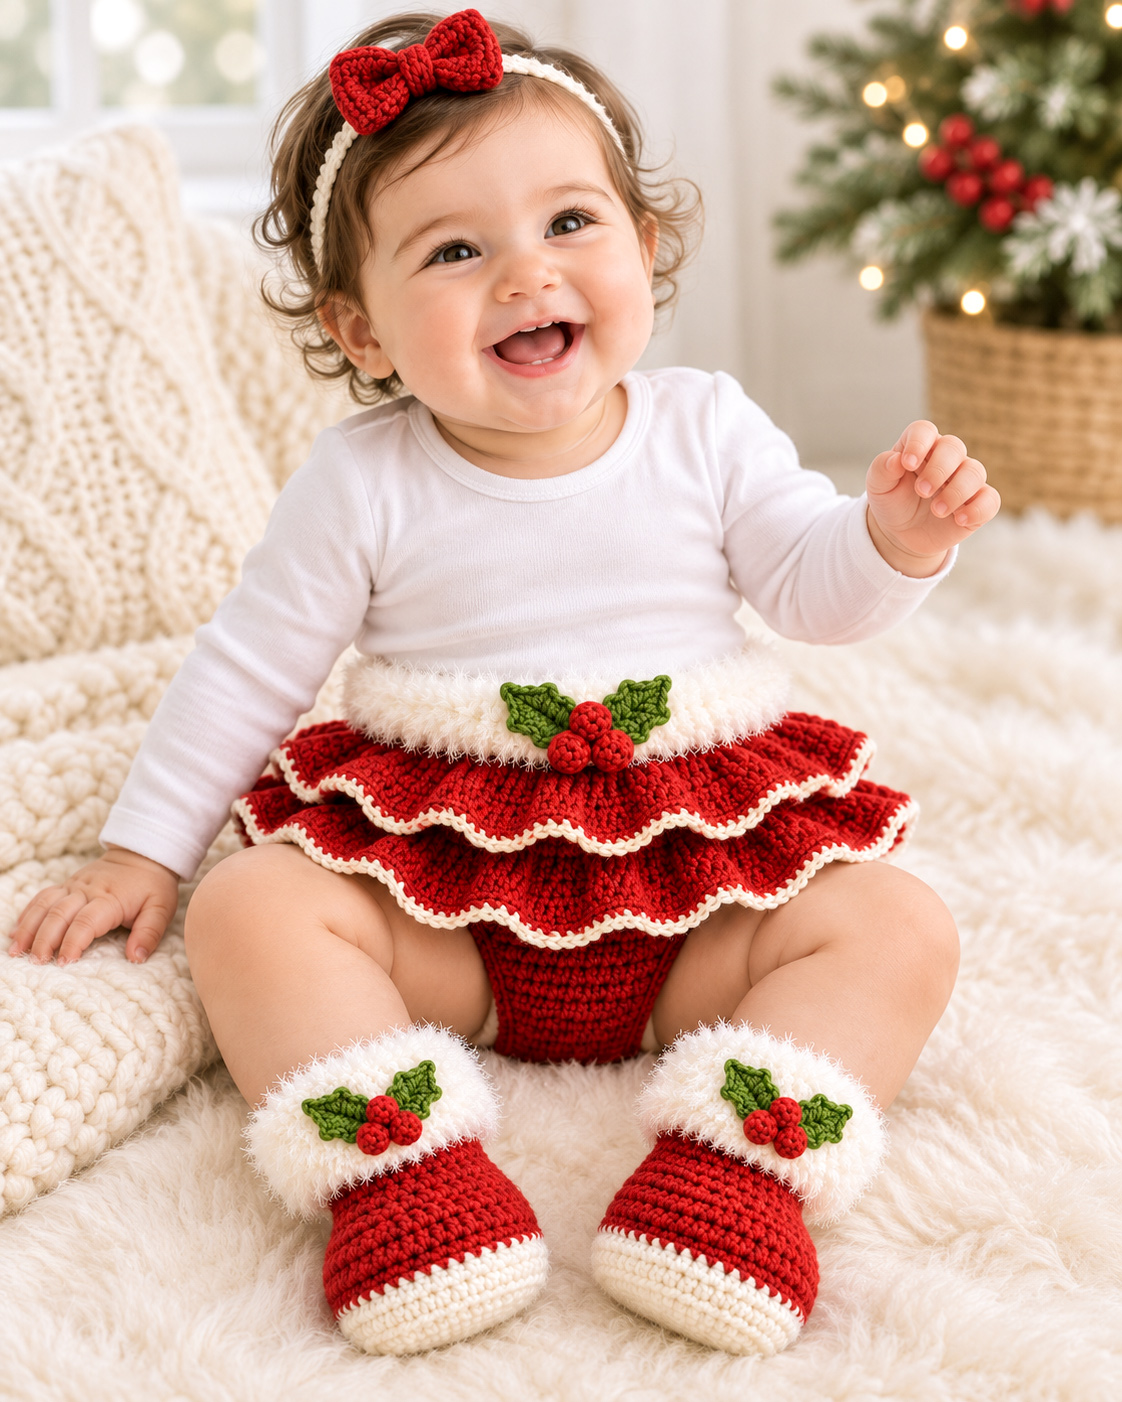
This free crochet Christmas tutu diaper cover pattern makes a festive little outfit for a baby girl with two layers of red ruffles, narrow ivory edging, a fluffy fur-like white waistband, and a miniature holly decoration. I designed the ruffles with raised crochet stitches so they have a little more texture than an ordinary tutu skirt. The fitted diaper cover underneath keeps the shape, while the ruffles give it that full Christmas look. Pair it with my matching Santa baby booties for a handmade holiday outfit.
Explore More Free Crochet Baby Patterns
Free Crochet Diaper Cover Patterns
Original Crochet Tutu Diaper Cover
See Supplies for This Project Here.
The example image is a styled design. The raised holly berries illustrate the decorative display version. For a baby wearing the outfit during supervised photos, make the flat embroidered berries described in the patterns for both the tutu and matching Santa booties.
Jump to a Section
- Sizes and Finished Measurements
- Yarn, Hooks and Supplies
- Pattern Notes and Abbreviations
- Newborn to 3 Months Pattern
- 3 to 6 Months Pattern
- 6 to 12 Months Pattern
- Side Seams and Waistband
- Ivory Leg Edging
- Upper Christmas Ruffle
- Lower Christmas Ruffle
- Fluffy White Waistband
- Crochet Holly Leaves and Berries
- Assembly and Finishing
- Frequently Asked Questions
Free Crochet Christmas Tutu Diaper Cover Pattern Sizes
This Christmas tutu diaper cover is written in three sizes: newborn/0–3 months, 3–6 months and 6–12 months. The fitted diaper cover goes underneath the two layers of red Christmas ruffles.
Choose the size according to the baby's measurements over the diaper she'll be wearing. The age ranges are a starting point, but waist, rise, and thigh room matter more.
| Size | Expected Waist | Flat Body Length |
|---|---|---|
| Newborn/0–3 months | 15 1/2 in. | 12 in. |
| 3–6 months | 17 1/4 in. | 13 5/8 in. |
| 6–12 months | 18 7/8 in. | 15 1/4 in. |
The waist and flat-body measurements are calculated from the stated stitch gauge, not measured from a completed sample. Flat-body length is measured from the starting back-waist edge to the ending front-waist edge, before adding the waistband. The finished rise will be greater once the red and fluffy waistband rounds are added. Measure the complete cover before wearing it.
The narrow crotch should measure approximately 3 1/8 (3 3/8, 3 3/4) inches across before any stretching.
Skill level: Intermediate. You'll need half double crochet, double crochet, decreases, increases, front post double crochet, joined rounds, and basic sewing.
Materials for the Christmas Crochet Tutu Diaper Cover
Yarn:
- Smooth medium-weight #4 yarn in Christmas red for the diaper cover and both ruffle tiers. Have approximately 400–500 yards available as a generous planning allowance, especially for the largest size.
- Smooth medium-weight #4 yarn in warm ivory for the narrow ruffle and leg borders. Allow approximately 40–70 yards.
- Fine-pile white fuzzy yarn with a firm central strand for the waistband. Allow approximately 35–60 yards.
- Small amounts of green and red sport-weight #2 yarn for the miniature holly decorations.
These are purchase allowances, not measured yarn consumption from a finished sample.
Hooks and tools:
- 5 mm (H/8) crochet hook for the main cover and ruffles, or the hook needed to obtain gauge
- 2.5 mm hook for the holly decorations
- Hook suitable for the fuzzy waistband yarn, starting with 5 mm
- Yarn needle
- Stitch markers
- Measuring tape
- Scissors
Main gauge: 14 hdc stitches and 10 hdc rows = 4 inches (10 cm) in smooth red yarn.
Make a swatch before starting, especially if you're making the cover for a particular baby. The ruffles use double crochet, so their finished drop and fullness will also depend on your tension.
Choose a fuzzy yarn that does not readily shed fibers. Avoid loose eyelash strands, beads, buttons, drawstrings, or detachable decorations on a baby-wear version.
Christmas Tutu Pattern Notes and Abbreviations
This diaper cover is made from the back waist down through the crotch and back up to the front waist as one flat piece. After sewing the short side seams, you'll add the red waistband, ivory leg edging, two textured ruffle tiers, fluffy white upper band, and holly decorations.
US crochet abbreviations:
- ch = chain
- sc = single crochet
- hdc = half double crochet
- dc = double crochet
- FPdc = front post double crochet
- hdc2tog = half double crochet two stitches together
- sc2tog = single crochet two stitches together
- sl st = slip stitch
- BLO = back loop only
- st/sts = stitch/stitches
- RS = right side
- WS = wrong side
Turning chains: The beginning chains do not count as stitches. Work the first actual stitch in the first available stitch, and do not work into the turning chain.
Decrease row: Work hdc2tog over the first two stitches, hdc in each stitch across until two remain, and hdc2tog over the final two stitches. This decreases the row by two stitches.
Increase row: Work 2 hdc in the first stitch, hdc across to the last stitch, and 2 hdc in the last stitch. This increases the row by two stitches.
Front post double crochet (FPdc): Yarn over, insert the hook from front to back and back to front around the post of the next stitch, yarn over and pull up a loop, then complete the double crochet. Each FPdc uses one stitch position and produces one new stitch.
These FPdc stitches form little raised vertical ridges through the Christmas ruffles. You'll work one raised stitch followed by three regular double crochets, keeping each raised stitch lined up above the previous one.
Right side: Choose the outside face of the flat diaper-cover body before sewing. The waistband and skirt ruffles are then worked with this side facing outward.
Construction note: No elastic cord, ribbon tie, buttons, or separate skirt fastening is needed. The ruffles attach to the red crocheted waistband. The ivory edging follows their outer edges.
Newborn to 3 Months: Red Crochet Diaper Cover
With red yarn and your 5 mm hook, ch 28.
Row 1: Hdc in the second chain from the hook and each remaining chain. (27 hdc)
Rows 2–5: Hdc across. (27 hdc each row)
Rows 6–13: Work one decrease at each end of every row. Your stitch counts after these eight rows should be 25, 23, 21, 19, 17, 15, 13 and 11 hdc.
Rows 14–17: Hdc across without increasing or decreasing. (11 hdc each row)
Rows 18–25: Increase at both ends of each row. The stitch counts should be 13, 15, 17, 19, 21, 23, 25 and 27 hdc.
Rows 26–30: Hdc across. (27 hdc each row)
Ch 1 and turn after every row except Row 30. Fasten off after Row 30.
Checkpoint: You should have 30 rows, with 27 stitches across each waist end and 11 across the narrow crotch. At gauge, the flat piece measures approximately 12 inches from end to end.
3 to 6 Months: Red Crochet Diaper Cover
With red yarn and your 5 mm hook, ch 31.
Row 1: Hdc in the second chain from the hook and each remaining chain. (30 hdc)
Rows 2–6: Hdc across. (30 hdc each row)
Rows 7–15: Decrease at both ends of each row. The stitch counts should be 28, 26, 24, 22, 20, 18, 16, 14 and 12 hdc.
Rows 16–19: Hdc across without shaping. (12 hdc each row)
Rows 20–28: Increase at both ends of each row. The stitch counts should be 14, 16, 18, 20, 22, 24, 26, 28 and 30 hdc.
Rows 29–34: Hdc across. (30 hdc each row)
Ch 1 and turn after every row except Row 34. Fasten off after Row 34.
Checkpoint: The completed piece should have 34 rows, 30 stitches across each waist end and 12 across the crotch. The calculated flat length is approximately 13 5/8 inches.
6 to 12 Months: Red Crochet Diaper Cover
With red yarn and your 5 mm hook, ch 34.
Row 1: Hdc in the second chain from the hook and each remaining chain. (33 hdc)
Rows 2–7: Hdc across. (33 hdc each row)
Rows 8–17: Decrease at both ends of each row. The stitch counts should be 31, 29, 27, 25, 23, 21, 19, 17, 15 and 13 hdc.
Rows 18–21: Hdc across without shaping. (13 hdc each row)
Rows 22–31: Increase at both ends of each row. The stitch counts should be 15, 17, 19, 21, 23, 25, 27, 29, 31 and 33 hdc.
Rows 32–38: Hdc across. (33 hdc each row)
Ch 1 and turn after every row except Row 38. Fasten off after Row 38.
Checkpoint: You should have 38 rows, with 33 stitches across each waist end and 13 across the narrow crotch. The calculated flat length is approximately 15 1/4 inches.
Before assembly: Lay the completed body flat. The starting-chain edge forms the back waist, and the final row forms the front waist. Both ends must have the same number of stitches. If they don't, correct the shaping before sewing.
Step 1: Sew the Side Seams and Crochet the Waistband
Now we'll turn the flat red piece into the fitted diaper cover. The red waistband also gives us two attachment rings for the Christmas ruffles.
Sew the Short Side Seams
Place the flat body right side up. The beginning-chain edge is the back waist, and the final row is the front waist.
Fold the front over the back with right sides together, matching the two waist edges and the side edges. The narrow crotch section should form the bottom of the folded piece.
Using a yarn needle and matching red yarn, sew the two layers together along the upper side edges:
- Newborn/0–3 months: Sew through 5 paired row-end spaces on each side.
- 3–6 months: Sew through 6 paired row-end spaces on each side.
- 6–12 months: Sew through 7 paired row-end spaces on each side.
Each sewing stitch should catch one front row-end space and the matching back row-end space. Start at the waist and stop after the specified number of paired spaces. Leave the curved leg-opening edges unsewn.
Repeat on the other side using the same seam length. Fasten off, weave in the ends, and turn the cover right side out.
Checkpoint: The cover should now have two equal side seams, a continuous top opening, and two leg openings. The front and back waist edges should meet evenly.
Crochet the Red Waistband
Keep the right side facing outward. Join red yarn at one side seam using your 5 mm hook.
Waistband Round 1: Ch 1. Work 27 (30, 33) hdc across the front waist, one into each stitch of the final body row. Continue across the back waist, working one hdc into each available foundation-chain loop directly beneath the 27 (30, 33) stitches from Body Row 1. Join with a sl st to the first hdc.
Round 1 total: 54 (60, 66) hdc.
Waistband Round 2: Ch 1. Working in BLO, hdc in each stitch around. Join to the first hdc. 54 (60, 66) hdc.
Waistband Round 3: Ch 1. Working in BLO, hdc in each stitch around. Join. 54 (60, 66) hdc.
Fasten off the red yarn and weave in the end.
The two back-loop rounds leave two rings of unused front loops around the waistband:
- The unused front loops from Waistband Round 2 will hold the upper Christmas ruffle.
- The unused front loops from Waistband Round 1 will hold the lower Christmas ruffle.
Don't crochet into those unused front loops until you're ready to attach the ruffles. Both rings should travel completely around the front, sides and back.
Waistband checkpoint: You should have 54 (60, 66) stitches around the completed red waistband. It should lie evenly without twisting. Check its relaxed circumference and stretch against the intended waist before adding the decorative layers.
Step 2: Add the Narrow Ivory Leg Edging
The ivory leg borders repeat the white trim around the soles of our matching Santa baby booties.
Before starting, count the exposed row-end spaces around either leg opening. You should have 20 (22, 24) spaces after the side seams are sewn.
With the right side facing outward, join smooth ivory yarn at the bottom of one side seam.
Leg Edging Round 1: Ch 1. Repeat [2 sc into the next exposed row-end space, 1 sc into the following exposed row-end space] 10 (11, 12) times around the leg opening. Join with a sl st to the first sc.
Final count: 30 (33, 36) sc.
Fasten off and weave in the end. Repeat the same edging around the second leg opening.
The ivory edging should be a narrow, even outline. It should lie against the diaper cover without pulling the leg opening inward or flaring outward dramatically.
Checkpoint: Both leg openings should have matching stitch counts and stretch comfortably around the intended thighs. The border is decorative and should not be used to tighten an oversized cover.
Step 3: Crochet the Upper Red Christmas Ruffle
Here comes the fun part. The upper tutu tier is shorter than the lower one, and we're adding little raised crochet ridges to give the red fabric a more defined Christmas look.
We'll work the skirt around the entire cover, not just across the back.
With the waistband at the top and the right side facing you, locate the unused front-loop ring from Waistband Round 2.
Join smooth red yarn in one of those unused front loops near a side seam. Use your 5 mm hook.
Upper Ruffle Round 1: Make the Full Flounce
Ch 2. This beginning chain does not count as a stitch.
Work 2 dc into the same unused front loop where you joined, then 2 dc into every remaining unused front loop around the entire waistband. Join with a sl st to the first dc.
Round 1 total: 108 (120, 132) dc.
Doubling the stitches provides the extra fabric needed for the ruffle. Don't work into the ordinary waistband stitches above the attachment ring.
Upper Ruffle Round 2: Begin the Raised Ridges
Ch 2, without counting it as a stitch.
Repeat [FPdc around the post of the next stitch, dc in each of the following 3 stitches] around the tier. Join with a sl st to the top of the first FPdc.
Round 2 total: 108 (120, 132) stitches.
The four-stitch repeat is worked 27 (30, 33) times. Each repeat has one raised FPdc and three ordinary dc stitches.
Continue the Upper Ruffle
Newborn/0–3 months, Round 3: Repeat Round 2. (108 stitches)
3–6 months and 6–12 months, Rounds 3–4: Repeat Round 2 in each round. (120, 132 stitches)
As you work, place each FPdc around the raised stitch directly below it. This creates vertical ridges rather than diagonal lines.
Fasten off the red yarn after the final red round.
Give the Upper Ruffle Its Ivory Edge
Join smooth ivory yarn at the back of the upper tier.
Ch 1. Sc in every stitch around the final red round, working one ivory sc for each red stitch. Join to the first sc.
Ivory edging count: 108 (120, 132) sc.
Fasten off and weave the ivory tail into the underside of the ruffle.
Let the ruffle fall naturally. The extra fabric should create shallow waves along the white-edged hem. There's no need to add separate shell motifs to the edging.
Checkpoint: The upper tier should travel all the way around the cover, with evenly spaced ridges and an uninterrupted ivory edge. It should be shorter than the lower tier we'll make next.
Step 4: Crochet the Longer Lower Christmas Ruffle
Lift the upper ruffle out of the way. Locate the unused front loops from Waistband Round 1. This lower attachment ring is beneath the upper one.
With the right side facing, join smooth red yarn into an unused front loop near a side seam.
Lower Ruffle Round 1
Ch 2, not counting it as a stitch. Work 2 dc into the same unused front loop and 2 dc into every remaining unused front loop around the waistband. Join to the first dc.
Round 1 total: 108 (120, 132) dc.
Lower Ruffle Round 2
Ch 2. Repeat [FPdc around the next stitch, dc in each of the next 3 stitches] around. Join to the first FPdc.
Round 2 total: 108 (120, 132) stitches.
Continue the Lower Ruffle
Newborn/0–3 months, Rounds 3–5: Repeat Round 2 in each round. (108 stitches per round)
3–6 months and 6–12 months, Rounds 3–6: Repeat Round 2 in each round. (120, 132 stitches per round)
Keep each FPdc aligned directly above the previous raised stitch. Fasten off after the last red round.
Add the Lower Ivory Edge
Join the smooth ivory yarn at the back of the lower tier.
Ch 1. Sc once in each stitch around the lower tier's final red round. Join to the first sc.
Final ivory edging count: 108 (120, 132) sc.
Fasten off and weave in the tail.
Checkpoint: Both red ruffles now have narrow ivory edges. The lower tier should extend beyond the upper tier. The upper tier should fall naturally over it, leaving both white outlines visible.
The raised ridges should run outward through each tier. Don't sew the ruffles together or flatten them with heavy blocking.
Set the cover upright and look at it from the front, sides and back. Both flounces should wrap completely around the diaper cover with no missing sections at the side seams.
Step 5: Add the Fluffy White Christmas Waistband
The fluffy white waistband makes this diaper cover look like it belongs with the matching Santa baby booties. We'll use the same general type of fine-pile yarn, but keep the waistband light enough to stretch comfortably.
With the right side facing, join the white fuzzy yarn into the top stitches of red Waistband Round 3 at the back of the cover. Use your 5 mm hook, or a slightly larger hook if your fuzzy yarn works more tightly.
Fluffy Round 1: Ch 1. Sc once in each stitch around the top of the red waistband. Join to the first sc. 54 (60, 66) sc.
Fluffy Round 2: Ch 1. Sc in each stitch around. Join. 54 (60, 66) sc.
Fluffy Round 3: Ch 1. Sc in each stitch around. Join. 54 (60, 66) sc.
Fasten off, leaving a yarn tail long enough to weave securely into the inside of the waistband.
Checkpoint: You should have a white fluffy band above the red tutu tiers, with 54 (60, 66) stitches around the top. The band should stay upright without folding over. Check that it still stretches comfortably over the diapered waist.
Part the fuzzy fibers gently when counting or weaving in ends. Catch the firm central strand of the yarn instead of sewing only through the loose pile.
If your fuzzy yarn sheds readily, choose a different yarn. Do not add more fuzzy rounds to compensate for a poor yarn choice.
Step 6: Crochet the Miniature Holly Decoration
For the Christmas version, I chose a little holly cluster at the center front of the waistband, just like the decorations on our matching Santa baby booties.
The decorative display version has two crocheted leaves and three small raised berries. For a version that baby will wear, use flat embroidered berries instead of the raised pieces.
Miniature Holly Leaves: Make Two
With green sport-weight yarn and a 2.5 mm hook, ch 7.
- Sc in the second chain from the hook.
- Hdc in the next chain.
- Dc in the next chain.
- Hdc in the next chain. Ch 2 and sl st into the second chain from the hook to form a small point.
- Sc in the next foundation chain.
- In the last foundation chain, work 1 sc, ch 2, sl st into the second chain from the hook, and 1 more sc into that same foundation chain.
- Rotate the foundation chain to work along the opposite side.
- Sc in the underside loop immediately beside the end chain.
- Hdc in the underside loop of the next chain. Ch 2 and sl st into the second chain from the hook to form another point.
- Dc in the underside loop of the next chain.
- Hdc in the underside loop of the next chain.
- Sc in the underside loop of the final chain, where the first sc was worked.
- Join with a sl st to the first sc.
Each leaf has 12 main stitches, not counting the picot chains and slip stitches used to make the points.
Fasten off, leaving a 10-inch tail for sewing. Make two leaves.
Raised Holly Berries for the Decorative Display Version
Make three small berries with red sport-weight yarn and your 2.5 mm hook.
Work in continuous spiral rounds without joining or beginning chains. Mark the first stitch of each round.
Round 1: Make a magic ring and work 6 sc into it. Pull the ring closed. (6 sc)
Round 2: Work 2 sc into each stitch. (12 sc)
Round 3: Sc in each stitch around. (12 sc)
Round 4: Sc2tog 6 times. (6 sc)
Fasten off with a 10-inch sewing tail. Thread the tail through the front loops of the six remaining stitches, pull the opening closed and shape the berry into a tiny dome. No stuffing is needed. Secure the starting tail inside the berry, and retain the finishing tail for attachment.
Make three matching berries.
Flat Embroidered Berries for Supervised Baby Wear
Instead of making the raised berries, embroider three small red circles directly onto the fluffy waistband.
Part the fuzzy fibers to find the firm crochet stitches underneath. Work small flat satin-stitched circles approximately 1/4 inch (6 mm) across, with one berry above the other two. Keep the embroidery flat and firmly anchored through the underlying stitch cores.
Secure the ends inside the waistband by weaving through several stitches and reversing direction.
The raised crochet berries shown in the example image are for the decorative display version, not for booties or clothing worn by a baby.
Step 7: Assemble and Finish the Christmas Tutu
Lay the cover in front of you with the waistband at the top and the red ruffles falling downward. Find the center front, directly above the middle of the diaper-cover front panel.
Position the Holly
- Place the two green leaves on the front of the fluffy waistband, angled outward in a shallow V.
- Overlap their bases slightly at the center.
- Use the green sewing tails to attach each leaf along its center and outer edges. Catch the firm stitches of the waistband, not just the fuzzy fibers.
- Secure the leaves so the points lie flat and cannot dangle freely.
- For the decorative display version, position three raised red berries over the overlapping leaf bases in a triangle, with one berry above the other two.
- Sew each raised berry down around its entire base with several passes in different directions, then secure the tail inside the band.
- For supervised baby wear, use the flat embroidered berries described above instead.
Important: Small raised decorations can detach and create a choking hazard. The raised-berry version is for decorative display only. Check all sewn leaves and embroidered details before a supervised photo session.
Finish the Crochet
- Weave every remaining yarn end into the wrong side and reverse direction before trimming.
- Check both side seams for any skipped or loose stitches.
- Compare the two leg openings. They should have identical stitch counts and comfortable stretch.
- Lift each ruffle to check that it is attached only to its own waistband loop ring.
- Check the ivory edging all the way around both tiers.
- Arrange the two layers so the shorter upper ruffle falls evenly over the longer lower one.
- Gently shape the fuzzy waistband with your fingers.
- Remove every stitch marker before the cover is worn or displayed.
A little gentle shaping is all this outfit should need. If the red ruffles need flattening, lightly dampen the smooth yarn and let the crochet dry naturally. Do not iron or apply direct heat to the fluffy yarn.
Final Christmas Tutu Checklist
Your finished diaper cover should have:
- One fitted red crochet diaper cover with two short side seams
- A red waistband with two complete skirt-attachment lines
- Two full-circumference red ruffle tiers with raised crochet ridges
- One narrow ivory edge around each ruffle
- Matching ivory edging around both leg openings
- One fluffy white upper waistband
- Two miniature green holly leaves
- Three raised berries for decorative display, or three flat embroidered berries for supervised wear
Pair It with the Matching Santa Baby Booties
I designed this Christmas tutu to coordinate with my free crochet Santa baby booties pattern. Both pieces use Christmas red, warm ivory, fluffy white trim, and miniature holly clusters.
The booties have their own complete instructions, so you won't need to repeat their construction here. For a coordinated outfit, use the same red and ivory color family in both projects.
The long-sleeve white top, matching booties, and red bow headband shown in the example image are styling pieces and are not included in this diaper cover pattern.
Fit and Baby-Wear Check
Before wearing, check the actual finished waist, rise, leg openings, and seat room over the baby's diaper. The waistband should stretch comfortably and the leg borders should not leave tight marks.
This is a decorative crochet diaper cover for awake, directly supervised wear and Christmas photos. It is not sleepwear and is not a waterproof cloth-diaper cover. Remove it before sleep and stop using it if any decoration, seam, or yarn end becomes loose.
The example image is a styled visual reference, not proof that the finished pattern has been physically tested. Actual ruffle drape, waistband thickness, and finished fit will depend on your yarn and gauge.
Frequently Asked Questions About the Christmas Crochet Tutu
Can I make the Christmas tutu without fuzzy yarn?
Yes. Work the three white waistband rounds in smooth ivory medium-weight yarn instead. Keep the same stitch count and check the opening. The band will be less fluffy, but the red ruffles and ivory borders will still give the outfit a Christmas look.
Why aren't my Christmas ruffles very full?
Check the first round of each tier. You need two double crochets in every unused waistband loop, giving 108 (120, 132) stitches. If you work only one stitch per loop, the fabric won't have the extra fullness needed to fall into waves.
Why are my raised crochet ridges moving diagonally?
Each FPdc should be worked around the post of the raised stitch directly below it. Make sure you're still repeating one FPdc followed by three regular dc stitches, with no extra stitches at the joined-round seam.
Can I make the ruffles shorter?
You can stop one red ruffle round earlier, but keep the same stitch count around the tier and finish with the ivory single crochet edging. Make sure the upper tier remains shorter than the lower one so both layers show.
Can I make the Christmas tutu without holly?
Yes. The red ruffles, ivory edges and fluffy white waistband make a complete Christmas design without the holly decoration. Leaving it off also eliminates the separate appliqué pieces.
Can a baby sleep in the Christmas tutu or matching Santa booties?
No. The tutu and booties are decorative accessories for supervised awake time. Remove them before sleep, and keep them out of the baby's sleep space. For a version worn during supervised photos, use the flat embroidered berry option instead of raised crochet berries.
When you click on links to various merchants on this site and make a purchase, this may result in this site earning a commission. This does not affect the price you pay.

UBGI Gold Standard 2026
Reviewed under the site's
editorial checklist.
Photos, decorating ideas, party setups and reader submissions are shared for inspiration unless a page is specifically presented as a pattern, tutorial, reference guide or step-by-step project. Follow the instructions, measurements, safety guidance and manufacturer directions provided for the particular project or product.
About Jan | Contact | Baby Nursery Ideas (Blog) | Site Map | Privacy Policy | Disclosure Policy | Disclaimer | Affiliate Disclosure | Earnings Disclosure | Facebook | Pinterest
I am a participant in the Amazon Services LLC Associates Program, an affiliate advertising program designed to provide a means for us to earn fees by linking to Amazon. As an Amazon Associate I earn from qualifying purchases.
Copyright © 2006-2026. All Rights Reserved.