Free Christmas Sampler Quilt Pattern with Reindeer, Stars and Holly
By Jan Bay
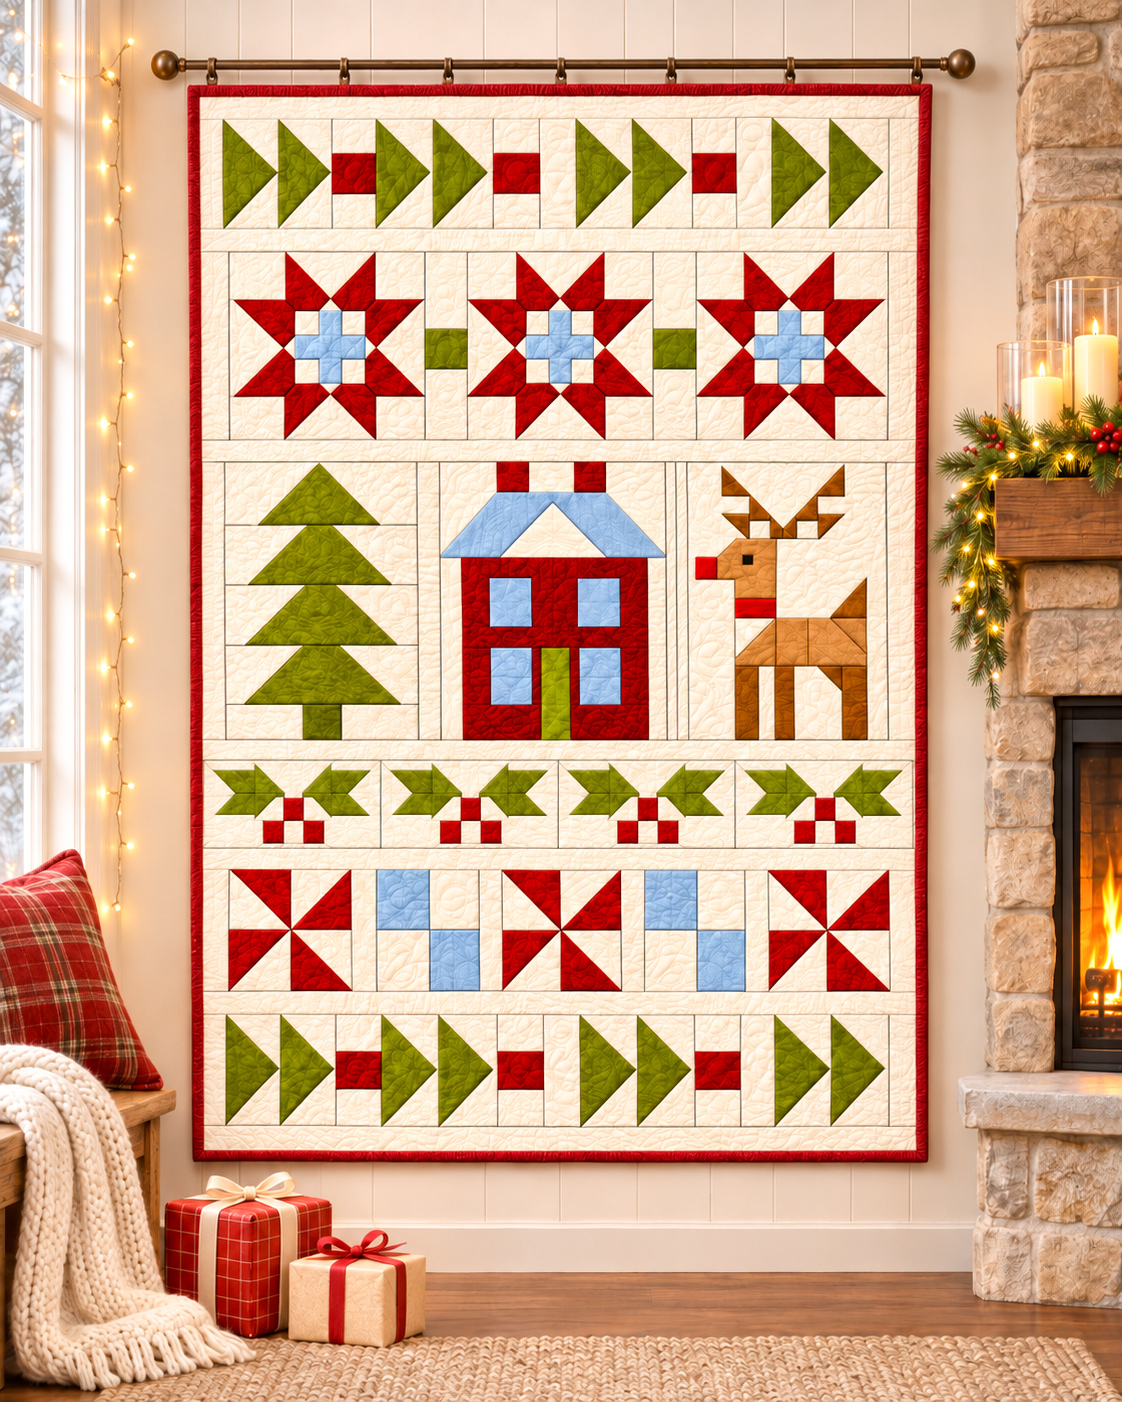
This free Christmas sampler quilt pattern is a little winter scene created using traditional patchwork, with an evergreen tree, a red two-story house and a pieced reindeer beneath three shining Christmas stars. Geometric holly-and-berry motifs, pinwheels and rows of flying geese complete the design in cranberry red, olive green, pale blue and warm cream. The finished quilt measures 56½ × 82¾ inches, and the free printable pattern includes full-size cutting templates. Every motif is machine-pieced. No appliqué. It's just the right size for cuddling with baby in the nursery rocking chair.
Explore More Free Christmas Quilt Patterns
Christmas Tree Irish Chain Quilt Pattern
See Supplies for This Project Here.
On This Page — Jump to a Section
Free Christmas Sampler Quilt Pattern: Finished Size and Design
What I like about this Christmas sampler quilt is that there's plenty going on, but every part has its own place. The little winter scene sits right in the middle, with the stars above it and the smaller patchwork blocks below. The red, green and pale blue fabrics give it that old-fashioned Christmas look without making the quilt feel too busy.
And there's something else I especially like. The entire quilt is pieced. Even the reindeer's antlers, the holly leaves and the little red berries are made from fabric patches joined with straight seams. There's no appliqué involved.
Finished Christmas Sampler Quilt Measurements
| Detail | Measurement or Specification |
|---|---|
| Finished design | 56½ × 82¾ inches between outer seam lines |
| Unquilted top, raw edges | 57 × 83¼ inches |
| Finished central design width | 54 inches |
| Seam allowance | ¼ inch throughout |
| Construction | Machine piecing with straight seams |
| Skill level | Advanced |
| Main quilt sections | Six horizontal bands |
| Printable pattern | 25-page PDF |
| Full-size templates | 72-page PDF |
The finished measurements are calculated from the pattern's outer seam lines. Once the binding wraps around the raw edges, the quilt's nominal outside size is approximately 57 × 83¼ inches before quilting take-up or washing.
What's Included in the Christmas Quilt Design?
The quilt has six pieced bands, each with a finished design width of 54 inches before the outer burgundy border is added.
- Top border: Ten green flying-geese units arranged in five pairs, with four red square accent blocks.
- Christmas stars: Three large red eight-point stars with pale blue cross-shaped centers and two green separator blocks.
- Winter scene: One four-tier evergreen tree, one red two-story house with a pale blue roof, and one left-facing pieced reindeer.
- Holly row: Four geometric green holly sprigs with three red berry squares in each block.
- Lower patchwork: Three red pinwheels alternating with two pale blue-and-cream checker blocks.
- Bottom border: A second row of ten green flying-geese units with red accents, matching the top border.
The reindeer gives this quilt its Christmas personality. Its brown body is made from straight-edged patches, with a red nose, a little red collar, a black square eye and matching angular antlers. The tail points upward, and three legs are visible in the finished design.
This is a fairly involved quilt, mainly because of the small pieces around the stars, reindeer and holly berries. The flying geese and pinwheels are more familiar patchwork units, but the pictorial blocks require careful marking and matching.
I'd keep the original cranberry red, olive green, pale blue and cream combination for the first version. Those colors make the house, tree and reindeer easy to distinguish, and the dark burgundy border finishes everything without competing with the blocks.
The cutting instructions below reproduce the printable pattern. The full-size PDF templates provide the actual cutting outlines for the irregular shapes, including the precise seam intersections that aren't practical to describe with rectangle measurements alone.
Fabric Requirements and Supplies for the Christmas Sampler Quilt
There are quite a few fabric colors in this quilt, although you won't need much of some of them. Most of the yardage goes into the warm cream background. The smaller amounts of brown, blue and green make the Christmas motifs stand out.
Before cutting, I'd separate the fabrics by color and label them with the letters in the chart. Those letters appear throughout the cutting instructions and template pages. It makes the smaller pieces much easier to keep straight.
Christmas Sampler Quilt Fabric Yardage
| Fabric | Key | Yardage |
|---|---|---|
| Warm cream background | C | 4½ yards |
| Forest or olive green | G | 1¼ yards |
| Lighter olive green | W | ¼ yard |
| Brick or cranberry red | R | 1⅛ yards |
| Pale blue | B | ½ yard |
| Reindeer body brown | T | ⅜ yard |
| Dark antler and haunch brown | N | ¼ yard |
| Rear-leg brown | U | ¼ yard |
| Black for reindeer eye | I | ⅛ yard |
| Burgundy outer border | Z | ⅝ yard |
These calculated cutting allowances assume standard quilting cotton with 40 inches of usable fabric width after removing selvages. They include a handling margin, but not extra fabric for prewashing shrinkage, directional prints or pattern matching. The quantities are based on the cutting layout in the downloadable pattern, rather than a general yardage estimate.
Backing, Batting and Binding
- Backing: 5¼ yards of 40-inch usable-width fabric, cut into two 40 × 92-inch panels.
- Batting: One piece measuring 66 × 92 inches.
- Binding: An additional ¾ yard of burgundy fabric, cut into eight strips measuring 2½ × 40 inches.
The additional burgundy binding yardage is separate from the ⅝ yard listed for the quilt's narrow outer border.
Quilting Tools
- Sewing machine with an accurate ¼-inch presser foot
- Rotary cutter, quilting ruler and cutting mat
- Fine sewing pins
- Removable fabric-marking pencil
- Fabric scissors and separate paper scissors
- Printed full-size pattern templates
- Clear tape for joining the larger tiled templates
- Iron and pressing surface
- Coordinating sewing thread
- Supplies for basting and quilting the finished layers
A ruler that reads sixteenths of an inch is particularly useful for this pattern. Some of the cutting measurements are smaller than the usual quarter-inch increments, and rounding those numbers would change how the pieces fit together.
Keep the paper templates after cutting. Several shapes are reused, and the reindeer alone has enough small pieces that checking the labels as you sew is worth the extra moment.
Complete Christmas Sampler Quilt Cutting Chart
The cutting chart is longer than the usual patchwork quilt chart, but there's a good reason. The house, antlers, stars and holly motifs are made from individual pieces that fit together in a particular order. Each one has its own cutting reference.
There are two kinds of pieces in this pattern. Pieces marked R are rectangles or squares cut with a rotary cutter. Pieces marked T are cut from the numbered full-size paper templates.
All measurements in the rotary chart are raw cutting measurements in inches, including the ¼-inch seam allowance. The first measurement is the width across the block. The second is the height from top to bottom. The fabric codes match the color chart above.
The quantities are totals for the entire quilt. You don't have to multiply them again for repeating blocks.
Rotary Cutting Chart: R01 through R25
| Piece | Cut Size (inches) | Fabric / Quantity |
|---|---|---|
| R01 | 3 × 3⅛ | C16 |
| R02 | 3 × 3 | R8 |
| R03 | 4⅛ × 4⅛ | C12 |
| R04 | 2¼ × 2¼ | C12, B6 |
| R05 | 5¾ × 1½ | B6 |
| R06 | 4⅛ × 6¼ | C4 |
| R07 | 13/16 × 3½ | C4 |
| R08 | 3½ × 3½ | G2 |
| R09 | 6⅛ × 2⅝ | C2 |
| R10 | 3¼ × 2⅝ | W1 |
| R11 | 5 × 3 | C2 |
| R12 | 3¼ × 3 | R2 |
| R13 | 4½ × 3 | C1 |
| R14 | 2⅛ × 2 | C3 |
| R15 | 15¾ × 2 | R1 |
| R16 | 2⅛ × 4¼ | C2 |
| R17 | 2⅝ × 4¼ | R2 |
| R18 | 4⅛ × 4¼ | B2 |
| R19 | 4¼ × 4¼ | R1 |
| R20 | 2⅛ × 2½ | C2 |
| R21 | 15¾ × 2½ | R1 |
| R22 | 2⅛ × 4⅜ | C2 |
| R23 | 2⅝ × 4⅜ | R2 |
| R24 | 4⅛ × 4⅜ | B2 |
| R25 | 1⅛ × 4⅜ | R1 |
Rotary Cutting Chart: R26 through R50
| Piece | Cut Size (inches) | Fabric / Quantity |
|---|---|---|
| R26 | 3⅛ × 4⅜ | G1 |
| R27 | 1 × 4⅜ | R1 |
| R28 | 2⅛ × 4⅛ | C2 |
| R29 | 6⅞ × 4⅛ | R1 |
| R30 | 3⅛ × 4⅛ | G1 |
| R31 | 6¾ × 4⅛ | R1 |
| R32 | 4¾ × 2 | C1 |
| R33 | 4 × 2 | C1 |
| R34 | 2⅝ × 1½ | C1 |
| R35 | 1⅞ × 1½ | C1 |
| R36 | 2⅝ × 1⅞ | C1 |
| R37 | 3 × 1⅞ | N1 |
| R38 | 1⅞ × 1⅞ | C1 |
| R39 | 4½ × 2⅛ | C1 |
| R40 | 3½ × 2⅛ | N1 |
| R41 | 3¾ × 2⅛ | C1 |
| R42 | 1¼ × 1⅛ | C1 |
| R43 | 2⅛ × 1⅛ | R1 |
| R44 | 2⅝ × 1⅛ | T1 |
| R45 | 1⅛ × 1⅛ | I1 |
| R46 | 2⅜ × 1⅛ | T1 |
| R47 | 9 × 1⅛ | C1 |
| R48 | 1¼ × 1½ | C1 |
| R49 | 2⅛ × 1½ | R1 |
| R50 | 5⅛ × 1½ | T1 |
Rotary Cutting Chart: R51 through R75
| Piece | Cut Size (inches) | Fabric / Quantity |
|---|---|---|
| R51 | 9 × 1½ | C1 |
| R52 | 4⅜ × 1⅞ | C1 |
| R53 | 3⅝ × 1⅞ | T1 |
| R54 | 9 × 1⅞ | C1 |
| R55 | 4⅜ × 2 | C1 |
| R56 | 3⅝ × 2 | R1 |
| R57 | 2⅛ × 2¼ | C1 |
| R58 | 4½ × 2⅝ | T1 |
| R59 | 2⅛ × 2⅝ | C2, T2 |
| R60 | 4⅜ × 2⅝ | C1 |
| R61 | 1⅝ × 2⅝ | C1 |
| R62 | 2¼ × 2⅝ | U1 |
| R63 | 4⅜ × 4⅝ | C2 |
| R64 | 2⅛ × 4⅝ | C1, T2 |
| R65 | 1⅝ × 4⅝ | C1 |
| R66 | 2¼ × 4⅝ | U1 |
| R67 | 14 × 1 | C4 |
| R68 | 4¾ × 1 | C8 |
| R69 | 2 × 2 | R4 |
| R70 | ¾ × 1 | C8 |
| R71 | 2 × 1 | C4, R8 |
| R72 | 5 × 1½ | C8 |
| R73 | 2 × 1½ | C4, R8 |
| R74 | 14 × 1½ | C4 |
| R75 | 4½ × 5⅛ | C4, B4 |
Some very narrow cream rectangles belong in the holly and reindeer sections. Keep their exact measurements. In particular, R07 is 13/16 inch wide and R70 is ¾ inch wide before sewing.
Full-Size Triangle and Shaped-Piece Cutting Chart: T01 through T112
These are the nonrectangular pieces. Print the companion template PDF at Actual Size or 100%, then cut each numbered shape on its solid outer line. The dashed inner line is the sewing line, already positioned ¼ inch inside the cutting edge.
The following inventory gives the fabric and total number of pieces for every template. For example, T18 C3 N1 means cut three T18 pieces from cream and one from dark brown.
T01–T14: T01 G20; T02 C20; T03 G20; T04 C20; T05 R3; T06 C3; T07 R3; T08 C3; T09 R6; T10 C3; T11 C3; T12 C3; T13 R3; T14 R3.
T15–T28: T15 C3; T16 C3; T17 R6; T18 C3 N1; T19 C3 N1; T20 C3; T21 C3; T22 R6; T23 C3; T24 C3; T25 C3; T26 C3; T27 R3; T28 R3.
T29–T42: T29 C3; T30 C3; T31 R6; T32 C3; T33 C3; T34 R3; T35 C3; T36 R3; T37 C1; T38 G1; T39 C1; T40 C1; T41 G1; T42 C1.
T43–T56: T43 C1; T44 G1; T45 C1; T46 C1; T47 G1; T48 C1; T49 C1; T50 B1; T51 C1; T52 B1; T53 C1; T54 N1; T55 C1; T56 N2.
T57–T70: T57 C1; T58 N1; T59 C1; T60 N1; T61 C1; T62 N1; T63 C1; T64 N1; T65 N1; T66 C1; T67 N1; T68 N1; T69 C1; T70 C1.
T71–T84: T71 N1; T72 C1; T73 N1; T74 C1; T75 N1; T76 C1; T77 C1; T78 T1; T79 C1; T80 C1; T81 C1; T82 T1; T83 T1; T84 N1.
T85–T98: T85 C1; T86 T1; T87 C1; T88 N1; T89 W4; T90 C4; T91 W4; T92 C4 W4; T93 G4; T94 C4; T95 C4 W4; T96 G4; T97 C4; T98 G4.
T99–T112: T99 W4; T100 C4; T101 C4; T102 W4; T103 G4; T104 C4; T105 C4; T106 G4; T107 G4; T108 C4; T109 C3 R3; T110 C3 R3; T111 C3 R3; T112 C3 R3.
Cutting and Marking the Templates
- Print the template PDF on US Letter paper, single-sided, at 100% or Actual Size.
- Turn off Fit to Page, Shrink to Fit and any automatic scaling setting.
- Measure the calibration square. It must measure exactly 1 × 1 inch in both directions.
- Find the required T number in the template directory on PDF page 2.
- For a template spread across several pages, match the numbered registration crosses and tape the sheets together before cutting the paper outline.
- Place fabric right side up, with the printed side of the paper template facing up.
- Keep the top of the template facing the top of its block and align the grainline arrow parallel to the fabric selvage.
- Trace and cut around the solid outer line. Don't add another seam allowance.
- Transfer the dashed-line seam intersections to the wrong side of the fabric with a removable marker.
- Write the template number and fabric letter on a small removable label so the cut pieces don't become mixed up.
Some of the sharp triangles have long little extensions beyond their sewing points. Those are the dog ears. Don't trim them off before sewing the patch into its strip. The completed strip is squared up afterward.
The 112 template numbers represent 112 different cutting shapes. Repeated pieces are included in the quantities above, so you don't have to print a new master sheet every time a shape appears.
Additional Framing and Sashing Cutting Chart
Cut these pieces separately from the numbered motif pieces. They provide the spaces between the quilt blocks and the horizontal bands.
| Fabric | Raw Cut (inches) | Quantity |
|---|---|---|
| Cream | 1¾ × 8¼ | 2 |
| Cream | 1⅞ × 8¼ | 4 |
| Cream | 1½ × 8¼ | 2 |
| Cream | 1¼ × 8¼ | 4 |
| Cream | 2⅛ × 15 | 2 |
| Cream | 2 × 22½ | 4 |
| Cream | 1⅝ × 9¾ | 2 |
| Cream | 2½ × 9¾ | 4 |
| Cream | 27½ × 2 | 6 |
| Cream | 27½ × 2¼ | 4 |
| Cream | 27½ × 2½ | 4 |
| Burgundy | 27¼ × 1¾ | 6 |
| Burgundy | 28¾ × 1¾ | 4 |
Join matching pairs of 27½-inch cream lengths with a ¼-inch seam to make seven horizontal sashing strips, each 54½ inches long at its raw edges.
The burgundy side borders are made from three 27¼-inch lengths joined end to end for each side. Each completed side border measures 80¾ inches long.
Join two 28¾-inch burgundy lengths for each top and bottom border. Each completed end border measures 57 inches long.
All burgundy borders are cut 1¾ inches wide. After attachment, the visible burgundy border between the seam lines is 1¼ inches wide.
Cutting checkpoint: The complete pattern inventory contains 570 pieces for the individual motifs and another 48 framing cuts, giving 618 fabric pieces for the quilt top. Binding strips and backing panels are counted separately.
How to Piece the Christmas Sampler Quilt Blocks
The quilt is built from individual blocks, then those blocks are joined into six long horizontal bands. It isn't sewn as one enormous patchwork grid from the beginning.
I would keep the pieces for each block in a separate labeled group. The stars, reindeer and holly have some similar-looking triangles, but their angles and measurements aren't interchangeable.
How to Read the Block Instructions
Each block is divided into numbered horizontal strips. The instructions below give the exact pieces for each strip, reading from left to right.
For example, G/T01 C/T02 means the first piece is green fabric cut from template T01, followed by a cream piece cut from template T02.
Important: The strip diagrams in the printable pattern show the front of the quilt, with each fabric patch in its proper position. Keep those diagrams beside the numbered instructions when sewing the irregular shapes.
- Choose the pieces listed for the first strip of the block.
- Lay them right side up in the exact left-to-right order shown in the strip chart.
- Match adjacent seam-line endpoint dots with the fabric right sides together. Pin through the dots.
- Sew each shared straight edge with a ¼-inch seam allowance, following the marked sewing line.
- Open the joined pieces and press. Continue adding the pieces in the numbered order.
- Once the horizontal strip is complete, square it to the unfinished strip height and the unfinished width specified for the block.
- Repeat for the remaining strips.
- Join the completed strips from top to bottom, matching the outer edges and the important design points shown on the block diagram.
- Press and check the block's unfinished width and height before joining it to another block.
On the complicated sections, the visible fabric corners won't always line up with the corners of the adjoining piece. Match the marked seam intersections instead of stretching the fabric to make the raw corners meet.
Keep the sharp points intact until the strips have been sewn and squared. That extra fabric matters around the star points, holly leaves and reindeer antlers.
Block G: Green Flying Geese — Make 20
The top and bottom borders each contain ten green flying-geese units. All twenty geese point to the right, just as they do in the finished quilt.
Finished size: 3¾ × 7¾ inches.
Unfinished size: 4¼ × 8¼ inches.
| Strip | Finished Height | Pieces, Left to Right |
|---|---|---|
| 1 | 3⅞ in. | G/T01, C/T02 |
| 2 | 3⅞ in. | G/T03, C/T04 |
- Cut twenty each of templates T01, T02, T03 and T04 in their listed fabric colors.
- For each goose, join green T01 to cream T02 along the marked diagonal seam.
- Repeat with green T03 and cream T04.
- Square each completed strip to 4¼ inches wide, keeping its prescribed unfinished height of 4⅜ inches.
- Join the two strips, matching the green points at the middle seam.
- Press and square the assembled goose to 4¼ × 8¼ inches unfinished.
- Repeat until all twenty geese are complete.
The broad green base stays on the left and the point faces right. Don't alternate the direction of the geese. Both outside bands have the same right-pointing design.
Block A: Red Square Accent — Make 8
These are the little red squares between some of the paired flying geese. They look simple, but their surrounding cream fabric brings each accent to the same height as the geese.
Finished size: 2½ × 7¾ inches.
Unfinished size: 3 × 8¼ inches.
| Strip | Finished Height | Piece |
|---|---|---|
| 1 | 2⅝ in. | C/R01 |
| 2 | 2½ in. | R/R02 |
| 3 | 2⅝ in. | C/R01 |
- Place one red R02 square between two cream R01 rectangles.
- Sew the first cream rectangle to the upper edge of the red square.
- Sew the second cream rectangle to its lower edge.
- Press the seams and check that the finished red square measures 2½ × 2½ inches between seam lines.
- Square the completed accent block to 3 × 8¼ inches unfinished.
- Make eight identical accent blocks.
Four accents go in the top border, and four go in the bottom border. The other spaces between geese are cream rectangles, not additional red square blocks.
Piecing the Christmas Tree, House and Reindeer Blocks
Now for my favorite part of the quilt. The center has three different designs, with the evergreen on the left, the red house in the middle and the reindeer on the right.
Each block finishes at exactly 22 inches tall. Their widths are different, but the cream vertical spacers bring them together into one 54-inch-wide scene.
The construction charts below preserve the shapes, colors and proportions of the approved quilt. For the irregular shapes, the numbered template pages contain the exact cutting outlines and stitch intersections.
Block E: Four-Tier Evergreen Christmas Tree — Make 1
The tree has four green triangular tiers, with the widest branches at the bottom and a small lighter-green trunk. The cream background remains visible between its sloping branches.
Finished size: 14 × 22 inches.
Unfinished size: 14½ × 22½ inches.
| Strip | Finished Height | Pieces, Left to Right |
|---|---|---|
| 1 | 5 in. | C/T37, G/T38, C/T39 |
| 2 | 4⅞ in. | C/T40, G/T41, C/T42 |
| 3 | 5 in. | C/T43, G/T44, C/T45 |
| 4 | 5 in. | C/T46, G/T47, C/T48 |
| 5 | 2⅛ in. | C/R09, W/R10, C/R09 |
- Begin with the upper tree tier. Join cream T37 to green T38 along the marked diagonal seam.
- Attach cream T39 to the opposite side of T38. The green piece forms the first triangular tree tier.
- Square strip 1 to 14½ inches wide and 5½ inches high.
- Repeat the same construction sequence with T40, T41 and T42 for strip 2. Square it to 14½ × 5⅜ inches.
- For strip 3, join T43, T44 and T45 in their listed order. Square it to 14½ × 5½ inches.
- For strip 4, join T46, T47 and T48. This forms the widest lower branches. Square it to 14½ × 5½ inches.
- Make the trunk strip by sewing the lighter olive R10 rectangle between the two cream R09 rectangles. Square it to 14½ × 2⅝ inches.
- Join the four triangular tree strips from top to bottom, keeping their centers aligned.
- Attach the trunk strip beneath the lowest tier, with the green trunk centered under the tree.
- Press and square the completed evergreen block to 14½ × 22½ inches unfinished.
Check the four tiers before joining the trunk. The top is narrowest, and each lower tier spreads farther outward than the one above it.
Block H: Two-Story Christmas House — Make 1
The house is made from red walls, four pale blue windows, a green front door and a blue roof with a cream triangle in the center. Two brick-red chimneys rise above the roof.
It's important to keep the two-story window arrangement. The house in the pattern has two windows upstairs and two downstairs, with the door centered between the lower windows.
Finished size: 18½ × 22 inches.
Unfinished size: 19 × 22½ inches.
| Strip | Finished Height | Pieces, Left to Right |
|---|---|---|
| 1 | 2½ in. | C/R11, R/R12, C/R13, R/R12, C/R11 |
| 2 | 4¾ in. | C/T49, B/T50, C/T51, B/T52, C/T53 |
| 3 | 1½ in. | C/R14, R/R15, C/R14 |
| 4 | 3¾ in. | C/R16, R/R17, B/R18, R/R19, B/R18, R/R17, C/R16 |
| 5 | 2 in. | C/R20, R/R21, C/R20 |
| 6 | 3⅞ in. | C/R22, R/R23, B/R24, R/R25, G/R26, R/R27, B/R24, R/R23, C/R22 |
| 7 | 3⅝ in. | C/R28, R/R29, G/R30, R/R31, C/R28 |
Step 1: Piece the Two Chimneys
- Arrange the five pieces for strip 1 in their listed order.
- Sew the first red R12 rectangle between the left cream R11 and the center cream R13.
- Attach the second red R12 rectangle and the remaining cream R11.
- Press and square the chimney strip to 19 inches wide and 3 inches high.
- Check that the two red chimney sections have cream fabric between them.
Step 2: Piece the Blue Roof
- Arrange the five roof templates in order: cream T49, blue T50, cream T51, blue T52 and cream T53.
- Join T49 to T50 along their marked diagonal edge.
- Attach the cream gable T51, matching both seam-line endpoint dots.
- Continue with blue T52 and cream T53.
- Keep the two blue roof slopes on opposite sides of the cream gable triangle.
- Square the finished roof strip to 19 × 5¼ inches unfinished.
- Attach the chimney strip above the roof strip, aligning the chimney positions shown in the pattern diagram.
Step 3: Sew the Upper Floor
- Make strip 3 by joining cream R14, red R15 and cream R14. Square it to 19 × 2 inches.
- Arrange strip 4 in this order: cream R16, red R17, blue R18, red R19, blue R18, red R17 and cream R16.
- Sew the seven rectangles together to form the two upper windows.
- Keep the red R19 rectangle between the windows and a red R17 piece at each outer side.
- Square strip 4 to 19 × 4¼ inches.
- Make strip 5 by joining cream R20, red R21 and cream R20. Square it to 19 × 2½ inches.
- Join strips 3, 4 and 5 in their numbered order, matching the outer edges.
Step 4: Sew the Lower Windows and Door
- Arrange strip 6 exactly as listed in the chart, beginning and ending with cream R22.
- Join the red and blue rectangles in sequence, placing green R26 in the doorway position.
- Keep the two blue R24 windows on opposite sides of the green door section.
- Square strip 6 to 19 × 4⅜ inches.
- Make strip 7 by joining cream R28, red R29, green R30, red R31 and cream R28.
- Square strip 7 to 19 × 4⅛ inches.
- Join strip 7 beneath strip 6, aligning the green R30 door section directly below green R26.
- Join the completed lower story beneath the upper story.
- Attach the completed chimney-and-roof section at the top.
- Press and square the entire house block to 19 × 22½ inches unfinished.
Before joining the house into the quilt, look at the windows and doorway from a little distance. The two upper windows belong directly above the two lower windows, and the green door runs vertically between the lower pair. The cream triangle belongs in the roof, not in the red wall below it.
Block D: Left-Facing Pieced Christmas Reindeer — Make 1
The reindeer is the most detailed block in the quilt. It's built entirely from straight-edged pieces, including the matching antlers and the pointed tail.
Finished size: 15½ × 22 inches.
Unfinished size: 16 × 22½ inches.
The reindeer faces left. Its nose and collar are red, the eye is a small black square, and the body uses several shades of brown. The antlers rise from the actual top of the head rather than floating above it.
There are fourteen horizontal strips in this block. Keep the strips numbered as you sew because several contain small pieces that look alike.
| Strip | Finished Height | Pieces, Left to Right |
|---|---|---|
| 1 | 1½ in. | C/R32, N/T54, C/T55, N/T56, C/R33 |
| 2 | 1 in. | C/R34, N/T19, C/T57, N/T58, C/T59, N/T60, C/T61, N/T18, C/R35 |
| 3 | 1⅜ in. | C/R36, N/T62, C/T63, N/T64, N/R37, N/T65, C/T66, N/T67, C/R38 |
| 4 | 1⅝ in. | C/R39, N/T68, C/T69, N/R40, C/T70, N/T71, C/R41 |
| 5 | ½ in. | C/T72, N/T73, C/T74, N/T75, C/T76 |
| 6 | 1⅜ in. | C/T77, T/T78, C/T79 |
| 7 | ⅝ in. | C/R42, R/R43, T/R44, I/R45, T/R46, C/R47 |
| 8 | 1 in. | C/R48, R/R49, T/R50, C/R51 |
| 9 | 1⅜ in. | C/R52, T/R53, C/R54 |
| 10 | 1½ in. | C/R55, R/R56, C/T80, N/T56, C/R14 |
| 11 | 1¾ in. | C/T81, T/T82, T/T83, N/T84, C/R57 |
| 12 | 2⅛ in. | C/T85, T/T86, T/R58, C/R59 |
| 13 | 2⅛ in. | C/R60, T/R59, C/R61, T/R59, C/T87, N/T88, U/R62, C/R59 |
| 14 | 4⅛ in. | C/R63, T/R64, C/R65, T/R64, C/R63, U/R66, C/R64 |
Step 1: Piece the Antler Tips
- Lay out strip 1 using cream R32, dark brown T54, cream T55, dark brown T56 and cream R33.
- Join the pieces at their marked seam intersections, preserving the sharp antler tips.
- Square strip 1 to 16 inches wide and 2 inches high.
- For strip 2, arrange R34, T19, T57, T58, T59, T60, T61, T18 and R35 in the exact fabric order listed above.
- Sew the short dark-brown branches between their cream background pieces, following the printed strip diagram.
- Square strip 2 to 16 × 1½ inches.
- Make strip 3 with its nine listed pieces, including the dark-brown R37 center section. Square to 16 × 1⅞ inches.
- Make strip 4 with its seven listed pieces. Square to 16 × 2⅛ inches.
- Join strips 1 through 4 from top to bottom, matching the antler branches where their seams meet.
Step 2: Join the Antler Bases to the Head
- Make strip 5 from cream T72, dark-brown T73, cream T74, dark-brown T75 and cream T76.
- Square this narrow connecting strip to 16 × 1 inch.
- Make strip 6 from cream T77, body-brown T78 and cream T79. Square to 16 × 1⅞ inches.
- Place the strip 5 antler bases directly above the brown head section in strip 6, following the matching seam-line points in the block diagram.
- Join the two strips. Both antler roots must connect to the head, with no separate cream gap beneath them.
- Attach the previously sewn antler strips 1 through 4 above this assembly.
- Press the small angled seams open.
This connection matters. The reindeer has two balanced sets of antler branches, with both sides growing from the top of its head. Keep the little cream background spaces between the branches, but don't leave a gap between the antler bases and the head itself.
Step 3: Piece the Face and Red Nose
- Arrange strip 7 using cream R42, red R43, brown R44, black R45, brown R46 and cream R47.
- Join the pieces in that order. The black R45 square forms the reindeer's eye.
- Square strip 7 to 16 × 1⅛ inches.
- For strip 8, join cream R48, red R49, brown R50 and cream R51. Square to 16 × 1½ inches.
- Align the red R49 piece with the red nose section in strip 7.
- Make strip 9 from cream R52, brown R53 and cream R54. Square to 16 × 1⅞ inches.
- Join strips 7, 8 and 9 beneath the upper head section in their numbered order.
- Check that the nose points left and the black square eye remains visible on the side of the face.
Step 4: Piece the Red Collar, Torso and Tail
- Make strip 10 from cream R55, red R56, cream T80, dark-brown T56 and cream R14. Square to 16 × 2 inches.
- Place the red section directly below the reindeer's head to form the collar.
- Make strip 11 from cream T81, body-brown T82, body-brown T83, dark-brown T84 and cream R57. Square to 16 × 2¼ inches.
- Make strip 12 from cream T85, body-brown T86, body-brown R58 and cream R59. Square to 16 × 2⅝ inches.
- Join strips 10, 11 and 12 in order, preserving the pointed shape of the raised tail at the right.
- Keep the triangular wedge beneath the tail dark brown, as shown in the approved reindeer design.
- Check that the front chest slopes into the brown body rather than forming a square corner.
Step 5: Piece the Three Visible Legs
- Make strip 13 from cream R60, brown R59, cream R61, brown R59, cream T87, dark-brown T88, rear-leg brown R62 and cream R59.
- Square strip 13 to 16 × 2⅝ inches.
- Make strip 14 from cream R63, brown R64, cream R65, brown R64, cream R63, rear-leg brown R66 and brown R64.
- Square strip 14 to 16 × 4⅝ inches.
- Join strips 13 and 14, aligning the leg columns from top to bottom.
- Keep three visible legs, with the darker rear leg beneath the haunch.
- Attach the leg section beneath the torso.
- Join the completed torso, collar, head and antler sections from bottom to top in their numbered order.
- Press and square the complete reindeer block to 16 × 22½ inches unfinished.
The final check is the outline. You want a left-facing reindeer with a red nose, black square eye, matched antlers, red collar, brown body, pointed brown tail and three visible legs. Those little details are what make the pieced animal recognizable.
Don't replace the intricate antler templates with ordinary rectangles or leave off the tail wedge. The template geometry is part of the design, and the finished block measurements depend on those pieces fitting together as drafted.
Piecing the Christmas Stars, Holly Sprigs and Pinwheel Blocks
These are the blocks that give the quilt its traditional sampler look. The stars make a bold row above the house, while the holly motifs and pinwheels bring smaller bits of red and green into the lower half.
The blue pieces are a nice touch, too. They repeat the blue from the house roof and windows, so that color doesn't appear in just one place.
Block S: Red Eight-Point Christmas Star — Make 3
Each Christmas star has eight large red points around a pale blue cross-shaped center. The narrow cream patches around the blue center keep the red and blue fabrics separate.
Finished size: 14½ × 14½ inches.
Unfinished size: 15 × 15 inches.
| Strip | Finished Height | Pieces, Left to Right |
|---|---|---|
| 1 | 3⅝ in. | C/R03, R/T05, C/T06, R/T07, C/R03 |
| 2 | ⅞ in. | C/T08, R/T09, C/T10, R/T09, C/T11 |
| 3 | 1¾ in. | C/T12, R/T13, C/R04, B/R04, C/R04, R/T14, C/T15 |
| 4 | 1 in. | C/T16, R/T17, C/T18, B/R05, C/T19, R/T17, C/T20 |
| 5 | 1 in. | C/T21, R/T22, C/T23, B/R05, C/T24, R/T22, C/T25 |
| 6 | 1¾ in. | C/T26, R/T27, C/R04, B/R04, C/R04, R/T28, C/T29 |
| 7 | ⅞ in. | C/T30, R/T31, C/T32, R/T31, C/T33 |
| 8 | 3⅝ in. | C/R03, R/T34, C/T35, R/T36, C/R03 |
- Begin with strip 1. Join the two red upper-point templates between their cream background pieces.
- Square strip 1 to 15 × 4⅛ inches.
- Make strip 2 with the two red T09 pieces and three cream shapes listed in the chart. Square to 15 × 1⅜ inches.
- Make strip 3 by joining cream T12, red T13, cream R04, blue R04, cream R04, red T14 and cream T15. Square to 15 × 2¼ inches.
- For strip 4, place blue R05 in the middle of the listed red and cream pieces. Square to 15 × 1½ inches.
- Make strip 5 in the same manner, using its own template numbers and another blue R05. Square to 15 × 1½ inches.
- Make strip 6 from its seven listed pieces, with the blue R04 square centered between two cream R04 squares. Square to 15 × 2¼ inches.
- Make strip 7 with red T31 pieces and the cream templates shown in the chart. Square to 15 × 1⅜ inches.
- Make strip 8 from cream R03, red T34, cream T35, red T36 and cream R03. Square to 15 × 4⅛ inches.
- Join the eight strips from top to bottom, following the full star diagram and matching the seam intersections around the points.
- Press and square the completed star to 15 × 15 inches unfinished.
- Repeat twice more, making three identical stars.
Before joining a star to its neighbors, check the center. The blue pieces must form a cross, with a vertical arm and a horizontal arm. The red points belong around that center, two on each of the star's four sides.
Block K: Green Star Separator — Make 2
Two little green squares sit between the three Christmas stars. Their cream backgrounds keep the stars from touching each other.
Finished size: 3⅝ × 14½ inches.
Unfinished size: 4⅛ × 15 inches.
| Strip | Finished Height | Pieces, Left to Right |
|---|---|---|
| 1 | 5¾ in. | C/R06 |
| 2 | 3 in. | C/R07, G/R08, C/R07 |
| 3 | 5¾ in. | C/R06 |
- Sew a narrow cream R07 rectangle to each side of the green R08 square.
- Square the center strip to 4⅛ × 3½ inches.
- Join one cream R06 rectangle above the green-square strip and another below it.
- Press and square the completed separator to 4⅛ × 15 inches unfinished.
- Make two identical separators.
The green center finishes at 3 × 3 inches. It's a small detail, but it repeats the olive color from the Christmas tree and the flying-geese borders.
Block L: Geometric Pieced Holly Sprig — Make 4
The holly row is made from four matching sprigs. Each sprig has angular green leaves spreading to the sides, with three little red berry squares below the center.
I'd keep the dark green outer leaves and lighter olive inner leaves just as pictured. That change in color makes the geometric shapes easier to read.
Finished size: 13½ × 7 inches.
Unfinished size: 14 × 7½ inches.
| Strip | Finished Height | Pieces, Left to Right |
|---|---|---|
| 1 | ½ in. | C/R67 |
| 2 | ½ in. | C/R68, W/T89, C/T90, W/T91, C/R68 |
| 3 | 2 in. | C/T92, G/T93, W/T92, C/T94, W/T95, G/T96, C/T95 |
| 4 | 1½ in. | C/T97, G/T98, W/T99, C/T100, R/R69, C/T101, W/T102, G/T103, C/T104 |
| 5 | ½ in. | C/T105, G/T106, C/R70, R/R71, C/R71, R/R71, C/R70, G/T107, C/T108 |
| 6 | 1 in. | C/R72, R/R73, C/R73, R/R73, C/R72 |
| 7 | 1 in. | C/R74 |
Step 1: Make the Upper Leaf Sections
- Begin with cream R67 for strip 1. This is the narrow cream section across the top of the sprig.
- Make strip 2 from cream R68, lighter green T89, cream T90, lighter green T91 and cream R68.
- Join the five pieces at their marked seam intersections and square to 14 × 1 inch.
- For strip 3, arrange T92, T93, T92, T94, T95, T96 and T95 in the exact fabric order from the chart.
- Join the angular green and cream pieces to form the upper leaf shapes.
- Square strip 3 to 14 × 2½ inches.
Step 2: Piece the Leaves Around the Center Berry
- Arrange the nine pieces of strip 4 in their listed order, with the red R69 square near the center.
- Join the left-side cream, dark green and lighter green shapes first.
- Attach the cream T100 piece, then the red R69 square and cream T101.
- Finish with lighter green T102, dark green T103 and cream T104.
- Match the diagonal points on the printed holly diagram so the two outward-facing leaves retain their angular notches.
- Square the strip to 14 × 2 inches unfinished.
Step 3: Make the Berry Cluster
- Make strip 5 from its nine listed pieces, keeping the two red R71 pieces separated by cream R71.
- Square strip 5 to 14 × 1 inch.
- Make strip 6 by joining cream R72, red R73, cream R73, red R73 and cream R72.
- Square strip 6 to 14 × 1½ inches.
- Keep the red squares aligned with the berry arrangement in the printed block diagram.
- Place cream R74 beneath the berry section as strip 7.
Step 4: Assemble the Complete Holly Sprig
- Join strips 1 through 7 from top to bottom.
- Match the green diagonal seams across the leaf sections before sewing each horizontal seam.
- Keep the two dark outer leaves pointing outward and the lighter green inner pieces facing the middle.
- Check that one red berry sits above two spaced red berries.
- Press and square the complete holly sprig to 14 × 7½ inches unfinished.
- Make four identical sprigs, all facing the same way.
Each sprig has three red berries, making twelve berries across the completed row. The four blocks join directly to one another without vertical cream sashing between them.
Block P: Red Pinwheel — Make 3
The lower patchwork row has three red pinwheels. These are much simpler than the stars because each pinwheel is built from four diagonal red-and-cream squares.
Finished size: 9¼ × 9¼ inches.
Unfinished size: 9¾ × 9¾ inches.
| Strip | Finished Height | Pieces, Left to Right |
|---|---|---|
| 1 | 4⅝ in. | C/T109, R/T110, C/T111, R/T112 |
| 2 | 4⅝ in. | R/T111, C/T112, R/T109, C/T110 |
- For the top strip, join cream T109 to red T110 to form the first diagonal square.
- Join cream T111 to red T112 for the second diagonal square.
- Sew the two completed squares together to form strip 1.
- Square strip 1 to 9¾ × 5⅛ inches.
- For the lower strip, join red T111 to cream T112, then red T109 to cream T110.
- Sew those two diagonal squares together, keeping their red triangles in the orientation shown in the diagram.
- Square strip 2 to 9¾ × 5⅛ inches.
- Join the two strips, matching all four diagonal seams at the pinwheel center.
- Press and square the completed block to 9¾ × 9¾ inches unfinished.
- Repeat to make three identical pinwheels.
All three pinwheels turn in the same direction. Check the red triangles before joining the two strips, because reversing a square would change the pattern.
Block B: Pale Blue and Cream Checker — Make 2
The two blue checker blocks sit between the red pinwheels. Each one has four large squares arranged diagonally, with blue in the upper left and lower right.
Finished size: 8 × 9¼ inches.
Unfinished size: 8½ × 9¾ inches.
| Strip | Finished Height | Pieces, Left to Right |
|---|---|---|
| 1 | 4⅝ in. | B/R75, C/R75 |
| 2 | 4⅝ in. | C/R75, B/R75 |
- Join one blue R75 rectangle to one cream R75 rectangle for the upper strip, with blue on the left.
- For the lower strip, join cream R75 to blue R75, with blue on the right.
- Square each strip to 8½ × 5⅛ inches.
- Join the upper and lower strips, matching the center vertical seam.
- Press and square the block to 8½ × 9¾ inches unfinished.
- Make two identical checker blocks.
That's all there is to the blue blocks. They give you a nice break from the smaller triangle work before the quilt's final assembly.
How to Assemble the Six Christmas Sampler Quilt Rows
Once the individual blocks are finished, the quilt comes together in six horizontal bands. Each band must measure 54 inches wide between its seam lines. That's the measurement that keeps the stars, Christmas scene, holly and borders aligned.
Don't sew the six bands together until you've checked their widths. A small difference in one block can become a much bigger problem when the full quilt top is assembled.
Band 1: Top Flying-Geese Border
Finished band: 54 × 7¾ inches.
Unfinished band: 54½ × 8¼ inches.
Use ten G flying-geese blocks, four A red accent blocks and the cream vertical spacer pieces from the framing chart.
Exact left-to-right layout:
- Cream spacer, 1¼ inches finished width
- Two G flying-geese blocks
- One A red accent block
- Cream spacer, 1⅜ inches finished width
- Two G flying-geese blocks
- One A red accent block
- Cream spacer, 1⅜ inches finished width
- Two G flying-geese blocks
- One A red accent block
- Cream spacer, 1 inch finished width
- Two G flying-geese blocks
- One A red accent block
- Cream spacer, ¾ inch finished width
- Two G flying-geese blocks
- Cream spacer, ¾ inch finished width
Sew the pieces together in that order, keeping every green arrow pointed right. Press the seams and check that the band measures 54½ × 8¼ inches unfinished.
Band 2: Three Christmas Stars
Finished band: 54 × 14½ inches.
Unfinished band: 54½ × 15 inches.
- Begin with a cream spacer measuring 1⅝ inches finished width.
- Attach the first S star block.
- Attach one K green separator block.
- Attach the second S star block.
- Attach the second K green separator block.
- Attach the third S star block.
- Finish with another 1⅝-inch-wide cream spacer.
All three stars face the same direction, with their blue crosses upright. Check that the two green separator squares sit at the same height.
The completed band must measure 54½ × 15 inches unfinished.
Band 3: Christmas Tree, House and Reindeer Scene
Finished band: 54 × 22 inches.
Unfinished band: 54½ × 22½ inches.
This is the centerpiece of the quilt. Keep the scene in the exact order shown in the main page image.
- Begin with a cream spacer measuring 1½ inches finished width.
- Attach the evergreen tree block E.
- Add another 1½-inch cream spacer.
- Attach the two-story red house block H.
- Add another 1½-inch cream spacer.
- Attach the left-facing reindeer block D.
- Finish with the fourth 1½-inch cream spacer.
- Press and check the completed band for a 54½-inch unfinished width and 22½-inch unfinished height.
The tree stays on the left. The red house stays in the center. The reindeer stays on the right, facing toward the house.
That's the arrangement. Don't reverse the scene or turn the reindeer around.
Band 4: Four Geometric Holly Sprigs
Finished band: 54 × 7 inches.
Unfinished band: 54½ × 7½ inches.
- Lay out the four completed L holly blocks from left to right.
- Keep the dark green leaves extending outward and the lighter green sections oriented identically in all four blocks.
- Check that all four groups of red berries are beneath their corresponding green leaves.
- Sew the four blocks together directly, without additional vertical sashing.
- Press and check the unfinished band size of 54½ × 7½ inches.
This row sits immediately below the winter scene, separated by a narrow cream horizontal sashing strip.
Band 5: Red Pinwheels and Blue Checker Blocks
Finished band: 54 × 9¼ inches.
Unfinished band: 54½ × 9¾ inches.
- Begin with a cream spacer measuring 1⅛ inches finished width.
- Attach the first red P pinwheel.
- Add a 2-inch-wide finished cream spacer.
- Attach the first blue B checker block.
- Add another 2-inch cream spacer.
- Attach the second red P pinwheel.
- Add another 2-inch cream spacer.
- Attach the second blue B checker block.
- Add another 2-inch cream spacer.
- Attach the third red P pinwheel.
- Finish with a 1⅛-inch cream spacer.
- Press and check that the completed band measures 54½ × 9¾ inches unfinished.
There are three red pinwheels and two blue checker blocks. Both blue blocks have their blue patches in the upper-left and lower-right positions.
Band 6: Bottom Flying-Geese Border
Finished band: 54 × 7¾ inches.
Unfinished band: 54½ × 8¼ inches.
Make the bottom band with the remaining ten G flying-geese units and four A red accent units. Follow the exact Band 1 spacer measurements and block sequence.
Every goose still points to the right. The bottom border is not turned upside down or reversed.
Assembly Checkpoints
| Band | Finished Height | Unfinished Size |
|---|---|---|
| 1. Top flying geese | 7¾ in. | 54½ × 8¼ in. |
| 2. Three stars | 14½ in. | 54½ × 15 in. |
| 3. Winter scene | 22 in. | 54½ × 22½ in. |
| 4. Holly sprigs | 7 in. | 54½ × 7½ in. |
| 5. Pinwheels and checkers | 9¼ in. | 54½ × 9¾ in. |
| 6. Bottom flying geese | 7¾ in. | 54½ × 8¼ in. |
The combined finished height of the six pieced bands is 68¼ inches. The cream sashing and burgundy borders provide the remaining height of the quilt.
Join the Bands with Cream Horizontal Sashing
The quilt has seven horizontal cream sashing strips. That includes the cream margin above the first band, the margin below the sixth band, and the five strips between the bands.
Join two matching 27½-inch cream pieces end to end for each sashing strip, using a ¼-inch seam. Each completed strip will measure 54½ inches long.
From top to bottom, the cream sashing has these finished heights:
- Above Band 1: 1½ inches
- Between Bands 1 and 2: 1¾ inches
- Between Bands 2 and 3: 1½ inches
- Between Bands 3 and 4: 1½ inches
- Between Bands 4 and 5: 1¾ inches
- Between Bands 5 and 6: 2 inches
- Below Band 6: 2 inches
The matching raw sashing-strip heights are 2, 2¼, 2, 2, 2¼, 2½ and 2½ inches.
- Lay the six completed bands on a large flat surface in the correct top-to-bottom order.
- Place each cream sashing strip in its assigned position.
- Sew the first cream strip to the upper edge of Band 1.
- Continue joining the sashing and quilt bands in order, matching the raw outer edges.
- Press the seams as you go, taking care not to stretch the long horizontal edges.
- Attach the final cream strip below Band 6.
- Measure the assembled center. It must measure 54½ × 80¾ inches at the raw edges.
Add the Burgundy Outer Border
- Join three burgundy 27¼ × 1¾-inch strips end to end with ¼-inch seams. Make two completed side-border strips, each 80¾ inches long.
- Attach one burgundy strip to each long side of the quilt center.
- Press the border seams toward the burgundy.
- Join two burgundy 28¾ × 1¾-inch strips for the upper border. Repeat for the lower border. Each completed strip measures 57 inches long.
- Attach the top and bottom burgundy borders.
- Press and measure the completed quilt top.
Final quilt-top checkpoint: The raw outer dimensions are 57 × 83¼ inches. The finished design measurement between the outer seam lines is 56½ × 82¾ inches.
Keep the burgundy border narrow. It's meant to frame the Christmas patchwork, not compete with the stars, reindeer or holly.
Download the Free Christmas Sampler Quilt Pattern and Templates
I've divided the printable instructions into two PDF files. The first contains the complete quilt pattern, including cutting charts, block diagrams and row assembly. The second contains the full-size templates for the triangle and shaped pieces.
You'll want both files for this quilt. The pattern explains where every piece belongs, and the templates provide the exact cutting shapes for the stars, Christmas tree, house, reindeer, holly and pinwheels.
Free Christmas Sampler Quilt PDF Downloads
Download the Complete Christmas Sampler Quilt Pattern PDF (25 pages)
Download the Full-Size Christmas Sampler Quilt Templates PDF (72 pages)
How to Print the Christmas Quilt Templates
- Download both PDFs and save them where you can find them again.
- Open the template PDF in a PDF reader.
- Select US Letter paper, measuring 8½ × 11 inches.
- Choose Actual Size or 100% in the print settings.
- Turn off Fit to Page, Shrink to Fit and booklet printing.
- Print the first template page and measure the 1-inch calibration square in both directions.
- If the square measures correctly, print the remaining template sheets you need.
- Consult the template directory on PDF page 2 for the page number associated with each T shape.
- For a large template spread across multiple pages, match the numbered registration crosses. Trim the left paper margin on the subsequent tile through the two LEFT JOIN crosses, align those crosses with the previous tile, and tape the sheets together.
- Check that the solid cutting lines and dashed sewing lines continue accurately across each taped join before cutting the complete paper template.
The solid outside line on each template is the fabric cutting line. The dashed line is where you'll sew. The black dots mark the seam intersections.
Don't add another ¼-inch seam allowance. It's already included in the printed cutting outline.
The completed PDF pattern includes the full cutting inventory, the diagram for each block, and the final quilt assembly measurements. Keep it available while working through the instructions above, especially for the reindeer antlers and the small holly pieces.
The pattern dimensions are mathematically drafted and diagrammatically checked against the approved design. They are not measurements from a physically test-sewn quilt.
Quilting, Binding and Finishing the Christmas Sampler Quilt
Once all six bands and the burgundy border are sewn together, the detailed patchwork is finished. The last part is layering the quilt, adding the quilting stitches and binding the edges.
I'd keep the quilting fairly simple around the reindeer and the small holly berries. Those little pieced shapes are already decorative, and there's no reason to bury them under a busy stitching design.
Prepare the Quilt Backing
- Cut two backing panels measuring 40 × 92 inches each.
- Remove the selvages from the edges that will be joined.
- Place the panels right sides together along their 92-inch edges.
- Sew the long seam with a ¼-inch seam allowance.
- Press the seam open.
- Lay the completed backing flat, wrong side facing up.
The backing is larger than the quilt top, leaving room around the edges during quilting.
Layer the Quilt
- Spread the prepared backing on a large flat surface, wrong side up.
- Smooth the backing and secure it temporarily so it doesn't shift.
- Center the 66 × 92-inch batting over the backing.
- Place the completed quilt top over the batting, right side up.
- Check that the backing and batting extend beyond the quilt top on every side.
- Smooth the layers from the middle outward.
- Baste the three layers together using your preferred quilting method.
Quilt the Christmas Sampler Design
Straight-line quilting along the cream sashing would suit this design nicely. It separates the six horizontal bands and lets the pieced Christmas motifs remain the main attraction.
Here is one way to organize the quilting without changing the patchwork:
- Quilt along the horizontal cream sashing strips to establish the main divisions.
- Add stitching around or within the three large star blocks, keeping the blue cross-shaped centers visible.
- Quilt the cream background around the evergreen tree, house and reindeer.
- Add quilting within the larger red house panels and green tree triangles if desired.
- Continue through the four holly sprigs, keeping the stitching clear of the small berry intersections.
- Quilt through the red pinwheels and blue checker blocks.
- Finish the flying-geese bands and the outer burgundy border.
Space the quilting stitches within the limits specified by your batting manufacturer. The Christmas motifs don't require a particular decorative quilting pattern, so the stitching design can remain simple.
Cut and Prepare the Burgundy Binding
The binding matches the narrow burgundy outer border, giving the finished quilt one continuous dark red frame.
Binding strips: Eight strips, each 2½ × 40 inches, cut from the additional ¾ yard of burgundy fabric.
- Cut all eight binding strips to the stated size.
- Join their short ends with diagonal seams to make one continuous binding length.
- Trim the diagonal seam allowances to ¼ inch.
- Press the joining seams open to reduce bulk.
- Fold the binding lengthwise with wrong sides together.
- Press the folded binding along its entire length.
Attach the Quilt Binding
- After quilting, trim the excess batting and backing even with the raw quilt-top edges.
- Beginning along one straight side, position the binding against the front of the quilt with its raw edges aligned with the quilt's raw edge.
- Leave a loose binding tail long enough for the final join.
- Sew the binding to the front with a ¼-inch seam allowance.
- At each corner, stop stitching ¼ inch before the edge.
- Fold the binding upward at a 45-degree angle, then fold it downward along the next edge to form a mitered corner.
- Continue around the quilt, treating the remaining corners in the same way.
- Join the two binding ends with a diagonal seam, trim and press that seam, and finish attaching the binding.
- Fold the binding over the raw edge to the back of the quilt.
- Secure the folded edge with hand stitching or machine stitching, keeping the corners neatly mitered.
For an additional reference on binding preparation, the American Quilter's Society explains how to calculate and prepare quilt binding strips.
Final Christmas Sampler Quilt Measurements and Check
After the quilting and binding are complete, lay the quilt flat and check the pieced design from top to bottom.
- The top and bottom flying-geese borders both point right.
- The three red stars have pale blue cross-shaped centers.
- The evergreen has four green tiers and a centered trunk.
- The house has two chimneys, four blue windows, a green door and its original blue-and-cream roof.
- The reindeer faces left, with balanced antlers connected to its head, a red nose and collar, a brown tail and three visible legs.
- All four holly sprigs have their green angular leaves and three red berries.
- Three red pinwheels alternate with two blue checker blocks.
- The cream sashing separates all six bands.
- The narrow burgundy border runs around the entire quilt.
The calculated finished design is 56½ × 82¾ inches between the perimeter seam lines. The nominal outside dimensions across the bound raw-edge position are approximately 57 × 83¼ inches before quilting take-up or washing.
This is a Christmas quilt with quite a bit of character. The red house, evergreen and reindeer make a charming winter scene, while the stars, holly, pinwheels and flying geese give it the familiar look of traditional patchwork.
And it's all pieced. That's what makes this design especially satisfying.
If you're interested in more handmade quilts beyond Christmas, there's also my collection of baby quilt ideas and patterns, with other themes, sizes and patchwork styles to explore.
When you click on links to various merchants on this site and make a purchase, this may result in this site earning a commission. This does not affect the price you pay.

UBGI Gold Standard 2026
Reviewed under the site's
editorial checklist.
Photos, decorating ideas, party setups and reader submissions are shared for inspiration unless a page is specifically presented as a pattern, tutorial, reference guide or step-by-step project. Follow the instructions, measurements, safety guidance and manufacturer directions provided for the particular project or product.
About Jan | Contact | Baby Nursery Ideas (Blog) | Site Map | Privacy Policy | Disclosure Policy | Disclaimer | Affiliate Disclosure | Earnings Disclosure | Facebook | Pinterest
I am a participant in the Amazon Services LLC Associates Program, an affiliate advertising program designed to provide a means for us to earn fees by linking to Amazon. As an Amazon Associate I earn from qualifying purchases.
Copyright © 2006-2026. All Rights Reserved.