Five Little Snowmen Handprint Art with an Original Baby Keepsake Poem
By Jan Bay
Five Little Snowmen Handprint Art turns one tiny baby handprint into a winter keepsake filled with personality. Each finger becomes a snowman wearing its own colorful hat or scarf, while an original poem tells the story of all five. This project shows you how to make a fold-open keepsake card with the painted handprint on one side and the poem on the other. Add your baby's name and date for a handmade gift that parents and grandparents can treasure long after those little hands have grown.
More Baby Handprint and Christmas Keepsake Ideas
Baby Christmas Crafts and Keepsakes
See Supplies for This Project Here.
Jump to a Section
See the Finished Five Little Snowmen Handprint Art Keepsake
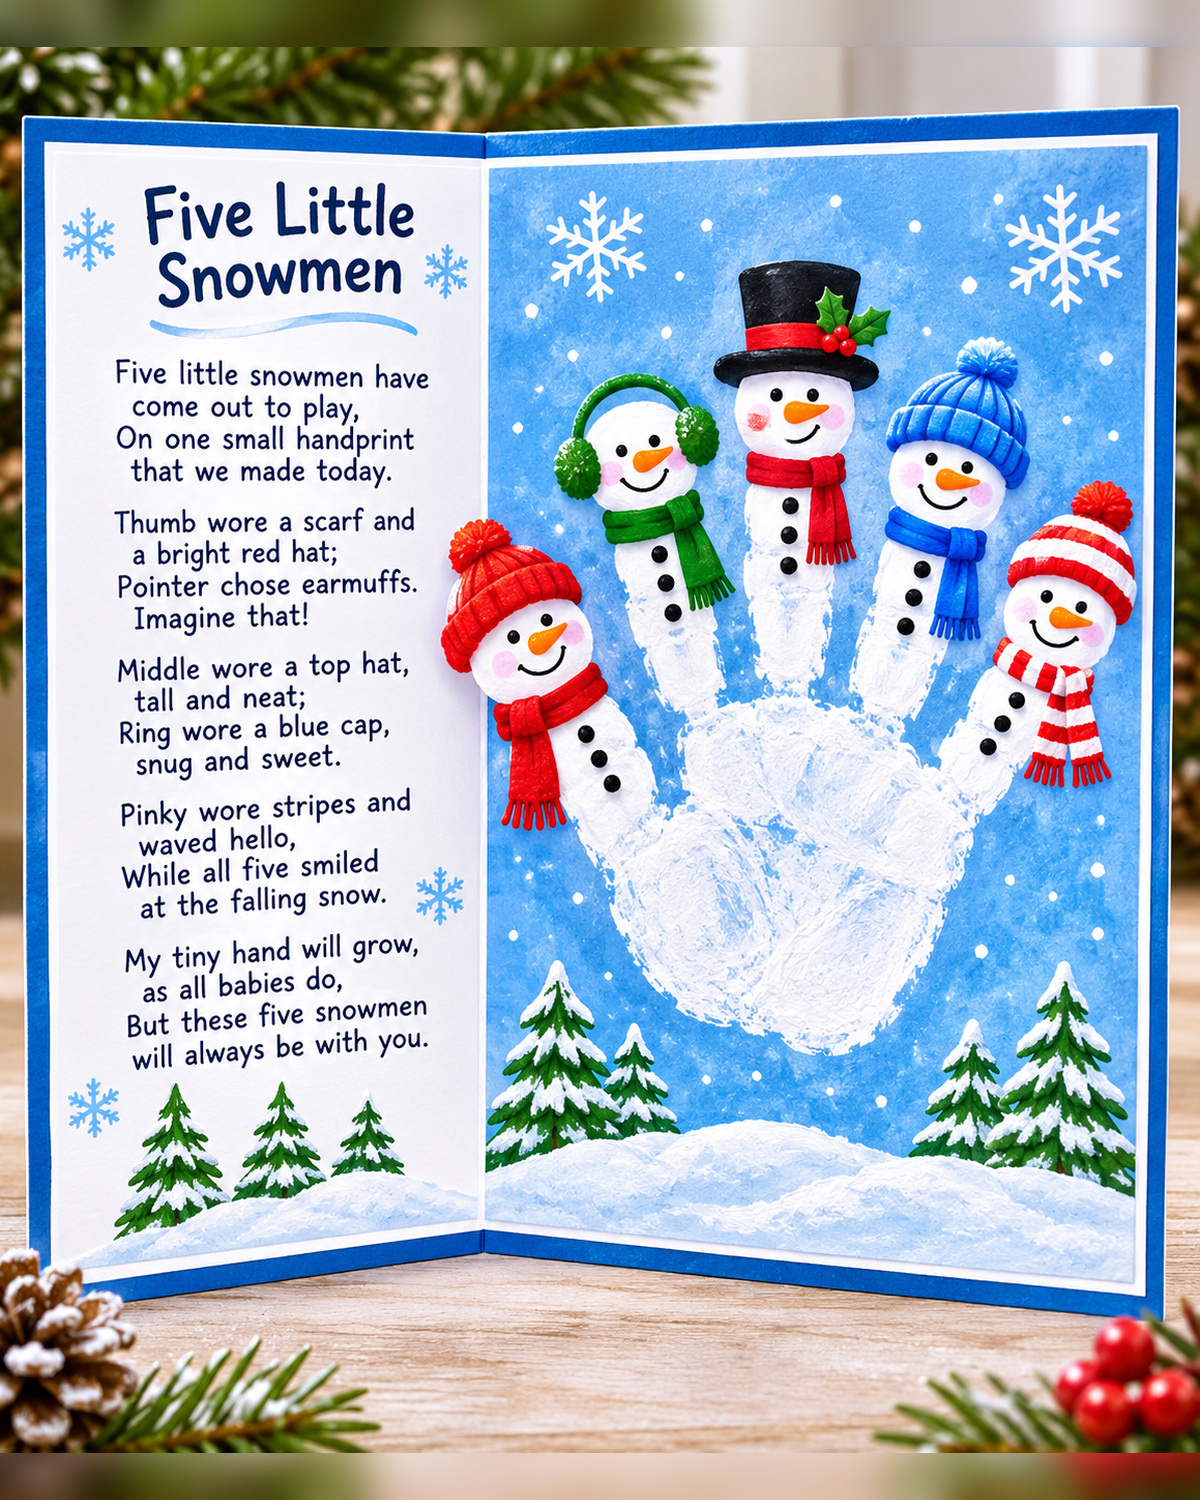
The finished project is a fold-open winter keepsake with two tall panels. The left side holds our original Five Little Snowmen poem, and the right side features a white handprint with five little snowmen peeking up from the fingers.
Each snowman has its own personality. Thumb wears a red hat, Pointer has green earmuffs, Middle wears a tall black top hat, Ring has a blue winter cap, and Pinky finishes the group with red-and-white stripes.
The fun is in those little differences. You don't need five elaborate snowmen. Give each one a cheerful face, a few buttons and the accessories mentioned in the poem. They'll look like they belong together without being identical.
Finished Size and Card Layout
For the full-size keepsake, start with one 12 x 12-inch sheet of blue cardstock. Fold it in half to make a tall card with two 6 x 12-inch panels.
- Card open: 12 inches wide x 12 inches tall.
- Card closed: 6 inches wide x 12 inches tall.
- Left poem panel: 5 1/2 inches wide x 11 1/2 inches tall.
- Right handprint panel: 5 1/2 inches wide x 11 1/2 inches tall.
- Visible blue border: 1/4 inch around each inside panel.
- Handprint: The child's actual hand size, with enough extra room for five decorated heads.
I'd choose blue for the outside of the card, white for the poem panel and a lighter blue for the handprint background. The white snowmen will show up clearly against the blue paper.
The finished example shows snowy hills, little evergreen trees and scattered snowflakes around the handprint. They're painted details, so there's no need to buy miniature decorations or attach anything bulky.
Our example image is a styled illustration of the finished keepsake. The hats, scarves, holly and pom-poms may look raised in the picture, but you'll paint or draw those details flat on the paper. You don't need to make separate accessories. Keep Thumb's hat and scarf within the right-hand artwork panel rather than extending them across the center crease. That way, the card will close without catching or bending the decorations.
Before you begin: The handprint is the part worth preserving. A baby's smaller print won't fill the panel quite like an older child's hand. That's fine. Keep the actual shape and size rather than stretching the fingers to make them look bigger.
Because the poem mentions specific fingers, we're going to arrange the print with the thumb on the left and the pinky on the right. Check that placement before making the final print. It will make the decorating much easier.
Supplies You'll Need for the Snowman Handprint Keepsake
You can make this project with ordinary paper-crafting supplies. I'd spend a little extra on sturdy cardstock and a good white marking product. The rest can be done with small amounts of paint and markers you may already have.
Paper and Card Supplies
- One 12 x 12-inch sheet of medium or dark blue cardstock, preferably about 80 to 110 lb cover weight, for the folded card
- One 12 x 12-inch sheet of smooth white paper or lightweight cardstock, trimmed to 5 1/2 x 11 1/2 inches for the poem
- One 12 x 12-inch sheet of light blue cardstock, trimmed to 5 1/2 x 11 1/2 inches for the handprint
- Extra paper for practice handprints
- Ruler and pencil
- Paper trimmer or scissors, used by an adult
- Glue stick or acid-free double-sided adhesive
- Bone folder or the smooth edge of a ruler for making the card fold
Paint and Decorating Supplies
- White marking paint specifically labeled as suitable for the intended skin-contact use, if you're making a direct painted handprint
- White opaque paint or a white paint marker for adult-added snow and touch-ups
- Black, orange, red, green and blue craft paints or paint markers for decorating the dried print
- Small detail paintbrushes, including a fine brush for eyes and mouths
- Pink paint or pencil for optional rosy cheeks
- A fine-tip dark blue pen for the poem if you're writing it by hand
- A soft cloth, warm water and soap for cleaning the child's hand immediately after printing
- A protective covering for your work surface
About the white handprint: Washable and non-toxic are useful labels, but they don't automatically mean that a paint is intended for a baby's skin. Check the product directions before applying anything to the hand. If the label doesn't specifically permit that use, don't use it for direct skin contact.
You can also skip skin-contact paint entirely. Trace an open hand onto paper, cut out the shape, transfer the outline to the blue panel and fill it in with white paint. That gives you a traced-hand version of the same project.
The American Academy of Pediatrics guide to choosing art supplies for children explains what to look for on art-material labels, including the ASTM D-4236 statement and appropriate product warnings.
Keep all materials out of your baby's mouth and eyes, and supervise the handprint activity closely. Adults should handle the cutting, gluing, lettering and decorating. The finished card is a keepsake for display or storage, not a toy.
One little shortcut: Use colored paper for the sky rather than painting an entire blue background. You'll save drying time, avoid wrinkled paper and have a nice, even color behind the white snowmen.
Free Five Little Snowmen Handprint Art Printable
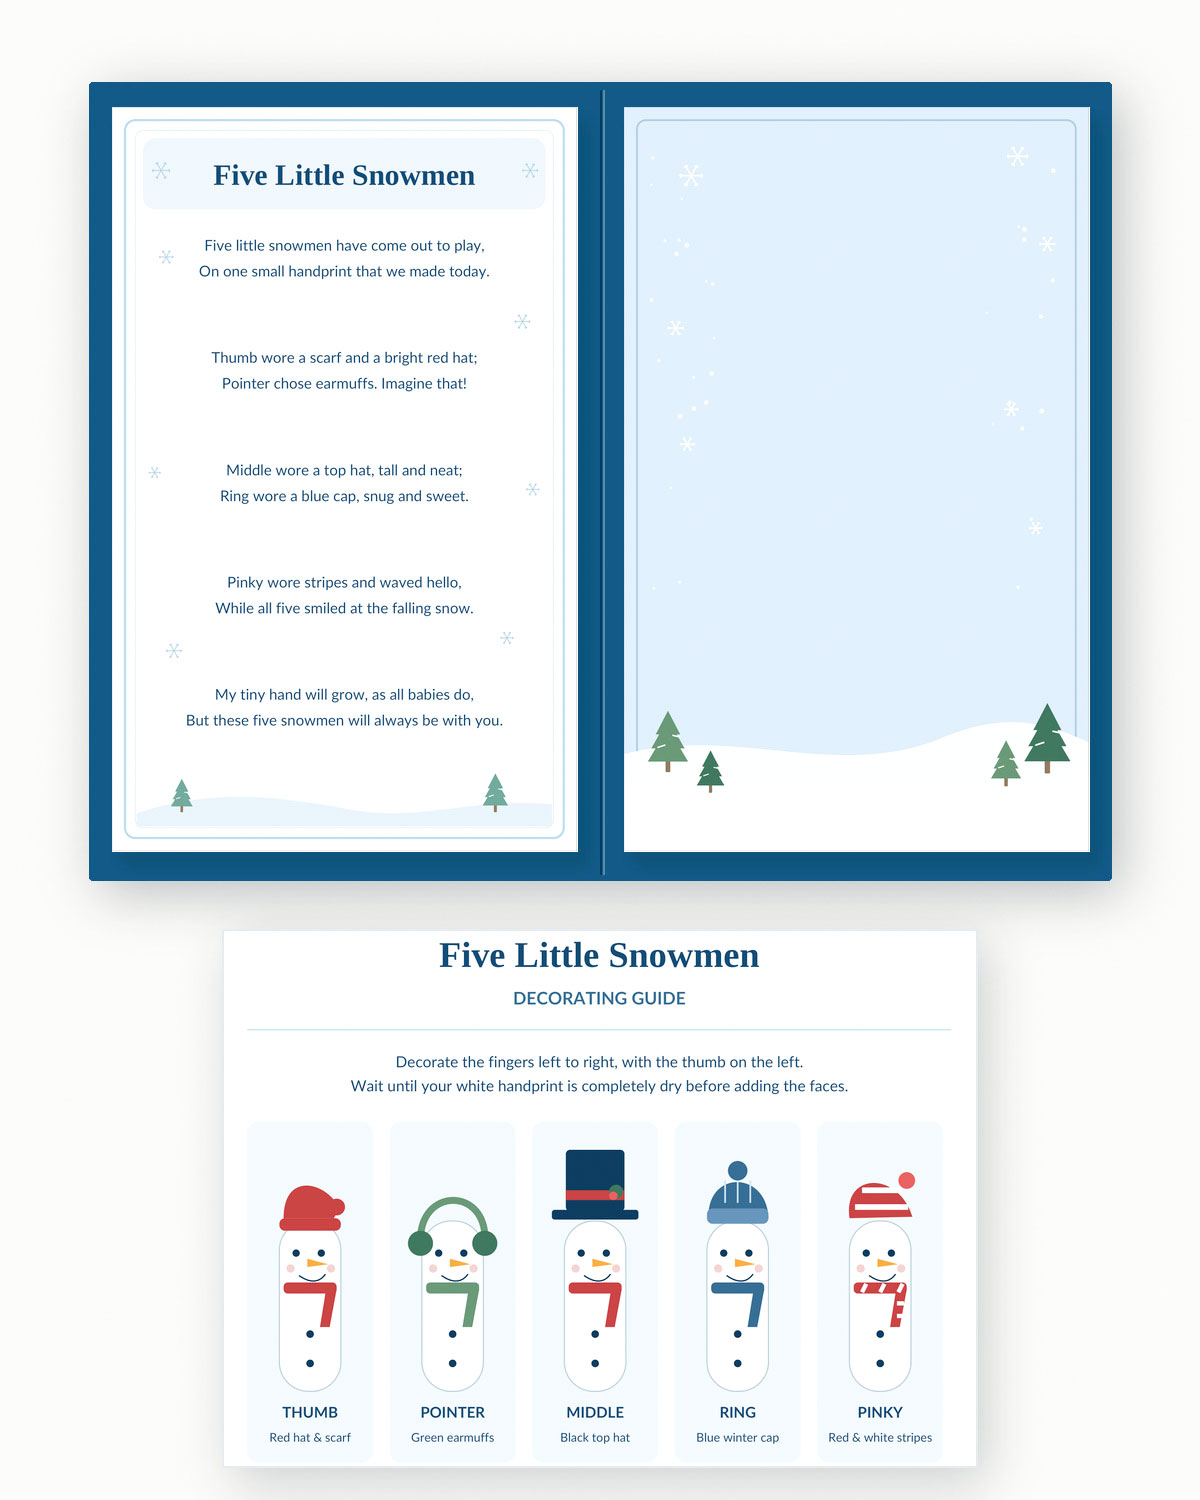
I've put together a free three-page printable to make your snowman keepsake a little easier. You'll get our original Five Little Snowmen poem, a matching snowy background for your child's handprint, and a decorating guide showing all five hats and scarves.
The winter background is blank in the middle on purpose. That's where your baby's own handprint belongs. No two finished keepsakes will be quite alike!
Download the Free Five Little Snowmen Printable PDF (3 Pages)
What's Included in the Download?
- Page 1: Our complete original Five Little Snowmen poem, arranged on a white winter panel with little snowflakes and evergreen trees.
- Page 2: A matching light blue background with snowy hills, evergreen trees and plenty of open space for your child's handprint.
- Page 3: A colorful decorating guide showing Thumb, Pointer, Middle, Ring and Pinky wearing their matching winter accessories.
How to Print and Use Your Keepsake Pages
This version is designed for ordinary US Letter paper, so you won't need a special printer or oversized cardstock.
Download the three-page PDF and print at 100% or Actual Size. Don't choose Fit to Page or Shrink to Fit.
Trim the poem and winter background along their fine gray outlines. Each finished panel should measure 5 x 8 inches.
Take one sheet of 8 1/2 x 11-inch cardstock, turn it sideways and fold it in half. Your folded card should measure 5 1/2 x 8 1/2 inches.
Add your child's white handprint to the blue winter background. Let it dry before decorating the five snowmen.
Use the decorating guide to paint the hats, scarves, faces and buttons.
Attach the poem panel inside the left half of the card and the finished handprint panel inside the right half.
Add your child's name and the date to the back cover.
Before you start painting: Check that your child's open hand fits comfortably on the smaller background with room above the fingertips for the hats. If the hand is too large, use the full-size 12-inch cardstock version explained below instead.
One more little tip: The blue background uses colored printer ink. Let the printed page dry completely, then test a small amount of white marking paint on an unused piece of the printed border before making the handprint. If the white paint smears or doesn't show up clearly, use plain light blue cardstock for the handprint instead. You can still use the printable poem and decorating guide.
That's everything you need from the download. The complete instructions below will walk you through painting and decorating each snowman.
Our Original Five Little Snowmen Poem
Here's the original poem written for this keepsake. Each pair of lines goes with the five snowmen on the handprint, and the ending makes it a gift worth putting away and bringing out again.
You can copy the poem into your favorite word processor, print it on white paper or write it by hand. Keep the five verses together on the left panel so the whole poem is visible when the card is open.
Five Little Snowmen
Five little snowmen have come out to play,
On one small handprint that we made today.
Thumb wore a scarf and a bright red hat;
Pointer chose earmuffs. Imagine that!
Middle wore a top hat, tall and neat;
Ring wore a blue cap, snug and sweet.
Pinky wore stripes and waved hello,
While all five smiled at the falling snow.
My tiny hand will grow, as all babies do,
But these five snowmen will always be with you.
How to Arrange the Poem on Your Card
Print the poem on the white panel before you glue anything together. A title around 24 to 28 points and poem text around 13 to 15 points is a reasonable starting place for this 5 1/2-inch-wide panel. The exact fit will depend on the font you choose.
I'd use a simple, rounded font in dark blue. It gives the keepsake a handwritten feeling without making the longer lines difficult to read.
Leave about 1/2 inch of open space around the text. If a line wraps, make the font a little smaller instead of squeezing the letters together. You have a tall panel to work with, so there's no need to crowd the verses.
Keep the original five verses and the title exactly as written. You can add a few pale blue snowflakes beside the poem and a little snowy hill along the bottom. Small evergreen trees at the lower corners will tie the poem panel to the artwork on the other side.
Print a practice copy on ordinary paper and lay it inside the folded card before using your final sheet. You'll know right away whether the title, verses and decorations have enough room.
How to Make the Five Little Snowmen Handprint Art
Now we're ready to make the actual handprint. Don't worry about hats, scarves or tiny snowman faces yet. Get a nice print first, let it dry, and then have fun with the details.
Make the handprint on the separate light blue panel rather than directly inside the folded card. That way, if the print smears, you can start again without ruining your card or the poem.
Using the free printable? Follow the smaller card measurements in the printable section above. The 12 x 12-inch cardstock instructions below are for the larger version shown in our finished example. Both versions use the same handprint decorating steps.
Step 1: Prepare and Fold the Card
Place your 12 x 12-inch blue cardstock on a flat surface.
Measure 6 inches from one side and make a light pencil mark at the top and bottom.
Score a straight line between the two marks using a scoring tool and ruler. Don't cut through the cardstock.
Fold along the scored line and gently sharpen the crease with a bone folder or the smooth edge of a ruler.
Open the card and lay it flat. You should have two panels, each measuring 6 x 12 inches.
Cut the white poem sheet and light blue handprint sheet to 5 1/2 x 11 1/2 inches each.
Lay the white sheet on the left and the light blue sheet on the right. Each should have a 1/4-inch border of darker blue cardstock showing around it.
Don't glue the panels down yet. It's easier to work on both pieces separately.
Step 2: Plan Where the Handprint Will Go
Put the light blue panel upright on your work surface. The short edges should be at the top and bottom.
We want the palm toward the lower half of the paper and the fingers pointing upward. To match our example, use the child's right hand, palm down, with the wrist toward the bottom of the page. Thumb will appear on the left, followed by Pointer, Middle, Ring and Pinky.
If the left hand is easier to print, that's fine too. The snowmen will appear in reverse order across the paper. Just decorate each finger according to its name in the poem rather than following the guide from left to right.
Leave some room above the fingertips for the hats. Middle needs the most space because that snowman wears the tall black top hat.
Before adding paint, check how much of the page the child's hand will cover. A smaller baby hand can sit near the center of the panel, with snowflakes filling some of the open sky. An older child's hand may need to sit a little lower to leave room for the hats.
I'd leave at least 3/4 inch between the highest finished hat and the top edge of the panel. Keep the sides clear enough that the thumb and pinky decorations won't run into the border.
Step 3: Make the White Handprint
If you're using a direct painted print, make sure the white marking product is specifically labeled for the intended contact with the child's skin. Keep a damp cloth and warm water close by so cleanup can happen immediately.
Cover your work surface and place the light blue panel where the handprint will go.
Have a second adult help support the baby if needed. Don't attempt to hold a moving baby, paint the hand and position the paper all at once.
Apply a thin, even layer of the suitable white marking product to the palm and fingers, following its instructions.
Gently open the hand without forcing the fingers apart.
Bring the palm down onto the paper first. Then help each finger touch the paper without sliding sideways.
Lift the hand straight off the paper once the print is made.
Immediately clean the child's hand according to the product directions.
Lay the handprint panel flat and let it dry fully before decorating.
Check your print: Can you see a palm, a thumb and four separate fingers? That's what matters. It doesn't need to look perfectly smooth, and a few lighter patches in the paint can give the finished snowmen a nice handmade look.
If the fingers have completely merged, I'd make another print on a fresh panel. It's much harder to turn one solid white shape into five separate snowmen.
Don't keep pressing a baby's hand down to improve a print. If those fingers don't want to open, leave it for another time or use the traced-hand method below.
Step 4: Make a Traced-Hand Version Instead
You don't have to put paint on the child's hand to make this keepsake.
Place the hand comfortably on a plain sheet of paper with the fingers naturally open.
Gently trace around the hand with a pencil. Stop if the child pulls away or becomes uncomfortable.
Cut out the hand shape using adult scissors.
Place the paper hand template on your light blue panel with the thumb to the left and fingers pointing upward.
Trace around the template with a light pencil line.
Fill the entire hand shape with opaque white craft paint using a small brush or foam applicator. Keep the edges neat and leave visible spaces between the fingers.
Let the white paint dry completely before adding decorations.
This produces a painted silhouette based on the child's hand rather than a direct handprint. It still gives you five little snowmen to decorate, with the same poem and finished card layout.
Step 5: Check the Handprint Before Decorating
Once the white paint is dry, look at the fingertips. We'll turn each one into a rounded snowman head while keeping the fingers recognizable as the bodies.
If a fingertip has a flat or uneven edge, use a small amount of white paint to round it slightly. Keep the rounded head connected to its finger. You don't want five separate circles floating above the hand.
Leave the main palm alone. It's the part that makes the whole picture a handprint keepsake rather than five ordinary painted snowmen.
Now we're ready for the hats and scarves.
Decorate All Five Snowmen to Match the Poem
Here's where our little snowmen get their personalities. We're going to decorate them in the same order they're named in the poem, beginning with Thumb on the left and finishing with Pinky on the right.
Use the finished example as your color guide. Each snowman has a rounded white head at the fingertip, a little face and two or three black buttons running down the white finger.
The decorations are painted or drawn directly onto the paper. There's no need for separate fabric hats, real pom-poms, beads or buttons.
First, Give All Five Snowmen Their Faces
Using a fine black paint marker or brush, make two small eyes near the top of each white fingertip.
Add a tiny orange carrot nose between and just below the eyes. A short tapered stroke will do. Make the point face sideways.
Paint a curved black smile below the nose.
Add a small touch of pink to each cheek if you like the rosy-cheeked look in the example.
Place two or three little black dots down each white finger for coal buttons, keeping them below the scarf area.
Keep the faces simple. Two eyes, a nose and a smile are enough. If the baby's handprint is tiny, use just two buttons on each finger instead of trying to squeeze in three.
Let the black and orange details dry before adding accessories that overlap the faces.
Thumb: Red Hat and Red Scarf
Thumb is the snowman at the far left. He gets a bright red winter hat and a matching scarf.
Paint a curved red band across the upper edge of the thumb's white head to form the hat brim.
Above the brim, paint a rounded red cap that leans slightly toward the left.
Add a little red pom-pom at the tip of the cap. Make it a painted circle, not a separate attached pom-pom.
Leave a narrow white edge on the hat brim to suggest fluffy trim.
Paint a red scarf across the lower part of the snowman's head, just above the buttons.
Extend one end of the scarf down the left side of the finger and add three or four tiny fringe lines.
Keep the scarf narrow enough that you can still see the white body underneath. A little red goes a long way.
Pointer: Green Earmuffs and Scarf
Pointer is the second snowman from the left. Instead of a hat, this little fellow wears green earmuffs.
Draw a curved green band over the top of the second fingertip.
Paint a round green earmuff at each end of the band, one on either side of the head.
Add a lighter green stroke or small white dots to give the earmuffs a little texture.
Paint a green scarf around the neck area.
Let one scarf end hang down the right side and finish it with short painted fringe lines.
The two round earmuffs are what make Pointer different from the others, so let them show clearly on either side of the head.
Middle: Tall Black Top Hat with Holly
Middle is the tallest snowman and sits near the center of the handprint. His black top hat gives the whole group a cheerful old-fashioned snowman look.
Paint a narrow black brim horizontally across the top of the middle fingertip. Let it extend slightly past the sides of the head.
Above the brim, paint a tall black crown with mostly straight sides and a gently rounded top.
Add a bright red band across the lower part of the crown.
On one side of the hatband, paint two tiny green holly leaves and a cluster of three red berries.
Paint a red scarf across the snowman's neck and let one end hang down the right side.
Add short fringe strokes at the scarf's end.
I'd make the hat a little taller than the others, but don't let it run into the top edge of the panel. You want room for the snowflakes around it.
The holly is completely optional if you're working with a very small print. A black hat with a red band already looks finished.
Ring: Blue Winter Cap and Scarf
Ring is the fourth snowman from the left. He wears a bright blue knitted cap with a little pom-pom on top.
Paint a rounded blue hat over the top of the fourth fingertip.
Add a thicker blue band along the lower edge of the hat to look like a folded knitted brim.
Draw several narrow, lighter blue lines running down the hat to suggest knit stitches.
Paint a small blue pom-pom on top.
Wrap a blue painted scarf across the neck and let one end hang down the right side.
Add a few little blue fringe lines to finish the scarf.
Don't worry about making actual knitted stitches. A few thin lines on a painted cap are enough to give that impression.
Pinky: Red-and-White Striped Hat and Scarf
Pinky is the smallest snowman, and his striped outfit is a fun way to finish the group.
Paint a red winter cap above the pinky fingertip, keeping the shape rounded.
Leave or paint white stripes across the red hat, beginning with a wider white band near the bottom.
Add a small red pom-pom at the top.
Paint a red scarf around the neck.
Add white stripes across the scarf and extend one end down the right side.
Finish with several red fringe lines.
If the pinky print is especially short, keep the striped scarf close to the head so you don't cover every button. The red-and-white stripes will identify this snowman even if you have room for only a small scarf.
Add the Snowy Winter Background
With all five snowmen dressed, we can finish the little winter scene around them.
Use white paint to make a softly curved snowbank along the bottom of the light blue panel. Keep the white hill below the handprint so the palm remains visible.
Paint two small evergreen trees near the lower left corner and two near the lower right. Start each tree with a short brown trunk, then add three or four layers of green branches.
Once the green paint is dry, add little white strokes across the branches for snow.
Paint three or four simple snowflakes in the open blue sky. Each can be made from three crossing white lines with little branches near their ends.
Scatter a few small white dots between the snowflakes to look like falling snow.
Check the faces and scarves once everything has dried. Touch up any details that disappeared beneath another color.
I'd keep the trees low and the biggest snowflakes near the top corners. That leaves the handprint as the center of attention.
You don't need to fill every empty space with snow. A little blue sky between the snowmen is part of what makes their different hats and scarves easy to see.
Final Decorating Check
Before you put the card together, check the snowmen against the poem:
- Thumb: Red winter hat and red scarf.
- Pointer: Green earmuffs and green scarf.
- Middle: Tall black top hat with red band, painted holly and red scarf.
- Ring: Blue winter cap and blue scarf.
- Pinky: Red-and-white striped winter hat and scarf.
All five should have smiling faces and black buttons. The sky should have a few snowflakes, and the snowy hills and evergreens should sit along the bottom.
That's the complete artwork. Let every painted detail dry before moving on to the card assembly.
Assemble the Fold-Open Snowman Keepsake Card
Now we get to put the poem and the handprint together. This part is easy, but it's worth taking a minute to line everything up before the glue goes on.
The white poem panel belongs on the inside left. The blue snowman panel belongs on the inside right. When you open the finished card, you should see the poem and the decorated handprint together, just like our example.
Step 1: Check the Panels
Open the folded blue card and place it flat on your work surface.
Lay the completed poem panel on the left side without attaching it.
Place the decorated handprint panel on the right side.
Check that both panels have a 1/4-inch blue border around the outside edges.
Check that no important lettering, hats or painted details are hidden by the center fold.
If a panel has curled slightly from the paint, place it between clean sheets of paper and let it rest flat under a lightweight book after the paint has dried completely. Don't press a wet painted surface.
Step 2: Attach the Poem Panel
Turn the white poem panel face down on a clean surface.
Apply an even layer of glue stick or strips of acid-free double-sided adhesive to the back, especially near the edges.
Turn the panel over and position it on the inside left of the blue card.
Press gently from the center toward the edges to remove air pockets.
Keep adhesive away from the center crease so the card will open and close freely.
If you're using a printed poem, don't rub the lettering with damp fingers. Smooth the paper with a clean, dry cloth instead.
Step 3: Attach the Snowman Handprint Panel
Make sure the handprint and every painted decoration are fully dry.
Turn the panel face down onto a clean sheet of protective paper.
Apply acid-free double-sided adhesive or a thin, even layer of paper-safe glue to the back.
Carefully center it on the inside right of the folded card.
Press gently around the edges and across any flat areas that need better contact.
Allow the adhesive to set according to its directions before closing the card.
I'd avoid heavy amounts of liquid glue here. Thin paper can wrinkle, and those ripples may show through the white handprint.
Step 4: Close and Open the Card
Once the adhesive has set, close the card gently and check that the two panels fold together without buckling.
Open it again and make sure the center crease is clean and the inside pages lie flat without pulling against each other.
You can leave the outside cover plain blue or add a simple title such as "Five Little Snowmen" in dark blue or white lettering. A tiny painted snowflake below the title is plenty.
I wouldn't put another large handprint on the cover. The surprise is opening the card and finding the little snowmen inside.
Personalize Your Five Little Snowmen Keepsake
The snowmen are adorable on their own, but adding the child's name and the date makes the keepsake much more meaningful later.
I'd keep the personalization small so it doesn't compete with the poem or the handprint. You want the child's little fingers to remain the part everyone looks at first.
Where to Add the Name and Date
You have three good choices:
- Below the poem: Add the child's first name and the month and year, centered near the bottom of the white panel.
- On the back cover: Write the child's full name, age and the date the handprint was made. This leaves the inside artwork exactly as pictured.
- On a small paper label: Cut a white rectangle about 2 x 3 inches, write the information on it and attach it to the back of the card.
For the finished design shown here, I'd choose the back cover. It keeps the poem and snowmen free of extra writing, and you can include more information without worrying about running out of space.
A Simple Personalized Message
If you're making this as a gift, you could write something like:
Made with love by: Emma
Age: 8 months
Date: December 2026
Five little snowmen made from one tiny hand.
Replace the example information with the child's own details. You could also write a short note to Grandma or Grandpa on the outside cover.
Turning the Card into a Gift
The fold-open format makes this a nice gift because the poem and artwork stay together. There's no loose poem sheet to get separated from the handprint later.
You can give the completed card as it is, place it in a keepsake box or display it open on a shelf where it won't be handled by the baby.
I'd skip glitter, loose sequins and bulky decorations. They don't add much to the picture, and a flat keepsake is easier to store without damaging the little painted details.
Our card is 6 x 12 inches when folded, so it won't fit a regular greeting-card envelope. For gifting or mailing, use a larger rigid envelope or protective mailer that accommodates the full size without bending.
How to Store the Finished Keepsake
Wait until the paint and adhesive are completely dry before putting the card away.
Place a clean sheet of acid-free, unbuffered interleaving tissue between the two decorated inside panels if needed, then store the closed card flat in an archival-quality folder or keepsake box.
Keep it away from damp storage areas and prolonged direct sunlight, which can affect paper and painted colors over time.
If you'd rather display it, open the card on a stable shelf or use a frame that is large enough to hold both panels without crushing the raised paint. Keep the frame glazing from pressing directly against the artwork.
For more projects that preserve tiny hands and feet, you can explore my baby handprint craft ideas. And if you're making Christmas gifts, the baby Christmas crafts page has other keepsake projects to choose from.
Whether you're making this for Christmas or simply celebrating a snowy winter day, the little handprint is what gives it meaning. The hats and scarves make it fun, and the poem tells the story. Someday those five tiny snowmen will be a reminder of just how small that hand used to be.
Five Little Snowmen Handprint Art FAQ
Can I make this snowman handprint craft with a newborn?
You can make a keepsake based on a newborn's hand, but don't force a tiny hand open or use paint that isn't specifically intended for the planned skin contact. If the fingers stay curled, choose a comfortable time to try a gentle tracing instead. An adult should handle the entire craft and keep all art materials away from the baby's mouth and eyes.
Can I make the card with regular printer paper?
Yes, although regular paper isn't sturdy enough for the large folded base. If you only have letter-size materials, fold an 8 1/2 x 11-inch sheet of cardstock in half to make a 5 1/2 x 8 1/2-inch card. Cut each inside panel to 5 x 8 inches. You'll need to use a smaller font for the poem and simplify the painted decorations, especially if the child's hand takes up much of the right panel.
Do I need a printable snowman template?
No. Your child's own hand supplies the shape for all five snowmen. The free printable includes our original poem, a matching winter background and a decorating guide showing exactly how each snowman should look. You won't need to cut out five separate snowman shapes.
What if one of the fingers doesn't print clearly?
Let the print dry first. You may be able to fill a small missed spot with white paint and a detail brush. If two or more fingers have merged into one solid shape, it's better to make another print on a fresh piece of paper. Keep the little gaps between the fingers visible so each snowman has its own body.
Can I make this handprint keepsake for a toddler or older child?
Absolutely. The five-snowmen idea works with larger hands, too. Before you begin, check whether the open hand will fit on the 5 1/2-inch-wide artwork panel with room for the hats. If it doesn't, start with a larger sheet of cardstock and adjust both inside panels to match. Keep the decorations in the same order so the poem still fits the picture.
Is this a Christmas craft or a winter craft?
It works for either. The snowflakes, winter hats and snowy hills aren't tied to a particular holiday. If you're making it for Christmas, add the year and a little holiday message to the back. For a winter birthday or a grandparent gift, simply use the child's name and the date.
Can I use the poem on a framed handprint instead of a folded card?
Yes. The same poem can sit beside a painted handprint in a two-opening frame or on one large sheet of paper. Keep the five snowmen dressed in the order described in the verses. You'll want enough space for the entire poem to remain readable without covering the handprint.
However you choose to display it, keep the five little snowmen together. That's what turns a simple handprint into a sweet little story worth keeping.
When you click on links to various merchants on this site and make a purchase, this may result in this site earning a commission. This does not affect the price you pay.

UBGI Gold Standard 2026
Reviewed under the site's
editorial checklist.
Photos, decorating ideas, party setups and reader submissions are shared for inspiration unless a page is specifically presented as a pattern, tutorial, reference guide or step-by-step project. Follow the instructions, measurements, safety guidance and manufacturer directions provided for the particular project or product.
About Jan | Contact | Baby Nursery Ideas (Blog) | Site Map | Privacy Policy | Disclosure Policy | Disclaimer | Affiliate Disclosure | Earnings Disclosure | Facebook | Pinterest
I am a participant in the Amazon Services LLC Associates Program, an affiliate advertising program designed to provide a means for us to earn fees by linking to Amazon. As an Amazon Associate I earn from qualifying purchases.
Copyright © 2006-2026. All Rights Reserved.