Free Scandinavian Felt Heart Pocket Christmas Ornament Pattern
By Jan Bay
This free Scandinavian felt heart pocket Christmas ornament pattern is one of those little sewing projects that looks much more complicated than it really is. I love the combination of deep Christmas red and warm ivory felt, especially with that little tree on the front and the curved pocket flap fastened with a wooden button. And the best part? You can tuck a tiny wrapped gift, a Christmas note, or a special little surprise inside. It's like a gift inside a gift! It's a lovely ornament for your own tree, and I think it would make an especially thoughtful handmade gift for someone who appreciates Christmas keepsakes and tiny surprises.
Explore More Felt Crafts and Christmas Patterns
Three Felt Christmas Tree Ornaments
Felt Crafts and Free Sewing Patterns
Baby Christmas Crafts and Keepsakes

See Supplies for This Project Here.
On This Page
Finished Size and Measurements
Felt Cutting Guide and Templates
Step-by-Step Sewing Instructions
Make the Pocket and Curved Flap
Add the Christmas Tree and Stars
Button, Hanging Loop and Finishing
Materials for the Scandinavian Felt Heart Pocket Christmas Ornament Pattern
You won't need a sewing machine for this little Christmas heart. Everything is cut from felt and stitched by hand, and the only decorative pieces are a Christmas tree and two small stars. I would choose wool-blend felt for the finished ornament because it has enough body to hold the curved flap neatly without making the whole project stiff.
You'll need:
- One 9 x 12-inch sheet of deep Christmas red felt
- One 9 x 12-inch sheet of warm ivory felt
- Red and ivory embroidery floss
- One 1/2-inch wooden button
- Hand-sewing needle and sharp fabric scissors
- Paper scissors for cutting the templates
- Removable fabric marker or chalk
- Sewing clips or pins
- A small scrap of felt for button reinforcement
- The free printable pattern package provided below
Felt approximately 1 to 1.5 mm thick is a practical starting point. Use three strands of embroidery floss for most decorative stitching and doubled sewing thread for the button and hanging loop.
Stitches used: Blanket stitch, running stitch, small whipstitches and buttonhole stitch for the fastening loop.
If you're new to blanket stitching, the DMC embroidery stitch guide is a useful reference.
Skill level: Confident beginner to intermediate. The individual stitches are straightforward, but fitting the functional pocket and curved flap takes a little care.
This is a decorative Christmas ornament, not a baby toy. The button and any small gifts tucked inside must be kept out of young children's reach.
Finished Size and Measurements
The completed ornament is designed to measure approximately 6 inches wide and 6 inches tall, not including the hanging loop.
The hanging loop adds approximately 3 inches above the heart, depending on how far you overlap its ends behind the ornament.
- Heart backing: 6 inches wide x 6 inches tall
- Ivory pocket front: Approximately 6 inches wide across the heart and 4 inches deep at the center
- Curved red flap: Approximately 6 inches wide and 2 5/8 inches deep at the center
- Christmas tree: 1 3/4 inches wide x 2 1/4 inches tall
- Two stars: Approximately 1/2 inch each
- Hanging strip: 1/2 inch wide x 7 inches long before folding
These are calculated template measurements, not measurements from a physically test-sewn sample. Cut the full-size paper pieces first and check their fit before transferring the shapes to felt.
Measurement checkpoint: The red backing, cream front and red flap should align along their shared outer edges without stretching. The flap must cover the open upper edge of the cream pocket without covering the tree.
Free Printable Felt Heart Cutting Templates and Pattern Package
Rather than asking you to draw a perfectly symmetrical heart by hand, I've included printable cutting shapes for the backing, pocket front, curved flap, Christmas tree, stars and hanging strip.
Download the PDF and print it on US Letter paper at 100% or Actual Size. Don't select Fit to Page, Shrink to Fit or any other scaling option.
Measure the 1-inch test square on the template pages before cutting your felt. If it doesn't measure exactly 1 inch, correct your printer settings and print again.
Free Scandinavian Felt Heart Pocket Christmas Ornament Pattern PDF
Download the full-size felt cutting templates, assembly instructions and sewing guide.
Download the Free Felt Heart Ornament Pattern (PDF)
Print on US Letter paper at 100% or Actual Size. Check the 1-inch test square before cutting.
Here's a preview of the printable package so you can recognize the file before downloading it.
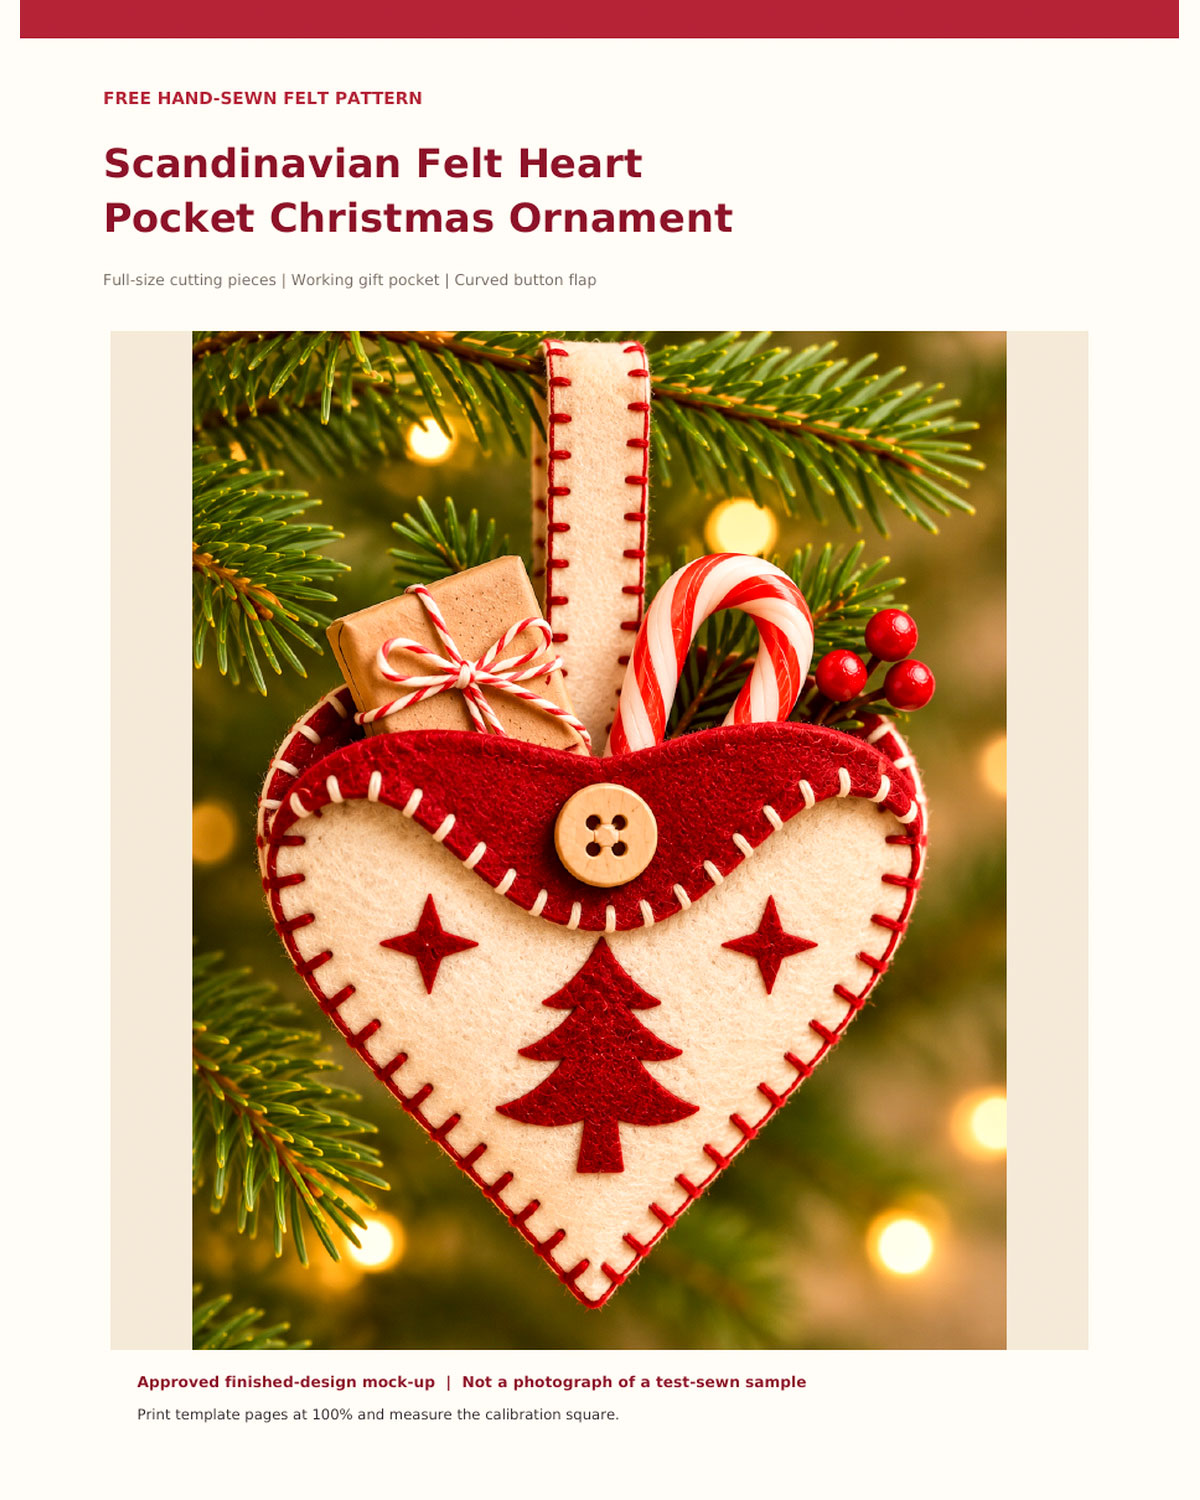
Preview of the printable felt heart ornament pattern package.
Cut the felt pieces
After printing and checking the templates, cut these pieces:
- One full heart backing from red felt
- One lower heart pocket panel from ivory felt
- One curved upper flap from red felt
- One Christmas tree from red felt
- Two small four-point stars from red felt
- One 1/2 x 7-inch hanging strip from ivory felt
- One small reinforcing patch from leftover felt
Don't add seam allowances. These pieces are assembled with visible edge stitches instead of turned seams.
Before sewing, lay the ivory pocket over the red backing and place the curved flap across the upper portion. Check that the front panel's top edge remains beneath the flap and that the flap can be lifted to reveal the opening.
If the paper edges don't match neatly, adjust the paper shapes before cutting the felt. That's much easier than trimming a partly sewn ornament.
Step-by-Step Sewing Instructions
Once all the felt pieces are cut, I would work on the decorations first and join the heart afterward. That keeps the little knots and thread ends behind the ivory front instead of leaving them exposed inside the pocket.
Step 1. Finish the pocket opening
Place the ivory pocket front on your table with its right side facing up and the pointed end facing down.
Thread your needle with three strands of red embroidery floss. Starting at the upper-left corner, work blanket stitches along the straight upper edge, spacing them approximately 1/4 inch apart and making each stitch about 1/8 inch deep.
Keep the stitches even without pulling the thread tight enough to pucker the felt. When you reach the opposite corner, secure the floss on the back.
This upper edge will form the pocket opening. It must remain separate from the red heart backing.
Step 2. Arrange the decorations
Place the red Christmas tree on the ivory panel, centered from left to right. Leave enough room above the tree for the curved flap when closed.
Position the two small red stars on either side of the tree, a little above its widest branch tier.
Keep at least 1/2 inch between the stars and the outside edge of the heart. You don't want the outer blanket stitches to cover their points.
Lay the flap temporarily over the panel. Check that the tree and both stars will remain visible, then lift the flap away.
Step 3. Sew the appliqués
Using two strands of matching red thread, sew around the tree with small whipstitches approximately 1/8 inch apart. Secure each branch point with a small additional stitch if necessary.
Repeat around each star, catching all four points so the corners lie flat.
Work through the ivory pocket panel only. Don't attach it to the backing yet.
Step 4. Decorate the curved flap
Take the red flap and thread your needle with three strands of ivory floss.
Work blanket stitches along the lower curved edge, spacing them approximately 1/4 inch apart and 1/8 inch deep.
Follow the shallow downward curve toward the center, then continue around the other half. Keep the curved lower edge free so it can lift when the ornament is finished.
Set the prepared pieces aside until assembly.
Checkpoint: You should now have an embroidered ivory pocket front, a decorated red flap, and an untouched full red heart backing. None of the large pieces should be joined yet.
Make the Functional Heart Pocket and Curved Flap
The pocket is my favorite feature of this ornament. Rather than attaching a small pouch to the front, the entire lower ivory section forms a usable pocket against the red backing. The curved flap is attached above it and opens independently.
Step 1. Position the pocket front
Lay the full red heart backing flat with its front facing up.
Place the ivory pocket panel over the lower portion, matching the bottom point and side curves. Its straight upper opening should fall approximately 2 inches below the highest points of the heart, matching the printable template.
Clip the matching outer edges together. Leave the upper pocket opening free.
Step 2. Test the pocket space
Slip a folded piece of paper approximately 2 inches square between the ivory pocket front and red backing.
It should fit without needing to stretch the sides. This is a preliminary test because the outside seam hasn't been sewn yet.
If the lower point or side curves don't match, correct the paper pieces and recut the affected felt piece before continuing.
Step 3. Position the red flap
Lay the red flap over the upper portion of the heart, right side facing up. Match its rounded upper outline to the corresponding upper outline of the backing.
Its lower curved edge should overlap the ivory pocket opening, with the shallow center point hanging over the cream front.
The lower flap edge must remain free to lift. Don't sew it to the ivory panel.
Step 4. Attach the flap along its upper perimeter
Lift the ivory pocket panel away temporarily so you can sew without accidentally catching it.
Using three strands of ivory embroidery floss, work small edge stitches through the red flap and red backing along their matching upper outline. Begin at one upper side, follow the rounded lobes and center notch, and finish at the opposite upper side.
Keep the lower curved flap edge completely unstitched to the backing. The flap lies on the front of the ornament and opens by bending along its attached upper portion.
Fold the lower edge upward with your fingers to check that it lifts comfortably without distorting the top of the heart.
Flap checkpoint: When lowered, the flap should cover the straight ivory pocket opening and leave the tree visible. When lifted, it should expose enough of the opening to insert a small folded note.
If the flap feels too stiff, inspect the upper perimeter stitching. It should hold the flap securely without trapping or distorting its movable lower section.
Step 5. Return the pocket front
Place the ivory panel back onto the red backing, beneath the movable flap. Match the side curves and lower point again.
Clip the outside edges in preparation for assembly. Lift the flap and confirm that you can still access the pocket opening.
Add the Christmas Tree and Star Appliqués
There's no need for large satin-stitched areas on this ornament. The color comes from the felt itself, and a few small stitches are all that's needed to hold the decorations in place.
Christmas tree placement
The tree should sit upright at the center of the ivory panel. Its uppermost point should remain below the closed flap, while the trunk should finish at least 3/4 inch above the bottom of the heart.
Use a single felt cutout with three branch tiers and a short trunk rather than assembling the tree from separate triangular pieces.
Star placement
Arrange one star to the left and one to the right of the tree. Keep them balanced without forcing them to line up with individual tree branches.
Small whipstitches or short straight stitches are enough to attach the stars. Catch every point, but don't fill the shapes with embroidery.
Final appliqué check
Run your fingertip lightly over each branch and star point. Nothing should curl upward or catch. If you find a loose tip, add one small securing stitch.
The finished front should show one red Christmas tree, two matching stars and plenty of plain ivory felt. I wouldn't add any more decoration.
Assemble the Heart Ornament
Now we'll join the ivory pocket front to the red backing. This gives the ornament its finished shape and closes the pocket along both sides and the bottom point.
Step 1. Match the edges
Lay the decorated ivory front over the backing and clip the two layers together. Match the bottom point first, then work upward along the left and right curves.
Move the red flap out of the way as needed. Don't stretch either felt piece to force the edges together.
Step 2. Sew the left side
Thread your needle with three strands of red floss.
Starting where the upper-left corner of the ivory pocket meets the backing, secure the thread between the layers.
Work blanket stitches down the left outer edge through both layers, approximately 1/4 inch apart and 1/8 inch deep.
Check the alignment every few stitches. The front and backing should lie flat without gathering.
Step 3. Shape the bottom point
Continue stitching toward the bottom of the heart.
At the tip, make a small securing stitch through both layers, then turn onto the right-hand side. Avoid pulling so tightly that the point folds or curls.
If the point begins to round off, loosen the last stitch and work it again.
Step 4. Sew the right side
Continue blanket stitching upward along the right curve until you reach the opposite end of the pocket opening.
Secure the floss between the layers and trim the end.
Do not sew across the straight upper edge of the ivory pocket panel. That is the opening.
Step 5. Test the completed pocket
Lift the red flap and slide two fingers into the pocket. You should be able to reach toward the lower heart point without encountering stitches across the opening.
Try the folded 2 x 2-inch paper packet again. If it catches, check for an accidental stitch through the pocket opening and remove that stitch.
Assembly checkpoint: The heart should lie flat, the lower point should be symmetrical, the pocket should open freely and the curved red flap should cover the pocket's upper edge.
Once those details are correct, the main construction is complete.
Button, Hanging Loop and Finishing
We're ready for the finishing touches. I want the wooden button to show on the red flap, just as it does in the finished example image, with the hanging loop coming from behind the heart rather than across the front.
Step 1. Mark the button position
Fold the red flap down into its finished position. Mark a spot on the outside of the red flap, approximately 3/8 to 1/2 inch above its lower center edge.
Check that the button will remain centered when the ornament hangs. The exact position can vary slightly according to the button size and the natural curve of your flap.
Step 2. Sew the button onto the red flap
Cut a small felt reinforcement patch approximately 3/4 inch square and place it against the underside of the flap, behind the button position.
Use doubled sewing thread to secure the wooden button through the red flap and reinforcement patch. Sew through the buttonholes several times, leaving a little space beneath the button for the fastening loop.
Make sure your needle passes through the flap only. Do not accidentally sew the flap shut against the ivory pocket front.
Tie off the thread securely beneath the flap.
Step 3. Make the fastening loop
With the flap closed, mark a point on the ivory pocket front directly below the flap's center tip.
Using doubled red sewing thread, anchor three or four thread loops to the ivory front at that point. The loops should extend upward far enough to pass over the flap's lower edge and hook around the wooden button.
Secure the loops into one cord with small buttonhole stitches. Fasten the thread at the back of the ivory panel, working carefully inside the pocket without stitching through the red backing.
Slip the finished cord loop over the wooden button. It should hold the flap in place without making the red felt buckle.
Closure checkpoint: If the flap puckers, lengthen the cord loop. If the flap hangs open, shorten it slightly. Test the fastening several times before trimming the final thread ends.
Step 4. Prepare the hanging strip
Take the 1/2 x 7-inch ivory felt strip from the template package.
Fold the two short ends together to create a loop. Using three strands of red embroidery floss, add small running stitches along both long edges for a simple contrasting detail.
Don't stitch the two long sides together. The strip is folded into a hanging loop by bringing its ends together, not by folding its width in half.
Step 5. Attach the loop at the back
Turn the ornament over with the red backing facing you.
Place the two ends of the hanging strip near the upper center of the backing, just below the notch between the rounded lobes. Overlap the ends onto the backing by approximately 3/4 inch.
Using doubled sewing thread, stitch a small rectangle through the ends and red backing. Keep the ivory pocket front folded away from your needle, and work through the red backing only. Add diagonal reinforcing stitches through each attachment.
Keep these stitches confined to the backing and hanging strip. Don't sew through the movable red flap or the ivory pocket opening.
Lift the ornament by its hanging loop over a padded surface. Check that the heart hangs upright and the strip doesn't pull toward one side.
Step 6. Finish and inspect the ornament
Hide the remaining thread ends between the felt layers wherever possible. Trim loose ends and gently smooth the front with your fingertips.
Open and close the flap, checking the button and cord loop once more.
Slip a small folded Christmas note into the pocket, fasten the flap and hang the ornament to check its appearance.
The tree should remain visible, the two stars should lie flat, and the hanging loop should stay behind the heart.
That's the finished design. No extra bows, embroidered checkerboard or additional trim needed.
Color Variations and Personalization
Red and ivory would be my first choice, especially for a traditional Christmas tree. But you can make the same ornament in a few other colors without changing any of the construction.
Forest green and ivory
Use dark forest-green felt for the backing, curved flap, tree and stars. Keep the pocket front ivory and use green embroidery floss around the edges.
Navy blue and cream
A navy flap and backing with a cream pocket would give the ornament a winter-night appearance. Keep the wooden button and simple appliqués.
Traditional Christmas red
For a brighter version, try cherry-red felt with warm cream. I'd still use a plain wooden button rather than a shiny decorative one. It suits the handmade character of the heart.
Add a personal Christmas message
The pocket is just the right place for a little handwritten note, a folded gift certificate or a small wrapped surprise.
You could also embroider a short name on the back before assembling the ornament. Use cream embroidery floss and keep the lettering small enough to fit comfortably within the heart.
There's no need to add a year. A name or a personal message tucked inside makes it special without changing the design.
Helpful Sewing Tips
Felt is forgiving, but there are a few things worth checking as you work. I'd pay particular attention to the flap and the pocket opening because those are the pieces that need to move.
Use felt with enough body
Very thin felt may stretch around the button or make the curved flap droop. A reasonably firm wool-blend or quality craft felt is a better choice for this project.
Don't pull the blanket stitches too tightly
If the outer edge starts gathering, loosen the last few stitches and work them again. The two layers should sit flat without stretching.
Keep the pocket opening free
Don't accidentally catch the straight upper edge of the ivory pocket in the backing stitches. The lower front must remain open beneath the flap.
Test the button before fastening off
Button placement is easier to adjust before the loop is permanently secured. Make sure the flap closes comfortably and opens without pulling on the ivory felt.
Don't overfill the pocket
A small folded note, paper gift certificate or lightweight wrapped treat is plenty. Heavy contents will pull on the sides and button closure.
I'd also avoid putting unwrapped candy directly against the felt.
Keep it as a Christmas decoration
The wooden button, thread loop and small appliqués mean this is not suitable as a baby toy. Keep the ornament away from cribs, play areas and anywhere a young child could reach it.
If you're giving it as a keepsake for a baby's first Christmas, it belongs on the tree or another out-of-reach display.
Frequently Asked Questions About the Scandinavian Felt Heart Pocket Christmas Ornament
Can I make this ornament without a sewing machine?
Yes. The complete ornament is designed for hand sewing. You'll use blanket stitches, small appliqué stitches and reinforced stitches for the button and hanging loop.
Does the pocket actually open?
Yes. The ivory front forms a pocket against the red backing. The curved flap lifts to reveal the opening and closes with a thread loop fastened over the wooden button.
Do I need to embroider the Christmas tree?
No. The tree is cut from red felt and attached with small outline stitches. The stars are made the same way. There's no satin-stitch filling or checkerboard embroidery.
Is the printable pattern full size?
Yes. The PDF includes actual-size paper cutting templates intended for printing on US Letter paper at 100%. Check the printed 1-inch calibration square before cutting your felt.
Can I make the heart larger?
Yes. Enlarge all the cutting templates by the same percentage, including the pocket front and curved flap. Keep the decorative pieces in proportion and consider reinforcing the hanging loop if the finished ornament will be considerably larger.
Should I add stuffing?
No. The heart is intended to remain flat enough to hold a tiny gift or note. Stuffing would take up the pocket space and make the flap difficult to close.
What can I put inside the pocket?
A handwritten Christmas message, folded gift certificate, little paper envelope or lightweight wrapped treat would be suitable. Keep anything bulky or heavy out of the pocket.
And that's your Scandinavian felt heart pocket Christmas ornament. I think the curved red flap, wooden button and simple little tree give it all the decoration it needs. Make one for your own Christmas tree or sew a few in different colors, each with a small surprise tucked inside.
For more handmade projects, visit my Felt Crafts collection as new patterns are added.
When you click on links to various merchants on this site and make a purchase, this may result in this site earning a commission. This does not affect the price you pay.

UBGI Gold Standard 2026
Reviewed under the site's
editorial checklist.
Photos, decorating ideas, party setups and reader submissions are shared for inspiration unless a page is specifically presented as a pattern, tutorial, reference guide or step-by-step project. Follow the instructions, measurements, safety guidance and manufacturer directions provided for the particular project or product.
About Jan | Contact | Baby Nursery Ideas (Blog) | Site Map | Privacy Policy | Disclosure Policy | Disclaimer | Affiliate Disclosure | Earnings Disclosure | Facebook | Pinterest
I am a participant in the Amazon Services LLC Associates Program, an affiliate advertising program designed to provide a means for us to earn fees by linking to Amazon. As an Amazon Associate I earn from qualifying purchases.
Copyright © 2006-2026. All Rights Reserved.