DIY Felt Christmas Stockings: Little Pink Ornaments with Free Template
By Jan Bay
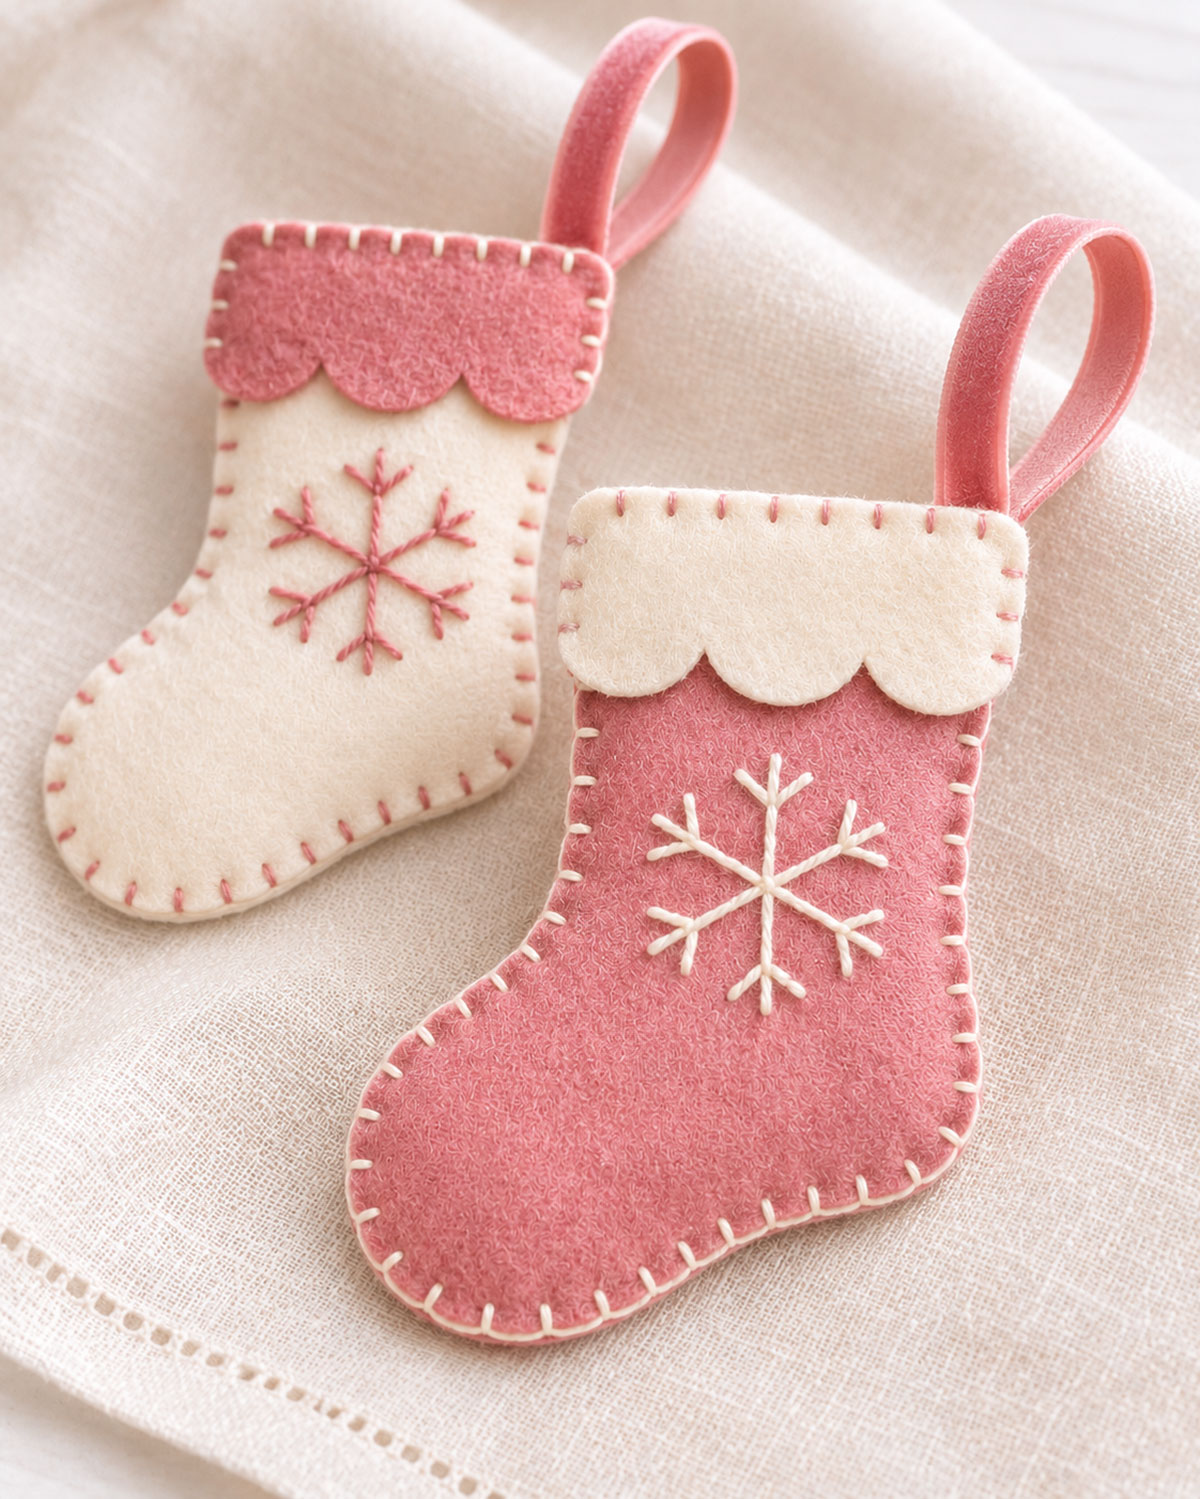
These DIY felt Christmas stockings are little enough to hang on your tree, but they're also pretty tucked into a Christmas gift, included in a string of handmade Christmas garland or used as decorations for a baby girl holiday shower. I've made the pattern for two matching styles, one dusty rose with an ivory cuff and one ivory with a pink cuff. Each has a scalloped top, an embroidered snowflake, and a pink velvet hanging loop. The free printable template and step-by-step instructions will show you how to sew both ornaments.
Explore More Christmas Crafts and Felt Ornaments
DIY Pink Christmas Decorations
Free Felt Crafts and Ornament Patterns
See Supplies for This Project Here.
Jump to a Section
- Free DIY Felt Christmas Stockings Template
- Materials and Sewing Supplies
- Cut the Pink and Ivory Felt Stocking Pieces
- Embroider the Two Snowflake Designs
- Make the Contrasting Scalloped Cuffs
- Make and Attach the Pink Velvet Hanging Loops
- Sew and Blanket-Stitch the Mini Felt Stockings
- Finish and Check Both Christmas Stocking Ornaments
- Christmas Tree, Gift and Baby Shower Decorating Ideas
I like these little stockings because you can make both from the same pattern and get two different looks just by switching the felt colors. The dusty-rose stocking has an ivory cuff and snowflake, while the ivory stocking has pink details. And those three little scallops give them a nicer finish than a plain straight cuff.
Each stocking measures approximately 5.8 inches tall by 4.4 inches wide, not counting the hanging loop. They're made from two layers of felt with embroidered fronts and visible blanket stitching around the edges. There's no stuffing, and the tops are sewn closed. They're ornaments, not miniature treat holders.
Free DIY Felt Christmas Stockings Template
The free two-page PDF includes the full-size stocking body, a three-scallop cuff, and two different snowflake embroidery designs. There's also an assembly guide showing where to attach the velvet hanging loop.
Free printable pattern: Download the Mini Felt Christmas Stocking Ornaments Template and Embroidery Guide.
Print both pages on US Letter paper at 100% or Actual Size. Turn off any setting that says Fit to Page or Shrink to Fit. Each page includes a 1-inch test square. Measure one before you cut your felt, because even a small printing change can affect how the cuff fits the stocking.
Here's what's included:
- Page 1: Full-size stocking body template, with the toe pointing left and a small placement mark for the embroidered snowflake.
- Page 2: Three-scallop cuff, larger ivory snowflake design, smaller dusty-rose snowflake design, hanging-loop measurements, and assembly order.
Cut along the solid outside lines of the stocking and cuff templates. Don't cut the snowflake center mark on the stocking body. It's there to help you position the embroidery.
Pattern note: You don't need to add seam allowances. The felt edges stay visible, and we'll sew them together with blanket stitches rather than turning the stocking inside out.
Materials and Sewing Supplies
You won't need much felt for these. I'd choose felt with enough body to hold the stocking shape, but not anything so thick that it's difficult to embroider through.
- Dusty-rose felt, approximately 1.5 to 2 mm thick, enough for two stocking bodies and one cuff
- Ivory felt of the same thickness, enough for two stocking bodies and one cuff
- Approximately 14 inches of pink velvet ribbon, 3/8 inch wide, for two hanging loops
- Ivory six-strand embroidery floss for the pink stocking's snowflake and edging
- Dusty-rose six-strand embroidery floss for the ivory stocking's snowflake and edging
- Matching sewing thread for temporarily securing the cuffs and ribbon loops
- An embroidery needle with an eye large enough for the floss
- A fine hand-sewing needle for the small tacking stitches
- Sharp fabric scissors and separate paper scissors
- Removable fabric marking pencil or chalk suitable for felt
- Pins or small sewing clips
- Ruler
- Thin tracing paper or another removable embroidery-transfer method
- Printed two-page pattern
One 9 x 12-inch sheet of each felt color may be enough if you arrange the pieces carefully, but check the full-size templates before buying or cutting. An extra sheet is useful if you want to make more ornaments.
For each stocking, cut the front and back from the same color of felt. You'll need two dusty-rose body pieces for the pink ornament and two ivory body pieces for the ivory ornament. Then switch the colors for the cuffs and embroidered snowflakes.
You can sew these entirely by hand. No sewing machine is needed.
Choose Your Embroidery and Edge Stitches
We'll use small straight or backstitches for the snowflakes, a few tiny holding stitches for the cuffs, and blanket stitches around the outside of the stockings.
If blanket stitch is new to you, DMC's illustrated embroidery stitch guide shows how to work blanket stitch and backstitch. You can practice both on a felt scrap before starting the ornaments.
I'd use two or three strands of floss for the snowflakes and three strands for the outer blanket stitching. The stitches should be easy to see without looking heavy against the felt.
Cut the Pink and Ivory Felt Stocking Pieces
Cut all the pieces for both stockings before beginning the embroidery. That way, you can check the matching shapes and keep the colors straight.
Cut the Dusty-Rose Stocking
- Print page 1 of the PDF and cut out the stocking body along its solid outside line.
- Lay the paper pattern on your dusty-rose felt with the toe pointing left.
- Trace carefully around the entire stocking shape.
- Cut the first felt stocking along the marked outline.
- Use the same pattern to cut a second matching dusty-rose body.
- Place the two pieces together, with their toes pointing in the same direction.
- Check that the top edges, heel curves, toes, and soles line up.
- Choose the piece with the neatest outward-facing surface for the embroidered front.
- Set the second piece aside for the plain back.
Pink stocking checkpoint: You should have two identical dusty-rose stocking shapes, each approximately 5.8 inches tall and 4.4 inches wide.
Cut the Ivory Stocking
- Place the same paper body template on the ivory felt.
- Trace and cut the first ivory stocking.
- Cut a second matching ivory stocking using the same template.
- Lay the two pieces together with their edges aligned and the toes pointing left.
- Choose one piece for the embroidered front and keep the other for the back.
Ivory stocking checkpoint: Two matching ivory stocking pieces, identical in size and outline to the dusty-rose pair.
Most craft felt looks similar on both sides. If your felt has a clearly different front and back, turn the paper template over when cutting the second body so the chosen outer faces will align properly during assembly.
Cut the Contrasting Scalloped Cuffs
- Cut out the three-scallop cuff template from page 2 of the PDF.
- Place the template on ivory felt.
- Trace around its straight upper edge, both short sides, and all three rounded scallops.
- Cut one ivory cuff, keeping the scalloped edge smooth.
- Use the same template to cut one dusty-rose cuff.
- Lay the ivory cuff across the top of the pink stocking's front piece.
- Check that the cuff's top and two short side edges line up with the stocking's top edges.
- Repeat with the dusty-rose cuff on the ivory stocking's front piece.
- Set the cuffs aside until the snowflakes are embroidered.
Cuff checkpoint: You should have one ivory cuff for the pink stocking and one dusty-rose cuff for the ivory stocking. Each cuff has exactly three rounded scallops along its lower edge.
Don't add a second cuff to the back of either stocking. In the approved design, the contrasting cuff decorates the front only.
Cut the Two Velvet Hanging Loops
- Measure and cut two pieces of pink velvet ribbon, each exactly 7 inches long and 3/8 inch wide.
- Fold each ribbon into a loop, bringing its two cut ends together.
- Keep the velvet surface facing outward around the loop.
- Set the folded loops aside. We'll secure them during final assembly.
Complete cutting checkpoint: You should now have four stocking body pieces, two contrasting three-scallop cuffs, and two pink velvet ribbon lengths.
The snowflakes are embroidered directly onto the front felt pieces. You won't need to cut separate felt snowflakes or attach any beads.
Embroider the Two Snowflake Designs
The two snowflakes are similar, but they aren't quite the same size. The pink stocking gets the larger ivory snowflake, and the ivory stocking gets the smaller dusty-rose one.
Both designs have six main spokes with little forked branches near their ends. There's a vertical spoke at the top and bottom, with four diagonal spokes between them. Don't add horizontal spokes. Follow the printed designs rather than making a regular eight-pointed snowflake.
Transfer the Large Snowflake to the Pink Felt
- Lay the dusty-rose stocking FRONT on your work surface with its toe pointing left.
- Find the LARGE SNOWFLAKE diagram on page 2 of the PDF.
- Place the diagram over the upper shaft of the stocking, below the area that will be covered by the scalloped cuff.
- Use the small center cross on the body template as your placement guide.
- Keep the snowflake centered from left to right on the stocking shaft, rather than over the rounded foot.
- Transfer the center, six spoke ends, and small V-shaped branch positions using a removable marking method suitable for felt.
- Remove the paper and check the marked design before stitching.
Placement checkpoint: The large snowflake should sit below the future ivory cuff, with room around its branches and no part of the design extending into the stocking's outer stitching area.
Embroider the Large Ivory Snowflake
- Thread your embroidery needle with three strands of ivory embroidery floss.
- Secure the thread on the back of the pink FRONT piece, keeping the starting end within the marked snowflake area.
- Begin at the center and stitch the upper vertical spoke toward its marked tip.
- Use small backstitches or carefully placed straight stitches to form a neat continuous line.
- Return to the center from the back of the felt and work the lower vertical spoke.
- Stitch the four diagonal spokes in the same way, always following the transferred lines.
- Check that all six spokes meet neatly at the center.
- Near the outer tip of the first spoke, find the point where its two small branches begin.
- Work one short angled stitch outward to the first branch tip.
- Work the matching branch on the opposite side, creating a small outward-opening V.
- Repeat this pair of branch stitches near the tip of each remaining spoke.
- Check that all six main spokes have one pair of small forked branches.
- Secure the thread on the back of the front felt piece and trim the excess.
- Remove any visible transfer marks according to the marking tool's instructions.
Large snowflake checkpoint: Your dusty-rose stocking front should have one ivory snowflake with six main spokes and six pairs of small branches. The stitching should be neat and lie flat against the felt.
Don't pull the floss too tightly. Felt can pucker if the stitches are pulled hard, especially around the center where all six lines meet.
Transfer the Smaller Snowflake to the Ivory Felt
- Place the ivory stocking FRONT on your work surface with its toe pointing left.
- Find the SMALL SNOWFLAKE diagram on page 2.
- Center the design on the upper shaft of the ivory stocking, using the same placement cross from the body template.
- Check that it will sit below the dusty-rose cuff without touching the three scallops.
- Transfer the six spokes and their small branch marks.
- Remove the paper and compare the placement with the larger snowflake on the pink stocking.
The two snowflakes don't need to fill exactly the same amount of space. The smaller pink design gives the ivory stocking a slightly lighter look.
Embroider the Smaller Dusty-Rose Snowflake
- Thread the embroidery needle with two or three strands of dusty-rose floss.
- Secure the starting end on the back of the ivory front piece.
- Stitch the upper and lower vertical spokes, meeting at the snowflake center.
- Work the four diagonal spokes, following the smaller printed design.
- Check that you have six spokes altogether, without adding horizontal arms.
- Near the outer tip of each spoke, stitch one small outward-opening V.
- Make the V branches slightly shorter than those on the larger ivory snowflake, following the printed guide.
- Secure the thread on the back of the felt.
- Trim the loose thread and remove any remaining transfer marks.
Small snowflake checkpoint: The ivory stocking front should have one dusty-rose snowflake with six spokes and a small fork near the end of every spoke.
Check Both Embroidered Fronts
- Lay the two embroidered stocking fronts side by side.
- Check that both toes point left.
- Make sure the large ivory snowflake belongs to the dusty-rose body.
- Make sure the smaller dusty-rose snowflake belongs to the ivory body.
- Check that neither snowflake is crooked or too close to the future cuff.
- Turn each piece over and secure any loose embroidery ends.
- Keep the plain back pieces separate until the cuffs and loops are ready.
At this point, the fronts should have their finished snowflakes, but no edge stitching yet. That's exactly where we want to be before adding the cuffs.
Make the Contrasting Scalloped Cuffs
Each cuff has three rounded scallops along its lower edge. The straight top edge and the two short side edges line up with the top of the stocking.
We'll tack the cuffs to the embroidered fronts first. The scalloped lower edges stay free, so they can lie naturally over the stocking bodies.
Attach the Ivory Cuff to the Pink Stocking
- Lay the embroidered dusty-rose stocking FRONT right side up.
- Take the ivory cuff with its three scallops pointing downward.
- Position the cuff over the top of the pink stocking.
- Match the cuff's straight upper edge to the stocking's straight top edge.
- Line up the two short side edges with the stocking's upper side edges.
- Check that all three scallops hang down over the upper pink shaft.
- Make sure the scallops do not cover the embroidered snowflake.
- Pin or clip the cuff in place.
- Thread a fine sewing needle with matching ivory sewing thread.
- Make a few tiny holding stitches near the cuff's straight upper edge, catching only the FRONT stocking layer.
- Add a small securing stitch near each upper side edge if needed.
- Keep the stitches inconspicuous and do not sew through the lower scalloped edge.
- Remove the temporary pins or clips.
Pink stocking cuff checkpoint: The dusty-rose stocking should now have an ivory cuff with three rounded scallops, and its larger ivory snowflake should remain visible below the cuff.
Attach the Pink Cuff to the Ivory Stocking
- Lay the embroidered ivory stocking FRONT right side up.
- Place the dusty-rose scalloped cuff over its upper edge.
- Align the three straight cuff edges with the matching top and side edges of the stocking.
- Keep all three scallops pointing downward.
- Check that the smaller pink snowflake remains visible below the cuff.
- Pin or clip the cuff to the ivory front.
- Use a fine needle and matching dusty-rose sewing thread to tack the cuff near its upper edge.
- Add tiny stitches near the upper side edges if needed.
- Do not sew along the three lower scallops.
- Remove the temporary pins or clips.
Ivory stocking cuff checkpoint: The ivory stocking should have one dusty-rose cuff with three scallops and a smaller dusty-rose embroidered snowflake below it.
Check the Cuff Edges Before Assembly
Lay the two fronts side by side and check that the scallops look even. If one cuff is sitting crooked, fix it now. It's much easier than trying to move it after the stocking has been sewn closed.
Only the straight top and short side edges will be caught in the final perimeter stitching. The three scallops remain unstitched along their curved lower edges, just as they appear in the finished example.
Make and Attach the Pink Velvet Hanging Loops
Both stockings have pink velvet loops at the upper right corner, above the heel side. The loops are caught between the two body layers so you won't see the cut ribbon ends.
Prepare the Two Ribbon Loops
- Take one of the 7-inch pieces of pink velvet ribbon.
- Fold it in half, bringing the two cut ends together.
- Arrange the ribbon so the velvet surface faces outward around the loop.
- Keep the two cut ends flat rather than twisting them together.
- Repeat with the second ribbon length.
- Check that both loops are approximately the same size.
Position the Loop on the Pink Stocking
- Lay the embroidered pink stocking FRONT right side up, with its toe pointing left.
- Find the upper right corner of the stocking, above the straight heel-side edge.
- Position the folded velvet loop so it rises above this corner.
- Place the two cut ribbon ends together on the back of the FRONT felt piece, extending approximately 1/2 inch below its top edge.
- Keep the ribbon attachment approximately 1/4 inch inward from the right side edge.
- Turn the front over carefully and check that the cut ends lie flat against the felt.
- Use a few small stitches of matching sewing thread to fasten both ribbon ends to the wrong side of the FRONT piece.
- Turn the stocking front right side up again.
- Check that the velvet loop points upward from the upper right corner and isn't twisted.
Pink stocking loop checkpoint: The velvet loop should rise above the top right corner, with both cut ends secured behind the front layer. Those ends will be hidden when you add the back.
Attach the Loop to the Ivory Stocking
- Lay the embroidered ivory stocking FRONT right side up, again with the toe pointing left.
- Position the second folded velvet loop at its upper right corner.
- Place the cut ends against the wrong side of the front, approximately 1/2 inch below the top edge.
- Keep the attachment approximately 1/4 inch inside the right edge.
- Sew through both ribbon ends and the front felt with several small holding stitches.
- Check that the loop rises upward and its velvet surface faces outward.
Hanging-loop checkpoint: Both stocking fronts should now have pink velvet loops attached at their upper right corners. The loops should match in width and approximate height.
Give each loop a gentle tug to check the holding stitches. The final edge stitching will reinforce the attachments, but I'd rather catch a loose ribbon now than after the stocking is closed.
Sew and Blanket-Stitch the Mini Felt Stockings
Now we can put the fronts and backs together. These aren't turned like little fabric bags. The felt edges stay on the outside, with the blanket stitches holding both layers together.
To match the finished example, we'll use two embroidery colors around each stocking. The stitches across the cuff match the stocking body, while the stitches around the lower stocking match its snowflake.
Arrange the Pink Stocking Front and Back
- Lay the completed dusty-rose FRONT right side up, with the ivory cuff and snowflake facing you.
- Place the plain dusty-rose BACK underneath it.
- Match the top edge, two side edges, heel, sole, and rounded toe.
- Check that the velvet loop stays between the two felt layers at the upper right corner, with the loop itself extending above the top.
- Use a few small clips around the outside to keep the two body pieces aligned.
- Check that the ivory cuff is still centered and its three scallops hang freely over the pink front.
- Don't place stuffing or any other material between the layers.
Layering checkpoint: You should have two matching dusty-rose felt layers with the embroidered front facing outward, the plain back behind it, and the pink velvet loop emerging from the top right corner.
Blanket-Stitch the Ivory Cuff Section
We'll start with the straight upper edge and the short side edges of the cuff. Dusty-rose floss will show nicely against the ivory cuff.
- Thread an embroidery needle with three strands of dusty-rose embroidery floss.
- Secure the starting thread between the felt layers near the lower end of the cuff's left short side.
- Bring the needle through all the aligned layers approximately 1/8 inch inward from the outside edge.
- Make a blanket stitch, keeping the working thread under the needle as you pull it through so the stitch wraps neatly around the felt edge.
- Continue up the left short side of the cuff, passing through the cuff, front body, and back body.
- Space the stitches approximately 1/4 inch apart, adjusting slightly at the corners.
- Turn the upper left corner and work blanket stitches across the complete straight top edge.
- Keep the stitch depth approximately 1/8 to 3/16 inch from the cut edge.
- As you reach the upper right corner, stitch through the area where the velvet ribbon ends are secured between the two body layers.
- Make several small reinforcing stitches through the ribbon attachment area without pulling the felt into wrinkles.
- Continue around the upper right corner and down the short right side of the cuff.
- Stop where the lower end of that straight cuff side meets the pink body beneath it.
- Secure the dusty-rose floss between the felt layers.
Cuff stitching checkpoint: The pink stocking should now have dusty-rose blanket stitches across the straight upper edge and both short cuff sides. Its three lower ivory scallops remain unstitched.
Blanket-Stitch the Pink Stocking Body
- Thread the embroidery needle with three strands of ivory floss.
- Begin at the right side of the pink stocking, just below the ivory cuff.
- Secure the new thread between the two body layers.
- Make the first ivory blanket stitch close to the last dusty-rose stitch, leaving no gap.
- Continue down the straight heel-side edge, stitching through both pink felt layers.
- Follow the rounded heel and the sloping lower edge of the stocking.
- Continue around the rounded toe, working slightly closer stitches wherever the curve becomes tighter.
- Work up the curved upper foot and toward the narrower ankle section.
- Continue up the left side of the stocking until you reach the lower left edge of the ivory cuff.
- Join the final ivory stitch neatly to the nearby dusty-rose stitches.
- Secure the thread between the felt layers and trim it.
- Remove the remaining sewing clips.
- Check that the entire outer edge, including the top, is sewn closed.
Pink stocking assembly checkpoint: The dusty-rose ornament should have ivory blanket stitches around the lower stocking and dusty-rose stitches around the ivory cuff section. The large ivory snowflake and all three cuff scallops should remain clearly visible.
Don't pull the stitches too tight around the toe and heel. The outer edge should keep its original rounded shape, not gather inward.
Arrange the Ivory Stocking Front and Back
- Lay the embroidered ivory FRONT right side up, with its dusty-rose scalloped cuff facing you.
- Place the plain ivory BACK beneath it.
- Match all the outside edges, keeping the toe pointing left.
- Check that the pink velvet loop is positioned between the layers at the upper right corner.
- Secure the layers temporarily with sewing clips.
- Make sure the smaller dusty-rose snowflake remains visible below the cuff.
Blanket-Stitch the Pink Cuff Section
- Thread the embroidery needle with three strands of ivory floss.
- Secure the thread between the felt layers at the lower left end of the pink cuff's straight side.
- Work blanket stitches upward along the left cuff side, sewing through the cuff and both body layers.
- Continue around the upper left corner.
- Blanket-stitch across the full straight top edge using evenly spaced ivory stitches.
- Reinforce the velvet loop attachment as you reach the upper right corner.
- Turn the corner and work down the short right edge of the dusty-rose cuff.
- Stop where the cuff ends and the ivory stocking body continues below it.
- Secure the ivory floss between the felt layers.
Ivory stocking cuff checkpoint: The dusty-rose cuff should have ivory stitches across its straight upper edge and both short sides. Its three lower scallops should remain free.
Blanket-Stitch the Ivory Stocking Body
- Thread the embroidery needle with three strands of dusty-rose floss.
- Begin just below the right side of the cuff, joining neatly to the last ivory stitch.
- Work blanket stitches down the right side of the ivory stocking.
- Continue around the heel and along the lower edge.
- Follow the rounded toe, adjusting the stitch spacing to suit the curve.
- Continue up the left side of the foot and ankle.
- Stop at the lower left edge of the dusty-rose cuff.
- Join the final dusty-rose stitch neatly to the ivory stitching above it.
- Secure the thread between the felt layers.
- Remove the clips and inspect the full perimeter.
- Check that the top is sewn closed and that no gap remains between the two felt layers.
Ivory stocking assembly checkpoint: The ivory ornament should have dusty-rose blanket stitching around its lower body, ivory stitching around the pink cuff, and the smaller embroidered pink snowflake on its front.
Check Both Stocking Seams
Lay the two ornaments flat and compare them. They should have matching outlines, with their toes pointing the same way and their hanging loops at the upper right.
You don't need an exact stitch count around the edges because the spacing changes a little on the curves. What matters is that each stitch catches both body layers, the edges remain aligned, and neither stocking has an opening.
If you find a loose section, secure it with a few additional stitches in the matching floss color. There's no need to take the whole stocking apart for a small missed edge.
Finish and Check Both Christmas Stocking Ornaments
We're nearly finished. The last step is to check the embroidery, cuffs, hanging loops, and edges before putting the stockings on the tree.
Final Finishing Checklist
- Lay both ornaments flat with their embroidered fronts facing upward.
- Check that the dusty-rose stocking has its ivory cuff and larger ivory snowflake.
- Check that the ivory stocking has its dusty-rose cuff and smaller dusty-rose snowflake.
- Count the scallops on both cuffs. There should be three on each.
- Make sure the lower scalloped edges remain smooth and aren't accidentally caught in the body stitching.
- Check that the blanket stitches pass through both felt body layers around the entire outline.
- Check the color changes at the lower ends of the cuff sides for loose thread or gaps.
- Turn the stockings over and inspect the backs for stray thread ends or loose stitches.
- Check that both velvet hanging loops are securely attached at the upper right corners.
- Gently pull each loop to make sure the attachment doesn't shift.
- Trim any loose thread ends and remove all remaining pins, clips, or temporary markings.
- Smooth the felt by hand and arrange the cuff scallops so they lie naturally against the fronts.
Finished measurement checkpoint: Each felt stocking should measure approximately 5.8 inches tall by 4.4 inches wide, excluding the hanging loop. The exact measurement may vary slightly with the thickness of your felt and the edge stitching.
The measurements come from the printable templates. The ornaments haven't been physically test-sewn from these instructions, so the final dimensions and ribbon drape remain expected rather than sample-tested.
Finished set checkpoint: You should now have two closed felt Christmas stocking ornaments, one dusty rose and one ivory, with contrasting embroidered snowflakes, three-scallop cuffs, visible blanket stitching, and pink velvet hanging loops.
Christmas Tree, Gift and Baby Shower Decorating Ideas
I'd hang these together rather than putting them on opposite sides of the tree. The pink and ivory colors look especially pretty as a pair, and the different snowflakes make them interesting without adding a lot of extra decoration.
Hang Them on a Christmas Tree
Slip the velvet loops over sturdy Christmas tree branches, arranging the stockings so their embroidered fronts face outward. I'd keep them near a few plain ivory or pink ornaments rather than surrounding them with lots of busy decorations.
They're flat, so you won't need deep branches to support them. You can also hang one slightly higher than the other to make the two stocking shapes easier to see.
Add One to a Wrapped Christmas Gift
Instead of a separate gift tag decoration, tie one of the felt stockings onto the outside of a wrapped present. An ivory ribbon around dusty-rose wrapping paper would work nicely with either stocking color.
Just remember that the stockings are sewn closed. They're intended as decorations, so there's no pocket for slipping in candy or a small gift.
Use Them for a Baby Girl Christmas Shower
These would be pretty hanging from a small decorative display or tucked among wrapped gifts on a Christmas baby shower table. The ivory stocking helps break up the pink, while the matching velvet loops make the pair look like a set.
If you're putting together a complete holiday party, my Christmas baby shower ideas page has more suggestions for decorating the gift table and planning the rest of the celebration.
Make More Stockings in Different Colors
You can make more stockings with the same templates. Try red with an ivory cuff for a traditional Christmas look, or keep the pink and ivory combination if you're decorating a nursery or a holiday party in those colors.
Keep the same body template, three-scallop cuff, and embroidery placement. You only need to change the felt, floss, and ribbon colors.
Store Your Felt Ornaments
After Christmas, store the stockings flat in a clean, dry box. I'd place a sheet of tissue paper between them to keep the velvet loops and embroidered fronts from catching on other decorations.
Keep these ornaments out of reach of babies and young children. The velvet loops are hanging cords, and the stockings are decorative items rather than toys.
That's all you need for these little felt stockings. Two colors of felt, two embroidered snowflakes, and a few simple stitches give you a pair of Christmas ornaments without buying a lot of supplies.
When you click on links to various merchants on this site and make a purchase, this may result in this site earning a commission. This does not affect the price you pay.

UBGI Gold Standard 2026
Reviewed under the site's
editorial checklist.
Photos, decorating ideas, party setups and reader submissions are shared for inspiration unless a page is specifically presented as a pattern, tutorial, reference guide or step-by-step project. Follow the instructions, measurements, safety guidance and manufacturer directions provided for the particular project or product.
About Jan | Contact | Baby Nursery Ideas (Blog) | Site Map | Privacy Policy | Disclosure Policy | Disclaimer | Affiliate Disclosure | Earnings Disclosure | Facebook | Pinterest
I am a participant in the Amazon Services LLC Associates Program, an affiliate advertising program designed to provide a means for us to earn fees by linking to Amazon. As an Amazon Associate I earn from qualifying purchases.
Copyright © 2006-2026. All Rights Reserved.