DIY Christmas Sleigh Centerpiece: Pink Paper Sleigh with Free Templates
By Jan Bay
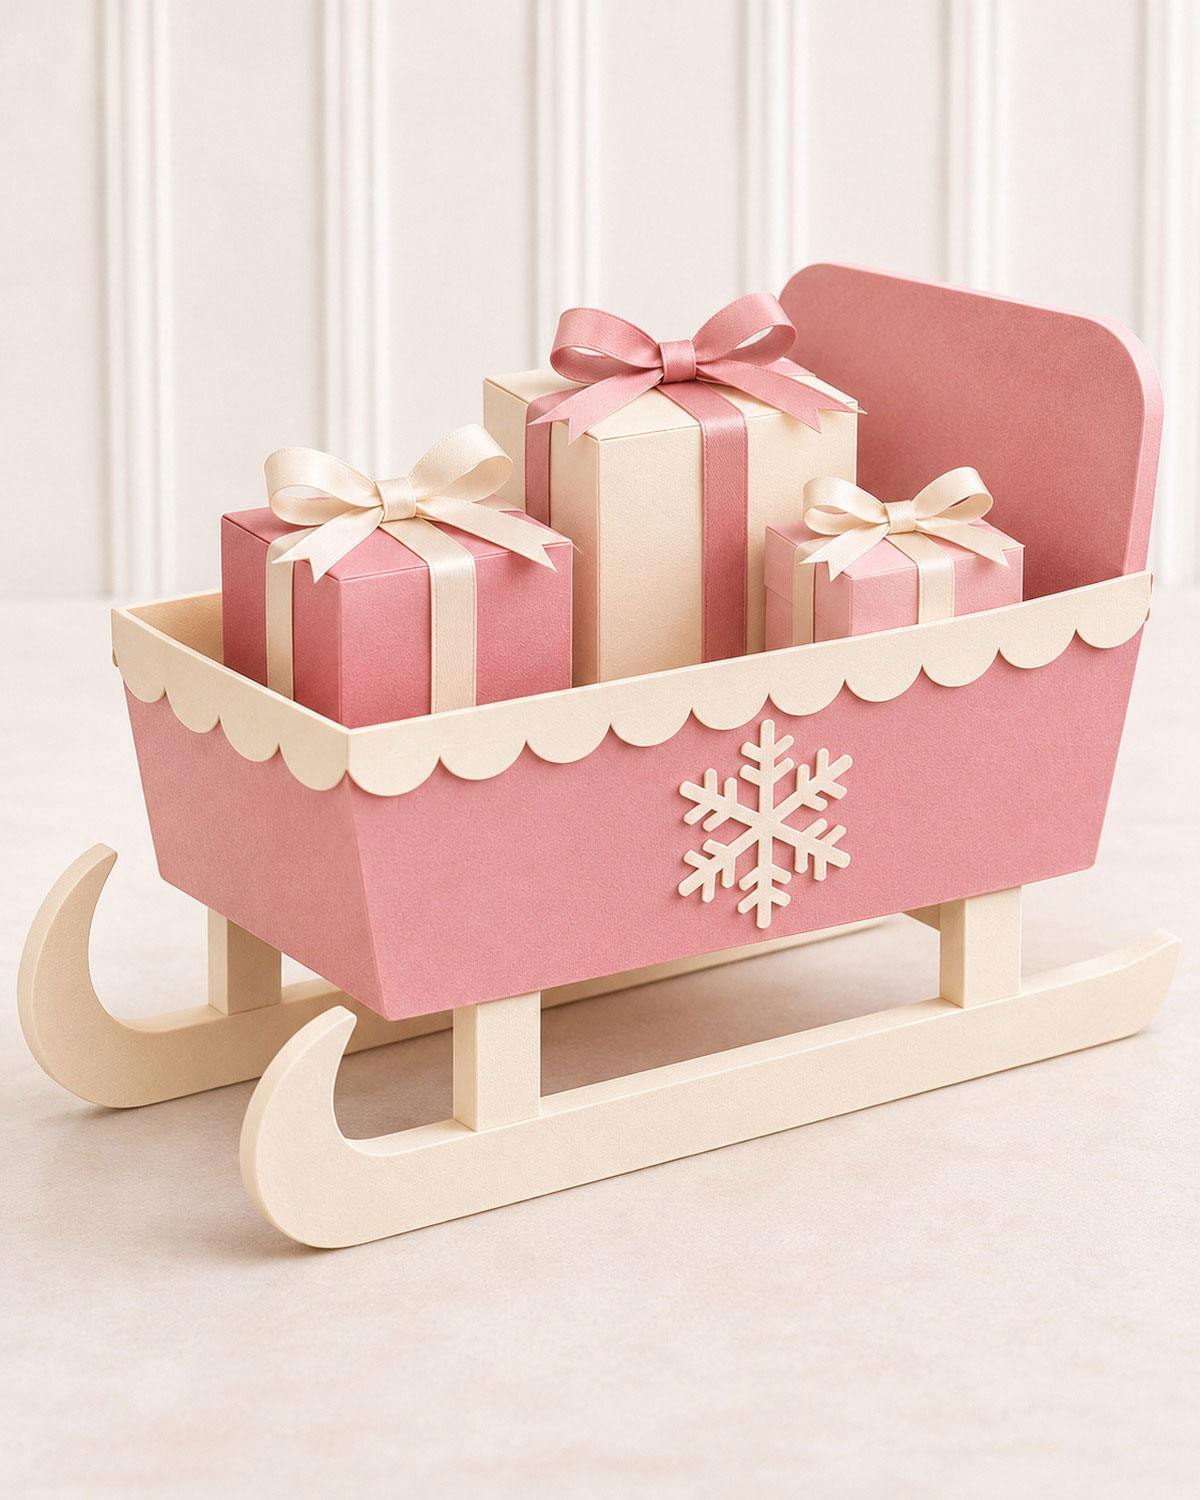
A Christmas sleigh centerpiece doesn't have to start with a wooden sleigh. This one is made from dusty-rose pink cardstock, with curved ivory runners, scalloped trim, and a little snowflake on the side. Three ribbon-tied paper presents sit inside, making it a pretty decoration for your family's Christmas table, a party or a baby girl Christmas shower. I've included free printable templates and step-by-step instructions so you can make the entire sleigh yourself.
Explore More Christmas Crafts and Decorating Ideas
DIY PInk Christmas Decorations
See Supplies for This Project Here.
Jump to a Section
- Free Printable Christmas Sleigh Centerpiece Templates
- Materials and Supplies
- Cut the Curved Ivory Sleigh Runners
- Cut the Pink Sleigh Body and Tray Pieces
- Add the Ivory Interior Linings
- Assemble the Pink Sleigh Body
- Make the Support Posts and Attach the Runners
- Add the Ivory Scalloped Trim
- Make and Attach the Ivory Snowflake
- Make the Three Miniature Christmas Gift Boxes
- Finish and Check the Christmas Sleigh Centerpiece
- Christmas Table and Baby Shower Decorating Ideas
The little sleigh has quite a few pieces, but you can make it in stages. I'd start with the runners and the pink tray, then add the ivory trim and three little presents after everything is assembled.
The finished design has a 7-inch-long pink tray, two matching ivory runners that measure about 9 1/8 inches long, and a taller rounded back. The sides flare outward just a little, which gives the sleigh a prettier shape than a plain rectangular box.
One detail I wouldn't skip is the open curve at the front of each runner. The tips sweep upward into points, with open space beneath them. They're not closed hooks or simple rounded ends. That shape makes a big difference in the finished sleigh.
Free Printable Christmas Sleigh Centerpiece Templates
You'll find all the cutting patterns in the seven-page download, including the corrected runners, pink sleigh body, ivory trim, snowflake, support posts, and three gift boxes.
Free printable pattern: Download the Pink Christmas Sleigh Centerpiece Templates and Assembly Guide.
Print the PDF on US Letter paper in landscape orientation at 100% or Actual Size. Don't select Fit to Page or Shrink to Fit. Measure the 1-inch test square before cutting anything. If it doesn't measure exactly 1 inch, check your printer settings and print again.
The seven pages include:
- Page 1: Full-size ivory runner outline, including the corrected open, pointed front crescent.
- Page 2: Seven-inch tray floor and two slightly flared long side panels.
- Page 3: Tapered front, tall rounded back, and the four square support-post patterns.
- Page 4: Three ivory scalloped trim pieces and the snowflake.
- Page 5: One-piece pattern for the tall ivory present.
- Page 6: Patterns for the medium and small pink presents.
- Page 7: Cutting checklist and assembly guide, including the ivory interior finish.
Keep page 7 close by as you work. It shows how the tray sits above the runners, where the support posts belong, and which parts of the interior should be ivory.
Materials for the Pink Christmas Sleigh Centerpiece
I'd use cardstock for the decorative pieces and thin, firm chipboard wherever the sleigh needs extra support. Ordinary lightweight paper is fine for tracing templates, but it won't hold the tray and runners in shape very well.
- Four to five sheets of dusty-rose pink cardstock, approximately 80 lb cover weight
- Six to eight sheets of ivory cardstock or ivory paper, allowing extra for the interior liners and gift boxes
- Thin, firm chipboard for two runners and the 7 x 3 1/2-inch tray floor
- Additional firm cardstock for the support-post end caps
- Matching ivory cardstock for covering the outer faces of the runners
- Thin ivory paper for the tray's interior lining
- Approximately 2 yards of dusty-rose satin ribbon, 1/4 to 3/8 inch wide
- Approximately 2 yards of ivory satin ribbon, 1/4 to 3/8 inch wide
- Clear-drying craft glue suitable for cardstock and chipboard
- Strong double-sided craft tape or a suitable paper-craft adhesive
- Ruler, pencil, and paper-scoring tool
- Sharp scissors
- Craft knife and cutting mat, helpful for the detailed snowflake and curved runner outlines
- Bone folder or the smooth back of a spoon for creasing paper
- Small clips for holding the pieces while glue dries
- Optional small adhesive foam squares for the snowflake
- Printed seven-page template set
Materials note: The paper quantities are estimates because they depend on how you arrange the patterns on each sheet. Have an extra sheet of pink and ivory cardstock available in case you need to recut a piece.
You won't need wood, a saw, or a cutting machine. The sleigh is a decorative paper-and-chipboard project, so it isn't intended to hold heavy objects.
Score the gift-box folds before bending the cardstock. A scoring tool gives the paper a neat fold line and helps prevent cracking. Cricut's cardstock guide has useful advice about scoring and choosing cardstock weights if you haven't worked with heavier paper before.
Cut the Curved Ivory Sleigh Runners
Start with the runners. They're the longest pieces in the project, and getting their shape right makes everything else easier.
The corrected pattern shows a gently rising, pointed crescent at the front and a much smaller upward curve at the rear. The long upper rail between them is where the support posts will attach.
Cut the Two Chipboard Runners
- Print page 1 of the corrected PDF at actual size.
- Cut around the complete runner outline, including both the outer curve and the inner curve beneath the pointed front tip.
- Place the paper template on a piece of thin, firm chipboard.
- Trace the outline carefully, keeping the long upper rail straight.
- Cut along the traced lines using sharp scissors or a craft knife and cutting mat.
- Work slowly around the open front crescent. You need both the outside curve and the inward curve that rises toward the tip.
- Cut the small upward sweep at the back without rounding off its pointed end.
- Use the same template to cut a second matching chipboard runner.
- Lay the two chipboard pieces together and compare their profiles.
Runner cutting checkpoint: You should have two matching chipboard runners, each approximately 9 1/8 inches long. The pointed front rises approximately 2 inches above the bottom of the rail.
The front crescent must remain open. Don't join its tip back to the straight upper rail or turn it into a closed loop.
Cover the Outside of Each Runner with Ivory Cardstock
- Place the runner template on ivory cardstock.
- Trace and cut two matching ivory runner covers.
- Place one chipboard runner on your work surface with its front curl pointing left.
- Choose the outward-facing side of that runner.
- Apply a thin, even layer of glue to that side of the chipboard.
- Place the first ivory cover over it, matching the curves and pointed ends.
- Press the covering gently into place without bending the narrow front tip.
- Repeat with the second runner, applying its ivory cover to the side that will face outward when the runners are installed.
- Lay both pieces flat and allow the adhesive to dry.
- Trim any tiny ivory overhangs so the covering follows the chipboard neatly.
Runner covering checkpoint: You should have two matching ivory-faced runners, with identical open front crescents and shorter raised rear tips.
Set them next to each other with their front tips pointing in the same direction. The runners will sit parallel beneath the sleigh, not face one another.
Cut the Pink Sleigh Body and Tray Pieces
The sleigh body is a shallow tray with a tall back. Its long sides and front flare outward slightly, so don't replace the printed shapes with plain rectangles.
Cut the Tray Floor
- Find the floor template on page 2.
- Trace it onto firm chipboard.
- Cut one rectangle measuring exactly 7 inches long by 3 1/2 inches wide.
- Check that the corners are square and the floor lies flat.
- Mark the underside lightly with the words FRONT and BACK so you'll know which direction the sleigh faces during assembly.
Cut the Two Pink Long Sides
- Find the flared long-side template on page 2.
- Trace the complete outline onto dusty-rose cardstock.
- Cut the first panel, following the slightly angled short edges.
- Cut a second matching panel from the same cardstock.
- Measure the lower edge of each panel. It should be 7 inches long.
- Check the upper edge. It should measure approximately 7.2 inches.
- Check the wall height. It should measure approximately 1 7/8 inches.
- Keep the two panels flat until you're ready to attach them.
Side-wall checkpoint: Each pink side has a 7-inch lower edge and a slightly longer upper edge, with about 1/10 inch of additional length at each end.
Cut the Pink Front and Tall Rounded Back
- Find the front and back patterns on page 3.
- Trace the shorter front-wall outline onto dusty-rose cardstock.
- Cut one front panel, following the slightly tapered sides.
- Check that its bottom edge measures 3 1/2 inches and its top edge measures 3 3/4 inches.
- Trace the tall back-wall pattern onto another piece of dusty-rose cardstock.
- Cut carefully around its two rounded upper corners and across its top.
- Check that the back has a 3 1/2-inch lower edge and an approximately 3 3/4-inch upper width.
- Keep the tall rounded back separate from the shorter front wall.
The front wall is the same height as the long sides, about 1 7/8 inches. The back rises to approximately 3 1/10 inches, making room for the taller present shown in the finished example.
Body cutting checkpoint: You should have five main body pieces: one firm rectangular floor, two matching pink long sides, one shorter pink front, and one tall rounded pink back.
Before gluing anything, arrange the pieces around the floor. The two long walls run along the 7-inch edges, while the front and back span the 3 1/2-inch ends. The taller rounded panel belongs at the rear.
Add the Ivory Interior Linings
The finished sleigh has a pink outside and a light ivory interior. I'd line the floor, both long sides, and the shorter front before putting the tray together. It's much easier to work with flat pieces than to try fitting paper inside the finished sleigh.
Leave the tall rounded back pink on both sides. That taller panel is meant to stand out behind the presents, just as it does in the example image.
Cut the Interior Lining Pieces
- Place the 7 x 3 1/2-inch floor template on thin ivory cardstock or sturdy ivory paper.
- Trace one floor lining.
- Trim approximately 1/16 inch inside the traced outline on all four sides.
- Using the two flared long-side pieces as guides, trace two matching ivory liners.
- Trim approximately 1/16 inch inside each liner's outer edges.
- Trace one liner from the short pink front-wall pattern.
- Trim it approximately 1/16 inch inside the outline.
- Do not cut an ivory lining for the tall rounded back.
- Lay each ivory piece over its matching pink or chipboard part to check the fit.
Lining checkpoint: You should have four ivory pieces: one floor liner, two flared side liners, and one shorter front liner.
Each liner should sit just inside the edges of its matching piece, leaving a very narrow border rather than extending past the cardstock.
Glue the Ivory Liners in Place
- Place the chipboard floor on your work surface with its upper face showing.
- Apply a thin, even layer of paper-craft adhesive to the back of the ivory floor liner.
- Center the liner on the floor, leaving approximately 1/16 inch uncovered around the edges.
- Press gently and allow it to dry flat.
- Lay the first pink long side with its future inside face upward.
- Center the matching ivory liner over that face.
- Glue it in place, keeping the upper and lower edges neatly aligned inside the pink outline.
- Repeat with the second pink long side.
- Attach the remaining ivory liner to the inside face of the short pink front wall.
- Check for bubbles, wrinkles, or loose corners.
- Leave all four lined pieces flat until the adhesive has dried.
Interior checkpoint: The tray floor, two long side walls, and front wall should have neat ivory inner faces. The tall rounded back should remain dusty rose.
Use very little liquid glue on these large flat pieces. Too much moisture can make cardstock ripple, and it's difficult to smooth out once the liner has dried.
Assemble the Pink Christmas Sleigh Body
Now we'll turn those flat pieces into the shallow sleigh tray. Its base is rectangular, but the walls lean outward slightly. That's intentional. Don't try to force the upper corners into the shape of a perfectly square box.
Prepare the Paper Hinges
The tray pieces don't have built-in glue tabs, so we'll make narrow folded strips to join them. I prefer doing this rather than overlapping the edges of the walls, because it keeps the finished tray dimensions much closer to the printed pattern.
- From spare dusty-rose cardstock, cut two strips approximately 7 inches long by 3/4 inch wide.
- Cut two more strips approximately 3 1/2 inches long by 3/4 inch wide.
- Score each strip lengthwise down its center, creating two 3/8-inch-wide sections.
- Fold each strip into an L shape.
- Trim a little from the ends of the strips if necessary to prevent extra paper building up at the tray corners.
- Keep the two longer hinges for the long side walls and the two shorter hinges for the front and back.
Hinge checkpoint: Four folded pink strips, with two long pieces and two shorter pieces, ready to attach the walls to the floor.
Attach the Two Long Side Walls
- Place the lined tray floor on your work surface, ivory side up.
- Take one long pink wall and position its 7-inch lower edge beside a 7-inch edge of the floor.
- Keep the pink outside facing outward and its ivory lining facing into the future tray.
- Apply glue to one half of a long folded hinge strip.
- Attach that half along the underside of the tray floor, close to its long edge.
- Apply glue to the other half of the hinge and attach it to the lower outside face of the pink wall.
- Bring the wall upright, keeping its lower edge level with the floor.
- Lean its upper edge outward very slightly rather than forcing it completely vertical.
- Hold the wall with clips or temporary supports until the adhesive grips.
- Repeat along the opposite long edge with the second pink wall and the remaining long hinge strip.
- Check that the upper edges of both walls are approximately level with one another.
Side-wall checkpoint: You should have a 7-inch-long tray floor with two pink side walls extending upward and leaning outward slightly. The ivory linings face inward.
The hinge strips sit mainly beneath the floor and against the outside lower edges, so they won't spoil the ivory interior.
Add the Shorter Front Wall
- Find the front end of the tray, opposite the taller rounded back's intended position.
- Take the short pink front panel with its ivory lining facing inward.
- Position its 3 1/2-inch lower edge against the front edge of the floor.
- Attach one half of a short folded hinge beneath the floor, along that edge.
- Glue the other hinge half to the lower outside face of the front panel.
- Raise the panel until it meets the front ends of the two long sides.
- Allow its upper edge to lean outward slightly, matching the side-wall taper.
- Check that the upper corners meet without forcing the cardstock to buckle.
- Hold the panel in place while the glue begins to set.
Front checkpoint: The sleigh should now have three low walls, with their ivory interiors facing the center and the upper edges flaring outward slightly.
Attach the Tall Rounded Back
- Take the tall dusty-rose back panel from page 3.
- Check that its two rounded upper corners are smooth.
- Position its 3 1/2-inch lower edge along the remaining short edge of the floor.
- Keep the rounded top pointing upward.
- Attach one half of the last short folded hinge beneath the floor.
- Attach the other half to the lower outside face of the pink back panel.
- Raise the back until its lower section meets the two long side walls.
- Let the upper section extend above the side walls.
- Adjust the angle so the lower side edges fit the tray corners without twisting.
- Clip or support the back until the adhesive grips.
Back checkpoint: The tall pink back should rise above the other three walls, with two rounded top corners. Its inside face remains dusty rose rather than ivory.
Reinforce the Four Tray Corners
- Cut four narrow paper hinge strips, each approximately 1/2 inch wide by 1 1/2 inches long.
- Use ivory paper where the hinge will show against the ivory-lined interior.
- Fold each strip lengthwise down the center.
- At the first front corner, hold the two neighboring walls together in their intended positions.
- Glue one half of the folded strip to the inside of the long side wall.
- Glue the other half to the inside of the front wall.
- Repeat at the second front corner.
- Use the remaining strips to reinforce the lower joined portions of the two rear corners.
- Keep the hinges below the tray's upper edge so they remain unobtrusive.
- Adjust the flared wall angles while the glue is workable.
- Allow all four corners to dry before lifting the tray.
Tray assembly checkpoint: You should now have one open pink sleigh body with a 7 x 3 1/2-inch floor, low flared sides and front, and a taller rounded back. The visible interior is ivory except for the tall back.
Set it on the table and check that the floor stays flat. If the walls pull it out of shape, loosen the affected hinge while the adhesive is still workable and realign that corner.
Make the Support Posts and Attach the Runners
The tray sits above the ivory runners on four little square posts. You'll use two posts for each runner, with the runners extending beyond the tray at the front and back.
Take your time here. The two runners need to be parallel and level or the finished sleigh may rock on the table.
Cut the Four Ivory Support Posts
- Find the support-post net on page 3 of the PDF.
- Trace the complete pattern onto firm ivory cardstock.
- Cut along its solid outside edge, including the narrow glue tab.
- Repeat until you have four matching post nets.
- Score the four vertical fold lines shown on each net.
- Leave the 1/4-inch joining tab attached to each piece.
- Using the separate 0.65 x 0.65-inch square cap dimensions on the PDF, cut eight small caps from firm cardstock.
- Check that all eight caps are the same size.
Each post will have a square cross section approximately 0.65 inch across. The printed net gives it a height of approximately 1 1/10 inches.
Post cutting checkpoint: Four post nets and eight square end caps. That's two caps for each post.
Fold and Assemble the Four Posts
- Take the first ivory post net.
- Fold along each of its vertical score lines to form four square sides.
- Bring the first and last side edges together.
- Glue the 1/4-inch tab behind the opposite edge to close the hollow square post.
- Hold the seam until it stays closed.
- Check that the post's four sides form an even square rather than a flattened rectangle.
- Glue one 0.65-inch square cap over its upper end.
- Glue a second cap over the lower end.
- Repeat with the remaining three posts.
- Allow the capped posts to dry completely.
Post assembly checkpoint: You should have four matching ivory square posts, closed at both ends. Each should stand upright without collapsing.
Position the Posts Beneath the Sleigh
- Place the sleigh tray upside down on a clean, padded work surface.
- Make sure the underside of its floor is accessible.
- Arrange two posts near one long edge of the floor and two near the opposite long edge.
- Position the front pair approximately 1 1/4 inches back from the front short edge, measured to their centers.
- Position the rear pair approximately 1 1/4 inches forward from the rear short edge, measured to their centers.
- Keep the posts near the two long sides, with approximately 3/8 inch between each post center and its nearest long edge.
- Check that the four posts form two parallel rows, with one front and one rear post in each row.
- Dry-fit both runners beneath the post rows before applying glue.
- Move the posts slightly if necessary so all four will meet the straight upper rails of the runners.
- Apply glue to the upper cap of each post and attach it to the underside of the floor.
- Hold the posts in position until the adhesive grips.
Post placement checkpoint: Four upright supports should extend evenly beneath the floor, two on each long side. The front and rear pairs should line up across the sleigh.
The runners must attach to the straight portions of their upper rails. Don't place a support inside the open front crescent or beneath the little raised rear tip.
Attach the Two Ivory Runners
- Place the first completed runner alongside the underside of the tray, with its open pointed crescent facing the sleigh's front.
- Position its straight upper rail against the lower caps of the two posts along the first long side.
- Check that both posts sit fully on the straight rail.
- Adjust the runner forward or backward until its front curl projects beyond the front of the sleigh and its raised rear tip extends beyond the back.
- Apply a suitable adhesive to the contact points between the post caps and the runner's straight upper rail.
- Press the runner into place without bending its open crescent.
- Repeat with the second runner beneath the other two posts.
- Check that both front curls point in the same direction.
- Look along the runners from front to back. They should remain parallel rather than leaning toward each other.
- Place the sleigh on a flat surface once the glue has gripped enough to support its weight.
- Check that both runners rest evenly and the pink tray sits level above them.
- Make small alignment adjustments while the adhesive is still workable.
- Return the sleigh to a supported position and allow the joints to cure completely.
Runner attachment checkpoint: The tray should stand above two matching ivory runners. Each runner should have an open, pointed crescent at the front, a long flat lower section, and a smaller raised tip at the back.
Look at the sleigh from both sides. The runners may look a little different because of perspective, but they're made from the same pattern. Their lengths, shapes, and positions should match.
Don't put the paper presents in the sleigh yet. Let the four posts and two runners become firm before adding anything inside.
Reinforce the Post-to-Runner Connections
Because the runners are made from upright chipboard, their upper edges are quite narrow. I'd reinforce the places where the square posts meet the rails rather than depending on glue along those thin edges alone.
- Cut eight small ivory cardstock strips, each 4/5 inch long by approximately 0.65 inch wide.
- Score each strip across its length at the halfway point, creating two sections approximately 2/5 inch long.
- Fold the strips into small right angles.
- At the first post-to-runner connection, place one folded strip against the outside face of the runner, directly beneath the post.
- Glue one half of the strip to the upright side of the runner.
- Fold the other half outward into a small horizontal shelf beneath the post's bottom cap and glue it there.
- Repeat on the inside face of the same runner, so the post has supporting tabs on both sides.
- Reinforce the remaining three post-to-runner connections in the same way.
- Check that all the tabs sit beneath the tray and don't extend into the decorative curls.
- Let the connections dry completely before handling the sleigh.
Support checkpoint: All four posts should be joined to the straight upper rails, with small hidden or nearly hidden ivory supports on either side of each connection. The two runners should remain upright and parallel.
Add the Ivory Scalloped Trim
The ivory scallops are a lovely detail on this design. They run along the upper edges of both long pink sides and across the shorter front wall. The tall rounded back is left plain.
I'd use sturdy ivory cardstock for these rather than thin paper. The scallops need to hold their curves without curling up.
Cut the Three Scalloped Strips
- Find the scalloped trim patterns on page 4 of the PDF.
- Cut out LONG TRIM A, following its straight upper edge and rounded lower scallops.
- Trace the shape onto ivory cardstock and cut one matching strip.
- Repeat with LONG TRIM B to make the second long strip.
- Trace and cut the shorter FRONT TRIM pattern.
- Check that the scallops along each strip are smoothly rounded.
- Don't cut away the narrow straight band above the scallops. That section is needed for attaching the trim.
- Keep the three strips flat until you're ready to glue them.
Trim checkpoint: You should have two long ivory scalloped strips for the sides and one shorter strip for the front.
Attach the Trim to the Long Sides
- Stand the completed sleigh upright on its runners.
- Choose the long pink side that will face forward in your display.
- Hold the first long ivory trim strip along its upper edge.
- Position the straight band against the outer upper portion of the pink wall.
- Allow the rounded scallops to hang downward over the pink surface.
- Center the trim along the wall. The printed strip is slightly shorter than the flared upper edge, so leave a small, even margin at both ends.
- Check that the lower curves are visible and not tucked inside the tray.
- Apply a thin line of craft glue along the straight attachment band.
- Press the strip into place, keeping its upper edge level with the top of the wall.
- Hold or clip it carefully until the glue grips.
- Attach the second long trim strip along the opposite side in the same way.
Side-trim checkpoint: Both long pink walls should now have ivory scallops hanging from their upper edges, with the rounded pattern facing outward.
Attach the Front Scalloped Trim
- Take the shorter ivory trim strip.
- Hold it across the upper edge of the short front wall.
- Center it so the two outer ends look balanced.
- Position the straight attachment band along the upper pink edge.
- Let the scallops hang down the outside of the front wall.
- Apply a thin layer of glue to the attachment band.
- Press the trim into place.
- Check that it meets the side decorations neatly at the corners without bunching or overlapping heavily.
- Allow all three trim pieces to dry.
Scallop finishing checkpoint: The sleigh should now have ivory scalloped trim on its two long sides and short front. The tall rounded pink back remains untrimmed.
Don't add scallops to the tall back. Keeping that panel plain gives the taller present a neat pink background.
Make and Attach the Ivory Snowflake
There's one small ivory snowflake centered on the visible pink side of the sleigh. You can cut it from the printable pattern or use the snowflake guide to draw the design with an ivory paint pen.
Cut the Snowflake from Ivory Cardstock
- Find the snowflake pattern on page 4 of the PDF.
- Cut out the printed shape carefully, preserving its six main arms.
- Trace the complete outline onto ivory cardstock.
- Use fine-point scissors or a craft knife to cut around the outer shape.
- Work slowly around the short branches on each arm.
- Remove any loose paper fibers along the cut edges.
- Check that the center and all six arms remain connected.
Snowflake checkpoint: You should have one delicate ivory six-arm snowflake with small branches extending from each spoke.
Those little cuts are the fiddliest part of this project. If your cardstock won't cooperate, use the printed outline as a guide and draw the snowflake onto the pink side with an ivory paint pen instead.
Attach the Snowflake to the Sleigh
- Place the sleigh so the long decorated side faces you.
- Find the center of that pink side wall, halfway between the front and back corners.
- Hold the snowflake against the center of the long pink side wall, with one arm pointing upward.
- Move it until its upper arm nearly touches or slightly overlaps the lower edge of the ivory scalloped border, as shown in the finished example.
- Check that the lower arms remain within the pink wall and that the snowflake is fully visible rather than hidden behind the trim.
- Apply a small amount of craft glue to the back of the snowflake, concentrating on its center and thicker sections.
- Press it gently onto the pink wall.
- Keep the delicate outer branches free of excess glue.
- Allow the snowflake to dry before handling that side of the sleigh.
Snowflake placement checkpoint: One ivory snowflake should be centered on the visible long pink wall. Its upper arm may touch or slightly overlap the lower scalloped edge, while the rest of the snowflake remains clearly visible.
That's enough decoration for the outside. The pale runners, scalloped edges, and little snowflake already give the sleigh plenty of detail.
Make the Three Miniature Christmas Gift Boxes
Now we can fill the sleigh. The three presents are empty paper boxes, so they won't add much weight. One is tall and ivory with a dusty-rose bow. The other two are pink, with ivory ribbon bows.
Make all three boxes before tying their ribbons. You'll be able to compare their sizes and arrange them inside the sleigh without trying to work around the bows.
Cut the Tall Ivory Gift Box
The tallest present has a square base measuring approximately 2 x 2 inches and stands 3 inches high.
- Find the tall gift-box net on page 5 of the PDF.
- Trace the complete outline onto ivory cardstock, including the top and bottom flaps and the narrow joining tab.
- Cut around the solid outside lines.
- Leave the 1/4-inch side glue tab attached.
- Score all the dotted vertical lines between the four main box panels.
- Score the dotted lines where the upper and lower closing flaps meet the box walls.
- Fold each vertical panel along its score line.
- Fold all the closing flaps toward the inside of the future box.
Ivory box cutting checkpoint: You should have one complete gift-box net with four 2-inch-wide walls, a height of 3 inches, top and bottom closing flaps, and one side joining tab.
Assemble the Tall Ivory Gift Box
- Bring the four wall panels together to form a rectangular tube.
- Apply glue to the 1/4-inch joining tab.
- Tuck the tab inside the opposite wall and press the seam closed.
- Check that the box has four square corners.
- At the bottom, fold one pair of opposite flaps inward.
- Fold the remaining pair over them, allowing the flaps to overlap.
- Glue the overlapping areas to close the bottom.
- Stand the box upright on its closed base.
- Check that it measures approximately 2 inches across each side and 3 inches high.
- Fold the four top flaps inward in the same alternating order.
- Glue the overlapping top flaps closed.
- Hold the box square while the adhesive dries.
Tall gift checkpoint: One closed, empty ivory gift box approximately 2 x 2 x 3 inches, with flat faces and square corners.
Make the Medium Pink Gift Box
The medium present is shorter than the ivory one, with a base approximately 1.7 inches square and a height of approximately 2 inches.
- Find the medium gift-box pattern on page 6 of the PDF.
- Trace it onto dusty-rose cardstock, including all its closing flaps and joining tab.
- Cut around the solid outside lines.
- Score each dotted vertical line and the dotted lines at the top and bottom flaps.
- Fold the four wall panels into a square tube.
- Glue the side joining tab behind the opposite wall.
- Close the bottom by folding opposite flaps inward, then overlapping the remaining flaps.
- Glue the bottom closed and check that it lies flat.
- Close and glue the top flaps in the same way.
- Press the corners gently into shape and allow the adhesive to dry.
Medium gift checkpoint: One dusty-rose pink gift box with an approximately 1.7-inch-square base and a height of 2 inches.
Make the Small Pink Gift Box
The smallest present has a base approximately 1 1/4 inches square and stands about 1 1/3 inches high.
- Find the small gift-box pattern on page 6.
- Trace the full outline onto dusty-rose cardstock.
- Cut around its solid edges, keeping all the flaps and the side glue tab.
- Score the dotted fold lines carefully.
- Fold the four walls upward into a square tube.
- Glue the joining tab inside the opposite wall.
- Fold the bottom flaps inward and glue their overlapping sections.
- Check that the small box stands squarely on its base.
- Fold and glue the top flaps closed.
- Let the box dry before adding ribbon.
Small gift checkpoint: One closed dusty-rose pink box approximately 1 1/4 inches square at the base and 1 1/3 inches high.
Wrap the Tall Ivory Present with Pink Satin Ribbon
The tallest ivory present gets a pink ribbon crossing over its top, with a larger pink bow at the center.
- Cut approximately 25 inches of dusty-rose satin ribbon for the main wrap and bow.
- Cut another piece approximately 12 inches long for the crossing band.
- Lay the shorter ribbon around the box in one direction, passing over its top, down the sides, and beneath its base.
- Overlap and secure the ends neatly underneath the box.
- Take the longer ribbon and wrap it around the box in the opposite direction, crossing the first band at the top center.
- Bring both loose ends to the top of the box.
- Tie them into a two-loop bow, centering the knot over the crossing ribbons.
- Adjust the bow loops to approximately 1 1/2 to 2 inches across.
- Trim the tails into neat V-shaped ends.
- Check that the ribbon bands lie straight against the ivory cardstock.
Tall gift finishing checkpoint: The ivory box should have a dusty-rose ribbon cross and a pink satin bow centered on top.
Wrap the Two Pink Presents with Ivory Ribbon
- Cut approximately 20 inches of ivory satin ribbon for the medium box's main wrap and bow.
- Cut a second piece approximately 10 inches long for its crossing band.
- Secure the shorter band around the medium box, passing across the top and underneath the base.
- Wrap the longer band in the opposite direction.
- Bring the ends together at the top center and tie a small ivory bow.
- Adjust the loops and trim the tails.
- For the smallest pink box, cut approximately 17 inches of ivory ribbon for the bow and main wrap.
- Cut another piece approximately 8 inches long for the crossing band.
- Wrap the small box in the same way, keeping the two bands straight.
- Tie a small ivory bow at the top center.
- Check that the bows are proportional to their boxes and don't hide the pink cardstock completely.
Ribbon checkpoint: You should now have three finished presents: one tall ivory box with a pink bow, one medium pink box with an ivory bow, and one small pink box with an ivory bow.
Arrange the Three Presents Inside the Sleigh
- Check that the sleigh tray is dry and stable on its runners.
- Place the tall ivory present near the middle of the tray, slightly toward the tall rounded back.
- Put the medium pink present toward the left front of the tray.
- Place the small pink present toward the right front.
- Adjust the three boxes until their ribbon bows are visible.
- Keep the boxes upright, with their flat bases resting on the ivory-lined floor.
- Check that the tall ivory present rises above the lower side walls without covering the rounded back completely.
- Leave the boxes loose rather than permanently gluing them into the tray, so you can rearrange or store them separately.
Gift arrangement checkpoint: Looking at the sleigh from the front, you should see the medium pink present on the left, the taller ivory present near the middle, and the small pink present on the right, with the rounded pink back rising behind them.
Finish and Check the Christmas Sleigh Centerpiece
Before putting the sleigh on your Christmas table, give the whole thing one final check. Pay particular attention to the runners and the four posts. Those are the pieces that support the tray, so the glue needs to be completely dry.
Check the Pink Sleigh Body
- Look at the sleigh from the front and make sure the two long side walls are approximately level.
- Check that the front wall is shorter than the tall rounded back.
- Make sure the back panel stands upright without buckling.
- Look inside the tray and check that the ivory floor, side, and front liners are firmly attached.
- Check that the tall rounded back remains dusty rose on both sides.
- Inspect all four lower wall hinges and four corner connections.
- Secure any loose joints before moving the sleigh.
Check the Runners and Support Posts
- Count the support posts. There should be four, with two beneath each long side of the tray.
- Check that all eight end caps are attached, with two on each post.
- Make sure the posts stand upright and their connections are firmly glued.
- Check the small reinforcing tabs where the posts join the runners.
- Look at both ivory runners from the side.
- Make sure they match in length and have the same open, pointed front crescent.
- Check that both front curls point in the same direction.
- Confirm that the posts attach to the straight upper rails rather than the curved ends.
- Set the sleigh gently on a flat surface.
- Check that the runners sit evenly without twisting or leaning sideways.
- If a runner is crooked, adjust its position before the adhesive fully cures.
Runner checkpoint: Both ivory runners should remain parallel and upright, with their front crescents extending beyond the sleigh body and their smaller rear tips curving gently upward.
Check the Decorations and Presents
- Inspect the two long ivory scalloped strips and the shorter front strip.
- Make sure all three are firmly attached along the upper edges of the pink walls.
- Check that the scallops hang downward rather than folding into the tray.
- Make sure the tall rounded back has no added scalloped trim.
- Look at the ivory snowflake on the visible long side.
- Check that all six arms are attached without loose branches.
- Make sure the three gift boxes are closed, with their ribbon bows facing upward.
- Arrange the taller ivory present between the two smaller pink presents.
- Check that the three boxes sit comfortably in the tray without pushing its sides outward.
- Remove all temporary clips, scraps, and other assembly tools.
- Allow every glued connection to cure fully before displaying the sleigh.
Finished project checkpoint: Your centerpiece should have a dusty-rose tray approximately 7 inches long and 3 1/2 inches wide at the floor, two ivory runners approximately 9 1/8 inches long, a tall rounded back, three ivory scalloped trim pieces, one ivory snowflake, and three ribbon-tied paper presents.
The measurements are based on the printable templates and planned construction. The design hasn't been physically test-made, so the exact assembled dimensions may vary slightly with your paper thickness and assembly.
Keep the sleigh indoors, away from moisture, candles, and heat sources. It's a tabletop decoration, not a toy or a container for heavy gifts. Keep the small paper pieces and ribbons out of reach of babies and young children.
Christmas Table and Baby Shower Decorating Ideas
I'd let this little sleigh be the main decoration on a small Christmas table instead of surrounding it with lots of other things. The curved runners, scallops, and ribbon-tied presents give it enough detail on their own.
Use the Sleigh as a Christmas Table Centerpiece
Set the sleigh in the middle of an ivory table runner or tablecloth. The ivory runners will blend nicely with the linens, while the dusty-rose body gives you a pretty little bit of color.
If you're setting a dining table, make sure the sleigh doesn't block anyone's view or get in the way of serving dishes. You can always move it to a sideboard while dinner is served.
Decorate a Baby Girl Christmas Shower
The pink and ivory colors would also be lovely for a Christmas baby shower. I'd place the sleigh on the gift table, with the three tiny paper presents inside and just a few coordinating decorations nearby.
There's no need to put miniature toys or lots of loose decorations in the tray. The little wrapped boxes already make it look like a Christmas sleigh carrying presents.
If you're planning the rest of the party, my Christmas baby shower ideas page has more ways to bring the holiday theme into your decorations, food, and table settings.
Change the Colors Without Changing the Pattern
You can use the same templates with other Christmas colors. A red sleigh with ivory runners would give you a traditional look, while pink with silver trim would be a little more festive.
Keep the body, runners, posts, and gift-box sizes the same. There's no reason to change the construction just because you're choosing different cardstock.
Store Your Handmade Sleigh
When Christmas is over, lift the three paper presents out of the tray and store them separately. That will make it easier to protect their ribbon bows.
Place the sleigh upright in a sturdy box, with enough room around the pointed runner ends and the tall rounded back. Don't stack heavier decorations on top of it.
The centerpiece should be kept in a dry place so the cardstock, chipboard, and glued joints don't warp.
And that's your pink Christmas sleigh. With three little presents tucked inside, it makes a pretty handmade decoration for Christmas or a baby girl holiday shower, without needing a wooden sleigh or expensive supplies.
When you click on links to various merchants on this site and make a purchase, this may result in this site earning a commission. This does not affect the price you pay.

UBGI Gold Standard 2026
Reviewed under the site's
editorial checklist.
Photos, decorating ideas, party setups and reader submissions are shared for inspiration unless a page is specifically presented as a pattern, tutorial, reference guide or step-by-step project. Follow the instructions, measurements, safety guidance and manufacturer directions provided for the particular project or product.
About Jan | Contact | Baby Nursery Ideas (Blog) | Site Map | Privacy Policy | Disclosure Policy | Disclaimer | Affiliate Disclosure | Earnings Disclosure | Facebook | Pinterest
I am a participant in the Amazon Services LLC Associates Program, an affiliate advertising program designed to provide a means for us to earn fees by linking to Amazon. As an Amazon Associate I earn from qualifying purchases.
Copyright © 2006-2026. All Rights Reserved.