Free Crochet Santa Hat Appliqué Pattern
By Jan Bay
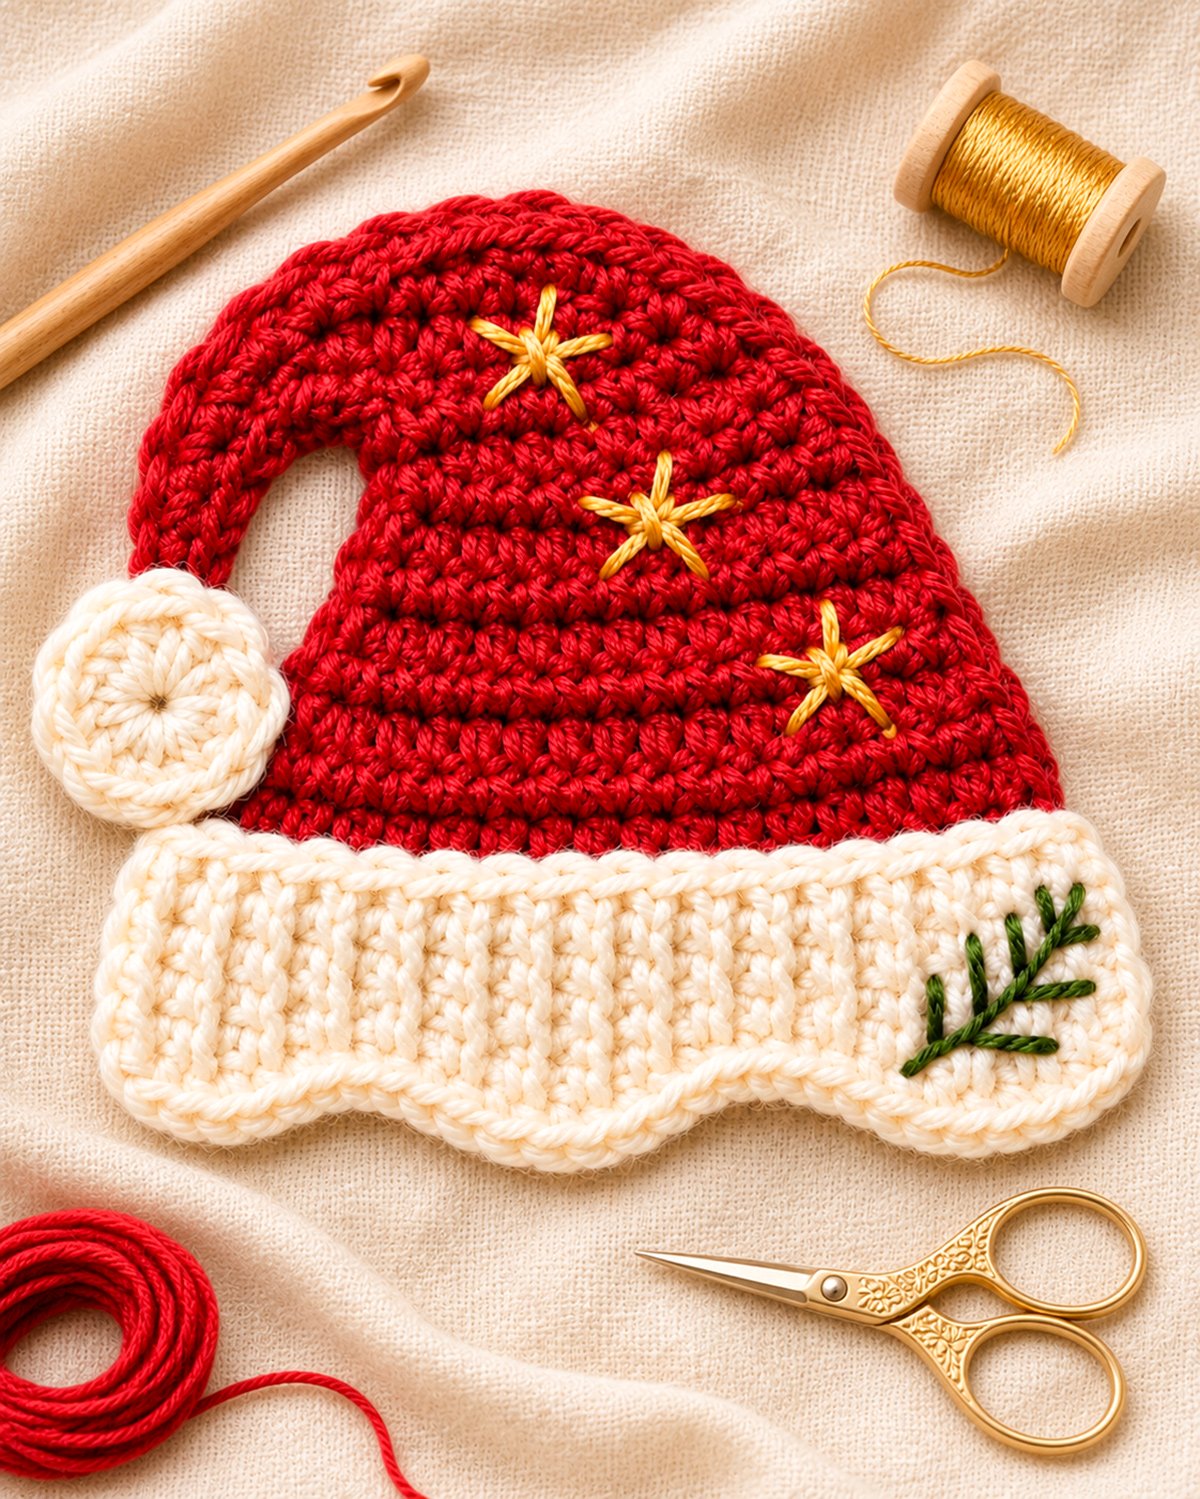
This free crochet Santa hat appliqué pattern has a long, curled red crown, three little gold stars and an ivory ribbed brim with a gently shaped edge. I've added an evergreen sprig at one corner and a round crocheted pompom at the tip. You can sew the finished hat onto a Christmas stocking, gift bag, holiday quilt block or other handmade decoration. The complete pattern will show you how to crochet the pieces, shape the curved tip and add the embroidered details.
Explore More Free Christmas Crochet Patterns
Christmas Crochet Appliqué Patterns
Santa Face Appliqué and Ornament
See Supplies for This Project Here.
Jump to a Section
Materials and Supplies
You won't need much yarn for this little Santa hat. I'd use a smooth cotton or cotton-blend yarn so the stars and the ribbing show up clearly. The hat is worked flat, and the pompom is crocheted rather than made from loose strands of yarn.
- DK weight yarn (#3), crimson red, approximately 35 yards
- DK weight yarn (#3), ivory, approximately 20 yards
- Small amount of gold yarn or embroidery floss for three stars
- Small amount of dark-green yarn or embroidery floss for the evergreen sprig
- 3.25 mm (D/3) crochet hook, or the size needed for gauge
- Yarn needle with an eye large enough for your yarn
- Small scissors
- Stitch marker
- Measuring tape or ruler
- Rustproof pins and a blocking mat or clean towel
The yarn amounts are estimates and include a little extra for sewing the pieces together. You can use leftover yarn if you have enough of each color.
Use gold yarn if you want the stars to have more texture. Embroidery floss will give you finer lines. Either will work, but keep all three stars about the same size.
Finished Size and Gauge
The finished crochet Santa hat appliqué is expected to measure about 4 1/2 inches across its widest point and about 3 3/4 inches tall. Those are calculated measurements based on the gauge below. They haven't been checked against a physical sample.
Plain single crochet gauge: 24 stitches and 26 rows = 4 inches.
Ribbing gauge: 26 rows worked in back-loop-only single crochet = 4 inches across when the ribbing is gently spread, not pulled tight.
Make a small single crochet swatch before you begin. If your stitches are wider than the gauge, try a smaller hook. If they're narrower, try a larger hook.
The cuff is worked sideways, so its width comes from the number of rows rather than the number of stitches in each row. That matters. A cuff that measures too narrow can pull the bottom of the hat inward.
Measurements to check as you work:
- Red crown after Row 1: approximately 4 1/8 inches wide.
- Red crown after Row 18: approximately 2 3/4 inches tall, with 9 stitches across the top.
- Curled extension before shaping: approximately 3 3/8 inches long.
- Ivory ribbed cuff before edging: approximately 4 1/3 inches wide and 1 1/8 inches high.
- Finished flat pompom: approximately 3/4 to 1 inch across.
Keep the measurements written down as you work. If your cuff is more than 1/4 inch narrower than the red crown, check the ribbing gauge before you sew it on. Don't force a short cuff across the bottom of the hat.
Stitches and Abbreviations
I'm using U.S. crochet terms throughout the pattern.
- ch: chain
- sc: single crochet
- hdc: half double crochet
- sl st: slip stitch
- st/sts: stitch/stitches
- BLO: back loop only
- sc2tog: single crochet two stitches together
- inc: two single crochet stitches in one stitch
- RS: right side, the front of the appliqué
- WS: wrong side, the back of the appliqué
How to make sc2tog: Insert your hook into the next stitch and pull up a loop. Insert your hook into the following stitch and pull up another loop. Yarn over and pull through all three loops. You've turned two stitches into one.
How to make an hdc: Yarn over, insert your hook into the stitch and pull up a loop. Yarn over again and pull through all three loops.
Turning chains: Chain 1 at the beginning of each new row unless the pattern says otherwise. The turning chain doesn't count as a stitch.
If you need to check a stitch, the Craft Yarn Council crochet abbreviations reference explains the standard U.S. terms.
Don't worry about memorizing the abbreviations. Keep this little list nearby and follow the row counts as you go.
Crochet Santa Hat Appliqué Pattern: Red Crown and Curled Tip
We'll start at the bottom of the red hat and work toward the narrow tip. The shaping comes from decreases at both ends of the crown rows. After Row 18, we'll continue into the long section that curls around to the left.
The red crown and curved tip are one continuous crocheted piece. There's no separate red tip to sew on.
Part A: Crochet the Main Red Crown
With crimson red yarn, chain 26.
Row 1: Sc in the second chain from the hook and in each remaining chain. (25 sc)
Row 2: Ch 1, turn. Sc in each stitch across. (25 sc)
Row 3: Ch 1, turn. Sc in each stitch across. (25 sc)
Row 4: Ch 1, turn. Sc2tog, sc in the next 21 stitches, sc2tog. (23 sc)
Row 5: Ch 1, turn. Sc in each stitch across. (23 sc)
Row 6: Ch 1, turn. Sc2tog, sc in the next 19 stitches, sc2tog. (21 sc)
Row 7: Ch 1, turn. Sc in each stitch across. (21 sc)
Row 8: Ch 1, turn. Sc2tog, sc in the next 17 stitches, sc2tog. (19 sc)
Row 9: Ch 1, turn. Sc in each stitch across. (19 sc)
Row 10: Ch 1, turn. Sc2tog, sc in the next 15 stitches, sc2tog. (17 sc)
Row 11: Ch 1, turn. Sc in each stitch across. (17 sc)
Row 12: Ch 1, turn. Sc2tog, sc in the next 13 stitches, sc2tog. (15 sc)
Row 13: Ch 1, turn. Sc in each stitch across. (15 sc)
Row 14: Ch 1, turn. Sc2tog, sc in the next 11 stitches, sc2tog. (13 sc)
Row 15: Ch 1, turn. Sc in each stitch across. (13 sc)
Row 16: Ch 1, turn. Sc2tog, sc in the next 9 stitches, sc2tog. (11 sc)
Row 17: Ch 1, turn. Sc in each stitch across. (11 sc)
Row 18: Ch 1, turn. Sc2tog, sc in the next 7 stitches, sc2tog. (9 sc)
First Measurement Checkpoint
Stop here and count your stitches. You should have 9 stitches across Row 18.
The crown should be approximately 2 3/4 inches high before adding the curled extension. Both sides should slope inward as they approach the top.
If your crown is much wider or taller than expected, check your gauge now. The next rows will form the hanging tip, so we want the crown measurements close before continuing.
Part B: Crochet the Long Curled Tip
Keep working with the red yarn. Don't fasten off after Row 18.
We'll make the extension long enough to form the rounded upper bend and hang down toward the left side of the cuff. The decreases are spaced along one edge so the tip gradually gets narrower. We'll secure the curve during assembly rather than expecting the crocheted strip to curl by itself.
Row 19: Ch 1, turn. Sc in each stitch across. (9 sc)
Row 20: Ch 1, turn. Sc in each stitch across. (9 sc)
Row 21: Ch 1, turn. Sc2tog, sc in the next 7 stitches. (8 sc)
Row 22: Ch 1, turn. Sc in each stitch across. (8 sc)
Row 23: Ch 1, turn. Sc in each stitch across. (8 sc)
Row 24: Ch 1, turn. Sc in each stitch across. (8 sc)
Row 25: Ch 1, turn. Sc2tog, sc in the next 6 stitches. (7 sc)
Row 26: Ch 1, turn. Sc in each stitch across. (7 sc)
Row 27: Ch 1, turn. Sc in each stitch across. (7 sc)
Row 28: Ch 1, turn. Sc in each stitch across. (7 sc)
Row 29: Ch 1, turn. Sc2tog, sc in the next 5 stitches. (6 sc)
Row 30: Ch 1, turn. Sc in each stitch across. (6 sc)
Row 31: Ch 1, turn. Sc in each stitch across. (6 sc)
Row 32: Ch 1, turn. Sc in each stitch across. (6 sc)
Row 33: Ch 1, turn. Sc2tog, sc in the next 4 stitches. (5 sc)
Row 34: Ch 1, turn. Sc in each stitch across. (5 sc)
Row 35: Ch 1, turn. Sc in each stitch across. (5 sc)
Row 36: Ch 1, turn. Sc in each stitch across. (5 sc)
Row 37: Ch 1, turn. Sc2tog, sc in the next 3 stitches. (4 sc)
Row 38: Ch 1, turn. Sc in each stitch across. (4 sc)
Row 39: Ch 1, turn. Sc in each stitch across. (4 sc)
Row 40: Ch 1, turn. Sc in each stitch across. (4 sc)
Fasten off and weave the yarn end into the wrong side of the narrow tip. You'll use a separate length of matching red yarn to secure the upper bend during assembly.
Second Measurement Checkpoint
You should now have 40 completed rows: 18 rows in the main crown and 22 rows in the extension.
The last row must contain 4 stitches. At the stated row gauge, the extension should measure approximately 3 3/8 inches before shaping. The entire red piece should measure approximately 6 1/8 inches from the foundation edge to the end of Row 40.
Lay the piece flat and check that the crown is wider at the bottom and the extension gradually narrows toward its tip. The extension will be folded into its leftward curve during assembly. Don't shorten it to match the finished height of the hat.
Add the Red Edge
The finished example has a defined red outline along the crown and curled tip. We'll use slip stitches to finish that edge without adding a wide border.
Before adding the red edging, lay the piece flat with the 25-stitch foundation edge at the bottom and the Row 40 tip at the top. Turn the piece over, if needed, so the edge shortened by the one-sided decreases in Rows 21, 25, 29, 33 and 37 is on your right. Treat the face toward you as the right side and mark it with a removable stitch marker. With this marked right side facing you, join red yarn at the lower-right corner of the crown.
- Work 1 loose slip stitch into the end of each of the 40 rows along the right edge, moving toward the narrow tip. (40 sl sts)
- Work 1 slip stitch in each of the 4 stitches across the end of the tip. (4 sl sts)
- Work 1 slip stitch into the end of each of the 40 rows along the remaining edge, moving back toward the lower-left corner. (40 sl sts)
- Fasten off and weave the edging tails into the wrong side.
That's 84 edging slip stitches. Leave the 25-stitch bottom edge of the crown unworked. The ivory cuff will cover it.
Keep these slip stitches loose. If the edge pulls inward, remove the tight section and work it again with a little more slack. The curved tip needs room to bend.
Shape the Curl
Lay the red piece flat with the wide foundation edge at the bottom and the marked right side facing up. Keep that same face toward you as you bend the extension toward the left. Don't turn the piece over or twist the tip. The marked side will remain the front through embroidery and final assembly.
Begin curving the extension near the top of the crown. Arrange approximately Rows 19-24 into the rounded upper bend, then guide the remaining rows toward the left and downward.
The narrow end should reach the upper-left area of the ivory cuff once that piece is attached. Leave an open space beneath the hanging part of the tip, just as shown in the finished example.
Pin the curve in place and check that it doesn't cover any of the three planned gold-star positions. Adjust the fold gently until the upper bend looks rounded rather than sharply creased.
If the extension springs back, dampen it lightly and pin the curve on a blocking mat. Let it dry completely. Don't permanently sew it into position yet. We'll secure the bend and pompom during assembly.
Important: The curve is held by its attachment points, not by the decrease stitches alone. It still needs to be checked against a crocheted sample.
Crochet the Ivory Ribbed Brim
The ivory brim is made sideways. Instead of crocheting one long horizontal strip, we'll make short rows in the back loops. Those raised ridges will run up and down when we turn the finished cuff across the bottom of the hat.
This also gives us a way to make the lower edge gently wavy without adding a bulky scalloped border.
Part A: Make the Ribbed Strip
With ivory yarn, chain 8.
Row 1: Sc in the second chain from the hook and in each remaining chain. (7 sc)
Row 2: Ch 1, turn. Working through the back loop only, sc in each stitch across. (7 sc)
Rows 3-28: Ch 1, turn. Sc BLO in each of the 7 stitches. (7 sc per row)
Fasten off and weave in the ends.
You should have 28 ribbed rows. Gently spread the strip and measure it across its long edge.
Expected measurement: Approximately 4 1/3 inches long and 1 1/8 inches high before edging.
Lay the strip across the bottom of the red crown. It should be just a little wider than the crown. If it's significantly shorter, don't stretch it hard enough to flatten the ribbing. Check the ribbing gauge first.
Part B: Finish the Upper Edge
Place the ribbed strip with its raised ridges facing you. Choose one long side as the top edge. That will be the edge sewn across the red hat.
- Join ivory yarn at the first row end along the upper edge.
- Work 1 loose slip stitch into each of the 28 row ends, moving across the strip. (28 sl sts)
- Fasten off and weave in the yarn ends on the back.
The slip stitches should make a neat upper border without drawing the ribbing together.
Part C: Make the Gently Scalloped Lower Edge
Turn the strip so the opposite long edge is nearest you, with the right side still facing up.
Join ivory yarn at one lower corner. Work across the 28 row ends as follows:
Lower Edge Row 1:
- Sc in each of the first 2 row ends. (2 sc)
- Hdc in each of the next 6 row ends. (6 hdc)
- Sc in each of the next 3 row ends. (3 sc)
- Hdc in each of the next 6 row ends. (6 hdc)
- Sc in each of the next 3 row ends. (3 sc)
- Hdc in each of the next 6 row ends. (6 hdc)
- Sc in each of the last 2 row ends. (2 sc)
Total: 28 edging stitches, consisting of 10 sc and 18 hdc.
Fasten off and weave in the ends.
You'll have three shallow raised sections along the lower edge. The changes from single crochet to half double crochet make the gentle waves.
If your hdc sections flare too much, loosen the fabric with your fingers and lay it flat. You can also try a slightly smaller hook for the edging. Don't add extra stitches to the scallops. That can make the lower border ripple more than intended.
Brim Checkpoint
Before sewing the brim to the red crown, check these details:
- 28 ribbed rows are complete.
- Each ribbed row contains 7 sc.
- The upper border contains 28 slip stitches.
- The lower border contains 28 stitches.
- Three gentle waves appear along the bottom.
- The ivory cuff is wide enough to cover the lower red crown without being pulled tight.
Leave the cuff flat for now. We'll center it over the bottom of the hat during assembly.
Make the Flat Crocheted Pompom
We're making a small, flat round pompom instead of a fluffy yarn ball. It matches the crocheted look of the hat and won't need any stuffing.
Use the same ivory yarn as the cuff.
Work the Circular Pompom
Round 1: Make a magic ring. Work 6 sc into the ring. Pull the ring closed and join with a slip stitch in the first sc. (6 sc)
Round 2: Ch 1. Work 2 sc into each stitch around. Join with a slip stitch in the first sc. (12 sc)
Round 3: Ch 1. *Sc in the next stitch, 2 sc in the following stitch.* Repeat from * to * 6 times. Join with a slip stitch in the first sc. (18 sc)
Fasten off, leaving a 10-inch tail for sewing.
Don't join your rounds too tightly. The little circle should lie reasonably flat without curling into a cup.
Add the Raised Spiral Center
The finished example has a rounded, slightly raised spiral in the middle of the pompom.
- Thread a separate 12-inch length of ivory yarn onto your yarn needle.
- Bring the needle from the wrong side to the right side close to the center of the circle.
- Make a small chain stitch following the curve of the first round.
- Continue the chain stitching in a loose spiral around the center, moving outward about one and a half turns.
- Stop before you reach the outer edge of Round 3.
- Take the yarn to the wrong side and secure the end through several existing stitches.
Keep the raised spiral small enough that the outer round remains visible.
Pompom checkpoint: You should have an approximately 3/4-inch to 1-inch flat circle, depending on your gauge. The center should have a little texture, but the piece should still lie flat.
Set the pompom aside. We'll sew it onto the narrow red tip after shaping the curl.
Add the Gold Stars and Evergreen Sprig
The three gold stars are what give this Santa hat its own look. I wouldn't add more. Three are plenty for the size of the red crown, and there's room for each one to show.
Work the stars before permanently folding the red tip. You'll have an easier time reaching the back of the crown.
Part A: Position the Three Gold Stars
Lay the red crown flat with the right side facing up and the wide foundation edge at the bottom. Count the row numbers upward from the foundation edge.
Use these positions as a starting point:
- Lower star: Around Row 5, near the 18th stitch counted from the left edge of that row.
- Middle star: Around Row 10, near the 12th stitch counted from the left edge of that row.
- Upper star: Around Row 15, near the 6th stitch counted from the left edge of that row.
These positions place the stars along a diagonal line, rising from the lower right toward the upper left. That's the arrangement shown in the finished example.
Adjust the center of an individual star by a stitch if needed so it doesn't sit directly over a decrease or disappear beneath the folded tip.
Part B: Embroider Each Five-Ray Star
Thread a yarn needle with gold yarn or a few strands of gold embroidery floss.
Each star has five short rays coming from one central point.
- Bring your needle from the wrong side to the right side at the center of the star.
- Make one straight stitch upward, about 1/4 inch long.
- Bring the needle back to the center.
- Make the second ray toward the upper right.
- Return to the center and make a third ray toward the lower right.
- Return to the center and make a fourth ray toward the lower left.
- Return to the center and make the fifth ray toward the upper left.
- Secure the gold yarn on the wrong side without pulling the center inward.
Repeat for the remaining two stars.
Keep the rays about the same length on all three stars. A small difference is fine, but one oversized star can crowd the others.
If your yarn is thick, make the rays a little shorter. You want the stars to be distinct, not bulky.
Part C: Embroider the Evergreen Sprig
Now pick up the ivory cuff. The evergreen sprig belongs near the lower-right corner, angled upward toward the right.
You won't need a separate crocheted leaf. This is a simple embroidered branch.
- Lay the cuff with its right side facing up and the scalloped edge at the bottom.
- Mark a starting point approximately 3/4 inch from the right edge and 1/4 inch above the scalloped edge.
- Mark a second point approximately 1/4 inch from the right edge and 3/4 inch above the scalloped edge.
- With dark-green yarn, embroider a slightly curved stem between the two points using three or four short backstitches.
- Starting near the lower end, make a short diagonal straight stitch extending to one side of the stem.
- Return to the stem and make a similar stitch extending to the opposite side.
- Move upward along the stem and repeat until you've made three pairs of short branches.
- Add one short stitch at the upper end to form the tip of the sprig.
- Secure the green yarn on the wrong side.
Keep the branch tips short, about 1/8 to 1/4 inch each. The sprig should look like a little piece of evergreen greenery, not a large leaf covering the cuff.
Make the stitches snug enough to lie against the ribbing, but don't pull the fabric inward. Secure the thread between nearby stitches on the back so there are no long loose loops.
Embroidery Checkpoint
Before assembly, check that all three gold stars are visible and that the green sprig is on the right side of the cuff.
The star embroidery should sit within the red crown rather than on the narrow curled extension. The evergreen sprig should stay within the ivory cuff.
Assembly and Finishing
We've made all the pieces. Now we'll put them together and arrange the curved tip to match the finished example.
Have the red crown, ivory cuff and crocheted pompom beside you. You'll also need your yarn needle, pins and measuring tape.
Step 1: Attach the Ivory Cuff
- Place the red crown right side up with the 25-stitch foundation edge at the bottom.
- Place the ivory cuff across the bottom of the red crown, right side facing up.
- Center the cuff so its ends extend evenly beyond the red crown.
- Overlap the bottom two rows of the red crown with the upper edge of the ivory cuff.
- Pin the center and both ends in place.
- Using ivory yarn and a yarn needle, sew the upper edge of the cuff to the red crown with small whipstitches or mattress stitches.
- Keep the raised ribbing visible on the front.
- Secure the left and right ends where they overlap the red crown.
- Take the yarn to the wrong side and weave it through several stitches before trimming.
Check the lower scalloped edge before sewing the final end. The ivory cuff should sit straight across the hat, with its three shallow waves pointing downward.
Don't pull the cuff so tightly that it loses its ribbing.
Step 2: Shape and Secure the Curled Tip
Lay the assembled hat right side up. Follow the curve you established earlier, bringing the extension over toward the left and down toward the cuff.
- Arrange approximately Rows 19-24 into a rounded bend above the main crown.
- Guide Rows 25-40 downward beside the left side of the crown.
- Leave a small open space beneath the hanging section of the tip.
- Position the four-stitch end near the upper-left area of the ivory cuff.
- Pin the bend and narrow end in place. Check that the red extension doesn't cover the gold stars.
- At the upper bend, use matching red yarn to make two small anchoring stitches through the overlapping layers where the extension touches the crown.
- Secure the yarn on the wrong side without drawing the two layers tightly together.
- Leave the narrow end pinned until you attach the pompom in Step 3.
- Do not sew across or close the open space beneath the curl.
The upper bend should look rounded, not folded into a sharp angle.
If the tip won't hold its curve, dampen the red section lightly, pin it into the intended shape on a blocking mat and allow it to dry. You may still need to secure the tip to the cuff or a fabric backing to keep the opening in place.
Step 3: Sew the Pompom in Position
- Place the flat ivory pompom over the four-stitch end of the red tip.
- Center it so the red end is covered.
- Use the long ivory yarn tail to sew the pompom firmly to the end of the extension.
- Keep the raised spiral facing outward.
- Position the pompom so its lower edge just overlaps the upper-left area of the ivory cuff.
- Make two or three small securing stitches between the back edge of the pompom and the nearby cuff stitches to hold the curl in place.
- Take the yarn to the back and weave in the end.
This little attachment point matters. It keeps the hanging tip close to the brim while leaving the curved opening above it.
If you're sewing the appliqué to a fabric project, you'll have another way to hold the curl in place. Stitch the red extension to the backing along its intended curved outline, then secure the pompom.
Step 4: Check the Finished Shape
Lay the completed Santa hat flat and check the outline.
- The red crown has a wide base and slopes inward toward the top.
- The top extends into a rounded curl toward the left.
- The ivory pompom is attached at the end of the curl.
- A small open area remains beneath the hanging portion of the tip.
- The cuff is centered, with vertical ribbing and three shallow lower scallops.
- Three gold stars form a diagonal line across the red crown.
- The dark-green sprig is near the lower-right corner of the cuff.
Don't worry if the exact curve needs another little adjustment. The important thing is to keep the tip rounded and the opening beneath it visible.
Step 5: Weave In and Secure All Ends
Turn the appliqué over and examine the back.
- Thread each remaining yarn tail onto a yarn needle.
- Weave it through several stitches on the wrong side.
- Change direction once before trimming the tail.
- Check the star embroidery and evergreen sprig for loose ends.
- Check the pompom attachment and the stitches holding the curl.
- Remove the temporary stitch marker and all shaping or assembly pins.
- Trim the yarn ends close to the fabric without cutting the crochet stitches.
If you're adding the appliqué to a stocking, quilt block or gift bag, pin it in place before sewing.
Use matching yarn or sewing thread to stitch around the outer edges. Secure the narrow red tip and all sides of the pompom, especially on projects that will be handled frequently. Once the appliqué is sewn in place, remove every pin used to hold it to the fabric. Check both sides of the project for any remaining pins before using it.
For items intended for babies or young children, avoid loose decorations and make sure the appliqué is fully attached. Don't leave a separate loose appliqué where it could be pulled apart or placed in a baby's mouth.
Step 6: Final Blocking
Place the completed appliqué on a clean towel or blocking mat.
If necessary, lightly dampen the crochet fabric and arrange the crown, curved tip and cuff into their intended shape. Use rustproof pins along the edges, but avoid pulling on the embroidery.
Allow everything to dry completely before removing the pins.
Don't flatten the ivory ribs or press the crocheted pompom hard. Their raised texture is part of the finished design.
Final Measurement Checkpoint
At the stated gauge, the completed appliqué should be approximately 4 1/2 inches wide and 3 3/4 inches tall. The exact dimensions will depend on how the hanging tip is curved and how the cuff lies after blocking.
These measurements are calculated targets. The design has not been physically test-crocheted from these instructions, so the final curl and fabric response still need a sample check.
Once it's finished, you can use the appliqué on a Christmas quilt block, fabric gift bag, stocking or another holiday sewing project. I would keep the hat as the main decoration rather than surrounding it with lots of smaller motifs. The stars and little evergreen sprig already give it plenty of detail.
Frequently Asked Questions
Is this a wearable crochet Santa hat?
No. This is a small, flat crochet appliqué that you sew onto another project. It isn't a hat for a baby or child to wear.
How do I make the curved tip hold its shape?
Shape the extension into its leftward curl, then secure it at the upper bend and near the cuff. The pompom can help anchor the lower end. If you're adding the appliqué to fabric, stitch the curved section to the backing so it stays where you want it.
Can I make this crochet Santa hat appliqué larger?
Yes. Try thicker yarn with a hook that suits it. Keep the same stitch counts, but remember that your finished dimensions will change. Make a sample first if you need the appliqué to fit a particular quilt block or stocking.
Do I need to stuff the pompom?
No. The pompom is a flat crochet circle with a raised stitched center. Leave it unstuffed so the appliqué lies against the fabric beneath it.
Can I use cotton yarn instead of acrylic?
Yes. Cotton is a good choice for the defined ribbing and embroidery. A smooth cotton-blend yarn works too. Check the gauge, since yarns of the same labeled weight can make slightly different-sized stitches.
When you click on links to various merchants on this site and make a purchase, this may result in this site earning a commission. This does not affect the price you pay.

UBGI Gold Standard 2026
Reviewed under the site's
editorial checklist.
Photos, decorating ideas, party setups and reader submissions are shared for inspiration unless a page is specifically presented as a pattern, tutorial, reference guide or step-by-step project. Follow the instructions, measurements, safety guidance and manufacturer directions provided for the particular project or product.
About Jan | Contact | Baby Nursery Ideas (Blog) | Site Map | Privacy Policy | Disclosure Policy | Disclaimer | Affiliate Disclosure | Earnings Disclosure | Facebook | Pinterest
I am a participant in the Amazon Services LLC Associates Program, an affiliate advertising program designed to provide a means for us to earn fees by linking to Amazon. As an Amazon Associate I earn from qualifying purchases.
Copyright © 2006-2026. All Rights Reserved.