Free Crochet Dragon Baby Mobile Pattern: Learning to Fly
By Jan Bay
This free crochet dragon baby mobile pattern features three little dragons out for their first flying lesson. A sage green dragon leads the way while dusty teal and lavender dragons follow close behind. Their large, finely detailed wings carry them above tiny clouds and golden stars, while curling spirals suggest little gusts of wind swirling around them. Each baby dragon has a smoothly rounded face, embroidered sleepy eyes, a cream-colored tummy and a gently sweeping tail. The finished design has the charm of a medieval storybook illustration, ready to enchant everyone who enters your baby's fantasy-themed nursery.
Explore More Free Crochet Baby Patterns
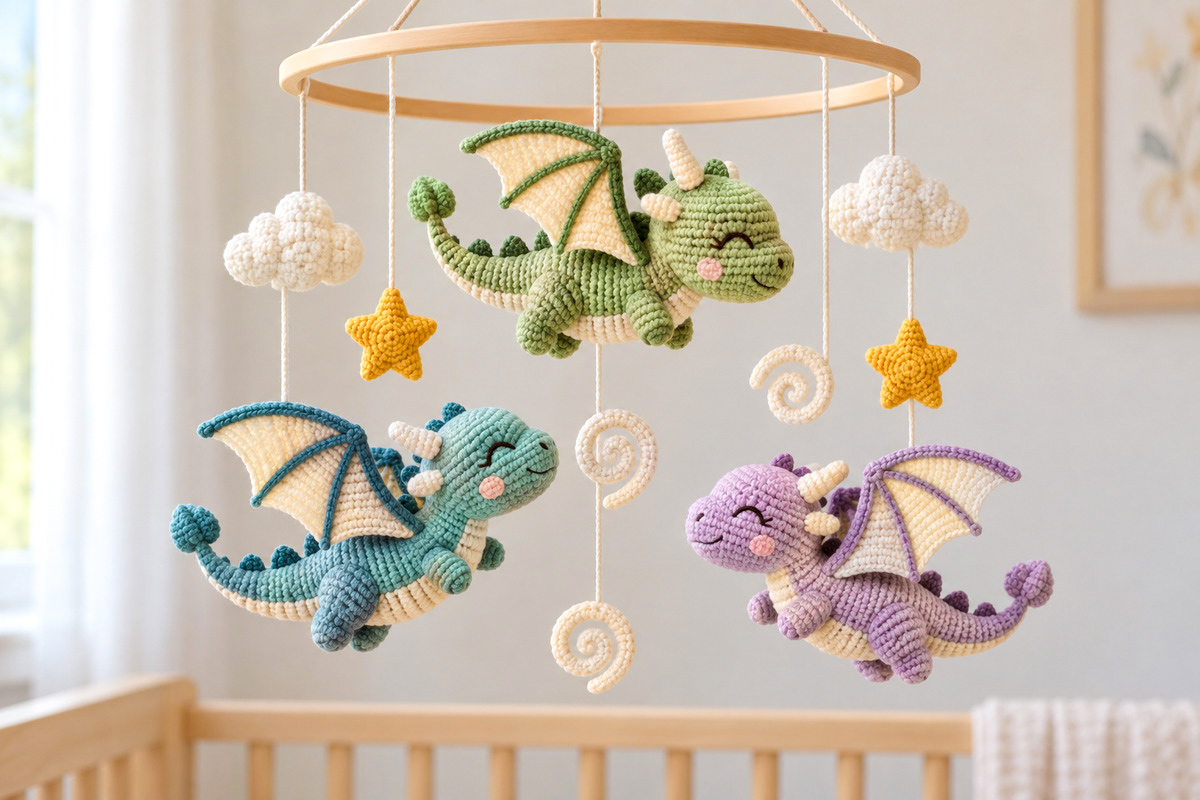
See supplies for this project here.
Jump to the Free Crochet Dragon Mobile Pattern
Materials for the Crochet Dragon Baby Mobile Pattern
Three little dragons need quite a few pieces before they're ready for their first flying lesson, but you won't need three different patterns. We'll make the same rounded dragon in sage green, dusty teal and lavender, then change the hanging angles so each one appears to be flying in a slightly different direction.
I'd choose smooth cotton or cotton-blend yarn rather than anything fuzzy. The little horns, embroidered faces and especially those large wings need stitches you can see clearly. Stick with one yarn weight for all three dragons so they finish close to the same size.
Yarn and materials:
- DK-weight yarn in sage green, approximately 80–110 yards
- DK-weight yarn in dusty teal, approximately 80–110 yards
- DK-weight yarn in soft lavender, approximately 80–110 yards
- DK-weight yarn in warm ivory for bellies, horns, wings, clouds and wind spirals, approximately 125–150 yards
- Small amounts of darker sage, teal and lavender yarn for wing edging, wing ribs, dorsal bumps and rounded tail-tip tufts
- Approximately 15 yards of golden-yellow yarn for two stars
- Small amounts of dark brown embroidery floss and soft pink embroidery thread
- 3 mm crochet hook for the dragons and accessories
- 2.5 mm crochet hook for the wings, or the size needed for firm wing fabric
- Small amount of polyester fiberfill
- Yarn needle and embroidery needle
- Stitch markers, scissors and measuring tape
- Lightweight natural wooden mobile hoop approximately 11 inches in diameter
- Strong, nonstretch, purpose-appropriate suspension cord and a compatible mobile mounting system
- Small digital scale for checking the hanging balance, if available
The yarn quantities are generous planning allowances, not amounts measured from a completed sample. You may use less, but I'd rather have a little yarn left than run short of lavender halfway through the last dragon.
Don't substitute safety eyes, beads, bells or loose decorations for the embroidered details. This mobile is designed as an out-of-reach nursery decoration, not as a toy for a baby to hold.
Finished Size, Gauge and Crochet Notes
Expected dragon length: Approximately 8–9 inches from snout to curled tail tip.
Expected wing spread: Approximately 5 1/2–7 inches, depending on how the wings are positioned.
Mobile hoop: Approximately 11 inches in diameter.
Expected hanging depth: Approximately 15–18 inches below the wooden hoop after final balancing.
Skill level: Intermediate amigurumi, with additional attention required for shaping, embroidery and mobile assembly.
Target gauge: Approximately 22 single crochet stitches and 26 rounds or rows over 4 inches, using DK-weight yarn and the 3 mm hook. Measure a firm, unstuffed sample without stretching it. This is a proposed working gauge and should be checked against a made sample before the finished dimensions are treated as exact.
The wings use the smaller hook. Their fabric should feel firmer than the dragons' bodies, without gaps between stitches.
US crochet abbreviations:
- ch = chain
- sc = single crochet
- hdc = half double crochet
- dc = double crochet
- sl st = slip stitch
- inc = 2 sc in the same stitch
- dec = invisible single crochet decrease over the next 2 stitches
- MR = magic ring
- st/sts = stitch/stitches
- FO = fasten off
- BLO = back loop only
Work the stuffed dragon pieces in continuous rounds unless I specify otherwise. Mark the first stitch of every round and move your marker up as you work. Turning chains on flat pieces do not count as stitches.
For an invisible decrease, insert your hook through the front loop of each of the next two stitches, yarn over and pull through both front loops, then yarn over and pull through the two loops on your hook.
Stuff the heads and bodies firmly enough to hold their rounded shape, but don't pack them until the stitches stretch apart. The tails and legs need less stuffing so you can bend and position them naturally.
Free Crochet Dragon Baby Mobile Pattern: Make the Three Baby Dragons
We'll begin with the sage green dragon who leads the flying lesson. Once you've made one dragon, repeat the same instructions in dusty teal and lavender. Keeping their bodies the same size matters because we'll use the hanging cords to give them different flying positions.
Each dragon has a plump body, oversized rounded head, separate little snout, four tucked legs and a tail that sweeps upward. The cream tummy and throat are added after the main pieces are joined, so the light-colored underside runs from the belly toward the chin.
Crochet the Dragon Body
Make one in each dragon color. Begin at the rump and work toward the narrower front of the body.
Round 1: Work 6 sc in a MR. (6 sts)
Round 2: Inc in each stitch around. (12 sts)
Round 3: *Sc 1, inc*; repeat around. (18 sts)
Round 4: *Sc 2, inc*; repeat around. (24 sts)
Round 5: *Sc 3, inc*; repeat around. (30 sts)
Round 6: *Sc 4, inc*; repeat around. (36 sts)
Rounds 7–11: Sc in each stitch around. (36 sts for 5 rounds)
Round 12: *Sc 4, dec*; repeat around. (30 sts)
Rounds 13–15: Sc in each stitch around. (30 sts for 3 rounds)
Round 16: *Sc 3, dec*; repeat around. (24 sts)
Rounds 17–19: Sc in each stitch around. (24 sts for 3 rounds)
Round 20: *Sc 2, dec*; repeat around. (18 sts)
Rounds 21–23: Sc in each stitch around. (18 sts for 3 rounds)
Stop with the 18-stitch front opening unclosed. Fasten off, leaving an 18-inch sewing tail.
Stuff the rounder back section first, then add a little more fiberfill through the narrower front. You want a soft, plump shape, not a stretched cylinder. The opening will be attached to the back of the head.
Body checkpoint: The widest section has 36 stitches. The body tapers through 30 and 24 stitches to an 18-stitch front opening. There are 23 rounds in all.
Crochet the Rounded Dragon Head
Make one in each dragon color.
Round 1: Work 6 sc in a MR. (6 sts)
Round 2: Inc around. (12 sts)
Round 3: *Sc 1, inc*; repeat around. (18 sts)
Round 4: *Sc 2, inc*; repeat around. (24 sts)
Round 5: *Sc 3, inc*; repeat around. (30 sts)
Round 6: *Sc 4, inc*; repeat around. (36 sts)
Round 7: *Sc 5, inc*; repeat around. (42 sts)
Rounds 8–10: Sc around. (42 sts for 3 rounds)
Round 11: *Sc 5, dec*; repeat around. (36 sts)
Round 12: Sc around. (36 sts)
Round 13: *Sc 4, dec*; repeat around. (30 sts)
Round 14: Sc around. (30 sts)
Round 15: *Sc 3, dec*; repeat around. (24 sts)
Round 16: *Sc 2, dec*; repeat around. (18 sts)
Round 17: *Sc 1, dec*; repeat around. (12 sts)
Stuff the head firmly but evenly, keeping the surface smooth and rounded.
Round 18: Dec around. (6 sts)
Fasten off, thread the tail through the front loops of the remaining 6 stitches and pull closed. Weave the end inside.
Head checkpoint: The largest round has 42 stitches, and the head contains 18 rounds. It should be visibly fuller than the front of the body. Don't flatten it into an oval when stuffing.
Make the Little Projecting Snout
Make one in each dragon color.
Round 1: Work 6 sc in a MR. (6 sts)
Round 2: Inc around. (12 sts)
Round 3: *Sc 1, inc*; repeat around. (18 sts)
Rounds 4–5: Sc around. (18 sts for 2 rounds)
Fasten off with a long sewing tail. Add a small amount of stuffing and leave the opening unclosed.
Place the snout against the front of the head, approximately over head Rounds 9–14, adjusting it so the nose projects forward rather than downward. Pin it temporarily before sewing. Its placement establishes which side of the head is the face and which side joins the body.
Sew the open 18-stitch edge to the head surface, catching secure stitches around the entire opening. Hide the yarn tail inside the head.
Keep the nose rounded. The dragon should look as though it's smiling through its flying lesson, not preparing to breathe fire.
Join the Head and Body
Set the body horizontally with the full rump at the back and the 18-stitch opening at the front.
Position the head against that opening. Its snout should point forward and slightly upward, with the body touching the lower back portion of the head, opposite the snout.
Use the body's long sewing tail to sew all 18 stitches around the front opening to a matching oval of secure stitches on the head surface. Keep the joins evenly spaced around the opening. Make a second reinforcing pass before hiding the tail.
Check the shape before finishing the seam. The head should rise slightly above the body rather than hang directly beneath it. Add a little more stuffing to the neck opening before completing the last few stitches if the connection looks hollow.
Don't try to make the three heads point in three dramatically different directions at this stage. A common body shape is more predictable. The final flying angles will come from the suspension points.
Crochet the Cream Body Belly
Make one for each dragon using ivory yarn. Work in turned rows, chaining 1 at the beginning of each new row.
Row 1: Ch 7. Sc in the second chain from the hook and in each remaining chain. (6 sts)
Row 2: Inc, sc 4, inc. (8 sts)
Rows 3–18: Sc across. (8 sts for 16 rows)
Row 19: Dec, sc 4, dec. (6 sts)
Rows 20–22: Sc across. (6 sts for 3 rows)
Fasten off, leaving a long sewing tail.
Place the wider end of the cream panel along the underside of the body, starting near the rump. Run the narrower end forward toward the head. The panel should cover the middle of the tummy without wrapping completely around the sides.
Sew around the edges with small stitches, keeping the cream panel flat against the stuffed body. If the edges try to buckle, smooth the panel and adjust its position before completing the seam. Don't pull it tight enough to gather the body.
Crochet the Cream Throat Panel
Make one for each dragon.
Row 1: Ch 5. Sc in the second chain from the hook and in each remaining chain. (4 sts)
Row 2: Inc, sc 2, inc. (6 sts)
Rows 3–12: Sc across. (6 sts for 10 rows)
Row 13: Dec, sc 2, dec. (4 sts)
Rows 14–15: Sc across. (4 sts for 2 rows)
Fasten off with a sewing tail.
Position the wider portion beneath the lower head and neck, overlapping the narrow front end of the body belly by about 1/4 inch. The remaining narrow end curves toward the underside of the snout.
Sew the panel down along both sides and secure the overlap. The finished underside should look like one continuous light-colored area even though it's made from two pieces.
Crochet the Curved Dragon Tail
Make one in each dragon color. Work from the narrow tip toward the wider base.
Round 1: Work 4 sc in a MR. (4 sts)
Round 2: Sc around. (4 sts)
Round 3: *Sc 1, inc*; repeat twice. (6 sts)
Round 4: Sc around. (6 sts)
Round 5: *Sc 2, inc*; repeat twice. (8 sts)
Round 6: Sc around. (8 sts)
Round 7: *Sc 3, inc*; repeat twice. (10 sts)
Round 8: Sc around. (10 sts)
Round 9: *Sc 4, inc*; repeat twice. (12 sts)
Round 10: Sc around. (12 sts)
Round 11: *Sc 5, inc*; repeat twice. (14 sts)
Rounds 12–13: Sc around. (14 sts for 2 rounds)
Round 14: *Sc 6, inc*; repeat twice. (16 sts)
Round 15: Sc around. (16 sts)
Round 16: *Sc 7, inc*; repeat twice. (18 sts)
Round 17: Sc around. (18 sts)
Fasten off with a long sewing tail. Stuff the base lightly, leaving the narrow tip flexible.
Lay the tail along the back of the body with its narrow end curving upward. To encourage that bend without wire, thread a separate length of matching yarn through several stitches along the inside of the curve, spanning approximately Rounds 4–9. Draw the stitches together a little at a time, then anchor the yarn securely inside the tail.
Test the curve with your fingers before tightening the shaping yarn. A gentle upward sweep is enough. Pulling too hard will create an ugly kink instead of the soft curve shown in the example.
Position the open 18-stitch tail base over the back of the body, centered around the closed starting end. Sew its entire circumference to the body surface. Make a second reinforcing pass around the seam.
Crochet the Cream Tail Underside
Make one narrow ivory panel for each dragon using the 3 mm hook. This tapered piece continues the cream belly along the underside of the tail without changing the original tail shaping.
Work in turned rows. Ch 1 and turn after each row except the final row. Turning chains do not count as stitches.
Row 1: Ch 5. Sc in the second chain from the hook and each remaining chain. (4 sts)
Rows 2–4: Sc across. (4 sts for 3 rows)
Row 5: Sc 2, dec. (3 sts)
Rows 6–9: Sc across. (3 sts for 4 rows)
Row 10: Sc 1, dec. (2 sts)
Rows 11–12: Sc across. (2 sts for 2 rows)
Row 13: Dec. (1 st)
Fasten off with a long sewing tail.
Pin the wider end against the underside of the tail base, where it meets the cream body belly. Extend the panel along the inside of the tail's upward curve, with the narrow end pointing toward the tail tip. It should cover most of the visible underside while leaving the narrowest part of the body-colored tail exposed.
Check the fit before sewing. The panel should follow the curve without gathering, buckling or pulling the tail downward. If necessary, adjust the placement rather than stretching the panel.
Sew both long edges to the tail with small stitches, secure both ends and remove the temporary pins. Hide the sewing yarn inside the tail.
Tail underside checkpoint: The panel contains 13 rows and tapers from four stitches to one. The finished tail should show a narrow, continuous-looking ivory underside with the dragon's main color visible along the upper curve.
Make the Four-Lobed Tail Tip
Make one in the darker accent shade used for that dragon's wing edging. This softly rounded tip has four shallow lobes rather than four flat petals.
Round 1: Work 6 sc in a MR. (6 sts)
Round 2: Inc around. (12 sts)
Rounds 3–4: Sc around. (12 sts for 2 rounds)
Round 5: *Sc 1, dec*; repeat four times. (8 sts)
Add a tiny amount of fiberfill, just enough to give the tip a rounded shape.
Round 6: Dec around. (4 sts)
Fasten off, leaving approximately 24 inches of yarn. Thread the yarn through the front loops of the remaining four stitches and draw the opening closed.
To create four shallow lobes, pass the sewing yarn through the center of the rounded tip, wrap it around the outside and bring it back through the center. Repeat at four evenly spaced positions, tightening only enough to suggest four rounded sections. Do not pull so firmly that the tip becomes flat.
Use the remaining sewing yarn to attach the rounded tip securely to the narrow starting end of the dragon tail. Catch multiple firm stitches around the join, make a reinforcing pass and hide the yarn end inside the tail.
Tail-tip checkpoint: Each tail ends in one softly rounded, four-lobed tuft. It should have the knobby appearance shown in the illustration, rather than resembling a flat crocheted flower.
Crochet the Front Legs
Make two in each dragon color, six front legs altogether.
Round 1: Work 6 sc in a MR. (6 sts)
Round 2: *Sc 1, inc*; repeat three times. (9 sts)
Rounds 3–6: Sc around. (9 sts for 4 rounds)
Fasten off with a long sewing tail. Lightly stuff the rounded end and leave the attachment end open.
Sew the two front legs onto opposite sides of the body near Body Rounds 17–20, just behind the head. Angle the feet forward and slightly inward, as though the little dragon has tucked its paws beneath its chest while flying.
Crochet the Rounded Hind Legs
Make two in each dragon color, six hind legs altogether.
Round 1: Work 6 sc in a MR. (6 sts)
Round 2: Inc around. (12 sts)
Round 3: *Sc 1, inc*; repeat around. (18 sts)
Rounds 4–5: Sc around. (18 sts for 2 rounds)
Round 6: *Sc 1, dec*; repeat around. (12 sts)
Round 7: Sc around. (12 sts)
Fasten off with a sewing tail. Stuff lightly, keeping the attachment end open.
Sew the hind legs to opposite sides of the fuller rear body, approximately over Body Rounds 8–11. The rounded ends should face forward and slightly downward.
The front paws are smaller than the hind legs on purpose. That difference gives the dragons their plump, slightly comical flying pose without making them look as though they're sitting upright.
Assembly checkpoint: Each dragon should now have one head, one protruding snout, one stuffed body, one cream tummy, one cream throat, two small front legs, two larger hind legs and one upward-curving tail. The wings, horns, back bumps and facial details come next.
Crochet the Dragon Wings and Embroidered Details
The wings give these little dragons their medieval storybook character. They're deliberately larger than the tiny wings you sometimes see on crochet dragon toys, with ivory centers, matching colored borders and raised lines that spread across the fabric like the ribs of a real wing.
We'll make each wing from two crocheted layers. That gives it more body than a single flat piece, without adding wire or plastic supports. The finished wing is attached securely along the back of the dragon, leaving its outer portion free to spread upward.
Crochet the Two-Tone Dragon Wings
Make two finished wings for each dragon. Each finished wing requires two matching ivory panels, so you'll crochet four panels per dragon, twelve panels altogether.
Use the 2.5 mm hook and ivory yarn. Work in rows with a ch 1 turn at the end of each row. Turning chains don't count as stitches.
First wing panel: Increase at the end of each even-numbered row.
Row 1: Ch 6. Sc in the second chain from the hook and each remaining chain. (5 sts)
Row 2: Sc 4, inc in the final stitch. (6 sts)
Row 3: Sc across. (6 sts)
Row 4: Sc 5, inc in the final stitch. (7 sts)
Row 5: Sc across. (7 sts)
Row 6: Sc 6, inc. (8 sts)
Row 7: Sc across. (8 sts)
Row 8: Sc 7, inc. (9 sts)
Row 9: Sc across. (9 sts)
Row 10: Sc 8, inc. (10 sts)
Row 11: Sc across. (10 sts)
Row 12: Sc 9, inc. (11 sts)
Row 13: Sc across. (11 sts)
Row 14: Sc 10, inc. (12 sts)
Row 15: Sc across. (12 sts)
Row 16: Sc 11, inc. (13 sts)
Row 17: Sc across. (13 sts)
Row 18: Sc 12, inc. (14 sts)
Row 19: Sc across. (14 sts)
Fasten off. The panel begins at five stitches and gradually widens to fourteen stitches. The straight edge is the attachment side, and the wider end forms the upper outside portion of the wing.
Make a second matching panel in ivory.
Opposite wing: Mirror the increases.
For the other wing, repeat all nineteen rows, but work the increase at the beginning of each even-numbered row rather than at the end. For example, Row 2 becomes inc, sc 4; Row 4 becomes inc, sc 5. Continue that placement through Row 18, which becomes inc, sc 12.
Make two matching panels for this mirrored wing.
You should now have two mirrored pairs of ivory wing panels.
Join the Double-Layer Wings
Place the two matching wing panels together so their outlines align exactly. Keep the 5-stitch starting edges together at the bottom and the 14-stitch final rows together at the top. Match the straight 19-row edges to each other and the sloping 19-row edges to each other.
Because the panels are asymmetrical, do not flip one merely to put a preferred stitch face outward. Either side of the single-crochet fabric may face outward. Check that both layers lie flat and their edges align before working the edging through both layers.
Join the darker accent yarn matching this dragon at the lower corner of the straight side. Work through both ivory layers throughout. Each long edge contains 19 row-end spaces, but we'll use 16 evenly distributed edging stitches along that length. As you work each long side, count its row ends from the starting corner and skip row ends 6, 12 and 18. This spacing is based on the proposed gauge and must be checked on a crocheted wing sample.
- Along the straight attachment edge, work 1 sc in each selected row-end space, moving from the narrow starting edge toward the wide top. Skip row ends 6, 12 and 18. (16 edging sts)
- Work 1 sc through both layers of each of the 14 stitches along the wide top edge. (14 edging sts)
- At the upper outer corner, ch 3, sl st in the second chain from the hook, sc in the next chain, then sl st into the same corner stitch where the top edging ended. This forms the pointed extension without adding to the perimeter stitch count.
- Along the sloping outer edge, again skip row ends 6, 12 and 18, counting from the upper corner. Work 1 sc into the first selected row-end space. Then repeat the following sequence three times across the next 15 selected spaces: sc, hdc, dc, hdc, sc, working one stitch in each selected space. (16 edging sts, forming three rounded scallops)
- Work 1 sc through both layers of each of the 5 stitches along the narrow starting edge. (5 edging sts)
- Join with a sl st to the first edging stitch. Fasten off and weave in the ends.
Edging checkpoint: The revised perimeter contains 51 stitches: 16 along the straight side, 14 across the top, 16 along the scalloped side and 5 along the narrow base. The upper pointed extension does not change the perimeter count. Check that the wing lies flat before embroidering its ribs.
Repeat for the mirrored wing, keeping the straight attachment edges on opposite sides so the completed wings form a left and right pair.
Keep both layers flat as you work. If the edging gathers or ripples, check the stitch spacing before completing the wing.
Embroider the Raised Wing Ribs
Use the same darker accent shade chosen for the wing edging.
Lay the wing with its intended outside surface facing upward. Mark a point near the lower inside attachment edge. This is where the ribs begin.
Using the matching darker accent yarn and a yarn needle, work three narrow lines of backstitch through both layers of the wing. All three lines begin near the lower inside corner and spread outward like the ribs of a folding fan.
- Upper rib: Run the first line toward the upper outer corner, ending just below the pointed extension.
- Middle rib: Run the second line diagonally toward the center of the scalloped outer edge, ending near the middle scallop.
- Lower rib: Run the third, shorter line toward the lower portion of the outer edge, ending near the lowest scallop.
Catch both ivory wing layers with every backstitch, keeping the stitches small and evenly tensioned. The lines should remain visible and slightly raised, but they must not gather the fabric or shorten the wing.
Lay the wing flat after completing each rib. If the fabric buckles, remove that line and restitch it with less tension. Repeat on the opposite wing, mirroring the placement so the ribbing faces outward on both sides of the dragon.
Wing checkpoint: Each finished wing has two ivory layers, colored edging, a pointed upper corner, three shallow lower scallop extensions and three radiating ribs. There should be no stuffing, wire or plastic inside either wing.
Attach the Wings to the Dragon
Place one wing on each side of the upper back, behind the head. The straight edge of each wing is its attachment edge. Position the narrow lower end toward the rear body and the wider upper portion so it can spread upward and outward.
Begin with the wing root aligned near Body Round 10 and extend the attached portion forward toward Body Round 21. Keep both wing roots slightly to either side of the upper back's center line so the rounded dorsal bumps will remain visible between them.
Starting at the narrow lower end of the wing, use the first 10 of the 16 straight-edge edging stitches as attachment points. These correspond to original row ends 1–11, with row end 6 skipped during edging. Sew the 10 attachment points evenly along the upper body between Body Rounds 10 and 21, catching secure body stitches at each point. Leave the remaining 6 straight-edge edging stitches unattached so the broad upper wing can spread outward. Make a second reinforcing pass along the entire attachment seam.
Check the wing from the front, side and above before hiding the sewing tail. Its broad portion should rise away from the body without pulling the attachment seam open. Repeat with the mirrored wing.
Important wing checkpoint: The wings must retain a recognizable upright, spread shape without assistance from the hanging cords. A soft double-layer wing may still fold or sag. If either wing does, the structure requires further engineering and physical testing before the finished mobile can be considered a faithful reproduction of the example image.
Don't attach the suspension cord to the wing tips or use the hanging cord to pull the wings upright. They must carry their own weight. If a wing folds completely against the dragon, the edge needs more structural support or the wing size needs to be checked before moving on.
Crochet the Cream Dragon Horns
Each dragon has two larger ivory horns and one smaller horn. All three are slightly tapered, with their points facing upward.
Larger horns: Make two per dragon.
Round 1: Work 4 sc in a MR. (4 sts)
Round 2: Sc around. (4 sts)
Round 3: *Sc 1, inc*; repeat twice. (6 sts)
Round 4: Sc around. (6 sts)
Round 5: *Sc 2, inc*; repeat twice. (8 sts)
Round 6: Sc around. (8 sts)
Fasten off with a sewing tail. Lightly fill the base if needed, but leave the tip pointed.
Smaller horn: Make one per dragon.
Round 1: Work 4 sc in a MR. (4 sts)
Round 2: Sc around. (4 sts)
Round 3: *Sc 1, inc*; repeat twice. (6 sts)
Round 4: Sc around. (6 sts)
Fasten off with a sewing tail.
Arrange the two larger horns across the upper front portion of the head, with the smaller horn just behind them. Keep enough room for the embroidered eyes and the first dorsal bump.
Sew each horn's open base to the head surface. Make sure the horns remain upright when you turn the dragon onto its side.
Crochet the Rounded Dragon Back Bumps
Make eight little rounded bumps in the darker accent shade for each dragon, twenty-four altogether.
Round 1: Work 6 sc in a MR. (6 sts)
Round 2: Sc around. (6 sts)
Round 3: *Sc 1, inc*; repeat three times. (9 sts)
Round 4: Sc around. (9 sts)
Fasten off with a sewing tail. Don't stuff these pieces. Press each one gently into a small rounded cone with its open base ready for sewing.
Sew five bumps along the center of the upper back, starting behind the head and continuing toward the rump. Place the remaining three along the upper curve of the tail, beginning near its base.
The bumps should be close enough to look like a continuous dragon ridge, but they shouldn't bury the wing roots. Adjust the spacing slightly if necessary so each bump stays visible.
Embroider the Sleepy Dragon Faces
Now we can give each dragon the friendly expression that makes the finished mobile so sweet. All three faces use dark brown embroidery floss, with a little soft pink for the cheeks.
Eyes: On each side of the head, just behind the snout, embroider a gently curved closed eye across approximately three head stitches. Position the curve around Head Rounds 9–11, adjusting for the snout placement. Use two or three small securing stitches to form a smooth, slightly raised arc. Add one or two short eyelashes near the outer end if desired.
Nostrils: Work two tiny dark brown satin stitches near the upper front of the snout. Keep them small and evenly spaced.
Smile: Embroider a short curved smile across the lower front or visible side of the snout, following the round surface instead of pulling the yarn tight.
Cheeks: Use pink embroidery thread to make two or three short satin stitches just below and slightly behind each eye.
Repeat the same expression on the opposite side of the head so the dragon looks finished from either direction.
Secure every embroidery end inside the stuffed head. Don't leave thread loops that can catch a finger, and don't substitute glued-on facial details.
Step back and look at your three dragons together. The sage, teal and lavender colors may be different, but their rounded faces, sleepy eyes, cream undersides and broad wings should make it obvious that they belong to the same little flying class.
Crochet Clouds, Golden Stars and Wind Swirls
Our three dragons have their wings and are almost ready to take off. Now they need a little sky to fly through.
The two ivory clouds, two golden stars and three curling wind swirls are small enough to leave plenty of room around the dragons. The wind curls are especially important to this design. They make it look as though the dragons are catching little gusts of air as they follow their leader.
Crochet the Puffy Little Clouds
Make two clouds in ivory yarn. Each cloud is assembled from one larger center puff and two smaller side puffs.
Center puff: Make two.
Round 1: Work 6 sc in a MR. (6 sts)
Round 2: Inc around. (12 sts)
Round 3: *Sc 1, inc*; repeat around. (18 sts)
Rounds 4–5: Sc around. (18 sts for 2 rounds)
Round 6: *Sc 1, dec*; repeat around. (12 sts)
Stuff lightly.
Round 7: Dec around. (6 sts)
Fasten off, draw the tail through the remaining front loops and pull closed. Hide the end inside.
Smaller side puffs: Make four.
Round 1: Work 6 sc in a MR. (6 sts)
Round 2: Inc around. (12 sts)
Rounds 3–4: Sc around. (12 sts for 2 rounds)
Round 5: *Sc 1, dec*; repeat four times. (8 sts)
Add a tiny amount of fiberfill.
Round 6: Dec four times. (4 sts)
Fasten off and close the opening.
Assemble each cloud: Place the larger puff in the center with one smaller puff on either side. Lift the center puff slightly above the side puffs, as though three little round clouds have drifted together.
Sew the two smaller puffs firmly to the center, catching several stitches from both pieces along each join. The three puffs should form one connected cloud that can be suspended from the center without separating.
Repeat for the second cloud.
Crochet the Five-Point Golden Stars
Make two finished golden stars using the 3 mm hook. Each star consists of two matching five-point motifs joined together, so make four motifs altogether.
For each motif:
Round 1: Work 5 sc in a MR. Pull the ring snug and join with a sl st to the first sc. (5 sts)
Round 2: *Ch 4, sl st in the second chain from the hook, sc in the next chain, hdc in the last chain, then sl st in the next sc of Round 1.* Repeat this sequence five times altogether, moving to the next base stitch for each new point.
Fasten off after the fifth point. Leave a long sewing tail on one motif of each matching pair. Weave in the other yarn ends.
Place two matching motifs together with their right sides facing outward and all five points aligned.
Using the long sewing tail, stitch the layers together around their outer edges, matching each point and working around the spaces between points without drawing them inward.
Before completing the seam, place a very small amount of fiberfill between the centers. Keep the filling away from the narrow point tips and avoid stretching the stitches.
Close the remaining seam securely and hide the yarn end inside the star. Repeat for the second star.
Star checkpoint: Each finished star has five recognizable points and a gently raised center. The two layers should stay aligned with no exposed filling or gaps in their seams.
Crochet the Curling Wind Swirls
Make three in ivory yarn. These are decorative spiral shapes rather than stuffed pieces.
Row 1: Ch 31. Sl st in the second chain from the hook and in each remaining chain. (30 sl sts)
Row 2: Turn the strip over so the unused loops along the opposite side of the starting chain face you. Work 1 sc into each of those 30 loops. (30 sc)
Fasten off, leaving approximately 30 inches of sewing yarn for joining and shaping.
Fold the narrow crocheted strip lengthwise around its starting-chain ridge, bringing the two worked sides together. Use the sewing tail to join the long edges with small, evenly spaced stitches. Keep the seam relaxed so the finished piece resembles a softly rounded cord rather than a flattened strip.
Place the cord on a flat surface with its joining seam facing downward. Beginning at one end, curve it inward to create an open spiral. Let the opposite end sweep outward like a little gust of wind.
Use the remaining sewing yarn to secure neighboring portions of the spiral where they touch. Make small stitches that hold the spiral in position without closing its open center or pulling the outer curve inward.
Repeat for the other two wind swirls.
Wind-swirl checkpoint: Each decoration begins with 30 slip stitches and 30 single crochet stitches. The completed shape should form one softly rounded spiral with an open center and a clearly visible outer sweep. Do not add wire or stuffing.
Check the Complete Set Before Hanging
Lay everything on a table and count the finished pieces:
- 3 finished baby dragons, one sage, one dusty teal and one lavender
- 2 ivory clouds, each made from three joined puffs
- 2 lightly filled golden five-point stars, each made from two joined motifs
- 3 ivory spiral wind decorations
That's ten finished hanging decorations altogether.
Make sure every sewing tail has been woven in securely, every dragon has its full set of wings and legs, and all the small details are firmly attached. Once the pieces go onto the mobile frame, some of those joins will be harder to reach.
If you're interested in another storybook animal project to make alongside the mobile, my crochet dragon lovey pattern uses the same friendly dragon theme. For more hanging nursery projects, the crochet baby mobile pattern collection has several different animal and storybook designs.
How to Assemble the Learning to Fly Dragon Mobile
Now comes the fun of watching the three little dragons take their places in the sky. The sage green dragon will lead the flying lesson, while the teal and lavender dragons follow beneath it. Their heads, wings and tails should point in slightly different directions so the mobile looks as though everyone is moving rather than sitting still.
Before tying anything permanently, lay the decorations around your wooden hoop. The dragons are the stars of the show, so give them enough space for their wings. The clouds, stars and wind swirls belong in the open spaces between them.
Prepare the Wooden Hoop and Suspension Cords
Use a smooth, purpose-made mobile hoop approximately 11 inches in diameter. Check it for splits, sharp areas or loose joints before adding the decorations.
Prepare three upper support cords according to the instructions for your mobile frame or mounting system. Arrange their attachment points evenly around the hoop, approximately 120 degrees apart, so they support the hoop without pulling it out of shape.
Bring the upper cords together at the designated upper connection supplied or specified by your mounting system. Secure them using the manufacturer's attachment method. The hoop should hang level before any crocheted pieces are added.
Prepare ten main hanging cords, one for each finished decoration, allowing approximately 26–30 inches per cord before adjustment. For the three heavier dragon figures, also prepare one additional 18-inch length of suitable nonstretch cord per dragon to form a separate two-point suspension bridle.
You'll need ten main hanging cords, three dragon bridle cords and three upper support cords for the wooden hoop. That's sixteen cord lengths if you're preparing everything yourself. If your mobile frame already includes its three upper support cords, use those according to the manufacturer's instructions. These are starting lengths for fitting and balancing, not tested hanging dimensions. Do not trim or permanently secure the cords until the attachment arrangement has been checked.
Do the balancing on a temporary workroom support where you can reach every cord. Do not use the baby's crib as your assembly stand.
Arrange the Three Dragons Around the Hoop
Imagine looking down on the wooden ring as though it were a clock.
- 12 o'clock: Sage green leader dragon
- 4 o'clock: Lavender follower
- 8 o'clock: Dusty teal follower
Those positions space the three larger decorations approximately one-third of the way around the hoop from each other. Since all three dragons use the same base pattern, their weights should be reasonably close, although you'll still need to check them individually.
Start with the sage dragon approximately 7 inches below the hoop. Hang the teal and lavender dragons approximately 10–12 inches below the hoop, then adjust the final positions.
The sage dragon should appear to be leading, with its head pointing forward and slightly upward. Angle the teal dragon a little higher at the nose, as though it's working hard to catch up. Let the lavender dragon follow at a slightly different orientation, with its face turned inward toward the group.
These angles are created by changing the suspension point and gently rotating the finished figures, not by pulling on their wings.
Attach the Hanging Cord to Each Dragon
The dragons are heavier at the head than they first appear, especially after the horns and snouts are attached. Don't simply hang each dragon from one stitch at the top of its head. That would make it much harder to keep the body in a flying position.
Use a two-point suspension bridle for each dragon, with the two attachment locations separated along the torso. The bridle must support the stuffed body itself rather than relying on a wing, horn, dorsal bump or small group of exposed crochet loops.
Before making any permanent connections, support the dragon in the intended flying position and identify its balance point. Mark a forward location near Body Rounds 17–19 and a rear location near Body Rounds 9–11. Adjust these starting locations if the head is unusually heavy or the tail has changed the balance.
For a prototype, the short bridle cord must pass through secure, reinforced attachment paths in the stuffed torso at both locations. Do not fasten the entire weight of the figure to two ordinary single crochet stitches. Bring the suspension ends together above the dragon and connect the separate main hanging cord at the balance point.
Check the position with the dragon suspended from a temporary workroom support. The body should hang horizontally, with the nose slightly raised and the wings independent of the suspension. If the bridle slides, stretches the crochet fabric, shifts toward the head or changes the flying angle, the attachment has failed its construction check and must be redesigned.
Construction limitation: The reinforced bridle, its cord connections and the completed hanging assembly have not been physically tested. Do not treat this prototype suspension description as a verified method for installing a mobile above an occupied crib. The final attachment specifications must be established using a made sample and a suitable mounting system before this project can be presented as a complete crib-mobile pattern.
Repeat for the other two dragons.
If the wings fold downward or the head tips sharply toward the floor, stop and correct the cause. A cord adjustment can change the dragon's flying angle, but it cannot repair a weak wing or an insecure head seam.
Hang the Clouds, Stars and Wind Swirls
Once all three dragons are in position, fill the remaining spaces around the hoop.
Use the following arrangement as the starting layout:
- 1 o'clock: First ivory wind swirl
- 2 o'clock: First ivory cloud
- 3 o'clock: First golden star
- 6 o'clock: Second ivory wind swirl
- 9 o'clock: Second golden star
- 10 o'clock: Second ivory cloud
- 11 o'clock: Third ivory wind swirl
The two clouds sit opposite each other across the upper portion of the display, while the two stars balance the left and right sides. The three cream swirls provide movement between the larger shapes.
Attach each cloud's cord through secure stitches in its center puff, reinforcing the attachment through neighboring stitches. The cord should support the whole cloud, not just one of its smaller side puffs.
Attach each star's cord through secure stitches in both layers near the center, without compressing or distorting the filling. For each wind swirl, attach the cord near its upper outer curve, catching several firm stitches and checking that its curled shape remains visible when suspended.
Try the clouds about 5–7 inches below the hoop, the stars about 7–9 inches below, and the wind swirls at varying positions around 8–12 inches below. These are starting distances, not fixed requirements. Adjust them so none of the little decorations hides a dragon's face or catches against a wing.
Balance the Finished Mobile
Hang the complete mobile from its temporary workroom support and let it settle naturally. Don't hold the hoop level while you're deciding whether it's balanced. Let go and look at what it actually does.
If one side drops noticeably lower, check that side's decorations and suspension points first. Shift the attachment positions of the affected pieces around the hoop in small increments, or adjust the arrangement where necessary. Do not rely on shortening the hanging cords alone to correct uneven weight distribution.
Look at the dragons from several directions. The sage leader should remain the highest dragon, and the teal and lavender followers should hang low enough for their individual wings, faces and curved tails to be recognized.
Also check for twisting. A little natural movement is part of a hanging mobile, but the dragons shouldn't continually rotate into one another or wrap their suspension cords together.
Once the hoop remains level and the decorations have enough clearance, check every attachment again. Remove all temporary pins, removable stitch markers, temporary support threads and other construction aids. None should remain inside or attached to the finished decorations.
Inspect both sides of every dragon, including the head seam, wing roots, horns, tail tip, legs and embroidery. Check the joining stitches on the clouds, the centers of the stars and the seams holding each wind swirl in shape.
Before permanent installation, the complete mobile must also pass a physical suspension and stability check using the actual finished figures, cords, hoop and mounting hardware. No such test has yet been documented for this pattern. Keep the project off the crib until the suspension system and finished assembly have been verified.
That's the arrangement I would keep. Three dragons, a few little clouds and stars, and just enough curling wind to make the whole flying lesson come to life.
Pattern development note: The stitch counts and construction have been reviewed mathematically for internal consistency. The finished dimensions and yarn quantities are estimates, and the pattern has not been physically test-crocheted. The wing structure and mobile suspension also require verification with a completed sample.
Safety for the crochet dragon baby mobile pattern
This handmade dragon mobile is a decorative nursery display. It is not a baby toy, a crib toy to be handled, or something a baby should ever be able to grasp.
Keep the complete mobile, including the wooden frame, every hanging cord and all the crocheted pieces, securely mounted and entirely outside your baby's reach. Don't tie it to crib rails, attach it to an improvised support or position it where a baby could pull down a dangling piece.
If you choose to display a mobile over a crib, remove the entire mobile and its attachment hardware by five months of age or as soon as your baby begins pushing up on hands and knees, whichever happens first. Remove it sooner if your baby can reach any part of it.
Use a properly installed, purpose-made mounting system suitable for the finished mobile's weight and the surface supporting it. Follow the hardware manufacturer's instructions. A crocheted figure may feel light in your hand, but the frame, cords and all ten decorations must be supported together.
Before displaying the mobile, inspect every head seam, leg, horn, wing, tail detail, cloud and hanging connection. None should pull loose under ordinary handling. Check the attachments regularly and take the mobile down immediately if anything becomes damaged or unsecured.
Do not use buttons, plastic eyes, beads, glued decorations, bells or exposed wire. Keep loose yarn ends completely secured inside the crocheted pieces.
The U.S. Consumer Product Safety Commission's crib mobile recall notice explains why hanging toys must be removed as babies become able to push up or reach them. Dangling cords and decorations can create entanglement and strangulation hazards.
This original crochet pattern has not undergone commercial product-safety testing. Following a craft pattern does not establish that a finished mobile meets applicable safety standards. If you cannot verify that the complete hanging arrangement is secure and outside a child's reach, display it away from the crib and other infant sleep spaces instead.
The Finished Learning to Fly Dragon Mobile
With their finely ribbed wings spread wide, our three baby dragons are finally ready for their first trip through the clouds. Sage leads the way, dusty teal follows along on one side, and lavender brings up the rear, with little golden stars and curling ivory winds marking their path.
The softly colored dragons have enough detail to stand on their own, but I like to think that together they tell a little story. That's what gives this mobile its medieval storybook charm. It isn't just three dragons hanging from a wooden ring. They're learning to fly!
If you're decorating the rest of the room around these little creatures, my dragon baby nursery theme ideas have more inspiration for carrying the storybook look into the room. Or browse the free baby crochet patterns for another handmade project to go with your mobile.
When you click on links to various merchants on this site and make a purchase, this may result in this site earning a commission. This does not affect the price you pay.

UBGI Gold Standard 2026
Reviewed under the site's
editorial checklist.
Photos, decorating ideas, party setups and reader submissions are shared for inspiration unless a page is specifically presented as a pattern, tutorial, reference guide or step-by-step project. Follow the instructions, measurements, safety guidance and manufacturer directions provided for the particular project or product.
About Jan | Contact | Baby Nursery Ideas (Blog) | Site Map | Privacy Policy | Disclosure Policy | Disclaimer | Affiliate Disclosure | Earnings Disclosure | Facebook | Pinterest
I am a participant in the Amazon Services LLC Associates Program, an affiliate advertising program designed to provide a means for us to earn fees by linking to Amazon. As an Amazon Associate I earn from qualifying purchases.
Copyright © 2006-2026. All Rights Reserved.