Crochet Dragon Lovey Pattern
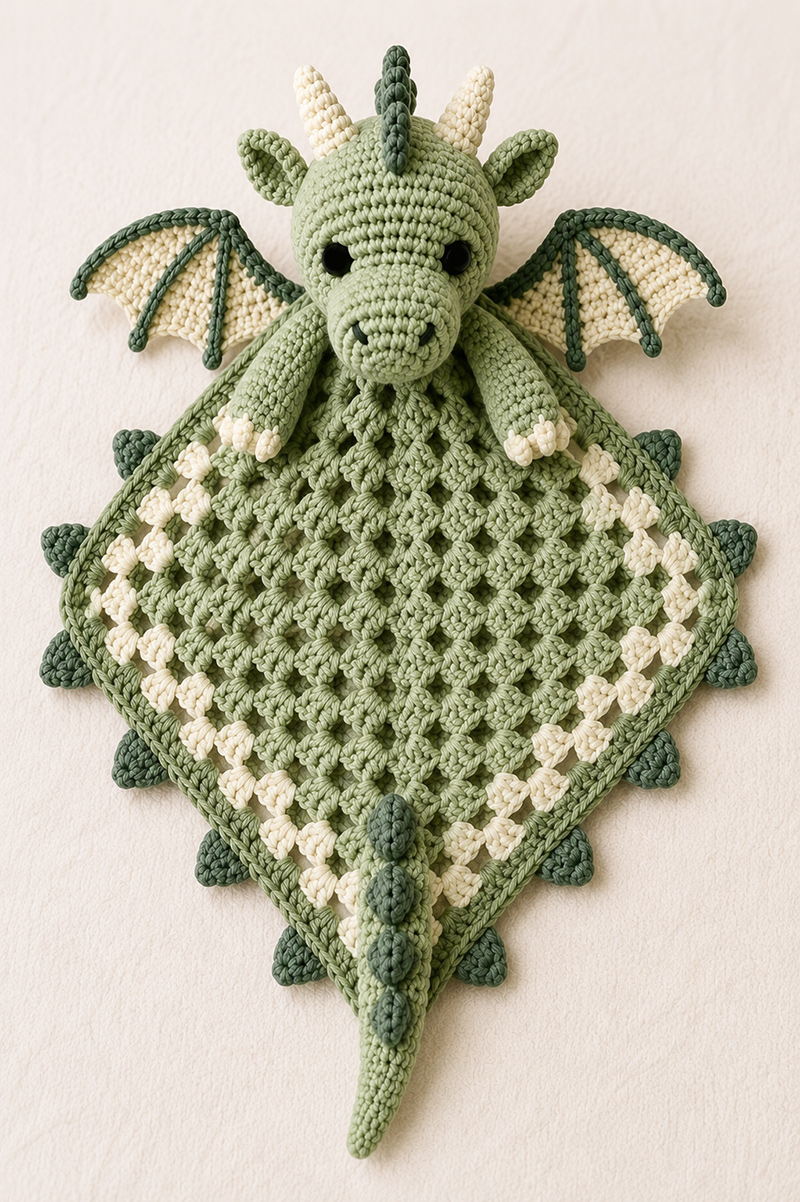
This crochet dragon lovey pattern makes a baby dragon security blanket with a rounded dragon head, tiny horns, small wings and a simple blanket body that works for a fantasy nursery, storybook baby room or handmade baby shower gift.
By Jan Bay
More Baby Crochet & Nursery Ideas
🧸 Crochet Animal Lovey Patterns
🧶 Easy Baby Lovey Crochet Patterns
Helpful crochet supplies:
Jump to a Section
➜ Crochet Dragon Lovey Pattern Overview
➜ Finished Size and Skill Level
➜ Crochet Snout, Horns and Ears
➜ Crochet Lovey Blanket Pattern
It doesn't take long to discover that baby gifts all start looking alike after you've wrapped a few. Then someone opens a handmade lovey and suddenly everybody at the shower wants to know where it came from. A crochet dragon lovey pattern stands out because it blends a security blanket with a playful fantasy character that still looks right at home in a nursery.
Here's the quick answer. This crochet dragon lovey pattern combines a lightly stuffed dragon head with small wings, little horns, a textured blanket body and a short tail. The granny-square blanket is designed to measure approximately 12 inches across, with the overall finished length depending on the head, tail and final assembly. Its compact proportions make it a distinctive handmade baby shower gift or nursery keepsake.
Not every dragon has to look fierce. A rounded snout, slightly oversized eyes and compact wings completely change the personality of the finished project. That's one reason this design works for babies while still looking unmistakably like a dragon.
If you're collecting nursery gift ideas, you'll also find dozens of animal projects on my Crochet Animal Lovey Patterns page, along with simpler projects on my Easy Baby Lovey Crochet Patterns page.
Small details completely change the finished dragon.
Materials for a Crochet Dragon Lovey That Holds Its Shape
A dragon has several pieces extending away from the head, so choosing yarn with enough body makes a noticeable difference. Cotton blends and quality acrylic baby yarn both hold wing edges better than very slippery fibers.
- Worsted weight yarn in sage green for the head, snout, ears, arms, blanket body and tail
- Worsted weight yarn in dark green for the forehead ridge, wing edging, wing ribs, blanket spikes and tail spikes
- Worsted weight yarn in cream for the horns, wing membranes, paw tips and outer blanket accent round
- 3.75 mm crochet hook
- Fiberfill stuffing
- Tapestry needle
- Locking stitch markers
- Black embroidery thread or black yarn for the eyes and nostrils
- Scissors
If you're making this for a newborn, embroidered facial features remain the safest choice. The U.S. Consumer Product Safety Commission recommends avoiding small detachable parts on products intended for infants.
Finished Size and Skill Level
This project is suitable for an adventurous beginner who already knows single crochet, increases, invisible decreases and working in continuous rounds.
- Overall length varies with the finished blanket size and the placement of the dragon head and tail; measure the assembled lovey from its highest point to its lowest point.
- Dragon head about 4½ inches across
- Blanket approximately 12 inches square
- Wingspan roughly 8 inches
Keeping the head slightly larger than the blanket corners gives the finished dragon a balanced look instead of making it appear top heavy. That proportion also helps the lovey drape naturally when it's folded across a rocking chair or displayed on a nursery shelf before baby arrives.
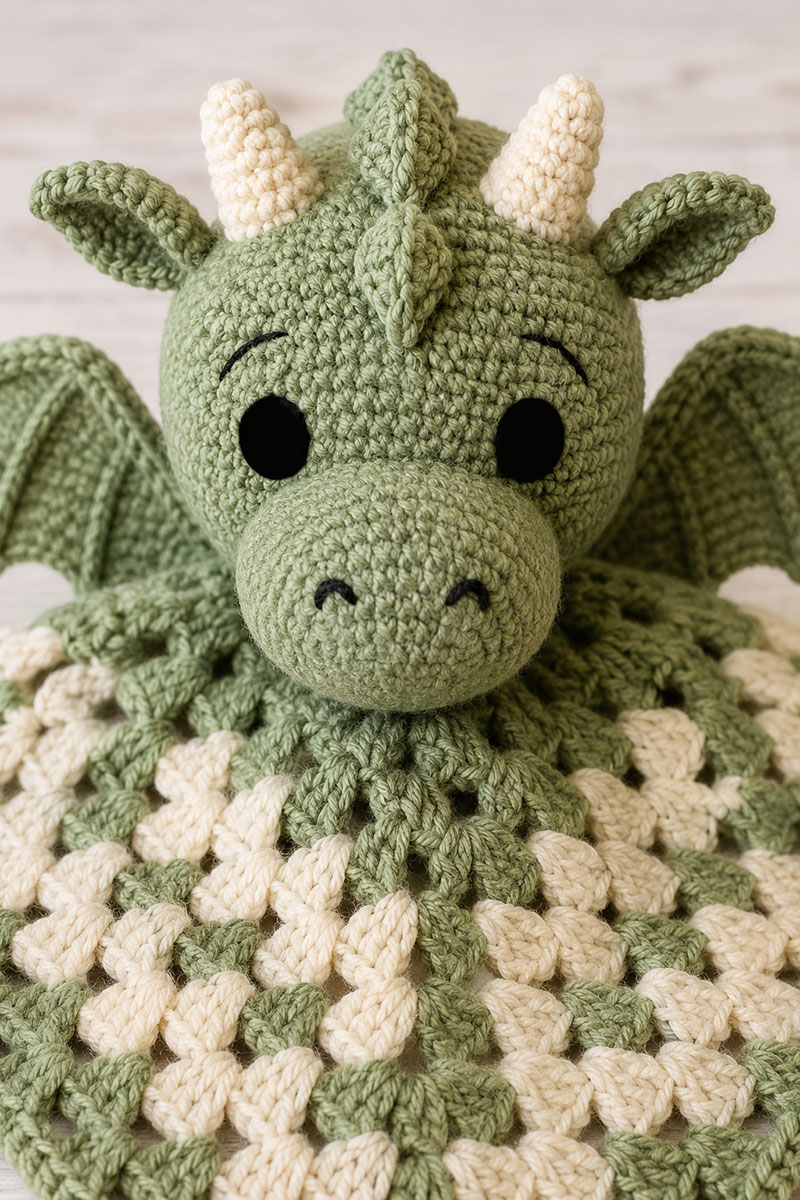
Crochet Dragon Head Pattern That Gives the Lovey Its Character
A dragon can look playful or adventurous with only a few stitch changes. For this lovey, the goal is a rounded head with balanced features instead of a narrow snout. That proportion helps the finished blanket look inviting while keeping its fantasy personality easy to recognize.
Work the head in continuous rounds unless noted otherwise.
Abbreviations
- mc = magic circle
- sc = single crochet
- inc = increase
- dec = invisible decrease
- sl st = slip stitch
Gauge
6 sc × 6 rounds = approximately 2 inches using worsted weight baby yarn and a 3.75 mm hook.
Dragon Head
Round 1: 6 sc in magic circle. (6)
Round 2: Inc in each stitch. (12)
Round 3: Sc 1, inc around. (18)
Round 4: Sc 2, inc around. (24)
Round 5: Sc 3, inc around. (30)
Round 6: Sc 4, inc around. (36)
Round 7: Sc 5, inc around. (42)
Rounds 8 through 14: Sc in each stitch around. (42 each round)
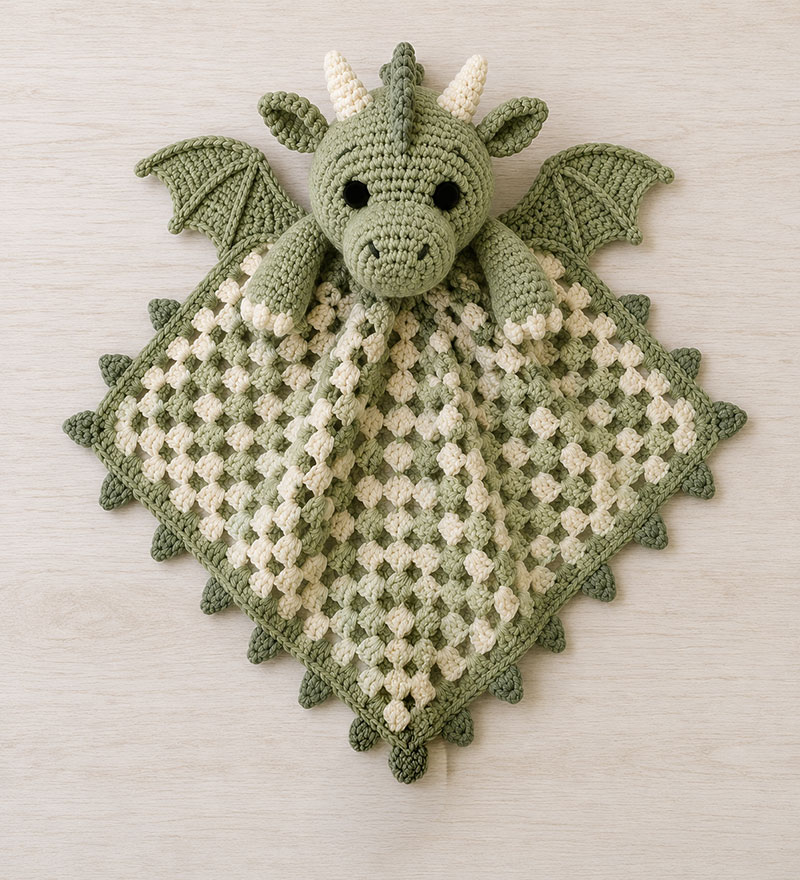
Embroider two larger black oval eyes between Rounds 11 and 13, spacing them about 8 stitches apart. Keep the eyes bold and simple rather than sleepy or curved. That gives the dragon the alert expression shown in the hero image while avoiding detachable pieces.
Begin stuffing after Round 14, just before the decreases begin. Add small amounts of fiberfill as you work the remaining rounds to keep the head evenly rounded.
Round 15: Sc 5, dec around. (36)
Round 16: Sc 4, dec around. (30)
Round 17: Sc 3, dec around. (24)
Add a final handful of stuffing before continuing.
Round 18: Sc 2, dec around. (18)
Round 19: Sc 1, dec around. (12)
Round 20: Dec around. (6)
Fasten off. Thread the yarn tail through the remaining stitches and pull closed.
For a baby gift, embroider the eyes and other facial details rather than attaching plastic eyes, buttons or beads. Secure every small crocheted piece carefully. The U.S. Consumer Product Safety Commission (CPSC) provides guidance on small parts and choking hazards in children's products. This handmade lovey is not a sleep-space accessory. Keep it out of a baby's crib, bassinet and other sleep areas during sleep, and use it only for supervised awake-time handling or out-of-reach nursery display.
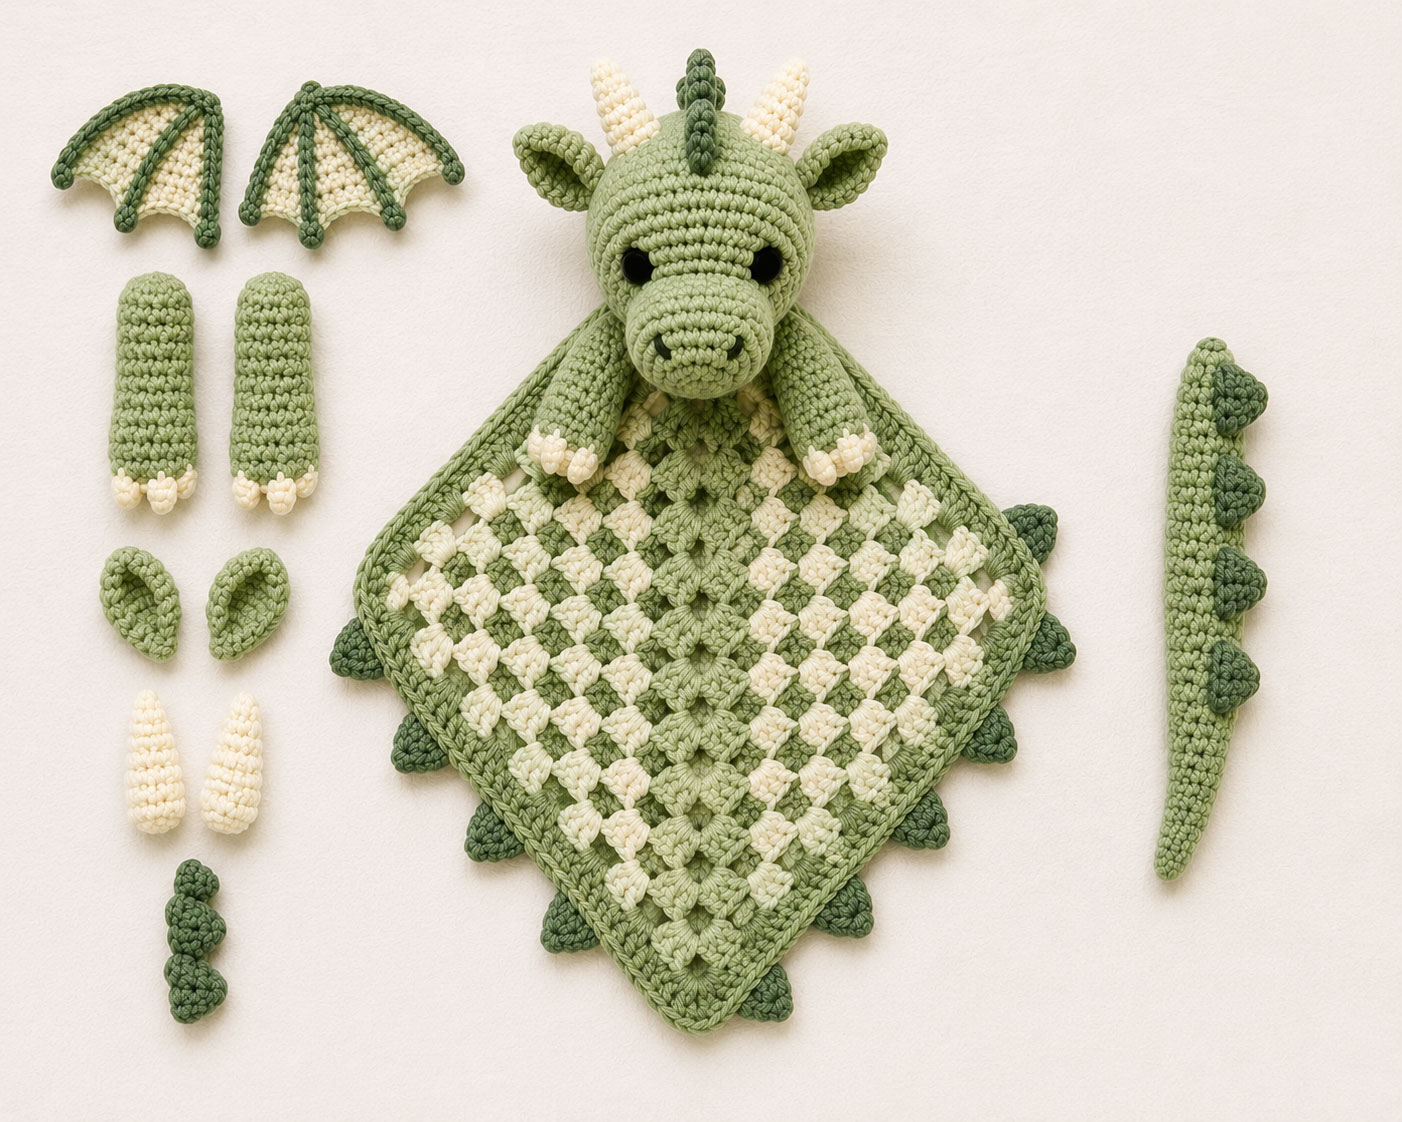
Crochet Dragon Snout, Horns and Ears That Stay in Proportion
Keeping each feature in scale is what gives this dragon its personality. Slightly smaller horns and compact ears allow the face to remain the focal point while the wings and blanket body still attract attention.
Snout
Using a coordinating yarn color:
Round 1: 6 sc in magic circle. (6)
Round 2: Inc in each stitch. (12)
Rounds 3 and 4: Sc around. (12 each round)
Fasten off after Round 4, leaving a long sewing tail. Add a small amount of stuffing without stretching the snout opening. Position the open edge against the head and sew through every stitch around the opening, securing the snout evenly. Weave the remaining yarn tail into the head.
The finished snout measures approximately 1½ inches across. Center it beneath the eyes with the upper edge aligned just below Round 12.
Embroider two small black nostrils near the front center of the snout. A short vertical stitch for each nostril is enough.
Horns
Make two.
Round 1: 4 sc in magic circle. (4)
Round 2: Sc around. (4)
Round 3: Inc in first stitch, sc in remaining 3 stitches. (5)
Rounds 4 through 7: Sc around. (5 each round)
Do not stuff the horns. After Round 7, fasten off, leaving a long sewing tail. Gently flatten the five-stitch opening and use the yarn tail to sew each horn securely to the head between Rounds 6 and 8, angling the horns slightly outward.
Before attaching the horns, place them side by side to confirm that both seven-round pieces are the same length. Measure the finished horns with your actual yarn and tension, since their length can vary with gauge.
Ears
Make two.
Chain 4.
Beginning in the second chain from the hook:
- 1 sc
- 1 hdc
- 3 dc in the final chain
- Working back along the opposite side, 1 hdc
- 1 sc
- Fasten off, leaving a sewing tail.
Sew each ear just behind a horn with a slight backward angle. That small adjustment gives the dragon an alert expression while matching the proportions shown in the main page image.
Forehead Ridge
Using dark green yarn, make one.
Chain 6.
Beginning in the second chain from the hook, work 1 slip stitch, 1 sc, 1 hdc, 1 dc and 3 dc in the final chain. Fasten off, leaving a sewing tail.
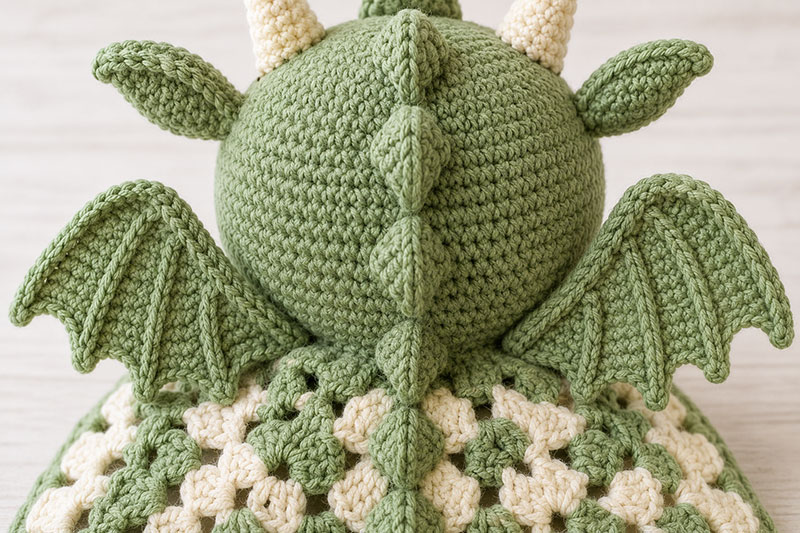
Sew the ridge along the top center of the head between the horns so the widest end sits toward the front of the crown, matching the raised center ridge in the hero image.
Arms
Make two.
Round 1: With cream yarn, 6 sc in magic circle. (6)
Round 2: Sc around. (6)
Change to sage green.
Rounds 3 through 10: Sc around. (6 each round)
Lightly stuff the lower half only. Fasten off, leaving a sewing tail. With cream yarn, embroider three short, thick claw shapes across the rounded end of each paw using several closely spaced stitches for each claw. Anchor every stitch securely through the crocheted paw fabric, keeping the claws integrated into the paw rather than making detachable pieces. Flatten the upper opening and sew one arm to each lower front side of the head so the cream paws hang down over the blanket.
Crochet Dragon Wings That Give the Lovey Its Signature Look
The wings are the detail that turns this from another animal blanket into a recognizable dragon. They work best when they are slightly rounded instead of long and pointed. Keeping them compact also helps the blanket fold naturally while letting the dragon remain the center of attention.
Make two matching wings.
Wing Pattern
With cream yarn, chain 13.
Row 1: Beginning in the second chain from the hook, work 1 sc in each chain across. Ch 1 and turn. (12)
Row 2: Sc in first 4 stitches, hdc in next 4 stitches, dc in final 4 stitches. Ch 1 and turn. (12)
Row 3: Sc2tog, sc in next 3 stitches, hdc2tog, hdc in next 3 stitches, sc2tog. Ch 1 and turn. (9)
Row 4: Sc2tog, sc in next 5 stitches, sc2tog. Fasten off. (7)
Join dark green yarn at the upper inner corner. Work 1 sc in each of the 7 top-edge stitches, 2 sc at the outer tip and 4 sc evenly down the outer side edge. Work 12 sc across the lower foundation edge. After the third, sixth and ninth sc along this lower edge, ch 3 and slip stitch into the first chain to form a small pointed extension before continuing into the next foundation stitch. Work 4 sc evenly up the inner side edge and join with a slip stitch. (29 sc, plus 3 decorative points)
After joining the dark green wing border, fasten off, leaving a long sewing tail for attaching the wing to the head. Work the three surface ribs with separate strands of dark green yarn.
Using dark green yarn, work three separate surface slip-stitch ribs from spaced positions along the upper wing edge toward the three pointed extensions along the lower edge. Fasten off each rib securely and weave its ends into the wing fabric. Keep the ribs flat against the cream membrane. Make the second wing with the same construction, positioning the rib details as a mirror image so both wings face forward when attached.
Do not stuff the wings. Lightly steam block if your yarn allows it. Sew one wing to each side of the dragon head between Rounds 8 and 12, angling them slightly upward and outward so the cream membrane faces forward and the dark green edging frames the wing.
Crochet Lovey Blanket Pattern With Easy Granny Square Texture
The blanket supports the dragon without competing for attention. A traditional granny square works well because it drapes naturally, grows quickly and provides an ideal center for attaching the dragon head.
Blanket Pattern
For the granny-square rounds, the beginning ch 3 counts as the first dc of its 3-dc group. Join each completed round with a slip stitch into the top of the beginning ch 3. Before starting the next round, slip stitch into the next corner ch-2 space. Work the side groups into the spaces between the existing 3-dc groups without adding extra chains between them.
Round 1: Make a magic circle. Ch 3, work 2 dc into the ring, ch 2. Repeat *(3 dc, ch 2)* three more times. Join with a slip stitch to the beginning chain. You will have four groups of 3 dc separated by four corner spaces.
Round 2: Slip stitch into the first corner space. Ch 3, work 2 dc, ch 2, 3 dc in the same corner. In each remaining corner space work 3 dc, ch 2, 3 dc. Join with a slip stitch.
Round 3: Slip stitch to the first corner. Ch 3, work 2 dc, ch 2, 3 dc in the same corner. Work 3 dc in every side space. In each corner work 3 dc, ch 2, 3 dc. Join.
Rounds 4 through 6: Continue the same pattern in sage green, working one 3-dc group in every side space and (3 dc, ch 2, 3 dc) in each corner.
Round 7: Change to cream and continue the established granny-square pattern for one full round. This creates the contrasting outer accent band seen in the hero image.
Round 8: Change back to sage green and work the established granny-square pattern for one full round. Measure the square after Round 8. If it is smaller than approximately 12 inches, continue adding sage-green rounds in the same pattern, measuring after each round, until the square reaches approximately 12 inches. Then work the dark-green border as directed.
Border Round: With the right side facing and dark green yarn, join in any stitch along a straight side and ch 1. Work 1 sc in each dc around the blanket, without adding stitches between the 3-dc groups. In each corner ch-2 space, work 3 sc and mark the middle corner stitch. Join with a slip stitch to the first sc and fasten off.
Blanket Edge Spikes
Using dark green yarn, make 11 blanket spikes.
For each spike: Chain 4. Beginning in the second chain from the hook, work 1 slip stitch, 1 sc and 3 dc in the final chain. Fasten off, leaving a sewing tail.
Lay the blanket flat in a diamond shape, with the head corner at the top and the tail corner at the bottom. Position 5 spikes evenly along the exposed left sloping edge and 5 along the exposed right sloping edge. Position the remaining spike at the lower corner, immediately beside the tail attachment rather than underneath it. Keep all spike points facing outward. Temporarily pin the spikes in place and check their spacing before sewing each one securely through its base and the blanket border.
The blanket spikes are decorative, not stuffed. Keep the spacing even so the outline resembles the hero image.
Set the completed dragon head over one corner of the granny square, overlapping the blanket by approximately 1 inch. Check its position, but wait until the snout, horns, ears, forehead ridge, wings and arms have been attached before sewing the head to the blanket. During final assembly, use matching yarn to sew through the lower head stitches and corresponding blanket stitches along the overlapped area, making several passes without bunching the blanket. Fasten off securely and weave the yarn ends into the stuffed head.
A finished blanket measuring about 12 inches before the edge spikes keeps everything in balance. Increasing it much beyond that size makes the dragon appear smaller than intended.
Dragon Tail and Individual Back Spikes Finish the Design
A shorter tail works better on a lovey because it stays visible instead of wrapping itself around the blanket. The back spikes are sewn on individually, giving the finished dragon more dimension than a single strip.
Tail
Round 1: With sage green yarn, 4 sc in a magic circle. (4)
Round 2: Sc around. (4)
Round 3: (Inc in next stitch, sc in next stitch) twice. (6)
Rounds 4 through 6: Sc around. (6 each round)
Round 7: Inc, sc 2 around. (8)
Rounds 8 through 12: Sc around. (8 each round)
Lightly stuff the tail, keeping it tapered rather than firm.
Rounds 13 through 16: Sc in each stitch around. (8 stitches per round)
Fasten off, leaving a long sewing tail. Leave the 8-stitch opening at the base of the tail unclosed so it can be sewn securely against the lower blanket corner.
Sew the open end securely to the lower blanket corner opposite the head so the tail extends downward from the point of the blanket. Shape the tail gently as you sew so it narrows toward the tip.
Tail Spikes
Using dark green yarn, make four.
Chain 4.
Beginning in the second chain from the hook:
- 1 slip stitch
- 1 single crochet
- 3 double crochet in the final chain
- Fasten off, leaving a sewing tail.
Sew the four tail spikes evenly along the top center of the tail, starting near the blanket corner and continuing toward the tip. Keep all spike points angled toward the tail tip.
Assembling the Crochet Dragon Lovey So It Sits Correctly
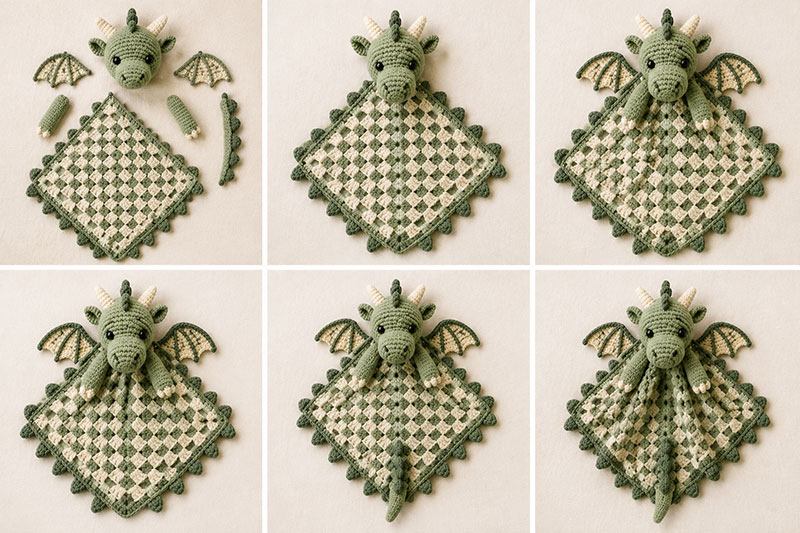
Assembly is where a handmade dragon either looks tidy or starts leaning in odd places. Lay every piece on the table before sewing anything down. It is much easier to move a wing by half an inch before the needle comes out.
Assembly order
- Sew the snout to the front of the head with the upper edge placed just below Round 12, then embroider the nostrils.
- Attach the horns between Rounds 6 and 8, angled slightly outward.
- Sew the ears just behind the horns.
- Add the forehead ridge centered between the horns.
- Sew one wing to each side of the head between Rounds 8 and 12, with the cream membrane facing forward.
- Sew one arm to each lower front side of the head so the cream paw ends hang over the blanket.
- Attach the dragon head to one corner of the granny square with the bottom of the head extending about 1 inch onto the blanket.
- Sew the tail to the opposite lower corner so it extends down from the blanket point.
- Sew the four tail spikes along the top center of the tail.
- Sew 5 blanket spikes evenly along each exposed sloping side of the diamond-shaped blanket and the remaining spike beside the bottom tail attachment. Keep all spike points facing outward.
Use firm stitches, but do not pull so tightly that the head puckers. A slightly wider sewing path around the base of the head keeps it steady without making the blanket bunch.
Before gifting the lovey, inspect the head attachment, snout, wings, horns, ears, tail and every spike. Gently pull each component to check its stitching and reinforce anything that shifts. Check that the embroidered eyes and other facial stitches are secure, weave in all remaining yarn ends and remove every temporary pin or stitch marker.
Follow the yarn manufacturer's washing instructions. If machine washing is permitted, place the lovey in a mesh laundry bag on a gentle cycle and dry it according to the yarn label. Check the seams and embroidered details again after washing.
Dragon Nursery Styling Ideas for a Handmade Gift
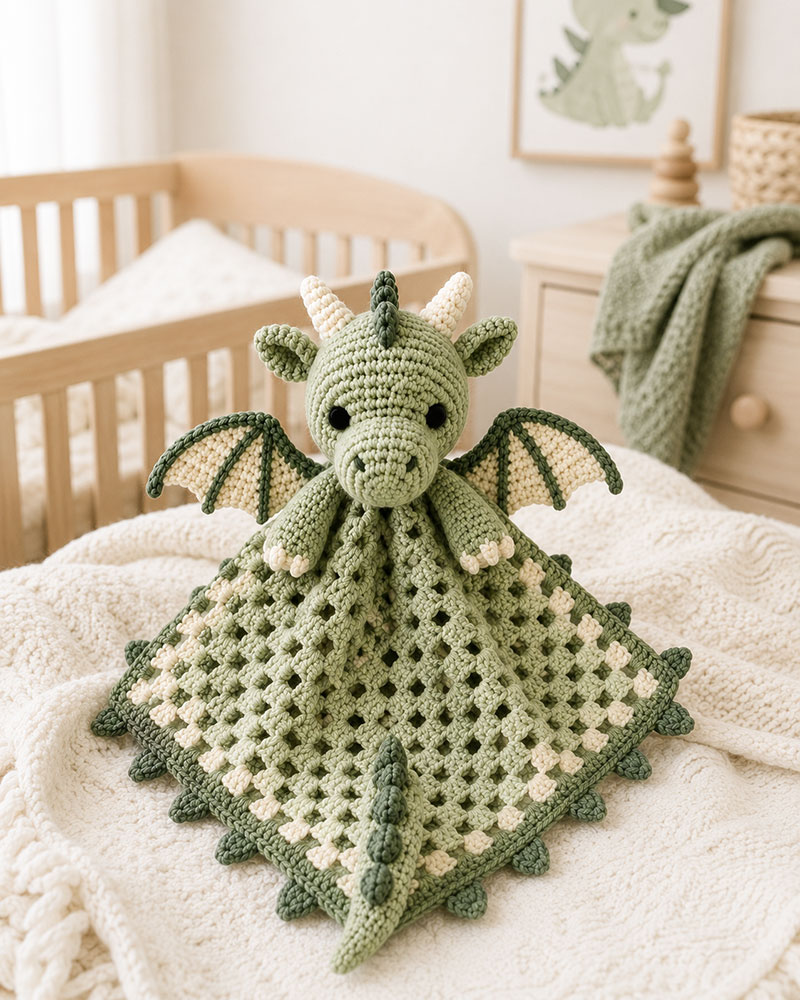
A crochet dragon lovey fits neatly into a storybook nursery, fantasy nursery or dragon baby room without needing the whole space to become themed. In many nurseries, one handmade piece on a dresser or shelf does more than a room full of matching decor.
If you'd like to carry the dragon theme onto the walls, my dragon wall mural ideas include friendly dragons flying over storybook castles, hand-painted designs, wallpaper and removable decals. A mural can give your handmade dragon lovey a charming backdrop without filling the nursery with extra decorations.
If the room already has a dragon theme, choose yarn that echoes one color from the bedding, curtains or wall art. If the nursery is neutral, a sage, moss, slate or muted teal dragon can add character without looking too loud beside a crib.
For a full dragon themed room, pair this project with ideas from my Dragon Baby Nursery Theme page. If you want more handmade baby gift options, my Free Baby Crochet Patterns page gives this project a useful next click after the pattern is finished.
I believe dragon decor works best when it has one clear focal point. The lovey can be that small handmade detail, especially in a room with castle art, moon accents or storybook shelves.
Frequently Asked Questions About This Crochet Dragon Lovey Pattern
Is this crochet dragon lovey pattern beginner friendly?
This pattern is best for an advanced beginner. The stitches are basic, but the project has several small pieces that need careful placement.
Can I use safety eyes on this dragon lovey?
For a baby gift, embroidered eyes are the better choice. Plastic eyes can loosen over time, especially after washing and daily handling.
What yarn works best for a crochet dragon baby lovey?
Worsted weight baby yarn, cotton blend yarn or washable acrylic yarn all work well. Choose yarn that can handle repeated washing without losing too much shape.
Can I make the blanket larger?
Yes, but keep the proportions in mind. If the granny square grows much larger than 12 inches, the dragon head may look too small for the finished lovey.
Can this dragon lovey be used as nursery decor?
Yes. Before baby is old enough to use it, display the lovey on a high shelf or dresser surface out of reach. Keep handmade items, pillows, blankets and loose objects out of the crib during sleep.
This crochet dragon lovey pattern is a baby security blanket made with a rounded dragon head, tiny horns, compact wings, a short tail, individual back spikes and a 12 inch granny square blanket. The finished project works as a handmade baby shower gift, fantasy nursery accent or dragon nursery keepsake when all small parts are sewn securely and infant-safe facial details are embroidered.
When you click on links to various merchants on this site and make a purchase, this may result in this site earning a commission. This does not affect the price you pay.

UBGI Gold Standard 2026
Reviewed under the site's
editorial checklist.
Photos, decorating ideas, party setups and reader submissions are shared for inspiration unless a page is specifically presented as a pattern, tutorial, reference guide or step-by-step project. Follow the instructions, measurements, safety guidance and manufacturer directions provided for the particular project or product.
About Jan | Contact | Baby Nursery Ideas (Blog) | Site Map | Privacy Policy | Disclosure Policy | Disclaimer | Affiliate Disclosure | Earnings Disclosure | Facebook | Pinterest
I am a participant in the Amazon Services LLC Associates Program, an affiliate advertising program designed to provide a means for us to earn fees by linking to Amazon. As an Amazon Associate I earn from qualifying purchases.
Copyright © 2006-2026. All Rights Reserved.