Free Crochet Christmas Pillow Pattern: Santa and Christmas Tree Set
By Jan Bay
This free Crochet Christmas Pillow pattern shows you how to turn two of our favorite Christmas granny squares into a matching set of 16-inch pillows that will make mom's nursery chair or dad's recliner even more comfy for the holidays. One features Santa Claus with his cheerful face, fluffy white beard, and traditional red hat. The other has a pretty evergreen Christmas tree with snowy white branches, red ornaments, and a little gold star. We'll keep both original granny square designs and add coordinating crocheted frames, decorative edging, and removable pillow backs. The finished pair makes a charming addition to your Christmas decorating or a thoughtful handmade gift.
Explore More Free Christmas Crochet Patterns
Santa Claus Granny Square Pattern
Christmas Tree Granny Square Pattern
Free Christmas Granny Square Patterns
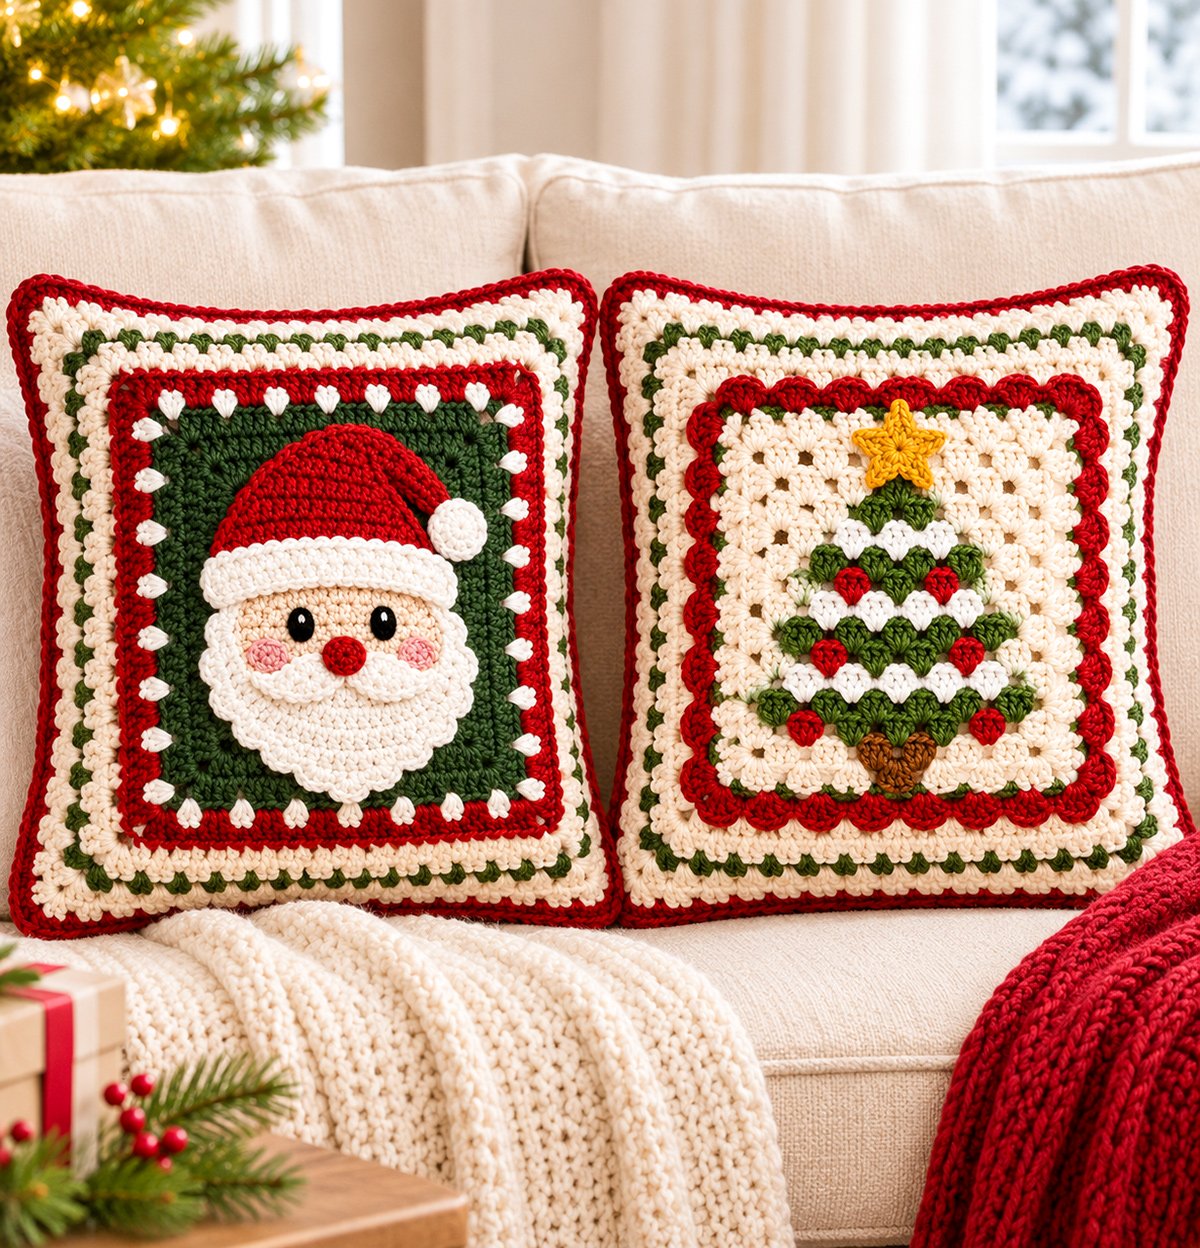
See Supplies for This Project Here.
Jump to the Free Crochet Christmas Pillow Pattern
- Materials and Finished Pillow Sizes
- Gauge, Stitches, and Pattern Notes
- Make the Santa and Christmas Tree Granny Squares
- Crochet the Santa Pillow Border
- Crochet the Christmas Tree Pillow Border
- Add the Matching Decorative Edging
- Crochet the Removable Pillow Backs
- Assemble Both Christmas Pillows
- Finishing and Size Checkpoints
- Helpful Tips and Troubleshooting
- Frequently Asked Questions
Materials for Two Crochet Christmas Pillows
We're making two pillows here, one with Santa and one with a Christmas tree. Both will finish at approximately 16 inches square, but the granny squares in the middle are different sizes. That's why we'll give each one its own amount of framing rather than changing the original designs.
You can make either pillow by itself, too. Just follow the instructions for the square you want and make one set of framing and backing pieces.
Yarn and Supplies
Use medium-weight #4 worsted yarn for Santa, both pillow foundations, the textured granny-cluster frames, and the envelope backs. For the larger Christmas tree pillow motif, use #5 bulky yarn in the original tree colors. Its stitch counts and color placement stay unchanged. Match the gauge of each part before beginning.
- Warm ivory yarn for the new crocheted framing panels and envelope backs
- Cranberry red yarn for the outer framing and pillow edging
- Forest green yarn for the narrow decorative stripes
- 5 mm (H/8) crochet hook, or the size needed for the #4 yarn foundation panels, framing strips, backs, and Santa square
- 6.5 mm (K/10.5) crochet hook as a starting size for the #5 bulky Christmas tree square; adjust to match the larger tree gauge
- Small amount of #5 bulky golden-yellow yarn for the larger Christmas tree star; use the same hook selected for the enlarged tree square
- Two 16 × 16-inch pillow inserts
- Yarn needle for attaching the granny squares and joining the pillow pieces
- Stitch markers, including four that can mark the panel corners
- Scissors and measuring tape
- Blocking mat and pins, if needed for shaping
For each pillow, allow approximately 600 to 900 yards of #4 warm ivory yarn for the foundation, textured granny-cluster framing strips, and two backs. Allow additional #4 forest green for the granny-cluster stripe and cranberry red for the outer edging. These are generous purchasing estimates, not measured yarn consumption. The two Christmas motifs need their own yarn allowances, listed below.
For the Santa Claus Granny Square
- Forest green: approximately 85 yards
- Christmas red: approximately 50 yards
- White: approximately 45 yards
- Peach: approximately 20 yards
- Small amounts of pink and black
- A tiny amount of white for embroidered eye highlights
For the Larger Christmas Tree Granny Square
Use #5 bulky yarn for the enlarged tree panel and its red scalloped border. Allow these approximate purchasing amounts:
- Warm ivory bulky yarn: 70 to 110 yards
- Forest green bulky yarn: 35 to 60 yards
- Bright white bulky yarn: 10 to 20 yards
- Cranberry red bulky yarn: 35 to 65 yards
- Small amount of brown bulky yarn for the trunk
- Small amount of #5 bulky golden-yellow yarn for the larger five-point star
- Small yarn bobbins for the color changes
Finished Sizes and Piece Counts
- Santa granny square: approximately 12 to 12 1/2 inches
- Christmas tree pillow square: approximately 11 1/4 inches at the larger #5 yarn gauge, including scallops; the original #4 square is approximately 9 inches
- Each new crocheted framing panel: approximately 15 1/2 inches before final pillow edging
- Each finished pillow cover: approximately 16 × 16 inches, measured across the outside edging
- Each envelope-back panel: approximately 15 1/2 inches wide by 10 inches tall before assembly
Each pillow needs eight main pieces: one decorative granny square, one crocheted foundation panel, four granny-cluster framing strips, and two envelope-back panels. Santa's appliqués and the tree's gold star are separate details. The strips lie over the foundation; its outer red round remains available for joining to the backs.
The finished size is calculated from the target gauge. Measure your work at the checkpoints in the instructions, because the width of the final crochet edging can vary a little with tension.
These are decorative Christmas throw pillows for chairs and sofas, not for a baby's crib or other infant sleep space. The U.S. Consumer Product Safety Commission's safe sleep guidance explains why pillows and other loose items should be kept out of infant sleep spaces.
Gauge, Stitches, and Pattern Notes
I'd check the gauge before starting the larger pillow panels. The original squares are lovely on their own, but the framing and backing pieces need to agree on size. Otherwise, you can end up with a front that's wider than its back.
Crochet Christmas Pillow Gauge
For the new framing and backing pieces, use the following target gauge:
- 16 single crochet stitches = 4 inches
- 16 single crochet rows = 4 inches
- Hook: 5 mm (H/8), adjusted if needed
Make a gauge swatch using the same ivory yarn you'll use for the pillow panels. Work at least 20 single crochet stitches across and 20 rows high, then measure the central four inches without including the outer edges.
If your stitches are too wide, try a smaller hook. If they're too narrow, try a larger hook. Check row height separately. Changing the hook size can affect both measurements, so don't assume the row gauge will automatically match.
Gauge for the Original Granny Squares
The Santa square uses a target of 14 double crochet stitches across four inches for its main background, with 16 single crochet stitches across four inches for its smaller pieces.
The original nine-inch Christmas tree square uses groups of three double crochets. Four groups should measure approximately 2 inches across and four completed rows about 1 3/4 inches high. For the enlarged pillow version, work the same stitches in #5 bulky yarn, aiming for four groups measuring 2 1/2 inches across and four rows measuring 2 3/16 inches high. This scales the tree approximately 25 percent without adding groups or rows.
For the new #4 textured framing strips, four granny groups should measure 2 inches across and four completed rows approximately 1 3/4 inches high. The structural ivory foundation and envelope backs keep their separate single crochet gauge: 16 stitches and 16 rows per 4 inches. Check the stitch width and row height for each part.
Abbreviations
- ch = chain
- sc = single crochet
- hdc = half double crochet
- dc = double crochet
- sl st = slip stitch
- sc2tog = single crochet two stitches together
- inc = two single crochet stitches in one stitch
- st or sts = stitch or stitches
- sp = space
- RS = right side
- WS = wrong side
- G3 = three double crochets worked into one stitch
All instructions use US crochet terms. You can check unfamiliar abbreviations in the Craft Yarn Council crochet abbreviations reference.
How the Two Pillow Fronts Are Built
We'll keep the original Christmas granny square stitch patterns. Santa stays at its original gauge; the tree uses the same stitches at a larger gauge. For each pillow, crochet a separate ivory foundation and six structural rounds, then add raised ivory granny-cluster strips with a green stripe. The outer red round stays uncovered so the backs can be joined without changing their stitch counts.
Next, center the completed motif on its textured foundation and sew it down. Santa's original 12 to 12 1/2-inch square fills more of its pillow center. The enlarged tree square is approximately 11 1/4 inches across, leaving a slightly wider band of ivory clusters around its red scallops.
The pillow backs are made from two overlapping crocheted rectangles. Once they're joined to the front around the outside edges, you can slip the pillow insert in and out through the opening in the back.
Important Color and Orientation Notes
- Keep the original granny squares right side facing outward.
- Keep Santa's red border and embroidered white accents visible.
- Keep the Christmas tree's red scalloped edging visible above the new ivory panel.
- Use warm ivory for the new center panels and most of the pillow backs.
- Use the same evergreen granny-cluster stripe and cranberry outer edge on both pillows.
- Keep the original white snow bands bright white so they remain distinct from the warm ivory background.
Use separate yarn strands or bobbins for the tree's color changes. Don't carry dark yarn behind long stretches of ivory, where it could show through the stitches.
Before You Begin
Skill level: Intermediate. This project uses basic crochet stitches, but you'll also need to follow color changes, shape pieces with increases and decreases, work granny-stitch groups, and sew several pieces together. If you're comfortable counting stitches, following a color chart, and joining crocheted pieces, you should be able to follow the pattern as written.
The original square measurements and the enlarged tree, framing strips, and backs are calculated gauge targets, not documented physical measurements. Make the early checks given below before sewing the strips or motifs to the panels. The framing strips add texture, but they must not shorten the 248-stitch outer red perimeter used to join the backs.
Make the Santa and Christmas Tree Granny Squares
Let's start with the two Christmas designs. If you've already crocheted Santa at approximately 12 to 12 1/2 inches, you can use the original square and its attached face pieces. To match the fuller pom-pom in the photograph, make the enlarged white pom-pom below and replace the smaller one if needed. For the Christmas tree, check your finished square before using it. This pillow calls for a tree measuring approximately 11 1/4 inches across its red scallops. The original nine-inch square is smaller than the version shown here.
Santa keeps his original background, border, and face construction, with a larger pom-pom for this pillow. The Christmas tree keeps its original 17 colorwork rows and borders, but is worked at a larger gauge with an enlarged five-point star. The separate granny-cluster frames complete the matching pillow fronts. Don't add extra rounds to Santa's red border or remove the scallops from the Christmas tree.
Santa Claus Granny Square
Our Santa Claus granny square pattern begins with a forest-green background and a red Christmas border. Santa's face, hat, beard, and other details are crocheted separately and sewn onto the green square.
The finished square should measure approximately 12 to 12 1/2 inches. Keep the red border around all four sides, including its 36 little white accents.
Crochet Santa's Green Background
With forest-green yarn and your 5 mm hook, ch 4 and join with a slip stitch to make a ring.
- Round 1: Ch 3, counting as the first dc. Work 2 dc in the ring, ch 2. Work (3 dc, ch 2) into the ring three more times. Join to the beginning ch 3. Count: 12 dc and four ch-2 corners.
- Round 2: Slip stitch into the next two dc and the next corner space. Ch 3, work 1 dc, ch 2, and 2 dc in that corner. Work 1 dc into each of the next 3 dc. Repeat (2 dc, ch 2, 2 dc) in every corner, with 1 dc in each stitch between corners. Join. Count: 7 dc per side.
- Round 3: Slip stitch into the next dc and then into the following ch-2 corner space. Ch 3 (counts as the first dc), work 1 dc, ch 2, and 2 dc in that corner. Work 1 dc in every dc along the next side. In each remaining corner, work (2 dc, ch 2, 2 dc), followed by 1 dc in every dc along the next side. Join to the top of the beginning ch 3. Count: 11 dc per side.
- Round 4: Repeat the corner increase and work 1 dc in each side stitch. Count: 15 dc per side.
- Round 5: Repeat. Count: 19 dc per side.
- Round 6: Repeat. Count: 23 dc per side.
- Round 7: Repeat. Count: 27 dc per side.
- Round 8: Repeat. Count: 31 dc per side.
- Round 9: Repeat. Count: 35 dc per side.
For Rounds 4 through 9, begin by slip stitching into the next dc and then into the following ch-2 corner space. Ch 3 (counts as the first dc), work 1 dc, ch 2, and 2 dc in that corner. Work (2 dc, ch 2, 2 dc) in each remaining corner, with 1 dc in every dc between corners. Join each round to the top of its beginning ch 3. Keep the stitch counts listed for Rounds 4 through 9 unchanged.
After Round 9, you should have 140 dc around the green square, plus four ch-2 corner spaces. At the original target gauge, the green square measures approximately 10 inches across. Fasten off the green yarn and weave in the end before joining red yarn for Round 10.
Add Santa's Red Border
Round 10: With the right side facing you, join red yarn in any corner space. Ch 3 (counts as the first dc), work 1 dc, ch 2, and 2 dc in the same corner space. Work 1 dc in each of the 35 dc along the next side. In each remaining corner, work (2 dc, ch 2, 2 dc), with 1 dc in every side stitch between corners. Join to the top of the beginning ch 3. Count: 39 dc per side, or 156 dc plus four ch-2 corner spaces.
Round 11: Slip stitch into the next dc and then into the following corner space. Ch 3 (counts as the first dc), work 1 dc, ch 2, and 2 dc in that corner. Work 1 dc in each of the 39 dc along the next side. Repeat the corner increase and side stitches around all four sides. Join to the top of the beginning ch 3, fasten off, and weave in the ends. Count: 43 dc per side, or 172 dc plus four ch-2 corner spaces.
Make the 36 White Border Accents
With a yarn needle and white yarn, mark stitches 4, 8, 12, 16, 20, 24, 28, 32, and 36 along each side of Round 10, counting after the corner space.
At each mark, bring the white yarn through from the back near the base of the red stitch. Make a small upright loop approximately 1/4 inch high. Return the needle near the starting point and make a tiny anchoring stitch across the top of the loop.
Make nine accents per side, for 36 altogether. Secure the yarn behind the square without pulling the red border inward.
Crochet Santa's Peach Face
Make a magic ring with peach yarn. Work in continuous rounds, moving a stitch marker to the start of each round.
- Round 1: 6 sc in ring. (6)
- Round 2: 2 sc in every stitch. (12)
- Round 3: (Sc 1, inc) six times. (18)
- Round 4: (Sc 2, inc) six times. (24)
- Round 5: (Sc 3, inc) six times. (30)
- Round 6: (Sc 4, inc) six times. (36)
- Round 7: (Sc 5, inc) six times. (42)
- Round 8: (Sc 6, inc) six times. (48)
- Round 9: (Sc 7, inc) six times. (54)
- Round 10: (Sc 8, inc) six times. (60)
Slip stitch loosely into the next stitch and fasten off, leaving a long sewing tail. The face is expected to measure approximately 4 3/4 inches across. Don't add stuffing.
Crochet Santa's White Beard
With white yarn, ch 25. Turning ch 1 does not count as a stitch.
- Row 1: Sc in second chain and across. Ch 1, turn. (24 sc)
- Row 2: Sc across. Ch 1, turn. (24)
- Row 3: Sc across. Ch 1, turn. (24)
- Row 4: Sc2tog, sc 20, sc2tog. Ch 1, turn. (22)
- Row 5: Sc2tog, sc 18, sc2tog. Ch 1, turn. (20)
- Row 6: Sc2tog, sc 16, sc2tog. Ch 1, turn. (18)
- Row 7: Sc2tog, sc 14, sc2tog. Ch 1, turn. (16)
- Row 8: Sc2tog, sc 12, sc2tog. Ch 1, turn. (14)
- Row 9: Sc2tog, sc 10, sc2tog. Ch 1, turn. (12)
- Row 10: Sc2tog, sc 8, sc2tog. Ch 1, turn. (10)
- Row 11: Sc2tog, sc 6, sc2tog. Ch 1, turn. (8)
- Row 12: Sc2tog, sc 4, sc2tog. Ch 1, turn. (6)
- Row 13: Sc2tog, sc 2, sc2tog. (4)
Fasten off. The beard begins with a wide top and tapers toward its lower point. Before the scallops, the calculated size is about 6 inches wide at the top and 3 1/4 inches tall.
Add the Beard's Scalloped Edging
Place the beard right side up with its wide foundation edge at the top. Join white yarn at the upper-left corner.
- Down the left sloping side, work 1 sc in each of the next 2 row ends, then 3 hdc in the third row end. Repeat this three-row sequence four times, covering Rows 1 through 12.
- Work 2 sc into the side edge of Row 13 at the lower-left corner.
- Across the four stitches of Row 13, work sc in the first stitch, 3 hdc in the second, 3 hdc in the third, and sc in the fourth.
- Work 2 sc into the opposite side edge of Row 13.
- Working upward along the right slope, work 3 hdc in the next row end, then sc in each of the following 2 row ends. Repeat this three-row sequence four times.
Fasten off with a long sewing tail. The edging contains 52 stitches: 20 along each side, two at each lower corner, and eight across the bottom. Leave the straight upper edge without an edging.
Crochet Santa's Red Hat
With red yarn, ch 27. Work in rows. The turning ch 1 does not count as a stitch.
- Row 1: Sc in second chain and across. Ch 1, turn. (26)
- Row 2: Sc across. Ch 1, turn. (26)
- Row 3: Sc2tog, sc 22, sc2tog. Ch 1, turn. (24)
- Row 4: Sc2tog, sc 20, sc2tog. Ch 1, turn. (22)
- Row 5: Sc2tog, sc 18, sc2tog. Ch 1, turn. (20)
- Row 6: Sc2tog twice, sc 16. Ch 1, turn. (18)
- Row 7: Sc 14, sc2tog twice. Ch 1, turn. (16) Before Row 8, lay the hat right side up. The decreases in Rows 6 and 7 should narrow the same physical edge, even though one row decreases at the beginning and the other at the end. If the new taper alternates between opposite edges, check that you turned after Row 6 and worked the decreases in the correct positions. Correct these two rows before continuing.
- Row 8: Sc2tog twice, sc 12. Ch 1, turn. (14)
- Row 9: Sc 10, sc2tog twice. Ch 1, turn. (12)
- Row 10: Sc2tog twice, sc 8. Ch 1, turn. (10)
- Row 11: Sc 6, sc2tog twice. Ch 1, turn. (8)
- Row 12: Sc2tog twice, sc 4. Ch 1, turn. (6)
- Row 13: Sc 2, sc2tog twice. Ch 1, turn. (4)
- Row 14: Sc2tog twice. (2)
Rows 6 through 13 place both decreases along the same side when viewed from the front, making the tip lean toward Santa's right. The directions above assume right-handed crochet. Left-handed crocheters should reverse the paired decrease placement to preserve that same rightward lean.
Fasten off, leaving a long red sewing tail. The hat should measure approximately 6 1/2 inches across its base and 3 1/2 inches tall. Its curved appearance comes from folding and positioning the upper tip during assembly.
Crochet the White Hat Brim
With white yarn, ch 27.
Row 1: Hdc in second chain from hook and in every chain across. Ch 2, turn. (26 hdc)
Row 2: Hdc in every stitch across. (26 hdc)
Fasten off with a long sewing tail. The brim should measure approximately 6 1/2 inches across.
Make the White Pom-Pom
With white yarn, make a magic ring.
- Round 1: 6 sc in the ring. (6)
- Round 2: 2 sc in each stitch. (12)
- Round 3: (Sc in next stitch, 2 sc in next stitch) six times. (18)
- Round 4: Sc in each stitch. (18)
Slip stitch to finish and leave a long sewing tail. Gently flatten the piece without stuffing it. At the target gauge, it should measure approximately 1 1/2 inches across, making a fuller white pom-pom like the one in our Christmas pillow photograph.
Make Santa's Red Nose
With red yarn, make a magic ring. Ch 1, then work 8 hdc into the ring. Pull closed and join to the first hdc with a slip stitch. Fasten off with a sewing tail.
Make Two Pink Cheeks
For each cheek, make a magic ring with pink yarn. Ch 1 and work 8 sc into the ring. Pull closed, join to the first sc, and fasten off with a sewing tail.
Make the Two White Moustache Pieces
With white yarn, ch 7.
Row 1: Sc in second chain, hdc in next chain, dc in next 2 chains, hdc in next chain, sc in last chain. Ch 1, turn. (6 stitches)
Row 2: Sc in first stitch, hdc in next, 2 dc in each of the next 2 stitches, hdc in next, sc in last. (8 stitches)
Fasten off with a sewing tail. Make two matching pieces, each approximately 1 1/2 inches long.
Embroider Santa's Eyes
Place the peach circle right side up. Mark two eye centers about 1 1/2 inches apart and approximately 1 3/4 inches below the top of the face.
With black yarn, make 5 to 7 close vertical stitches at each mark, forming two small oval eyes approximately 3/8 inch tall. Add one tiny white highlight stitch near the top of each eye.
Place the pink cheeks below and slightly outside the eyes, with their centers about 2 1/4 inches below the top of the peach face. Sew each cheek around its outside edge.
Assemble Santa's Face and Hat
- Lay the finished green and red granny square right side up. Center the peach circle horizontally, beginning with its top approximately 4 1/2 inches below the square's upper edge.
- Arrange the red hat, white brim, beard, and pom-pom before sewing. Keep the entire Santa arrangement inside the green background, leaving at least 1/4 inch of green showing beyond the highest and lowest details.
- Sew the peach face around its outside edge, catching the green stitches beneath it.
- Place the wide red hat base across the upper peach face, overlapping it by approximately 1/4 to 1/2 inch. Fold Rows 11 through 14 gently toward the right so the tip curves downward. Secure the fold with red stitches, then sew around the hat.
- Position the white beard over the lower peach circle. Its wide upper edge should sit approximately 2 1/2 to 2 3/4 inches below the top of the face. Sew across the upper edge, then around the scalloped sides and lower point.
- Center the white brim over the hat's lower edge. Sew its two long edges and short ends without covering Santa's eyes.
- Add white face-framing scallops to both exposed sides of the peach face. With the right side facing you, place a loop of fresh white yarn on your hook. Start at the first exposed outer-edge stitch of the peach face just below the brim on Santa's left side (the viewer's right). Working downward toward the beard, repeat (sl st in next outer face stitch, 3 hdc in next outer face stitch) four times, catching a small strand of the green background to anchor each stitch. Fasten off and secure the yarn on the wrong side. With a separate white strand, repeat on Santa's right side (the viewer's left), again working downward from the brim toward the beard. Each side has four slip stitches and 12 hdc, making four small scallops. Do not carry the working yarn across the back between the two sides.
- Sew the flattened white pom-pom onto the folded hat tip. It should overlap the red hat slightly.
- Place the two white moustache pieces beneath the red nose position. Angle their outer tips toward the cheeks and sew both pieces in place.
- Sew the little red nose where the moustache halves meet, letting its lower edge overlap their inner ends.
Check that the eyes, cheeks, moustache, and beard remain visible. The finished Santa should look like the original granny square, with his hat leaning toward the viewer's right and his white beard centered below the face.
Weave in the loose ends and check the back before attaching the square to the new pillow panel. Don't press an iron onto the raised face pieces.
Christmas Tree Granny Square
Important for this pillow: The original tree measures approximately nine inches in #4 yarn. For this pillow pair, use the same 17 colorwork rows and three border rounds in #5 bulky yarn at the enlarged gauge. All six red ornament groups, three snow bands, the brown trunk, and 32 red scallops keep their original positions and stitch counts. The separate five-point gold star is made larger to match the proportions in the pillow photograph.
Our Christmas tree granny square pattern is a little different from Santa. The tree, white snow bands, red ornaments, and brown trunk are worked directly into the granny stitches. The gold star is the only separately crocheted decoration.
Keep the original red scalloped border. It's a pretty part of the design, and I don't want to hide it beneath the new pillow frame.
Christmas Tree Color Key
- C = warm ivory background
- G = forest green tree
- W = bright white snow
- R = cranberry red ornament
- B = brown trunk
Each letter represents one complete group of three double crochets. The number following it tells you how many groups to make in that color.
For example, C4, G7, C4 means four ivory groups, seven green groups, and another four ivory groups. That adds up to 15 groups.
Foundation and Granny Stitch Rows
With #5 bulky ivory yarn and the hook needed for the larger tree gauge (start with a 6.5 mm hook), ch 44. Keep the 15-group row counts and all original colorwork instructions unchanged.
Foundation anchor row: Sc in the second chain from the hook. Repeat (ch 2, skip 2 chains, sc in next chain) 14 times.
Count: 15 sc anchors with 14 ch-2 spaces between them.
Row 1: Turn, ch 2, and work 3 dc into the first sc anchor. Ch 1, skip the next ch-2 space, and work 3 dc into the next sc anchor. Repeat across all 15 anchors, changing colors according to Row 1 below. The first seven groups are ivory, the eighth is brown, and the final seven are ivory.
Rows 2 through 17: Turn and ch 2. Work 3 dc into the middle dc of the first granny group below. Repeat (ch 1, 3 dc into the middle dc of the next group) across.
The turning ch 2 doesn't count as a stitch. Every colorwork row contains exactly 15 groups, or 45 dc, separated by 14 ch-1 spaces.
Change yarn colors during the final yarn-over of the last dc before a new color. Use the new yarn to finish that dc and work the following chain space and granny group. Keep unused yarn on the wrong side.
Complete Christmas Tree Colorwork Chart
Follow each color sequence in the direction you're crocheting. The first row faces the front. Even-numbered rows face the wrong side and odd-numbered rows face the right side.
| Row | 15-Group Color Sequence |
|---|---|
| 1 | C7, B1, C7 |
| 2 | C7, B2, C6 |
| 3 | C2, G11, C2 |
| 4 | C2, G11, C2 |
| 5 | C2, G1, R1, G7, R1, G1, C2 |
| Checkpoint after Row 5: Turn the work so the right side faces you. You should have 15 groups across, with one red group in position 4 and another in position 12, counting from the left. Both should sit inside the green tree. If either ornament is misplaced, check the color-change positions before starting Row 6. Correct Row 5 now rather than continuing with the wrong placement. | |
| 6 | C2, G11, C2 |
| 7 | C3, G1, W7, G1, C3 |
| 8 | C3, G1, R1, G5, R1, G1, C3 |
| 9 | C3, G9, C3 |
| 10 | C4, G1, W5, G1, C4 |
| 11 | C4, G1, R1, G3, R1, G1, C4 |
| 12 | C4, G7, C4 |
| 13 | C5, G1, W3, G1, C5 |
| 14 | C5, G5, C5 |
| 15 | C6, G3, C6 |
| 16 | C7, G1, C7 |
| 17 | C15 |
At the enlarged pillow gauge, the 15-group by 17-row panel should measure approximately 9 3/8 inches across and 9 5/16 inches tall before its border. Check both measurements. If one direction is noticeably off, correct the stitch or row gauge instead of adding groups or rows.
Check the design before adding the border. There should be two brown trunk groups across the upper trunk row, six red ornament groups, three white snow bands, and a narrow green tip at the top. Fasten off the ivory working yarn after Row 17, leaving a tail to weave into the wrong side. The green border begins with a separate yarn join.
Christmas Tree Border Round 1: Forest Green
Mark the four corners of the colorwork panel. The upper corners are the outside dc of the first and last groups in Row 17. The lower corners are the outer foundation sc anchors.
With the right side facing you, join green yarn in the marked upper-left corner stitch.
- Work 3 sc in the upper-left corner stitch.
- Across the top, work 1 sc into the middle dc of each of the 15 groups and 1 sc into each of the 14 chain-one spaces. Count: 29 sc along the edge.
- Work 3 sc in the upper-right corner.
- Down the right side, work 2 sc into row ends 1, 2, 3, 4, 5, 7, 8, 9, 10, 12, 13, 14, and 16. Work 1 sc into row ends 6, 11, and 15. Count: 29 sc.
- Work 3 sc in the lower-right corner.
- Across the foundation edge, work 1 sc into the 13 interior sc anchors and each of the 14 ch-2 spaces. Add one extra sc into the fourth and eleventh chain spaces. Count: 29 sc.
- Work 3 sc in the lower-left corner.
- Work up the left edge using the same 29-sc row-end distribution as the right side.
- Join to the first sc.
Count: 128 sc total, including four three-stitch corner groups. Mark the middle sc of each corner group. Fasten off the green yarn, leaving a tail to weave into the wrong side. Keep the four corner markers in place for the cranberry red border.
Christmas Tree Border Round 2: Cranberry Red
Join cranberry red yarn in the first stitch of a corner group. Ch 2, which does not count as a stitch.
Work 1 dc in each green sc around the square, except at the four marked corner stitches. Work 3 dc in each marked corner stitch instead of 1 dc.
Join to the first dc. Count: 136 dc. Mark the middle dc of each new three-dc corner group.
Christmas Tree Border Round 3: Red Scallops
Fasten off and rejoin cranberry red yarn at the marked middle dc of any corner group.
- Work (sc, ch 2, sc) into the marked corner.
- Skip the next dc.
- Work 5 dc in the following dc to make a shell.
- Skip the next dc and work 1 sc in the following dc.
- Repeat Steps 2 through 4 until you have eight shells along that side.
- Skip the remaining dc before the next marked corner.
- Work (sc, ch 2, sc) in the next corner.
- Repeat the eight-shell sequence around all four sides. Join to the first corner sc and fasten off.
Count: Eight shells on each side, for 32 red shells altogether, plus four ch-2 corners.
Scallop checkpoint: Lay the square flat with the right side up. You should see eight rounded red shells along each side, with five dc in every shell. The main square should lie flat, while the shells form small rounded lobes along the outside edge. If a side curls inward, first check that every shell has five dc and that the skipped stitches and single crochets are in the correct positions. If the counts are correct but the red edging is pulling inward, undo only the scallop round and work it again with a slightly larger hook. If the shells wave excessively beyond their intended rounded shape, check for extra stitches. When the counts are correct but the stitches are noticeably loose, redo this round with a slightly smaller hook. Keep the original shell count and placement. Correct the edging before sewing the square onto its ivory pillow panel.
Crochet the Gold Christmas Star
Use #5 bulky golden-yellow yarn and the hook selected for your enlarged Christmas tree square. Make an adjustable ring, leaving a long starting tail for sewing.
- Ch 4.
- Sc in the second chain from the hook.
- Hdc in the next chain.
- Dc in the last chain, working back toward the center ring.
- Sl st into the center ring to complete one star point.
- Repeat Steps 1 through 5 four more times. You should have five points, with one sc, one hdc, and one dc in each point.
- Pull the center ring closed and fasten off, leaving the starting tail for sewing.
The larger star should have five distinct points and measure approximately 2 to 2 1/2 inches across, depending on your bulky yarn and hook. Lay it over the upper tip of the Christmas tree before sewing. If it is smaller than the pictured proportions, check the yarn weight and hook size rather than adding extra points.
Center the star over the narrow green tip at Row 16, allowing its upper point to extend into the ivory area of Row 17. Sew through the center and secure the bases of the five points without pulling the tree square out of shape. Keep the outer tips visible.
Finish Both Original Granny Squares
Weave the yarn ends through the wrong side of each square, changing direction to secure them. Shape the edges and block according to your yarn's care instructions.
Check Santa's finished square across both directions: approximately 12 to 12 1/2 inches. For this pillow, the larger-gauge Christmas tree square should be approximately 11 1/4 inches across, including its scallops. The nine-inch measurement applies to the original #4 version of the tree pattern.
Keep those measurements handy. They'll tell you how much of the ivory framing panel should show around each design.
Crochet the Santa Pillow Border
Santa keeps his original 12 to 12 1/2-inch granny square. We'll give his pillow a firm ivory foundation with a cranberry outer edge, then sew raised rows of ivory granny clusters and a forest-green stripe over the visible frame. His original red border and white accents stay uncovered.
Make the Ivory Foundation Panel
With #4 warm ivory yarn and the hook needed for the single crochet gauge, ch 51.
Row 1: Sc in the second chain from the hook and in each remaining chain. Ch 1, turn. (50 sc)
Rows 2 through 49: Sc in all 50 stitches across. Ch 1, turn after each row. (50 sc per row)
Row 50: Sc in all 50 stitches. Do not make another turning chain. (50 sc)
Fasten off and weave in the end. This panel contains 50 stitches across and 50 rows, for an expected measurement of 12 1/2 inches square.
Checkpoint: Check the width and height before you add the frame. If they differ noticeably, compare your stitch gauge and row gauge. The foundation should lie flat and square, not pull inward at one side.
Add the Six Structural Framing Rounds
Work Rounds 1 through 5 in ivory and Round 6 in cranberry. These are single crochet rounds. The raised green stripe will be part of the separate granny-cluster strips, not a structural border round.
Mark the four foundation corners. Count 50 stitch positions along each horizontal edge and 50 row ends along each vertical edge. At the corners, treat the horizontal stitch and adjoining vertical row-end position as separate places to work.
Round 1, ivory: Join ivory yarn at the upper-left corner, with Row 50 across the top. Work 1 sc in each of the 50 top stitches, adding two more sc in the final upper-right stitch. Work 1 sc in each of the 50 row ends down the right side, adding two more sc in the final lower-right row end. Work 1 sc in each of the 50 foundation-chain positions across the bottom, adding two more sc in the final lower-left position. Work 1 sc in each of the 50 row ends up the left side, adding two more sc in the final upper-left position. Join to the first sc. (208 sc)
Mark the middle stitch of each three-sc corner group. From one marked corner stitch to the next, counting the starting marker but not the next, there should be 52 stitches.
Round 1 checkpoint: Lay the panel flat. If a corner flares, check that you added only two extra stitches at that corner, not two extras in both adjoining edge positions. If a side draws inward, recount its 50 working positions. Correct the first round before continuing.
Round 2, ivory: Ch 1 (does not count as a stitch). Work 1 sc in every stitch except the marked corner stitches. Work 3 sc into each marked corner stitch. Join to the first sc. (216 sc)
Round 3, ivory: Ch 1. Work 1 sc in every stitch except the marked corners; work 3 sc in each corner. Join. (224 sc)
Round 4, ivory: Ch 1. Repeat the same round of sc with three stitches at each marked corner. Join. (232 sc)
Round 5, ivory: Ch 1. Repeat. Join. (240 sc)
Move the four corner markers to the middle stitches of the new three-sc corner groups after each round. At the end of Round 5, there are 60 stitches between consecutive marked corner centers, counting the first marker but not the next. Add a short contrasting yarn marker at each Round 5 corner center so you can find these attachment positions later.
Round 6, cranberry: Fasten off ivory and join cranberry red yarn. Ch 1. Work 1 sc in every stitch, with 3 sc in each marked corner stitch. Join and fasten off. (248 sc)
Move the main corner markers to the middle stitches of the new red corner groups. Keep the temporary Round 5 references in place for attaching the granny strips. The expected outside measurement is approximately 15 1/2 inches square. Keep the whole final red round clear for the pillow-back join.
Crochet Santa's Textured Granny-Cluster Frame
Make four separate #4 worsted-weight strips: two long strips across the top and bottom and two shorter strips on the sides. Each strip has three granny-stitch rows: ivory, green, and ivory. At the framing gauge, four granny groups measure approximately 2 inches and four rows measure approximately 1 3/4 inches.
Two Long Strips, 30 Granny Groups Each
With ivory yarn, ch 89.
Foundation row: Sc in the second chain from the hook. Repeat (ch 2, skip 2 chains, sc in next chain) 29 times. Count: 30 sc anchors and 29 ch-2 spaces.
Row 1, ivory: Turn, ch 2 (does not count). Work 3 dc in the first sc anchor. Repeat (ch 1, 3 dc in the next sc anchor) 29 times. (30 groups, 90 dc, 29 ch-1 spaces)
Row 2, forest green: Change to green on the final yarn-over of the last dc in Row 1. Turn, ch 2, and work 3 dc into the middle dc of the first granny group below. Repeat (ch 1, 3 dc into the middle dc of the next group) across. (30 groups, 90 dc, 29 ch-1 spaces)
Row 3, ivory: Change to ivory on the final yarn-over of Row 2's last dc. Turn, ch 2, and repeat the same granny-group row. (30 groups, 90 dc, 29 ch-1 spaces)
Fasten off, weave in the ends, and make a second identical long strip. Each should measure approximately 15 inches long and 1 9/16 inches wide, including the foundation-anchor row. These measurements are calculated from the target gauges.
Checkpoint: All three rows should have 30 groups, and the green stripe should run straight between the ivory rows. Correct a missed group before making the second strip.
Two Short Strips, 24 Granny Groups Each
With ivory yarn, ch 71.
Foundation row: Sc in the second chain from the hook. Repeat (ch 2, skip 2 chains, sc in next chain) 23 times. Count: 24 sc anchors and 23 ch-2 spaces.
Row 1, ivory: Turn, ch 2 (does not count). Work 3 dc in the first anchor. Repeat (ch 1, 3 dc in the next anchor) 23 times. (24 groups, 72 dc, 23 spaces)
Row 2, forest green: Change to green on the last yarn-over of Row 1. Turn, ch 2, and work 3 dc in the middle dc of each group below, with ch 1 between groups. (24 groups, 72 dc, 23 spaces)
Row 3, ivory: Change to ivory on the last yarn-over of Row 2. Turn, ch 2, and repeat the same granny-group row. (24 groups, 72 dc, 23 spaces)
Fasten off, weave in the ends, and make a second identical short strip. Each should measure approximately 12 inches long and 1 9/16 inches wide, including the foundation-anchor row. The shortened strips leave room for the top and bottom framing strips to meet them at the corners without bunching. These are expected measurements at the target gauges.
Arrange and Attach the Four Granny Strips
Lay the foundation right side up, with its red Round 6 around the outside. Place the long strips along the top and bottom, with their Row 1 ivory edges facing the center and their final ivory rows beside the outer red round.
- Line up the 30 groups of each long strip with the 60 Round 5 positions between its corner references, using two foundation stitches for each group.
- Place a short strip along each side. Leave six Round 5 stitch positions at each end for the long strip corners. The 24 groups cover the remaining 48 positions. The short strips should meet the top and bottom strips with little or no overlap.
- Arrange the four strip ends so they meet without bulky overlap. The green rows should look like one continuous stripe around the frame.
- With a yarn needle and ivory yarn, sew through the middle dc of each group along the strips' outer ivory rows and through the second stitch of each consecutive two-stitch pair on Round 5. Make 30 attachment stitches per long strip and 24 per short strip.
- Sew the inner edges of the strips to the ivory foundation with small, relaxed stitches. Secure the ends where they meet at the corners. Do not gather the panel or cover its final red Round 6.
Frame checkpoint: The foundation should still measure approximately 15 1/2 inches square. You should see ivory clusters nearest the center, the raised green stripe, more ivory clusters, and the outer red edge. If the panel draws inward, loosen the attachment stitches before sewing down Santa.
Position and Sew Santa to the Pillow Front
Lay the completed Santa square over the middle of the decorated foundation, both right sides up. Center its red border within the ivory granny frame. A square measuring 12 to 12 1/2 inches may cover a little of the strips' innermost ivory row, but the strips must not cover Santa's red border or any of its 36 white accents.
Check that the hat points toward the viewer's right, the beard is centered, and the red Santa border is evenly spaced from the pillow's outside edge. Hold the square with removable stitch markers.
Thread a yarn needle with cranberry yarn and sew around the original Santa square's outer red stitches, catching the foundation beneath. Add a few discreet anchoring stitches through plain green background areas into the foundation, avoiding the raised face, beard, hat, and pom-pom.
Secure the sewing ends on the wrong side. The completed front still has 248 structural sc around its outer red edge for joining the envelope backs. The decorative granny strips do not add to that perimeter.
Crochet the Christmas Tree Pillow Border
The tree pillow uses the same 16-inch outside size, but its granny square is worked at a larger gauge to match the proportions in the approved photograph. The original 17 colorwork rows, three border rounds, six red ornaments, three snow bands, and 32 scallops remain unchanged. The separate gold star is enlarged while keeping its five-point shape and original position at the top of the tree.
The pillow-scale tree square should measure approximately 11 1/4 inches including its scallops. Its frame has four rows of raised granny clusters, one more than Santa's, to give the tree a wider ivory surround.
Make the Tree Pillow's Ivory Foundation
With #4 warm ivory yarn and the single crochet gauge hook, ch 51.
Row 1: Sc in the second chain from the hook and across. Ch 1, turn. (50 sc)
Rows 2 through 49: Sc in each of the 50 stitches across. Ch 1, turn after every row. (50 sc per row)
Row 50: Sc in all 50 stitches. (50 sc)
Fasten off and weave in the end. The panel should be approximately 12 1/2 inches square and match Santa's foundation in both directions.
Add the Same Six Structural Framing Rounds
Use the precise Round 1 corner and edge placement described for Santa. Work ivory for Rounds 1 through 5 and cranberry for Round 6. At the start of each round, ch 1 (not counted), and join each round to its first sc.
- Round 1, ivory: Work 50 sc along each foundation edge plus two extra sc at each corner. (208 sc)
- Round 2, ivory: Work 1 sc in every stitch except the four marked corner stitches; work 3 sc in each marked corner. (216 sc)
- Round 3, ivory: Repeat the marked-corner increases. (224 sc)
- Round 4, ivory: Repeat. (232 sc)
- Round 5, ivory: Repeat. (240 sc)
- Round 6, cranberry: Fasten off ivory and join cranberry. Repeat the corner increases, join, and fasten off. (248 sc)
Move each corner marker to the middle sc of its new three-sc corner group after every round. At the end of Round 5, leave short contrasting reference markers at its four corner centers. Each side has 60 stitch positions between those reference markers. Keep the main markers at the final red corner centers.
Measure the foundation before attaching the decorative strips. It should be approximately 15 1/2 inches square and match Santa's finished foundation. The final red round must remain uncovered.
Make the Tree's Wider Granny-Cluster Frame
Use #4 worsted yarn and the same granny-strip gauge as Santa: four groups approximately 2 inches across and four rows approximately 1 3/4 inches tall. Make two long strips of 30 groups and two short strips of 22 groups. Each has four rows in this order: ivory, ivory, green, ivory.
Two Long Tree Strips, 30 Granny Groups Each
With ivory yarn, ch 89.
Foundation row: Sc in second chain from hook. Repeat (ch 2, skip 2 chains, sc in next chain) 29 times. (30 anchors, 29 ch-2 spaces)
Row 1, ivory: Turn, ch 2 (does not count), and work 3 dc in the first anchor. Repeat (ch 1, 3 dc in next anchor) 29 times. (30 groups, 90 dc, 29 spaces)
Row 2, ivory: Turn, ch 2, and work 3 dc in the middle dc of each group below, with ch 1 between groups. (30 groups, 90 dc, 29 spaces)
Row 3, forest green: Change to green on the last yarn-over of Row 2. Turn, ch 2, and repeat the granny-group row. (30 groups, 90 dc, 29 spaces)
Row 4, ivory: Change back to ivory on the last yarn-over of Row 3. Turn, ch 2, and repeat the granny-group row. (30 groups, 90 dc, 29 spaces)
Fasten off, weave in the ends, and make a second long strip. Each strip should measure approximately 15 inches long by 2 inches wide, including the foundation-anchor row. Check that all four granny-cluster rows have 30 groups before moving on. These measurements are calculated from the target gauges.
Two Short Tree Strips, 22 Granny Groups Each
With ivory yarn, ch 65.
Foundation row: Sc in second chain from hook. Repeat (ch 2, skip 2 chains, sc in next chain) 21 times. (22 anchors, 21 ch-2 spaces)
Row 1, ivory: Turn, ch 2 (does not count), and work 3 dc in the first anchor. Repeat (ch 1, 3 dc in next anchor) 21 times. (22 groups, 66 dc, 21 spaces)
Row 2, ivory: Turn, ch 2, and work 3 dc in the middle dc of each group below, with ch 1 between groups. (22 groups, 66 dc, 21 spaces)
Row 3, forest green: Change to green on the last yarn-over of Row 2. Turn, ch 2, and repeat the granny-group row. (22 groups, 66 dc, 21 spaces)
Row 4, ivory: Change to ivory on the last yarn-over of Row 3. Turn, ch 2, and repeat. (22 groups, 66 dc, 21 spaces)
Fasten off, weave in the ends, and make a second short strip. Each should measure approximately 11 inches long by 2 inches wide, including the foundation-anchor row. At the target gauge, these strips fit between the two-inch-wide top and bottom framing strips without requiring a bulky overlap.
Arrange and Sew the Tree Frame
Lay the foundation right side up with its red Round 6 at the outside. The four granny strips sit over the ivory Round 5, with each strip's first ivory row toward the center and its final ivory row beside the outer red edge.
- Place the 30-group long strips along the top and bottom. Match their 30 groups with the 60 Round 5 stitches between corner references, using two foundation positions per group.
- Place the short strips along the left and right edges. Leave eight Round 5 stitch positions at each end for the adjoining long-strip corners. The 22 groups occupy the 44 positions between them. The strip ends should meet neatly without overlapping.
- Bring all four strip ends together neatly. The green stripes should meet at the corners without one strip lying in a thick fold over another.
- With an ivory sewing strand, secure each group's outer row through its middle dc and through the second stitch of the corresponding two-stitch pair in Round 5. Use 30 attachment points per long strip and 22 per short strip.
- Stitch the inner edges to the foundation with relaxed sewing stitches. Secure all four corners. Keep the final red Round 6 uncovered for the pillow-back join.
Frame checkpoint: Both pillow foundations should still be approximately 15 1/2 inches square. The tree frame will be wider, but the ivory clusters, green stripe, and red outside edge should coordinate with Santa's. Loosen any sewing stitches that make the foundation pucker.
Center the Pillow-Scale Christmas Tree
Use the Christmas tree square made in #5 bulky yarn at the larger gauge, approximately 11 1/4 inches across the red scallops. Lay it right side up in the middle of the textured foundation. Keep the star at the top and brown trunk at the bottom.
- Measure from the outside tips of the red scallops to the outside red edge of the foundation. An 11 1/4-inch square on a 15 1/2-inch panel leaves approximately 2 1/8 inches at each side.
- Center the square horizontally and vertically. Allow its red shells to sit above the innermost ivory clusters; do not hide the scallops under the strips.
- Check that the tree remains upright and its star, white snow bands, six red ornaments, and brown trunk remain in their intended positions.
Placement checkpoint: If the square measures close to nine inches rather than 11 1/4, check whether you followed the original #4 gauge instead of the larger pillow gauge. Do not stretch the finished square to make it fit.
Attach the Tree Square
With a yarn needle and cranberry yarn, sew through the bases of all 32 red scallops and the foundation beneath them. Secure all four corners. Keep the rounded parts of the scallops free and visible, and add small hidden stitches along the underlying red border if a portion lifts away.
Fasten off, weave the ends into the wrong side, and recheck the center placement. Both completed pillow fronts should have the same outside size and a free 248-sc cranberry perimeter for attaching their envelope backs. The separate granny strips do not add any outer perimeter stitches.
Add the Matching Decorative Edging
The two pillow fronts already have their ivory, green, and cranberry frames. We'll use one more cranberry edging around each finished cover to give them matching outside edges.
Don't work this final edging yet. It's added after the fronts and backs have been joined. I'm putting the instructions here so you can see exactly how both pillows will be finished.
First Edging Round: Join the Front and Back
Once the envelope backs are in position, join cranberry yarn at a corner of the pillow.
Working through the front framing panel and the matching back edge, make 1 sc in each outside stitch. At each of the four marked corner stitches, work 3 sc instead of one.
The front framing panel has 248 stitches around its final round. Replacing one stitch with three at each of the four corners adds eight stitches.
Joining-round count: 256 sc total.
This joining round also serves as the first part of the decorative red pillow edging.
Second Edging Round: Reverse Single Crochet
Keep the same cranberry yarn. With the pillow right side facing you, work one round of reverse single crochet, sometimes called crab stitch.
- Do not turn the work after joining the first edging round.
- Insert your hook into the stitch immediately to the right of your hook.
- Yarn over and pull up a loop.
- Yarn over and pull through both loops on the hook.
- Continue working toward the right, making one reverse single crochet in each stitch of the joining round.
- Work all the way around the pillow, including the corners.
- Join neatly to the beginning stitch and fasten off.
Work 256 reverse single crochet stitches in total. Don't add additional corner increases in this round. Keep the yarn relaxed as you turn each corner.
This gives the outside edge a narrow, rounded cranberry finish rather than a large ruffle. It's enough decoration without competing with Santa's face or the Christmas tree's red scallops.
Finished Edging Check
Measure each cover across the outside edging. The expected finished measurement is approximately 16 inches in both directions.
The framed front should lie flat without rippling. If the outer edge draws inward, the reverse single crochet stitches may be too tight. Loosen that round rather than pulling the cover into shape.
Crochet the Removable Pillow Backs
I'm using envelope backs for these pillows. There's no zipper to sew in and no row of buttons to fasten. The two back panels overlap, so you can remove the pillow insert when you need to.
We'll make four identical ivory rectangles in total. Two belong to Santa's pillow and two belong to the Christmas tree pillow.
Make Four Ivory Back Panels
Use #4 warm ivory yarn and the same hook used for the single crochet foundation panels, matching 16 stitches and 16 rows per four inches. Do not use the larger hook for the bulky tree or a different hook chosen for the decorative strips. The backs must match the structural foundation.
Foundation: Ch 63.
Row 1: Sc in the second chain from the hook and each remaining chain. Ch 1, turn. (62 sc)
Rows 2 through 39: Sc in each of the 62 stitches across. Ch 1, turn after every row. (62 sc per row)
Row 40: Sc in all 62 stitches. Do not make another turning chain. (62 sc)
Fasten off and weave in the end.
Make three more panels using exactly the same instructions.
Back Panel Measurements
Each panel contains 62 stitches across and 40 rows high.
At the target gauge:
- Width: 62 stitches divided by 4 stitches per inch = approximately 15 1/2 inches
- Height: 40 rows divided by 4 rows per inch = approximately 10 inches
Two 10-inch panels overlapping across a 15 1/2-inch pillow front produce an overlap of approximately 4 1/2 inches.
That's a generous overlap. It should keep the insert covered without needing buttons or ties.
Finish the Envelope Opening Edges
We'll use a small amount of cranberry yarn to finish the two exposed opening edges on each pillow.
For the upper back panel, join cranberry yarn at one end of Row 40. Work one loose slip stitch into each of the 62 stitches across that row. Fasten off.
For the lower back panel, join cranberry yarn at one end of the foundation edge. Work one loose slip stitch into each of the 62 foundation-chain positions along that edge. Fasten off.
Opening-edge checkpoint: Lay each panel flat after adding the cranberry slip stitches. The finished opening edge should still measure approximately 15 1/2 inches across, matching the panel's original width. If the edge has drawn inward, curls, or is noticeably shorter than the opposite edge, remove only the slip-stitch edging and work it again with looser loops or a slightly larger hook. Keep all 62 slip stitches. The opening edge should lie flat before you arrange the overlapping back panels.
Repeat for the second pillow.
Arrange the Overlapping Backs
Lay one finished pillow front face down, with its top edge pointing away from you.
- Place the upper back panel right side outward against the wrong side of the front, with its top and side edges aligned with the pillow front.
- Let its finished cranberry opening edge extend across the pillow approximately 10 inches below the top.
- Place the lower back panel over the remaining lower part of the front, with its lower and side edges aligned.
- Tuck the upper edge of the lower panel beneath the free edge of the upper panel, so the upper flap will lie on top when the pillow is turned over.
- Align the side edges carefully. The two back panels should overlap by approximately 4 1/2 inches.
- Use stitch markers at the corners and along the overlap to hold everything in place.
Check the opening before joining the pieces. You should be able to slide your hand beneath the upper flap and reach the inside of the cover. The overlap should open without pulling the panels out of position.
Don't sew the two free opening edges together. They need to remain open for the pillow insert.
Assemble Both Christmas Pillows
Now all the crochet pieces are ready. We'll join the outside edges, finish the red trim, and add the inserts.
Use the same assembly method for Santa and the Christmas tree. Since the outside measurements and stitch counts match, we don't need two different joining patterns.
Step 1: Check the Pillow Fronts
Lay each front panel face up. Check that the original granny square is centered and firmly sewn in place.
Santa's raised appliqués should lie neatly against the green background. On the tree, the star should be attached firmly and all 32 red scallops should be secured near their bases.
Measure the framing panels. Both should be approximately 15 1/2 inches square before the outside edging.
Step 2: Match the Front and Back Edges
Place the front right side down. Arrange the two envelope-back panels over its wrong side, keeping their right sides facing outward.
Align the top, bottom, and side edges. The upper back panel covers the first 40 rows of the pillow height, and the lower back panel covers the last 40 rows.
That means the two panels overlap across 18 row positions, approximately 4 1/2 inches at gauge.
Along each outside side edge, the first 22 row positions belong only to the upper panel, the next 18 positions contain both overlapping panels, and the final 22 belong only to the lower panel.
At the overlap, the joining stitches must catch both back layers and the front. Everywhere else, they catch the front and one back layer.
Before joining, use the four corner markers to divide the 248-stitch front perimeter into four groups of 62 stitches. Count each group from its starting corner marker up to, but not including, the next corner marker. Match those 62 front positions with the 62 back-edge positions along each side. Along the vertical edges, the two overlapping back panels supply 22 positions from the upper panel alone, 18 positions through both panels, and 22 positions from the lower panel alone. Check the alignment before working the joining round.
Step 3: Join the Outside Edges
With cranberry yarn and the right side of the pillow front facing you, join yarn at an outside corner. Keep the envelope backs aligned behind the front.
- Insert the hook through an outside stitch of the front's final red framing round and the corresponding outside edge of the back.
- Yarn over and draw up a loop through the joined layers.
- Yarn over and pull through both loops to make one sc.
- Continue with one sc in each corresponding outside stitch along the edge.
- Where the envelope backs overlap, insert the hook through the front and both back panels together.
- At each marked front corner stitch, work 3 sc through the corner layers instead of one.
- Continue around all four sides and join to the first sc.
There are 248 stitches around the front's final framing round. The four three-sc corners add eight stitches, giving 256 sc in the completed joining round.
Count: 256 sc.
The envelope opening remains unjoined in the center of the back. Only the outer perimeter is joined.
Step 4: Finish the Outer Red Edging
With the front still facing you, work the reverse single crochet edging described earlier.
Work one reverse sc in each of the 256 joining-round stitches, including around the corners. Join and fasten off.
Check that the edging is even and the corners aren't curling.
Step 5: Insert the Pillow Forms
Turn the pillow so its decorative front faces outward.
Lift the upper envelope flap at the back. Fold the pillow insert slightly and slide it through the opening.
Work the insert into the four corners, then smooth the upper and lower back panels over it.
The opening should lie flat with the top flap overlapping the lower one. Check that the front doesn't bow or twist.
Repeat the complete joining and insertion steps for the second pillow.
Step 6: Final Assembly Check
Place both pillows side by side. The outer cranberry edges should match, and each pillow should measure approximately 16 inches square.
Check that Santa's red hat and white beard remain inside the original green square, while the Christmas tree's scallops remain clearly visible against the wider ivory frame.
That's our matching pair!
Finishing and Size Checkpoints
Before you call the pillows finished, give them one last check. A few minutes spent looking at the edges and backs can save you from discovering a twisted corner after the inserts are in place.
Check the Measurements
- Original Santa square: approximately 12 to 12 1/2 inches
- Christmas tree pillow square: approximately 11 1/4 inches at the enlarged gauge, including its red scallops
- Each ivory structural foundation: approximately 12 1/2 inches before its six outer rounds
- Each framed front: approximately 15 1/2 inches across, with raised granny strips sewn above the foundation and its red outer edge free
- Envelope-back rectangles: approximately 15 1/2 × 10 inches each
- Envelope overlap: approximately 4 1/2 inches
- Finished pillow cover: approximately 16 × 16 inches
Measure across the middle of each finished cover, not just from corner to corner. Check the width and height separately.
What to Do If the Size Is Off
If the ivory center panel is too small or too large, go back to the single crochet gauge before making the other pieces. At the target gauge, 50 stitches and 50 rows should each measure approximately 12 1/2 inches.
If the framed front is the correct width but the back is too narrow, compare the back's 62-stitch foundation with the same stitch gauge used for the front. Both need to agree before joining.
If a framing strip puckers or draws the panel inward, loosen its attachment stitches before sewing on the central square. If the front and back match but the finished cover is slightly smaller than expected, check the joining and reverse single crochet rounds. Those stitches should follow the edges without drawing them inward.
Don't stretch a badly undersized piece around the pillow insert. It's better to correct the gauge of the affected panel. If your actual gauge differs from the calculated target, make matching adjustments to both the front framing and backs rather than adding unplanned rounds to only one piece.
Check the Granny Square Attachments
Look closely at Santa's raised details. The eyes, cheeks, nose, moustache, beard, hat, and pom-pom should all be firmly attached.
On the tree pillow, check the gold star and every red scallop. The scallops can stand slightly above the ivory panel, but their bases shouldn't lift away when the pillow is handled.
Weave loose ends into stitches of the same color where possible. Change direction at least once before trimming.
Blocking and Final Shaping
If the covers need shaping, remove the pillow inserts first. Follow the care instructions for your yarn when lightly dampening or blocking the crochet.
Shape the four corners, straighten the outer edges, and let the covers dry completely before replacing the inserts.
Don't flatten Santa's raised face pieces or the Christmas tree's gold star with a hot iron.
Once everything is dry, remove all temporary stitch markers, holding pins, and any basting threads. Check both the front and inside of each cover so nothing has been left behind. Put the pillow inserts back in and smooth the envelope openings.
Helpful Tips for Making Your Christmas Pillows
There are a few things I'd pay attention to with this particular set. The granny squares are already complete designs, so our job is to give them attractive pillow frames without changing what makes each one special.
Keep Santa's Face From Looking Crowded
Don't add extra decorations around Santa's original red border. The hat, beard, white accents, and rosy cheeks already give his square plenty of detail.
Let the raised ivory granny clusters and narrow green stripe surround him. His original green background should remain visible between the appliqués and red border. Do not cover the 36 white accents when sewing the square onto its foundation.
Keep the Christmas Tree Scallops Visible
The tree's red scallops need to sit above the new ivory panel. Sew near their bases, not across the rounded outer edges.
Don't replace them with a plain red border. That would change the original Christmas tree design.
Don't Add Separate Red Ornaments to the Tree
Those six little red ornaments are part of the original granny stitch colorwork. They aren't separate circles sewn over the tree.
Keep the three white snow bands, brown trunk, and gold star in their original positions, too.
If the Pillow Front Ripples
Check the four corners of the framing panel. Each new round should add eight stitches, with three single crochets worked into each marked corner stitch instead of one.
The framing-round totals should be 208, 216, 224, 232, 240, and 248 stitches.
If the counts are correct but the fabric still ripples, compare stitch and row gauge before changing the construction. If the foundation lies flat but gathers only after the granny strips are sewn on, loosen those sewing stitches. Do not add or remove stitches from the 248-stitch outer red perimeter.
If the Envelope Opening Gapes
Make sure the two back panels overlap in the intended order, with the upper flap over the lower one.
Each panel should measure approximately 10 inches tall, producing a 4 1/2-inch overlap on the 15 1/2-inch framed front. A shorter back panel will reduce that overlap.
Also check that the slip stitches along the opening edges aren't pulling the fabric out of shape.
Make Just One Pillow If You Prefer
You don't have to make the pair. The Santa and Christmas tree pillows use the same framing and backing construction, so either one works as a separate project.
If I were making the set, I'd keep the colors and outside edging identical. That's what makes the two different granny squares look as though they were designed to sit together.
Crochet Christmas Pillow Pattern Questions
Are both Christmas pillows the same size?
Yes. Both covers are designed to measure approximately 16 × 16 inches. Santa uses its 12 to 12 1/2-inch original square; the pillow-scale tree is approximately 11 1/4 inches. The tree has one additional row of granny clusters around its center.
Do I have to change the original granny square patterns?
The main granny square stitch counts stay the same. Santa keeps his original gauge, with a larger white pom-pom for the pictured pillow. The Christmas tree keeps its original 17 colorwork rows and scalloped border but uses bulkier yarn at a larger gauge, along with a larger gold star. Both motifs are sewn onto separate foundations with textured granny-cluster frames.
What size pillow inserts do I need?
Use two 16-inch square pillow inserts. Check the completed covers before purchasing inserts if your finished gauge differs noticeably from the target measurements.
Can I remove the pillow covers for cleaning?
Yes. Each cover has two overlapping crocheted back panels. Lift the upper flap to remove the insert. Follow the washing and drying instructions for your yarn, especially because the raised appliqués and decorative edging need gentle handling.
Can I use another Christmas granny square instead?
Yes, provided the finished square fits inside the inner opening left by the granny-cluster strips. Measure the square and the opening before attaching either one. Another motif may need a different gauge to achieve the same proportions, but do not change the structural 248-stitch outer edge or back-panel dimensions.
You'll find more designs in my free Christmas granny square patterns collection. I would choose one with colors that coordinate with these two pillows rather than adding too many different shades.
Are these pillows suitable for a baby's crib?
No. These are decorative throw pillows for sofas, chairs, or other areas outside an infant's sleep space. Pillows and other loose items should not be placed in a baby's crib, bassinet, or play yard.
And there you have it! Two Christmas pillows with the same finished size, matching cranberry edges, and their own cheerful granny square designs. Santa and the snowy Christmas tree make a pretty pair, whether you're decorating for the holidays or making a handmade gift.
When you click on links to various merchants on this site and make a purchase, this may result in this site earning a commission. This does not affect the price you pay.

UBGI Gold Standard 2026
Reviewed under the site's
editorial checklist.
Photos, decorating ideas, party setups and reader submissions are shared for inspiration unless a page is specifically presented as a pattern, tutorial, reference guide or step-by-step project. Follow the instructions, measurements, safety guidance and manufacturer directions provided for the particular project or product.
About Jan | Contact | Baby Nursery Ideas (Blog) | Site Map | Privacy Policy | Disclosure Policy | Disclaimer | Affiliate Disclosure | Earnings Disclosure | Facebook | Pinterest
I am a participant in the Amazon Services LLC Associates Program, an affiliate advertising program designed to provide a means for us to earn fees by linking to Amazon. As an Amazon Associate I earn from qualifying purchases.
Copyright © 2006-2026. All Rights Reserved.