Free Crochet Christmas Tree Granny Square Pattern
By Jan Bay
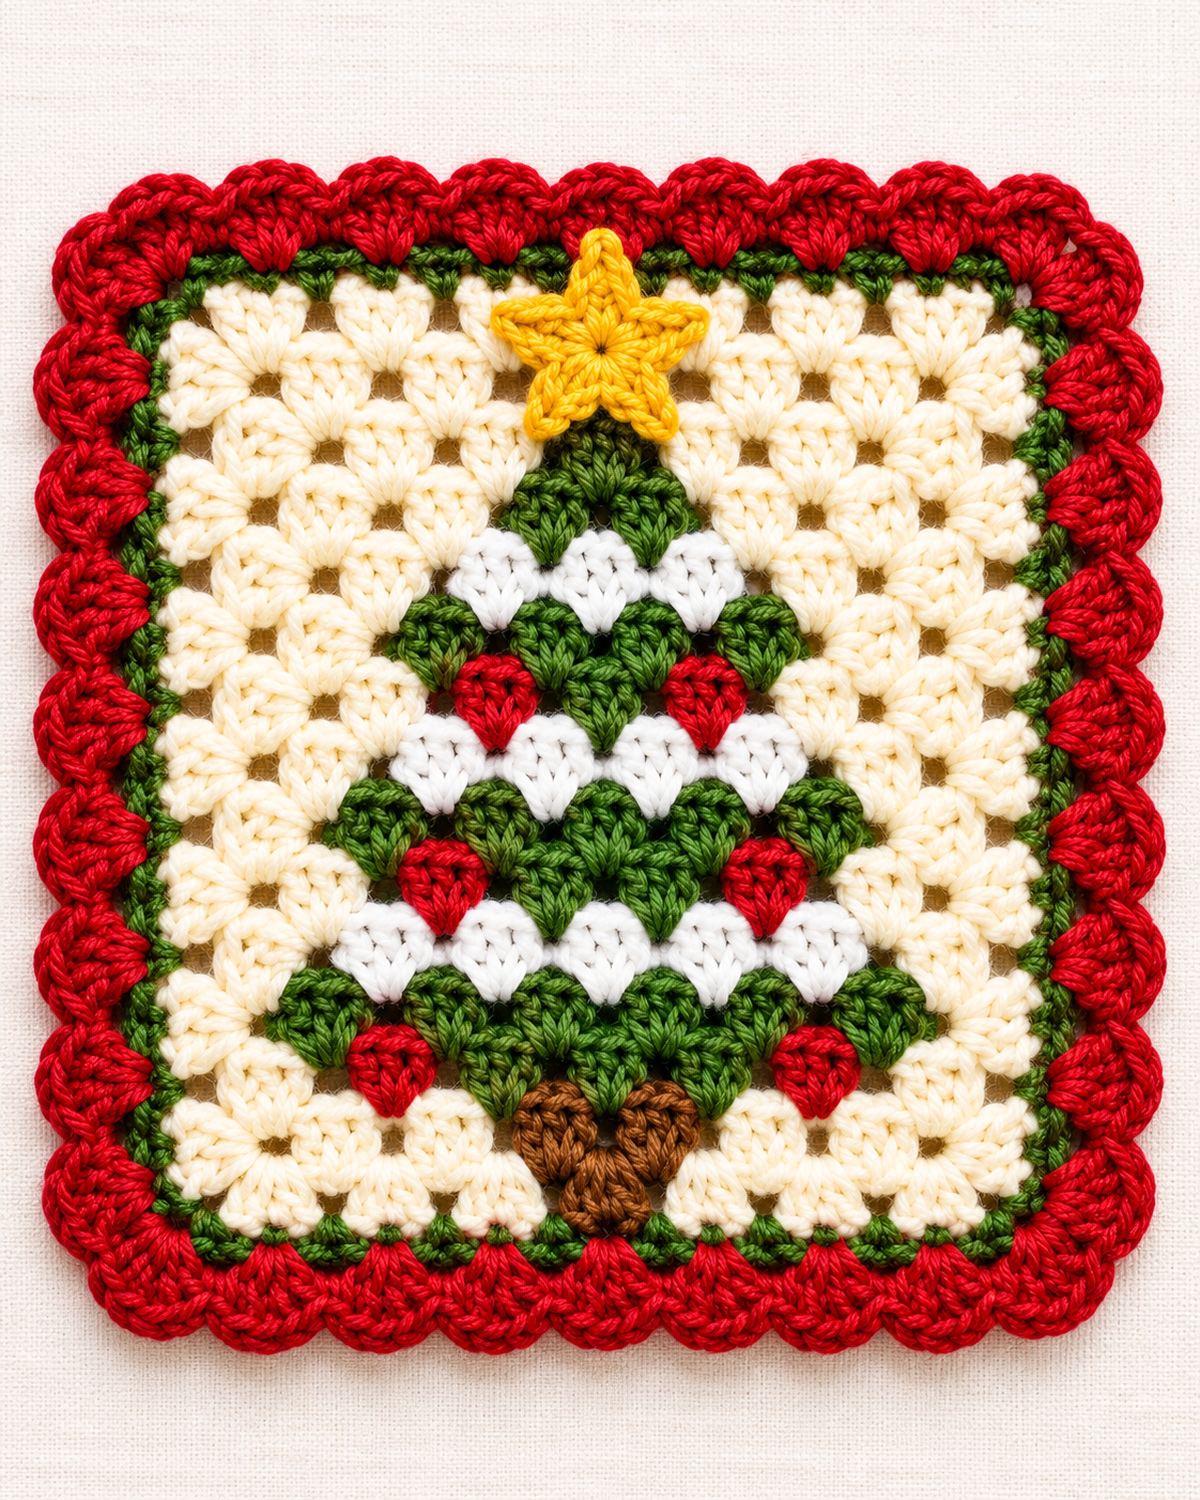
This free Christmas tree granny square pattern features a pretty evergreen tree with snowy white branches, little red ornaments and a gold star on top. What makes this design different is that the tree is worked right into the granny square with colorful crochet stitches rather than made separately and sewn onto the background. Nothing is applique except the gold star. The white layers give the tree a snow-covered look, while the cranberry red border finishes the square with a festive touch. Make one for a Christmas decoration, a pillow centerpiece or join several together to create a cozy holiday throw blanket for a special someone on your gift list.
Explore More Free Christmas Crochet Patterns
Free Christmas Granny Square Patterns
Christmas Granny Square Blanket Pattern
See Supplies for This Project Here.
On This Page
- Materials and Finished Size
- Stitches and Abbreviations
- Pattern Notes and Color Changes
- Christmas Tree Granny Square Instructions
- How to Crochet the Snowy Branches
- Gold Star, Border and Finishing
- Christmas Tree Granny Square Blanket Ideas
- Joining Squares for a Christmas Throw
- Frequently Asked Questions
Materials and Finished Size
You'll need six yarn colors for this Christmas tree granny square, but you won't need a whole skein of each. Most of the square is ivory, with green for the tree, bright white for the snow, cranberry red for the ornaments and border, brown for the trunk and a little gold for the star.
Yarn and Supplies
- Medium-weight #4 yarn in warm ivory: allow approximately 45 to 70 yards.
- Forest green yarn: allow approximately 20 to 35 yards.
- Bright white yarn: allow approximately 6 to 12 yards.
- Cranberry red yarn: allow approximately 25 to 40 yards.
- Brown yarn: a small scrap for the trunk.
- Golden yellow yarn: a small scrap for the star.
- 5 mm (H/8) crochet hook for the square.
- 4 mm (G/6) crochet hook for the star.
- Tapestry needle and scissors.
- Four stitch markers.
- Ruler or measuring tape.
- Small yarn bobbins or separate short lengths of yarn for the color changes.
The yarn quantities are estimates for one square, not amounts measured from a completed sample. Your yarn, tension and final size will affect how much you use. If you're making a blanket, make one complete square and weigh the yarn before buying enough for the rest.
Finished Size and Gauge
The planned finished square measures approximately 9 inches across after blocking. The stitch layout is designed around a central panel measuring about 7 1/2 inches, with the green and red edging adding the remaining width.
Target gauge: Four three-double-crochet groups measure approximately 2 inches across, and four completed rows measure approximately 1 3/4 inches tall.
At that gauge, the 15-group-wide panel should measure about 7 1/2 inches, while the 17 rows should measure about 7 7/16 inches before the border. Those measurements are calculated, not taken from a finished sample.
Before beginning the Christmas tree, make a small practice swatch with your ivory yarn and 5 mm hook. Ch 11. Sc in the second chain from the hook. *Ch 2, skip the next 2 chains, sc in the next chain.* Repeat from * to * three times. You should have four single-crochet anchors.
Turn and ch 2. Work 3 dc into the first anchor. *Ch 1, work 3 dc into the next anchor.* Repeat from * to * three times. You should have four granny groups.
Turn and ch 2. Work 3 dc into the middle double crochet of the first group. *Ch 1, work 3 dc into the middle double crochet of the next group.* Repeat from * to * three times. Work two more rows the same way, turning before each row.
Your four-group, four-row swatch should measure approximately 2 inches across and 1 3/4 inches tall at the planned gauge. These are target measurements, not measurements from a physically tested sample.
Check that the fabric lies flat without pulling sideways or spreading into a fan. If the width is correct but the height is noticeably different, adjust your row tension before starting the Christmas tree. Don't rely on blocking to correct a large difference.
Skill level: Intermediate. The stitches themselves are familiar, but the number of color changes calls for a little patience.
Stitches and Abbreviations
This pattern uses US crochet terms. The main stitch is a group of three double crochets worked into one stitch. Those groups build both the background and the Christmas tree, so you won't need a separate tree appliqué.
- ch: Chain.
- sc: Single crochet.
- hdc: Half double crochet.
- dc: Double crochet.
- sl st: Slip stitch.
- st: Stitch.
- sp: Space.
- RS: Right side of the work.
- WS: Wrong side of the work.
- G3: Three double crochets worked into one stitch to make a granny-style group.
How to Make the Granny Groups
To make one granny group, work three double crochets into the same stitch. Place one chain between groups. In the following row, work the new group into the middle double crochet of the group below it.
This is a stacked granny-cluster variation rather than the usual granny square worked outward from a center ring. That difference matters. It lets us make a tree with planned color changes without crocheting a separate decoration.
Cluster count: Each row contains 15 groups of three double crochets, with 14 chain-one spaces between them.
How to Change Yarn Colors
- Work the last double crochet of the current color until two loops remain on the hook.
- Drop the current yarn and pull the next color through those two loops.
- Make the chain-one space with the new color.
- Work the next three-double-crochet group in the new color.
- Keep unused yarn on the wrong side of the square.
For a clean-looking front, use separate small yarn bobbins where the same color appears in two places on one row. Don't carry a dark green strand behind a long stretch of ivory stitches. It can show through the openings.
For a one-cluster ornament, you can carry the green yarn behind that short red section and catch it neatly on the wrong side. For the longer white snow bands, use separate green yarn ends on the two sides rather than stretching green yarn behind the snow.
If you need a reminder about a stitch abbreviation, the Craft Yarn Council's crochet abbreviation reference lists the standard US terms.
Pattern Notes and Color Changes
Before you pick up your hook, here's how the design goes together. You'll start at the bottom of the square, work the little brown trunk, then make the green branches wider and narrower as the rows build toward the top.
The white bands are worked in three different widths. The lowest has seven white groups, the middle has five and the top has three. A green group at each end of a snowy row keeps the white inside the tree instead of letting it disappear into the ivory background.
Color Key
- C: Cream or warm ivory background.
- G: Forest green tree.
- W: Bright white snow.
- R: Cranberry red ornament.
- B: Brown trunk.
Each letter represents a complete three-double-crochet group. The number tells you how many consecutive groups to work in that color.
For example, C4, G7, C4 means four ivory groups, seven green groups and four more ivory groups. That's 15 groups altogether.
Work the color changes in the order shown for each row, reading each sequence in the direction you're crocheting. All rows except Row 2 are symmetrical. Row 2 has seven ivory groups, two brown groups and six ivory groups, placing the two upper trunk groups beside one another.
Construction Order
- Make the foundation chain and anchor row.
- Crochet 17 rows of granny groups using the color instructions below.
- Work the narrow green border.
- Add the cranberry red border and scalloped edging.
- Crochet the gold star separately and sew it to the top of the tree.
- Weave in the remaining ends and block the square.
You should have one main crocheted piece and one small star when you're finished. The tree, snow, ornaments and trunk all belong to the main fabric.
Right and wrong sides: The side facing you while you work Row 1 is the right side (front) of the square. Odd-numbered rows face the front, and even-numbered rows face the back. Keep carried yarn strands and loose ends on the wrong side. After Row 17, the right side will be facing you. This is also the side where you'll attach the gold star.
Keep These Measurements and Counts Handy
- Foundation: 44 chains.
- Foundation anchors: 15 single crochets.
- Foundation chain spaces: 14.
- Colorwork rows: 17.
- Granny groups in each row: 15.
- Chain-one spaces in each row: 14.
- Total red ornament groups: 6.
- Total white snow bands: 3.
Important: These instructions are an engineered draft based on the finished design image. They have not been physically test-crocheted. Check the measurements and shape as you work, especially before making several squares for a blanket.
Christmas Tree Granny Square Pattern Instructions
Here's the complete stitch plan for the Christmas tree granny square pattern. Use the color key above and keep the group count at 15 across every row. The stitches themselves don't change when you switch colors. Only the yarn changes.
Foundation
Foundation chain: With ivory yarn and the 5 mm hook, ch 44.
Foundation anchor row: Sc in the second chain from the hook. *Ch 2, skip the next 2 foundation chains, sc in the next chain.* Repeat from * to * 14 times.
Checkpoint: You should have 15 single-crochet anchors and 14 chain-two spaces between them. The last single crochet should be in the final foundation chain.
How to Work the Colorwork Rows
Row 1: Turn and ch 2. The turning chain does not count as a stitch. Work 3 dc into the first single-crochet anchor. *Ch 1, skip the chain-two space, work 3 dc into the next single-crochet anchor.* Repeat from * to * 14 times. Follow the Row 1 color sequence, working the first seven groups in ivory, the eighth group in brown and the final seven groups in ivory. Change yarn between groups as explained above.
Row 1 has 15 granny groups and 14 chain-one spaces. The eighth group is brown, and the other 14 groups are ivory.
Rows 2 through 17: Turn and ch 2, which does not count as a stitch. Work 3 dc into the middle double crochet of the first group in the previous row. *Ch 1, work 3 dc into the middle double crochet of the next group.* Repeat from * to * 14 times.
That gives you 15 groups in every row. Change colors between groups according to the instructions below. Work all three double crochets of each group in the assigned color.
Complete Row-by-Row Color Instructions
| Row | Color Sequence |
|---|---|
| 1 | C7, B1, C7 |
| 2 | C7, B2, C6 |
| 3 | C2, G11, C2 |
| 4 | C2, G11, C2 |
| 5 | C2, G1, R1, G7, R1, G1, C2 |
| 6 | C2, G11, C2 |
| 7 | C3, G1, W7, G1, C3 |
| 8 | C3, G1, R1, G5, R1, G1, C3 |
| 9 | C3, G9, C3 |
| 10 | C4, G1, W5, G1, C4 |
| 11 | C4, G1, R1, G3, R1, G1, C4 |
| 12 | C4, G7, C4 |
| 13 | C5, G1, W3, G1, C5 |
| 14 | C5, G5, C5 |
| 15 | C6, G3, C6 |
| 16 | C7, G1, C7 |
| 17 | C15 |
Every row: 15 groups, 45 double crochets and 14 chain-one spaces. There are no increases or decreases in the main panel. The tree shape comes entirely from the number and placement of colored groups.
Colorwork Checkpoints
After Row 3: The trunk should have one brown group at the bottom in Row 1 and two brown groups above it in Row 2. Row 3 begins the wide green branches directly over the trunk. The two upper brown groups sit slightly off center because the square has 15 groups across. Check that all three brown groups are visible before continuing.
After Row 7: The lower tree branches should contain two red ornament groups and the first white band. The white band has seven groups with one green group at either end.
After Row 10: You should have four red ornament groups in total and two white snow bands. The second white band has five groups.
After Row 13: All six red ornament groups and all three white bands should be complete. The upper white band contains three groups.
After Row 17: The green tree should narrow to one group at its top, with an ivory row above it. There should be 17 complete colorwork rows.
Fasten off the main working yarn after Row 17, leaving the fabric flat. The border will be added separately.
If you have 14 or 16 groups instead of 15, correct the affected row before continuing. Don't compensate by adding an extra group at the end of a later row. That would shift the tree off center.
How to Crochet the Snowy Branches
The white snow bands are what give this Christmas tree its special look. Instead of crocheting white pieces and sewing them over the branches, you'll use white yarn for selected granny groups as you work across each row.
Keep the ivory background and the snowy white sections in two noticeably different shades. If they're too close in color, the snow can disappear into the background and the tree won't have the same layered appearance.
Lower Snow Band: Row 7
Work three ivory groups, followed by one green group. Change to bright white and work seven white groups. Change back to green for one group, then finish with three ivory groups.
Row sequence: C3, G1, W7, G1, C3.
The seven white groups should sit between the green branches, with a little green showing at each end. Don't add another white edging over the top. Those seven groups are the snow.
Middle Snow Band: Row 10
Work four ivory groups and one green group. Change to white for five groups, then return to green for one group. Finish with four ivory groups.
Row sequence: C4, G1, W5, G1, C4.
You'll have a shorter strip of snow across the middle of the tree. The ivory background stays outside the two green groups.
Upper Snow Band: Row 13
Work five ivory groups, one green group, three white groups, one green group and five ivory groups.
Row sequence: C5, G1, W3, G1, C5.
That's the smallest snow band. The green branches narrow above it, leaving room for the gold star.
Working the Red Ornaments into the Tree
The red ornaments are made in Rows 5, 8 and 11. Each ornament is one complete group of three double crochets, worked in cranberry yarn.
There are two red groups in each of those three rows, making six ornaments altogether.
- Row 5: Two ornaments on the widest lower branches.
- Row 8: Two ornaments between the lower and middle snow bands.
- Row 11: Two ornaments above the middle snow band.
Because the red stitches are worked into the main fabric, you won't have any little ornaments to sew on later.
Checkpoint: Lay the square flat after Row 13. You should see three white bands and three pairs of red ornaments. If a snow band looks uneven, check its group count before moving on. The white bands should contain seven, five and three groups from bottom to top.
Gold Star, Border and Finishing
Once the tree is finished, you'll add a narrow green border and a wider cranberry edging. The gold star is the only separately crocheted decoration on this square.
Round 1: Forest Green Border
Place a marker at each corner of the main panel. The upper corners are the outside double crochets of the first and last groups in Row 17. The lower corners are the first and last single-crochet anchors in the foundation row.
The border is worked with the right side facing you.
- Join green yarn in the marked upper-left corner stitch. Work 3 sc in that stitch.
- Across the top, work 1 sc into the middle double crochet of each of the 15 groups in Row 17. Work 1 sc into each of the 14 chain-one spaces. You now have 29 sc along the top edge, not counting the corner stitches.
- Work 3 sc in the marked upper-right corner stitch.
- Work down the right edge of the 16 row ends below the top row. Place 2 sc into each of the row ends numbered 1, 2, 3, 4, 5, 7, 8, 9, 10, 12, 13, 14 and 16. Place 1 sc into row ends 6, 11 and 15. You should have 29 sc along this edge.
- Work 3 sc in the marked lower-right foundation corner.
- Across the foundation edge, work 1 sc into each of the 13 interior single-crochet anchors and 1 sc into each of the 14 chain-two spaces. Add one more sc into the fourth and eleventh chain-two spaces, counting from your starting side of the foundation edge. You should have 29 sc along this edge.
- Work 3 sc into the marked lower-left foundation corner.
- Work up the left edge using the same distribution as the right edge: 2 sc in row ends 1, 2, 3, 4, 5, 7, 8, 9, 10, 12, 13, 14 and 16, and 1 sc in row ends 6, 11 and 15.
- Join with a slip stitch to the first sc of the round.
Round 1 count: 128 sc total. Each side has 29 edge stitches, plus a group of 3 sc at each corner.
Mark the middle single crochet of each three-stitch corner group. Those four marked stitches will receive the corner increases in the next round.
Round 2: Cranberry Red Border
Fasten off the green yarn and join cranberry red in the first stitch of a corner group.
- Ch 2 to bring the hook to double-crochet height. Do not turn. This beginning chain does not count as a stitch.
- Work 1 dc in each green sc around the square, except at the four marked corner stitches.
- At each marked corner stitch, work 3 dc into that one stitch instead of 1 dc.
- Continue around all four sides and join with a slip stitch to the first dc.
Round 2 count: 136 dc. The four corner increases add eight stitches to the previous round.
At each corner, mark the middle double crochet of the new three-double-crochet corner group. The marked corner stitches are 34 stitches apart, counting from one marked corner stitch to the next.
Round 3: Scalloped Cranberry Edging
This final round gives the square its rounded red edge. Keep the yarn the same cranberry color.
Fasten off and rejoin the red yarn in the marked middle double crochet of any corner group.
- Work (sc, ch 2, sc) into the marked corner stitch.
- Skip the next dc.
- Work 5 dc in the following dc to form a shell.
- Skip the next dc and work 1 sc in the following dc.
- Repeat Steps 2 through 4 until you have made eight shells along the side.
- Skip the one remaining dc before the next marked corner.
- Work (sc, ch 2, sc) in the next marked corner stitch.
- Repeat the eight-shell sequence on each of the other three sides, working the same corner treatment at each marked corner.
- Join with a slip stitch to the first corner sc. Fasten off.
Round 3 count: Eight shells per side, 32 shells altogether, with four chain-two corners.
If the scallops curl inward, check that each shell contains five double crochets. If the edging waves excessively, compare your red yarn tension with the green border before blocking.
Small Gold Crochet Star
Use golden yellow yarn and the 4 mm hook. The star is worked separately and sewn to the top of the tree.
- Make an adjustable ring, leaving a long yarn tail for sewing.
- Ch 3.
- Sc in the second chain from the hook.
- Hdc in the next chain, working back toward the center ring.
- Sl st into the center ring. One point is complete.
- Repeat Steps 2 through 5 four more times, making five points altogether.
- Pull the adjustable ring closed and fasten off, leaving the sewing tail.
Star checkpoint: You should have five points radiating from the center. The expected size is roughly 1 to 1 1/2 inches across, depending on your yarn and tension.
Attach the Star
- Lay the square right side up.
- Position the star over the narrow green tip at Row 16, allowing its upper point to extend slightly into the ivory area of Row 17.
- Thread the long gold yarn tail into a tapestry needle.
- Sew through the underside of the star's center and the stitches beneath it. Add small securing stitches at the bases of the points so the star lies flat.
- Secure the yarn on the back and weave in the end.
The star should sit above the tree without pulling the upper edge of the square out of shape.
Weave In Ends and Block
Turn the square over and weave each loose yarn tail through several stitches of the same color. Reverse direction at least once to help secure the ends.
Remove the four temporary corner markers once the border is complete. Lay the square flat, gently shape the corners and smooth the red scallops. If your yarn can be wet-blocked, follow the yarn manufacturer's care instructions and let the square dry completely before removing any blocking pins.
Before using the square, check that all markers and pins have been removed, the yarn ends are secured and the gold star is firmly attached.
Measure across the finished square in both directions. The expected size is approximately 9 by 9 inches. Check that the edges are straight, the corners remain square and the white bands lie flat.
If the finished fabric is much wider than it is tall, don't stretch the shorter side aggressively just to reach the target measurement. Make a gauge adjustment before crocheting more squares.
Final design check: Your square should have one green tree, three white snow bands, six red ornament groups, one brown trunk, one gold star and a cranberry scalloped border.
Christmas Tree Granny Square Blanket Ideas
One Christmas tree granny square makes a pretty holiday decoration, but I think this design becomes especially interesting when you arrange several squares into a blanket. You can repeat the trees across the whole throw or give them a little breathing room with plain granny squares between them.
Here are four arrangements worth considering. The sizes below use a planned nine-inch finished square and don't include any extra width from joining or an optional outer border.
Option 1: All Christmas Trees
Make 20 matching Christmas tree squares and arrange them in four columns and five rows. Each square has the same cream background, snowy green tree and red border.
Squares needed: 20 Christmas tree squares.
Approximate layout size: 36 by 45 inches before joining allowances.
This is the version I'd choose if the Christmas trees are the whole point of the blanket. The repeating pattern makes a cheerful holiday throw without introducing other motifs.
Option 2: Christmas Tree Checkerboard
Make 15 Christmas tree squares and 15 plain granny squares, then alternate the decorated and plain blocks in five columns and six rows.
Squares needed: 15 tree squares and 15 plain squares.
Approximate layout size: 45 by 54 inches.
Use a mixture of ivory, deep green and cranberry for the plain squares. Keep the outside borders consistent so the blocks look like part of one design.
I prefer this arrangement for a larger throw because the plain blocks give the detailed Christmas trees more room to stand out.
Option 3: Christmas Tree Medallion Throw
Arrange nine Christmas tree squares in a three-by-three section at the center of the blanket. Surround them with 16 plain squares to make a five-by-five layout.
Squares needed: 9 tree squares and 16 plain squares.
Approximate layout size: 45 by 45 inches.
The center becomes a little Christmas tree picture made from nine matching squares, while the plain outer squares act as a wide frame. You can arrange the plain colors in alternating cranberry and ivory, or use green at the four outside corners.
Option 4: Mixed Christmas Granny Square Throw
Combine ten Christmas tree squares with 20 other Christmas granny squares to make a five-column, six-row blanket.
Squares needed: 10 Christmas tree squares and 20 coordinating squares.
Approximate layout size: 45 by 54 inches.
Snowflakes, stars, poinsettias and plain granny squares would all suit the color palette. I'd keep the same cranberry joining color throughout the blanket so the different motifs look coordinated.
You can find other ideas in my free Christmas granny square patterns collection.
One measurement matters here: the coordinating squares in my existing Christmas granny square blanket pattern were designed around an approximately eight-inch square. This new Christmas tree square is planned at about nine inches. Don't join those different sizes without first adjusting the gauge or border rounds so every square finishes at the same measurement.
If you're making a whole blanket from this new design, I'd finish one square, measure it and then settle on the final arrangement. That way, you'll know exactly what size you're working toward before making the rest.
Joining Squares for a Christmas Throw
Once you've made enough granny squares for your Christmas blanket, spread them out on a clean, flat surface before sewing anything together. Move the colors around until you're happy with the arrangement.
Keep all the Christmas trees pointing in the same direction. I also recommend turning every square so the scalloped red borders line up evenly along the seams.
Making Plain Coordinating Squares
If you're using one of the blanket layouts with plain blocks, you can make matching squares without the Christmas tree color changes.
- Use the same 44-chain foundation and 15-anchor foundation row.
- Work 17 rows of 15 granny groups, using one background color throughout.
- Keep 14 chain-one spaces between the groups in every row.
- Work the same 128-stitch green border round.
- Work the 136-double-crochet red border round.
- Finish with the same 32-shell scalloped edging.
- Block the square to match the Christmas tree squares.
You can use ivory, cranberry or green for the main fabric. The important part is keeping the stitch counts, final measurements and borders the same.
Joining the Red Scalloped Edges
For a blanket made from the fully edged squares, I'd use cranberry yarn for the seams. Joining two scalloped edges will give you a decorative, slightly raised seam rather than a completely flat one. That's fine if you like a textured Christmas throw, but I'd join two finished squares first to see whether you like the result before making the whole blanket.
- Block every square to the same finished size and let it dry completely.
- Arrange the squares in their final order, with the right sides facing up.
- Place two neighboring squares side by side, with the matching red edges touching.
- Thread a tapestry needle with a length of cranberry yarn.
- Begin at the matching corner chain-two spaces and secure the yarn on the wrong side.
- Work a mattress-style seam through the corresponding edge stitches, taking small stitches from one square and then the other.
- Match the third double crochet at the center of each five-double-crochet shell, followed by the single-crochet valley after that shell.
- Continue through all eight shells and eight valleys along the side, then join the matching corner spaces.
- Keep the yarn snug enough to close the gap without bunching the red edging.
- Secure the yarn and weave the end into the wrong side of the seam.
Joining checkpoint: Each matched side has eight shells and eight single-crochet valleys. With the two end corners, that gives you 18 matching anchor positions along the seam.
Lay the joined squares flat before continuing. The scallops may form a decorative ridge, but the squares shouldn't bunch or pull out of shape. If the seam draws the blocks together too tightly, undo it and use a looser sewing tension. Don't stretch the shells to force the edges to meet.
This joining method is a proposed construction for the completed scalloped squares. Its appearance still needs checking on an actual pair of finished blocks.
Repeat for each pair of squares. At a junction where four square corners meet, use a few extra stitches through the corner spaces to close the opening without pulling the corners together too tightly.
Putting the Blanket Rows Together
Join the squares across each horizontal row first. Then lay the completed rows beside each other and sew the long row seams together using the same method.
For example, a five-column, six-row throw has 30 squares. You'll make six rows of five squares, then join those six rows together.
The finished red scallops can serve as the outside edging of the blanket, so you don't have to add another border. If you'd prefer a different outer edge, make a small sample of the proposed edging first. Adding another crochet round over the scallops can change their appearance.
Final Blanket Check
Spread the completed blanket flat. Check that the joins are secure, the corners meet neatly and the squares haven't been pulled out of shape.
Weave in every loose yarn end and gently block the finished blanket as your yarn allows. Let it dry completely before folding or using it.
The finished measurements will depend on your actual square size and how closely you sew the edges together. Use the size of your completed sample square for your final blanket calculations rather than relying only on the nine-inch estimate.
Frequently Asked Questions
Is the Christmas tree sewn onto the granny square?
No. The green tree, white snow bands, red ornaments and brown trunk are all made with color changes as you crochet the square. The small gold star is the only separately crocheted decoration.
Is this a traditional granny square?
It uses groups of three double crochets, just like a traditional granny square, but the construction is different. You work back and forth in rows instead of starting at the center and working outward. That makes it easier to place the tree colors in the right spots.
Can I leave off the gold star?
Yes. The tree will still be recognizable without it. If you're making a throw and would rather have a completely flat design with no separately attached decorations, simply leave off the star. You won't need to change any of the square's stitch counts.
If you're making this as a baby blanket, I'd leave off the separately attached star. Keep decorative blankets out of an infant's sleep space.
Can I use the same yarn color for the snow and background?
You can, but I wouldn't choose that combination for this particular design. The three snow bands are what make the tree look different. Bright white against a warm ivory background helps the layers show up clearly.
How many Christmas tree granny squares do I need for a throw blanket?
For the planned nine-inch squares, 20 blocks arranged four across and five down would make an approximately 36-by-45-inch layout before joining allowances. For a larger throw, 30 squares arranged five across and six down would make an approximately 45-by-54-inch layout.
Can I mix these Christmas trees with other granny square patterns?
Yes, as long as the finished squares have compatible sizes and edges. Make one of each design first and compare the measurements before working on the entire blanket.
Is this Christmas tree granny square suitable for a beginner?
If you're comfortable making double crochets and changing colors, you can give it a try. The main challenge isn't the individual stitches. It's keeping track of the small color changes and making sure every row has 15 groups. I'd call it an intermediate pattern rather than a first crochet project.
The finished square is lovely on its own, but it also gives you plenty of ways to make a Christmas throw. Start with one, get the colors and measurements the way you want them, and then decide whether to make a whole blanket of snowy Christmas trees or mix them with other holiday granny squares.
When you click on links to various merchants on this site and make a purchase, this may result in this site earning a commission. This does not affect the price you pay.

UBGI Gold Standard 2026
Reviewed under the site's
editorial checklist.
Photos, decorating ideas, party setups and reader submissions are shared for inspiration unless a page is specifically presented as a pattern, tutorial, reference guide or step-by-step project. Follow the instructions, measurements, safety guidance and manufacturer directions provided for the particular project or product.
About Jan | Contact | Baby Nursery Ideas (Blog) | Site Map | Privacy Policy | Disclosure Policy | Disclaimer | Affiliate Disclosure | Earnings Disclosure | Facebook | Pinterest
I am a participant in the Amazon Services LLC Associates Program, an affiliate advertising program designed to provide a means for us to earn fees by linking to Amazon. As an Amazon Associate I earn from qualifying purchases.
Copyright © 2006-2026. All Rights Reserved.