Santa Claus Granny Square Crochet Pattern with Easy Appliqués
By Jan Bay
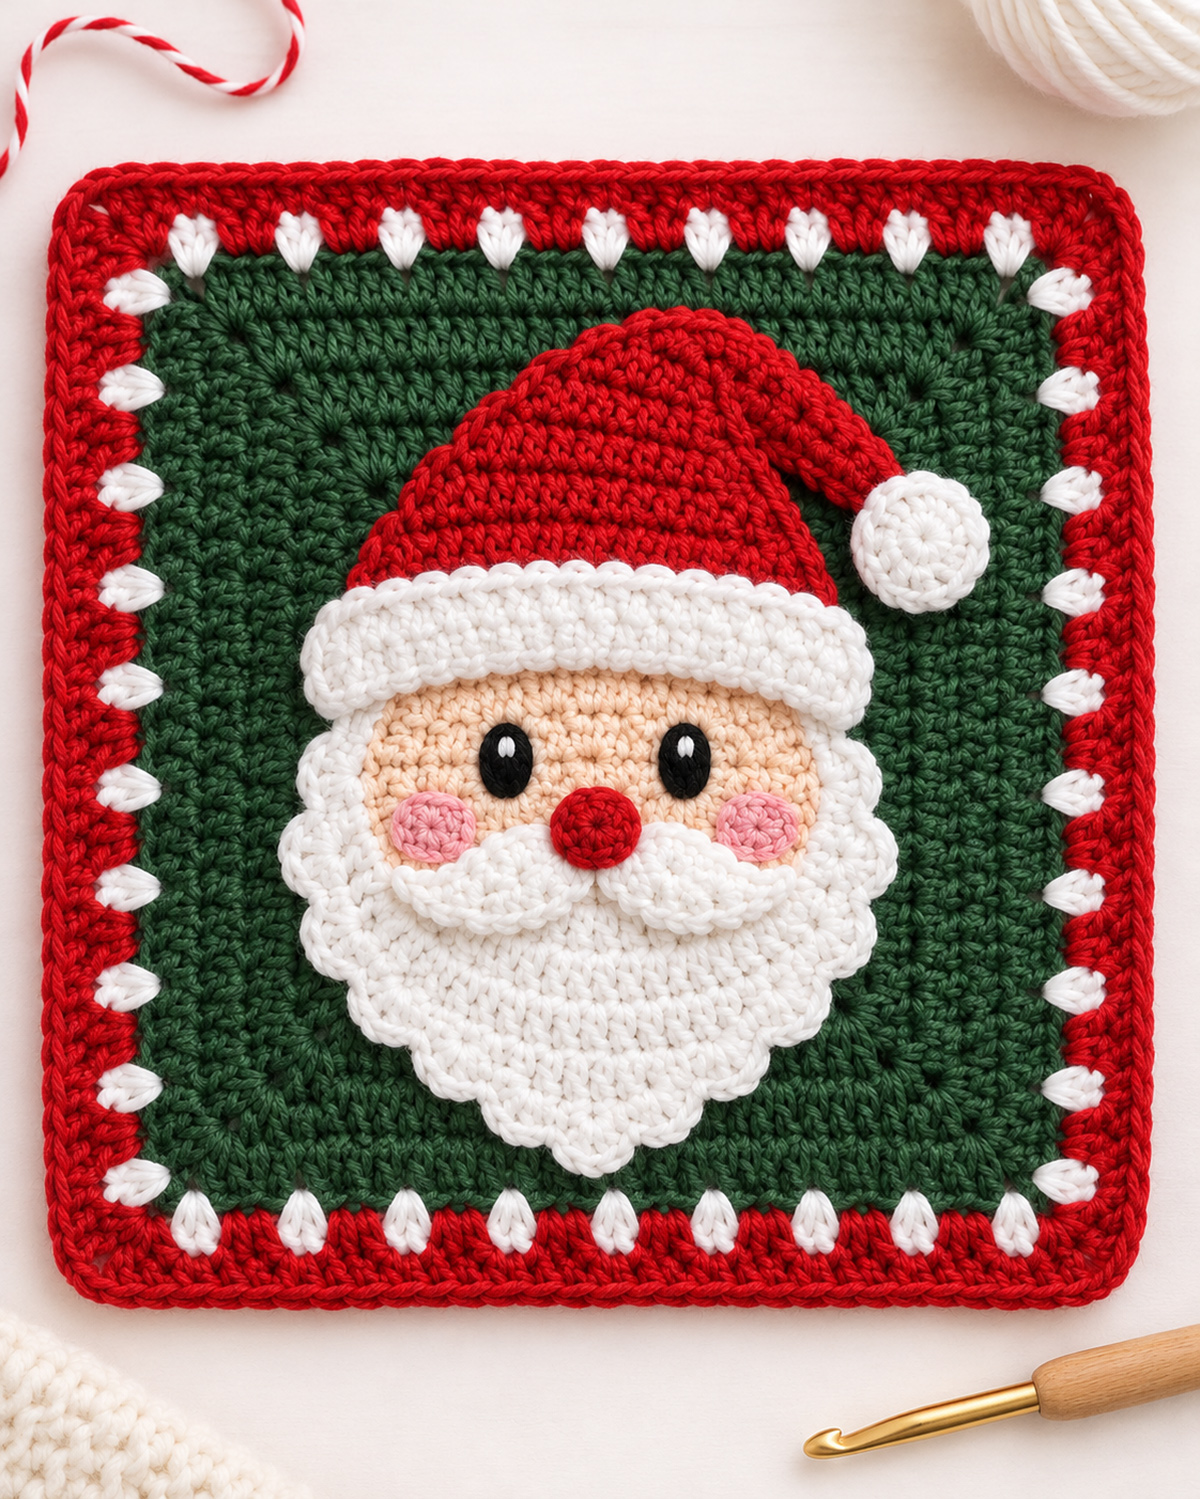
This Santa Claus Granny Square Crochet Pattern has everything I love about a cheerful Christmas project: a jolly Santa face, a bright red hat, a fluffy white beard, and those classic red and green Christmas colors. And you won't have to work complicated color changes to make his face! We'll crochet Santa's features separately and sew them onto a simple green granny square. I like this approach because you can arrange everything just where you want it before stitching the pieces in place. Make one for a Christmas throw pillow or put several together for a festive holiday blanket.
Explore More Free Christmas Crochet Patterns
Christmas Tree Granny Square Pattern
See Supplies for This Project Here.
Jump to the Santa Claus Granny Square Pattern
- Materials and Finished Size
- Gauge, Stitches, and Pattern Notes
- Crochet the Green Granny Square
- Add the Red and White Christmas Border
- Crochet Santa's Face
- Crochet Santa's White Beard
- Crochet Santa's Red Hat and White Brim
- Make Santa's Eyes, Nose, and Cheeks
- Assemble the Santa Granny Square
- Finishing and Troubleshooting
- Frequently Asked Questions
Materials for Your Santa Claus Granny Square
You'll only need a few yarn colors for this Santa Claus granny square. The green and red make up the background, and the smaller pieces of white, peach, pink, and black yarn give Santa his cheerful face.
I'd keep the yarn weight the same for every piece. It makes the little appliqués easier to fit together, especially around the hat and beard.
Yarn and Supplies
- Worsted-weight (#4) yarn in forest green, approximately 85 yards
- Christmas red yarn, approximately 50 yards
- White yarn, approximately 45 yards
- Peach yarn, approximately 20 yards
- Small amounts of pink and black yarn
- A tiny amount of white yarn for eye highlights
- 5 mm (H/8) crochet hook, or size needed to match gauge
- Yarn needle for sewing the pieces together
- Stitch markers
- Scissors and measuring tape
These yarn amounts are estimates, not measured amounts from a finished sample. Having a little extra of each main color is a good idea.
Finished Size
The completed square is expected to measure approximately 12 to 12 1/2 inches across at the suggested gauge, including the red border.
The crocheted peach face should measure approximately 4 3/4 inches across, and the red hat should be about 6 1/2 inches wide at its base.
Those proportions leave enough of the green background showing around Santa. You don't want his beard or hat crowding the Christmas border.
If you're making several squares for a blanket, measure the first completed square before making the others. Use that finished measurement for every square in the set.
Gauge and Crochet Stitches
This pattern uses US crochet terms. You'll work the square in joined rounds, the face and pom-pom in continuous rounds, and the hat, beard, and brim in rows.
Gauge
- 14 double crochet stitches = approximately 4 inches across
- 16 single crochet stitches = approximately 4 inches across
- Approximately 16 single crochet rows = 4 inches high
These are target gauges for the calculated pattern measurements. Check your own gauge before cutting the yarn for any appliqué pieces.
The most useful checkpoint is the green square after Round 9. It should measure roughly 10 inches across. If yours is much smaller or larger, the finished square and Santa pieces may not fit together as planned.
Abbreviations
- ch = chain
- sl st = slip stitch
- sc = single crochet
- hdc = half double crochet
- dc = double crochet
- inc = 2 single crochet stitches in the same stitch
- sc2tog = single crochet 2 stitches together
- st = stitch
- sp = space
- RS = right side
- WS = wrong side
- rep = repeat
The beginning ch 3 counts as one double crochet when making the square. Turning chains in the appliqué instructions do not count as stitches.
If you need to check a crochet abbreviation, the Craft Yarn Council's crochet abbreviations reference explains the standard US terms.
Before You Begin
Make the green and red square first. Then crochet Santa's face, beard, hat, brim, pom-pom, nose, two pink cheeks, and two white moustache pieces separately.
Don't sew the little pieces down as soon as you finish them. Lay everything in place first and check that the eyes will be visible between the hat brim and beard.
We'll embroider the eyes and attach the little crocheted pink cheeks before sewing the peach face onto the square. The two white moustache pieces and red nose go on after the beard is attached. That way, Santa's moustache sits on top of his beard, just like the finished example.
Use the side of the square with the clearly defined stitch tops facing you as the front. Keep your sewing knots and loose yarn ends on the back.
Santa Claus Granny Square Crochet Pattern: Green Base
Let's start with the background. This is a solid granny square, so you'll have enough fabric to sew Santa's face onto without leaving large gaps behind his features.
You'll work nine rounds in forest green, then add two rounds of red. Keep the corner spaces open and make your stitches fairly even. There's no need to pull the corners tight.
Rounds 1–9: Forest Green
Round 1: With green yarn, ch 4 and join with a sl st to form a ring. Ch 3 (counts as first dc), work 2 dc into the ring, ch 2. Work (3 dc, ch 2) into the ring three more times. Join with a sl st to the top of the beginning ch 3.
Count: 12 dc total, arranged as four groups of 3 dc, with four ch-2 corner spaces.
Round 2: Sl st in each of the next 2 dc and into the next ch-2 corner space. Ch 3, work 1 dc, ch 2, and 2 dc into that same corner. Work 1 dc into each of the next 3 dc. Then work (2 dc, ch 2, 2 dc) in the next corner space and 1 dc into each of the following 3 dc. Repeat this corner-and-side sequence around all four sides. Join to the top of the beginning ch 3.
Count: 7 dc along each side, counting the 2 dc on each side of its corner spaces, plus four ch-2 corner spaces.
Round 3: Sl st into the next dc and then into the following corner space. Ch 3, work 1 dc, ch 2, and 2 dc into that corner space. Work 1 dc into every dc along the next side. In each following corner, work (2 dc, ch 2, 2 dc), followed by 1 dc in every dc along the next side. Continue around all four corners and join to the top of the beginning ch 3.
Count: 11 dc per side.
Rounds 4–9: Continue the same method used in Round 3. At the beginning of each round, after joining to the top of the beginning ch 3, sl st into the next dc and then into the following ch-2 corner space. Work (2 dc, ch 2, 2 dc) in every corner and 1 dc in every dc between corners. Join each round to the top of its beginning ch 3.
- Round 4: 15 dc per side
- Round 5: 19 dc per side
- Round 6: 23 dc per side
- Round 7: 27 dc per side
- Round 8: 31 dc per side
- Round 9: 35 dc per side
After Round 9, you should have 140 dc around the square, plus four ch-2 corner spaces.
Fasten off the green yarn and weave in the end.
Check Your Square Before Adding the Border
Lay the square on a flat surface. All four sides should have the same stitch count, and the corners should form clear right angles.
At the suggested gauge, the green square should measure approximately 10 inches across. It doesn't have to be perfect, but check the measurement now so you know whether the face and beard will fit.
If the square is cupping, check for missed corner increases. If it ripples, check that you haven't worked extra stitches into the corners or sides.
Add the Red and White Christmas Border
The red border gives this square its Christmas colors, while the little white accents make it look a little more festive.
We'll keep the border construction simple and add the white details afterward. That means you won't have to change yarn colors every few stitches.
Round 10: First Red Round
With the right side of your square facing you, join red yarn in any corner space.
Ch 3 (counts as first dc), 1 dc, ch 2, and 2 dc in the same corner space.
Work 1 dc in each of the 35 dc along the next side. In the next corner space, work (2 dc, ch 2, 2 dc).
Repeat around the remaining sides and corners. Join with a sl st to the top of the beginning ch 3.
Count: 39 dc per side, or 156 dc total, plus four ch-2 corner spaces.
Round 11: Outer Red Border
Sl st into the next dc and then into the following corner space.
Ch 3, 1 dc, ch 2, and 2 dc in the same corner.
Work 1 dc in each of the 39 dc along the next side. Work (2 dc, ch 2, 2 dc) in the next corner.
Repeat around all four sides, working 1 dc in each existing dc and the same increase in every corner.
Join to the beginning ch 3. Fasten off and weave in the ends.
Final count: 43 dc per side, or 172 dc total, plus four ch-2 corner spaces.
White Border Accents
The approved design has little white stitches running around the inside of the red border. You can make a similar effect with small embroidered teardrops.
Thread a yarn needle with white yarn. With the right side facing you, count the dc stitches along one side of Round 10, beginning immediately after the preceding corner space.
Mark stitches 4, 8, 12, 16, 20, 24, 28, 32, and 36. You'll have nine evenly spaced accents along that side.
At each marked stitch, bring the white yarn through from the back near the base of the red stitch. Make a small upright loop approximately 1/4 inch high. Return the needle close to the entry point, leaving the loop visible on the front.
Take one small anchoring stitch across the top of the loop to hold its teardrop shape.
Repeat at all nine marked positions. Work the same arrangement along the other three sides, keeping the corner spaces free.
You'll have 36 white accents altogether.
Carry the white yarn along the back between nearby accents, taking care not to pull the border inward. Secure the yarn at the beginning and end of each side.
Checkpoint: The square should still lie flat. If the white details make the border draw inward, loosen the embroidery stitches before going any further.
Crochet Santa's Face
Santa's face begins with a plain peach-colored circle. We're keeping this piece flat because the eyes, cheeks, nose, hat, and beard will provide plenty of detail.
You'll work in continuous rounds without joining. Move your stitch marker to the first stitch of each new round.
Peach Face Circle
Round 1: Make a magic ring and work 6 sc into the ring. Pull the ring closed. (6 sc)
If you prefer, ch 2 and work 6 sc into the second chain from the hook instead.
Round 2: Work 2 sc into every stitch around. (12 sc)
Round 3: (Sc in next stitch, inc in next stitch) 6 times. (18 sc)
Round 4: (Sc in next 2 stitches, inc in next stitch) 6 times. (24 sc)
Round 5: (Sc in next 3 stitches, inc in next stitch) 6 times. (30 sc)
Round 6: (Sc in next 4 stitches, inc in next stitch) 6 times. (36 sc)
Round 7: (Sc in next 5 stitches, inc in next stitch) 6 times. (42 sc)
Round 8: (Sc in next 6 stitches, inc in next stitch) 6 times. (48 sc)
Round 9: (Sc in next 7 stitches, inc in next stitch) 6 times. (54 sc)
Round 10: (Sc in next 8 stitches, inc in next stitch) 6 times. (60 sc)
Sl st loosely in the next stitch to smooth the end of the spiral. Fasten off, leaving approximately 48 inches of peach yarn for sewing the face securely around its entire edge and weaving in the remaining end.
Face Measurement Check
The circle should measure approximately 4 3/4 inches across at the suggested gauge.
Lay it flat and check the shape. If the edge is cupping, your stitches may be too tight. If the circle is noticeably ruffling, your tension may be too loose.
Correct any persistent shaping problem before sewing the circle onto the square. Changing hook size and remaking the circle is preferable to forcing it flat with stitches.
Don't stuff the face. It should remain a flat appliqué.
Crochet Santa's White Beard
Santa needs a nice full beard, but we don't need a complicated stitch pattern to get one.
We'll make a flat white piece that starts wide at the top and gradually narrows toward the bottom. Then we'll add little scallops around the lower edges.
The top of the beard will overlap the lower part of Santa's peach face, just underneath his cheeks.
Beard Shape
With white yarn, ch 25.
Row 1: Sc in the second chain from the hook and in each remaining chain. Ch 1, turn. (24 sc)
Row 2: Sc in each stitch across. Ch 1, turn. (24 sc)
Row 3: Sc in each stitch across. Ch 1, turn. (24 sc)
Row 4: Sc2tog over the first 2 stitches, sc in each of the next 20 stitches, sc2tog over the final 2 stitches. Ch 1, turn. (22 sc)
Row 5: Sc2tog, sc in next 18 stitches, sc2tog. Ch 1, turn. (20 sc)
Row 6: Sc2tog, sc in next 16 stitches, sc2tog. Ch 1, turn. (18 sc)
Row 7: Sc2tog, sc in next 14 stitches, sc2tog. Ch 1, turn. (16 sc)
Row 8: Sc2tog, sc in next 12 stitches, sc2tog. Ch 1, turn. (14 sc)
Row 9: Sc2tog, sc in next 10 stitches, sc2tog. Ch 1, turn. (12 sc)
Row 10: Sc2tog, sc in next 8 stitches, sc2tog. Ch 1, turn. (10 sc)
Row 11: Sc2tog, sc in next 6 stitches, sc2tog. Ch 1, turn. (8 sc)
Row 12: Sc2tog, sc in next 4 stitches, sc2tog. Ch 1, turn. (6 sc)
Row 13: Sc2tog, sc in next 2 stitches, sc2tog. (4 sc)
Fasten off and weave in this end. We'll add the scallops with a new strand of white yarn.
Scalloped Beard Edging
Lay the beard with the right side facing you and its wide foundation edge at the top.
Join white yarn at the upper-left corner. Working down the sloping left side, insert your hook into the ends of the rows, not into the top stitches.
Left side: Work 1 sc into each of the next 2 row ends. Work 3 hdc into the third row end. Repeat that 3-row sequence four times altogether, covering the ends of Rows 1 through 12.
Bottom-left corner: Work 2 sc into the side edge of Row 13.
Bottom edge: Across the 4 stitches of Row 13, work 1 sc in the first stitch, 3 hdc in the second, 3 hdc in the third, and 1 sc in the fourth.
Bottom-right corner: Work 2 sc into the other side edge of Row 13.
Right side: Working upward through the ends of Rows 12 through 1, work 3 hdc into the next row end, then 1 sc into each of the following 2 row ends. Repeat this 3-row sequence four times altogether.
Fasten off, leaving approximately 48 inches of white yarn. You'll use this tail to secure the beard along its top edge, both scalloped sides, and the lower edge before weaving in the remainder.
The edging contains 52 stitches: 20 along each sloping side, 2 at each lower corner, and 8 across the bottom.
You don't need to crochet an edging along the straight top of the beard. That edge will be hidden against Santa's face.
Beard Checkpoint
Before adding the scallops, the beard should measure approximately 6 inches across the top and 3 1/4 inches from top to bottom at the target gauge.
The edging adds a little width and length, so check the actual finished piece against the peach face.
The beard should be wider than the visible lower face, with a gently tapered bottom and small scallops along the sides.
Don't pull the scallops tightly against the background. They should sit flat without curling upward.
Crochet Santa's Red Hat and White Brim
We're going to make the red hat as a separate flat triangle. It's much easier to count the stitches this way, and you can position it over Santa's forehead before sewing it down.
The tip will lean a little to the right, just like the approved design.
Red Hat
With red yarn, ch 27.
Row 1: Sc in second chain from hook and each remaining chain. Ch 1, turn. (26 sc)
Row 2: Sc across. Ch 1, turn. (26 sc)
Row 3: Sc2tog, sc in next 22 stitches, sc2tog. Ch 1, turn. (24 sc)
Row 4: Sc2tog, sc in next 20 stitches, sc2tog. Ch 1, turn. (22 sc)
Row 5: Sc2tog, sc in next 18 stitches, sc2tog. Ch 1, turn. (20 sc)
Hat Shaping Direction: Rows 1 through 5 form the wide lower portion of the hat. Beginning with Row 6, both decreases will be worked along the left edge of the hat, as viewed from the right side with the foundation edge at the bottom. This moves the narrow tip toward the right rather than keeping it centered.
The following directions assume right-handed crochet. Left-handed crocheters should reverse the beginning and end placement of the paired decreases in Rows 6 through 13 to maintain the same rightward lean.
Row 6: Sc2tog twice, sc in next 16 stitches. Ch 1, turn. (18 sc)
Row 7: Sc in next 14 stitches, sc2tog twice. Ch 1, turn. (16 sc)
Row 8: Sc2tog twice, sc in next 12 stitches. Ch 1, turn. (14 sc)
Row 9: Sc in next 10 stitches, sc2tog twice. Ch 1, turn. (12 sc)
Row 10: Sc2tog twice, sc in next 8 stitches. Ch 1, turn. (10 sc)
Row 11: Sc in next 6 stitches, sc2tog twice. Ch 1, turn. (8 sc)
Row 12: Sc2tog twice, sc in next 4 stitches. Ch 1, turn. (6 sc)
Row 13: Sc in next 2 stitches, sc2tog twice. Ch 1, turn. (4 sc)
Row 14: Sc2tog twice. (2 sc)
Hat Checkpoint: The wide foundation edge should remain straight, while the narrowing upper rows lean toward the right when viewed from the front. All 14 row counts remain unchanged.
Fasten off, leaving approximately 42 inches of red yarn for sewing around the hat and securing its folded tip.
At the target gauge, the base of the hat should measure approximately 6 1/2 inches wide, and the hat should measure about 3 1/2 inches tall.
The hat is deliberately made as a simple triangle. Its slight curve will come from how you position the narrow upper rows during assembly.
White Hat Brim
With white yarn, ch 27.
Row 1: Hdc in the second chain from the hook and each remaining chain. Ch 2, turn. (26 hdc)
Row 2: Hdc in every stitch across. (26 hdc)
Fasten off, leaving approximately 42 inches of white yarn for sewing around the brim's two long edges and both short ends.
The brim should measure approximately 6 1/2 inches across, matching the width of the red hat's base.
Set it aside until you've attached the hat. We'll sew the brim over the hat's lower edge so the red and peach join won't show.
White Pom-Pom
Using white yarn, make a magic ring.
Round 1: Work 6 sc into the ring. Pull closed. (6 sc)
Round 2: Work 2 sc in every stitch. (12 sc)
Round 3: Sc in every stitch around. (12 sc)
Sl st into the next stitch. Fasten off, leaving a long tail.
The small circle may cup slightly after Round 3. That's fine. Flatten it gently with your fingers when you're ready to sew it onto the hat.
It should measure roughly 1 inch across.
Don't add stuffing. The pom-pom only needs to sit a little higher than the red hat.
Give Santa His Eyes, Nose, Moustache, and Rosy Cheeks
Now for the little details that give Santa his cheerful expression!
We'll embroider his eyes, crochet two small pink cheeks, and make a separate white moustache that sits on top of the beard. These little pieces are easy to work, and you can move them around until you like the expression.
Red Crochet Nose
With red yarn, make a magic ring.
Round 1: Ch 1 (does not count as a stitch). Work 8 hdc into the ring. Pull the ring closed and join with a sl st to the top of the first hdc. (8 hdc)
Fasten off, leaving a 12-inch sewing tail.
Flatten the little circle. It should measure approximately 1/2 to 3/4 inch across, depending on your tension.
Set it aside until assembly.
Pink Crochet Cheeks (Make 2)
Using pink yarn, make a magic ring.
Round 1: Ch 1 (does not count as a stitch). Work 8 sc into the ring. Pull the ring closed and join with a sl st to the first sc. (8 sc)
Fasten off, leaving a 12-inch sewing tail.
Make the second cheek exactly the same way.
Each cheek is a tiny, slightly raised circle. There's no stuffing and no need to add more rounds.
Embroider Santa's Black Eyes
Place the peach face right side up on a flat surface.
Mark two eye positions approximately 1 1/2 inches apart, measured from center to center. The centers should sit about 1 3/4 inches below the top of the peach circle.
Using black yarn and a yarn needle, embroider a small vertical oval at each mark.
- Bring the needle from the back of the peach circle at the bottom of the first eye.
- Make 5 to 7 closely spaced straight stitches, approximately 3/8 inch tall.
- Spread the middle stitches slightly outward to give the eye an oval shape.
- Secure the yarn on the back.
- Repeat for the second eye, keeping both eyes the same size.
Using a small amount of white yarn, add one tiny highlight stitch near the upper part of each black oval.
Attach the Pink Cheeks
Place one pink circle below and slightly outside each eye.
The cheek centers should sit approximately 2 1/4 inches below the top of Santa's face.
Using the pink sewing tails, stitch around the outer edges of both cheeks, catching the peach yarn underneath.
Keep the circles flat but slightly raised. They shouldn't overlap the eyes.
Secure the ends on the back of the face.
White Crochet Moustache (Make 2)
Santa's moustache is made from two little white pieces that meet beneath his nose. Each piece has narrow ends and a fuller middle, giving it a gently curved look.
Using white yarn, ch 7.
Row 1: Sc in the second chain from the hook, hdc in the next stitch, dc in the next 2 stitches, hdc in the next stitch, and sc in the last stitch. Ch 1, turn. (6 stitches)
Row 2: Sc in the first stitch, hdc in the next stitch, 2 dc in the next stitch, 2 dc in the following stitch, hdc in the next stitch, and sc in the last stitch. (8 stitches)
Fasten off, leaving a 14-inch sewing tail.
Make a second moustache piece using the same instructions.
Each piece should measure approximately 1 1/2 inches long, with a fuller middle and narrower ends.
During assembly, position the two pieces side by side beneath Santa's nose. Turn one piece end for end if needed to make the pair look balanced.
Angle the outside tips slightly upward toward the cheeks. The fuller middle sections should rest over the upper portion of the white beard.
You'll sew the pieces down after attaching the beard.
Check the Facial Features
Before sewing the face onto the green square, lay the beard, moustache pieces, and nose in their approximate positions.
Make sure the cheeks and eyes remain visible above the beard.
The two moustache pieces should fit beneath the red nose without covering the pink cheeks.
If the arrangement looks crowded, move the beard slightly lower. Don't stretch any of the pieces to make them fit.
Once you're happy with the placement, set aside the loose pieces and continue with the assembly instructions.
How to Assemble Your Santa Claus Granny Square
Now we're ready to put Santa together. This is the part I'd take my time with, because a few small changes in placement can make his face look quite different.
Santa has ten crocheted pieces altogether: the face, beard, hat, brim, pom-pom, nose, two pink cheeks, and two white moustache halves. The cheeks should already be attached to the peach face. Lay the remaining pieces on the green square without sewing them down yet. Use removable stitch markers to hold the larger pieces in place while you check the arrangement.
Step 1: Position and Attach the Face
Lay the square right side up, with one edge at the top.
Center the peach circle horizontally. For a finished square measuring approximately 12 to 12 1/2 inches, begin with the top of the face about 4 1/2 inches below the upper edge of the square.
Before sewing, lay the red hat, white brim, pom-pom, and beard in their final positions. Check that the pom-pom and lowest beard scallop remain inside the green area, with at least 1/4 inch of green background showing beyond them. Move the entire Santa arrangement slightly up or down if needed. Keep the face centered, the hat above the eyes, and the beard below the cheeks. Once everything fits without stretching or crowding the red border, mark the face position and begin sewing.
Thread your yarn needle with the long peach tail. Sew around the outside of the face, catching the outer loops of the peach stitches and small portions of the green stitches underneath.
Keep the stitches close together but don't pull them tight enough to pucker the square.
Secure the tail on the wrong side.
Step 2: Position and Attach the Red Hat
Place the wide end of the red hat over the upper edge of the peach face. Let it overlap the face by approximately 1/4 to 1/2 inch.
The lower edge of the hat should run almost straight across Santa's forehead.
Keep the lower portion of the hat flat against the peach face. Beginning around Row 11, gently fold the narrow upper portion toward the right and downward. Let Rows 12 through 14 lie over the red hat underneath, rather than pointing straight upward.
Temporarily place the white pom-pom over the folded tip to check its position. The pom-pom and beard must both remain inside the green background without covering the red border.
The main placement should already have been checked before sewing down the face in Step 1. If the folded hat now causes the pom-pom to cover the border, adjust the hat's fold first. If the complete arrangement still doesn't fit, carefully remove the face attachment stitches and reposition the pieces before sewing them down again. Don't stretch the hat or beard to make them fit.
Once the hat has the desired curve and everything fits, remove the temporary pom-pom and secure the folded portion with several small red stitches. The pom-pom will be permanently attached in Step 5.
Use the red sewing tail to sew around the outer edges of the hat, keeping the folded tip in its chosen position. Secure the yarn on the wrong side and weave in the end.
Do not stretch the hat to make it reach the pom-pom position.
Step 3: Attach the White Beard
Lay the beard over the lower portion of the peach circle.
Its wide, straight edge should sit approximately 2 1/2 to 2 3/4 inches below the top of the face.
Check the position of Santa's eyes and cheeks. You should still see both eyes clearly, along with most of the pink cheeks.
The scalloped sides of the beard will extend slightly beyond the peach circle. Its tapered bottom should point toward the lower center of the green square.
Pin or mark the beard in place.
Using the long white tail, sew across the top edge of the beard first, securing it to the peach face.
Continue sewing around the sloping sides and bottom edge, attaching the white piece to the green background wherever it extends beyond the face.
Keep the scalloped edge smooth. Don't pull the stitches so tightly that the little white curves disappear.
Step 4: Attach the White Hat Brim
Place the white hdc strip across the lower edge of the red hat.
Center it so the same amount extends to the left and right of Santa's face.
Let the strip overlap the red hat slightly. Its lower edge should rest across the top of the peach face without covering the eyes.
Sew along both long edges and the two short ends of the brim.
Keep the sewing stitches small and work them into the white yarn whenever possible.
Add Santa's White Face-Framing Trim
The finished Santa has small white scallops running down both sides of his peach face, connecting the white hat brim visually to the beard.
These scallops are crocheted directly onto the assembled face. You do not need to make separate pieces.
With the right side of the square facing you, join white yarn at the first exposed outer-edge stitch of the peach circle just below the white hat brim on Santa's left side (the viewer's right). The brim extends beyond the peach face, so begin at the peach edge rather than directly beneath the brim's outer end.
Working downward toward the white beard, insert your hook through the next available outer-edge stitch of the peach face, catching a small strand of the green background underneath to anchor the trim.
Work 1 sl st into that stitch, then 3 hdc into the next outer-edge stitch, again catching the backing fabric. Repeat this two-stitch sequence four times altogether.
Left Side Count: 4 sl st and 12 hdc, forming four small white scallops across eight outer-edge stitches.
Fasten off and secure the yarn on the wrong side.
Repeat along Santa's right side (the viewer's left). Start at the first exposed outer-edge stitch of the peach circle just below the white hat brim. Work downward toward the beard, mirroring the four scallops on the opposite side.
Right Side Count: 4 sl st and 12 hdc, forming four matching scallops.
Arrange the scallops so they frame the peach face without covering the pink cheeks or black eyes. The bottom scallop on each side should meet or slightly overlap the upper outer edge of the beard.
If the new trim pulls the peach circle or green square out of shape, loosen the stitches before fastening off. The scallops should sit slightly raised but lie neatly against the background.
Step 5: Sew on the Pom-Pom
Position the white pom-pom at the narrow tip of the red hat.
Using its white sewing tail, attach the circle around its outer edge, catching the red hat underneath.
Let the pom-pom overlap the hat tip slightly so there is no visible gap between the two pieces.
The pom-pom should remain a little raised but should not dangle loosely.
Step 6: Attach Santa's White Moustache and Red Nose
Place the two white moustache pieces over the upper portion of the beard.
Position their inner ends near the center of Santa's face, directly beneath the red nose position. Let their outer ends angle gently upward toward the pink cheeks.
The pieces should sit beside each other, not directly on top of one another. A slight overlap at their inner ends is fine because the nose will cover the join.
Using the white sewing tails, stitch around the edges of each moustache piece, catching the beard and peach face underneath wherever they overlap.
Keep the two middle sections slightly raised, but secure both ends firmly.
Now center the little red nose over the place where the moustache pieces meet.
The lower edge of the nose should overlap the inner ends of the moustache pieces.
Using the red sewing tail, stitch around the nose, catching the peach face and white moustache underneath.
Keep the nose round and slightly raised. You don't need stuffing.
Check that both moustache halves remain visible beneath the nose and that the pink cheeks aren't covered.
Step 7: Check the Finished Santa
Lay the completed granny square flat and look at Santa from a little distance. The red hat should sit above his eyes, the white brim should cover the hat-to-face join, and the pom-pom should rest inside the green background.
Check that both black eyes are level, the pink cheeks remain visible, and the white moustache halves meet neatly beneath the red nose.
The beard should be centered beneath the face, with its scalloped edges lying flat against the green square.
Check all four corners of the square. They should remain square without pulling, twisting, or rippling.
Remove every temporary pin and stitch marker, including any used to position the appliqués or mark the corners. Check the back for loose yarn ends before beginning the final finishing.
Finishing Your Santa Granny Square
Once all the pieces are attached, turn the square over and check the back.
Weave in each remaining yarn end through several stitches of the same color. Change direction once or twice to help keep the end from working loose.
Trim the ends only after they're firmly secured.
Gently shape the square with your hands. If the corners need straightening, lightly dampen and block the square on a flat surface according to your yarn's care instructions.
Don't press an iron directly onto Santa's face, beard, or hat. You want to keep the little raised details intact.
What If the Pieces Don't Fit?
The face is too large for the square: Compare the actual circle and green square measurements against the gauge checkpoints. The face should be approximately 4 3/4 inches across. If it's much larger, remake it with a smaller hook rather than removing increase rounds.
The beard is wider than expected: Some extra width is intentional, but the scallops shouldn't reach the red border. Check your single crochet gauge and make sure the beard's top edge contains 24 stitches before the edging is added.
The hat doesn't reach the position shown in the example: Check that its base has 26 stitches and its final row has 2. Position the hat with its base straight and gently angle or fold the narrow tip. The simple triangle won't reproduce every curve of the photographed hat.
The hat brim is too short or too long: Measure the red hat base and white brim before sewing. Both have 26 stitches across, but single crochet and half double crochet can differ in width. If they don't match, adjust the hook size used for the brim and remake that piece.
The square curls at the corners: Check that each corner has (2 dc, ch 2, 2 dc). Make sure you haven't skipped any of the double crochet stitches along the sides.
The white border accents pull the sides inward: Loosen the embroidery stitches. Those decorative loops shouldn't change the square's shape.
Using the Square in a Blanket or Cushion
This Santa granny square can be used as the front of a Christmas cushion or combined with other holiday squares for a blanket.
If you're joining it to other squares, make sure they have matching outside measurements and compatible edge stitch counts.
One thing to check before planning a whole blanket: this Santa square is larger than the approximately 8-inch coordinating squares used in my free Christmas granny square patterns collection. You can't join them directly at their original sizes and expect the edges to line up. I'd use this larger Santa for a separate cushion or make coordinating squares with matching finished measurements.
You can use the outer red round as the joining edge, or add a plain round of single crochet to create a neater seam.
For an optional single crochet joining edge, join red yarn in any ch-2 corner space.
Joining Round: Work 3 sc into the first corner space.
Along the next side, work 1 sc in each of the next 5 dc, then 2 sc in the next dc. Repeat (1 sc in each of the next 6 dc, 2 sc in the next dc) five times. Work 1 sc in each of the final 2 dc.
In the next corner space, work 3 sc. Repeat the same 43-dc side sequence.
Continue around the remaining two sides, working 3 sc into each corner space and the same side sequence each time. Join with a sl st to the first sc.
Count: 208 sc total. Each side contains 49 sc worked into the 43 existing dc, with six evenly spaced increases. Each of the four corners contains 3 sc.
Checkpoint: At the suggested gauge, 49 sc should cover approximately the same width as the preceding 43 dc. Lay the square flat before fastening off. The new edge should follow the red border without pulling inward or rippling. If necessary, check your single crochet gauge before completing the joining round.
If you're making the square for a baby keepsake blanket, embroider the facial details securely and check that every appliqué is firmly attached. Avoid buttons, plastic eyes, or loose decorative pieces. Keep decorative blankets and cushions out of an infant's sleep space. The U.S. Consumer Product Safety Commission recommends keeping cribs, bassinets, and play yards free of blankets, pillows, and other loose items.
And if you want another Christmas design to go with Santa, take a look at the Christmas tree granny square pattern. The two designs would make a cheerful holiday combination once their finished sizes are matched.
Santa Claus Granny Square Pattern FAQ
Is this Santa Claus granny square suitable for beginners?
It's best for a confident beginner who already knows single crochet, double crochet, basic increases and decreases, and how to sew crocheted pieces together. The individual pieces are simple, but getting all the facial features in the right positions takes a little care.
Can I make the Santa face separately from the granny square?
Yes. Santa is made from ten separate crocheted pieces: the peach face, white beard, red hat, white brim, pom-pom, red nose, two pink cheeks, and two white moustache halves. You can arrange and sew the pieces onto another crocheted background, provided it has enough room for the complete design.
Can I use different yarn colors?
Of course. You could use burgundy instead of bright Christmas red, cream instead of white, or a lighter green background. Keep the yarn weight and gauge consistent if you want the pieces to fit the same way.
Do I have to make all 36 white border accents?
No. They're decorative. You can leave the border plain red if you'd rather spend less time on embroidery. The square will have exactly the same stitch counts either way.
Can I use this square for a Christmas blanket?
Yes. Make additional squares at the same gauge and join them along their outside edges. You can alternate Santa with plain squares or other Christmas motifs. Measure every finished square before joining so the seams stay even.
Has this crochet pattern been physically tested?
This pattern was developed using calculated stitch counts, expected gauge measurements, and a finished design reference. It has not yet been physically sample-tested. Check the component measurements before assembly, especially the fit of the hat brim and the proportions of the beard.
When you click on links to various merchants on this site and make a purchase, this may result in this site earning a commission. This does not affect the price you pay.

UBGI Gold Standard 2026
Reviewed under the site's
editorial checklist.
Photos, decorating ideas, party setups and reader submissions are shared for inspiration unless a page is specifically presented as a pattern, tutorial, reference guide or step-by-step project. Follow the instructions, measurements, safety guidance and manufacturer directions provided for the particular project or product.
About Jan | Contact | Baby Nursery Ideas (Blog) | Site Map | Privacy Policy | Disclosure Policy | Disclaimer | Affiliate Disclosure | Earnings Disclosure | Facebook | Pinterest
I am a participant in the Amazon Services LLC Associates Program, an affiliate advertising program designed to provide a means for us to earn fees by linking to Amazon. As an Amazon Associate I earn from qualifying purchases.
Copyright © 2006-2026. All Rights Reserved.