Crochet Butterfly Lovey Pattern (Free Baby Security Blanket Pattern)
My crochet butterfly lovey pattern combines the comfort of a baby security blanket with the charm of a colorful butterfly. This free crochet butterfly pattern creates a soft lovey with decorative wings, gentle textures, and an easy-to-hold shape that works beautifully for baby showers, spring baby gifts, and butterfly-themed nurseries. The finished butterfly lovey is lightweight, cuddly, and intended for awake, directly supervised comfort during stroller rides and quiet cuddle time.
By Jan Bay

Supplies for This Butterfly Lovey Pattern
Crochet Butterfly Lovey Pattern
Skill Level: Advanced Beginner
Quick note: This is an advanced beginner crochet butterfly lovey pattern, not a first-time crochet project.
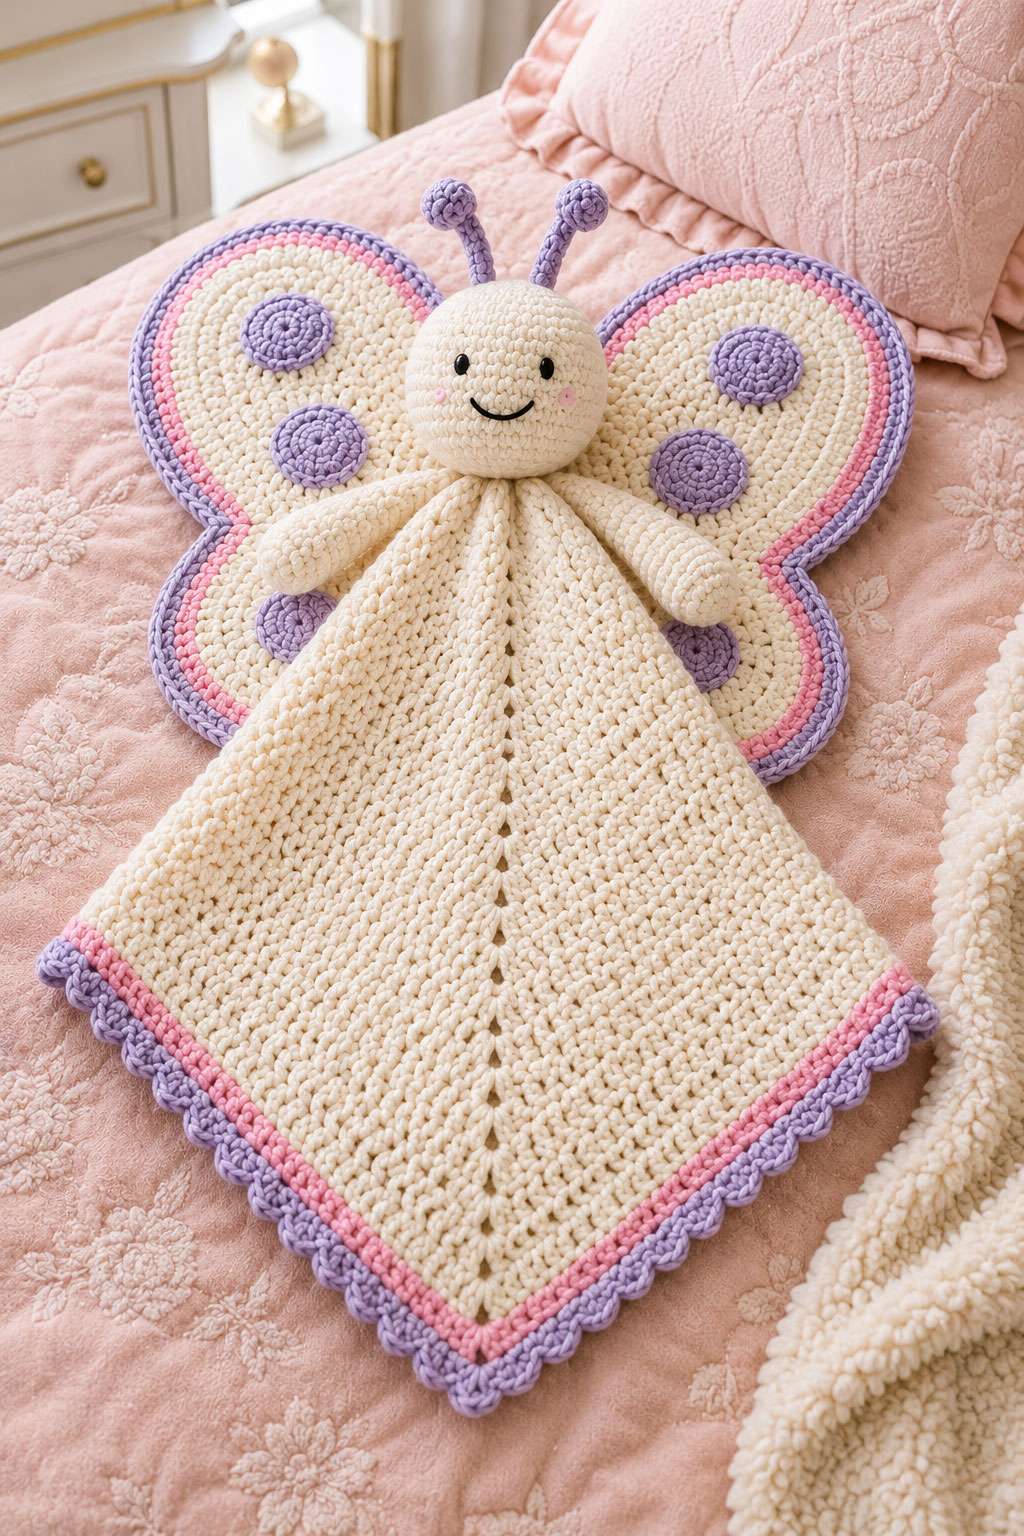
This crochet butterfly lovey pattern makes a soft butterfly with a rounded-square textured blanket, slightly oval head, short curved antennae, small arms and four separate wings. The lavender, pink and cream palette is a perfect choice for a feminine nursery project. As pretty as the colors are, the two larger upper wings, two smaller lower wings and simple heart details are what give this butterfly its charm.
The animal lovey crochet patterns page brings the butterfly together with woodland, farm, safari, ocean and garden animals so you can compare their finished shapes and styles.
For a larger butterfly project made from joined crochet squares, see my butterfly crochet blanket pattern with dimensional appliqués added across the finished blanket.
Pattern overview: This crochet butterfly lovey pattern is written as a complete lovey project rather than a small butterfly applique. The pattern includes the rounded-square blanket, slightly oval head, short antennae, arms, two large upper wings, two smaller lower wings, heart details and complete assembly.
The blanket is worked first and then turned so one corner becomes the top of the finished lovey. The butterfly head sits near that corner with the four separate wings arranged behind it. The pink upper wings have cream heart outlines, while each smaller lavender lower wing has a little cream heart applique.
Finished Measurements
- Blanket before border: approximately 12 x 12 inches
- Blanket after the two plain border rounds: approximately 12 1/2 to 13 inches square
- Head: approximately 3 1/2 to 4 inches wide and 4 to 4 1/2 inches tall
- Each large upper wing: approximately 5 to 5 1/2 inches tall and 3 3/4 to 4 1/2 inches wide
- Each small lower wing: approximately 3 1/4 to 3 3/4 inches tall and 2 1/2 to 3 inches wide
- Antennae length: approximately 1 1/2 to 1 3/4 inches
- Arms length: approximately 3 inches
- Assembled height when the square is displayed point-down: approximately 20 to 22 inches including the antennae
- Assembled width across the widest part of the blanket: approximately 17 1/2 to 18 1/2 inches
The finished measurements are calculated from the written stitch counts and gauge, so allow for a little variation with yarn and tension.
Gauge
Gauge affects the proportion of the blanket, head and wings. Make a small swatch before beginning and use the finished measurements as the final checkpoint.
- Blanket gauge: approximately 4 moss-stitch repeats and 8 rows across 2 inches
- Head gauge: approximately 4 1/4 to 4 1/2 sc across 1 inch, with fabric dense enough to conceal the stuffing
- Wing gauge after blocking: approximately 5 sc and 5 rounds across 1 inch
- If the blanket is stiff rather than softly draping, use a larger hook for the blanket only.
- If the head fabric shows visible gaps, use a smaller hook for the head, arms and other stuffed pieces.
- Make and block the first upper wing before making the second if you need to adjust hook size. Do the same with the first lower wing so each matching pair finishes close to the same size.
Yarn Requirements
- Lavender worsted weight yarn: approximately 180 to 200 yards
- Cream worsted weight yarn: approximately 160 to 180 yards
- Pink worsted weight yarn: approximately 60 to 75 yards
- Black embroidery thread: approximately 1 yard
Yardage varies with yarn thickness, hook size and tension. Keep additional yarn from the same dye lot available until both wings, all borders and the final assembly are complete.
Materials
- Worsted weight #4 yarn
- 4 mm crochet hook
- Additional hook sizes as needed to meet gauge
- Polyester fiberfill
- Yarn needle
- Embroidery needle
- Stitch markers
- Straight pins for assembly
- Scissors
Abbreviations
- MR = magic ring
- ch = chain
- st = stitch
- sl st = slip stitch
- sc = single crochet
- dc = double crochet
- hdc = half double crochet
- inc = 2 sc in the same stitch
- dec = invisible single crochet decrease used in continuous rounds
- sc2tog = single crochet 2 stitches together, used in flat rows
Pattern Notes
- This butterfly lovey pattern uses US crochet terms.
- The blanket is worked flat in rows.
- The head, arms and four wing pieces are worked in continuous rounds. Each antenna is worked from a short foundation chain with a small flat tip and slip-stitch stem.
- Use a stitch marker to mark the first stitch of every amigurumi round.
- Do not use safety eyes for a baby butterfly crochet pattern. Embroider the face instead.
- Use short, securely fastened embroidery stitches for the facial features. Do not use raised or plastic eyes on a baby lovey.
- The two large upper wings, two smaller lower wings, cream heart details, blocking and complete assembly instructions are included below.
Textured Butterfly Lovey Blanket
The blanket forms the lower body of this crochet butterfly lovey. Moss stitch gives the fabric a soft, lightly textured surface with enough flexibility to drape beneath the head.
Use lavender yarn.
Foundation: Ch 48.
Row 1: Sc in 2nd ch from hook. *Ch 1, skip next ch, sc in next ch.* Repeat from * to * across. Turn.
Row 1 count: 24 sc and 23 ch-1 spaces.
Row 2: Ch 1. Sc in first sc. *Ch 1, skip next ch-1 space, sc in next sc.* Repeat from * to * across. Turn.
Row 2 count: 24 sc and 23 ch-1 spaces.
Moss Stitch Note: Every row should contain 24 single crochet stitches from edge to edge. The chain spaces create the texture, but they are not counted as stitches. If you lose or gain stitches, count only the single crochet stitches to get back on track.
Rows 3-23: Repeat Row 2.
Row 24: Repeat Row 2.
Row 24 checkpoint: The blanket should measure approximately 12 inches wide and 6 inches tall. At this halfway point, it should be a rectangle rather than a square. Lay it flat on a table. The side edges should remain straight, and the fabric should not pull inward.
Rows 25-35: Repeat Row 2.
Row 36: Repeat Row 2.
Row 36 checkpoint: The blanket should measure approximately 9 inches tall. The moss stitch texture should appear even across the entire piece with no obvious loose or tight sections.
Rows 37-48: Repeat Row 2.
Each row count: 24 sc and 23 ch-1 spaces.
Row 48 checkpoint: The blanket should measure approximately 11 1/2 to 12 inches square. The fabric should drape softly when lifted from one corner. If the blanket feels stiff, use a larger hook for future projects. If it appears narrow, your chain spaces may be too tight.
Fasten off the lavender yarn after Row 48.
Blanket Border
The redesigned lovey has a simple two-color border instead of a shell or scalloped edge. The cream first round and pink second round frame the lavender blanket without turning the lower edge into a ruffle.
Border Round 1: Join cream yarn in the top right corner.
Ch 1. Across the top edge, work 1 sc in each of the 24 sc and each of the 23 ch-1 spaces. Work 2 sc in the center ch-1 space instead of 1 so the straight top edge contains 48 sc.
In the first corner, work (sc, ch 2, sc).
Work 48 sc down the first side by placing 1 sc into the end of each of the 48 blanket rows.
In the second corner, work (sc, ch 2, sc).
Across the bottom edge, work 1 sc in each of the 47 foundation-chain positions beneath Row 1. Work 2 sc in the center foundation-chain position instead of 1 so the bottom edge contains 48 sc.
In the third corner, work (sc, ch 2, sc).
Work 48 sc up the final side by placing 1 sc into the end of each of the 48 blanket rows.
In the last corner, work (sc, ch 2, sc). Join with sl st to the first sc and fasten off the cream yarn.
Border Round 1 count: 200 sc total plus 4 corner ch-2 spaces. There are 50 sc between each pair of corner spaces when the corner sc are included.
Border Round 2: Join pink yarn in any corner ch-2 space. Ch 1 and work (sc, ch 2, sc) in the same corner space.
Sc in each of the next 50 sc. Work (sc, ch 2, sc) in the next corner space. Repeat this side-and-corner sequence two more times. Sc in each of the final 50 sc along the fourth side. Join with sl st to the first sc of the starting corner and fasten off.
Border Round 2 count: 208 sc total plus 4 corner ch-2 spaces.
Border checkpoint: The border should lie flat with softly rounded corners. If it begins to ripple, check that you haven't accidentally added stitches along the straight sides.
Mark the Top Corner for Assembly
Choose one corner of the finished square to become the top of the butterfly. Lay the blanket right side up like a diamond with that corner pointing straight upward and the opposite corner pointing downward.
Place a stitch marker in the chosen top corner ch-2 space. This is the top-corner marker.
From that corner, measure approximately 1 1/4 inches diagonally toward the center of the blanket and place a second marker in the blanket fabric. This is the head-center marker.
The head, arms and wings will all be balanced around the diagonal line running from the top-corner marker through the head-center marker to the opposite bottom corner.
Butterfly Head
The redesigned butterfly has a slightly taller oval head instead of a round ball-shaped head. Work in continuous rounds and keep the fabric dense enough that the stuffing does not show.
Use cream yarn.
Round 1: 6 sc in MR. 6
Round 2: Inc in each st around. 12
Round 3: *Sc 1, inc.* Repeat 6 times. 18
Round 4: *Sc 2, inc.* Repeat 6 times. 24
Round 5: *Sc 3, inc.* Repeat 6 times. 30
Round 6: *Sc 4, inc.* Repeat 6 times. 36
Round 7: *Sc 5, inc.* Repeat 6 times. 42
Round 8: *Sc 6, inc.* Repeat 6 times. 48
Rounds 9-18: Sc in each st around. 48 each round
Head checkpoint: The head should now look a little taller than it is wide rather than like a round sphere. At the stated gauge, aim for approximately 3 1/2 to 4 inches across.
Round 19: *Sc 6, dec.* Repeat 6 times. 42
Round 20: *Sc 5, dec.* Repeat 6 times. 36
Round 21: *Sc 4, dec.* Repeat 6 times. 30
Round 22: *Sc 3, dec.* Repeat 6 times. 24
Add stuffing after Round 22. Use several small pieces and shape the head as you work. Keep the front smooth and preserve the slightly oval shape.
Round 23: *Sc 2, dec.* Repeat 6 times. 18
Fasten off, leaving a 24-inch sewing tail. Leave the 18-stitch opening unclosed so it can be sewn directly to the blanket.
Face Placement Guide
Choose the smoothest side of the head as the front.
Place the eye markers between Rounds 12 and 13 with their centers approximately 8 stitches apart. Adjust each marker by one stitch if needed so the face is centered on the oval head.
Do not embroider the face yet. The curved eyes and smile are added after the head is attached so you can make sure the butterfly faces straight forward.
Butterfly Antennae
The new antennae are shorter and use a small flat crochet tip rather than the larger popcorn-style ball.
Make 2 with lavender yarn.
Ch 9.
In the second chain from the hook, work 5 sc into the same chain. Join with a sl st to the first of those 5 sc to form a small flat round tip.
Continue down the foundation chain by working 1 sl st in each of the remaining 7 chains.
Fasten off at the base, leaving an 18-inch sewing tail.
Antenna count: 1 small flat 5-sc tip and 7 sl sts in the stem.
Antenna checkpoint: Each antenna should measure approximately 1 1/2 to 1 3/4 inches. Flatten the little tip between your fingers and let the stem curve naturally rather than pulling it straight.
Butterfly Arms
These small arms give the finished butterfly a balanced shape and add a soft detail below the head. The hands are lightly stuffed, while the lavender arms stay soft and flexible.
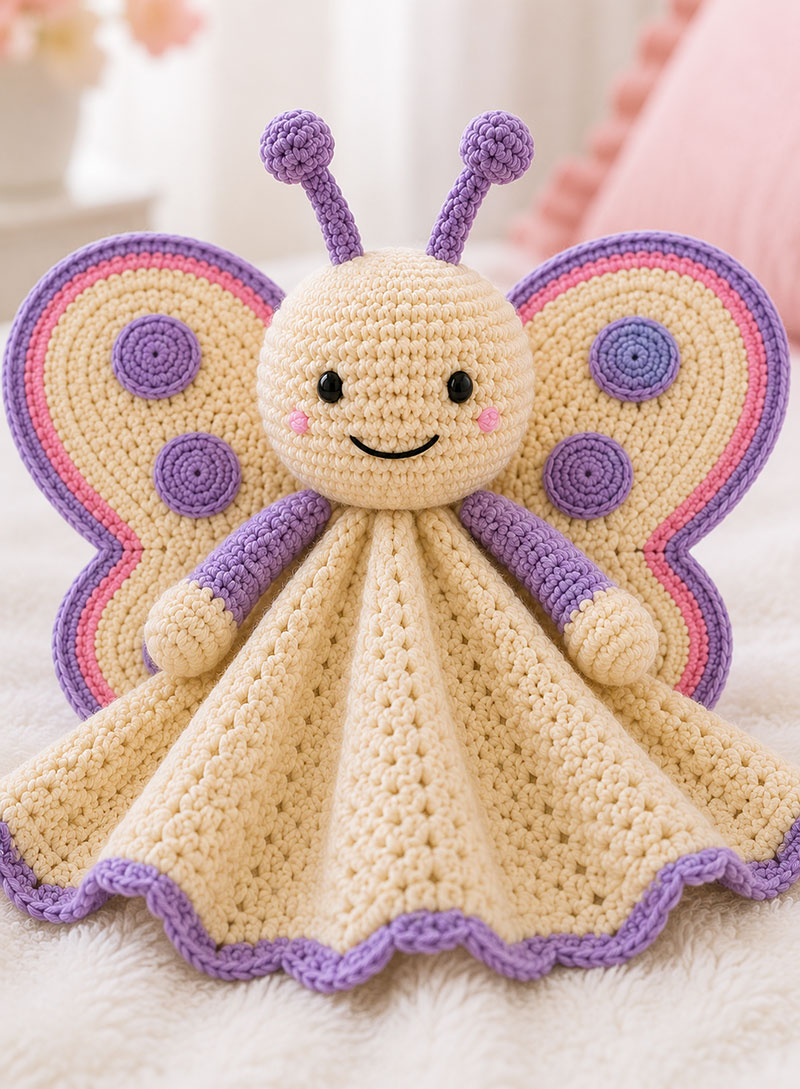
Make 2. Start with cream yarn.
Round 1: 6 sc in MR. 6
Round 2: Inc in each st around. 12
Rounds 3-4: Sc in each st around. 12 each round
Lightly stuff the cream hand only.
Change to lavender yarn.
Rounds 5-10: Sc in each st around. 12 each round
Flatten the opening. Sc through both layers to close.
Closure count: 6 sc across.
Fasten off, leaving a 16-inch sewing tail.
Arm checkpoint: Each arm should measure approximately 3 inches long. The cream hand should be softly rounded, and the lavender arm should bend easily.
Before Beginning the Wings
Check that these pieces are complete before beginning the butterfly wings and final assembly:
- 1 lavender rounded-square blanket with cream and pink border
- 1 cream oval butterfly head
- 2 short lavender antennae
- 2 lavender-and-cream arms
Lightly shape the stuffed head with your hands.
Check that the top-corner marker and head-center marker are still in place on the blanket.
Butterfly Wing and Assembly Instructions
The redesigned butterfly uses four separate wing pieces rather than two connected upper-and-lower wing panels. Make two larger pink upper wings and two smaller lavender lower wings. The separate pieces make the upper and lower wings visibly different in size and shape.
Four-Piece Butterfly Wings
The upper and lower wings are now separate pieces. Work all four wings in continuous rounds around a foundation chain.
Large Upper Wings, Make 2
Use pink yarn.
Foundation: Ch 8.
Place a stitch marker in the first stitch of Round 1 and move it up as you work each continuous round.
Round 1: Starting in the second ch from the hook, sc in the next 6 ch, work 3 sc in the last ch. Turn the foundation chain so you can work along the unused loops on the opposite side. Sc in the next 5 ch and work 2 sc in the remaining end ch. 16 sc
Round 2: Inc in first st, sc in next 5 sts, inc in each of next 3 sts, sc in next 5 sts, inc in each of last 2 sts. 22 sc
Round 3: Sc 1, inc, sc in next 5 sts, *sc 1, inc* 3 times, sc in next 5 sts, *sc 1, inc* 2 times. 28 sc
Round 4: Sc 2, inc, sc in next 5 sts, *sc 2, inc* 3 times, sc in next 5 sts, *sc 2, inc* 2 times. 34 sc
Round 5: Sc 3, inc, sc in next 5 sts, *sc 3, inc* 3 times, sc in next 5 sts, *sc 3, inc* 2 times. 40 sc
Round 6: Sc 4, inc, sc in next 5 sts, *sc 4, inc* 3 times, sc in next 5 sts, *sc 4, inc* 2 times. 46 sc
Round 7: Sc 5, inc, sc in next 5 sts, *sc 5, inc* 3 times, sc in next 5 sts, *sc 5, inc* 2 times. 52 sc
Round 8: Sc 6, inc, sc in next 5 sts, *sc 6, inc* 3 times, sc in next 5 sts, *sc 6, inc* 2 times. 58 sc
Round 9: Sc 7, inc, sc in next 5 sts, *sc 7, inc* 3 times, sc in next 5 sts, *sc 7, inc* 2 times. 64 sc
Round 10: Change to lavender. Sc 8, inc, sc in next 5 sts, *sc 8, inc* 3 times, sc in next 5 sts, *sc 8, inc* 2 times. 70 sc
Join with sl st and fasten off, leaving a 24-inch sewing tail.
Upper-wing checkpoint: Block each wing to approximately 5 to 5 1/2 inches tall and 3 3/4 to 4 1/2 inches across. Choose one rounded end of each wing as the inner attachment end and mark it with removable yarn.
Cream Heart Outlines on the Upper Wings
Block both upper wings before adding the heart outlines.
On the front of each pink wing, lightly mark a heart approximately 2 to 2 1/2 inches tall. Mirror the two hearts so their pointed ends angle downward and inward toward the butterfly's head when the wings are assembled.
Use cream yarn for surface crochet. Hold the cream yarn behind the wing, insert the hook from the front along the marked heart line and pull up a loop. Work surface slip stitches around the entire heart outline, keeping the stitches loose enough that the wing stays flat.
Secure and weave both cream yarn ends into the back of the wing. The heart should lie flat with no long loose strands on the surface.
Small Lower Wings, Make 2
Use lavender yarn.
Foundation: Ch 6.
Place a stitch marker in the first stitch of Round 1 and move it up as you work each continuous round.
Round 1: Starting in the second ch from the hook, sc in the next 4 ch, work 3 sc in the last ch. Turn the foundation chain and work along the unused loops on the opposite side. Sc in the next 3 ch and work 2 sc in the remaining end ch. 12 sc
Round 2: Inc in first st, sc in next 3 sts, inc in each of next 3 sts, sc in next 3 sts, inc in each of last 2 sts. 18 sc
Round 3: Sc 1, inc, sc in next 3 sts, *sc 1, inc* 3 times, sc in next 3 sts, *sc 1, inc* 2 times. 24 sc
Round 4: Sc 2, inc, sc in next 3 sts, *sc 2, inc* 3 times, sc in next 3 sts, *sc 2, inc* 2 times. 30 sc
Round 5: Sc 3, inc, sc in next 3 sts, *sc 3, inc* 3 times, sc in next 3 sts, *sc 3, inc* 2 times. 36 sc
Round 6: Sc 4, inc, sc in next 3 sts, *sc 4, inc* 3 times, sc in next 3 sts, *sc 4, inc* 2 times. 42 sc
Round 7: Sc 5, inc, sc in next 3 sts, *sc 5, inc* 3 times, sc in next 3 sts, *sc 5, inc* 2 times. 48 sc
Join with sl st and fasten off, leaving an 18-inch sewing tail.
Lower-wing checkpoint: Block each lower wing to approximately 3 1/4 to 3 3/4 inches tall and 2 1/2 to 3 inches across. Mark one rounded end of each piece as the inner attachment end.
Small Cream Heart Appliques, Make 2
Use cream yarn and make a magic ring.
Ch 2. Into the ring work 3 dc, 3 hdc, ch 1, 1 dc, ch 1, 3 hdc, 3 dc, ch 2, then sl st into the ring.
Pull the magic ring tightly closed and fasten off, leaving a sewing tail.
Make a second heart the same way.
Center one cream heart on the front of each lavender lower wing with the point facing downward and slightly inward. Sew around the complete outside edge of the heart so it lies flat.
With pink yarn, add 1 or 2 short flat stitches in the center of each cream heart for the small pink accent shown in the finished butterfly.
Blocking and Final Wing Check
Block the four wing pieces before assembly using a method appropriate for your yarn's fiber content and care label.
Compare the two upper wings side by side and the two lower wings side by side. Matching pairs should be close in size and should lie flat without cupping or twisting.
After blocking, add the cream upper-wing heart outlines and sew the small cream hearts to the lower wings.
Final wing checkpoint: You should now have 2 large pink-and-lavender upper wings with mirrored cream heart outlines and 2 smaller lavender lower wings with cream heart appliques.
Finished-piece checkpoint before assembly: You should have 12 crocheted pieces: 1 blanket, 1 head, 2 antennae, 2 arms, 2 upper wings, 2 lower wings and 2 small cream heart appliques. The two cream heart outlines on the upper wings are surface crochet and are not separate pieces.
Assembly, Embroidery and Finishing
Lay the blanket right side up like a diamond with the marked top corner pointing upward.
Assembly Order
- Confirm that all four wings have been blocked and decorated.
- Temporarily position the head over the head-center marker.
- Arrange the two upper wings behind the head.
- Arrange the two smaller lower wings below the upper wings.
- Remove the temporarily positioned head without disturbing the pinned wings.
- Sew all four wing bases securely to the back of the blanket.
- Return the lovey right side up and sew the head over the upper inner wing area.
- Add hidden stabilizing stitches between the upper wings and the back of the head.
- Sew on the antennae.
- Sew on the arms.
- Embroider the curved eyes, smile and optional cheeks.
- Remove all pins and markers, weave in every yarn end and perform the final tug test.
Wing Placement
Keep the blanket in its diamond orientation with the top-corner marker pointing upward. Temporarily center the 18-stitch opening of the head over the head-center marker without sewing it yet.
Position the Upper Wings
- Place one large pink wing on each side of the head.
- The marked inner end of each wing should point toward the head.
- Slide approximately 1 to 1 1/2 inches of each inner wing end behind the upper back of the blanket.
- Angle the wings upward and outward so the pair mirrors each other.
- The cream heart points should angle inward toward the butterfly rather than toward the outer wing edges.
Position the Lower Wings
- Place one smaller lavender wing below each large upper wing.
- Slide approximately 1 inch of each marked inner end behind the blanket.
- Position each lower wing approximately 2 1/2 to 3 inches down from the marked top corner along its side of the blanket.
- Allow the upper wing to overlap the top of the lower wing by about 3/4 to 1 inch.
- Check that the two little cream hearts sit at the same height.
Stand back and compare both sides before sewing. The two upper wings should match each other, and the two lower wings should match each other.
Sew the Wings to the Blanket
Carefully remove the temporarily positioned head without disturbing the wings.
Turn the blanket wrong side up. If a wing's sewing tail is close to its inner attachment end, use that tail. Otherwise weave it in and use a separate length of matching yarn.
Whipstitch the hidden inner 1 to 1 1/2 inches of each upper wing securely to stable blanket stitches. Do not sew only through an open moss-stitch chain space.
Sew the hidden inner inch of each lower wing to the blanket in the same way.
Where an upper and lower wing overlap, add 2 or 3 small hidden stitches through the two wing layers so the pair stays together without becoming stiff.
Head Placement
Return the lovey right side up and place the head over the head-center marker.
Center the 18-stitch opening around the marker with the top corner of the blanket directly behind the lower back of the head. Make sure every opening stitch rests on blanket fabric. If necessary, move the head only slightly farther toward the center while keeping it aligned with the top-to-bottom diagonal.
The head should overlap the two upper inner wing ends evenly.
Pin the head in place.
Use the 24-inch cream tail to whipstitch through each of the 18 opening stitches and stable blanket stitches beneath them. Keep the stitches snug without pulling tightly enough to flatten the oval head.
Stabilize the Upper Wings
Turn the lovey so the back is facing upward.
Add 2 or 3 small hidden stitches between the inner edge of each upper wing and the back half of the head where the pieces touch.
Do not pass these stitches through the front of the face.
Antennae Placement
Position the two antennae at the top of the head with their bases approximately 5 stitches apart.
Sew the bases between Rounds 4 and 5. Angle the stems slightly outward and allow each one to curve naturally.
Sew through the base several times before weaving the tails into the head.
Arm Placement
Lay the lovey right side up. The flattened six-stitch closure at the top of each existing arm is the attachment edge.
- Place one arm on each side of the head with the cream hands pointing downward.
- Slide approximately 1/2 inch of each flattened closure beneath the lower side of the head.
- Keep both arms at the same height and angle them slightly downward over the lavender blanket.
- Pin each arm to stable blanket stitches rather than attaching it only to the head.
Using the existing 16-inch sewing tail, sew through each of the 6 closure stitches and the stable blanket stitches beneath them.
Add 1 or 2 small hidden stitches from the inner top of each arm to the lower back or side of the head. Tug-test both arms before weaving in the tails.
Face Embroidery
Use black embroidery thread for the eyes and smile. Keep all visible stitches short, flat and secure.
Curved Eyes
- Center one eye at each marker between Rounds 12 and 13.
- Use 2 or 3 short backstitches to make a shallow curved closed eye.
- Mirror the curve on the second eye.
- If you want the eyelash look shown in the finished butterfly, add 1 or 2 very short stitches at the outer end of each eye.
Smile
- Center the smile approximately 2 rounds below the eyes.
- Form the small curve with 2 or 3 short backstitches.
- Do not use one long exposed strand across the face.
Optional Cheeks
- Use pink embroidery thread to make 1 or 2 short satin stitches below each eye.
- Keep the cheeks flat and evenly positioned.
Secure every embroidery end through several head stitches, pass the remaining tail into the stuffed head and trim only after confirming that the embroidery cannot loosen.
Final Measurements and Display
After blocking and assembly, lay the lovey flat with the blanket in its diamond orientation and without pulling the wings outward.
- Assembled height including antennae: approximately 20 to 22 inches
- Assembled width across the widest part of the blanket: approximately 17 1/2 to 18 1/2 inches
- Head: approximately 3 1/2 to 4 inches wide and 4 to 4 1/2 inches tall
- Upper wings: approximately 5 to 5 1/2 inches tall
- Lower wings: approximately 3 1/4 to 3 3/4 inches tall
Minor variation caused by yarn, hook size, tension, border depth and natural drape is expected.
The blanket remains a complete square. Nothing is gathered, rolled or permanently folded to create the finished butterfly shape. The point-down appearance comes only from turning the square so one corner becomes the top attachment area and the opposite corner hangs below.
Troubleshooting
My Wings Curl
Re-block the individual wing and shape it flat. Check that the surface-crochet heart on an upper wing was not worked so tightly that it pulls the pink fabric inward.
My Wings Look Uneven
Compare the two upper wings separately and the two lower wings separately. Then check that matching pieces are attached the same distance from the marked top corner.
My Head Wobbles
Add another secure pass around the 18-stitch head opening and check the hidden stabilizing stitches between the upper wings and the back of the head.
One Wing Sits Higher Than the Other
Remove the attachment stitches from that wing and reposition it before finishing the assembly. Do not stretch one wing farther during blocking just to compensate for uneven placement.
FAQ About This Crochet Butterfly Lovey Pattern
Is this crochet butterfly lovey pattern beginner friendly?
This pattern is best for an advanced beginner. You should already know how to make single crochet, double crochet, increases, decreases, simple color changes, and basic sewing joins.
Can I use safety eyes on this butterfly lovey?
No. For a baby lovey, embroidered eyes are the better choice. Buttons, beads, and plastic safety eyes can become choking hazards if they loosen over time.
Can I change the colors?
Yes. The pictured version uses lavender, pink and cream, with pink upper wings, lavender lower wings and cream heart details. If you change the colors, keep enough contrast for the four separate wings and heart details to remain easy to see.
Why are the wings made as four separate pieces?
Using separate upper and lower wings gives the butterfly two clearly different wing sizes and makes it easier to angle each piece during assembly. The larger upper wings can sit behind the head while the smaller lower wings sit farther down the blanket.
Baby Safety Notes
This crochet butterfly lovey is a handmade comfort item for awake, directly supervised use. Keep it out of every infant sleep space, including cribs, bassinets and play yards, during naps and nighttime sleep. For current safe-sleep guidance, review the U.S. Consumer Product Safety Commission’s Safe Sleep information.
- Use securely embroidered eyes and facial features only.
- Do not use plastic eyes, buttons, beads or glued decorations.
- Sew the head, wings, lower-wing heart appliques, arms and antennae firmly in place, and make sure the surface-crochet heart outlines are securely fastened.
- Weave every yarn end securely into several stitches.
- Inspect the lovey regularly for loose yarn, open seams or damaged pieces.
- Remove the lovey from all infant sleep spaces during every sleep period.
Before gifting the lovey, tug-test the head, wings, arms, antennae and both lower-wing heart appliques. Check the upper-wing heart outlines for loose yarn as well. Stop using the item if any component loosens, stuffing becomes visible or the crocheted fabric becomes damaged.
Before Calling It Finished
- Head centered on the top-to-bottom blanket diagonal
- Upper wing joins hidden and secure
- Lower wing joins hidden and secure
- Two upper wings symmetrical
- Two lower wings symmetrical
- Cream heart details secure and flat
- Face centered
- Antennae secure
- Arms evenly positioned
- All straight pins, stitch markers and contrasting yarn markers removed
- All ends woven in
- No gaps in sewing seams
Once everything passes the final checklist, your crochet butterfly lovey is ready to gift, display, or enjoy as part of a butterfly-themed nursery.
For a complete room plan to match the finished lovey, these butterfly nursery theme ideas show how to coordinate butterfly bedding, wall decor, colors and handmade accents.
When you click on links to various merchants on this site and make a purchase, this may result in this site earning a commission. This does not affect the price you pay.

UBGI Gold Standard 2026
Reviewed under the site's
editorial checklist.
Photos, decorating ideas, party setups and reader submissions are shared for inspiration unless a page is specifically presented as a pattern, tutorial, reference guide or step-by-step project. Follow the instructions, measurements, safety guidance and manufacturer directions provided for the particular project or product.
About Jan | Contact | Baby Nursery Ideas (Blog) | Site Map | Privacy Policy | Disclosure Policy | Disclaimer | Affiliate Disclosure | Earnings Disclosure | Facebook | Pinterest
I am a participant in the Amazon Services LLC Associates Program, an affiliate advertising program designed to provide a means for us to earn fees by linking to Amazon. As an Amazon Associate I earn from qualifying purchases.
Copyright © 2006-2026. All Rights Reserved.