Free Crochet Baby Elf Costume Pattern with Ear Beanie and Diaper Cover
By Jan Bay
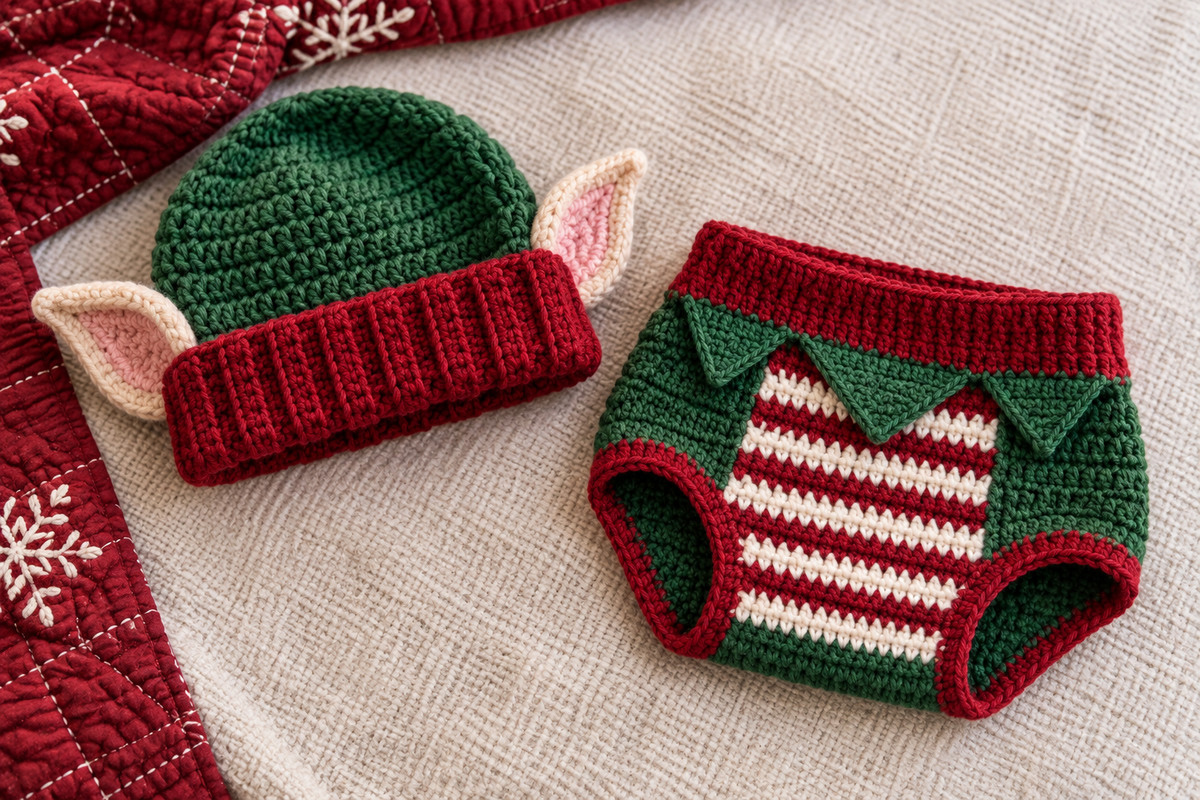
This free crochet baby elf costume pattern with an elf-ear beanie hat and matching diaper cover will dress your little one as one of Santa's helpers for those precious Christmas pictures! The outfit includes a snug green beanie with a folded cranberry-red brim and oversized pointed elf ears peeking out at the sides, plus a matching diaper cover with candy-cane stripes and little elf-tunic points. It's a fun alternative to the traditional long-tail elf hat, and you'll find a pattern for that style here too, along with curly-toed elf booties to complete the outfit for baby's first Christmas photos.
More Free Christmas Crochet Patterns for Baby
Long-Tail Crochet Elf Baby Hat
Christmas Elf-Style Baby Booties
Supplies for this project here.
Jump to the Baby Elf Costume Pattern
Sizes and Materials for the Crochet Baby Elf Costume Pattern
You can make this little elf outfit in four baby sizes, from newborn through 12 months. The hat and diaper cover are worked separately, so you can choose different sizes for the two pieces if you need to. A baby with a larger head doesn't necessarily need a larger diaper cover.
The important measurements are head circumference, waist circumference over a diaper, and the distance from the front waist through the crotch to the back waist. Age is a useful starting point, but measurements will give you a better fit.
Finished Size Guide
| Size | Hat Circumference | Hat Height | Diaper Cover Body Circumference |
|---|---|---|---|
| Newborn | 13.3 in. | 5.3 in. | 14.2 in. |
| 0–3 months | 14.2 in. | 5.6 in. | 16 in. |
| 3–6 months | 16 in. | 6.5 in. | 17.8 in. |
| 6–12 months | 17.8 in. | 6.8 in. | 19.6 in. |
These are calculated finished measurements at the stated gauge, not measurements from a completed sample. The hat circumferences describe the green crown; the folded red brim is designed to stretch and may measure smaller when relaxed. Check the actual brim against the baby's head measurement before adding the crown, since back-loop ribbing can have a different row gauge. The diaper-cover body measurements are taken before adding the narrower waistband.
Yarn and Supplies
Yarn: Soft, washable medium-weight yarn (category 4) in four colors:
Holly green: For the beanie crown, diaper-cover body, and three pointed tunic details.
Cranberry red: For the folded hat brim, diaper-cover waistband, candy stripes, and leg edging.
Warm ivory: For the alternating candy stripes and the outer elf ears.
Soft pink: For the inside of each elf ear.
Estimated yarn amounts: Allow approximately 110–175 yards of green, 55–80 yards of cranberry, 25–40 yards of ivory, and a small amount of pink, depending on size. These are planning estimates rather than physically verified yarn quantities. Having a little extra of the green is worthwhile.
Crochet hooks: 4.5 mm (US 7) for the main diaper cover and hat, and 3.75 mm (US F/5) for the ears and decorative points. Change hook size if needed to obtain gauge.
Other supplies: Tapestry needle, scissors, stitch markers, measuring tape, and small yarn bobbins or separate yarn lengths for the colorwork.
You won't need buttons, bells, ribbon ties, wire, or plastic stiffeners. The little ears and the pointed front trim provide all the decoration this outfit needs.
Gauge
Single crochet: 18 stitches and 20 rows = 4 inches (10 cm), measured over a flat swatch.
Half double crochet: 18 stitches and 13 rounds = approximately 4 inches (10 cm), measured vertically and horizontally on a suitable swatch.
The hat brim uses back-loop single crochet and stretches differently from the hat crown. Check its circumference as you work rather than relying on the number of ribbing rows alone.
Don't skip the gauge swatch. A small difference in tension makes a surprising difference in a baby's hat, especially with that snug little folded brim.
Stitches and Pattern Notes
This pattern uses ordinary crochet stitches, but there are two parts where you'll want to pay attention: shaping the diaper cover and keeping the candy-cane stripes centered on its front.
The hat is fairly straightforward. The red cuff is crocheted sideways to make vertical ribs, folded into a double layer, and joined to the green crown. The ears are added afterward.
Abbreviations: US Crochet Terms
ch: Chain
sc: Single crochet
hdc: Half double crochet
dc: Double crochet
sl st: Slip stitch
st/sts: Stitch/stitches
RS: Right side
WS: Wrong side
BLO: Back loop only
FPdc: Front post double crochet
BPdc: Back post double crochet
sc2tog: Single crochet two stitches together
sc3tog: Single crochet three stitches together
hdc2tog: Half double crochet two stitches together
Working the Pieces
Hat: The ribbed brim is worked in turned rows. After joining and folding the brim, the green crown is worked upward in joined rounds. The starting chain of each crown round does not count as a stitch.
Diaper cover: The main piece is worked in turned rows. Begin at the back waist, decrease toward the crotch, work the narrow crotch section, and increase again toward the front waist. Join the upper sides afterward. The waistband and leg borders are added in rounds.
Colorwork: The front stripes alternate two rows of cranberry and two rows of ivory. Keep the middle striped area centered as the green side sections grow. Separate small balls of green yarn make it easier to work both sides without carrying long strands behind the stripes.
Change colors during the final pull-through of the stitch immediately before the new color begins. Keep unused yarn on the wrong side, and carry a waiting stripe color only along the short vertical edge of its own stripe section. Don't carry it all the way across the front.
Size order: Whenever four stitch counts appear in parentheses, they are given in this order: newborn (0–3 months, 3–6 months, 6–12 months).
Turning chains: For all flat single-crochet pieces, ch 1 and turn once between rows, unless the instructions say otherwise. If a row already ends with "Ch 1, turn," do not repeat that step before beginning the next row. For groups of rows written as a range, ch 1 and turn after each row except the final row of that piece. Turning chains do not count as stitches. Unless stated otherwise, work into both loops.
Stitch-count checks: Count each shaping row before moving to the next. The instructions include specific checkpoints for the hat crown, crotch shaping, front colorwork, and triangular points.
Work the main parts first and save the little decorative details until the end. It's much easier to position the ears and the three front points once you can see the actual shape of the finished pieces.
Crochet Elf Beanie Hat Pattern
Let's begin with the little green beanie. Unlike the long, pointed elf hats that droop over to one side, this one has a rounded crown and a wide red brim that folds up around the baby's forehead.
We're making the cranberry brim first, then adding the green crown. The two oversized ears go on last so you can position them exactly where they look best.
Step 1: Make the Cranberry Ribbed Brim
Use cranberry yarn and the 4.5 mm hook.
Foundation: Ch 13 (13, 15, 15).
Row 1: Sc in the second ch from hook and in each remaining ch. You should have 12 (12, 14, 14) sc. Ch 1, turn.
Row 2: Sc in the BLO of each stitch across. Ch 1, turn.
Continue: Repeat Row 2 until you have completed a total of 60 (64, 72, 80) rows, counting Row 1.
Keep the stitch count at 12 (12, 14, 14) for every row. The little ridges running across your strip will become the vertical ribs of the hat brim.
Bring the first and last short ends together without twisting the strip. Join them with a neat seam, using slip stitches or a tapestry needle. You now have a wide ribbed tube.
Fold the tube lengthwise with the wrong sides together. The two long edges should meet evenly, and the folded edge becomes the bottom edge of the finished hat.
The folded brim should be approximately 1 1/3 inches deep for newborn and 0–3 months, or approximately 1 1/2 inches deep for 3–6 and 6–12 months, at the stated gauge.
Keep the two raw long edges aligned. We'll crochet through both layers to attach the green crown, which also holds the folded brim together.
Step 2: Crochet the Green Hat Body
Change to holly-green yarn. Use the 4.5 mm hook.
Keep the cranberry seam at the center back. Join the green yarn at that seam, working through the aligned row ends of both red layers.
Round 1: Ch 2. Work 1 hdc through each paired row end of the folded brim. You should have 60 (64, 72, 80) hdc. Join with a sl st to the first hdc. Do not turn.
Check the circumference now. The ribbing needs to stretch enough to sit comfortably beneath the green crown without pulling it into tight gathers.
Rounds 2 onward: Ch 2, hdc in each stitch around, and join with a sl st to the first hdc. Do not increase or decrease.
Continue these even rounds until you have completed the following total number of green rounds, including Round 1:
Newborn: 6 even green rounds, 60 stitches each.
0–3 months: 7 even green rounds, 64 stitches each.
3–6 months: 8 even green rounds, 72 stitches each.
6–12 months: 8 even green rounds, 80 stitches each.
The green section should form a smooth tube above the folded red brim. Now we'll shape the rounded crown.
Step 3: Shape the Rounded Crown
Keep working in green. At the beginning of each decrease round, ch 2. Work the stated decreases, then join with a sl st to the first hdc. The beginning ch 2 does not count as a stitch.
Newborn only, first decrease round: (Hdc in next 13 sts, hdc2tog) 4 times. You now have 56 sts.
For all sizes, use the following decrease sequence. Start at the row matching your current stitch count, then continue downward through the remaining rows until 8 stitches remain.
| Starting Stitches | Work Around | Stitches Remaining |
|---|---|---|
| 80 | (Hdc 8, hdc2tog) 8 times | 72 |
| 72 | (Hdc 7, hdc2tog) 8 times | 64 |
| 64 | (Hdc 6, hdc2tog) 8 times | 56 |
| 56 | (Hdc 5, hdc2tog) 8 times | 48 |
| 48 | (Hdc 4, hdc2tog) 8 times | 40 |
| 40 | (Hdc 3, hdc2tog) 8 times | 32 |
| 32 | (Hdc 2, hdc2tog) 8 times | 24 |
| 24 | (Hdc 1, hdc2tog) 8 times | 16 |
| 16 | Hdc2tog 8 times | 8 |
Size starting points: Newborn begins at 60 stitches with its special four-decrease round, then continues from 56. The 0–3 month size begins at 64, the 3–6 month size begins at 72, and the 6–12 month size begins at 80.
After the final decrease round, fasten off with a long green tail. Thread the tail through the front loops of the remaining 8 stitches and pull the opening closed. Weave the tail securely into the inside of the crown.
Turn the hat right side out and smooth the rounded top with your hands. Don't add a pointed extension or a pom-pom. The oversized ears will provide the elf shape, and the crown needs to stay round like the one in the finished example.
Set the hat aside while you crochet the ears.
Crochet Elf Ears for the Baby Beanie
Those big pointed ears are what make this little hat such fun! They're ivory around the outside, with a soft pink center and gently tapered tips. Make the two ears the same size so they balance each other when attached to the beanie.
We'll use a smaller hook to make the stitches firmer. Each ear has two ivory outer pieces and one pink center. The finished pieces are joined together without wire or plastic supports.
Use the 3.75 mm hook for all the ear pieces.
Ivory Outer Ear: Newborn and 0–3 Months
Make four identical ivory pieces, two for each finished ear.
Foundation: Ch 8.
Row 1: Sc in second ch from hook and across. (7 sts)
Row 2: 2 sc in first st, sc in next 5 sts, 2 sc in last st. (9 sts)
Row 3: Sc across. (9 sts)
Row 4: 2 sc in first st, sc in next 7 sts, 2 sc in last st. (11 sts)
Row 5: Sc across. (11 sts)
Row 6: Sc2tog, sc in next 7 sts, sc2tog. (9 sts)
Row 7: Sc across. (9 sts)
Row 8: Sc2tog, sc in next 5 sts, sc2tog. (7 sts)
Row 9: Sc2tog, sc in next 3 sts, sc2tog. (5 sts)
Row 10: Sc2tog, sc in next st, sc2tog. (3 sts)
Row 11: Sc3tog. (1 st)
Fasten off. Repeat until you have four ivory pieces.
Ivory Outer Ear: 3–6 and 6–12 Months
Make four identical ivory pieces using the following larger shape.
Foundation: Ch 10.
Row 1: Sc in second ch from hook and across. (9 sts)
Row 2: 2 sc in first st, sc in next 7 sts, 2 sc in last st. (11 sts)
Row 3: Sc across. (11 sts)
Row 4: 2 sc in first st, sc in next 9 sts, 2 sc in last st. (13 sts)
Rows 5–6: Sc across. (13 sts)
Row 7: Sc2tog, sc in next 9 sts, sc2tog. (11 sts)
Row 8: Sc across. (11 sts)
Row 9: Sc2tog, sc in next 7 sts, sc2tog. (9 sts)
Row 10: Sc2tog, sc in next 5 sts, sc2tog. (7 sts)
Row 11: Sc2tog, sc in next 3 sts, sc2tog. (5 sts)
Row 12: Sc2tog, sc in next st, sc2tog. (3 sts)
Row 13: Sc3tog. (1 st)
Fasten off. Repeat until you have four ivory pieces.
Pink Inner Ear: Newborn and 0–3 Months
Make two pink pieces.
Foundation: Ch 5.
Row 1: Sc in second ch from hook and across. (4 sts)
Row 2: 2 sc in first st, sc in next 2 sts, 2 sc in last st. (6 sts)
Rows 3–4: Sc across. (6 sts)
Row 5: Sc2tog, sc in next 2 sts, sc2tog. (4 sts)
Row 6: Sc2tog twice. (2 sts)
Row 7: Sc2tog. (1 st)
Fasten off, leaving a long tail for sewing. Make the second pink center the same way.
Pink Inner Ear: 3–6 and 6–12 Months
Make two pink pieces.
Foundation: Ch 6.
Row 1: Sc in second ch from hook and across. (5 sts)
Row 2: 2 sc in first st, sc in next 3 sts, 2 sc in last st. (7 sts)
Row 3: 2 sc in first st, sc in next 5 sts, 2 sc in last st. (9 sts)
Row 4: Sc across. (9 sts)
Row 5: Sc2tog, sc in next 5 sts, sc2tog. (7 sts)
Row 6: Sc across. (7 sts)
Row 7: Sc2tog, sc in next 3 sts, sc2tog. (5 sts)
Row 8: Sc2tog, sc in next st, sc2tog. (3 sts)
Row 9: Sc3tog. (1 st)
Fasten off, leaving a long sewing tail. Make the second pink center.
Assemble the Pointed Ears
Place one pink center on the right side of an ivory ear. Center it so there's a visible ivory border around the sides and tip. Stitch the pink piece down with its long yarn tail, using small stitches that don't show prominently on the front.
Place a second ivory ear behind the first, with wrong sides facing inward and all edges aligned. Join ivory yarn at one lower corner of the ear, where the foundation edge meets a shaped side.
Work sc through both layers along the first shaped side, picking up approximately four stitches for every five row ends. Work one sc at the pointed tip, then continue down the opposite shaped side at the same spacing. Work one sc through both layers in each of the 7 (9) foundation-edge stitches for the smaller (larger) ear. Join with a sl st to the first edging stitch.
Keep the border smooth and flat. Fasten off at the base, leaving a long ivory tail for attaching the ear to the hat. Repeat for the second ear.
You should now have two matching ears, each with a pink center, an ivory border, and a softly pointed tip.
Attach the Ears to the Beanie
Lay the hat flat with the cranberry seam centered at the back. Mark the left and right sides of the hat, approximately one-quarter of the way around its circumference from the back seam in each direction.
Position one ear at each side of the beanie, where the upper cranberry brim meets the lower green crown. Hold each ear with its 7-stitch (9-stitch) foundation edge running nearly vertically against the side of the hat for the smaller (larger) ear. The pointed tip should extend outward from the side of the head and angle slightly upward, not point straight toward the top of the crown.
Angle the foundation edge slightly as needed so its lower end rests against the upper portion of the folded cranberry brim and its upper end reaches the first green round. Keep the pink center facing slightly forward. Sew the entire foundation edge securely to the hat, catching the brim and lower green crown. Add small reinforcing stitches at both ends of the attachment without closing or tightening the hat opening. Repeat on the opposite side, mirroring the angle so the ears extend evenly to the left and right.
Check the position before weaving in the tails. Both ears should extend from the sides of the hat rather than sitting directly on top of the crown.
That's the beanie finished. The rounded green crown, wide red brim, and oversized pink-centered ears should now match the main example image.
Crochet Elf Diaper Cover Pattern with Candy-Cane Stripes
Now for the matching diaper cover! The green sides and little pointed tunic details give it that Santa's-helper look, while the cranberry-and-ivory stripes add a little Christmas cheer right down the front.
The diaper cover is shaped as one continuous piece, starting at the back waist and working down through the crotch before coming up the front. Once the sides are joined, you'll add the red waistband, leg edging, and three green points.
We're keeping the center stripes part of the actual fabric rather than stitching another layer over the front. That avoids unnecessary bulk, especially near the crotch.
Step 1: Crochet the Green Back Panel
Use holly-green yarn and the 4.5 mm hook. Work in turned rows.
Foundation: Ch 33 (37, 41, 45).
Row 1: Sc in the second ch from hook and each remaining ch. You should have 32 (36, 40, 44) stitches. Ch 1, turn.
Row 1 is already complete. The numbered row ranges below include that first row, so continue with Row 2 rather than repeating Row 1. Work one row for each row number shown.
Newborn: Work Rows 1–8 even at 32 sts. Decrease one stitch at each end of Rows 9–18, leaving 12 sts after Row 18. Work Rows 19–26 even at 12 sts.
0–3 months: Work Rows 1–8 even at 36 sts. Decrease one stitch at each end of Rows 9–19, leaving 14 sts after Row 19. Work Rows 20–28 even at 14 sts.
3–6 months: Work Rows 1–9 even at 40 sts. Decrease one stitch at each end of Rows 10–21, leaving 16 sts after Row 21. Work Rows 22–30 even at 16 sts.
6–12 months: Work Rows 1–9 even at 44 sts. Decrease one stitch at each end of Rows 10–22, leaving 18 sts after Row 22. Work Rows 23–32 even at 18 sts.
Back Panel Decrease Method
On each decrease row, work sc2tog over the first two stitches, sc across until two stitches remain, then sc2tog over the final two stitches. Ch 1 and turn.
This removes exactly two stitches from each decrease row, one from either edge.
Your final back panel should have a wide, straight waist edge and a narrow lower section that will pass between the baby's legs.
Back panel stitch-count check: You should finish with 12 (14, 16, 18) stitches across the narrow end and 26 (28, 30, 32) completed rows.
Step 2: Work the Narrow Crotch Bridge
Do not fasten off the green yarn.
Continue working evenly across the remaining 12 (14, 16, 18) stitches for another 2 (2, 3, 3) rows.
These extra rows form the narrow center of the crotch and connect the front and back without a bulky sewn seam between the legs.
Keep the stitch count unchanged throughout the crotch bridge. After completing the final bridge row, ch 1 and turn once for the next row, then fasten off the green yarn and weave its tail securely into the wrong side. Join cranberry yarn at the edge where Front Row 1 begins and work across the crotch stitches as directed in Step 3. Do not carry the unused green yarn along the lower striped section. Fresh green strands are joined later when the side sections begin.
Step 3: Begin the Candy-Cane Striped Front
Change to cranberry red at the beginning of the next row. The front is worked in the same single crochet stitch as the back, but with alternating red and ivory stripes.
Stripe sequence: Work two rows in cranberry, then two rows in ivory. Repeat this four-row sequence throughout the front, including all shaping rows and the final straight rows.
Count the stripe sequence from Front Row 1. For example, Front Rows 1–2 are cranberry, Rows 3–4 are ivory, Rows 5–6 are cranberry, and Rows 7–8 are ivory. Continue alternating every two rows without restarting the sequence when you reach an increase section.
Begin by working straight across the full width of the narrow crotch.
Newborn: Work Front Rows 1–8 even at 12 stitches.
0–3 months: Work Front Rows 1–9 even at 14 stitches.
3–6 months: Work Front Rows 1–9 even at 16 stitches.
6–12 months: Work Front Rows 1–10 even at 18 stitches.
At this stage, the front is still narrow and entirely striped. The green sides begin after the next three increase rows.
Step 4: Widen the Lower Striped Front
Continue the red-and-ivory stripe sequence as established.
For the next three rows, increase one stitch at each end of every row. Keep the entire row in the current stripe color.
Increase method: Work 2 sc in the first stitch, sc across to the final stitch, and work 2 sc in that last stitch. Ch 1 and turn.
Each increase row adds two stitches.
Newborn: Increase on Front Rows 9–11. Stitch counts: 14, 16, 18.
0–3 months: Increase on Front Rows 10–12. Stitch counts: 16, 18, 20.
3–6 months: Increase on Front Rows 10–12. Stitch counts: 18, 20, 22.
6–12 months: Increase on Front Rows 11–13. Stitch counts: 20, 22, 24.
Now the striped front has widened enough for the green side sections to begin.
Step 5: Add the Green Sides While Keeping the Stripes Centered
This is the one section where I'd keep a stitch marker handy. The striped panel needs to stay the same width while the green fabric grows on both sides of it.
The fixed striped section will be 16 (18, 20, 22) stitches wide after the first green increase row.
First green increase row: Join a separate strand of green at the beginning of the row. Work 2 sc in the first stitch using green. Change to the current stripe color and sc across the next 16 (18, 20, 22) stitches. Change to a second strand of green and work 2 sc in the final stitch.
You should now have 20 (22, 24, 26) stitches, arranged as 2 green stitches, 16 (18, 20, 22) striped stitches, and 2 green stitches.
On each following increase row, continue increasing at the two outside green edges. Work the green side stitches, change to the correct stripe color for the fixed center section, then change back to green for the opposite side.
Important: Do not increase within the striped center after this point. All remaining increases go into the outside green edges.
Newborn: Work the green-sided increase section on Front Rows 12–18. The final row has 32 stitches: 8 green, 16 striped, 8 green.
0–3 months: Work the green-sided increase section on Front Rows 13–20. The final row has 36 stitches: 9 green, 18 striped, 9 green.
3–6 months: Work the green-sided increase section on Front Rows 13–21. The final row has 40 stitches: 10 green, 20 striped, 10 green.
6–12 months: Work the green-sided increase section on Front Rows 14–23. The final row has 44 stitches: 11 green, 22 striped, 11 green.
You should see a clear candy-striped center panel, approximately half the total front width, with matching green sections on either side.
Step 6: Complete the Upper Front
Stop increasing. Continue working straight across the entire row, keeping the green side sections and alternating red-and-ivory center stripes in their established positions.
Newborn: Work Front Rows 19–26 even, maintaining 32 stitches.
0–3 months: Work Front Rows 21–28 even, maintaining 36 stitches.
3–6 months: Work Front Rows 22–30 even, maintaining 40 stitches.
6–12 months: Work Front Rows 24–32 even, maintaining 44 stitches.
Fasten off and weave the colorwork ends neatly into the wrong side. Don't pull them tightly enough to gather the striped center.
Front panel check: The completed front should have exactly the same total number of rows as the back: 26 (28, 30, 32). The two upper waist edges should also have the same number of stitches.
Step 7: Join the Side Seams
Lay the shaped piece flat with the right side facing upward. Fold the piece at the center of the narrow crotch bridge, bringing the front and back waist edges together with right sides facing each other and wrong sides facing outward. Line up the upper side edges carefully, matching the front and back row ends. Keep the striped front centered.
Using green yarn and a tapestry needle, join the upper sides with mattress stitch.
Newborn: Join the upper 6 rows on each side.
0–3 months: Join the upper 6 rows on each side.
3–6 months: Join the upper 7 rows on each side.
6–12 months: Join the upper 7 rows on each side.
Leave the shaped edges below these short seams open. They form the two leg openings.
Turn the diaper cover right side out. It should now resemble a pair of high-waisted crocheted briefs, with the candy-cane stripes centered on the front and green fabric wrapping around the hips and back.
Step 8: Crochet the Cranberry Ribbed Waistband
Join cranberry yarn at one of the upper side seams. Work around the complete waist opening.
The original combined front and back waist edges contain 64 (72, 80, 88) stitches. The first round reduces this slightly to help the waistband fit closer than the diaper-cover body.
Round 1, newborn: (Sc in next 6 sts, sc2tog) 8 times. (56 sts)
Round 1, 0–3 months: (Sc in next 7 sts, sc2tog) 8 times. (64 sts)
Round 1, 3–6 months: (Sc in next 8 sts, sc2tog) 8 times. (72 sts)
Round 1, 6–12 months: (Sc in next 9 sts, sc2tog) 8 times. (80 sts)
Join Round 1 with a sl st to the first sc.
Round 2: Ch 2. Dc in each stitch around. Join with a sl st to the first dc. Maintain 56 (64, 72, 80) stitches.
Round 3: Ch 2. Alternate FPdc around the next stitch and BPdc around the following stitch all the way around. Join. Maintain the stitch count.
Rounds 4–5: Ch 2. Work FPdc around each FPdc and BPdc around each BPdc. Join each round. Maintain the same stitch count.
Fasten off, leaving a neat upper edge. Weave the tail into the inside of the waistband.
The red waistband should form a deep, softly ribbed band around the top of the cover, like the one in the finished photograph. It is not folded over.
Step 9: Add Cranberry Edging Around Both Legs
The two leg openings are already shaped by the tapered front and back panels. The red edging follows those curves rather than changing the shape of the cover.
With the right side facing out, join cranberry yarn at a side seam where the first leg opening begins.
Round 1: Each leg opening has 42 (46, 49, 53) exposed row ends: 20 (22, 23, 25) along the back, 2 (2, 3, 3) along the crotch bridge, and 20 (22, 23, 25) along the front.
Work around the opening, picking up stitches through the exposed row ends. Work one sc in each row end except at 6 (8, 7, 9) evenly spaced locations, where you will work sc2tog across two adjacent row ends. Each sc2tog uses two row ends and produces one stitch.
This gives exactly 36 (38, 42, 44) stitches around the opening. Join with a sl st to the first sc. Before working Round 2, check that the edging lies flat without pulling the leg opening inward. The stated counts are calculated targets and may need adjustment if your actual row gauge differs.
Round 2: Ch 1. Sc in every stitch around. Join and fasten off.
Repeat for the second leg opening.
The cranberry edging should be a narrow, smooth outline around each leg, not a thick cuff. It needs to lie flat without tightening the opening against the baby's thigh.
Weave the ends into the inside of the green fabric.
You now have the main diaper cover completed. All that's missing are the three little green points across the front.
Costume Assembly and Finishing
We're almost finished! The three little points across the front of the diaper cover are worth taking a few extra minutes over. They're what turn an ordinary pair of striped crochet diaper-cover shorts into a little elf costume.
Make one larger center triangle and two smaller matching side triangles. They sit directly beneath the cranberry waistband, with their tips pointing downward over the front of the cover, just as shown in the finished photograph.
Step 1: Crochet the Three Green Elf-Tunic Points
Use holly-green yarn and the 3.75 mm hook.
Make one larger center triangle using the following instructions. Then make two smaller matching side triangles using the separate instructions below. The center point should extend farther down the striped front, as shown in the finished example.
Foundation: Ch 11 (12, 13, 14).
Row 1: Sc in second ch from hook and across. You should have 10 (11, 12, 13) stitches. Ch 1, turn.
Row 2: Sc2tog over the first two stitches, sc across until two stitches remain, then sc2tog over the last two stitches. Ch 1, turn.
Continue decreasing one stitch at each end of every row until only two or three stitches remain.
If two stitches remain, sc2tog to make the final point. If three stitches remain, sc3tog to make the final point.
Your stitch counts should follow these sequences:
Newborn: 10, 8, 6, 4, 2, 1. (6 rows)
0–3 months: 11, 9, 7, 5, 3, 1. (6 rows)
3–6 months: 12, 10, 8, 6, 4, 2, 1. (7 rows)
6–12 months: 13, 11, 9, 7, 5, 3, 1. (7 rows)
Two Smaller Side Triangles
Make two matching green side triangles with the 3.75 mm hook.
Foundation: Ch 8 (9, 10, 11).
Row 1: Sc in the second ch from hook and across. You should have 7 (8, 9, 10) stitches. Ch 1, turn.
Row 2: Sc2tog over the first two stitches, sc across until two stitches remain, then sc2tog over the last two stitches. Ch 1, turn.
Continue decreasing one stitch at each end of every row. Ch 1 and turn between rows. When two stitches remain, work sc2tog; when three stitches remain, work sc3tog to complete the point.
Newborn side triangle: 7, 5, 3, 1. (4 rows)
0–3 months side triangle: 8, 6, 4, 2, 1. (5 rows)
3–6 months side triangle: 9, 7, 5, 3, 1. (5 rows)
6–12 months side triangle: 10, 8, 6, 4, 2, 1. (6 rows)
Fasten off each side triangle at its point. Make the second side triangle identically. The finished set consists of one wider, longer center point and two matching smaller side points.
Fasten off at the pointed tip of each triangle and weave that tail securely into the wrong side. Use a separate length of matching green yarn, attached at an upper corner, when sewing the triangle to the diaper cover.
Make all three before attaching them so you can compare their shape and size. They should be broad across the top and taper to a single point at the bottom.
Step 2: Position the Elf-Tunic Points
Lay the diaper cover flat with the striped front facing up and the waistband straight across the top.
Arrange the three triangles directly beneath the lower edge of the cranberry waistband. Place one in the center and one on each side.
Space the three upper edges evenly across the front. They should sit side by side with little or no overlapping at their bases. The middle triangle points down over the candy-cane stripes, while the two outside triangles extend over the transition between the green side sections and striped center.
The center triangle has a base of 10 (11, 12, 13) stitches, and each smaller side triangle has a base of 7 (8, 9, 10) stitches. Together, their bases contain 24 (27, 30, 33) stitches. Because the triangles use the smaller hook, check their actual combined width against the diaper cover rather than matching stitch counts directly. Center the larger triangle over the candy-cane stripes immediately beneath the waistband. Position the two smaller triangles symmetrically on either side, leaving their points slightly higher than the center point. Keep the upper edges close together without gathering or overlapping the fabric.
Using a separate strand of matching green yarn, sew each triangle's straight upper edge to the diaper-cover fabric immediately beneath the cranberry waistband. The middle triangle attaches across the striped section, while the outer triangles attach across the green sides and the edges of the stripes. Use small, even stitches that hold the triangles flat without gathering the fabric.
Stitch the sloping edges down neatly as well, including a secure stitch at each pointed tip. The points should remain clearly outlined but should not hang loose where little fingers could catch them.
Keep all three points facing downward. Don't turn one sideways or add extra points between them. The finished example has exactly three, and that simple arrangement is part of its charm.
Step 3: Check the Finished Color Placement
Before weaving in the last ends, lay the hat beside the diaper cover and compare them with the finished example.
The hat should have a completely green rounded crown, a deep cranberry folded brim, and one oversized ivory-and-pink ear on each side.
The diaper cover should have a cranberry ribbed waistband, solid green back and side sections, a centered panel of cranberry-and-ivory stripes, three green pointed tabs, and narrow cranberry edging around both legs.
Check that the striped front is centered and that the three points don't pull the waistband out of shape.
Weave all remaining yarn ends securely into the wrong side, passing each tail through several stitches before trimming it. Remove all temporary stitch markers and check every ear attachment, seam, and decorative point before the outfit is worn.
Step 4: Complete the Christmas Elf Outfit
Now you have the matching two-piece costume. You can stop here and use the beanie and diaper cover together for Christmas pictures, or add crocheted elf shoes for a complete Santa's-helper outfit.
The Christmas crochet baby booties pattern has the softly curled elf toes that look so cute with this set. I'd use the green booties without the optional bells for a baby.
And if you'd rather have a long, floppy elf hat with your Christmas outfit, there's also a separate free crochet elf baby hat pattern with that traditional pointed shape.
The two hats give you different looks without having to make another diaper cover.
Fit and Sizing Tips for Your Baby Elf Costume
A handmade baby costume needs a little room in the right places. The beanie should stay above the baby's eyebrows, the ears should sit comfortably away from the face, and the diaper cover should fit over a diaper without squeezing around the waist or thighs.
Checking the Hat Fit
Measure around the baby's head just above the eyebrows and ears. Compare that measurement with the finished hat circumference in the size guide.
The ribbed brim should stretch gently without leaving deep marks. If it feels too tight before you've added the green crown, check your gauge first. You can move to the next listed size if its finished circumference is suitable. Don't add extra brim rows and then use the original crown instructions unchanged, because the decrease counts are written for specific stitch totals.
Don't fold the brim so deeply that it pushes the ears up onto the top of the hat. The ears should extend outward from either side, with the pink centers facing slightly forward.
If an ear droops more than you'd like, check the sewing at its base first. A wider, firmer attachment across the upper brim can help support the shape without adding wire or stiffeners.
Checking the Diaper Cover Fit
Measure the baby's waist over the diaper that will be worn with the outfit. Remember that the waistband is narrower than the body of the cover. It should stretch gently when pulled on, then sit comfortably without leaving deep marks.
The cover also needs enough depth from the waistband to the crotch. If you're crocheting for a baby who needs extra room, add a few straight rows near the upper portions of both front and back panels before sewing the side seams. Add the same number of rows to each panel to keep the leg openings balanced.
For more room around the thighs, shorten the upper side seams slightly. If you join one fewer row on both sides, the leg openings will become a little larger. Adjust the cranberry edging to follow the new openings without pulling them tight.
Check the fit before fastening the final ends. It's much easier to correct a leg opening at that stage than after everything has been sewn and tucked away.
Choosing Between the Two Elf Hat Styles
The short ear beanie is the one I'd choose when the oversized ears are meant to be the main feature of the costume. It keeps the look simple and lets those pointed ears show up in the pictures.
The long-tail hat gives a more traditional Christmas elf appearance, especially when paired with curly-toed booties. Either style can go with the same striped diaper cover, so there's no need to crochet a second pair of shorts.
A Quick Note About Baby Photo Props
This outfit is intended for brief, directly supervised photographs while the baby is awake. Remove the beanie before sleep, and don't use the costume as sleepwear. Keep the ears away from the baby's face and check the sewn attachments before each use.
For more information about keeping a baby's sleep space safe, see the U.S. Consumer Product Safety Commission's safe sleep guidance.
No little bells or buttons are needed for the finished outfit. The striped diaper cover, red brim, and pointed elf ears give it plenty of personality all by themselves.
Once everything fits comfortably, arrange the finished pieces together for your Christmas pictures. The matching colors make the whole outfit look coordinated, and that little pair of pink-centered elf ears is bound to steal the show!
Pattern development note: The stitch counts, shaping sequences, and color placement have been reviewed mathematically for internal consistency. The finished dimensions and yarn quantities are estimates, and the pattern has not been physically test-crocheted. The ear structure, waistband stretch, and fit of the leg openings require verification with a completed sample.
When you click on links to various merchants on this site and make a purchase, this may result in this site earning a commission. This does not affect the price you pay.

UBGI Gold Standard 2026
Reviewed under the site's
editorial checklist.
Photos, decorating ideas, party setups and reader submissions are shared for inspiration unless a page is specifically presented as a pattern, tutorial, reference guide or step-by-step project. Follow the instructions, measurements, safety guidance and manufacturer directions provided for the particular project or product.
About Jan | Contact | Baby Nursery Ideas (Blog) | Site Map | Privacy Policy | Disclosure Policy | Disclaimer | Affiliate Disclosure | Earnings Disclosure | Facebook | Pinterest
I am a participant in the Amazon Services LLC Associates Program, an affiliate advertising program designed to provide a means for us to earn fees by linking to Amazon. As an Amazon Associate I earn from qualifying purchases.
Copyright © 2006-2026. All Rights Reserved.