Crochet Baby Cowboy Boots and Booties Pattern Ideas
By Jan Bay
The crochet baby cowboy boots pattern makes a cute pair of western-style booties you can give for baby gifts, newborn photos, shower presents, or decor for a cowboy nursery theme. This page pulls together crochet baby cowboy booties, tiny cowgirl boot ideas, western baby outfit inspiration, and easy ways to tie the look into a ranch, horse, or cowboy baby room.
More western baby ideas to click next:

Need yarn for this crochet baby cowboy boots pattern?
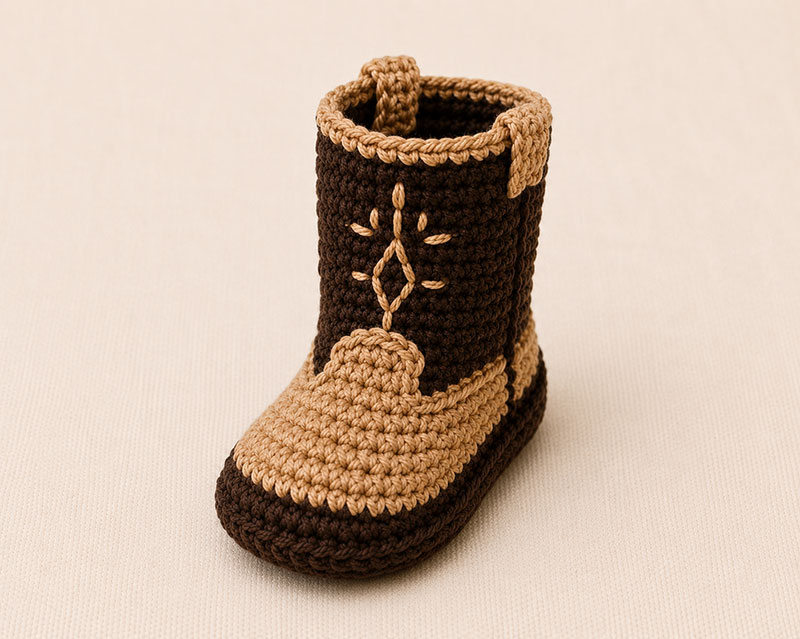
Small crochet booties can look adorable in a photo and still leave a beginner wondering where the toe begins, how tall the shaft should be, or how to make the second boot match the first. This crochet baby cowboy boots pattern keeps the shape close to the example image on this page, with a dark brown sole and shaft, a tan rounded toe wrap, tan cuff trim, side pull tabs, and a simple stitched western motif on the front of each boot.
These booties are western inspired not a copy of any brand. The proportions, stitched shaft detail, and two-tone layout are adjusted so the finished pair has its own handmade look while still giving you an authentic looking western baby boot style.
Quick answer: The dark brown boot body is worked from the sole upward through a 10-round single crochet shaft. A separate tan front vamp with a narrow center tab and two tan pull tabs are sewn onto each boot, then tan cuff trim and an embroidered western motif finish the design.
These are supervised-wear booties only.
Jump to the crochet baby cowboy boots pattern:
Crochet Baby Cowboy Boots Pattern at a Glance
The finished pair should look like two short western baby boots, not tall slippers. The dark brown base gives the bottom weight, the tan toe wrap rounds the front, and the little stitched design on the shaft makes the boot read western without needing buttons, buckles, beads, fringe, or anything loose.
- Skill level: Advanced beginner
- Intended size: Newborn to 3 months; actual fit varies with yarn and tension
- Expected sole length: about 3.5 inches at the stated gauge
- Expected sole width: about 2 inches at the broadest point
- Expected finished boot height: about 3.75 to 4 inches at the stated row gauge
- Expected cuff opening: about 4.75 inches around at the stated stitch gauge
- Main color: dark brown
- Contrast color: tan
- Construction: 2 boot bodies worked from the sole upward, with 2 separate tan vamps and 4 separate tan pull tabs sewn on afterward
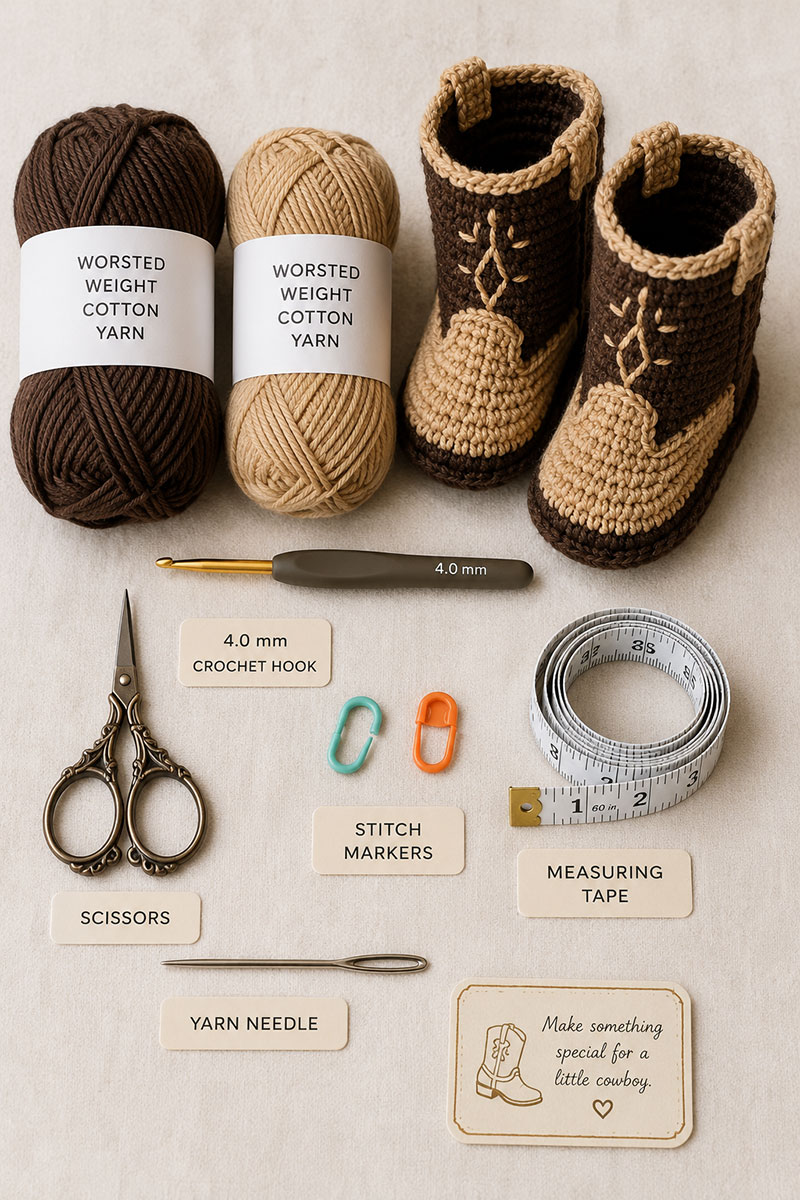
- Yarn: worsted weight cotton or cotton blend in dark brown and tan; one 50-gram skein of each color gives a comfortable working allowance for the pair
If you are making these as part of a western baby gift, they pair naturally with cowboy baby nursery ideas, western nursery theme ideas, and horse nursery theme ideas.
Materials, Gauge and Notes
When making baby booties, yarn choice matters a lot. A yarn that is too limp makes the shaft collapse, while yarn that is too bulky makes the boot look heavy for a newborn foot.
Materials
- 1 skein, 50 grams or larger, worsted weight cotton or cotton blend yarn in dark brown
- 1 skein, 50 grams or larger, worsted weight cotton or cotton blend yarn in tan
- 4.0 mm crochet hook
- Yarn needle
- 2 stitch markers, optional for keeping the center front and center back easy to identify
- Scissors
- Tape measure
Gauge
- 16 single crochet stitches = 4 inches
- 18 single crochet rows = 4 inches
Abbreviations
- ch means chain
- sl st means slip stitch
- sc means single crochet
- sc2tog means single crochet two stitches together
- BLO means back loop only
- st means stitch
Pattern notes
- Ch 1 does not count as a stitch.
- Join each round with a slip stitch unless stated otherwise.
- After joining each round, work the first stitch of the next round into the same stitch as the join unless the pattern says otherwise.
- Keep the right side of the boot body facing outward while working the joined rounds.
- The separate tan vamps and pull tabs are worked flat and turned as instructed.
- Make both soles before building the uppers so you can check that the pair matches.
- The finished measurements are expected targets based on the stated gauge. Check them after light shaping and drying flat.
- Use the stitch counts first, then use the measurements as a final check.
- Do not add buttons, charms, beads, fringe, buckles, or loose ties.
Make the Dark Brown Sole
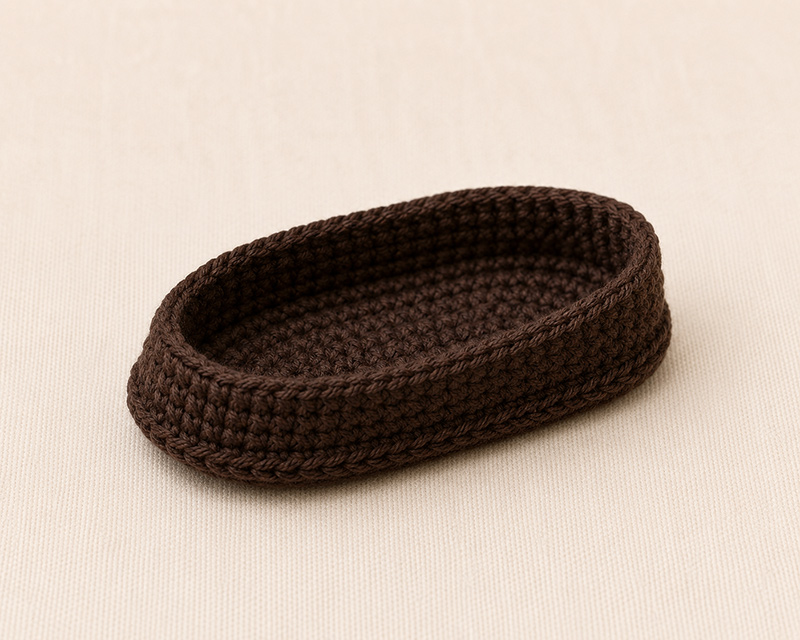
The sole is worked around both sides of the starting chain. The goal is a flat oval, about 3.5 inches long, with no cupping at the toe or heel.
Make 2 soles in dark brown.
Round 1: Ch 10. Sc in second ch from hook. Sc in next 7 ch. Make 3 sc in last ch. Working along the opposite side of the starting chain, sc in next 7 ch. Make 2 sc in last ch. Join to first sc with sl st. 20 sts.
Round 2: Ch 1. Make 2 sc in first st. Sc in next 7 sts. Make 2 sc in each of next 3 sts. Sc in next 7 sts. Make 2 sc in each of last 2 sts. Join. 26 sts.
Round 3: Ch 1. Sc in first st. Make 2 sc in next st. Sc in next 7 sts. Repeat 1 sc in next st, 2 sc in next st three times around the toe. Sc in next 7 sts. Repeat 1 sc in next st, 2 sc in next st two times around the heel. Join. 32 sts.
Checkpoint: At the stated gauge, expect each sole to measure about 3.5 inches long and about 2 inches wide at the broadest point. If the two soles differ, keep the one closest to those target measurements and remake the other before moving on.
Build the Boot Sidewall
The sidewall creates the dark base that is visible around the bottom of the example boots. This is the part that keeps the boot from looking like a flat slipper.
Round 4: Ch 1. Working in BLO, sc in each st around. Join. 32 sts.
Round 5: Ch 1. Sc in each st around. Join. 32 sts.
Round 6: Ch 1. Sc in each st around. Join. 32 sts.
Checkpoint: The boot should now have a dark raised edge around the sole, about two-thirds of an inch high at the stated row gauge. The piece should stand upright when placed on a table.
Add the Tan Toe Wrap
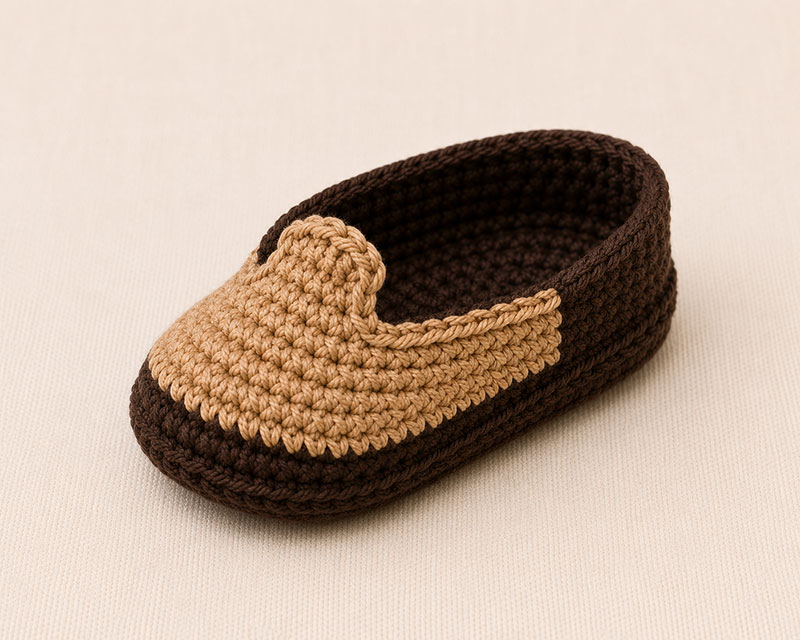
The finished boots have a dark brown foot with a separate tan outer vamp covering only the front of the toe. The tan does not continue around the heel. Making the vamp separately also creates the narrow center tab visible where the tan toe meets the dark shaft.
Color Placement Reference
- Dark brown sole and sidewall: Rounds 1 through 6
- Dark brown toe shaping: Rounds 7 through 9
- Dark brown shaft: Rounds 10 through 19
- Tan vamp: worked separately and sewn over the front toe
- Tan cuff trim: final round only
Shape the toe in dark brown first.
Keep the dark brown yarn attached after Round 6. Count 10 stitches from the center back join. The next 12 stitches are the center-front toe section.
Round 7: Ch 1. Sc in next 10 sts. Sc2tog 6 times across the next 12 sts. Sc in final 10 sts. Join. 26 sts.
Round 8: Ch 1. Sc in next 9 sts. Sc2tog 4 times across the center-front toe. Sc in final 9 sts. Join. 22 sts.
Round 9: Ch 1. Sc in next 8 sts. Sc2tog 3 times across the center-front toe. Sc in final 8 sts. Join. 19 sts.
Checkpoint: The dark brown toe should now curve upward and leave a 19-stitch opening for the shaft. The decreases form the underlying boot shape. They will be covered at the front by the separate tan vamp.
Make 2 tan vamp pieces.
The vamp is worked flat from the broad front edge toward the narrow center tab.
Row 1: Ch 12. Sc in second ch from hook and across. 11 sts.
Row 2: Ch 1, turn. Sc2tog. Sc in next 7 sts. Sc2tog. 9 sts.
Row 3: Ch 1, turn. Sc2tog. Sc in next 5 sts. Sc2tog. 7 sts.
Row 4: Ch 1, turn. Sc2tog. Sc in next 3 sts. Sc2tog. 5 sts.
Row 5: Ch 1, turn. Sc2tog. Sc in next st. Sc2tog. 3 sts.
Row 6: Ch 1, turn. Sc in each st across. 3 sts.
Row 7: Ch 1, turn. Sc in each st across. 3 sts. Fasten off, leaving about a 24-inch tail for sewing.
Vamp checkpoint: At the stated gauge, expect the finished piece to measure about 2.5 to 2.75 inches across the broad toe edge and about 1.5 inches from the broad edge to the top of the center tab. The narrow tab should be 3 stitches, or roughly three-quarters of an inch, wide.
Set the tan vamp aside while you crochet the shaft. It will be sewn on after the shaft is complete so the narrow center tab can lie over the lower front of the shaft like the one shown in the finished boots.
Crochet the Dark Boot Shaft
The finished boot has a taller dark brown shaft made entirely in single crochet. Working ten compact single crochet rounds gives the upright western boot shape and the even horizontal texture shown in the example image.
Continue with dark brown yarn from the 19-stitch opening.
Round 10: Ch 1. Sc in each st around. Join. 19 sts.
Round 11: Ch 1. Sc in each st around. Join. 19 sts.
Round 12: Ch 1. Sc in each st around. Join. 19 sts.
Round 13: Ch 1. Sc in each st around. Join. 19 sts.
Round 14: Ch 1. Sc in each st around. Join. 19 sts.
Round 15: Ch 1. Sc in each st around. Join. 19 sts.
Round 16: Ch 1. Sc in each st around. Join. 19 sts.
Round 17: Ch 1. Sc in each st around. Join. 19 sts.
Round 18: Ch 1. Sc in each st around. Join. 19 sts.
Round 19: Ch 1. Sc in each st around. Join. 19 sts. Fasten off dark brown.
Tan cuff trim: Join tan yarn at the center back of the cuff. Ch 1. Sc in each st around. Join. 19 sts. Fasten off and weave in ends.
Attach the tan vamp: Center the broad 11-stitch edge across the front of the boot just above the dark brown sidewall. Smooth the tapered sides over the shaped brown toe. The narrow 3-stitch tab should point straight upward at the center front and overlap the lower portion of the dark shaft.
Using the 24-inch tan yarn tail, begin at one upper side of the center tab. Sew down the first tapered side, continue across the entire broad toe edge, then sew upward along the second tapered side. Continue around the outer edge of the 3-stitch center tab so the tab lies flat against the lower front of the shaft, then secure the yarn where you began. Keep the vamp centered so the same amount of dark brown remains visible on the left and right sides.
Hero check: The tan should now cover only the rounded front of the boot. The sides and heel should remain dark brown, and a narrow tan tab should extend upward at the exact center front where the vamp meets the shaft.
After the tan cuff and vamp are attached, expect the boot to measure about 3.75 to 4 inches from the bottom of the sole to the top of the cuff at the stated row gauge. The 19-stitch cuff opening should measure about 4.75 inches around at the stated stitch gauge.
For nursery styling, this same brown and tan color story fits easily with cowboy baby bedding ideas because it reads western without making the whole room feel like a costume.
Make and Attach Side Pull Tabs
The side tabs are small, but they matter. They help the shaft look like a tiny boot instead of a plain cuffed sock.
Before sewing the tabs, place both boots sole-to-sole. The shafts, toe wraps, and cuff heights should match before finishing.
Make 4 tabs in tan.
Ch 6. Sc in second ch from hook and across. 5 sts.
Ch 1. Turn. Sc across. 5 sts.
Fasten off, leaving a 10-inch tail for sewing.
Finished tab size: At the stated gauge, each tab should measure about 1.25 inches long and about half an inch wide.
Placement:
- Place one tan tab on each side of each boot shaft.
- Locate the center front of the shaft. Center one tab about 5 stitches to the left of center front and the other about 5 stitches to the right.
- Position each tab vertically with about one-quarter inch projecting above the tan cuff and the rest lying flat against the outside of the dark shaft.
- The lower end should finish about 4 to 5 single crochet rounds below the cuff.
- The two tabs should appear level with one another when the boot is viewed from the front.
Using the tan yarn tail, sew down both long sides and across the lower end of each tab. Leave only the short portion above the cuff free. Do not form a loose loop.
Add the Western Stitching Detail
The stitched motif is centered on the front of the shaft and is intentionally different from commercial western boot embroidery patterns. It creates the same visual effect while remaining an original handmade design.
Use tan yarn and a yarn needle.
The motif should be tall and narrow like the one shown in the finished boots. Center it on the front of the shaft, with the highest stitch about 2 single crochet rounds below the tan cuff and the lowest stitch ending just above the tan center tab.
The completed motif should measure approximately:
- 1.5 inches tall
- 3/4 inch wide at the widest side accents
- about 7 of the 10 dark brown shaft rounds from top to bottom
Placement:
- Locate the exact center front of the shaft.
- Keep the central diamond on that center line.
- Keep the entire motif between the tan cuff and tan center tab.
- Do not extend the stitching onto either pull tab.
Motif Construction:
- Stitch an elongated vertical diamond about 3/4 inch tall and about 3/8 inch wide.
- From the top point of the diamond, add a short vertical stem upward along the center line.
- Add one short vertical accent above that upper stem.
- From the bottom point of the diamond, add a short vertical stem downward toward the tan center tab.
- Add one short angled accent to the left and one to the right of the upper stem area.
- Add one short angled accent to the left and one to the right beside the lower half of the diamond.
The finished design should read as one centered elongated diamond with a short vertical detail above and below it and four small side accents, matching the proportions shown in the finished boot image.
Checkpoint: When both boots are placed side by side, the motifs should begin and end on the same shaft rounds and the center diamonds should sit directly above the tan center tabs.
Finish, Fit and Care
Final construction check: Before weaving in the last tails, each boot should have a 32-stitch sidewall through Round 6, a 19-stitch opening after Round 9, exactly 10 dark brown shaft rounds from Round 10 through Round 19, 1 tan cuff round, 1 tan front vamp with a 3-stitch center tab, 2 tan pull tabs, and 1 centered tan western motif. Remove any optional stitch markers before finishing.
Set both boots side by side before weaving the final tails. Check the sole length, shaft height, vamp placement, pull-tab placement, and front stitching. A small mismatch shows more clearly when the finished pair is viewed together.
Weave in all ends securely on the inside. When possible, weave yarn tails through the inside of the sidewall instead of the toe so the toe stays smooth against baby's foot. Tug the tabs gently to make sure they are firmly attached. Smooth the toe wrap with your fingers so both boots have the same rounded front.
Care instructions:
- Hand wash in cold water.
- Gently press out extra water with a towel.
- Lay flat to dry.
- Do not bleach.
- Do not iron.
Safety note: These crochet baby cowboy boots are for supervised wear, photo use, gifts, and display only. Remove them before naps, bedtime, car seat use, or any time the baby is not being watched. For current baby sleep safety information, see the U.S. Consumer Product Safety Commission safe sleep guidance.
If you want more handmade baby projects after this pair, the closest next stops are crochet baby booties patterns, free baby crochet patterns, free baby patterns, and crochet farm animals lovey patterns.
Crochet Baby Cowboy Boots FAQ
Are these crochet baby cowboy boots beginner friendly?
Yes, for an advanced beginner. You should be comfortable with single crochet, slip stitch joins, back loop only stitches, simple decreases, and basic sewing with a yarn needle.
Do these boots match the example image?
The pattern is written to reproduce the visible design details in the example image: a dark brown sole and shaped foot, a separate tan front vamp with a narrow center tab, a 10-round dark brown single crochet shaft, tan cuff trim, tan pull tabs, and the tall centered western stitch detail. Finished fit and proportions can vary slightly with yarn, gauge, and tension.
Can I make these crochet cowboy booties larger?
For a slightly larger boot, you can try a 4.5 mm hook and measure the sole after Round 3. Continue only if the sole is close to the size you want and still lies flat. Do not add stitches to the 32-stitch sole without also reworking the toe shaping and shaft counts.
Can I make the stitch design simpler?
Yes. Keep the elongated center diamond and the short vertical stems above and below it, then omit the four small side accent stitches.
Can these booties be worn for sleep?
No. These booties are not sleepwear. They are meant for supervised wear, photos, gifts, and keepsake use.


When you click on links to various merchants on this site and make a purchase, this may result in this site earning a commission. This does not affect the price you pay.

UBGI Gold Standard 2026
Reviewed under the site's
editorial checklist.
About Jan | Contact | Baby Nursery Ideas (Blog) | Site Map | Privacy Policy | Disclosure Policy | Disclaimer | Affiliate Disclosure | Earnings Disclosure | Facebook | Pinterest
I am a participant in the Amazon Services LLC Associates Program, an affiliate advertising program designed to provide a means for us to earn fees by linking to Amazon. As an Amazon Associate I earn from qualifying purchases.
Copyright © 2006-2026. All Rights Reserved.