Free Christmas Wreath Granny Square Crochet Pattern
By Jan Bay
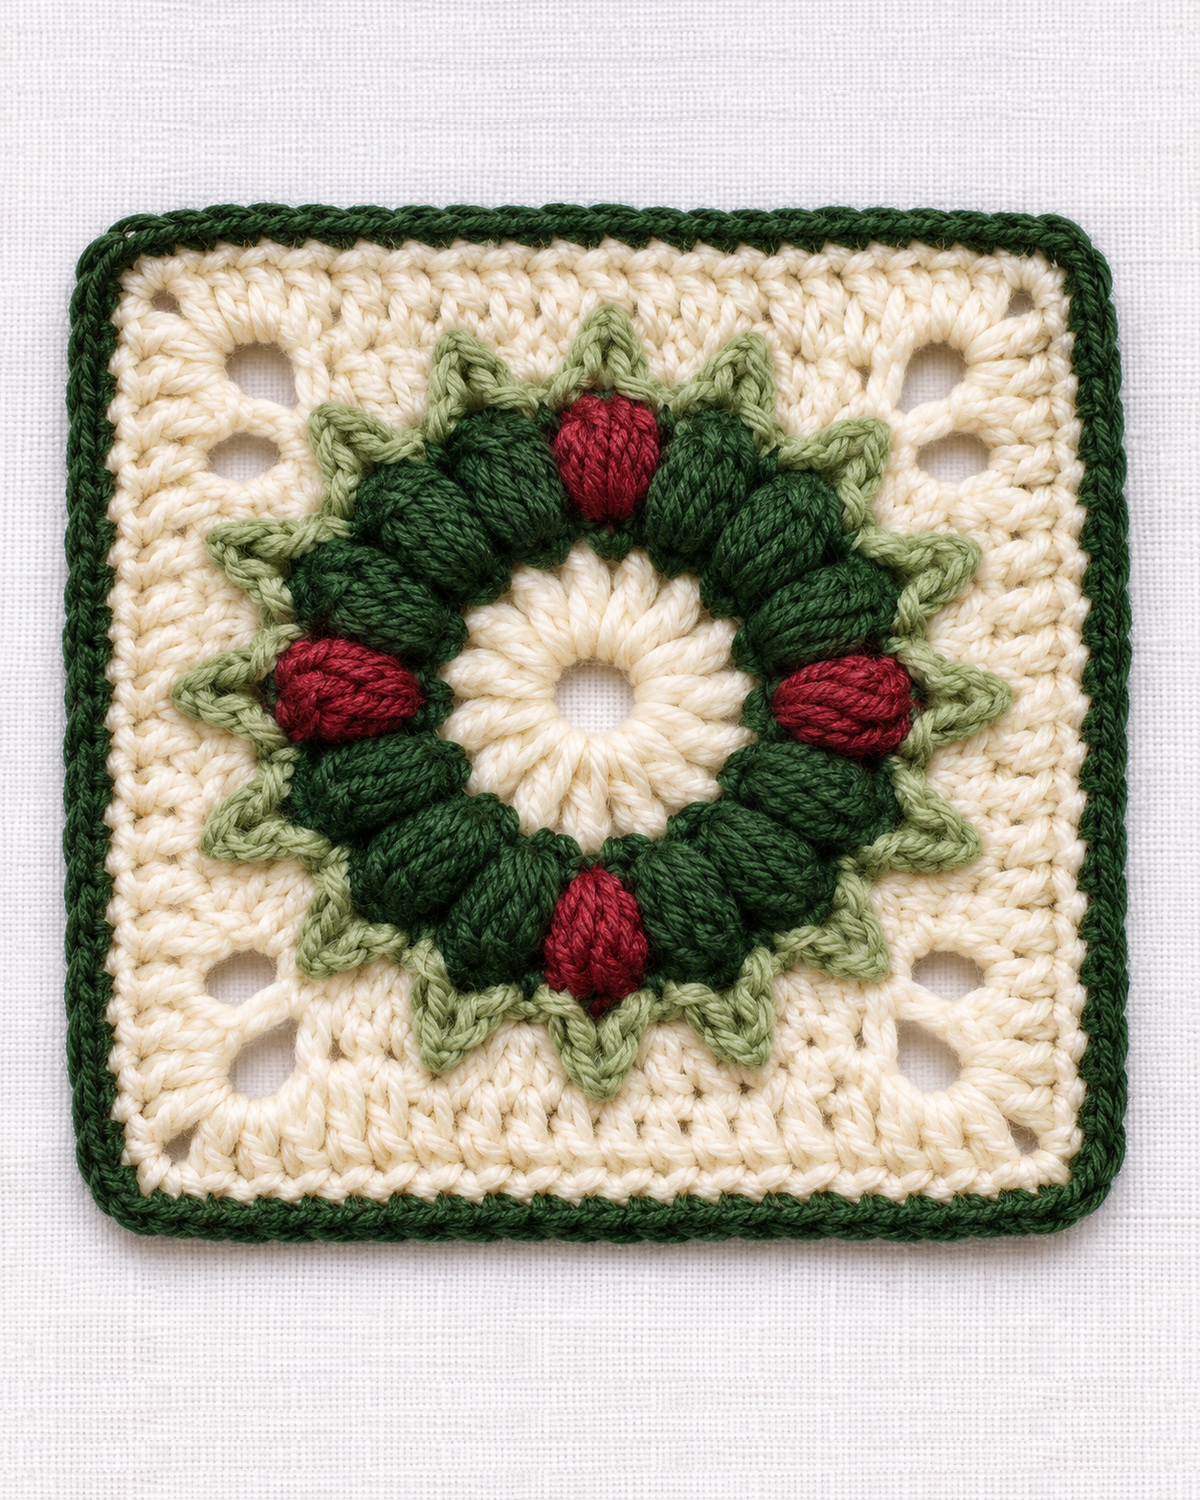
This free Christmas Wreath Granny Square crochet pattern features a full evergreen wreath made right into the square, with raised pine-green stitches, little sage points, and four cranberry berries. The warm ivory background and narrow green edging give it a classic Christmas look without a bulky bow or sewn-on appliqués. I love how the greenery stands out while the square itself stays simple enough to mix and match with my other holiday granny square patterns.
Explore More Free Christmas Granny Square Patterns
Free Christmas Granny Square Patterns
Christmas Tree Granny Square Pattern
See Supplies for This Project Here.
Christmas Wreath Granny Square: Finished Size and Skill Level
Skill level: Intermediate. You'll need to be comfortable with joined rounds, color changes, puff stitches and working into the back loops of stitches.
Expected finished size: About 7 1/2 to 9 inches square with medium-weight yarn and a 5 mm hook. This is a calculated estimate, not a measurement taken from a crocheted sample.
Construction: One connected crochet square. The ivory center, raised evergreen wreath, cranberry puffs, pointed sage greenery and square background are all worked into the same piece.
Rounds: Eight main rounds, followed by one pine-green edging round.
Assembly: None. There are no separate leaves, berries or bows to sew onto the finished square.
Before making several squares for a blanket, finish one and measure it after blocking. The size matters if you're planning to join it to other Christmas granny squares. The stitch counts are fixed, but your yarn and tension determine the finished measurements.
The most important thing to watch is the wreath itself. Those raised green stitches need room to sit next to one another without bunching up. Keep your puff stitches even, and don't pull the yarn tightly when you change to cranberry.
The sage points should stand out around the wreath, while the ivory background stays flat. A little waviness before blocking isn't unusual, but the square shouldn't curl into a bowl or develop large ripples.
Yarn and Supplies for the Christmas Wreath Granny Square
I'd keep the yarn smooth and the colors a little muted for this design. You want the stitches to do the decorating, especially those raised evergreen puffs.
- Ivory: Medium-weight #4 yarn for the center and square background. This is the main color, so you'll need more of it than the others.
- Deep pine green: Medium-weight #4 yarn for the wreath puffs and final edging.
- Muted sage green: Medium-weight #4 yarn for the pointed evergreen tips.
- Cranberry red: A small amount of medium-weight #4 yarn for four raised berry puffs.
- Crochet hook: 5 mm (US H/8), or the size needed for a firm but flexible fabric.
- Yarn needle: For weaving in the ends.
- Scissors
- Stitch markers: At least four for marking the corners. A few extra removable markers are helpful during color changes.
- Blocking mat and rustproof pins: Optional, but helpful for shaping the corners.
- Tape measure: For checking the finished square.
Choosing Your Yarn Colors
The pine green should be much darker than the sage. That's what keeps the little pointed leaves from disappearing into the wreath. I would choose a warm cream instead of pure white for the background, and a cranberry red rather than a bright orange-red.
Use yarns with similar thicknesses. A much thinner cranberry yarn will make the berries look smaller than the green puffs, even when you use the same stitch instructions.
If you're choosing yarn from different brands, check the weight category on each label. The Craft Yarn Council yarn weight guide explains the standard yarn categories and recommended hook ranges.
Gauge and Size Check
A useful planning gauge is approximately 14 double crochets across 4 inches (10 cm) in the ivory background. This is a proposed gauge for the pattern, not a measured test sample.
At that stitch width, the 27 double crochets between the corner spaces in Round 8 cover approximately 7 3/4 inches before allowing for the corners and final edging. Your finished square may be a little larger.
If your stitches are considerably wider or narrower, don't expect the same finished measurement. Use the same hook and yarn combination for every square in a matching set.
Crochet Stitches and Abbreviations
This pattern uses US crochet terms.
- ch: Chain
- sc: Single crochet
- hdc: Half double crochet
- dc: Double crochet
- tr: Treble crochet
- sl st: Slip stitch
- st: Stitch
- sp: Space
- BLO: Back loop only
- RS: Right side, or front
- WS: Wrong side, or back
Special Stitch: Raised Wreath Puff
The raised puff is what gives the wreath its full, rounded look. Use the same puff stitch for both the pine-green sections and the cranberry berries.
- Yarn over, insert your hook into the indicated stitch, yarn over and pull up a long loop.
- Repeat that yarn-over, insert-hook and pull-up movement three more times in the same stitch.
- You should now have nine loops on the hook.
- Yarn over and pull through all nine loops.
- Leave the completed puff on your hook with one working loop. Make the one chain-1 specified in Round 2, using the next color when the instructions call for a color change. Do not add a second chain.
Important: Pull all four long loops to approximately the same height. Aim for roughly the height of a relaxed double crochet, or just a little taller. Don't make the loops so short that the puff becomes a tight knot, and don't make them so long that the wreath turns into loose loops.
After completing each puff, use your fingers to bring its rounded front toward you. The puff should stand up slightly from the center, but its base should stay firmly attached.
The chain-1 after each puff is part of the round. Don't add a second chain between puffs.
Special Stitch: Pointed Sage Evergreen Leaf
The sage points are worked directly into the chain spaces around the wreath. They're not separate appliqués.
- After making the first sc in the indicated space, chain 5.
- Slip stitch into the second chain from the hook.
- Work 1 sc in the next chain.
- Work 1 hdc in the next chain.
- Work 1 dc in the last chain, nearest the base.
- Work 1 more sc into the original chain space to anchor the leaf.
The stitches increase in height from the tip back toward the base, giving the leaf a pointed, tapered shape. Gently guide the point outward, away from the center of the wreath.
Only the two anchoring sc stitches count toward the next round. The chain and shaping stitches that make the pointed leaf are decorative. You'll leave those stitches alone when adding the ivory background.
How to Work Into the Back Loop
Look at the top of a regular crochet stitch. You'll see two loops forming a little V. The back loop is the loop farther away from you when the right side is facing.
In the first ivory square-shaping round, work through the back loop of each sage anchoring sc. This leaves the front loops and pointed leaves free to sit in front of the ivory background.
Don't work into the decorative leaf stitches by mistake. Those are not part of the 32-stitch foundation.
Pattern Notes Before You Begin
There are a few little details worth getting right before you start. The stitches themselves aren't especially difficult, but the color placement and the way the wreath connects to the background make a difference in how the finished square looks.
- Work in joined rounds. Keep the right side facing you throughout. Don't turn the work between rounds.
- Use the colors in the same order. The center is ivory, the raised wreath is pine and cranberry, the pointed greenery is sage, the background is ivory, and the final edging is pine.
- Keep the cranberry puffs evenly spaced. They go at puff positions 1, 5, 9 and 13. That leaves three pine puffs between each pair.
- Count only the sage anchoring stitches. The decorative pointed leaves don't count as foundation stitches when you begin the square.
- Leave the center opening visible. Don't pull the beginning chain ring tightly closed.
- Keep the corner spaces clear. All four ivory corners use chain-2 spaces. Don't fill them until the next round tells you to.
- Beginning chains count only when stated. A beginning chain-3 counts as one dc, and a beginning chain-4 counts as one tr where indicated.
- Don't count joining slip stitches. They close the rounds but don't add to the stitch totals.
Getting the Cranberry Color Changes Right
You'll use four short cranberry strands and four working sections of pine yarn. The trick is to change colors while making the single chain immediately after a puff. That connects the next color to the previous puff without leaving loose gaps between them.
To change colors, finish the puff in the current color and leave one loop on your hook. Drop that yarn, place the new color over your hook, and pull it through the loop to make one chain. The new color is now ready for the next puff.
Don't make a chain in the old color first. The color-change chain is the one chain-1 required after that puff.
Once the new chain is complete, cut the previous color, leaving a tail of about 6 inches (15 cm). You'll weave those tails in after the square is finished.
This method connects all 16 puffs in one continuous round. It also avoids carrying long strands of cranberry behind the green stitches or leaving gaps that the sage round must hold together.
Color checkpoint: Each cranberry puff should be followed by three pine puffs. The cranberry puffs belong at positions 1, 5, 9 and 13.
Before starting the square: Set the wreath down with one cranberry puff at the top. The other three should fall at the right, bottom and left. The four ivory corners will go between those berry positions.
Free Christmas Wreath Granny Square Crochet Pattern
You'll begin with the little ivory center and work outward. The raised wreath comes next, followed by the sage greenery. Once those parts are finished, the ivory rounds turn the circle into a square.
Take your time with the first three rounds. They're the part everyone will notice most, and the rest of the square is much easier once the wreath is sitting properly.
Round 1: Ivory Sunburst Center
Color: Warm ivory.
- Chain 5.
- Join with a slip stitch into the first chain to make a small ring.
- Chain 3. This counts as your first dc.
- Work 15 more dc into the center ring.
- Join with a slip stitch to the top of the beginning chain-3.
- Fasten off ivory, leaving a tail for weaving in.
Stitch count: 16 dc.
Checkpoint: You should have 16 ivory stitches radiating from the small center opening. They should form a neat circle rather than a tight little knot.
Leave that middle opening alone. It belongs in the design. If your opening is much larger than the stitches around it, remake the starting ring with chain 4 instead of chain 5. Keep the 16 dc unchanged.
Round 2: Raised Evergreen Wreath With Four Cranberry Puffs
Colors: Deep pine and cranberry.
You'll work one puff into each of the 16 ivory dc from Round 1. Every puff is followed by one chain-1.
The color order is:
- Puff 1: Cranberry
- Puffs 2, 3 and 4: Deep pine
- Puff 5: Cranberry
- Puffs 6, 7 and 8: Deep pine
- Puff 9: Cranberry
- Puffs 10, 11 and 12: Deep pine
- Puff 13: Cranberry
- Puffs 14, 15 and 16: Deep pine
Work the round as follows:
- With the right side facing, join cranberry yarn with a slip stitch in the first ivory dc from Round 1.
- Work 1 cranberry puff in that same dc. Leave the completed puff on your hook without making a chain yet.
- Change to pine by using the pine yarn to make the next chain-1. Cut the cranberry yarn, leaving a 6-inch tail.
- Work 1 pine puff in the second ivory dc, then ch 1 with pine.
- Work 1 pine puff in the third ivory dc, then ch 1 with pine.
- Work 1 pine puff in the fourth ivory dc. Change to a new cranberry strand while making the following chain-1. Cut the pine yarn, leaving a 6-inch tail.
- Work 1 cranberry puff in the fifth ivory dc. Change to a new pine strand while making the following chain-1. Cut cranberry, leaving a 6-inch tail.
- Work 1 pine puff in each of the sixth and seventh ivory dc, making ch 1 with pine after each puff.
- Work 1 pine puff in the eighth ivory dc. Change to cranberry while making the following chain-1. Cut pine, leaving a 6-inch tail.
- Work 1 cranberry puff in the ninth ivory dc. Change to pine while making the following chain-1. Cut cranberry, leaving a 6-inch tail.
- Work 1 pine puff in each of the tenth and eleventh ivory dc, making ch 1 with pine after each puff.
- Work 1 pine puff in the twelfth ivory dc. Change to cranberry while making the following chain-1. Cut pine, leaving a 6-inch tail.
- Work 1 cranberry puff in the thirteenth ivory dc. Change to pine while making the following chain-1. Cut cranberry, leaving a 6-inch tail.
- Work 1 pine puff in the fourteenth ivory dc, then ch 1 with pine.
- Work 1 pine puff in the fifteenth ivory dc, then ch 1 with pine.
- Work 1 pine puff in the sixteenth ivory dc, then ch 1 with pine.
- Join with a slip stitch to the top of the first cranberry puff. Fasten off pine.
Stitch count: 16 puffs total, consisting of 12 pine puffs and four cranberry puffs, plus 16 chain-1 spaces.
Color checkpoint: There must be exactly three pine puffs between every pair of cranberry puffs, including the pair that crosses the joining point.
Shape checkpoint: Lay the wreath flat. The puffs should form one continuous ring with a small ivory sunburst visible in the middle.
The puffs may look crowded before the sage round is added. That's fine as long as you can clearly find all 16 chain-1 spaces and the fabric isn't pulled into a tight cup.
If the ring is sharply cupped, check that you made each chain-1 and that the puff loops aren't pulled too tightly. Rework the tight puffs before continuing. A slightly larger hook for this puff round may help if your tension is firm.
If the ring has large loose ripples, check that you haven't added extra chains or pulled the puff loops unusually high. Don't try to fix a wrong stitch count by stretching the next round.
Round 3: Crocheted Sage Evergreen Points
Color: Muted sage green.
This round gives the wreath its little pointed tips. You'll make one tapered leaf in each chain-1 space from Round 2.
- With the right side facing, join sage yarn with a slip stitch in the chain-1 space immediately after the first cranberry puff.
- Chain 1. This beginning chain does not count as a stitch.
- Work 1 sc into the same chain-1 space.
- Chain 5.
- Slip stitch into the second chain from the hook.
- Work 1 sc in the next chain.
- Work 1 hdc in the next chain.
- Work 1 dc in the final chain, nearest the base.
- Work 1 more sc into the original chain-1 space. Your first pointed leaf is complete.
- Move to the next chain-1 space between the wreath puffs.
- Work 1 sc, ch 5, sl st in the second chain from the hook, 1 sc in the next chain, 1 hdc in the next chain, 1 dc in the final chain, then 1 sc in that same chain-1 space.
- Repeat Step 11 in each of the remaining 14 chain-1 spaces.
- Join with a slip stitch to the first sage sc. Fasten off sage.
Stitch count: 32 anchoring sc and 16 decorative pointed leaves.
Checkpoint: You should have 16 sage tips around the outside of the wreath. Each tip grows from a chain space between two puffs.
The two sc at the base of each leaf are the stitches you'll use in Round 4. All the stitches forming the leaf itself stay free on the front.
Don't accidentally crochet into the leaf chains when you start the ivory background. That would pull the pointed greenery out of shape.
Leaf placement: Use your fingers to guide every point outward from the center. The tips may lean slightly to one side because of the stitch structure. Keep them pointing generally outward rather than twisting them around the wreath.
Round 4: Shape the Wreath Into an Ivory Square
Color: Warm ivory.
Now you'll turn the round wreath into a square without covering the little sage points.
Start by finding the 32 sage anchoring sc from Round 3. Ignore the decorative leaf stitches while counting.
Beginning with the first sage sc made in Round 3, count around the wreath and place a stitch marker in anchoring sc numbers 5, 13, 21 and 29.
These four marked sc are your corner foundations. Each pair of neighboring markers has seven unmarked sc between them.
Remove each marker immediately before working into its marked sc. Make the full ivory corner group in that stitch, then continue along the side. All four markers should be removed by the end of Round 4.
Work through the back loop only of every sage sc in this round. Keep the decorative leaves on the front of the work.
- Join ivory yarn in the back loop of marked sc number 5.
- Chain 4. This counts as the first tr.
- Work 1 more tr into the same back loop.
- Chain 2.
- Work 2 tr into that same back loop. The first corner is complete.
- Work 1 tr in the back loop of the next sc.
- Work 1 dc in the back loop of the next sc.
- Work 1 hdc in the back loop of the next sc.
- Work 1 sc in the back loop of the next sc.
- Work 1 hdc in the back loop of the next sc.
- Work 1 dc in the back loop of the next sc.
- Work 1 tr in the back loop of the next sc.
- At the next marked corner sc, work (2 tr, ch 2, 2 tr) in its back loop.
- Repeat Steps 6 through 12 across the next seven unmarked sc.
- Work (2 tr, ch 2, 2 tr) in the third marked corner sc.
- Repeat Steps 6 through 12 across the next seven unmarked sc.
- Work (2 tr, ch 2, 2 tr) in the fourth marked corner sc.
- Repeat Steps 6 through 12 across the final seven unmarked sc.
- Join with a slip stitch to the top of the beginning chain-4.
Stitch count: 44 stitches plus four chain-2 corner spaces.
There are four treble stitches in every corner group and seven shaping stitches between corner groups.
Checkpoint: Look at the shape before continuing. You should see four definite corners, with the taller stitches near the corners and the shorter stitches near the middle of each side.
The sage leaf points should still be visible on the front of the wreath. If several have been caught under the ivory stitches, undo that part of the round and work through the correct sage back loops.
Don't worry if the outer edges look a little rounded. The following ivory rounds will make the square more defined.
Keeping Your Christmas Wreath Full and the Square Flat
Before you continue with the ivory background, lay your work on a flat surface with the wreath facing up. The dark-green puffs should look full and rounded, the sage points should sit around their outside edges, and the ivory center should still be visible.
Here's what I'd check if something doesn't look quite right:
- If the green wreath curls into a bowl: Check that Round 2 has all 16 puffs and 16 chain-1 spaces. If your counts are correct, the puff stitches may be too tight. Try pulling the loops a little higher and keeping them the same height. If necessary, undo and remake the puff round with a slightly larger hook, but don't add extra stitches.
- If the wreath looks flat instead of full: Gently bring each puff toward the front with your fingers. Check that all four pulled-up loops in each puff were made to an even height. If the puffs are still too small, remake the affected stitches with slightly taller loops rather than adding more yarn overs.
- If the wreath has large ripples: Look for extra chains between the puffs or loops that were pulled much higher than their neighbors. Correct any uneven stitches before continuing. Don't rely on blocking to flatten a badly rippled wreath.
- If the sage points curl or disappear: Make sure the decorative leaves haven't been caught beneath the ivory stitches. Round 4 must be worked into the back loops of the 32 sage anchoring sc. Gently guide each leaf outward, but don't stretch its tip.
- If the ivory square pulls tightly around the wreath: Check the four corner groups and the seven foundation stitches between them. Make sure the corners have their full chain-2 spaces and the ivory stitches aren't pulling the sage foundation inward. If the counts are correct but the stitches are very tight, remake the affected ivory section with more relaxed tension.
Before moving on to Round 5: You should be able to lay the work down without forcing the center flat or stretching the four corners. A little rounding at the edges is fine. Deep cupping, large ripples, or a wreath that pulls inward should be corrected now.
Once the square is finished, blocking can help even out small differences in tension and straighten the corners. It won't correct missing stitches or a wreath that's been pulled too tightly, so it's worth checking those details while they're still easy to fix.
Round 5: First Full Ivory Background Round
Color: Warm ivory.
- Slip stitch into the next tr, then slip stitch into the first corner chain-2 space.
- Chain 3. This counts as the first dc.
- Work 1 more dc in that corner space, ch 2, then work 2 more dc in the same corner space.
- Work 1 dc in each of the next 11 stitches along the side.
- In the next corner chain-2 space, work (2 dc, ch 2, 2 dc).
- Work 1 dc in each of the next 11 side stitches.
- Repeat Steps 5 and 6 for the third corner and side.
- Work (2 dc, ch 2, 2 dc) in the fourth corner.
- Work 1 dc in each of the final 11 side stitches.
- Join with a slip stitch to the top of the beginning chain-3.
Stitch count: 60 dc and four chain-2 corner spaces.
Checkpoint: Every corner has (2 dc, ch 2, 2 dc), and there are 15 dc between consecutive corner spaces when you include the two dc on each side of the corner groups.
The ivory background should now begin framing the wreath without covering the sage tips.
Round 6: Make the Eight Corner-Area Windows
Color: Warm ivory.
This round adds the small openings near the corners. You'll make two windows on each side, for eight altogether.
- Slip stitch into the next dc and then into the first corner chain-2 space.
- Chain 3, counting as the first dc.
- Work 1 more dc, ch 2, then 2 dc in that corner space.
- Work 1 dc in each of the next two stitches.
- Chain 2 and skip the next two stitches. This makes the first openwork window on the side.
- Work 1 dc in each of the next seven stitches.
- Chain 2 and skip the next two stitches. This makes the second openwork window.
- Work 1 dc in each of the next two stitches.
- In the next corner chain-2 space, work (2 dc, ch 2, 2 dc).
- Repeat Steps 4 through 9 across the next two sides.
- On the fourth side, repeat Steps 4 through 8, then join to the top of the beginning chain-3.
Stitch count: 60 dc, eight chain-2 window spaces, and four chain-2 corner spaces.
Checkpoint: Count eight openwork windows, with two on each side. There should be seven dc between the two windows on every side.
Each window spans two skipped foundation stitches. Keep the chain-2 openings relaxed and even. Don't tighten them into little eyelets.
The window spaces and corner spaces both use chain 2, but they have different jobs. In Round 7, you'll work into the window spaces to restore the full stitch count. The four corner spaces remain the square's turning points.
Round 7: Frame the Openwork Windows
Color: Warm ivory.
- Slip stitch into the next dc, then into the corner chain-2 space.
- Chain 3, counting as the first dc.
- Work 1 more dc, ch 2, then 2 dc in that corner space.
- Working across the side in order, make 1 dc in each of the next 4 dc, 2 dc into the first chain-2 window space, 1 dc in each of the next 7 dc, 2 dc into the second chain-2 window space, and 1 dc in each of the final 4 dc before the next corner space. You will have 19 dc between corner spaces.
- Work (2 dc, ch 2, 2 dc) in the next corner chain-2 space.
- Repeat Steps 4 and 5 at the next two corners.
- On the fourth side, repeat the same sequence as Step 4: work 1 dc in each of the next 4 dc, 2 dc into the first chain-2 window, 1 dc in each of the next 7 dc, 2 dc into the second chain-2 window, and 1 dc in each of the final 4 dc.
- Join to the top of the beginning chain-3.
Stitch count: 92 dc and four chain-2 corner spaces.
Checkpoint: You should now have 23 dc between neighboring corner spaces, counting the stitches on either side of the corner groups.
The eight windows should remain visible below the stitches you just made. Work exactly 2 dc into each chain-2 window space. Don't add extra stitches to fill the openings more tightly.
Round 8: Final Ivory Background Round
Color: Warm ivory.
- Slip stitch into the next dc, then into the first corner chain-2 space.
- Chain 3, counting as the first dc.
- Work 1 more dc, ch 2, then 2 dc in that corner space.
- Work 1 dc in each of the next 23 stitches along the side.
- Work (2 dc, ch 2, 2 dc) in the next corner chain-2 space.
- Repeat Steps 4 and 5 at the next two corners.
- Work 1 dc in each of the final 23 side stitches.
- Join to the top of the beginning chain-3.
- Fasten off ivory and leave a tail for weaving in.
Stitch count: 108 dc and four chain-2 corner spaces.
Checkpoint: Every side now has 27 dc between the corner chain-2 spaces. Count one side carefully before beginning the edging.
The ivory background is complete. The wreath should be centered, the sage points should sit inside the ivory frame, and the little openings should appear near the corners.
Round 9: Narrow Pine-Green Edging
Color: Deep pine green.
This is the final round. Keep it narrow so the ivory background stays the main frame around the wreath.
- Join pine yarn in any corner chain-2 space.
- Chain 1. This does not count as a stitch.
- Work (1 sc, ch 2, 1 sc) in that corner space.
- Work 1 sc in each of the next 27 stitches along the side.
- In the next corner chain-2 space, work (1 sc, ch 2, 1 sc).
- Repeat Steps 4 and 5 around the next two sides.
- Work 1 sc in each of the final 27 side stitches.
- Join with a slip stitch to the first sc.
- Fasten off, leaving a tail for weaving in.
Stitch count: 116 sc and four chain-2 corner spaces.
Don't pull the green edging tightly. It should follow the ivory square without drawing the corners inward.
If the square looks slightly rounded, gently shape the corners with your hands. The four chain-2 corner spaces should sit at the points of the finished square.
Christmas Wreath Granny Square Stitch Counts and Checkpoints
Here's a quick way to check your work without having to count the entire square every time. I'd check the wreath before starting the ivory background, then count one full side after each square round.
| Round | Stitch Count | What to Check |
|---|---|---|
| 1 | 16 dc | Small ivory sunburst with a center opening |
| 2 | 16 puffs, 16 ch-1 spaces | 12 pine puffs, 4 cranberry puffs |
| 3 | 32 sc, 16 pointed leaves | One sage point between every pair of puffs |
| 4 | 44 stitches, 4 ch-2 corners | Four corners between the berry positions |
| 5 | 60 dc, 4 ch-2 corners | 15 dc between corner spaces |
| 6 | 60 dc, 8 ch-2 windows, 4 corners | Two windows on every side |
| 7 | 92 dc, 4 ch-2 corners | 23 dc between corner spaces |
| 8 | 108 dc, 4 ch-2 corners | 27 dc between corner spaces |
| 9 | 116 sc, 4 ch-2 corners | Even pine-green border |
How the Square Increases
Round 4 begins the square with 44 stitches. The next regular square round adds 16 stitches, bringing the total to 60.
Round 6 has 60 actual dc, eight chain-2 window spaces, and four chain-2 corner spaces. Each window replaces two stitches with two chains. The round therefore still has 76 stitch-and-chain positions when the corner chains are excluded.
Round 7 fills each chain-2 window with 2 dc, bringing the total to 92 dc. Round 8 increases the count to 108 dc. The final green border uses one sc in every existing stitch, plus the corner groups.
There shouldn't be any mystery stitches. If a round doesn't match these counts, check it before going on.
What to Check Before Finishing
- The wreath has 16 raised segments, not 15 or 17.
- The four cranberry puffs are evenly spaced.
- All 16 sage points are visible outside the dark-green wreath.
- The ivory center still shows inside the wreath.
- All four corners fall between berry positions, not directly over them.
- There are eight openwork windows around the square.
- The final ivory round has 27 dc between each pair of corner spaces.
- The pine edging sits evenly without pulling the sides inward.
If Your Square Doesn't Lie Flat
Check the earliest round where the trouble begins. Don't add or skip stitches in the outer rounds to cover up an incorrect count.
If the wreath cups inward: Check the 16 chain-1 spaces and the height of the puff stitches. A tightly drawn puff ring can pull the center inward. Reworking that round with more relaxed tension may help.
If the wreath ruffles: Make sure you haven't added extra chains between puffs. Very tall, loose puffs can also spread farther than the surrounding stitches comfortably support.
If the sage leaves disappear: Check Round 4. The ivory shaping stitches belong in the back loops of the 32 sage anchoring sc, not in the decorative leaf stitches.
If the corners pull upward: Check that every corner has its full chain-2 space and the required stitches on both sides. The pine edging also needs to be relaxed enough to follow the ivory fabric.
If the whole square has large ripples: Lay it flat before blocking. Check the stitch counts and compare your stitch height with the background gauge. Blocking can help a slightly uneven square, but it won't reliably correct badly mismatched stitches.
Finishing and Blocking Your Christmas Wreath Granny Square
Once the pine-green edging is finished, you're almost done. The last few minutes are worth taking because the wreath has several raised stitches and little pointed leaves that need to stay visible.
Weave In the Yarn Ends
- Turn the square over so the wrong side is facing you.
- Thread an ivory tail onto your yarn needle and weave it through several ivory stitches on the back. Change direction before trimming it.
- Weave the pine tails into the neighboring pine stitches, keeping them away from the open ivory center.
- Take each cranberry tail through the back of its own puff and nearby covered stitches. Keep the yarn tucked out of sight from the front.
- Weave in the sage ends through the base of the sage round. Don't pull them so tightly that they distort the pointed leaves.
- Trim the ends only after they're secure and the fabric is lying comfortably.
Check the four cranberry puffs from the front after weaving in the ends. They should still look full and rounded, not flattened by tight yarn tails.
Shape the Evergreen Points
Lay the square right side up. Use your fingers to bring the little sage points forward and guide them toward the outer edge of the wreath.
You don't need to stretch each one into a perfectly identical shape. A little difference between the points gives the wreath a natural look. Just make sure they're all visible and none are trapped beneath the ivory stitches.
Block the Square
- Check the yarn label for the recommended care method.
- If the yarn can be wet-blocked, dampen the finished square and gently remove the extra water without wringing it.
- Lay the square on a blocking mat with the right side facing up.
- Arrange the four corners into an even square.
- Pin the corners and, if needed, the middle of each side. Use rustproof pins.
- Keep the wreath round while you straighten the ivory background.
- Gently arrange the sage points and cranberry puffs.
- Let the square dry completely before removing the pins.
Don't stretch the center opening into a larger hole just to make the outer square look bigger. The center should remain a small ivory sunburst with a neat opening.
Avoid pressing directly on the raised wreath stitches. You want those puffs to keep their shape.
Final Measurement
Measure from one outer green edge to the opposite edge after the square is completely dry.
Record that measurement if you're making more than one. Use the same yarn, hook and tension for the remaining squares so you don't end up with several different sizes.
Check both directions. The width and height should be close to equal, and the four corners should lie comfortably without being stretched.
Ways to Use Your Christmas Wreath Granny Squares
The wreath makes a pretty focal point all by itself, so you don't need to surround it with a lot of other decorations. I'd let the deep green and cranberry stand out against the ivory.
A Christmas Granny Square Blanket
Try using the wreath as one of several different Christmas motifs in a blanket. I would put it between quieter designs so the raised greenery has some room to stand out.
You could alternate wreath squares with snowflakes, Christmas trees or plain ivory granny squares. Keeping the background and outer border colors consistent will help the different motifs look like they belong together.
Take a look at my free Christmas granny square patterns if you're planning a mixed-motif blanket.
Before joining the squares, check that they're all the same size. Don't stretch a smaller square to make it fit a larger one. Adjust the background of the mismatched square or choose a different arrangement instead.
A Christmas Pillow Front
For a small holiday pillow, make four matching wreath squares and join them in a two-by-two arrangement. Use a plain crocheted or fabric back to keep the front from looking too busy.
Measure the joined front before choosing the pillow insert. If you want a firmer pillow, a fabric lining behind the crochet will help keep the stuffing or insert from showing through the little openings.
A Christmas Wall Hanging
One square would also make a small seasonal wall decoration. Add a simple hanging loop to the upper corners after the square is finished, or join three matching squares vertically.
I would skip extra bows or dangling decorations. The crocheted wreath already has its own color and texture, and it's prettier when those details aren't hidden.
A Decorative Christmas Baby Keepsake
You could also include the wreath in a decorative Christmas baby quilt or keepsake blanket made from crocheted squares.
Keep the finished fabric free of loose pieces, secure all yarn ends, and remember that blankets and decorative crochet items don't belong in an infant sleep space.
Christmas Wreath Granny Square FAQs
Can I Crochet the Wreath Without the Cranberry Berries?
Yes. Replace all four cranberry puffs with pine-green puffs. You'll still make 16 puffs in Round 2, followed by the same 16 sage points in Round 3. The stitch counts don't change.
You'll get an all-green wreath with the same raised texture. You can also use burgundy or another muted Christmas color in place of cranberry.
Why Do My Sage Points Lean to One Side?
The pointed leaves are made with a short chain and progressively taller stitches, so they may lean slightly in the direction you're working.
As you finish each one, guide the tip outward with your fingers. After the ivory background is complete, you can straighten the points gently during blocking. Don't pull so hard that the sage anchoring stitches open up.
What If I Accidentally Crochet Into a Sage Leaf in Round 4?
Undo the affected ivory stitches and return to the last correct anchoring sc.
Count the sage foundation stitches again, ignoring the decorative leaves. Round 4 must use exactly 32 sage sc as its foundation. Working into a leaf by mistake can change the square's shape and hide part of the greenery.
Can I Make the Square Larger to Match Another Granny Square?
You can add another regular ivory increase round before the green edging, but that will make the ivory frame wider than the one shown in the finished example.
For an extra ivory round, work (2 dc, ch 2, 2 dc) in each corner chain-2 space and 1 dc in each of the 27 stitches between corners. This produces 124 dc and four chain-2 corner spaces.
Then work the pine edging as written, using 1 sc in each of the 31 stitches between the new corner spaces and (1 sc, ch 2, 1 sc) in each corner. The expanded edging will contain 132 sc.
I'd make one complete sample and measure it before changing the background. If you're trying to match another pattern, that first measurement will tell you whether the extra round is actually needed.
Should I Sew the Wreath Down After Crocheting the Square?
No. The wreath is part of the square from the beginning. The puff stitches attach to the ivory center, and the sage points connect to the wreath. The ivory square is then worked directly into the sage foundation.
There shouldn't be a separate wreath, bow, berry or leaf to sew onto the front.
Once the yarn ends are woven in and the square is blocked, your Christmas wreath granny square is complete. The deep-green edging gives it a neat finish, and the little raised wreath is ready to join other holiday squares or use on its own.
When you click on links to various merchants on this site and make a purchase, this may result in this site earning a commission. This does not affect the price you pay.

UBGI Gold Standard 2026
Reviewed under the site's
editorial checklist.
Photos, decorating ideas, party setups and reader submissions are shared for inspiration unless a page is specifically presented as a pattern, tutorial, reference guide or step-by-step project. Follow the instructions, measurements, safety guidance and manufacturer directions provided for the particular project or product.
About Jan | Contact | Baby Nursery Ideas (Blog) | Site Map | Privacy Policy | Disclosure Policy | Disclaimer | Affiliate Disclosure | Earnings Disclosure | Facebook | Pinterest
I am a participant in the Amazon Services LLC Associates Program, an affiliate advertising program designed to provide a means for us to earn fees by linking to Amazon. As an Amazon Associate I earn from qualifying purchases.
Copyright © 2006-2026. All Rights Reserved.