Free Crochet Snowflake Granny Square Pattern
By Jan Bay
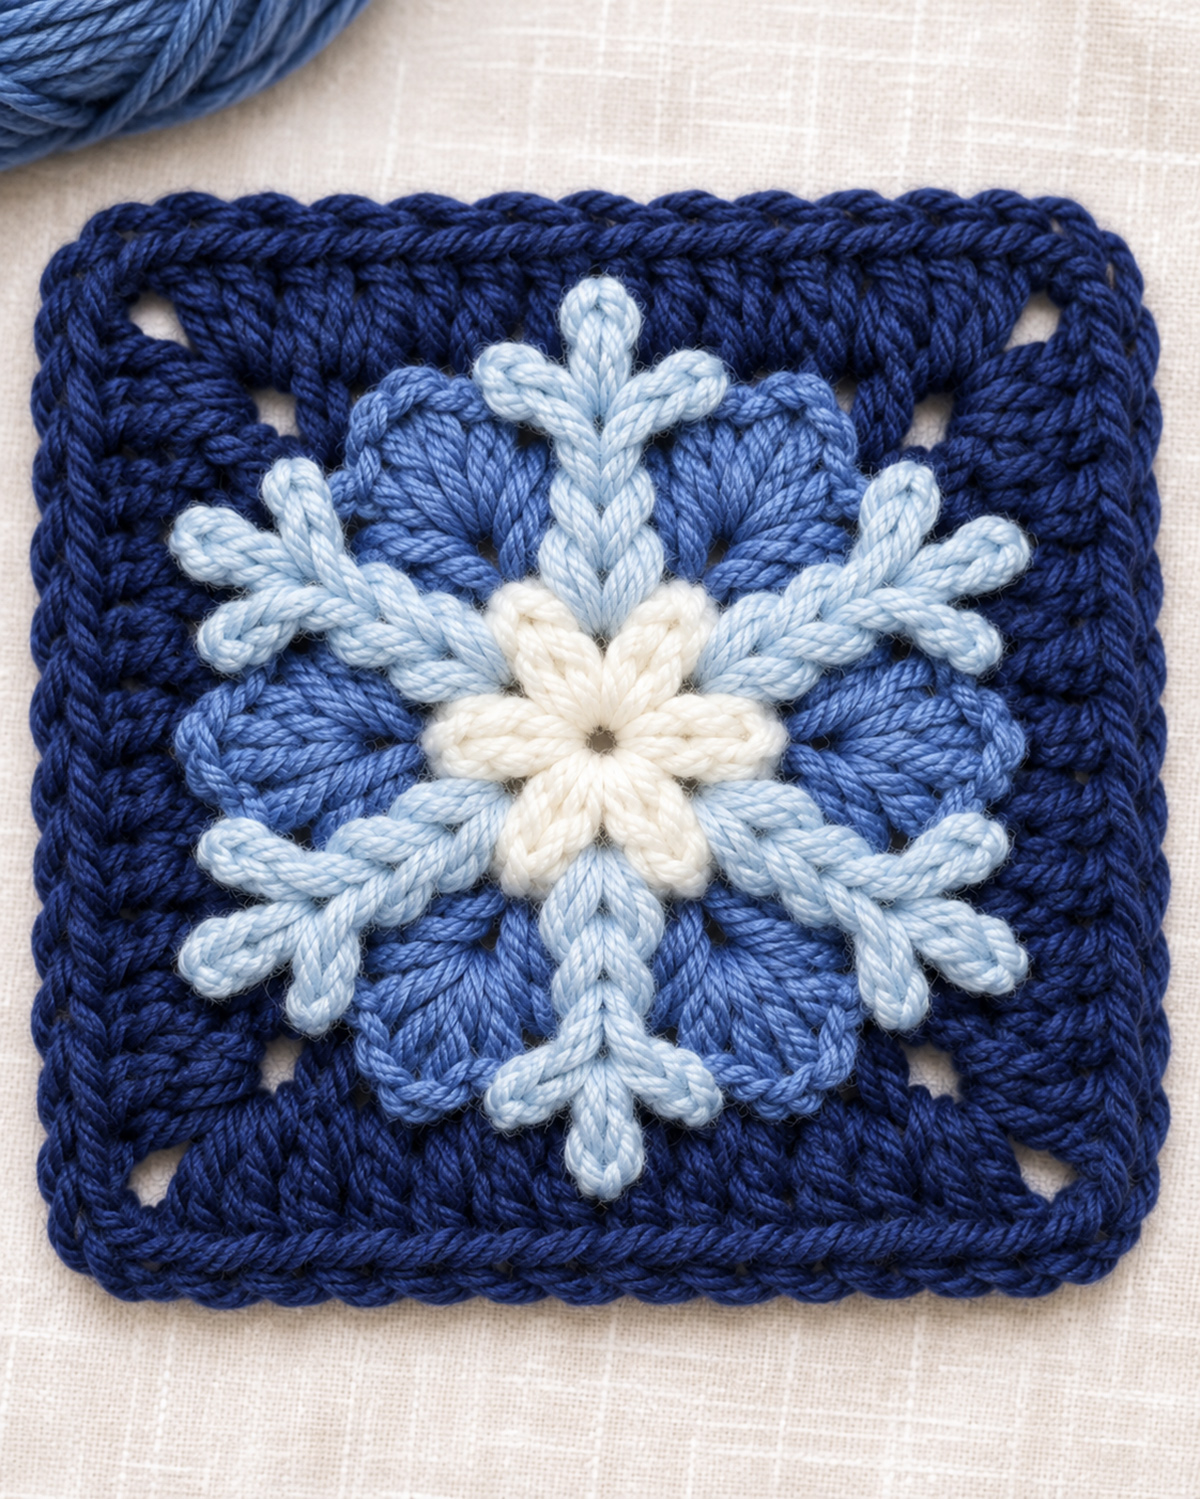
This free crochet snowflake granny square pattern features a six-point snowflake with icy-blue branches, beautiful layered stitches, and a deep navy border. The raised snowflake stands out against the darker blue background, making this square a lovely choice for a winter blanket, decorative pillow, or collection of seasonal granny squares. I like the blue-and-white colors because they look just as pretty in January as they do at Christmas.
Explore More Free Christmas Crochet Patterns
Free Christmas Granny Square Patterns
Christmas Granny Square Blanket Pattern
See Supplies for This Project Here.
Free Crochet Snowflake Granny Square Pattern: The Finished Design
This snowflake square has three pretty layers that give it its winter look. A six-petal ivory center sits over icy-blue snowflake arms, with six medium-blue fans underneath. A deep navy square frames everything and makes the lighter stitches stand out.
We'll crochet the snowflake pieces and navy square separately, then layer them together. That way, the square keeps its four evenly shaped corners, and we don't have to turn six snowflake points into four corners. It's a more straightforward way to make this design.
The finished square is expected to measure about 7 to 8 inches across with medium-weight yarn. Make several for a winter blanket, or use one for the front of a small decorative pillow.
Skill level: Intermediate. You'll use basic crochet stitches, work in joined rounds, and sew a few crocheted layers together.
Construction: Four crocheted pieces total. The six blue fans form one piece, and all six snowflake arms form another. You won't have to crochet twelve separate little branches.
Materials and Supplies
You'll need four yarn colors. I would keep the navy fairly dark so the snowflake really shows up.
- Medium-weight #4 yarn in deep navy: approximately 60–80 yards
- Medium-weight #4 yarn in medium or periwinkle blue: approximately 30–45 yards, including yarn for assembly
- Medium-weight #4 yarn in pale icy blue: approximately 20–30 yards
- Medium-weight #4 yarn in ivory or winter white: approximately 8–12 yards
- 5 mm (H/8) crochet hook
- 6 mm (J/10) crochet hook for the raised snowflake arms
- Yarn needle
- Scissors
- Four removable stitch markers
- Blocking mat and pins, optional
The pale-blue snowflake arms are worked with two strands held together. That gives them a fuller, rounded appearance like the snowflake in the picture. You can pull from both ends of one skein or use two small balls of yarn.
Keep the other pieces single-stranded. Using the same yarn weight for all four colors will help the finished square keep its shape.
Finished Size and Gauge
Expected finished size: Approximately 7–8 inches square after light blocking.
Reference gauge: Approximately 14 double crochet stitches and 8 double crochet rows or rounds per 4 inches, using the 5 mm hook and a single strand of medium-weight yarn.
These are calculated starting measurements rather than measurements taken from a finished sample. Your square may be a little larger or smaller depending on the yarn and your tension.
Size checkpoints:
- After Round 2: 7 double crochet stitches along each side, including the corner stitches
- After Round 4: 15 double crochet stitches along each side
- After Round 6: 23 double crochet stitches along each side
- Finished navy square: approximately 7–8 inches across at the suggested gauge
If you're making a blanket, use the same yarn and hook for every square and block the finished squares to matching measurements.
Crochet Abbreviations and Special Stitches
This pattern uses U.S. crochet terms.
- ch = chain
- sl st = slip stitch
- sc = single crochet
- hdc = half double crochet
- dc = double crochet
- MR = magic ring
- st = stitch
- sp = space
- RS = right side
- WS = wrong side
Corner group: Work (2 dc, ch 2, 2 dc) into the same corner chain space.
Blue fan: Each medium-blue fan is one expanding section of a five-round medallion. The final round forms its rounded edge with 2 sc, 1 hdc, 3 dc, 1 hdc, and 2 sc worked across seven stitches from the preceding round.
Small snowflake branch: Ch 5, hdc in the third chain from the hook, sc in the next chain, and sl st in the last chain. Sl st back into the main stem at the same foundation-chain stitch where the branch began. This extra slip stitch anchors the branch.
If you'd like to check a stitch abbreviation, the Craft Yarn Council crochet abbreviation guide is a useful reference.
Before You Begin
There are just a few things to keep in mind before you start.
- The square is worked in joined rounds. Don't turn the work.
- The beginning ch 3 counts as the first double crochet in each square round.
- The corner ch-2 spaces are not included in the double crochet stitch counts.
- Keep the corner openings visible as the square grows.
- The snowflake arms and blue fans are crocheted separately and attached to the navy square.
- Work the white center last when assembling the layers so it covers the center joins.
- Don't pull the pale-blue branches tightly when sewing them down. Their raised shape is part of the design.
We'll begin with the decorative pieces and then make the navy square. You can also make the square first if you'd rather have the background ready before you crochet the snowflake.
Crochet the Ivory Snowflake Center
We'll start with the little ivory center. It has six rounded petals and will sit on top of the pale-blue arms when everything is assembled.
Yarn: Ivory
Hook: 5 mm
Make: One six-petal center
Round 1: Make Six Petal Spaces
Make a magic ring.
Ch 1. Work (1 sc, ch 2) into the ring six times.
Pull the ring closed enough to leave a small center opening. Join with a sl st to the first sc.
Count: 6 sc and 6 ch-2 spaces.
Round 2: Crochet the Six Ivory Petals
Sl st into the first ch-2 space.
Work (1 sc, 1 hdc, 2 dc, 1 hdc, 1 sc) into that space.
Repeat the same group in each of the remaining five ch-2 spaces.
Join with a sl st to the first sc of the round.
Count: 6 petals, with 6 stitches in each petal. Total: 36 stitches.
Fasten off, leaving an 18-inch tail for sewing.
Checkpoint: You should have six separate, rounded petals surrounding a small center opening. Each petal should have two taller stitches in the middle and shorter stitches along its sides.
Lay the flower flat with the right side facing up. If the petals curl, shape them gently with your fingers. Don't stretch them into points. The center in our finished design has rounded petals.
Make the Six Icy-Blue Snowflake Arms
Now for the part that gives our square its snowflake shape. Each arm has one long stem with two little branches near the outer end.
We're making all six arms from one center ring, so there's no need to crochet each arm separately and sew them together.
Yarn: Pale icy blue, held double
Hook: 6 mm
Make: One six-arm snowflake
Foundation Ring
Make a magic ring with both strands of pale-blue yarn held together. Leave the ring loose enough to accommodate six single crochet stitches.
Arm 1
- Work 1 sc into the magic ring.
- Ch 11. This is the foundation chain for the first arm.
- Working back along that chain, make 1 hdc in the third chain from the hook.
- Work 1 sc in each of the next 2 chains.
- Make the first side branch from the foundation-chain stitch where you just worked the second sc. Ch 5, hdc in the third chain from the hook, sc in the next chain, and sl st in the last chain. Sl st back into that same foundation-chain stitch of the main arm to anchor the branch.
- Make the second side branch from the same junction. Ch 5, hdc in the third chain from the hook, sc in the next chain, and sl st in the last chain. Sl st back into the same foundation-chain stitch of the main arm. Both branches share one junction and will be spread to opposite sides during assembly.
- Return to the original ch-11 foundation. Work 1 sl st in each of the next 2 unworked foundation chains.
- Work 1 sl st in each of the remaining 4 foundation chains, bringing you back to the center ring.
Arm 1 checkpoint: You should have one main stem, a rounded outer tip, and two smaller branches attached at one junction. All 9 available main foundation-chain positions have been worked: 1 hdc, 2 sc, and 6 sl st. Each side branch contains 1 hdc, 1 sc, and 2 sl st, including the slip stitch used to anchor it to the main stem. Each completed arm has 9 main-stem stitches and 8 branch stitches, not counting the center-ring sc.
Arms 2–6
Repeat all eight steps used for Arm 1 five more times, starting each new arm with another sc in the magic ring.
After the sixth arm, join with a sl st to the first sc in the center ring.
Carefully tighten the magic ring. Keep the six arms spread evenly around the center.
Fasten off, leaving a tail approximately 24 inches long for sewing.
Final snowflake count:
- 6 sc in the center ring
- 6 main arms
- 9 stitches worked along each main foundation chain
- 2 small branches on each arm
- 12 small branches altogether
Shape the Snowflake
Lay the snowflake flat, with one arm pointing straight up and another pointing straight down.
Arrange the remaining four arms diagonally, two toward the upper corners and two toward the lower corners.
Gently spread the two smaller branches on each arm in opposite directions. They'll be secured in that position when the snowflake is sewn onto its blue background.
The finished piece should look like a six-point snowflake, not an eight-point star.
Important: This branched construction is calculated but has not been physically tested. Before fastening it to the square, check that all six arms are the same length, the branches can be spread without twisting the stems, and the snowflake can lie flat without pulling the center ring out of shape.
Crochet the Blue Square Background and Six Decorative Fans
Our snowflake needs a square background that will hold its shape without pulling on the six arms. We'll make a solid double-crochet square in navy, then add the six medium-blue fans that sit underneath the snowflake.
The square uses four equal sides and four ordinary corner spaces. The fans are a separate crocheted piece, so they don't affect the corner counts.
Part A: Begin the Navy Square
Yarn: Deep navy
Hook: 5 mm
Round 1: Center Square
Make a magic ring.
Ch 3. This counts as your first dc.
Work 2 dc into the ring, then ch 2.
Work (3 dc, ch 2) into the ring three more times.
Join with a sl st to the top of the beginning ch 3.
Pull the magic ring closed.
Count: 12 dc and four ch-2 corner spaces. Each side has 3 dc.
Checkpoint: You should have a small square with four clearly visible corners.
Round 2: Increase the Square
Sl st across the next 2 dc and into the following ch-2 corner space.
Ch 3, then work 1 dc, ch 2, and 2 dc into that same corner space. Your first corner is complete.
Work 1 dc in each of the next 3 dc.
In the next ch-2 corner space, work (2 dc, ch 2, 2 dc).
Work 1 dc in each of the next 3 dc.
Repeat that corner group and the following 3 dc across the next two sides.
Join with a sl st to the top of the beginning ch 3.
Count: 28 dc and four ch-2 corner spaces.
Each side now contains 7 dc, counting the 2 dc belonging to each neighboring corner.
Round 3
Sl st into the next dc and then into the following ch-2 corner space.
Ch 3, then work 1 dc, ch 2, and 2 dc in the same corner space.
Work 1 dc in each of the next 7 dc.
In the next corner space, work (2 dc, ch 2, 2 dc).
Continue around, working 1 dc in each of the 7 dc between successive corners and the same corner group in each remaining corner space.
After the fourth corner, work the final 7 dc and join with a sl st to the top of the beginning ch 3.
Count: 44 dc and four ch-2 corner spaces.
Each side now contains 11 dc, including its corner stitches.
Round 4
Sl st into the next dc and then into the following ch-2 corner space.
Ch 3, then work 1 dc, ch 2, and 2 dc in that corner.
Work 1 dc in each of the next 11 dc.
In the next corner space, work (2 dc, ch 2, 2 dc).
Continue in the same way around all four sides, working 11 dc between corner groups.
After the fourth corner, work the remaining 11 dc and join to the beginning ch 3.
Count: 60 dc and four ch-2 corner spaces.
Each side contains 15 dc, including its corner stitches.
Don't fasten off. Pull the working loop up slightly and place a removable stitch marker through it to prevent unraveling. Set the navy square aside with the working yarn still attached while you crochet the medium-blue fans.
Part B: Crochet the Six Medium-Blue Fans
These six rounded fans are the layer you can see behind the icy-blue snowflake arms. They're all joined together in one piece, so you won't have six separate petals to sew on.
Yarn: Medium or periwinkle blue
Hook: 5 mm
Make: One six-fan medallion
Fan Round 1: Establish Six Sections
Make a magic ring with medium-blue yarn and the 5 mm hook.
Ch 3. This counts as the first dc.
Ch 1, then work (1 dc, ch 1) into the ring five times.
Join with a sl st to the top of the beginning ch 3. Pull the ring closed.
Count: 6 dc and six ch-1 spaces.
Fan Round 2
Ch 3. This counts as the first dc of the new round.
Work 2 more dc into the same stitch, then ch 1.
Working into the dc stitches of the previous round, make (3 dc in the next dc, ch 1) five times.
Join to the top of the beginning ch 3.
Count: 18 dc arranged in six groups of 3 dc, separated by six ch-1 spaces.
Fan Round 3
Ch 3. Work 1 more dc into the same stitch.
Work 1 dc into the next dc and 2 dc into the last dc of that group. Ch 1.
For each of the remaining five groups, work 2 dc in the first dc, 1 dc in the middle dc, and 2 dc in the last dc. Ch 1 after each group.
Do not work into the separating chain spaces.
Join to the beginning ch 3.
Count: 30 dc arranged in six groups of 5 dc, with six ch-1 spaces.
Fan Round 4
Ch 3. Work 1 more dc into the same stitch.
Work 1 dc in each of the next 3 dc, then 2 dc in the last dc of that group. Ch 1.
Repeat across the remaining five groups: 2 dc in the first dc, 1 dc in each of the next 3 dc, and 2 dc in the last dc. Ch 1.
Skip the separating chain spaces.
Join to the beginning ch 3.
Count: 42 dc arranged in six groups of 7 dc, with six ch-1 spaces.
Fan Round 5: Shape the Rounded Fans
Ch 1. This does not count as a stitch.
Work 2 sc into the first dc of the first group.
Work 1 hdc in the next dc, 1 dc in each of the next 3 dc, 1 hdc in the next dc, and 2 sc in the last dc of that group. Ch 1.
Repeat this nine-stitch sequence across each of the remaining five groups of 7 dc, followed by ch 1.
Skip the separating chain spaces from the previous round.
Join with a sl st to the first sc.
Count: Six rounded fan sections, each containing 9 stitches, for 54 stitches and six ch-1 spaces.
Fasten off, leaving a 24-inch tail for assembly.
Checkpoint: The medallion should now have six broad sections with rounded outer edges and narrow separations between them. Its center should lie flat without forming a tight ruffle.
Before sewing the medallion to the navy square, lay both pieces flat and compare their proportions with the finished example. The medium-blue fans should occupy roughly two-thirds to three-quarters of the square's width, leaving a visible navy frame.
If the medallion cups, ripples heavily, or measures substantially smaller than the pictured proportions, do not stretch it into position. Its fit needs to be corrected before assembly.
Lay the medallion flat on the navy square, with its center directly over the square's center. Arrange the six fans between the positions where the snowflake arms will sit. With the snowflake arms pointing toward 12, 2, 4, 6, 8, and 10 o'clock, the medium-blue fans should point approximately toward 1, 3, 5, 7, 9, and 11 o'clock.
Don't sew the medallion on yet. We'll check all the layers together after the navy border is complete.
Add the Navy Granny Square Border
Now we'll finish the navy square with two more rounds of double crochet. The dark outer border is fairly wide in our example, and I want to keep those four little corner openings visible.
Return to the navy square. Place the held working loop back onto your 5 mm hook, remove the stitch marker, and tighten the loop to its normal size. Continue with the navy yarn from Round 4.
Round 5
Sl st into the next dc and then into the following ch-2 corner space.
Ch 3, then work 1 dc, ch 2, and 2 dc in the same corner space.
Work 1 dc in each of the next 15 dc.
In the next corner space, work (2 dc, ch 2, 2 dc).
Continue around, working 15 dc between each pair of corner groups.
After the fourth corner, work the final 15 dc and join to the beginning ch 3.
Count: 76 dc and four ch-2 corner spaces.
Each side now contains 19 dc, including the corner stitches.
Round 6: Final Navy Round
Sl st into the next dc and then into the following ch-2 corner space.
Ch 3, then work 1 dc, ch 2, and 2 dc in the same corner space.
Work 1 dc in each of the next 19 dc.
In the next corner space, work (2 dc, ch 2, 2 dc).
Continue around all four sides, working 19 dc between each pair of corner groups.
After the fourth corner, work the remaining 19 dc and join with a sl st to the beginning ch 3.
Count: 92 dc and four ch-2 corner spaces.
Each side contains 23 dc, including the corner stitches.
Fasten off and weave in the navy yarn ends on the wrong side.
Check Your Finished Square
Lay the navy square on a flat surface with the right side facing up.
Count the stitches along one side. You should have 23 dc between the two corner chain spaces, counting the stitches worked into the corners at either end.
Check all four sides. They should match.
The four ch-2 corners should still be open, and the edges should be reasonably straight.
If one side has a different stitch count, go back to the first round where its count changed and correct that round before joining the snowflake pieces.
A little curling can often be corrected with blocking. If the square ripples badly or pulls into a bowl shape, check your corner increases and try a slightly larger hook before continuing.
Assemble, Finish, and Block Your Snowflake Square
Now we get to put those pretty layers together. Before sewing anything, arrange all four pieces on the table so you can see how they'll fit.
The order is simple: navy square on the bottom, medium-blue fans next, pale-blue snowflake arms over the fans, and the little ivory center on top.
Assembly orientation: Keep the right side of all four crocheted pieces facing up. For the medium-blue fans, pale-blue snowflake, and ivory center, use the side that faced you while crocheting. Arrange all four layers before sewing so the raised stitches remain visible on the front.
Step 1: Position the Medium-Blue Fans
Lay the navy square right side up.
Place the medium-blue fan medallion in the center of the square. Rotate it so the six fans will fill the spaces between the snowflake arms rather than sit directly underneath them. The upper two fans should angle toward the upper corners, the middle two should point toward the left and right edges, and the lower two should angle toward the lower corners.
The fans should cover much of the navy center without hiding the outer border or its four corner openings.
Use a few removable stitch markers or pins to hold the medallion in place.
Check the placement: Look at all four edges. The medallion should appear centered, with a reasonably even amount of navy showing around it.
Step 2: Sew the Blue Fans in Place
Thread the medium-blue yarn tail through your yarn needle. Use it to secure the center and as many fans as the tail comfortably reaches. When only a few inches remain, weave that end securely into the wrong side. Continue with a fresh 24-inch length of medium-blue yarn, securing it on the back before sewing the remaining fans. Use another length if needed rather than pulling the stitches tight to conserve yarn.
Bring the needle through the back of the navy square and through the center of the fan medallion. Make several small securing stitches around the center ring.
Then work outward, attaching each fan near its outer edge and at one point along its middle.
Pass the needle through the tops or back loops of the medium-blue stitches and into the navy background. Keep the sewing stitches small so they don't show on the front.
Don't pull the fan edges tightly against the square. We want to keep their rounded shape.
Secure all six fans, then weave the yarn tail into the wrong side.
Step 3: Add the Six Icy-Blue Snowflake Arms
Lay the pale-blue snowflake on top of the medium-blue fans.
Match its center ring to the center of the square.
Arrange the arms with one pointing straight up, one straight down, two toward the upper sides, and two toward the lower sides.
Position each pale-blue arm between two neighboring medium-blue fans. Leave the rounded blue fans visible in the spaces between the arms, just as they appear in the finished example. Adjust the placement until the six arms are evenly spaced and none extends beyond the navy border.
Spread the two small branches at the end of each arm in opposite directions. They should look like little forks rather than a pair of branches stacked on top of each other.
Pin the snowflake in place and check the overall shape before sewing.
Placement checkpoint: You should see six distinct pale-blue arms, twelve smaller branches, and six medium-blue fans showing between and beneath them. None of the arms should extend beyond the navy border.
Step 4: Secure the Snowflake Arms
Using the pale-blue yarn tail, sew the snowflake center ring firmly to the background. Then use separate 24-inch lengths of matching pale-blue yarn to secure the arms and branches, working a few arms at a time. Secure each length on the wrong side and weave in its ends before starting another. Don't try to attach all six arms with one short sewing tail.
Work along each arm, making small attachment stitches near the base, around the middle, and just below the forked end.
Secure each small branch near its base, with one branch lying to each side of the main stem.
Leave the rounded tips slightly raised to preserve the textured appearance.
Don't pull the stitches so tightly that the navy square puckers.
Repeat for all six arms. Turn the square over and secure the yarn ends on the wrong side.
Step 5: Attach the Ivory Center
Place the ivory flower over the center ring of the pale-blue snowflake.
Arrange its six petals so they line up with the six snowflake arms.
The white petals should cover the center joins and blend into the bases of the pale-blue branches.
Using the ivory yarn tail, sew around the center and attach the base of each petal to the stitches underneath.
Keep the outer edges of the petals slightly raised. They should remain rounded rather than being pulled flat.
Secure the yarn and weave the end into the wrong side.
Step 6: Check the Finished Snowflake
Lay your square flat and look at it from directly above.
Before blocking, check these details:
- The ivory center has six rounded petals.
- There are six pale-blue snowflake arms.
- Every arm has two little side branches.
- The medium-blue fans are visible behind the snowflake.
- The dark navy border shows on all four sides.
- All four corner openings remain visible.
- The square isn't pulling inward around the snowflake.
If one arm looks crooked, adjust its sewing stitches rather than pulling the whole square out of shape.
Step 7: Block the Finished Square
Lightly dampen the square using a method appropriate for your yarn.
Lay it right side up on a blocking mat and gently shape the four corners into a square.
Use a ruler to make the sides even. Pin the corners if needed.
Arrange the snowflake branches while the piece is still damp, keeping their forked ends spread apart.
Let the square dry completely before removing the pins.
Keep the raised center and branches from being pressed flat. Before using the finished square, check the front and back and remove every remaining pin or removable stitch marker.
Final measurement: Measure the blocked square across its width and height. The expected size is approximately 7–8 inches, although your yarn and tension may change that measurement.
That's your finished snowflake square!
Ways to Use Your Crochet Snowflake Squares
A single snowflake square makes a pretty little winter decoration, but I especially like the idea of joining several together for a blanket. The navy border gives each square its own frame, and the pale-blue branches would stand out beautifully when the squares are arranged side by side.
Make a Snowflake Blanket
Try arranging the squares in rows, with each snowflake pointing in the same direction.
For a blanket made with 7-inch squares, a layout of five squares across and seven squares down would measure approximately 35 by 49 inches before adding the joining width and outer border.
If you're making this as a baby keepsake, keep the finished blanket and decorative pillows out of an infant's sleep space. They can be enjoyed as supervised handmade projects or keepsakes.
You could also alternate snowflake squares with plain navy or icy-blue granny squares. That would give the blanket a little more open space between the snowflakes.
Use a Snowflake Square for a Pillow
Four matching squares could make a pretty pillow front. Join them in a two-by-two arrangement, then crochet a plain back panel to match.
If you want a fuller pillow, add plain border rounds around the joined front until it fits your pillow insert.
Mix Snowflakes with Christmas Tree Squares
Snowflakes would also look lovely beside our Christmas tree granny square pattern.
I'd keep the same navy border on both designs if you're planning to join them into one blanket. Matching the outer colors will make the different motifs look like they belong together.
Just be sure all the squares have the same finished measurements and compatible edge stitch counts before joining them.
Frequently Asked Questions About the Snowflake Granny Square
Is this snowflake granny square suitable for beginners?
I'd recommend it for someone who already knows how to make double crochet stitches, work in joined rounds, and sew crocheted pieces together. The navy square is straightforward. The raised snowflake branches and assembly require a little more attention.
Why are the snowflake arms crocheted separately from the square?
A snowflake has six arms, but a square has four corners. Making the two shapes separately lets us keep the snowflake symmetrical while giving the background four evenly worked sides. It also keeps the decorative branches from pulling the square out of shape.
Can I use only two colors?
Yes. You could make the navy square and medium-blue fans in one color, then use white for the snowflake and center. You would lose some of the layered color effect, but the construction would stay the same.
Why are the icy-blue snowflake arms worked with two strands?
Using two strands makes the branches thicker and gives them a raised appearance. That's an important part of the design shown in the finished example. If your yarn is already quite thick, make a sample arm before deciding whether to hold it double.
What if my finished square curls?
Check the stitch counts first. Every corner should have its chain-2 space and the correct number of increases.
If the counts are correct but the square still curls, try a slightly larger hook or block the square gently. Also make sure the snowflake appliqué isn't sewn down too tightly.
Can I make a larger snowflake square?
Yes. Add more double-crochet rounds to the navy foundation, working the same four corner increases used in the pattern.
Each additional round adds four double crochet stitches to each side, or sixteen double crochet stitches to the round total.
The snowflake itself will stay the same size, with more navy background showing around it.
Has this pattern been physically tested?
The written stitch counts have been calculated, but this version has not yet been physically test-made. The finished size and the way the raised branches lie against the background still need confirmation with a crocheted sample.
Use the stitch-count and assembly checkpoints above to verify your work before making several matching squares.
When you click on links to various merchants on this site and make a purchase, this may result in this site earning a commission. This does not affect the price you pay.

UBGI Gold Standard 2026
Reviewed under the site's
editorial checklist.
Photos, decorating ideas, party setups and reader submissions are shared for inspiration unless a page is specifically presented as a pattern, tutorial, reference guide or step-by-step project. Follow the instructions, measurements, safety guidance and manufacturer directions provided for the particular project or product.
About Jan | Contact | Baby Nursery Ideas (Blog) | Site Map | Privacy Policy | Disclosure Policy | Disclaimer | Affiliate Disclosure | Earnings Disclosure | Facebook | Pinterest
I am a participant in the Amazon Services LLC Associates Program, an affiliate advertising program designed to provide a means for us to earn fees by linking to Amazon. As an Amazon Associate I earn from qualifying purchases.
Copyright © 2006-2026. All Rights Reserved.