Free Christmas Tree Quilt Pattern with Pieced Cardinals
By Jan Bay
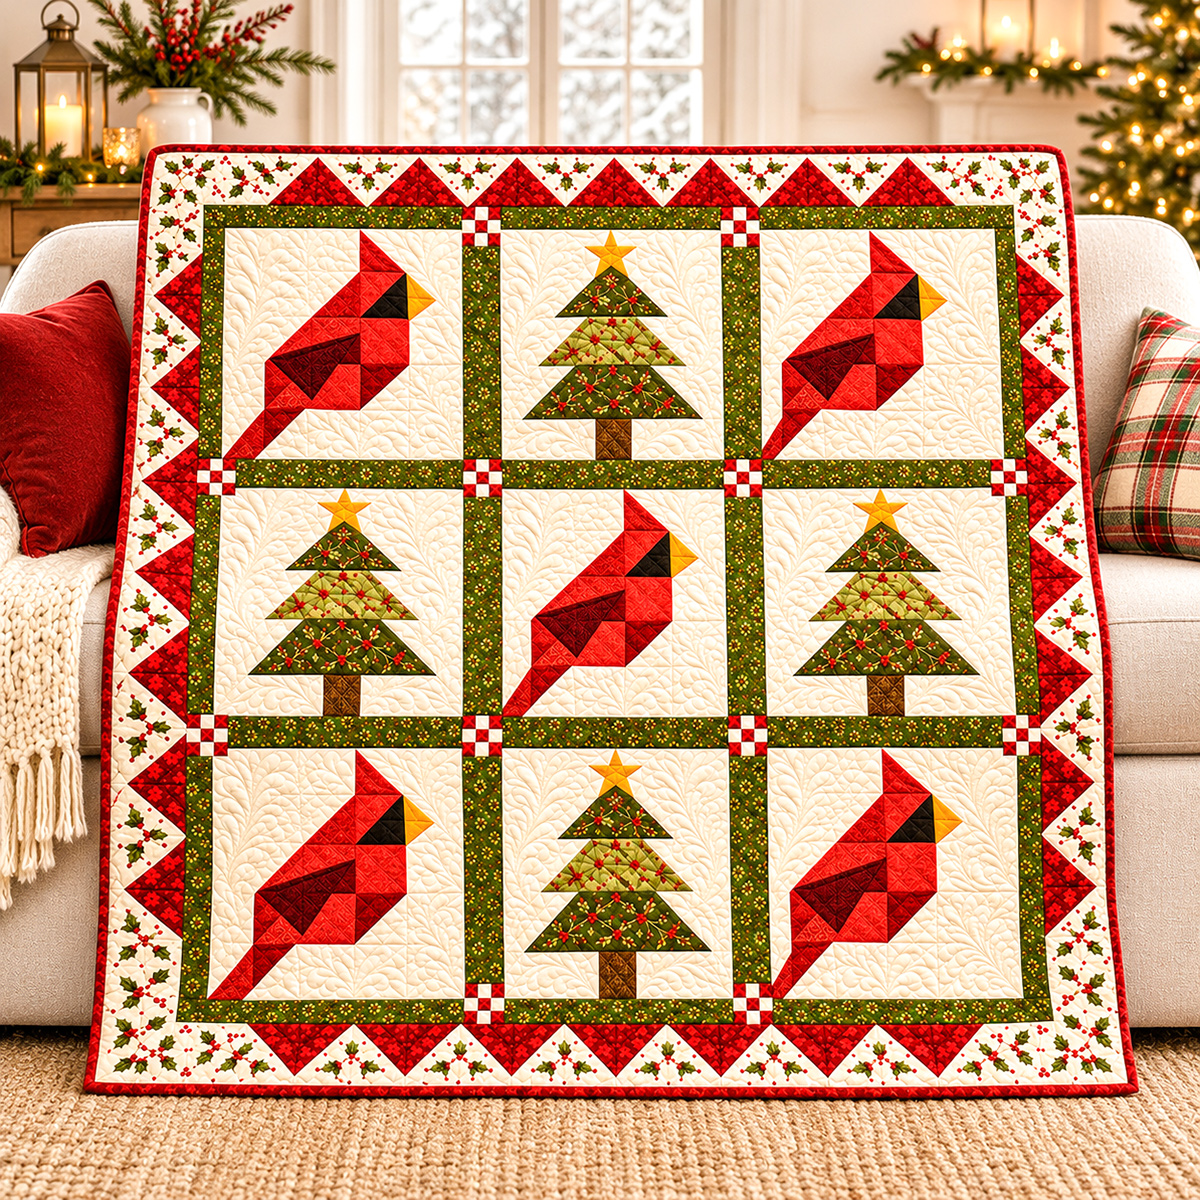
Make a beautiful Christmas quilt with this free Christmas Tree Quilt Pattern featuring five red patchwork cardinals and four evergreen trees. Each cardinal is made from geometric fabric pieces, with a pointed crest, a large triangular wing, and a long tail. The nine-block design features green sashing, red-and-cream checkerboard cornerstones, and a traditional sawtooth border finished with Christmas holly prints.
This cardinal quilt pattern is dedicated to those who see a cardinal at Christmas and feel that someone they love is near. May each little red bird stitched into this quilt bring you the same comfort as the one that visits your window.
Explore More Free Christmas Quilt Patterns
See Supplies for This Project Here.
Jump to the Free Christmas Tree Quilt Pattern
- Quilt Design and Finished Size
- Materials, Fabrics, and Supplies
- Fabric Cutting Instructions
- How to Sew the Patchwork Cardinal Blocks
- How to Make the Christmas Tree Blocks
- Assemble the Nine-Block Quilt Top
- Green Sashing and Checkerboard Cornerstones
- Sew the Christmas Sawtooth Border
- Quilting, Binding, and Finishing
- Download the Free Quilt Pattern and Templates
- Frequently Asked Questions
Christmas Tree Quilt Pattern: Design and Finished Size
This Christmas quilt brings together deep cardinal red and evergreen green against a warm ivory background. Five patchwork cardinals alternate with four Christmas trees, and the little red-and-ivory checkerboards tie everything together.
The birds are genuinely pieced from fabric shapes. Each has a pointed crest, black face patch, golden beak, diagonal tail, and a generous dark burgundy wing that points downward. The Christmas trees have three graduated green tiers and a gold star above each one.
The trees are pieced, too. Only the four gold stars are added with fusible appliqué.
Finished Quilt Measurements
- Planned finished size: 59½ × 59½ inches across the outside of the binding
- Quilt layout: Three rows of three blocks
- Cardinal blocks: Five identical right-facing birds
- Christmas tree blocks: Four
- Finished block size: 15 × 15 inches
- Unfinished block size: 15½ × 15½ inches
- Cardinal construction: 28 pieced patches per block
- Christmas tree construction: 19 pieced patches and one appliqué star per block
- Green sashing: 2¼ inches finished
- Checkerboard intersections: 12, with nine small squares in each crossing
- Checkerboard cell size: ¾ inch finished
- Olive-green inner frame: 1½ inches finished
- Framed quilt center: 53 inches square before adding the sawtooth border, measured across the raw edges
- Sawtooth border: 3¼ inches finished
- Sawtooth triangles: 28, with seven along each side
- Patchwork seam allowance: ¼ inch
How the Nine Blocks Are Arranged
| Cardinal | Christmas Tree | Cardinal |
| Christmas Tree | Cardinal | Christmas Tree |
| Cardinal | Christmas Tree | Cardinal |
All five cardinals face right. Their wings, tails, and facial patches follow the same construction, so you'll make the same bird block five times.
The checkerboards sit at the intersections of the green sashing and olive frame. There are four complete interior crossings and eight more around the perimeter. Each crossing has five red squares and four ivory squares.
The finished dimensions are based on the sewing lines. Three 15-inch blocks contribute 45 inches, the green sashing contributes 4½ inches, the olive frame contributes 3 inches, and the sawtooth borders contribute 6½ inches. That makes 59 inches between the binding attachment seams. The planned outside dimension across the bound quilt is 59½ inches.
The actual finished measurement can vary a little after quilting and binding. The cutting measurements and templates are based on the verified 59½-inch design.
Materials, Fabrics, and Supplies
I like using several coordinating red prints for the cardinals instead of making every section the same color. The dark wine wings stand out against the red bodies, and the green trees look pretty with a lighter Christmas print between two darker tiers.
Fabric Requirements
These fabric amounts are calculated for quilting cotton with at least 40 inches of usable width. They include the pieces for all nine blocks, sashing, checkerboards, borders, and binding. Small, non-directional prints work best with the calculated cutting quantities.
- Ivory background: 1⅞ yards
- Cardinal red: ⅝ yard for breasts, backs, crests, and tails
- Brick burgundy: ¼ yard for lower flanks and wing shadows
- Dark wine: ¼ yard for the five inverted triangular wings
- Black: ¼ yard for the cardinal face patches
- Gold: ¼ yard for beaks and stars
- Evergreen holly print: ½ yard for the upper and lower tree tiers
- Light green Christmas print: ⅜ yard for the middle tree tiers
- Brown: ¼ yard for the tree trunks
- Deep green Christmas print: ⅝ yard for the interior sashing
- Olive green: ½ yard for the surrounding frame and its corners
- Red Christmas border and checkerboard print: ⅞ yard
- Cream holly print: ⅞ yard for the sawtooth border
- Red binding: ⅝ yard
Backing: Allow 4 yards of standard quilting cotton with 40 inches of usable width, or 2 yards of wide backing fabric at least 70 inches wide.
Batting: One piece measuring 70 × 70 inches.
Other Supplies
- Sewing machine and matching quilting thread
- Rotary cutter, cutting mat, and acrylic quilting ruler
- ¼-inch patchwork presser foot
- Fabric scissors
- Iron and pressing surface
- Fabric marking pencil or fine removable marker
- Quilting pins or clips
- Paper or cardstock for tracing specialty templates
- A fine needle for marking seam intersections
- Paper-backed fusible web for the four gold stars
- Appliqué thread for securing the star edges
- Printed full-size cardinal and Christmas tree templates
Before cutting the quilt pieces, check your ¼-inch seam allowance on a few fabric scraps. Three strips cut 2 inches wide and joined side by side should measure 5 inches across after pressing. If they don't, adjust the seam allowance before sewing the quilt blocks.
The American Quilter's Society quilting tips offer additional information about accurate piecing and working with quilt fabrics.
The full-size printable templates contain the actual cutting outlines for the cardinal wings, beaks, tails, and pieced Christmas tree sections. Print the templates at Actual Size or 100%, with scaling turned off. Check the 1-inch test square before cutting any fabric.
Fabric Cutting Instructions for the Christmas Quilt
We'll cut the cardinals, Christmas trees, and border pieces separately. There are quite a few shapes, but you only have to learn one bird block and one tree block. The remaining blocks repeat those same pieces.
All measurements are in inches. The cutting sizes include ¼-inch seam allowances unless the piece is identified as a raw-edge appliqué shape.
For the specialty pieces, use the full-size printable templates that accompany this pattern. Their solid outlines are the cutting lines, and the dashed lines mark the stitching positions. The templates also show the seam intersection dots for matching angled pieces.
Cutting Chart for Five Cardinal Blocks
Cut the following quantities for all five birds. The measurements are width × height, as viewed in the finished block.
| Piece | Fabric and Cutting Size | Quantity |
|---|---|---|
| A | Ivory, 9¼ × 3½ | 5 |
| Z | Ivory, 3¾ × 3½ | 5 |
| J | Ivory, 6¼ × 3½ | 5 |
| B4 | Ivory, 1¾ × 3½ | 5 |
| M | Ivory, 3¼ × 6½ | 5 |
| V | Ivory, 3¾ × 6½ | 5 |
| T4 | Ivory, 10¼ × 3½ | 5 |
| P | Cardinal red, 3½-inch square | 5 |
| W6 | Cardinal red, 6½ × 1 | 5 |
| B1 | Gold beak triangle, template | 5 |
| B2, B3 | Ivory beak corners, templates | 5 each |
| W1 | Dark wine inverted wing, template | 5 |
| W2 | Brick burgundy shoulder, template | 5 |
| W3 | Red shoulder, template | 5 |
| W4 | Ivory upper shoulder, template | 5 |
| W5 | Red upper shoulder, template | 5 |
| T1, T3 | Ivory tail corners, templates | 5 each |
| T2 | Red diagonal tail, template | 5 |
Half-Square Triangle Cutting
You'll also make the following half-square triangles. Cut the parent squares 4 inches square, sew on both sides of the marked diagonal, and trim the completed units to 3½ inches square.
- Red and ivory: 5 pairs, using 5 red squares and 5 ivory squares. These produce 10 units for crests C and upper backs H.
- Red and black: 3 pairs, using 3 red squares and 3 black squares. These produce 6 units for the five face patches F, with one spare.
- Brick burgundy and ivory: 3 pairs, using 3 brick squares and 3 ivory squares. These produce 6 units for the five lower flanks Q, with one spare.
The parent-square total is eight cardinal-red squares, eight ivory squares, three black squares, and three brick-burgundy squares, all cut 4 inches square.
Cutting Chart for Four Christmas Trees
- Ivory caps: 4 rectangles, each 15½ × 3 inches.
- G1: 4 upper evergreen tiers, using the full-size folded-paper template.
- G2: 4 lighter-green middle tiers, using the full-size folded-paper template.
- G3: 4 lower evergreen tiers, using the full-size folded-paper template.
- G1a and G1b: 4 ivory upper-tier corners in each orientation, using the template and its mirror.
- G2a and G2b: 4 ivory middle-tier corners in each orientation.
- G3a and G3b: 4 ivory lower-tier corners in each orientation.
- G1l and G1r: 8 ivory rectangles, each 4¼ × 3¾ inches.
- G2l and G2r: 8 ivory rectangles, each 3¼ × 3¾ inches.
- G3l and G3r: 8 ivory rectangles, each 2 × 3⅞ inches.
- Tl and Tu: 8 ivory trunk-band rectangles, each 6¾ × 3⅛ inches.
- Tr: 4 brown trunk rectangles, each 3 × 3⅛ inches.
- Gold stars: 4, cut from the full-size fusible appliqué template without added seam allowance.
Green Sashing and Olive Frame Cutting
- Cut 4 plain deep-green rails measuring 15½ × 2¾ inches.
- Cut 8 shorter deep-green rails measuring 14¾ × 2¾ inches.
- Cut 12 olive-green frame rails measuring 15½ × 2 inches.
- Cut 4 olive-green corner squares measuring 2 × 2 inches.
Checkerboard Strip Cutting
These pieces make the small nine-patch crossings. Each square finishes at ¾ inch.
- Set A: Cut two red strips and one ivory strip, each 1¼ × 31 inches.
- Set B: Cut one red strip and two ivory strips, each 1¼ × 16 inches.
The strips will be joined lengthwise and subcut into checkerboard rows. Set A produces 24 slices, and Set B produces 12 slices.
Sawtooth Border Cutting
- Cut 28 red Christmas-print rectangles measuring 7 × 3¾ inches.
- Cut 56 cream holly-print squares measuring 3¾ × 3¾ inches for the stitch-and-flip corners.
- Cut 8 cream holly-print end caps measuring 4 × 3¾ inches.
- Cut 4 additional cream holly-print corner squares measuring 3¾ × 3¾ inches.
Binding Cutting
Cut seven red strips, each 2¼ inches wide and approximately 40 inches long. These will be joined into one continuous narrow double-fold binding.
Cutting Checkpoint
Sort the pieces by their template letters before sewing. Keep the five cardinal sets separate from the four tree sets. The small angled pieces can look surprisingly similar when they're all sitting together.
Don't substitute ordinary half-square triangles for the specialty wing, beak, or tail pieces. Their actual shapes are supplied in the template PDF and are part of the approved design.
How to Sew the Patchwork Cardinal Quilt Blocks
Now we'll make the five cardinals. Each bird finishes at 15 inches square and uses 28 fabric patches. All five face right, with the long red tails extending toward the lower-left corner.
The large inverted burgundy wing is one actual fabric triangle. It's not two little half-square triangles sewn together. That was part of an earlier construction idea, but the final pattern uses a single template piece, W1.
Step 1: Prepare the Cardinal Templates
- Print the full-size templates on US Letter paper at Actual Size or 100%.
- Measure the 1-inch test square before cutting fabric.
- Cut out the specialty paper templates along their solid outlines.
- Keep the printed face of the template upward when tracing onto the right side of a single fabric layer.
- Mark the seam intersection dots on the wrong side of each fabric piece.
- Keep the grainline arrows parallel to the fabric selvage.
For an angled seam, place the fabric pieces right sides together and match their stitching-line dots. Pin through the dots at both ends before sewing.
Don't try to match the raw pointed tips instead of the seam intersections. Some of the corners naturally extend beyond one another until the seam is sewn and pressed.
Step 2: Make the Cardinal Half-Square Triangles
- Place one 4-inch red square and one 4-inch ivory square right sides together.
- Draw a diagonal line from corner to corner on the wrong side of the lighter square.
- Sew ¼ inch on either side of the marked line.
- Cut along the marked line to separate the two units.
- Open and press the fabric toward the darker color.
- Trim each half-square triangle to 3½ × 3½ inches, keeping the diagonal seam aligned with the 45-degree line of the ruler.
- Repeat for all five red-and-ivory pairs.
- Make the red-and-black and brick-and-ivory units the same way.
You'll use five C crest units, five H upper-back units, five F black-face units, and five Q burgundy-flank units.
Orientation check: For C, the red right angle sits at the lower left. For H, red sits at the lower right. For F, black sits at the lower right. For Q, brick burgundy sits at the upper left.
Step 3: Sew the Crest Row
The top row contains three pieces, A, C, and Z.
- Place ivory rectangle A on the left.
- Place the red-and-ivory crest unit C beside it, with the red triangle oriented as shown in the cardinal placement diagram.
- Place ivory rectangle Z on the right.
- Sew the pieces together with ¼-inch seams.
- Press toward the ivory rectangles.
The completed crest row should measure 15½ × 3½ inches unfinished.
Step 4: Piece the Golden Beak
- Take one gold B1 triangle and the matching ivory B2 and B3 pieces.
- Join B2 along the upper sloping edge of the gold triangle, matching the marked seam dots.
- Join B3 along the lower sloping edge.
- Press the seams toward the ivory pieces.
- Check that the gold beak points right and its full base is on the left.
The completed beak section should measure 2½ × 3½ inches unfinished.
Step 5: Sew the Cardinal Head Row
Arrange the pieces from left to right as follows:
J / H / F / completed beak / B4
- Sew ivory J to H.
- Add the red-and-black face unit F.
- Join the completed beak to F so the black face patch meets the gold triangle.
- Add ivory B4 at the far right.
- Press toward J where practical, and press the beak-to-face seam toward F.
This row measures 15½ × 3½ inches unfinished.
Step 6: Piece the Large Inverted Burgundy Wing
Here's our distinctive cardinal wing. The dark wine triangle spans 6 inches horizontally in the finished bird, with an area of 10½ square inches inside the stitching lines. It's a real triangular fabric piece, large enough to stand out against the red body.
Use the W1 template on page 5 of the full-size template PDF. Cut five W1 triangles from dark wine fabric, all oriented exactly as printed.
- Lay W1 right side up on the cardinal placement diagram.
- Take brick-burgundy W2 and sew it to the lower-left edge of W1, matching the seam dots.
- Take red W3 and join it along the long right edge of W1. Both seams meet at the lower burgundy point.
- Press toward W2 and W3.
- Join ivory W4 to red W5 along their shared 45-degree diagonal.
- Press the W4/W5 seam toward W5.
- Place this upper shoulder section against the long top edge of W1.
- Match the two wingtip dots and stitch the section in place.
- Press toward the upper shoulder section.
- Add the narrow red W6 strip along the entire bottom edge of the wing panel.
- Press the final seam toward W6.
The completed wing panel should measure 6½ × 6½ inches unfinished.
Wing checkpoint: W1 forms one substantial downward-pointing burgundy triangle. Its lower point sits ½ inch above the finished bottom edge of the wing panel. Don't turn it upside down or divide it into smaller decorative triangles.
Step 7: Make the Breast and Lower Flank
- Take the bright red square P.
- Place it directly above the brick-burgundy-and-ivory half-square triangle Q.
- Turn Q so the brick-burgundy triangle is at the upper left.
- Join the two pieces using a ¼-inch seam.
- Press toward P.
The assembled breast column should measure 3½ × 6½ inches unfinished.
Step 8: Assemble the Cardinal Body
Arrange the four sections from left to right:
M / completed wing panel / breast-and-flank column / V
- Join ivory M to the left side of the wing panel.
- Add the breast-and-flank column to the right of the wing.
- Add ivory V at the far right.
- Match the seam intersections before stitching.
- Press toward the ivory pieces at the outer joins and toward the breast column at the center join.
The completed body section measures 15½ × 6½ inches unfinished.
Step 9: Piece the Long Diagonal Tail
- Lay out ivory T1, red T2, and ivory T3 according to the cardinal placement map.
- Join T1 to the left sloping edge of T2, matching the stitching-line dots.
- Join T3 to the right sloping edge.
- Press the seams toward the red tail.
- Check that the assembled tail section measures 5¾ × 3½ inches.
- Join ivory rectangle T4 to its right side.
- Press toward T4.
The red tail should run diagonally toward the lower-left corner of the completed block. Keep the template oriented as printed so you don't accidentally reverse it.
Step 10: Join the Four Cardinal Rows
Each bird is assembled from four horizontal sections:
- Top crest row: A / C / Z, measuring 15½ × 3½ inches unfinished.
- Head row: J / H / F / beak / B4, measuring 15½ × 3½ inches unfinished.
- Body row: M / wing panel / breast column / V, measuring 15½ × 6½ inches unfinished.
- Tail row: T1–T3 tail section / T4, measuring 15½ × 3½ inches unfinished.
Stack the rows in this order. Align the crest with the black face, the face with the breast, and the lower shoulder with the tail seam.
Pin the matching intersections and sew the three long horizontal seams. Press them open.
Each completed cardinal block must measure 15½ × 15½ inches unfinished.
Step 11: Make the Remaining Four Birds
Repeat the entire construction for the other four cardinals. Keep all five facing right, with the beaks on the right and the tails extending toward the lower-left corner.
Check that every burgundy wing has the same shape and orientation. The wing is such an important part of the design that even one reversed triangle would be noticeable.
The downloadable pattern includes the complete cardinal placement map and enlarged wing assembly diagram. Keep those drawings beside your sewing machine while joining the angled pieces.
How to Make the Christmas Tree Quilt Blocks
Now for the four Christmas trees! Each one has three graduated tiers, with darker evergreen fabric at the top and bottom and a lighter green print in the middle. The ivory background shows around the branches, giving each tree its neat, stepped shape.
These trees are pieced rather than appliquéd onto a single background square. The only appliqué is the little gold star at the top.
Step 1: Prepare the Full-Size Tree Templates
The green tree tiers and their matching ivory corner pieces are included in the printable template PDF. Each green tier is drawn as a half-template so the full shape will fit on US Letter paper.
- Print the template PDF at Actual Size or 100%.
- Check the 1-inch calibration square.
- Take the paper template for G1, the upper evergreen tier.
- Fold a separate piece of paper and place the template's marked center edge along that fold.
- Trace and cut the outline through the folded paper.
- Open the paper to reveal the complete symmetrical tree-tier template.
- Repeat for G2 and G3.
- Use the opened paper shapes to trace the full-size pieces onto a single layer of green fabric.
Keep the printed orientation and grainline markings consistent for all four trees.
Step 2: Prepare the Ivory Corner Pieces
Each green tier has two sloping sides that meet matching ivory triangles.
- Trace the upper-tier ivory corner template G1a.
- Turn the paper template over to trace its mirrored partner G1b.
- Repeat for the middle tier using G2a and G2b.
- Repeat for the lower tier using G3a and G3b.
- Cut four of each left and right corner piece for the four trees.
- Mark the stitching-line endpoints on the wrong side of the fabric.
Keep the left and right corner pieces in separate labeled groups. They are mirror images, and the angled seams won't line up properly if they're mixed together.
Step 3: Piece the Upper Evergreen Tier
- Place the dark evergreen G1 fabric shape right side up.
- Position the matching ivory G1a triangle against its left sloping edge, right sides together.
- Match the marked stitching points and sew with a ¼-inch seam.
- Press toward the green fabric.
- Attach the mirrored G1b triangle to the right sloping edge.
- Press and check that the completed center section measures 8 × 3¾ inches unfinished.
- Attach the ivory G1l rectangle, measuring 4¼ × 3¾ inches, to the left side.
- Attach the matching G1r rectangle to the right side.
- Press toward the outside ivory rectangles.
The complete upper-tier band measures 15½ × 3¾ inches unfinished.
The upper tree tier comes to a point and finishes with a base 7½ inches wide.
Step 4: Piece the Middle Green Tier
- Take the lighter-green G2 tier and its matching ivory G2a and G2b corner triangles.
- Sew the ivory triangles to the sloping sides, matching the stitching-line dots.
- Press toward the green fabric.
- Check that the center section measures 10 × 3¾ inches unfinished.
- Add the two ivory G2l and G2r side rectangles, each measuring 3¼ × 3¾ inches.
- Press toward the outer ivory pieces.
The completed middle-tier band measures 15½ × 3¾ inches unfinished.
The finished middle tier has a 3-inch top edge and a 9½-inch base.
Step 5: Piece the Lower Evergreen Tier
- Take the dark evergreen G3 tier and its ivory G3a and G3b corner triangles.
- Join the two ivory corners along the sloping edges.
- Press toward the green fabric.
- Check that the center section measures 12½ × 3⅞ inches unfinished.
- Add ivory G3l and G3r side rectangles, each measuring 2 × 3⅞ inches.
- Press toward the outer ivory pieces.
The finished lower-tier band measures 15½ × 3⅞ inches unfinished.
The lowest green tier has a 5-inch finished top edge and a 12-inch finished base.
Step 6: Make the Brown Trunk Band
The trunk is centered beneath the lowest green tier.
- Lay out ivory rectangle Tl, brown rectangle Tr, and ivory rectangle Tu.
- Each ivory rectangle measures 6¾ × 3⅛ inches.
- The brown center rectangle measures 3 × 3⅛ inches.
- Sew the three pieces together using ¼-inch seams.
- Press toward the brown trunk.
The completed trunk band measures 15½ × 3⅛ inches unfinished. The brown trunk finishes at 2½ inches wide and 2⅝ inches tall.
Step 7: Join the Five Tree Sections
Each tree block has five horizontal sections:
- Ivory cap, 15½ × 3 inches
- Upper evergreen tier, 15½ × 3¾ inches
- Light-green middle tier, 15½ × 3¾ inches
- Lower evergreen tier, 15½ × 3⅞ inches
- Brown trunk band, 15½ × 3⅛ inches
Arrange the sections in that order, keeping the tree centered from top to bottom.
- Fold each band lightly in half to mark its center.
- Join the ivory cap to the upper tier.
- Add the middle tier.
- Add the lower tier, matching the center markings.
- Join the trunk band beneath the lower tier.
- Press the horizontal joining seams open.
Trim only the projecting dog-ears after sewing and pressing. Keep the ¼-inch allowance above the green apex as indicated in the pattern.
The completed tree block measures 15½ × 15½ inches unfinished.
Step 8: Add the Gold Five-Point Star
Each Christmas tree gets one gold star, cut from the full-size star template. The finished outline is approximately 3 5/16 inches wide and 3 3/16 inches tall.
- Trace the star outline onto the paper side of the fusible web.
- Cut roughly around the traced shape.
- Fuse the web to the wrong side of the gold cotton according to the product instructions.
- Cut along the star's solid outline without adding a seam allowance.
- Remove the paper backing.
- Center the star above the upper tree tier, placing its top point ⅜ inch below the raw top edge of the block.
- Check that the star's lower center notch just meets the green tree point.
- Fuse the star in position.
- Secure its edges with a narrow zigzag stitch or short straight stitches just inside the raw edge.
Use matching gold thread and pivot carefully at the five points.
Step 9: Check the Finished Tree
The finished green tier bases, measured between stitching lines, are:
- Upper tier: 7½ inches wide
- Middle tier: 9½ inches wide
- Lower tier: 12 inches wide
The base of the upper tier sits 5¾ inches below the finished top of the block. The middle tier base sits at 9 inches, and the bottom tier base at 12⅜ inches.
Check that the three tiers are centered and that the star sits directly above the upper green point.
Step 10: Make Three More Christmas Trees
Repeat these instructions to make four matching tree blocks. Keep the same tier widths, colors, and star positions throughout.
All four tree blocks measure 15½ inches square unfinished. They will finish at 15 inches when the quilt top is assembled.
Assemble the Nine-Block Christmas Quilt Top
With the five cardinals and four Christmas trees finished, it's time to arrange the quilt. The birds and trees alternate in three rows, making a balanced Christmas design.
Lay out the blocks in this order:
- Top row: Cardinal, Christmas Tree, Cardinal
- Middle row: Christmas Tree, Cardinal, Christmas Tree
- Bottom row: Cardinal, Christmas Tree, Cardinal
All five cardinals face right, and every tree has its gold star at the top.
Check the Blocks Before Assembly
- Measure each block. It should be 15½ inches square unfinished.
- Check that all five burgundy wings point downward and match the approved cardinal construction.
- Check that the four tree blocks have matching tier widths and star placements.
- Keep the blocks arranged in their final positions while preparing the sashing.
Don't sew the blocks directly together. The green rails and little nine-patch checkerboards go between the blocks and around the outside of the nine-block center.
The complete assembly uses seven horizontal rows, including the narrow checkerboard rows and the olive-green top and bottom frame sections.
Sew the Green Sashing and Checkerboard Cornerstones
Those little red-and-ivory checkerboards are part of what makes this quilt so pretty. They mark the intersections of the green sashing and olive frame, adding a bit of traditional patchwork between the birds and Christmas trees.
There are 12 crossings altogether. Four sit inside the quilt, and eight sit where the green rails meet the olive frame. Every finished crossing has five red cells and four ivory cells.
Step 1: Make Checkerboard Strip Set A
- Cut two red strips and one ivory strip, each 1¼ × 31 inches.
- Arrange them red, ivory, red.
- Sew the three strips together lengthwise using ¼-inch seams.
- Press toward the red strips.
- Check that the joined strip set measures 2¾ inches across.
- Square one short end.
- Subcut into 24 slices, each 1¼ inches wide.
Step 2: Make Checkerboard Strip Set B
- Cut one red strip and two ivory strips, each 1¼ × 16 inches.
- Arrange them ivory, red, ivory.
- Sew the three strips together lengthwise.
- Press toward the red center strip.
- Check the completed width at 2¾ inches.
- Square one end and subcut into 12 slices, each 1¼ inches wide.
Each slice contains three little fabric squares. The finished cells measure ¾ inch square.
Step 3: Make Four Complete Nine-Patch Checkerboards
- Take two Set A slices and one Set B slice.
- Arrange them in three rows: A, B, A.
- Match the vertical seams so the red and ivory squares alternate.
- Sew the three rows together using ¼-inch seams.
- Press and check that the completed unit measures 2¾ × 2¾ inches unfinished.
- Repeat to make four complete nine-patch checkerboards.
Each complete checkerboard finishes at 2¼ inches square and contains five red squares and four ivory squares.
Step 4: Make Eight Perimeter Checkerboard Sections
The eight perimeter checkerboards are assembled a little differently because they cross between the olive frame and green sashing.
- Take one Set A slice and one Set B slice.
- Join them to make a two-row checkerboard measuring 2¾ × 2 inches unfinished.
- Repeat until you have eight two-row sections.
- Keep the remaining eight Set A slices for the shorter green rails.
Two checkerboard rows occupy the olive frame, and the third row extends into the green rail. Together they form the same nine-patch design as the four interior crossings.
Step 5: Add Checker Rows to the Short Green Rails
- Take one deep-green rail measuring 14¾ × 2¾ inches.
- Join one remaining Set A slice to a short end of the rail.
- Press the seam toward the green fabric.
- Check that the completed rail measures 15½ × 2¾ inches unfinished.
- Repeat for all eight shortened green rails.
These are the tipped rails. Their checkerboard ends will join the two-row sections to complete the perimeter nine-patches.
You should now have four complete nine-patch checkerboards, eight two-row checkerboard sections, eight tipped green rails, and four plain green rails.
Step 6: Arrange the Seven Quilt Rows
The olive rails form the frame around the quilt blocks. The checkerboards and green sashing must line up from one row to the next.
Use the following left-to-right arrangements:
| Row | Arrangement |
|---|---|
| 1 and 7 | Olive corner / Olive rail / Double checker / Olive rail / Double checker / Olive rail / Olive corner |
| 2 and 6 | Olive rail / Cardinal / Tipped green rail / Tree / Tipped green rail / Cardinal / Olive rail |
| 3 and 5 | Double checker / Tipped green rail / Full nine-patch / Plain green rail / Full nine-patch / Tipped green rail / Double checker |
| 4 | Olive rail / Tree / Plain green rail / Cardinal / Plain green rail / Tree / Olive rail |
A double checker is the two-row A-and-B section. A full nine-patch is the three-row A-B-A checkerboard.
Turn the rails vertically in the tall block rows and horizontally in the narrow checkerboard rows.
For every perimeter intersection, position Set A toward the outside olive frame and Set B toward the green rail. The tipped end of each shorter green rail completes the third checkerboard row.
Step 7: Sew the Rows Together
- Join the pieces across Row 1 according to the arrangement chart.
- Press the seams toward the rails where practical.
- Assemble Rows 2 through 7 in the same manner.
- Keep the checkerboard intersections square while stitching.
- Lay all seven completed rows in order.
- Pin the matching intersections, making sure the green rails and checkerboards line up.
- Join the seven rows using ¼-inch seams.
- Press the six long horizontal seams open.
Check the Framed Center
The quilt center, including the green sashing and olive frame, should measure 53 × 53 inches across its raw edges.
Between the stitching lines, the framed center measures 52½ inches square.
The three tall block rows each measure 15½ inches high unfinished. The narrow interior checkerboard rows measure 2¾ inches high, and the top and bottom olive-frame rows measure 2 inches high.
Look along the vertical green sashing. Every checkerboard should line up with the rails above and below it. Check the horizontal lines, too.
If a checkerboard is shifted, check the 1¼-inch strip slices and the orientation of the A and B rows before continuing.
How to Sew the Christmas Sawtooth Quilt Border
The red sawtooth border makes a lovely finish around the birds and trees. Each side has seven red triangles pointing outward, with cream holly-print fabric around the points.
You'll make 28 identical sawtooth units using a stitch-and-flip method. Each unit finishes at 6½ inches wide and 3¼ inches deep.
Step 1: Prepare the Sawtooth Pieces
For the complete border, you'll need:
- 28 red rectangles, each 7 × 3¾ inches
- 56 cream holly-print squares, each 3¾ × 3¾ inches
- 8 cream holly-print end caps, each 4 × 3¾ inches
- 4 cream holly-print corner squares, each 3¾ × 3¾ inches
Step 2: Make the Red Sawtooth Units
- Place one red 7 × 3¾-inch rectangle horizontally, right side up.
- Draw a diagonal line on the wrong side of two cream holly-print squares.
- Place the first holly square right sides together over the left end of the rectangle.
- Orient its diagonal line from the lower-left corner toward the upper-right corner.
- Sew directly on the marked line.
- Fold the holly fabric toward the upper-left corner and check that it covers the red corner.
- Trim the fabric layers beneath the folded corner to a ¼-inch seam allowance.
- Press the holly triangle outward.
- Position the second holly square over the right end, with its diagonal running from upper left to lower right.
- Sew along the marked line.
- Fold the holly fabric outward, check that it covers the red corner, and trim the seam allowance to ¼ inch.
- Press the completed unit.
The two diagonal seams cross ¼ inch below the upper raw edge, leaving one red triangular point.
Each completed unit measures 7 × 3¾ inches unfinished.
Repeat until you have 28 matching sawtooth units.
Step 3: Assemble Four Sawtooth Border Runs
- Take seven completed sawtooth units and arrange them side by side, with all the red points facing the same edge.
- Join the seven units using ¼-inch seams.
- Attach one 4 × 3¾-inch cream holly-print end cap to each end.
- Press the seams open.
- Check that the completed border run measures 53 × 3¾ inches unfinished.
- Repeat to make four identical border runs.
Each run has seven complete red teeth. The holly-print end caps fill the space at the ends without creating partial triangles.
Step 4: Attach the Side Borders
- Take two completed sawtooth border runs.
- Rotate them so the red points face outward from the quilt center.
- Pin one run to the left side of the framed quilt center.
- Match the ends, midpoint, and quarter marks.
- Sew using a ¼-inch seam.
- Repeat along the right side.
- Press the seams toward the olive frame.
The quilt should now measure 59½ inches across its raw width and 53 inches from top to bottom.
Step 5: Add the Holly-Print Corner Squares
- Take one of the remaining 53 × 3¾-inch sawtooth runs.
- Attach a 3¾-inch holly-print square to each end.
- Press the seams.
- Check that the strip measures 59½ × 3¾ inches unfinished.
- Repeat with the last sawtooth run.
Step 6: Attach the Top and Bottom Borders
- Place the top border against the quilt, with the red triangle points facing outward.
- Match the holly-print corner squares with the ends of the side borders.
- Pin the ends, midpoint, and quarter marks.
- Sew using a ¼-inch seam.
- Press toward the olive frame.
- Repeat for the bottom border.
The completed quilt top measures 59½ × 59½ inches across the raw edges.
There are seven red sawtooth triangles on each side, making 28 in all. The four outer corners are cream holly-print squares rather than partial sawtooth triangles.
Check that the border lies flat before making the quilt sandwich. If one side seems too long or short, measure the individual units and seams rather than stretching the border to fit.
Quilting, Binding, and Finishing the Christmas Quilt
Once the sawtooth border is attached, the patchwork top is ready for backing and batting. I like the feather-style quilting shown against the ivory background. It adds lovely texture without competing with the cardinals or Christmas trees.
Step 1: Prepare the Backing
Cut the batting to 70 × 70 inches.
For standard-width backing, cut two pieces approximately 70 inches long. Remove the selvages, join the long edges with a ½-inch seam, and press the seam open. Trim the assembled backing to 70 × 70 inches.
If using wide backing fabric, cut one 70-inch square instead.
Step 2: Make the Quilt Sandwich
- Press the completed quilt top and backing.
- Spread the backing wrong side up on a clean, flat surface.
- Place the batting over the backing.
- Center the quilt top right side up over the batting.
- Smooth the three layers from the center outward.
- Baste using quilting pins, thread basting, or another suitable method.
The backing and batting are larger than the quilt top, leaving room for quilting and trimming.
Step 3: Quilt the Three Layers
Stitch in the ditch along selected block and border seams to stabilize the layers.
In the ivory background areas, mark a gently curving feather spine. Sew rounded teardrop-shaped plumes along one side, returning to the spine after each plume, then repeat along the other side.
Keep the cardinal wings, pointed crests, tree shapes, and gold stars clearly defined. A coordinating ivory thread works nicely against the background fabric.
Complete the quilting according to the batting manufacturer's maximum recommended spacing between quilting lines.
Step 4: Prepare the Red Binding
- Take seven red binding strips, each 2¼ × 40 inches.
- Join the strips end to end using 45-degree diagonal seams.
- Trim the joining seam allowances to ¼ inch.
- Press the seams open.
- Fold the continuous binding strip in half lengthwise, wrong sides together.
- Press the folded strip.
The assembled binding provides more than 260 inches after the diagonal joins, enough for the approximately 238-inch quilt perimeter and the joining allowance.
Step 5: Attach the Binding
- After quilting, trim the extra batting and backing even with the quilt top.
- Align the raw edges of the folded binding with the front edge of the quilt.
- Leave approximately 10 inches of loose binding at the starting point.
- Sew ¼ inch from the quilt edge.
- At each corner, stop ¼ inch before the edge and backstitch.
- Fold the binding upward at a 45-degree angle, then fold it down along the next side to form a mitered corner.
- Continue around all four sides.
- Stop with approximately 12 inches of the quilt edge unsewn.
- Lay the binding tails along the opening and overlap them by 2¼ inches.
- Trim the excess fabric, open the folded ends, and join them with a diagonal seam.
- Press the joined ends, refold the binding, and finish sewing across the opening.
- Wrap the folded binding edge to the back of the quilt.
- Miter the corners and slipstitch the folded edge in place.
Step 6: Final Quilt Measurements and Check
The verified construction plan produces a quilt top measuring 59½ inches square across the raw edges. The planned outside measurement across the completed binding is also 59½ inches square.
The distance between the binding attachment seams is 59 inches. Actual finished dimensions may vary slightly with quilting take-up and handling.
Spread the quilt out and check the nine-block arrangement, the checkerboards, the seven red sawtooth points on each side, and the binding corners.
The finished design has five matching cardinals, four Christmas trees, 12 aligned nine-patch intersections, an olive frame, and a red sawtooth border.
That's plenty of Christmas detail. The red cardinals and their dark burgundy wings are the feature, and the green trees give the whole quilt a lovely holiday look.
Download the Free Christmas Tree Quilt Pattern and Templates
Want a printable copy of this Christmas Tree Quilt Pattern to keep beside your sewing machine? There are two free PDF downloads, one with the complete sewing instructions and another with the full-size templates.
The complete pattern includes the cutting chart, cardinal placement map, enlarged burgundy wing diagram, Christmas tree construction, checkerboard assembly, and sawtooth border instructions.
Download the Free Christmas Tree and Cardinal Quilt Pattern (PDF)
The companion template PDF contains the actual-size cutting outlines for the specialty pieces, including the cardinal wings, beaks, tails, tree tiers, ivory corners, and gold stars.
Download the Full-Size Cardinal and Christmas Tree Quilt Templates (PDF)
Printing: Print the template PDF on US Letter paper at Actual Size or 100%. Turn off Fit to Page and all automatic scaling. Check the 1-inch test square and the 10-centimeter scale before cutting fabric.
The complete pattern is 13 pages, and the full-size template collection is 16 pages. Both are designed for the same 59½-inch Christmas quilt.
Frequently Asked Questions About the Christmas Tree Quilt Pattern
Do I need a special quilting ruler to make the cardinal wings?
No special ruler is necessary, but you'll need the full-size W1 wing template. Each bird has one substantial dark-wine triangular wing. Cut five identical wing pieces from the printable template, keeping the same orientation for every cardinal.
Can I use fabric scraps for the cardinals?
Yes. Coordinating red and burgundy scraps work nicely for the cardinals, provided they're large enough for the required pieces. I'd use the same dark wine fabric for all five wings so the birds look consistent.
Can I make the trees with different Christmas fabrics?
Absolutely. You can change the fabric prints without changing the shapes. Keep the same three-tier construction, with darker greens above and below the lighter middle tier.
Can I make a smaller version of this quilt?
The complete pattern is designed for a 59½-inch square quilt. A smaller version would require recalculating the block pieces, sashing, checkerboards, and sawtooth border. The downloadable templates are full-size for this particular design.
Are the cardinal blocks made with appliqué?
No. The cardinals are pieced from fabric shapes, including the crests, beaks, face patches, wings, bodies, and tails. Each cardinal contains 28 patches.
The Christmas trees are also pieced. Only the four gold stars are attached using raw-edge appliqué.
How many checkerboard squares are in the quilt?
There are 12 red-and-ivory nine-patch intersections. Four are inside the quilt, and eight cross the green sashing and olive frame. Each checkerboard contains five red squares and four ivory squares.
Can I use this quilt as a Christmas wall hanging?
Yes, although the approximately 59½-inch square size is large for a small wall. It also makes a pretty Christmas throw or a decorative quilt displayed over a bed or sofa.
If you enjoy sewing Christmas projects, you might also like our Christmas Village Quilt Pattern, with its little houses and winter fabrics.
When you click on links to various merchants on this site and make a purchase, this may result in this site earning a commission. This does not affect the price you pay.

UBGI Gold Standard 2026
Reviewed under the site's
editorial checklist.
Photos, decorating ideas, party setups and reader submissions are shared for inspiration unless a page is specifically presented as a pattern, tutorial, reference guide or step-by-step project. Follow the instructions, measurements, safety guidance and manufacturer directions provided for the particular project or product.
About Jan | Contact | Baby Nursery Ideas (Blog) | Site Map | Privacy Policy | Disclosure Policy | Disclaimer | Affiliate Disclosure | Earnings Disclosure | Facebook | Pinterest
I am a participant in the Amazon Services LLC Associates Program, an affiliate advertising program designed to provide a means for us to earn fees by linking to Amazon. As an Amazon Associate I earn from qualifying purchases.
Copyright © 2006-2026. All Rights Reserved.