Baby's First Christmas Nativity Footprint Art with Free Printable
By Jan Bay
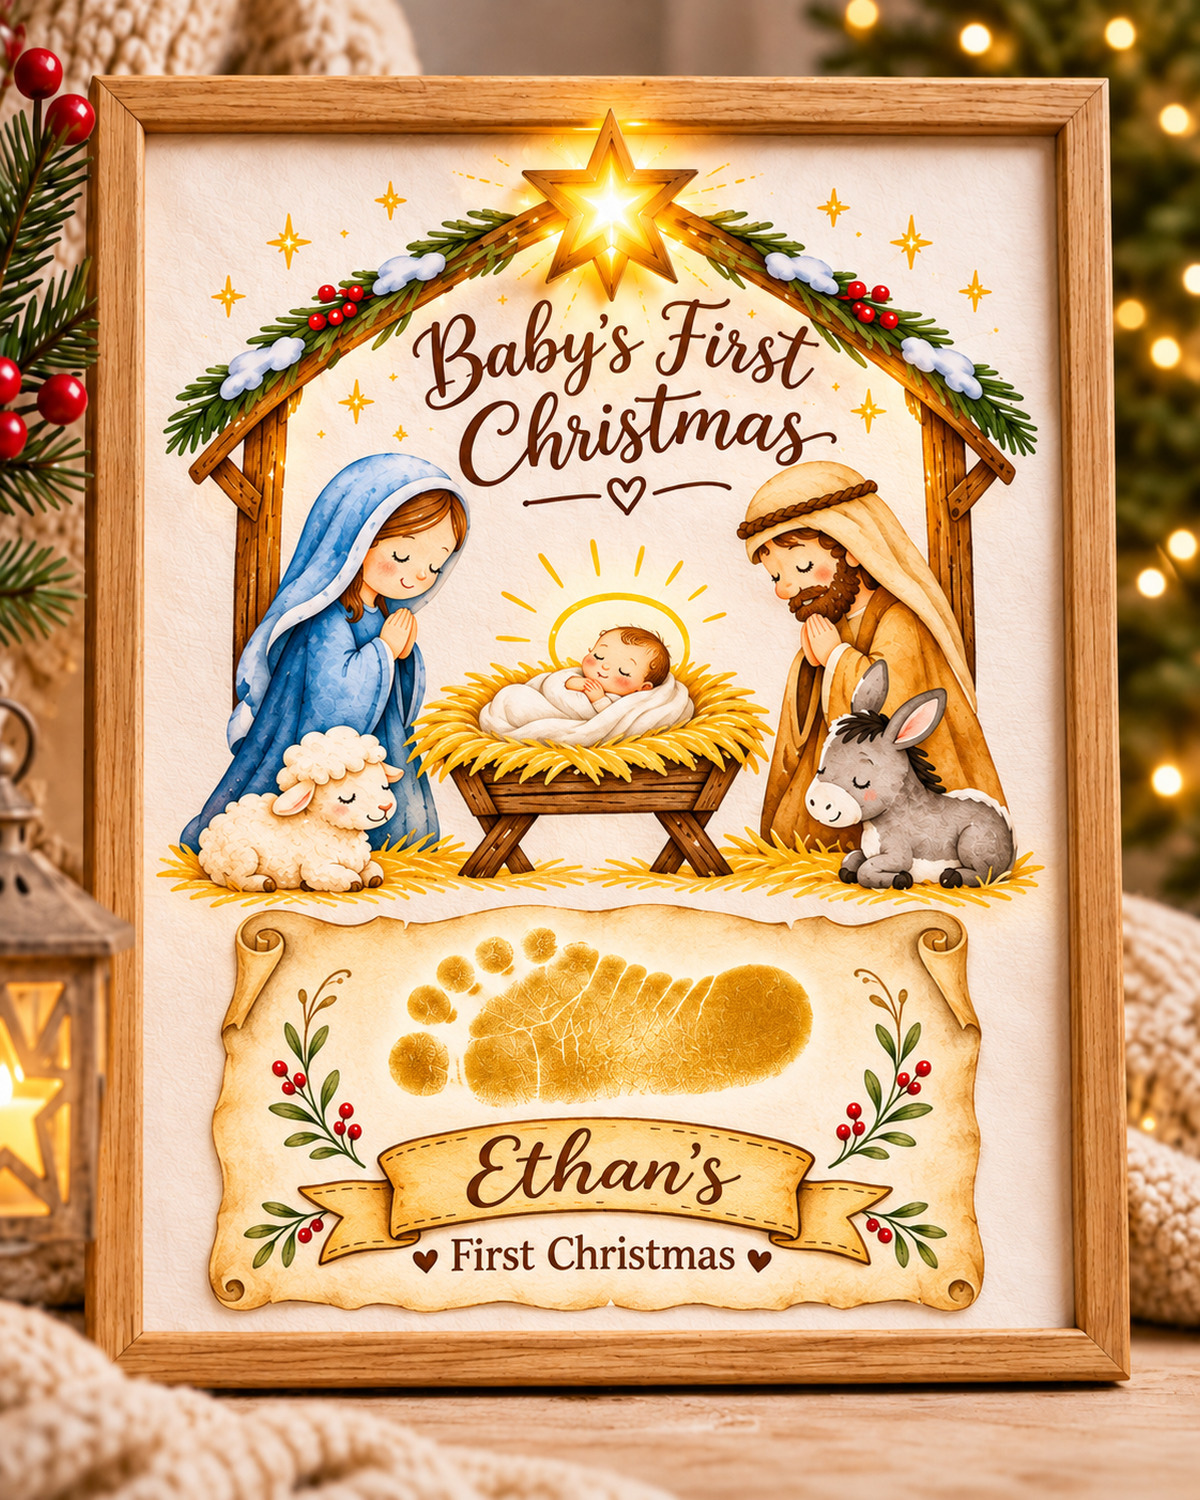
There's something especially touching about those tiny baby feet at Christmas. It's a bittersweet fact that parents are aware of...they will never be that little again. This Baby's First Christmas Nativity Footprint Art brings together the traditional manger scene and one little footprint you'll want to treasure forever. I've included a free printable background with Mary, Joseph, baby Jesus, and the Christmas star, along with a separate parchment keepsake panel where you can add your baby's actual footprint and name. It's a lovely way to remember that first Christmas while keeping the true meaning of the nativity at the heart of the picture.
More Baby Christmas Crafts and Keepsakes
See Supplies for This Project Here.
On This Page
Download the Free Nativity Printable
How to Make Your Nativity Footprint Art
Tips for Getting a Clear Baby Footprint
Download the Free Nativity Printable
I've made the background so you can add your baby's real footprint without having to draw the nativity scene yourself. Mary, Joseph, and baby Jesus are already in place, with the Christmas star above the stable. The parchment panel underneath is left empty for that little foot, and there's a blank ribbon below it for your baby's name.
Take a look at the printable before downloading it. The example image at the top of the page shows the finished idea, while this version is ready for you to personalize.
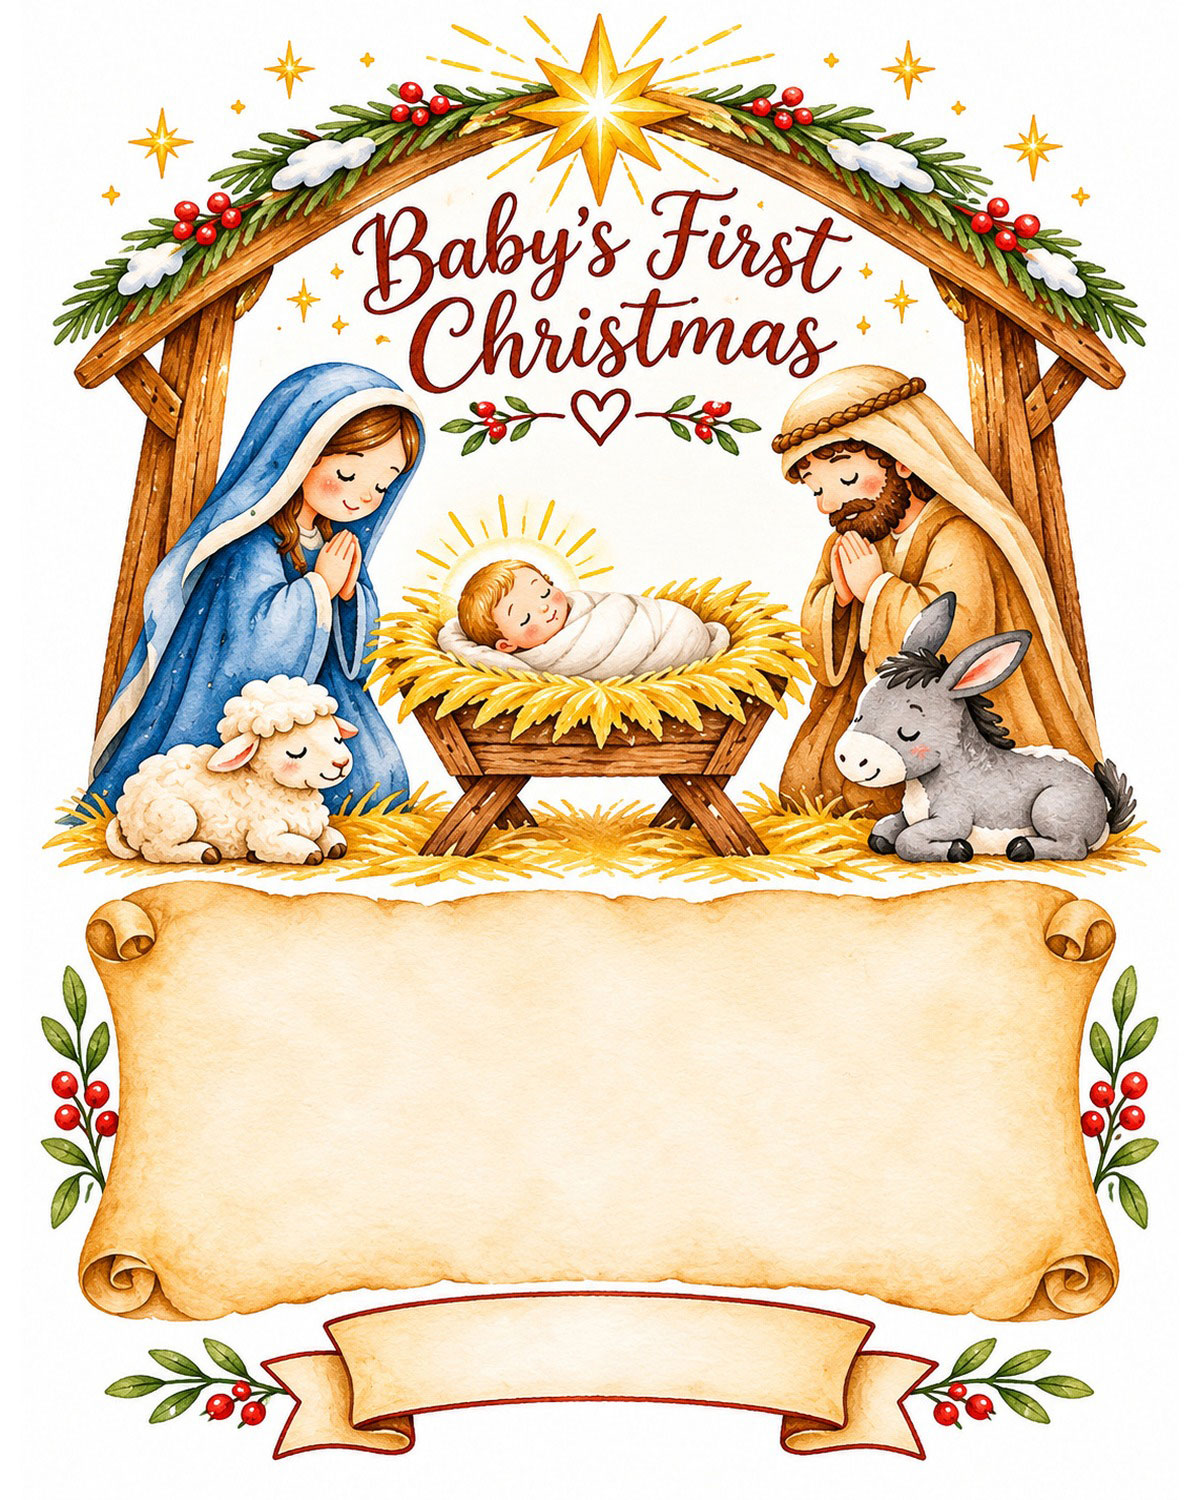
Free printable nativity background with a blank footprint panel and name ribbon.
Free Baby's First Christmas Nativity Footprint Printable
Print the Christmas nativity background, add your baby's actual footprint to the parchment panel, and write your baby's name on the ribbon underneath. No special drawing skills needed!
Download the Free Nativity Footprint Art Printable (PDF)
The ZIP download contains one printable PDF. Download the ZIP, extract the PDF, and print on US Letter paper at Actual Size or 100%. The footprint and name areas are blank.
I'd print one extra copy before starting. That way, if the first footprint smudges or lands a little crooked, you have another background ready. You can also practice on plain paper before using the decorated printable.
The artwork is designed for one footprint placed sideways, with the toes pointing toward the left. The name goes on the ribbon below. Keep the footprint inside the parchment panel so it doesn't cover the manger scene.
Supplies You'll Need
There's no need for a long shopping list. The printable does most of the decorating for you. I'd concentrate on getting a clear footprint and choosing paper that will hold up nicely in a frame.
- Free nativity printable: Download the PDF above.
- White matte cardstock: Around 65 to 80 lb is a good option if your printer accepts it. Regular printer paper works for practice.
- Footprint printing material: A washable product specifically labeled as suitable for the baby's skin and age, or a baby footprint kit that keeps ink from touching the skin.
- Small foam applicator: Only if the instructions for your skin-contact printing product recommend one.
- Plain practice paper: Have a couple of sheets ready.
- Clean damp washcloth and towel: For prompt cleanup if you're using a skin-contact product.
- Fine-tip brown or dark red pen: For adding your baby's name to the ribbon.
- Frame: An 8.5 x 11-inch document frame, or a larger frame with a properly sized mat.
Gold makes a pretty footprint against the parchment, just as it does in the finished example. But don't use metallic acrylic paint or ordinary craft paint on a baby's foot simply because the color looks right. A label saying "non-toxic" doesn't automatically mean the product is intended for direct skin contact.
If you can't find a suitable gold printing product, I'd use an infant-appropriate clean-touch footprint kit instead. You can preserve the print in its original color or make a gold digital version later without putting metallic craft paint on the baby's skin.
Check the age guidance, intended use, ingredients, directions, and warnings on the product you choose. The U.S. Consumer Product Safety Commission's art materials information explains the labeling requirements for art supplies. Those requirements don't replace the manufacturer's specific skin-contact instructions.
One more little thing I'd have ready is a second adult to help with the paper or the baby's position. It's much easier than trying to hold a tiny foot, keep the page straight, and manage the printing material all at once.
How to Make Baby's First Christmas Nativity Footprint Art
The nativity scene is already complete, so you'll be working only on the parchment keepsake panel and the name banner underneath it. Baby Jesus stays in the manger, with Mary and Joseph beside him. Your baby's footprint becomes a separate reminder of that first Christmas.
Step 1. Print the background
Download the free ZIP file and extract the PDF inside it. Open the PDF and print it on US Letter paper, measuring 8.5 x 11 inches. Choose "Actual Size" or "100%" in your printer settings. Don't select a smaller paper size or print several copies on one sheet.
If you're using cardstock, make sure the weight is supported by your printer. Matte paper is my choice here because it gives the watercolor scene a nice finish and is generally easier to work with than a slick glossy surface.
Let the printer ink dry before handling the sheet. The printable should show a Christmas nativity scene at the top, a large empty parchment panel below it, and a blank ribbon at the bottom.
Step 2. Check the space for your baby's footprint
Look at the parchment panel underneath the manger. That's where the footprint belongs, turned sideways with the toes pointing left and the heel toward the right.
Before you use any printing material, compare the size of your baby's foot with the open area. Make sure there's room for the heel and all five toes without touching the scroll's curled edges.
The printable is designed for a single baby footprint, not a pair. If your baby's foot is too large for the panel, you can have the background enlarged proportionally on bigger paper. I wouldn't shrink a real footprint just to squeeze it into a small space if you're hoping to preserve its actual size.
Step 3. Prepare everything before making the print
Place the printable on a firm, flat surface where it won't slide. Put your practice paper and cleanup supplies within reach. If you're using a product that touches the skin, read its instructions before you bring the baby over.
Make sure the baby's foot is clean and dry and the skin is free of cuts or irritation. Choose a time when your baby is comfortable. If the baby is upset or pulling away, save the craft for another time.
Have another adult support the baby while you manage the print if possible. Keep the baby's face, mouth, and hands away from printing materials and never leave the baby unattended with craft supplies.
Step 4. Make a practice footprint
Practice on plain paper using the printing method you've chosen. If it's a skin-contact product approved for this use, follow its directions for applying a thin, even layer. If it's a clean-touch kit, follow the supplied instructions for the film and paper.
Support the baby's ankle gently. Lower the heel onto the paper first, then bring the rest of the foot down until the toes make contact. Lift the foot straight up without dragging it sideways.
You're looking for a recognizable little heel, foot, and toes. Don't press harder to force the details to appear. If the practice print is too heavy or the toes run together, adjust the amount of printing material according to the product directions before trying again.
Step 5. Add the footprint to the parchment panel
Once you're happy with the practice result, make the keepsake print. Turn the paper as needed so that, when the picture is upright, the toes point toward the left and the heel points toward the right.
Center the footprint inside the parchment area, leaving a little empty space around it. Lower the heel first, gently make contact with the rest of the foot, and lift straight up. Don't slide or twist the foot against the paper.
If you're using a clean-touch kit that makes the print on a separate sheet, there's no need to transfer wet ink onto the printable. Preserve that original print. You can scan or photograph it, remove the plain background in an image editor, and position a copy inside the parchment panel digitally. Keep the footprint's proportions unchanged. Print the completed artwork afterward.
Whichever method you use, keep the artwork with the baby's real footprint. The finished example shows gold, but your own keepsake doesn't have to match its color exactly.
Step 6. Clean up and let the artwork dry
If a skin-contact printing product was used, clean the baby's foot promptly according to its instructions. Use gentle washing as appropriate, and don't use paint thinner, harsh solvents, or other craft cleaners on the skin.
Set the finished print on a clean, level surface to dry completely. Follow the printing product's stated drying time. Don't stack another sheet over it while the print is damp.
Step 7. Add your baby's name
Once the footprint is dry, write your baby's name on the ribbon below the parchment panel. Center the lettering and leave a little space at both ends.
I'd use dark brown lettering to go with the nativity illustration. Print the name lightly in pencil first if you need help with the spacing, then trace it with a suitable pen and erase any visible pencil marks after the ink has dried.
The example shows "Ethan's First Christmas," but the printable ribbon is blank so you can personalize it however you like. A first name alone is fine, too.
Step 8. Frame the finished keepsake
Allow everything to dry before putting the artwork into a frame. A document-size frame will accommodate the full 8.5 x 11-inch page without cutting away the star, stable, or ribbon. You can also choose a larger frame with a mat opening that shows the entire illustration.
Keep the printed surface from sticking to the glazing. A suitable mat or spacer is helpful, especially if the footprint has raised paint texture. Don't press freshly finished paint directly against the glass.
And there you have it. A Christmas nativity with your baby's own little footprint underneath, all ready to keep or give as a gift.
Tips for Getting a Clear Baby Footprint
Those tiny toes are adorable, but they don't always cooperate when you're trying to make a keepsake. You may get four clear toes and one faint little mark. Or the heel may turn out beautifully while the toes hardly show at all.
Don't worry about making it look like a photograph. A real footprint has its own character. I would rather keep a slightly uneven print that really came from the baby than spend the afternoon trying to make every toe perfect.
If the toes look like one big blob
Too much printing material can fill in the spaces between the toes. If you're using an appropriate skin-contact product, apply only the amount recommended in its instructions. Make your next practice print with a lighter, more even application rather than pressing harder.
If the heel hardly shows
Check that the heel touches the paper before the rest of the foot. Support the ankle without squeezing it, and lower the foot gently. A firm, flat work surface helps keep the paper from bending away from the heel.
If the footprint looks smeared
Sliding the foot is often the problem. Keep the sheet from moving, make contact, then lift the foot straight up. Don't roll the foot sideways across the paper to create the horizontal shape. Turn the printed background before you begin instead.
If your baby keeps curling those little toes
Try again at a more comfortable time. Don't pull the toes straight or hold the foot down to force a print. You can always use a clear impression made on separate paper and add it to the printable afterward.
Keep one good original
Once you have a footprint you like, save a clear photograph or scan before doing any extra decorating. That gives you a backup if you decide to make a second framed piece for grandparents.
If you'd like more ideas for preserving those little prints, my baby footprint crafts and keepsake ideas page covers framed artwork, ink prints, clay impressions, and other ways to save them.
Personalizing Your Christmas Keepsake
The footprint makes this project personal, but that little ribbon at the bottom gives you a chance to make it even sweeter.
I kept the ribbon separate from the parchment panel for a reason. The footprint deserves its own space, and the baby's name should be easy to read without running across the print.
What to write on the name ribbon
You don't need a long message. A few words will do nicely. Here are three simple choices:
- Ethan for a clean, simple name banner.
- Ethan's First Christmas for a personalized Christmas keepsake.
- Our Little Christmas Blessing for a version without a name on the front.
Replace the sample name with your own baby's name, of course. If the name is long, I'd use smaller lettering rather than extending it beyond the ribbon.
Should you add a date?
I've intentionally left the date off the printable. The Christmas title, nativity scene, and baby's footprint already tell the story without another line of text.
You can write the year and the baby's age on the back of the finished artwork before framing it. That preserves the information without making the front feel crowded.
Choose a footprint color that belongs with the picture
The gold footprint in the finished example picks up the golden star and straw in the manger. It looks especially pretty against the warm parchment background.
If your chosen infant-appropriate printing method produces another color, that's perfectly fine. A clear brown or charcoal footprint can look lovely here, too. I'd choose a printing method suitable for the baby before worrying about matching the gold in the example.
Keep the stable, the figures, and the parchment exactly as printed. You don't need more stars, glitter, or decorations around the footprint. There is already plenty to look at, and the little foot is meant to have its own special place.
Framing and Display Ideas
Once the footprint and lettering are finished, I think a simple frame is all this nativity picture needs. The illustration has enough color and detail to look lovely without an elaborate frame.
Choose the frame before trimming anything
The free printable is made for 8.5 x 11-inch paper. A matching document frame is the easiest option because it preserves the complete picture.
If you already have an 8 x 10-inch frame, check the opening before cutting the artwork. Trimming a full letter-size print to fit can remove parts of the greenery, star, or name ribbon. I wouldn't cut away those details just to use a smaller frame.
A light natural wood frame is my first choice for this design because it goes with the wooden stable and parchment. Dark walnut would be pretty, too, especially if you want something that looks more like a traditional Christmas decoration.
Where to display your nativity keepsake
You could place it on a Christmas mantel, hang it alongside family holiday photographs, or display it on a shelf with your other Christmas decorations.
If you want it in the nursery during December, hang it securely away from the crib and anywhere the baby can reach. Keep loose frames and glass out of the baby's reach.
A pair of coordinating frames would also make a lovely display. You could put the nativity footprint art in one and a photograph from baby's first Christmas in the other.
Make one for grandparents
Here's another nice use for that saved footprint image. You can make a second copy with the same little print, add the baby's name, and put it in a frame for grandparents.
You won't have to repeat the whole footprint-making process. Just use a properly sized copy of the original print and preserve its proportions.
Putting the keepsake away after Christmas
Store the artwork somewhere dry, away from prolonged direct sunlight and moisture. If you're not leaving it framed, keep it flat in a suitable protective sleeve or archival-quality storage folder. Make sure the footprint is completely dry before storing it.
I would also keep a full-resolution scan or photograph of the finished piece. Christmas decorations get packed, moved, and sometimes misplaced, and that digital copy is worth having.
For more little projects you can make with a baby's real prints, visit my baby crafts and keepsake ideas page. You can put together a matching collection without making every piece look exactly alike.
Frequently Asked Questions
Does the free nativity printable include a baby footprint?
No. The parchment panel is intentionally blank so you can add your own baby's actual footprint. The name ribbon is blank, too. The personalized example image shows how the completed keepsake can look.
Can I put two footprints on the parchment?
The printable is arranged for one footprint placed sideways. Two may overlap or crowd the curled edges of the parchment. I'd make two separate keepsakes rather than squeeze both feet into the small panel.
Does the footprint have to be gold?
Not at all. Gold is the color shown in the finished example, but you can use the color produced by your chosen baby footprint kit. If you want a gold result, use a printing product specifically intended for that kind of contact with your baby, or make an inkless print and add the gold color digitally afterward.
Can I print the nativity background at 5 x 7 inches?
You can reduce the background for a smaller framed picture, but remember that the footprint panel becomes smaller, too. A real baby footprint may no longer fit. I'd use the full-size printable for the original keepsake, especially if you want to preserve the footprint at its actual size.
Can I add the baby's name on my computer instead of writing it by hand?
Yes. You can open the background in an image-editing or design program and place your baby's name over the blank ribbon before printing. Choose lettering that fits neatly inside the ribbon. If you're adding a digital footprint as well, you can finish the whole picture before printing.
Why is the footprint below the nativity instead of in the manger?
I wanted the nativity itself to remain traditional, with baby Jesus resting in the manger and Mary and Joseph beside him. The baby's footprint belongs in a separate keepsake panel below the scene. That way, the picture honors the birth of Jesus while remembering your own baby's first Christmas.
Can I reuse this printable for another baby's first Christmas?
Yes. Print another blank copy and add the second baby's own footprint and name. Each child can have a separate keepsake with the same Christmas background.
And that's really all you need to make a Baby's First Christmas Nativity Footprint Art keepsake. The nativity picture is ready to print, and the part that makes it yours comes from one tiny foot. Add a name, choose a frame, and you'll have a Christmas memory to bring out again year after year.
When you click on links to various merchants on this site and make a purchase, this may result in this site earning a commission. This does not affect the price you pay.

UBGI Gold Standard 2026
Reviewed under the site's
editorial checklist.
Photos, decorating ideas, party setups and reader submissions are shared for inspiration unless a page is specifically presented as a pattern, tutorial, reference guide or step-by-step project. Follow the instructions, measurements, safety guidance and manufacturer directions provided for the particular project or product.
About Jan | Contact | Baby Nursery Ideas (Blog) | Site Map | Privacy Policy | Disclosure Policy | Disclaimer | Affiliate Disclosure | Earnings Disclosure | Facebook | Pinterest
I am a participant in the Amazon Services LLC Associates Program, an affiliate advertising program designed to provide a means for us to earn fees by linking to Amazon. As an Amazon Associate I earn from qualifying purchases.
Copyright © 2006-2026. All Rights Reserved.