Baby Salt Dough Handprint Ornament: A Christmas Keepsake to Make at Home
By Jan Bay
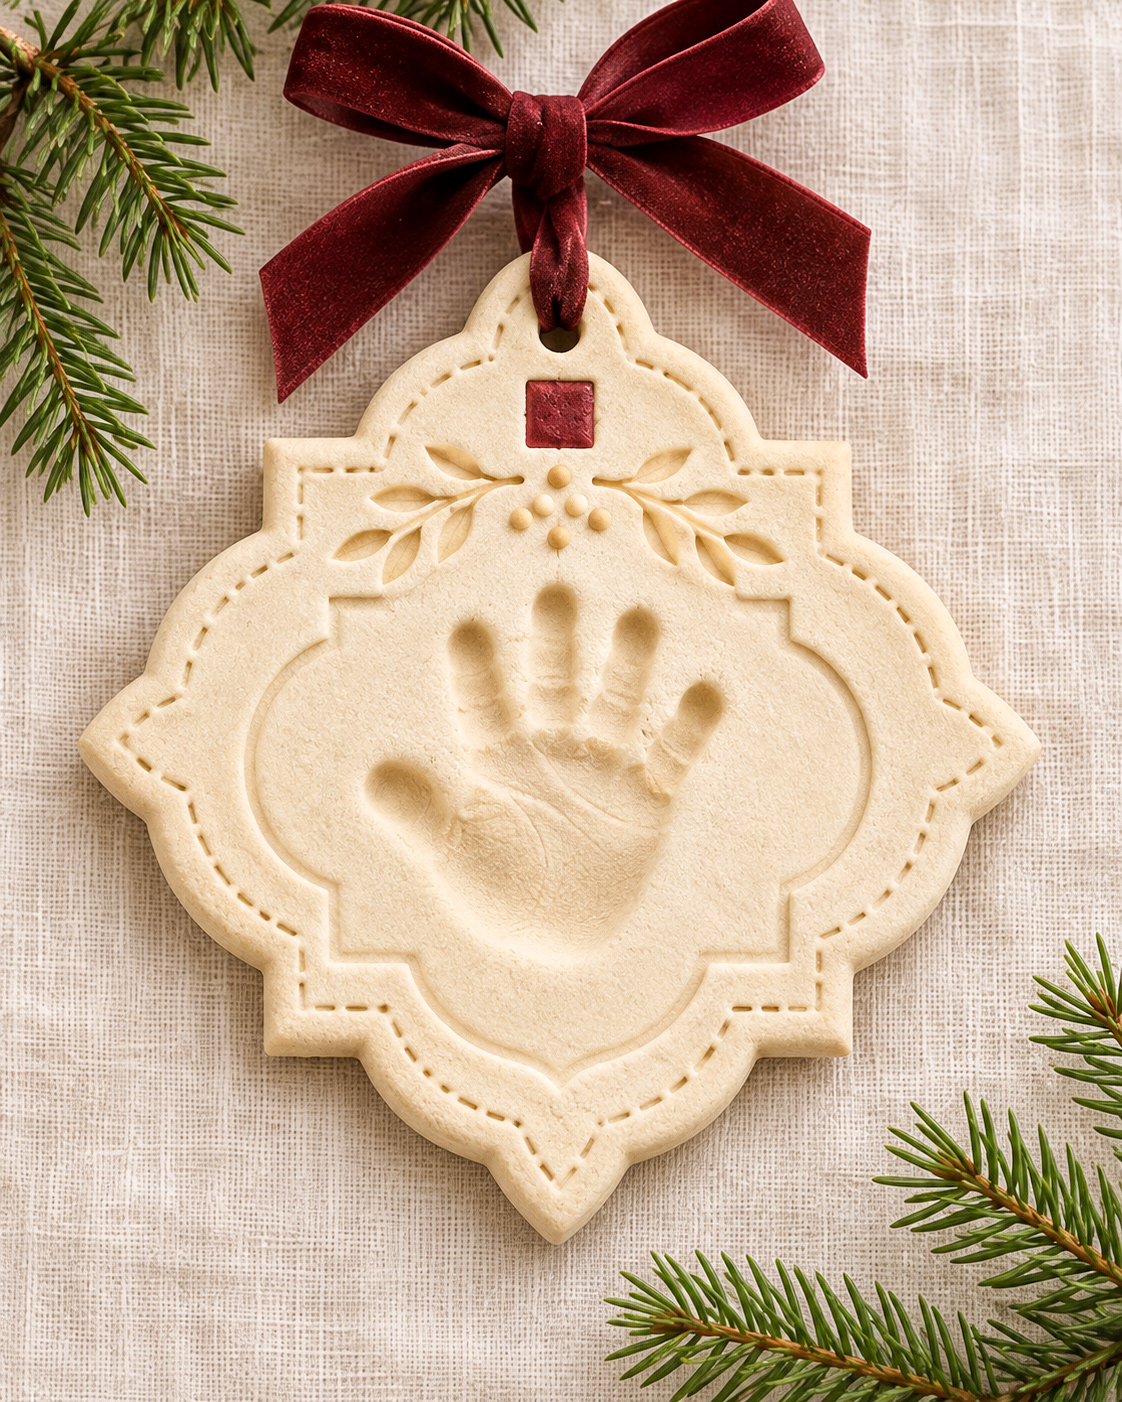
A Baby Salt Dough Handprint Ornament has been a sweet way to remember just how tiny your baby's hands once were for a long time. But...I saw where improvements could be made and I've given this Christmas keepsake a little more personality than the usual round handprint ornament. I added a pretty shaped border, tiny stitched details, engraved leafy branches, and a Christmas red accent. The handprint medallion is still the star of the show, but those extra touches make it look like something you'd find in a lovely little Christmas shop. And you can make it yourself with flour, salt, water, and a few simple decorating tools!
More Baby Christmas Keepsakes & Handprint Crafts
4 Salt Dough Baby Christmas Ornaments
See Supplies for This Project Here.
Jump to a Section
- Supplies & Materials
- Easy Salt Dough Recipe
- Free Printable Ornament Pattern & Templates
- Prepare the Dough & Make Baby's Handprint
- Cut the Decorative Ornament Shape
- Make the Stitched Border & Inner Frame
- Add the Leafy Branches, Berries & Red Accent
- Drying & Baking Instructions
- Painting, Sealing & Adding the Ribbon
- Troubleshooting & Helpful Tips
- Displaying & Storing Your Ornament
- Frequently Asked Questions
Supplies & Materials for Your Baby Salt Dough Handprint Ornament
You'll be surprised how much of this project you can make with supplies you probably already have. The dough itself takes just three ingredients. The interesting part is the shaped border, little engraved leaves, and those tiny details that make the ornament look like a handmade Christmas keepsake instead of an ordinary round plaque.
Salt Dough Ingredients
- 2 cups all-purpose flour
- 1 cup fine table salt
- 3/4 to 1 cup water, added gradually
- A little extra flour if needed
This makes one batch of dough. You may have some left over, depending on how large you make the ornament and how much dough you trim away.
Tools & Decorating Supplies
- Printable ornament pattern
- Two sheets of US Letter paper
- Printer and scissors
- Rolling pin
- Two 3/8-inch-thick rolling guides
- Parchment paper and a flat baking sheet
- Small craft knife or clay-cutting tool
- Ruler
- Drinking straw for the ribbon hole
- Wooden toothpick or blunt engraving tool
- Small round-ended tool for the stitched border
- Fine paintbrush
- Cranberry-red acrylic craft paint
- Clear matte craft sealer suitable for fully dried salt dough
- Burgundy velvet ribbon
You'll also need a few drops of water and a small brush to attach the little dough berries before drying.
Keep the craft supplies away from your baby. Salt dough is not edible, despite being made from kitchen ingredients. Its high salt content can be dangerous if swallowed, particularly for babies and pets. An adult should handle all the cutting, decorating, baking, and finishing. Wash baby's hand after making the impression.
The ASPCA also warns about the danger of salt dough ornaments to pets. Keep the finished decoration where little hands and curious animals can't reach it.
Easy Salt Dough Recipe for Your Christmas Ornament
For this design, you'll want dough that's smooth enough to capture baby's tiny fingers but firm enough to keep the ornamental edges from spreading. I'd start with the smaller amount of water and add more only when needed.
Ingredients for One Batch
- 2 cups all-purpose flour
- 1 cup fine table salt
- 3/4 cup water to begin, plus up to 1/4 cup more as needed
Mix the Dough
- Combine the flour and salt in a mixing bowl.
- Pour in 3/4 cup of water, a little at a time, while stirring.
- Bring the mixture together with your hands.
- Knead for approximately 8 to 10 minutes, adding water by the teaspoon if the dough remains crumbly.
- Stop adding water when the dough forms a smooth, firm ball.
- If it feels sticky, knead in a little extra flour.
- Cover the dough until you're ready to roll it.
Press a fingertip into a small test piece. The impression should stay visible without the dough sticking to your finger. That's the consistency you're looking for.
Use plain all-purpose flour rather than self-rising flour. We don't want the ornament puffing up and changing the shape of the handprint.
Free Printable Baby Salt Dough Handprint Ornament Pattern & Templates
I've included a printable pattern because this ornament has more curves and details than you could comfortably cut by eye. You'll get a better result if you make the paper template first instead of trying to shape everything while the dough is sitting out.
Download the Free Baby Salt Dough Handprint Ornament Pattern (PDF)
The printable has two pages:
- Page 1: Full-size outer cutting outline, center-panel reference, and hanging-hole position.
- Page 2: Decorative placement guide for the inner frame, leafy branches, five berries, and small red square.
Pattern Measurements
- Finished ornament body: Approximately 7 inches wide and 7 inches tall
- Dough thickness: 3/8 inch before making the impression
- Inner handprint panel: Approximately 3 1/2 inches wide at its broadest point
- Red accent square: Approximately 1/2 inch square
- Berries: Five small dough beads, approximately 1/8 to 3/16 inch across
- Hanging hole: Approximately 1/4 inch across
- Ribbon: Approximately 18 inches before tying the bow and hanger
These are proposed measurements for the pictured design. The ornament has not been physically test-made, so check the paper pattern against baby's actual hand before cutting the dough.
How to Print the Pattern
- Open the two-page PDF.
- Choose US Letter paper.
- Select Actual Size or 100% in your printer settings.
- Turn off Fit to Page or automatic scaling.
- Print both pages.
- Measure the 1-inch test line. It should measure exactly 1 inch.
- Cut out the outer ornament shape from Page 1.
- Keep Page 2 intact as your decorative placement guide.
Before cutting any dough: Place baby's open hand over the center area of the paper pattern. You need room for the entire impression without the fingertips or palm reaching the decorative border.
If baby's hand is too large, enlarge both template pages by the same percentage. Don't enlarge only the center opening. The outline, inner border, leaves, and ornament proportions all need to stay together.
The pattern is intended to give you the distinctive outline and decoration shown in the example. Baby's actual handprint will naturally be different from the one pictured, and that's the part that makes your ornament personal.
Prepare the Dough & Make Baby's Handprint
Now we're ready for the fun part! Before you bring your baby over, get the dough rolled out and everything arranged. You don't want to be searching for the rolling pin while trying to get those little fingers to cooperate.
Roll the Dough
- Place parchment paper on a clean, flat work surface.
- Set your 3/8-inch rolling guides on opposite sides of the parchment.
- Put a portion of the dough between the guides and roll it into a sheet slightly larger than your paper ornament pattern.
- Roll slowly, keeping the dough an even thickness from one side to the other.
- Check for air bubbles, folds, or cracks. Smooth or reroll the dough if necessary.
- Keep the rolled dough on its parchment paper. You'll move the parchment and ornament together onto the baking sheet later.
Don't cut the fancy outline yet. Make the handprint first so you can position the ornament shape around it.
Make Baby's Handprint
- Place the outer paper template lightly over the dough to identify the center.
- Mark the approximate handprint area with two tiny marks outside the central panel. Remove the template.
- Wash and dry baby's hand.
- Have another adult help hold your baby comfortably, if needed.
- Gently open the hand and lower it onto the center of the dough, with the fingers pointing toward the top of the ornament.
- Use light, even pressure over the palm and fingers. Don't force the fingers straight.
- Lift the hand away without sliding it across the dough.
- Check that the thumb, four fingers, and palm have made clear impressions.
Don't worry if the fingers aren't perfectly straight. A natural little handprint is much nicer than one that looks forced.
If the dough sticks or the impression smears, roll it out again and try once more. If your baby isn't interested, stop and come back to the craft another time.
Check the Impression Depth
You want a clear recessed impression without making the bottom of the ornament paper-thin. Aim to leave approximately 1/4 inch of dough beneath the deepest part of the print where possible.
Because every baby's hand and the pressure used will be different, treat that as a guide rather than a guaranteed measurement.
Checkpoint: Before cutting the shape, check that the handprint is centered, the fingertips have room below the decorative branches, and the surrounding dough is still smooth.
Cut the Decorative Ornament Shape
This is the part that gives our ornament its unusual outline. Instead of a plain circle or oval, it has a rounded top, little squared shoulders, wide curved sides, and a pointed lower section.
It looks much more complicated than it is if you use the printed cutting pattern.
Cutting the Ornament
- Place the Page 1 paper template over the dough, centering it around baby's handprint.
- Make sure the fingertips stay below the space reserved for the decorative leaves.
- Check that the thumb and outside fingers have room inside the inner frame.
- Use a small knife or clay-cutting tool to cut around the outer paper outline.
- Start at the rounded upper section and work slowly around one side.
- Follow the small square shoulder, then the broad outer curve.
- Continue around the lower rectangular section and pointed bottom.
- Repeat on the opposite side, keeping the ornament balanced.
- Remove the surrounding scraps, leaving the ornament on its parchment paper.
Smooth the Edges
Use a fingertip dampened with just a little water to smooth the cut edges. Keep the pointed bottom, squared shoulders, and rounded upper section clearly defined.
Don't use so much water that the dough turns sticky. A few gentle passes around the edge are enough.
Make the Hanging Hole
- Find the marked hanging-hole position near the top center of the ornament.
- Use a drinking straw to cut a hole approximately 1/4 inch across.
- Remove the small plug of dough from the straw.
- Make sure the hole goes completely through the ornament.
- Smooth the opening carefully without enlarging it.
- Check that at least 1/2 inch of sound dough remains between the upper edge of the hole and the outside outline.
The ribbon will pass through this hole, so don't put it too close to the top. If the upper section looks thin or stretched, reshape the fresh dough before adding the decorations.
Shape checkpoint: The ornament should have one continuous decorative outline, with matching left and right sides, a clearly defined pointed bottom, and one hanging hole centered near the top.
Make the Stitched Border & Inner Frame
The stitched border is one of my favorite details on this ornament. Those tiny marks make the edge resemble a piece of handmade fabric without adding anything that could fall off.
You'll make two separate decorations here: the narrow stitched marks around the outer edge and the shallow frame surrounding baby's handprint.
Engrave the Inner Frame
- Place the Page 2 decorative guide beside your ornament.
- Study the shape of the inner frame before making any marks.
- With a blunt modeling tool, begin the frame below the leafy decoration.
- Make a shallow curved line down the upper-left side.
- Continue around the rounded left section of the handprint panel.
- Follow the short straight section near the lower-left corner.
- Bring the line downward toward the pointed bottom of the panel.
- Repeat the same sequence on the right side.
- Join the two lower lines at the centered point beneath the palm.
The frame should be approximately 1/16 inch deep or less. You only need enough of an impression to catch the light.
Keep a generous space between the engraved line and baby's handprint. If the handprint is larger than the example, move the inner frame outward rather than cutting through the impression.
Add the Stitched Outer Border
- Start near the lower point of the ornament.
- Make one short dash approximately 1/4 inch inside the outer edge.
- Continue along the edge with short dashes approximately 1/4 inch apart.
- Follow the broad curve up the left side.
- Work around the squared shoulder and toward the rounded top.
- Stop before reaching the hanging hole so the area around it remains clear.
- Repeat along the right side of the ornament.
- Finish the remaining lower-edge marks, keeping the spacing balanced.
Each stitched mark can be approximately 1/8 inch long. Keep the marks shallow and slightly angled so they follow the curves of the ornament.
You don't need to count every dash. The important thing is that they're evenly spaced and follow the outline without crossing the handprint or weakening the edge.
Checkpoint: Your ornament should now have a recessed decorative frame around the handprint and a separate ring of little stitch-like marks following the outside silhouette.
Add the Leafy Branches, Berries & Red Accent
We're going to keep the leaves and berries near the top, leaving the handprint completely uncovered. It's a small decoration, but it gives the ornament a lovely Christmas look without turning it into a Santa or reindeer craft.
Engrave the Two Leafy Branches
- Use Page 2 of the printable as your placement guide.
- Find the open area above the fingertips and below the small red square.
- Mark a shallow branch extending from near the center toward the upper-left side.
- Make a matching branch extending toward the upper-right side.
- Keep both branches approximately 1 to 1 1/2 inches long, adjusting them to fit the ornament.
- Along each branch, mark three pairs of narrow pointed leaves.
- Shape each leaf with two curved lines that meet at a pointed tip.
- Use the rounded end of your tool to deepen each leaf slightly.
- Add a tiny center vein to selected leaves if there's enough room.
The branches should resemble a small arrangement of Christmas greenery spreading outward above the handprint. Keep the leaves small and fairly simple. You don't need to fill the entire upper section.
Make the Five Tiny Berries
The berries in the example are raised rather than engraved, so they need to be made from the same dough while the ornament is still fresh.
- Pinch off five very small pieces of salt dough.
- Roll each piece between your fingertips into a rounded bead approximately 1/8 to 3/16 inch across.
- Arrange the beads in a loose cluster between the two branches, using the printable as a guide.
- Lightly roughen the dough where each berry will sit.
- Brush the contact area with a tiny amount of water.
- Place each bead on the prepared spot.
- Press gently into the base so the bead becomes slightly flattened underneath.
- Repeat with the remaining four berries.
Don't leave the berries standing high above the surface. Keep them low and rounded so they're less likely to break off during drying.
Leave the berries their natural cream color. The little cluster doesn't need any paint.
Mark the Cranberry-Red Square
- Measure a small square approximately 1/2 inch wide near the upper center of the ornament.
- Position it above the leaves and berries, below the hanging hole.
- Use a ruler and blunt tool to engrave a shallow outline.
- Keep the square smooth inside. You'll paint it after the ornament dries.
- Check that the square doesn't touch the berry cluster or hanging hole.
One little square of red is plenty. I'd skip any extra paint on the leaves, berries, or handprint. The natural dough and engraved details already give this ornament plenty of character.
Final Pattern Check Before Drying
Your ornament should now have all the features shown in the finished example:
- One decorative shaped salt dough plaque
- One recessed baby handprint in the center
- A shallow inner frame surrounding the handprint
- A ring of short stitched marks around the outer edge
- Two leafy branches spreading outward above the fingertips
- Five small raised dough berries between the branches
- One square near the upper center, ready for cranberry-red paint
- One hanging hole centered above the decoration
Take a careful look before drying. Fresh dough is much easier to correct than a finished ornament. If a line is too deep, smooth it now. If a berry is loose, reattach it while the dough is still workable.
Drying & Baking Instructions
You've done all that careful shaping, so don't rush the drying. This ornament has a fairly large surface and several little details that could change shape if the oven gets too hot.
I'd use low heat and give it plenty of time. The goal is to dry the dough all the way through without puffing up the handprint or losing those little engraved lines.
Low-Temperature Oven Method
- Leave the ornament on its parchment paper and carefully slide it onto a flat baking sheet.
- Check the hanging hole and make sure it's completely open.
- Check that the five berries are attached and the engraved lines are clear.
- Preheat your oven to 200°F (93°C).
- Place the baking sheet in the oven.
- Begin checking the ornament after approximately two hours.
- Continue drying at the low temperature, checking periodically. A large ornament may need several additional hours.
- Once the top is firm enough to handle without bending, carefully check the underside.
- If the back remains damp, continue drying. Carefully turning the ornament onto fresh parchment may help, but only after it is firm enough to support its own shape.
- Remove the ornament when it is thoroughly dry and hard.
- Allow it to cool completely on a flat surface before painting.
Drying checkpoint: Check the edges, back, deepest part of the handprint, and areas around the berries. Everything should feel hard and dry. If the underside is still cool and damp or any area yields under gentle pressure, it needs more drying time.
The drying time is an estimate, not a tested time for this exact ornament. Your oven, the thickness of the dough, and the depth of baby's handprint will all make a difference.
Can You Air-Dry the Ornament?
Yes, although it may take several days or longer. Leave it on a flat surface in a dry, ventilated room. Check the underside and turn it carefully only after the dough has become firm enough to handle.
Avoid a damp room or an enclosed container while the ornament is drying. Trapped moisture can spoil the finished keepsake.
Check the Berries Before Decorating
Those five little berries deserve an extra look. Once the ornament is completely dry, check whether each one is firmly attached. Don't pull or twist them.
If any berry has separated or feels loose, don't hang the ornament where a detached piece could fall. A loose detail needs to be repaired using an adhesive appropriate for decorative crafts, with full curing time according to the product directions. Alternatively, keep the ornament on display where it won't be handled.
Before you hang your ornament: Check the area around the ribbon hole for cracks or thin spots. This decorative plaque is larger than an ordinary round salt dough ornament, and its hanging strength hasn't been physically tested. If it feels too heavy or the upper edge looks fragile, display it on a sturdy keepsake stand instead. It's not worth risking a broken ornament.
Painting, Sealing & Adding the Ribbon
We're almost finished! The only painted part is that tiny cranberry-red square near the top. Everything else stays its natural salt dough color, just like the approved design.
Paint the Red Square
- Check that the ornament is completely cool and dry.
- Dip a fine paintbrush into cranberry-red acrylic paint.
- Fill in the engraved square near the upper center.
- Keep the paint inside the outline.
- Let the first coat dry completely.
- Add a second thin coat only if needed for an even finish.
Try not to paint over the raised berries or engraved leaves. Their natural color is part of the design.
Seal the Ornament
A clear matte finish will help protect the dry surface during ordinary handling. Choose a product suitable for dried salt dough or similar porous craft materials.
- Test the finish on a spare piece of dried salt dough first.
- Follow the manufacturer's instructions for application and ventilation.
- Apply a thin coat to the front of the ornament.
- Allow it to dry as directed.
- Coat the back and edges, taking care around the hanging hole.
- Apply another coat only if the product instructions recommend it.
- Allow the finish to cure completely before adding the ribbon.
Clear sealer helps protect salt dough, but it doesn't make it waterproof. You'll still want to keep your ornament away from moisture.
Add the Burgundy Velvet Ribbon
- Cut approximately 18 inches of burgundy velvet ribbon.
- Thread the ribbon through the hanging hole.
- Bring the ends together to form a loop.
- Secure the ribbon with a firm knot.
- Arrange the remaining ribbon into a bow above the ornament, following the finished example.
- Trim the ribbon ends neatly.
Make sure the ribbon doesn't pull sharply against the top edge. If the ornament is heavy, use a stable display rather than depending on the ribbon alone.
And that's your finished Baby Salt Dough Handprint Ornament! The center belongs to baby's tiny hand, with the pretty little details surrounding it like a decorative frame.
Troubleshooting & Helpful Tips
Handprint crafts don't always cooperate on the first try. That's especially true when you're trying to get a clear impression from a baby who would rather curl those little fingers into a fist!
What If Baby's Hand Won't Fit Inside the Pattern?
Enlarge both pages of the printable by the same percentage. Keep the outside shape and decorative details in proportion, then check the handprint area again before cutting any dough.
You can also move the inner frame slightly outward if the handprint needs extra space. Just make sure there's still a generous border around the outside.
What If the Handprint Smears?
If the dough is still fresh, smooth or reroll it and try again. Lift baby's hand straight up rather than sliding it away. If your baby doesn't want to cooperate, stop and try another time.
What If the Decorative Edges Crack?
Small cracks in fresh dough can sometimes be smoothed with a damp fingertip. If the dough is cracking throughout, knead in a few drops of water before rolling it again.
Don't try to hang a finished ornament with cracks around the ribbon hole or deep cracks in the outer points.
What If the Engraved Leaves Disappear During Drying?
The original marks may have been too shallow or the dough may have puffed slightly. For your next ornament, make the leaf impressions a little clearer while keeping the grooves shallow enough that they don't weaken the plaque.
What If a Berry Falls Off?
The little berries need enough contact with the base to stay attached. When you're making them, flatten their undersides slightly, dampen the contact area, and press them gently into the fresh dough.
If a dried berry comes loose, don't simply press it back into place. Use a suitable craft adhesive according to its directions, or display the ornament without handling the loose detail.
What If the Ornament Is Too Heavy to Hang?
Choose a sturdy keepsake stand. The shaped design makes a pretty display piece even without hanging it from a Christmas tree.
I wouldn't try to make a finished ornament lighter by shaving away the back. That could weaken the dough beneath baby's handprint.
Displaying & Storing Your Ornament
Once the ornament is finished, choose a spot where you can enjoy it without worrying about someone bumping or dropping it.
For a Christmas tree, use a well-supported branch and check that the ribbon and hanging hole can carry the weight. Keep the ornament out of reach of babies and pets.
If you prefer a keepsake display, place it on a stable ornament stand or a padded shelf where it won't tip forward.
Putting It Away After Christmas
- Make sure the ornament is completely dry and the sealer has fully cured.
- Wrap it in clean, dry acid-free tissue paper.
- Place it in a sturdy box with padding around the decorative edges.
- Avoid putting heavy decorations on top of it.
- Store the box in a dry, temperature-stable indoor location.
- Check the ornament for cracks or moisture before displaying it again.
You might like to tuck a little note into the box with baby's name and the Christmas when the ornament was made. That way, the front can stay exactly as designed without adding lettering to the handprint.
Frequently Asked Questions About Baby Salt Dough Handprint Ornaments
What is the best dough thickness for a baby handprint ornament?
For this design, start with dough approximately 3/8 inch thick. The impression needs to be deep enough to show the fingers and palm while leaving enough dough underneath to keep the ornament intact.
Do I need the printable pattern?
You can draw the shape yourself, but the printable makes the curved outline, inner frame, and leafy decoration much easier to position. It also helps keep the proportions close to the finished example.
Can I enlarge the ornament for an older baby?
Yes. Enlarge both pattern pages together so the decorative outline and details stay in proportion. Check that the handprint fits with enough room around it before rolling the dough.
Can I make the ornament without the raised berries?
You can, but it will be a variation of the featured design. If you want the ornament to match the example, include all five berries. Keep them small and firmly attached.
How long will the ornament take to dry?
That depends on the ornament's thickness, size, the depth of the handprint, and the drying method. A large salt dough plaque may need several hours in a low oven or several days of air drying. Check that the entire ornament is hard and dry before decorating.
Can I paint the handprint?
Yes, once the dough is completely dry, but the featured ornament leaves the handprint unpainted. The only colored accent is the little cranberry-red square above the leaves.
How do I keep the ornament from breaking?
Roll the dough evenly, avoid cutting deep grooves near the edges, leave enough dough around the ribbon hole, and dry the ornament gradually. If the finished plaque is too heavy to hang, use a display stand instead.
If you'd like to make more keepsakes with baby's little hands and feet, take a look at the four Salt Dough Baby Christmas Ornaments in the main collection. You'll find a quilt-inspired footprint plaque, a Christmas star handprint, a double-footprint keepsake, and a little handprint cottage.
When you click on links to various merchants on this site and make a purchase, this may result in this site earning a commission. This does not affect the price you pay.

UBGI Gold Standard 2026
Reviewed under the site's
editorial checklist.
Photos, decorating ideas, party setups and reader submissions are shared for inspiration unless a page is specifically presented as a pattern, tutorial, reference guide or step-by-step project. Follow the instructions, measurements, safety guidance and manufacturer directions provided for the particular project or product.
About Jan | Contact | Baby Nursery Ideas (Blog) | Site Map | Privacy Policy | Disclosure Policy | Disclaimer | Affiliate Disclosure | Earnings Disclosure | Facebook | Pinterest
I am a participant in the Amazon Services LLC Associates Program, an affiliate advertising program designed to provide a means for us to earn fees by linking to Amazon. As an Amazon Associate I earn from qualifying purchases.
Copyright © 2006-2026. All Rights Reserved.