Baby Salt Dough Footprint Ornament: A Matching Christmas Keepsake
By Jan Bay
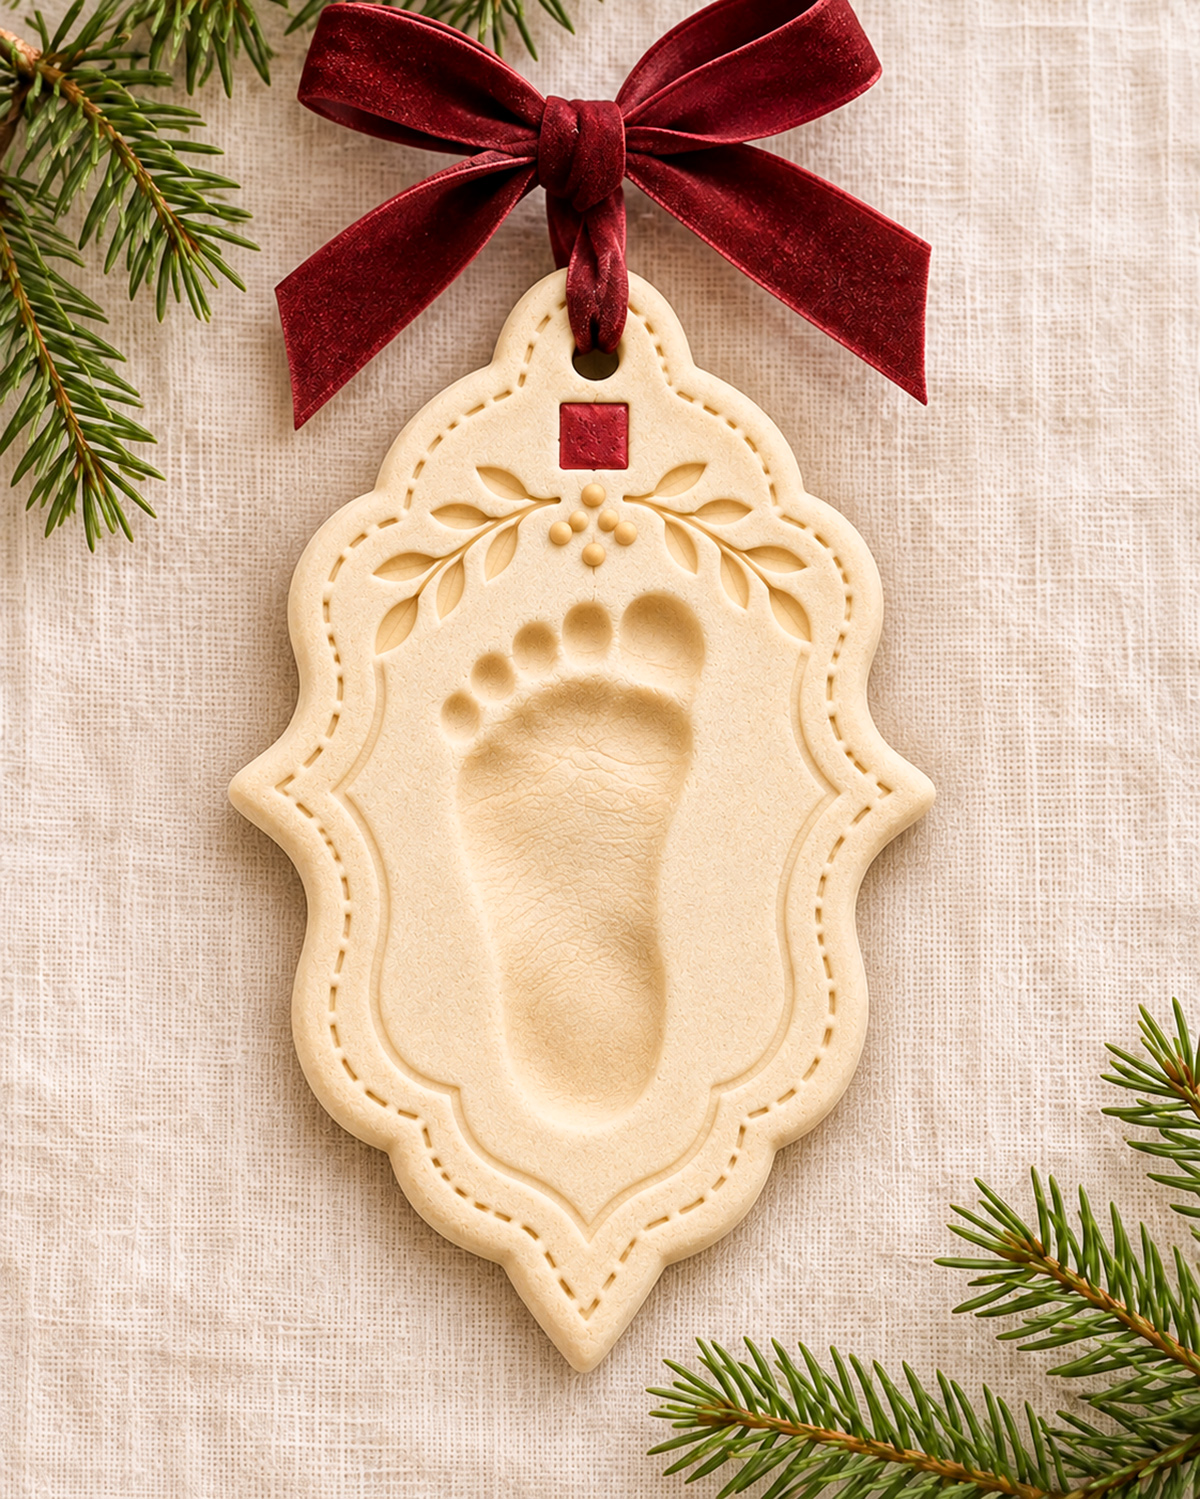
This Baby Salt Dough Footprint Ornament is a lovely companion to my baby's handprint Christmas keepsake! I wanted these two ornaments to look like they belong together as a set without making them exactly alike. So I've kept the little stitched border, engraved leafy branches, cranberry-red accent, and beautiful burgundy ribbon, but given the footprint ornament its own tall, decorative shape. The tiny footprint takes center stage, surrounded by details that make it look more like a Christmas keepsake from a specialty shop than an ordinary homemade dough ornament. And just like its matching handprint ornament, you can make it with flour, salt, water, and a free printable pattern!
More Baby Christmas Keepsakes & Footprint Crafts
Matching Baby Salt Dough Handprint Ornament
4 Salt Dough Baby Christmas Ornaments
See Supplies for This Project Here.
Jump to a Section
- Supplies & Materials
- Easy Salt Dough Recipe
- Free Printable Footprint Ornament Pattern
- Prepare the Dough & Make Baby's Footprint
- Cut the Decorative Ornament Shape
- Make the Stitched Border & Inner Frame
- Add the Leafy Branches, Berries & Red Accent
- Drying & Baking Instructions
- Painting, Sealing & Adding the Ribbon
- Make a Matching Handprint & Footprint Keepsake Set
- Troubleshooting & Helpful Tips
- Displaying & Storing Your Ornament
- Frequently Asked Questions
Supplies & Materials for Your Baby Salt Dough Footprint Ornament
The nice thing about this ornament is that most of the supplies are probably already in your kitchen or craft drawer. The flour, salt, and water make the keepsake itself. The rest is mostly a matter of taking your time with the shaped border and little Christmas details.
You'll be making one ornament with a single footprint, not a separate collection of pieces to assemble. Only the five tiny berries are added to the surface before drying.
Salt Dough Ingredients
- 2 cups all-purpose flour
- 1 cup fine table salt
- 3/4 to 1 cup water, added gradually
- A little extra flour if the dough becomes sticky
Tools & Decorating Supplies
- Free printable footprint ornament pattern, three pages
- US Letter printer paper and scissors
- Mixing bowl and spoon
- Rolling pin
- Two 3/8-inch-thick rolling guides
- Parchment paper and a flat baking sheet
- Small craft knife or clay-cutting tool
- Ruler
- Drinking straw approximately 1/4 inch across
- Blunt wooden engraving tool or toothpick
- Small rounded modeling tool for making the stitched marks
- Fine paintbrush
- Cranberry-red acrylic craft paint
- Clear matte craft sealer suitable for completely dried salt dough
- Approximately 18 inches of burgundy velvet ribbon
- Small brush and a little water for attaching the berries
Don't buy a collection of special clay tools just to make one ornament. A ruler, toothpick, straw, and a few ordinary craft supplies will handle most of the decorating.
Important: Salt dough is not edible. Its high salt content can be dangerous if swallowed, particularly by babies and pets. An adult should handle the cutting, baking, painting, and finishing. Keep the dough away from your baby's mouth and wash baby's foot after making the impression.
The ASPCA explains why salt dough ornaments must also be kept away from pets. That includes the finished ornaments, not just the leftover dough.
Easy Salt Dough Recipe for Baby Christmas Keepsakes
We're using the same three-ingredient dough as the matching handprint ornament. That way, if you're making the pair, you won't have to learn two different recipes or buy different materials.
For the footprint, I would keep the dough firm enough to hold those tiny toe impressions without spreading. Too much water can make the dough sticky, which makes it harder to lift baby's foot cleanly.
Ingredients for One Batch
- 2 cups plain all-purpose flour
- 1 cup fine table salt
- 3/4 cup water to begin
- Up to 1/4 cup additional water, only as needed
Mixing Instructions
- Combine the dry ingredients. Stir the flour and salt together in a large bowl.
- Add the water. Pour in 3/4 cup water gradually, stirring as you go.
- Gather the dough. Use your hands to bring the mixture together into a ball.
- Knead. Work the dough for approximately 8 to 10 minutes until it becomes smooth and firm.
- Adjust the moisture. If dry crumbs remain, add water a teaspoon at a time. If the dough sticks to your fingers, knead in a little extra flour.
- Test the dough. Press a fingertip into a small piece. The impression should stay visible when you lift your finger.
- Cover until needed. Keep the unused dough covered so the surface doesn't dry while you're working.
A smooth dough that holds its shape is what you want. Don't add the entire cup of water automatically. You may not need it.
Use all-purpose flour rather than self-rising flour. The ornament needs to stay as flat as possible during drying so the footprint and engraved decorations remain recognizable.
Recipe checkpoint: Roll a small test piece to 3/8 inch thick. Press a fingertip into it and lift straight up. If the mark stays clear and the dough doesn't cling to your skin, you're ready to begin.
Free Printable Baby Salt Dough Footprint Ornament Pattern
I've made a separate printable pattern for this footprint ornament rather than asking you to squeeze a footprint into the handprint template. The matching details are the same, but this one needs a longer shape with more room for the heel and toes.
Download the Free Baby Salt Dough Footprint Ornament Pattern (PDF)
What's Included in the Pattern?
The printable has three pages:
- Page 1: Full-size cutting outline, inner-frame reference, and hanging-hole location.
- Page 2: Decorative placement guide showing the stitched-border path, inner frame, suggested footprint area, two leafy branches, five berries, and the little red square.
- Page 3: The approved finished ornament image so you can compare your cutout and engraved details with the design you're making.
The dotted oval on the second page only marks the space reserved for your baby's foot. It isn't a footprint stencil. Your baby's actual impression is what goes inside that space.
Expected Finished Measurements
- Outer ornament: Approximately 5.2 inches wide and 8 inches tall, measured from the revised paper cutting template before drying
- Dough thickness before pressing: 3/8 inch
- Suggested footprint space: Approximately 2 1/4 inches wide and 3 9/10 inches long
- Hanging hole: Approximately 1/4 inch in diameter
- Dough above hanging hole: Approximately 9/16 inch
- Red accent square: Approximately 1/2 inch across
- Berries: Five small rounded pieces, approximately 1/8 to 3/16 inch across
- Ribbon: Approximately 18 inches before tying
These are dimensions taken from the drafted paper pattern, not from a baked ornament. Salt dough may change slightly while drying.
Print the Pattern at Actual Size
- Open the printable PDF.
- Choose US Letter paper.
- Select Actual Size or 100% in your printer settings.
- Turn off Fit to Page or any automatic scaling setting.
- Print Pages 1 and 2 for the cutting and decorative templates. Print Page 3 too if you'd like the finished ornament photograph beside you while you work.
- Measure the 1-inch test line on the pattern. It should measure exactly 1 inch.
- Cut out the solid outside outline from Page 1.
- Keep Page 2 beside you as the guide for the decorative details.
- Use the approved photograph on Page 3 to check the finished shape, curved leaves, berries, and border placement.
Before cutting any dough: Check the space for baby's footprint. The entire heel, sole, and all five toes need to fit comfortably inside the decorative frame.
If your baby's foot is too large, enlarge the cutting outline and decorative placement guide by the same percentage. For example, printing both at 110% makes the ornament approximately 5.7 inches wide and 8.8 inches tall. You may need larger paper or tiled printing to keep the entire pattern at the correct scale. The third PDF page is only a finished-project photograph and doesn't need enlarging.
I'd rather enlarge the whole ornament than crowd the toes into the leafy decoration. Keep the proportions of the border and the decorative details together.
Prepare the Dough & Make Baby's Footprint
Before you bring your baby over, get everything ready. Roll the dough, check your pattern, and have another adult nearby to help if needed. Getting a good footprint is much easier when you're not trying to juggle the baby and a rolling pin at the same time!
Roll the Dough
- Place a sheet of parchment paper on a clean, flat work surface.
- Put the 3/8-inch rolling guides on either side of the parchment.
- Take enough dough to make a sheet larger than your printed ornament outline.
- Roll the dough evenly between the guides.
- Check the thickness across the entire sheet. Aim for approximately 3/8 inch throughout.
- Look for cracks, folds, and air pockets. Smooth or reroll the dough if needed.
- Leave the dough on its parchment paper so you won't have to lift the shaped ornament later.
Don't cut the decorative outline yet. We'll make the footprint first and then center the ornament shape around it.
Plan the Footprint Position
Place the printed outline lightly over the dough to find the center. Use the second pattern page to see where the footprint belongs.
The heel goes toward the pointed lower end of the ornament, and the toes point upward toward the leafy branches. Leave space between the toes and the decorations.
Make two tiny reference marks outside the planned footprint area, then remove the paper pattern before pressing baby's foot.
Make Baby's Footprint
- Wash and dry baby's foot.
- Position your baby comfortably, with another adult helping if needed.
- Hold the foot gently, supporting the heel and ankle.
- Lower the heel onto the prepared dough first.
- Bring the sole and toes into contact with the dough, using gentle, even pressure.
- Support the toes individually if necessary, without forcing them into position.
- Lift the foot carefully without dragging it across the dough.
- Check that the heel, sole, and all five toes have left recognizable impressions.
You don't need to press very hard. A clear impression is more important than a deep one, especially since this ornament will be hanging by a hole near the top.
If the toes smear or the heel barely shows, reroll the dough and try again. And if your baby doesn't want to cooperate, stop and try later.
Check the Footprint Before Cutting
Set the outer paper template around the impression again. The toes should fit below the leafy decoration, and the heel should have room above the pointed bottom.
Try to leave approximately 1/2 inch or more between the actual footprint and the recessed inner-frame line wherever possible. The space may vary with baby's foot size.
With dough initially rolled to 3/8 inch thick, aim to leave approximately 1/4 inch beneath the deepest part of the footprint. That means pressing only about 1/8 inch into the dough at its deepest point. The actual depth will vary, so treat this as a working target rather than an exact measurement.
Footprint checkpoint: The print should be centered, all five toes should be visible, and there should still be enough dough beneath the impression to keep the plaque intact.
Cut the Decorative Ornament Shape
The tall shape is what makes this ornament different from its handprint companion. It has a rounded top, curved shoulders, decorative points along the sides, and a pointed bottom beneath the heel.
Don't try to cut these curves freehand if you've printed the pattern. That's what the cutting template is for.
Cut the Outer Shape
- Place the Page 1 paper template over the dough, centering it around baby's footprint.
- Check that the toe and heel impressions fit inside the planned inner frame.
- Using a small craft knife or clay-cutting tool, begin cutting around the rounded top.
- Follow the upper-right shoulder and its first outward curve.
- Continue toward the pointed projection on the right side.
- Follow the inward curve beneath that projection and the rounded lower-right section.
- Continue down toward the pointed bottom.
- Work around the bottom point and back up the left side, following the matching curves and projections.
- Finish at the rounded top and lift away the paper pattern.
- Remove the surrounding scraps, leaving the ornament on its parchment paper.
Use short, controlled cuts around the pointed sections. These should be rounded slightly at their tips rather than left with thin, sharp ends that could chip during drying.
Smooth the Edges
- Dip a fingertip into clean water and shake off the excess.
- Gently smooth the outside edges.
- Round the exposed upper and lower corners slightly.
- Keep the side projections and pointed bottom recognizable.
- Check that the plaque lies flat on the parchment.
Too much water will make the dough sticky and may blur the footprint. You only need enough to tidy the cut edges.
Make the Hanging Hole
- Find the hanging-hole position marked near the top center of the printable.
- Use a straw approximately 1/4 inch across to cut straight through the dough.
- Remove the small plug of dough.
- Check that the opening is round and completely clear.
- Gently smooth the cut edges without making the hole larger.
- Confirm that approximately 9/16 inch of solid dough remains between the top of the hole and the outside edge on the unbaked ornament.
The upper hanging area needs to stay solid. Don't carve the stitched marks right into the hole or make the opening larger to accommodate a wider ribbon.
Shape checkpoint: You should now have one continuous tall ornamental plaque with a single footprint, matching left and right outer curves, a pointed bottom, and a centered hanging hole.
Make the Stitched Border & Inner Frame
The little stitched marks are one of the details that tie this ornament to the matching handprint keepsake. They make the edge look almost like a piece of fabric, but they're simply tiny impressions in the dough.
You'll also make a separate inner frame around the footprint. That gives the impression its own space without covering any of the tiny details.
Engrave the Inner Frame
- Place Page 2 of the printable beside the ornament.
- Find the recessed inner-frame lines shown around the suggested footprint area.
- Start on the upper-left side, just below the leafy decoration.
- Using a blunt modeling tool, draw a shallow line down the left side of the footprint.
- Follow the inward and outward curves shown on the guide.
- Continue the line around the lower-left portion toward the pointed bottom beneath the heel.
- Make the matching line on the right side.
- Join the two lower lines in a gentle point beneath the footprint.
- Leave the upper section open for the leafy branches and berries.
Keep the groove shallow, approximately 1/16 inch deep or less. You're engraving a decorative line, not cutting out a separate frame.
If baby's footprint is larger than the suggested space, move the inner-frame line outward as needed. Keep enough solid dough between that line and the outer stitched border.
Engrave the Stitched Outer Border
- Start near the lower pointed end of the ornament.
- Use a small rounded tool or blunt toothpick to make a short dash approximately 1/4 inch inside the outer edge.
- Make the next dash about 1/4 inch farther along the border.
- Continue around the lower-right curve, following the outer silhouette.
- Work around the side projection and up the upper-right shoulder.
- Continue toward the rounded top, stopping before the hanging-hole area.
- Repeat on the left side of the ornament.
- Finish the remaining stitches around the lower point, keeping the spacing balanced.
Each little dash can be approximately 1/8 inch long. Angle the marks slightly so they follow the direction of the border.
Don't worry about making an exact number of stitches. There isn't a stitch count to reconcile here. The marks are decorative impressions, and the spacing may need slight adjustments around the tight curves.
Keep each dash shallow and separate. The finished border should look like little stitched marks, not a continuous groove cut through the dough.
Border checkpoint: The ornament should have two distinct decorative lines: a continuous shallow inner frame around the footprint and a separate series of short stitch-like marks following the outer edge.
Add the Leafy Branches, Berries & Red Accent
Now for the little details that make the two ornaments look like a matching Christmas set. The leaves, berries, and red square belong above the toes, not around the heel or down the sides.
Keep the decoration in the upper section. There's no need to fill every empty space around the footprint.
Engrave the Two Leafy Branches
- Place the decorative pattern guide beside your ornament.
- Find the open space above the toe impressions and below the red accent square.
- Use a blunt tool to mark a shallow branch running outward from the center toward the upper-left side.
- Make a matching branch extending toward the upper-right side.
- Keep each branch approximately 1 to 1 1/4 inches long, adjusting the length to the space available.
- Along the left branch, mark three pairs of small pointed leaves.
- Repeat the three pairs on the right branch.
- Shape each leaf with two gently curved lines meeting at a point.
- Press the center of each leaf slightly deeper to give it a recessed appearance.
- Add a very light center vein only where there's enough space.
The example has six leaves on each side, twelve altogether. Keep them narrow, with the outer leaves pointing away from the middle.
These are engraved shapes, not separately attached leaves. That makes the decoration simpler to construct and avoids adding fragile loose pieces around the top.
Make the Five Raised Berries
The little berries are the only separate salt dough decorations you'll attach to the plaque. They're very small, so don't make them stand too high above the surface.
- Pinch off five tiny pieces of fresh salt dough.
- Roll each into a smooth ball approximately 1/8 to 3/16 inch across.
- Arrange the berries in a loose cluster between the two leafy branches.
- Use the printable to check the placement: two berries near the upper part of the cluster, two slightly farther apart, and one lower central berry.
- Lightly roughen each contact spot on the ornament with the tip of a toothpick.
- Brush the contact spots with a very small amount of water.
- Place each berry on its marked spot.
- Gently press the base of each berry into the fresh dough so the underside flattens slightly.
- Check that all five berries remain rounded and sit close to the ornament surface.
Don't use large, loose balls of dough. Smaller, low-profile berries are closer to the finished example and give each piece more contact with the plaque.
These berries are decorative. If you make the ornament for a household with babies or pets, keep it well out of reach, even after the dough has dried.
Mark the Cranberry-Red Square
- Find the small square marked below the hanging hole on Page 2.
- Use a ruler and blunt tool to mark an approximately 1/2-inch square.
- Keep it centered beneath the hanging hole and above the berries.
- Engrave a very shallow border around the square.
- Leave the inside smooth and unpainted until the ornament has dried completely.
Check that the square doesn't touch the hanging hole or the berry cluster. There should be a little visible dough between each feature.
Don't paint the leaves or berries. The little red square is the only colored part of the ornament, just like its handprint companion.
Final Construction Check Before Drying
Before you put the ornament in the oven or set it aside to air-dry, check that you have all the details shown in the example:
- One tall decorative salt dough plaque with matching side curves
- One baby footprint centered vertically, toes pointing upward
- A shallow inner frame surrounding the footprint
- Short engraved stitched marks following the outer edge
- Two leafy branches above the toes, with six leaves on each side
- Five small raised berries between the branches
- One smooth square centered above the greenery
- One open hanging hole at the upper center
Make any corrections while the dough is still fresh. If a groove is too deep, smooth it now. If a berry is loose, reattach it before drying. And check the toes one final time to be sure none of the decorative marks cross the footprint.
Drying & Baking Instructions
You've spent time getting that tiny footprint and all the engraved details just right, so don't rush the drying. This ornament is larger than an ordinary cookie-cutter decoration, and the raised berries need a little extra attention.
I'd use a low oven temperature and allow the dough to dry gradually. Too much heat can cause puffing, which could spoil the footprint and make the engraved details less clear.
Low-Temperature Oven Method
- Prepare the baking sheet. Leave the ornament on its parchment paper and carefully slide the parchment onto a flat baking sheet.
- Check the decoration. Make sure all five berries are attached, the hanging hole is open, and none of the engraved lines have collapsed.
- Preheat the oven. Set it to 200°F (93°C). An oven thermometer is useful if your oven runs hot.
- Begin drying. Place the baking sheet in the oven. Start checking the ornament after approximately two hours.
- Continue gradually. The plaque may need several additional hours because of its thickness and size. Check it periodically.
- Check the surface. The top should become firm, with no visibly damp dough around the toes, berries, or edges.
- Check the underside. Once the ornament is firm enough to handle without bending, carefully inspect the back.
- Continue if needed. If the back still feels damp, return the ornament to the low oven. Once the plaque can support itself, carefully turning it onto fresh parchment may help the underside dry.
- Cool completely. When the ornament is hard and dry throughout, remove it and leave it on a flat surface until cool.
- Inspect again. Check the back, edges, deepest footprint areas, and berry attachments before decorating.
Drying checkpoint: The ornament should be hard throughout, not just on the front. There should be no damp or yielding areas beneath the footprint or around the raised decorations.
The drying time is an estimate. This exact ornament has not been physically test-made, and the time needed will depend on your oven, the dough thickness, and how deeply the footprint was pressed.
Can You Air-Dry the Ornament?
Yes, but give it plenty of time. A large ornament like this may take several days or longer to dry, depending on humidity and air circulation.
Leave it flat in a dry, ventilated room. Once the dough is firm enough to handle, check the underside and turn it carefully if necessary.
Don't seal the ornament until you're certain it has dried completely. Moisture trapped inside the dough can cause trouble later.
Check the Berries and Hanging Hole
Once the ornament is dry, check the five little berries. They should remain attached to the plaque without visible gaps around their bases. Don't pull on them to test the attachment.
Look closely at the hanging hole, too. If the dough around it has cracked, become thin, or changed shape, don't hang the ornament by that opening.
Before you hang your ornament: This is a fairly large salt dough keepsake, and its finished weight and hanging strength haven't been physically tested. Check the dried plaque carefully. If it feels too heavy for the ribbon hole or the upper edge looks fragile, put it on a sturdy keepsake stand instead. There's no reason to risk breaking that precious little footprint just to hang it on a tree.
Painting, Sealing & Adding the Ribbon
We're almost finished! The only part that needs paint is the little cranberry-red square above the leaves. Everything else stays the natural cream color of the salt dough.
That's what makes the design look so nice beside the handprint ornament. They have the same little red accent and botanical details without being identical.
Paint the Red Accent Square
- Make sure the ornament is completely dry and cool.
- Use a small, fine-tipped brush and cranberry-red acrylic paint.
- Carefully fill the engraved square beneath the hanging hole.
- Keep the paint inside the marked outline.
- Allow it to dry completely.
- Add a second thin coat only if needed for even coverage.
Leave the footprint, leaves, and berries unpainted. You don't need to add any more color.
Apply a Clear Matte Finish
Salt dough absorbs moisture, so a clear protective finish is useful once the ornament is thoroughly dry. It won't make the dough waterproof, but it can help protect the surface during ordinary handling.
- Choose a clear matte craft sealer suitable for completely dried salt dough or similar porous craft materials.
- Test the product on a spare piece of dried dough first to check whether it changes the cream color.
- Follow the manufacturer's application and ventilation directions.
- Apply a thin coat over the front, working carefully around the footprint and berries.
- Let the coat dry as directed.
- Coat the back and outside edges.
- Apply any additional coats recommended by the manufacturer.
- Allow the finish to cure completely before adding the ribbon.
If you're using a spray finish, follow the label directions for ventilation and keep children and pets away from the work area.
Add the Burgundy Velvet Ribbon
- Cut approximately 18 inches of burgundy velvet ribbon.
- Check that the ribbon can pass through the hanging hole without forcing it.
- Thread one end through the hole.
- Bring the ribbon ends together above the ornament.
- Tie a secure hanging loop.
- Use the remaining ribbon to form a generous bow above the ornament, following the example image.
- Arrange the bow loops and trim the ribbon ends neatly.
The ribbon should rest against the top of the ornament without pulling sharply against the hole. If the finished piece is too heavy or the hole looks fragile, use a display stand instead of suspending it.
And there's your finished Baby Salt Dough Footprint Ornament! A little footprint in the middle, surrounded by those pretty handmade details. Nothing else needs to be added.
Make a Matching Handprint & Footprint Keepsake Set
These two ornaments were designed to look like they belong together. The handprint ornament is wider, with a decorative shape surrounding baby's little hand. The footprint ornament is taller, with more room for the heel and toes.
They share the same natural cream finish, stitched-style borders, leafy branches, five raised berries, cranberry-red accents, and burgundy ribbons.
That's enough to make them a matching set without simply copying the same shape twice.
How to Make the Pair
- Download both printable patterns.
- Print each at its intended size and check the one-inch scale marks.
- Check baby's hand and foot against their separate templates before mixing the dough.
- Prepare enough salt dough for both plaques. You may need an additional batch, depending on the sizes and thicknesses.
- Make the handprint and footprint impressions while the dough is fresh.
- Cut and decorate each ornament using its own pattern.
- Dry both ornaments thoroughly, allowing extra time if their thicknesses differ.
- Paint the little cranberry squares and finish both with clear matte sealer.
- Use matching burgundy ribbon for the two ornaments.
Make sure the larger ornament isn't too heavy to hang before choosing how you'll display the pair.
You can find the matching design, complete instructions, and its separate printable pattern on my Baby Salt Dough Handprint Ornament page.
I'd keep the pair together when you pack them away after Christmas. Just wrap each one separately so the decorative points and raised berries don't rub against one another.
Troubleshooting & Helpful Tips
Even a simple salt dough ornament can give you a little trouble, especially when you're working with tiny toes and a decorative outline. Most problems are easier to correct while the dough is still fresh.
What If Baby's Footprint Doesn't Fit the Template?
Enlarge both printable pages by the same percentage before cutting the dough. The footprint needs enough room for the heel, sole, and all five toes without touching the inner frame.
Don't squeeze the toes together to make the print fit. Enlarge the ornament instead.
Why Are the Toe Impressions Blurry?
The dough may be too sticky, or baby's foot may have moved while you lifted it. Try adding a little flour if the dough sticks to the skin, then reroll the piece and make another impression.
Lift the foot carefully rather than sliding it across the dough. And don't force your baby to cooperate. You can always try again later.
Why Did the Decorative Edges Crack?
The dough may be too dry, or the edges may have started drying while you worked. If the dough is still fresh, knead in a few drops of water and reroll it.
Small surface cracks may be smoothed with a slightly damp fingertip. Deep cracks around the hanging hole or side points are more serious. Don't hang an ornament with damaged areas that could break under its own weight.
Why Did the Footprint Puff Up During Baking?
High heat or trapped air may have caused the dough to swell. Use a low oven temperature, check for air bubbles before shaping, and allow more time for drying.
Avoid self-rising flour because we're trying to preserve the impression rather than make the dough rise.
What If the Engraved Lines Aren't Visible After Drying?
The lines may have been too shallow, or the dough may have shifted during drying. On your next ornament, make the marks a little clearer while the dough is fresh, but don't cut deep channels into the plaque.
For the outer stitched border, a short dash is enough. The marks don't need to go deeply into the dough.
What If a Raised Berry Comes Loose?
When making the ornament, slightly flatten the underside of each tiny dough berry and press it into a lightly dampened, roughened spot.
If a berry comes loose after drying, use a craft adhesive appropriate for porous decorative materials and follow its curing instructions, or keep the ornament where the damaged detail won't be handled. Don't leave loose small pieces where a baby or pet could reach them.
What If the Ornament Is Too Heavy to Hang?
Display it on a sturdy keepsake stand. The tall decorative shape looks attractive that way, too.
Don't shave away the back of a finished ornament to reduce the weight. You could weaken the dough beneath the footprint.
Displaying & Storing Your Ornament
Once your ornament is finished, you'll want to put it somewhere it can be enjoyed without getting knocked around.
If you hang it on a Christmas tree, choose a well-supported branch and keep it out of reach of babies and pets. Make sure the ribbon, hanging hole, and dried dough are sound.
A sturdy ornament stand or supported shelf is another option, especially for a heavier piece.
How to Store Your Salt Dough Keepsake
- Wait until the dough is completely dry and the sealer has fully cured.
- Wrap the ornament in clean, dry acid-free tissue paper.
- Use enough padding to protect the decorative side points and raised berries.
- Place it in a sturdy box where nothing heavy will rest on top.
- Keep the box in a dry, temperature-stable indoor location.
- Avoid damp basements, garages, and humid storage areas.
- Check the ornament for cracks or moisture before displaying it again.
If you're making the matching handprint ornament, wrap it separately and place both pieces in the same keepsake box.
You could tuck a small note into the box with baby's name and the Christmas when the impressions were made. There's no need to paint lettering on the ornament itself and change the finished design.
Frequently Asked Questions About Baby Salt Dough Footprint Ornaments
What is the best dough thickness for a baby footprint ornament?
For this decorative plaque, start with dough approximately 3/8 inch thick. Make the impression deep enough to show the toes and heel while leaving enough dough beneath it to keep the ornament intact.
Do I need a separate pattern for the footprint ornament?
Yes, if you want to reproduce the featured design. The footprint ornament is taller and narrower than the matching handprint ornament. Its printable includes a separate cutting outline and decorative placement guide.
Can I enlarge the pattern for an older baby's footprint?
Yes. Enlarge both pattern pages by the same percentage so the outside shape, inner frame, and decorative details remain in proportion. Check that the entire footprint fits before cutting the dough.
Can I make the ornament without the raised berries?
You can, but it will be a variation of the pictured design. The approved ornament has five small raised berries between the engraved leafy branches. Keep them small and firmly attached if you want to match the example.
How long should a salt dough footprint ornament bake?
Drying time depends on the thickness and size of the ornament, the depth of the impression, and your oven. A large plaque may need several hours at 200°F (93°C), or longer. Check that the front, back, and deepest parts are completely hard and dry before decorating.
Can I paint the footprint after baking?
Yes, once the dough has dried completely, but the featured ornament leaves the footprint unpainted. The only colored decoration is the little cranberry-red square above the leaves.
How can I keep my footprint ornament from breaking?
Roll the dough evenly, avoid deep decorative grooves near the outside edges, leave plenty of material around the hanging hole, and dry the ornament gradually. If the finished plaque is too heavy to hang, display it on a sturdy stand instead.
If you'd like more ideas for capturing baby's tiny hands and feet, take a look at my Salt Dough Baby Christmas Ornaments collection. It includes four more keepsake designs with different shapes and decorative details.
When you click on links to various merchants on this site and make a purchase, this may result in this site earning a commission. This does not affect the price you pay.

UBGI Gold Standard 2026
Reviewed under the site's
editorial checklist.
Photos, decorating ideas, party setups and reader submissions are shared for inspiration unless a page is specifically presented as a pattern, tutorial, reference guide or step-by-step project. Follow the instructions, measurements, safety guidance and manufacturer directions provided for the particular project or product.
About Jan | Contact | Baby Nursery Ideas (Blog) | Site Map | Privacy Policy | Disclosure Policy | Disclaimer | Affiliate Disclosure | Earnings Disclosure | Facebook | Pinterest
I am a participant in the Amazon Services LLC Associates Program, an affiliate advertising program designed to provide a means for us to earn fees by linking to Amazon. As an Amazon Associate I earn from qualifying purchases.
Copyright © 2006-2026. All Rights Reserved.