Baby Fingerprint Christmas Lights Craft (Free Fold-Out Village Printable)
By Jan Bay
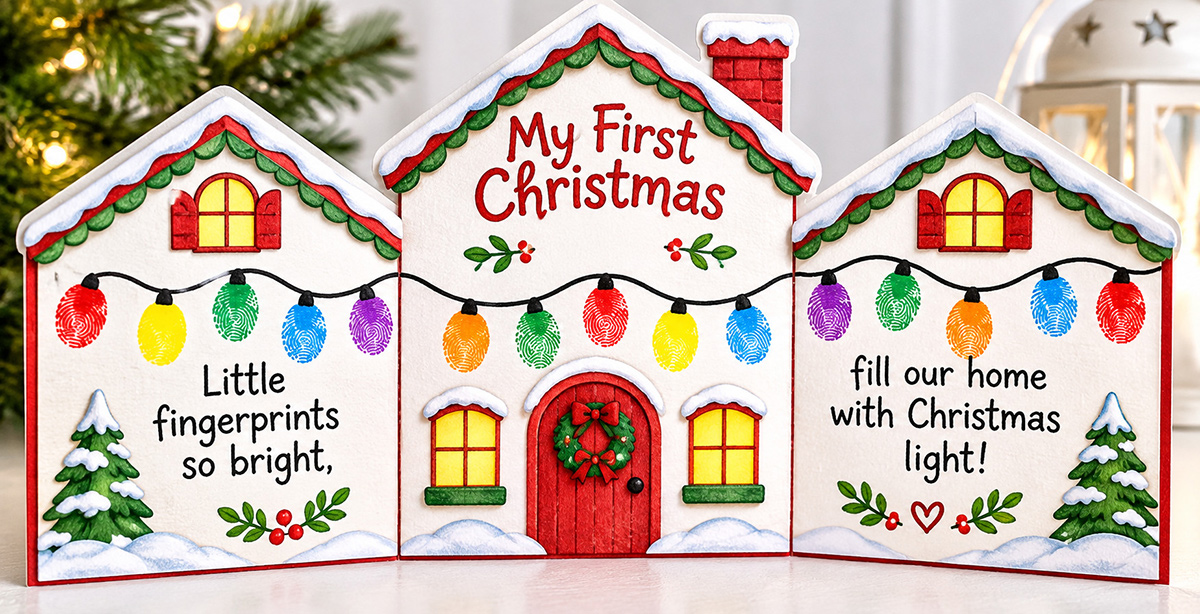
This free Baby Fingerprint Christmas Lights Craft (with printable background) turns tiny fingerprints into colorful Christmas bulbs across three little paper houses. The houses fold into a standing Christmas village with snowy roofs, a red front door, and a special place to celebrate Baby's First Christmas. Add your baby's name and the year to make a keepsake your family can display every December.
Explore More Baby Christmas Crafts
Baby Christmas Crafts and Keepsakes
See Supplies for This Project Here.
Jump to:
Free Christmas Village Printable
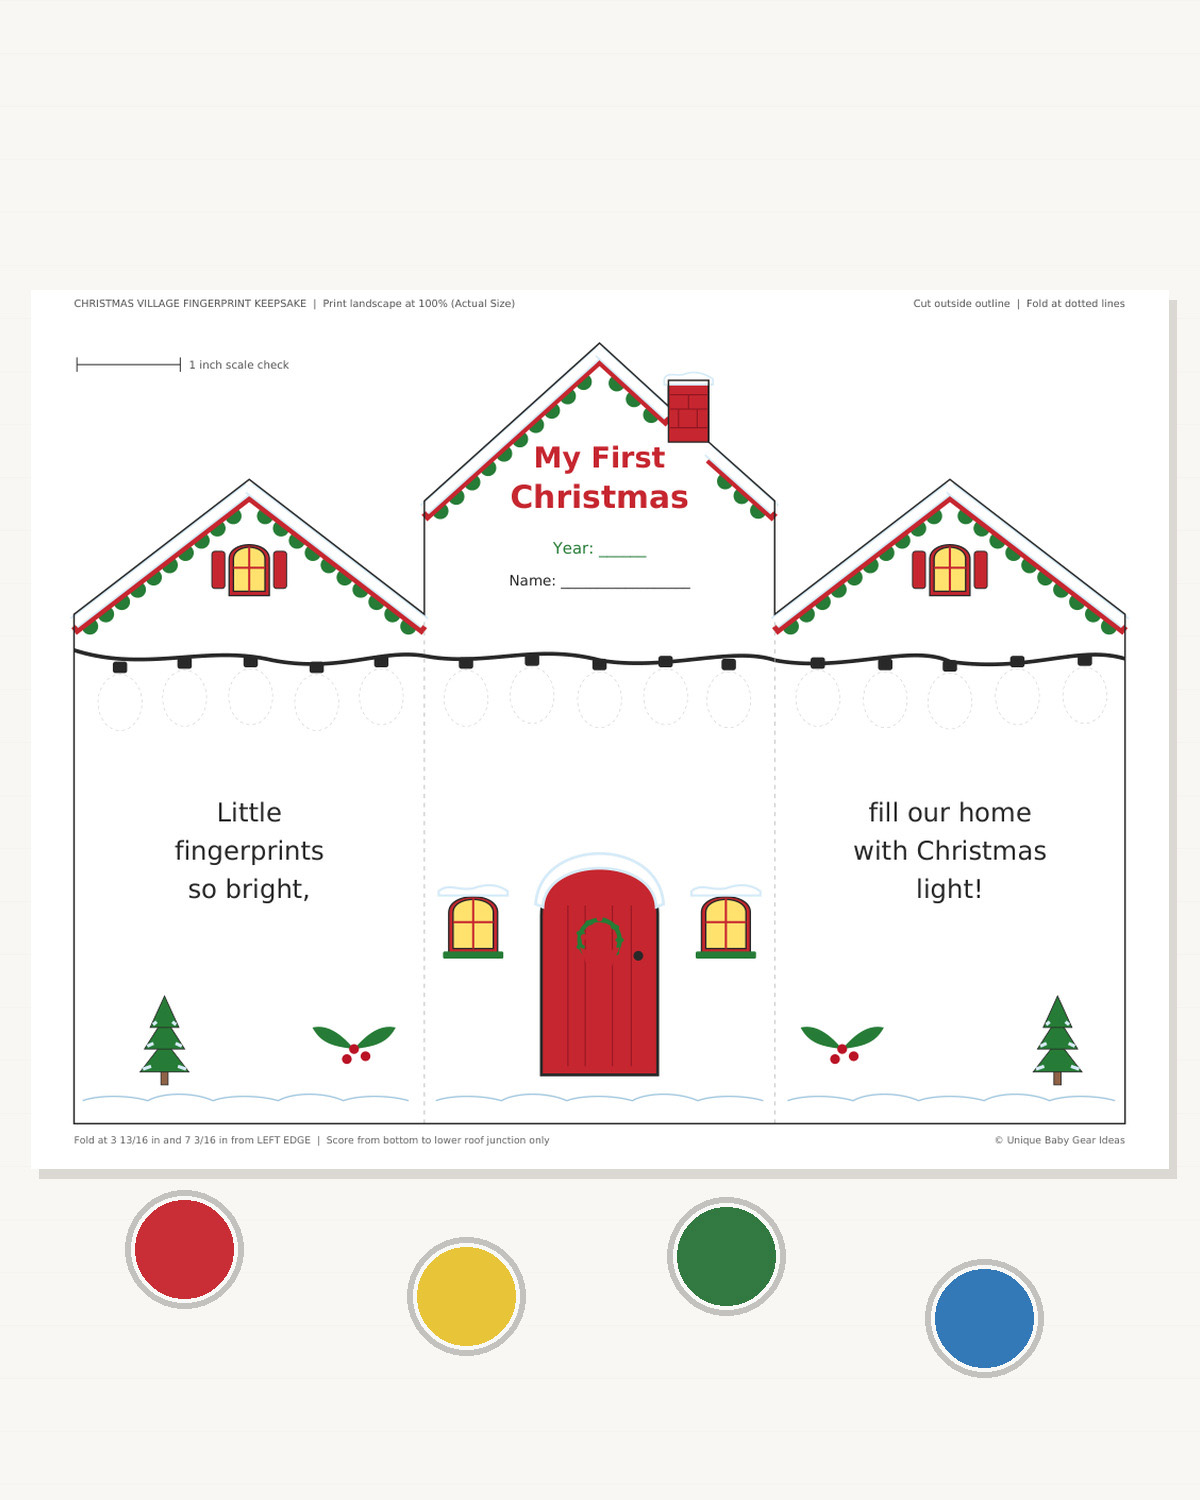
You don't have to draw three little houses or figure out how to connect them. I've put the village together on one printable sheet, with the rooflines, windows, red front door, Christmas trees, and light string already in place.
The printable follows the same three-house shape and Christmas light string as the finished example, but the decorations are simpler for home printing. There aren't any extra pieces to glue on. If you want a little more detail, draw red berries and a bow on the door wreath before adding the fingerprints.
The only thing missing is the most important part: your baby's fingerprints!
The printable includes five empty Christmas bulbs on each house, giving you 15 little lights across the village. There's also room for your baby's name and the Christmas year. The original keepsake verse reads:
Little fingerprints so bright,
fill our home with Christmas light!
Choose the version you want:
- Page 1: Full-color Christmas village with red roof trim and front door, green decorations, yellow windows, and snowy accents.
- Page 2: Black-and-white version with the same layout, ready for you to color before adding the fingerprints.
Download the Free Christmas Village Printable (PDF)
Printing Your Baby Fingerprint Christmas Lights Craft
You'll need one sheet of US Letter cardstock, 8.5 by 11 inches. The printable is already arranged for landscape printing, so you won't have to join separate pages together.
- Open the PDF and choose page 1 or page 2.
- Set the paper size to US Letter and the orientation to landscape.
- Choose Actual Size or 100% in your print settings.
- Turn off Fit to Page, Shrink to Fit, and other automatic resizing options.
- Print a test copy on plain paper before using your cardstock.
- Measure the 1-inch test line near the top of the page. It should measure exactly 1 inch.
- Check that the outside rooflines, chimney, and bottom border have printed completely.
- On your plain-paper test copy, cut around the outside outline and try both accordion folds. Check that the houses stay connected, the chimney remains intact, and the folds line up correctly. Plain paper may sag, so don't worry if it won't stand on its own. The finished cardstock village should be checked for stability after folding.
If the test line doesn't measure 1 inch, correct your print settings before continuing. You want all three houses to stay the same size as the template.
Expected finished dimensions: The village measures approximately 10 1/6 inches across when opened flat. The tallest center house is about 7 9/16 inches high, and each side house is approximately 6 1/4 inches high. Each folding panel is about 3 3/8 inches wide.
On your final cardstock copy, leave the houses joined together and keep the sheet flat. Don't cut or fold it yet. It's much easier to make the fingerprints before turning the sheet into a standing village.
Supplies You'll Need
You won't need a large collection of craft supplies for this one. The printable takes care of the little houses and decorations, so I'd put my attention into choosing good cardstock and a print-making product that's suitable for your baby's age.
Materials
- One printed Christmas village template
- One sheet of white cardstock, preferably 65 to 80 lb cover weight if your printer can handle it
- Washable, water-based fingerprint paint or ink specifically labeled for the intended infant skin-contact use and your baby's age
- Red, green, yellow, blue, orange, and purple colors, or your choice of Christmas colors
- Several sheets of scrap paper for practice fingerprints
- A small foam applicator, if the selected print-making product requires one
- A protected, firm work surface
- Adult-use scissors
- A ruler and a blunt scoring tool or bone folder
- A fine-tip pen for the baby's name and year
- Clean water, mild soap, and a soft washcloth for immediate cleanup
- Colored pencils or markers if you're using the black-and-white printable
My cardstock suggestion: I'd choose matte white cardstock rather than glossy photo paper. Matte paper is easier to fold, and it gives the fingerprint paint a surface to settle into. Check your printer's paper-weight limit before feeding heavier cardstock through it.
Regular printer paper is fine for the practice copy, but it's rather flimsy for the finished village. The three houses need enough body to stand in a gentle zigzag without being glued to a separate display board.
Choose the Fingerprint Colors
The finished example uses cheerful red, green, yellow, blue, orange, and purple Christmas bulbs. You can follow that mixture without worrying about a strict repeating order.
I'd keep the first light red, scatter the other colors along the string, and finish the last house with another red light. That gives the village a nice Christmas look without making every bulb match.
If you'd rather use only red, green, and yellow, that's fine too. You don't need to buy six different colors for one keepsake.
Before Putting Paint on Baby's Fingers
Read the complete directions on your paint or ink product first. The words "washable" and "non-toxic" do not automatically tell you that a product is suitable for direct contact with an infant's skin.
The American Academy of Pediatrics' guide to choosing art and craft supplies for children explains what to look for on art-material labels. For this particular project, you'll also need the manufacturer's directions to specifically permit the intended skin contact and age.
Don't substitute household paint, permanent ink, or ordinary office stamp pads. Keep all materials away from your baby's mouth, eyes, and irritated skin.
Have one adult support the baby while another handles the print-making. Set out the washcloth and cleanup supplies before you begin. If your baby isn't comfortable, stop and come back to the project another time.
Step-by-Step Baby Fingerprint Christmas Lights Craft Instructions
Let's turn that flat sheet into a little Christmas village! The trick is to add the fingerprints before you do any cutting or folding. Once the paint is dry, the houses are easy to trim and stand up.
Step 1. Prepare Your Christmas Village
Print the full-color template on your cardstock and place it on a protected, flat table with the pictures facing up.
If you chose the black-and-white version, color the houses before you begin making fingerprints. Here's how to match the finished example:
- Roofs: Color the narrow trim red, the little decorations along the roof edges green, and leave the snow white.
- Windows: Color the glass yellow to give the houses a warm, glowing look.
- Front door: Color the large center door red. Make its wreath green with a red bow and berries.
- Chimney: Color the chimney red and leave its snow cap white.
- Christmas trees: Use green for the branches, brown for the trunks, and leave the snowy sections white.
- Holly: Color the small leaves green and the berries red.
Keep the background white. I'd skip extra drawings or stickers because the little houses and colorful fingerprint lights already give this keepsake plenty of Christmas charm.
Let any markers or added coloring dry completely before moving on.
Step 2. Find the 15 Christmas Light Bulbs
Look at the black cord running across the three houses. You'll see five little bulb sockets on the left house, five on the center house, and five on the right house.
Each socket has a faint oval guide beneath it. Those are the places for your baby's fingerprints.
There should be:
- 5 fingerprints on the left house
- 5 fingerprints on the center house
- 5 fingerprints on the right house
- 15 fingerprints altogether
The guides are about 7/16 inch wide. They're meant to show where each print belongs, not to make every fingerprint the same size. Your baby's natural fingertip print is what makes the craft personal.
Don't paint the bulbs yourself or fill the guides with markers. Leave those spaces for the real prints.
Step 3. Make a Practice Fingerprint
Before using the village, try a fingerprint on scrap paper with your chosen product.
Use only the amount of paint or ink recommended by its manufacturer. With a product intended for direct skin contact, gently bring the inked fingertip straight down onto the practice paper and lift it straight back up.
Look at the result. Can you see the shape of the little fingertip? If the print looks like a large puddle, you'll want less paint on the next attempt.
Don't press hard or roll the finger around. A natural little fingerprint looks much nicer than a large smudge.
Step 4. Add the Fingerprint Christmas Lights
Now you're ready for the village.
Keep the cardstock flat. Have one adult support the baby comfortably while another adult guides the finger to the paper.
Start with the first bulb on the left house.
- Prepare the fingertip according to the print-making product's directions.
- Position the finger over the first faint oval, directly below the black socket.
- Touch the fingertip to the cardstock with gentle, even pressure.
- Lift it straight off the paper without sliding.
- Clean the finger as directed before changing colors.
- Let the fresh print settle before making another one close to it.
- Continue across the string as long as your baby is comfortable.
Here's a color arrangement you can use to match the Christmas look of the example.
- Left house: Red, yellow, green, blue, purple
- Center house: Orange, green, red, yellow, blue
- Right house: Purple, green, orange, blue, red
I'd work from left to right so you can see which bulbs are finished. That also helps avoid brushing against a wet fingerprint while reaching across the page.
You don't have to complete all 15 prints in one sitting. If your baby gets restless, stop, clean the skin, and let the completed prints dry. You can return to the empty bulbs another time.
And if one fingerprint is a little crooked? Leave it. That's your baby's print, not a machine-stamped Christmas decoration.
Step 5. Let the Fingerprints Dry
Once you've finished the light bulbs, move the sheet to a clean, flat place where it won't be touched.
Follow the paint or ink manufacturer's drying instructions. Don't fold the cardstock while any fingerprint is still damp or tacky.
Before you continue, check three things:
- The fingerprints are completely dry.
- All the prints stay clear of the fold lines.
- The printed Christmas verse and the front door are still easy to see.
There should be one continuous line of colorful lights running across the three houses.
Step 6. Add Your Baby's Name and Christmas Year
Write your baby's name and the year in the spaces on the tall center house.
The example image shows Baby's First Christmas in 2026, but the printable leaves the year open so you can use the same design for another Christmas.
You can also write the full date and your baby's age on the back. I'd include both. Those little details are easy to forget once the keepsake has been packed away with the Christmas decorations.
Step 7. Score the Two Fold Lines
Keep the printed sheet flat for this step. You'll see two faint vertical dotted lines separating the three houses.
Use a ruler and a blunt scoring tool to make a light crease along each line. Don't press hard enough to tear or cut the cardstock.
The fold positions are:
- First fold: Approximately 3 13/16 inches from the left edge of the original sheet.
- Second fold: Approximately 7 3/16 inches from the left edge of the original sheet.
Both lines run upward from the bottom border to the lower edge of the adjoining roofs. Follow the dotted lines rather than scoring through the roof peaks.
You'll be able to fold the village much more neatly if you score it before cutting away the excess paper.
Step 8. Cut Out the Christmas Village
Now comes the fun little transformation. You're going to cut around the outside of the village so the straight sheet of cardstock becomes three connected houses.
- Use scissors to cut along the solid outside border.
- Start at a bottom corner and work your way up the outside wall of the first house.
- Follow the sloping roof up to its peak and back down.
- Continue around the higher center roof, including the small chimney.
- Cut around the right-hand roof and down its outside wall.
- Finish along the straight bottom edge.
Do not cut along the two vertical fold lines. The houses must stay connected as one piece.
Work slowly around the chimney and the places where the roof heights change. Those corners are easier to trim with small cuts than one long snip.
Once the outside paper has been removed, you'll have a single village-shaped piece of cardstock with three decorated houses.
Step 9. Make the Accordion Folds
Place the cut-out village on the table with the printed side facing you.
Gently fold the left house forward along its scored line. Fold the right house backward along the second scored line. The houses should form a loose zigzag when viewed from above.
Don't force the cardstock into a tight fold right away. Open and close the panels gently until the score lines move easily.
Then stand the village on its straight bottom edge.
Adjust the two side houses until the center house stands upright and the village feels balanced. You want all three decorated fronts visible, just like the finished example.
Step 10. Finish Your Christmas Keepsake
Take a look at the whole village before putting it away or displaying it.
Check that:
- All three houses remain connected.
- The two folds move without tearing.
- The center house stands upright.
- The colorful fingerprints follow the black Christmas light cord.
- The baby's name and Christmas year are easy to read.
- No paint transfers when the panels touch.
That's your little Christmas village!
If you'd like to give it to grandparents, you can make another copy of the printable and create a second keepsake. Or photograph the finished original and have a copy printed, keeping the actual fingerprints on your own village.
Tips for Making Baby's Fingerprints
Getting 15 tiny fingerprints onto one piece of cardstock is a little different from making one big handprint. You have smaller spaces to work with, and you'll probably need to change colors several times.
I'd worry less about making every bulb perfect and more about keeping the experience short and comfortable for your baby.
Use a Fingertip, Not the Whole Finger
The Christmas bulbs are small. Try to capture the rounded fingertip rather than pressing the entire length of the finger against the paper.
Place the finger just below the little black socket. The print should hang down from it like a Christmas light bulb.
If the impression extends a little outside the faint oval, that's fine. You don't have to squeeze your baby's fingertip into a perfect shape.
Use Less Paint for Clearer Prints
A heavy coat of paint can hide the natural lines of the fingerprint. A lighter application, following the product's directions, may give you a clearer impression.
Test on scrap paper first. It's worth using an extra sheet rather than finding out that the paint is too thick after you've started on the village.
Keep the Colors from Mixing
Clean and dry the finger between colors according to the product instructions. That helps keep your red bulbs red and your yellow bulbs yellow.
I'd also keep the open paint containers away from the cardstock. You don't want a spilled blue ink pad covering the center house after you've finished all those little lights.
What If a Fingerprint Smudges?
Don't try to repair a wet fingerprint by pressing the finger over it again. You'll probably make the mark larger.
If the print is still recognizable as a Christmas bulb, I'd leave it alone.
If it covers the verse or spreads into another bulb, printing a new sheet may give you a better result. That's another reason to make a practice copy first.
What If Your Baby Won't Cooperate?
You don't have to finish the village in one session.
Make a few prints while your baby is comfortable, clean the skin, and stop. Leave the cardstock flat while the prints dry.
Later, you can return to the empty bulbs. There's no reason to keep trying when your baby wants to do something else.
Don't force the baby's fingers open, hold the hand down against resistance, or keep paint on the skin while waiting for another opportunity. The keepsake can wait.
Keep the Printed Details Simple
The village already includes snowy rooftops, little glowing windows, a red front door, a Christmas wreath, trees, holly, and the original verse.
I'd leave those details alone rather than adding glitter, stickers, or dangling decorations.
The colorful fingerprints are what make this Christmas craft different. Let them be the stars of the project.
If you decide you'd rather make a keepsake with one complete handprint, my baby handprint Christmas ornament ideas include several ways to preserve the whole hand instead of individual fingertips.
How to Fold and Display Your Christmas Village
The finished village is meant to stand on its own, with the tall center house in front and the two smaller houses turned slightly to the sides.
You don't need glue, tape, a separate cardboard base, or a stand. The two folds are what give the village its shape.
Getting the Folds Just Right
Open the village and place it on a flat table. The center panel should face forward.
Turn one side house slightly toward you and the other slightly away. That gives the three houses a shallow accordion shape.
Start with gentle angles rather than folding the houses all the way back. Adjust them until the bottom edges rest evenly on the table.
If the village tips forward or backward, open the folds a little farther and check that the bottom edge is resting on a level surface.
The exact width of the standing village will change depending on how far you open the two side panels. That's fine. What matters is that it stands without tipping.
Where to Display Your Christmas Village
A mantel, bookshelf, or holiday display table would make a lovely place for this keepsake.
I'd set it where you can see all three houses rather than squeezing it between larger Christmas decorations.
Leave the area in front of the village clear. The little red door, glowing windows, and string of fingerprint lights are worth seeing.
Keep the cardstock display away from candles, heaters, damp surfaces, and direct sunlight. Paper decorations should also stay out of your baby's reach, away from the crib, and away from places where they could be pulled down.
How to Fold It Flat for Storage
When Christmas is over, gently close the village along the same two folds.
Let the left and right panels follow their original accordion creases. Don't press the roof points or chimney under a heavy stack of decorations.
I'd put the folded keepsake inside an acid-free folder or a sturdy envelope large enough for the tall center house. Add a little piece of acid-free tissue between the decorated panels if the painted surfaces need protection.
Write the baby's name and year on the outside of the storage folder so you'll know exactly which Christmas it belongs to.
Next December, unfold the houses and set the village back on display. Those little fingerprints will be a reminder of just how tiny your baby's hands once were.
Frequently Asked Questions
Can I use this Christmas lights craft with a newborn?
The paper cutting, coloring, and folding are adult activities. Whether a newborn can participate in making the fingerprints depends on the print-making product's specific age and skin-contact instructions. Never assume ordinary washable paint is suitable for newborn skin. If you can't find a product that clearly permits the intended use, wait until you have an appropriate option rather than substituting household ink or paint.
Do I have to make all 15 fingerprints?
The finished design has 15 light bulbs, but you can complete them over more than one short session. If your baby is finished after five prints, let those dry and come back to the remaining bulbs later. There is no need to rush.
Can I make the Christmas village with just red and green fingerprints?
Yes. Alternate the two colors along the light string for a traditional red-and-green Christmas look. The houses and verse will stay the same, so the village will still look finished.
What if my baby's fingerprints are bigger than the bulb outlines?
The faint outlines are placement guides, not strict borders. Aim the fingertip directly below each socket and let the natural print shape show. If the prints are much wider than the guides, try a practice impression to see whether you can keep neighboring bulbs separate without pressing or manipulating the finger.
Can I make the village without a color printer?
Yes. Use page 2 of the free PDF. It includes the same houses, light string, verse, and fold lines in black and white. You can color the roof trim, door, windows, trees, and other decorations yourself before adding the fingerprints.
Do I need a cutting machine?
No. Ordinary scissors are enough. An adult cuts around the outside of the village, following the roof peaks and chimney. There are no small interior shapes to cut out.
How do I keep the three houses together?
They're already connected in the printable. Cut only around the outside silhouette, leaving the two vertical fold lines uncut. The houses will remain attached as one continuous strip of cardstock.
Can I change the Christmas year?
Yes. Write the correct year on the center house. The example image shows 2026, but the printable has a blank year line, so you can use it for future Christmases.
Can I give the finished village as a Christmas gift?
Absolutely. It makes a personal gift for grandparents or another family member who would enjoy having a keepsake with your baby's actual fingerprints.
If you're making more than one, print a fresh village for each original set of fingerprints. You can also photograph or scan one finished keepsake to make paper copies while preserving the original.
How should I store the finished fingerprint village?
Make sure the paint is completely dry, fold along the two original creases, and store the village in a sturdy folder or envelope. Keep it somewhere dry where the roof peaks and chimney won't be crushed. A photograph or scan gives you a backup of the artwork as well.
What other Christmas keepsakes can I make with my baby?
If you're enjoying little projects like this, you can find more handmade decorations and keepsakes on my baby Christmas crafts page. There are ideas using handprints, footprints, ornaments, and other small details that make Baby's First Christmas worth remembering.
A Little Christmas Village to Bring Out Every Year
I love the idea of a Christmas decoration that becomes more meaningful each time you bring it out. This little paper village starts with three snowy houses and a string of empty Christmas bulbs. Your baby's fingerprints turn it into something no store-bought decoration could replace.
Add the name, write the year, and save it with your Christmas keepsakes. In a few years, those tiny colored fingerprints may be the first thing you look for when you open the decoration box.
And all it took was one sheet of cardstock and a few little fingerprints.
When you click on links to various merchants on this site and make a purchase, this may result in this site earning a commission. This does not affect the price you pay.

UBGI Gold Standard 2026
Reviewed under the site's
editorial checklist.
Photos, decorating ideas, party setups and reader submissions are shared for inspiration unless a page is specifically presented as a pattern, tutorial, reference guide or step-by-step project. Follow the instructions, measurements, safety guidance and manufacturer directions provided for the particular project or product.
About Jan | Contact | Baby Nursery Ideas (Blog) | Site Map | Privacy Policy | Disclosure Policy | Disclaimer | Affiliate Disclosure | Earnings Disclosure | Facebook | Pinterest
I am a participant in the Amazon Services LLC Associates Program, an affiliate advertising program designed to provide a means for us to earn fees by linking to Amazon. As an Amazon Associate I earn from qualifying purchases.
Copyright © 2006-2026. All Rights Reserved.