Free Woodland Deer Family Quilt Pattern
By Jan Bay
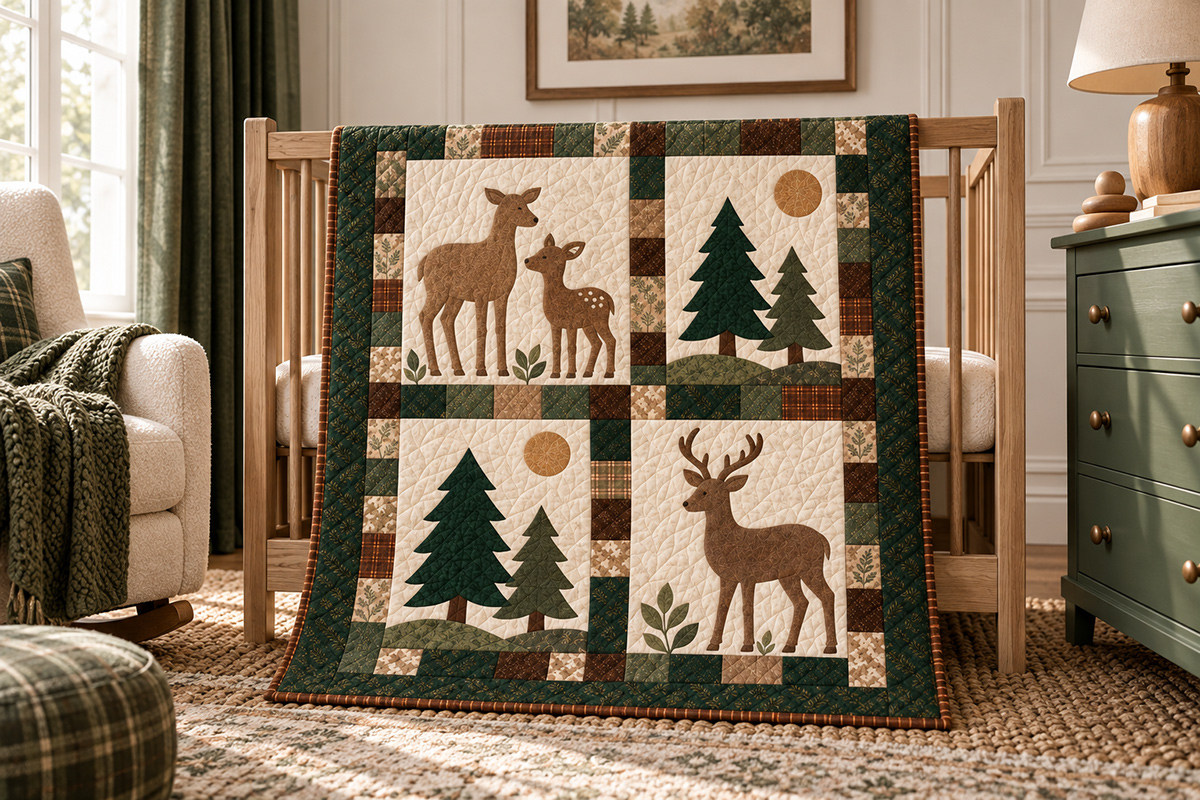
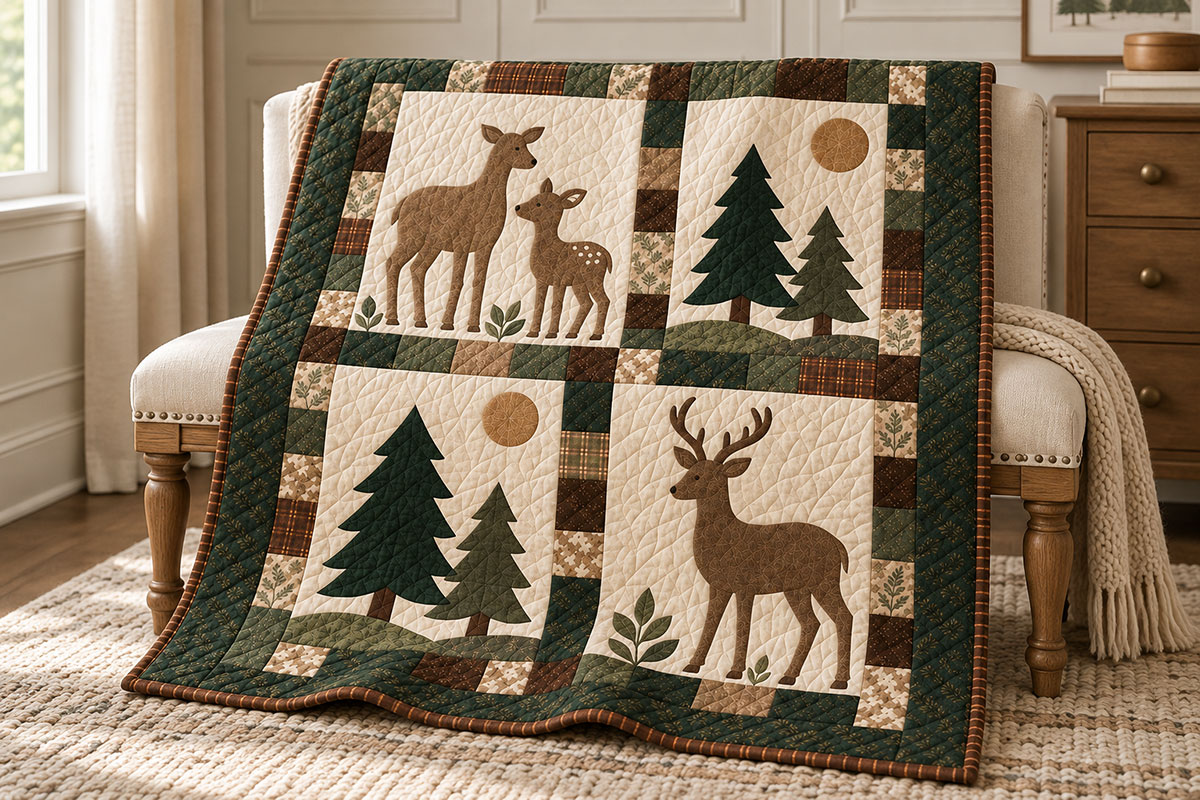
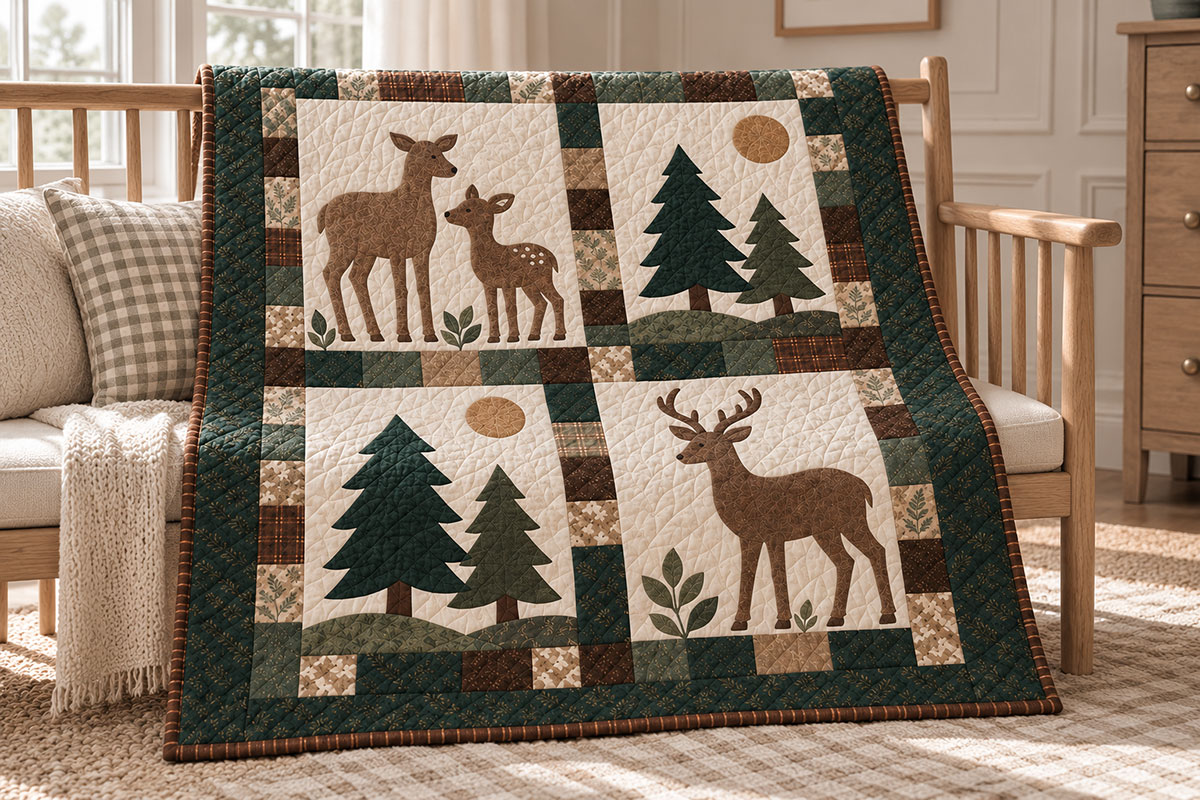
My woodland deer family quilt pattern features a doe, a spotted baby fawn, a buck and a simple evergreen forest scene together in one 40 × 50 inch nursery quilt. I designed the large appliqué shapes to make the woodland scenes easy to create with a four-pane layout and a patchwork border.
Explore More Baby Quilt Patterns
Single Deer Baby Quilt Pattern
See fusible web for appliqué quilt projects
On This Page
Materials for the Woodland Deer Family Quilt Pattern
This quilt finishes at 40 × 50 inches and uses four separate appliqué panes, so I’d sort the fabric by job before cutting anything. The deer all use the same chestnut color fabric family, while the two tree panes pull most of their color from the deep forest, pine and moss fabrics. That keeps the four scenes tied together without making every pane look identical. Study the layout that's in this quilt for tips if you have ever struggled to mix patterns in the same color family. I believe that you will find that it's an excellent visual tutorial for a natural forest color palette.
You’ll need:
- Warm ivory: 1 yard for the four appliqué backgrounds, plus a 6 × 6-inch scrap for the fawn spots. If you want the 14 ivory patchwork squares cut from the same fabric, allow about another 1/4 yard.
- Deep forest green: 1 yard for the outer borders, large fir trees and 29 patchwork squares.
- Chestnut brown: 1 yard for the doe, fawn and buck bodies, binding and 14 patchwork squares.
- Pine green: 1/2 yard for the front rolling-ground pieces, simple leaf clusters and 14 patchwork squares.
- Moss green: 1/2 yard for the smaller fir trees, rear rolling-ground pieces and 14 patchwork squares.
- Walnut brown: 1/4 yard for the tree trunks, buck antlers and 14 patchwork squares.
- Bark tan: 1/4 yard for the inner ears, optional chest accents and 15 patchwork squares.
- Muted golden brown: one 8 × 8-inch scrap for the two sun or moon circles.
- Backing: about 2 3/4 yards of standard-width quilting fabric.
- Batting: at least 48 × 58 inches, or the size required by your quilting method.
- Lightweight fusible web: about 2 yards at approximately 17 inches wide if you arrange the pieces economically.
- Thread: matching thread for the raw appliqué edges plus dark embroidery thread for the deer eyes and noses.
The fabric amounts are intentionally a little generous. They allow for normal cutting waste, but not for shrinkage, fussy cutting or matching a directional print. If you’re using a plaid or a very directional woodland print in the patchwork border, buy enough extra to place it the way you want rather than settling for less than the look you're after or trying to squeeze every square from the minimum yardage.
I’d keep the fabrics used for the deer quieter than the border prints. A small tone-on-tone texture works well on the bodies because a lot of movement might be distracting. Using a solid color might be tempting but fabrics with tonal differences are more natural. You want just enough activity so that the doe, fawn and buck silhouettes don't look "flat" and lifeless. Save the busier pine needles, leaves and plaids for the patchwork border.
The three lighter chest pieces are optional. This finished preview leaves them off, and I prefer that simpler look here because the deer silhouettes already carry the design. The templates are included if you want more contrast at the throat and chest, so you can decide before fusing anything.
The eyes and noses are embroidered rather than cut as tiny fabric pieces. No buttons, beads or separate fabric eyes are needed.
Finished Quilt Size and Four-Pane Layout
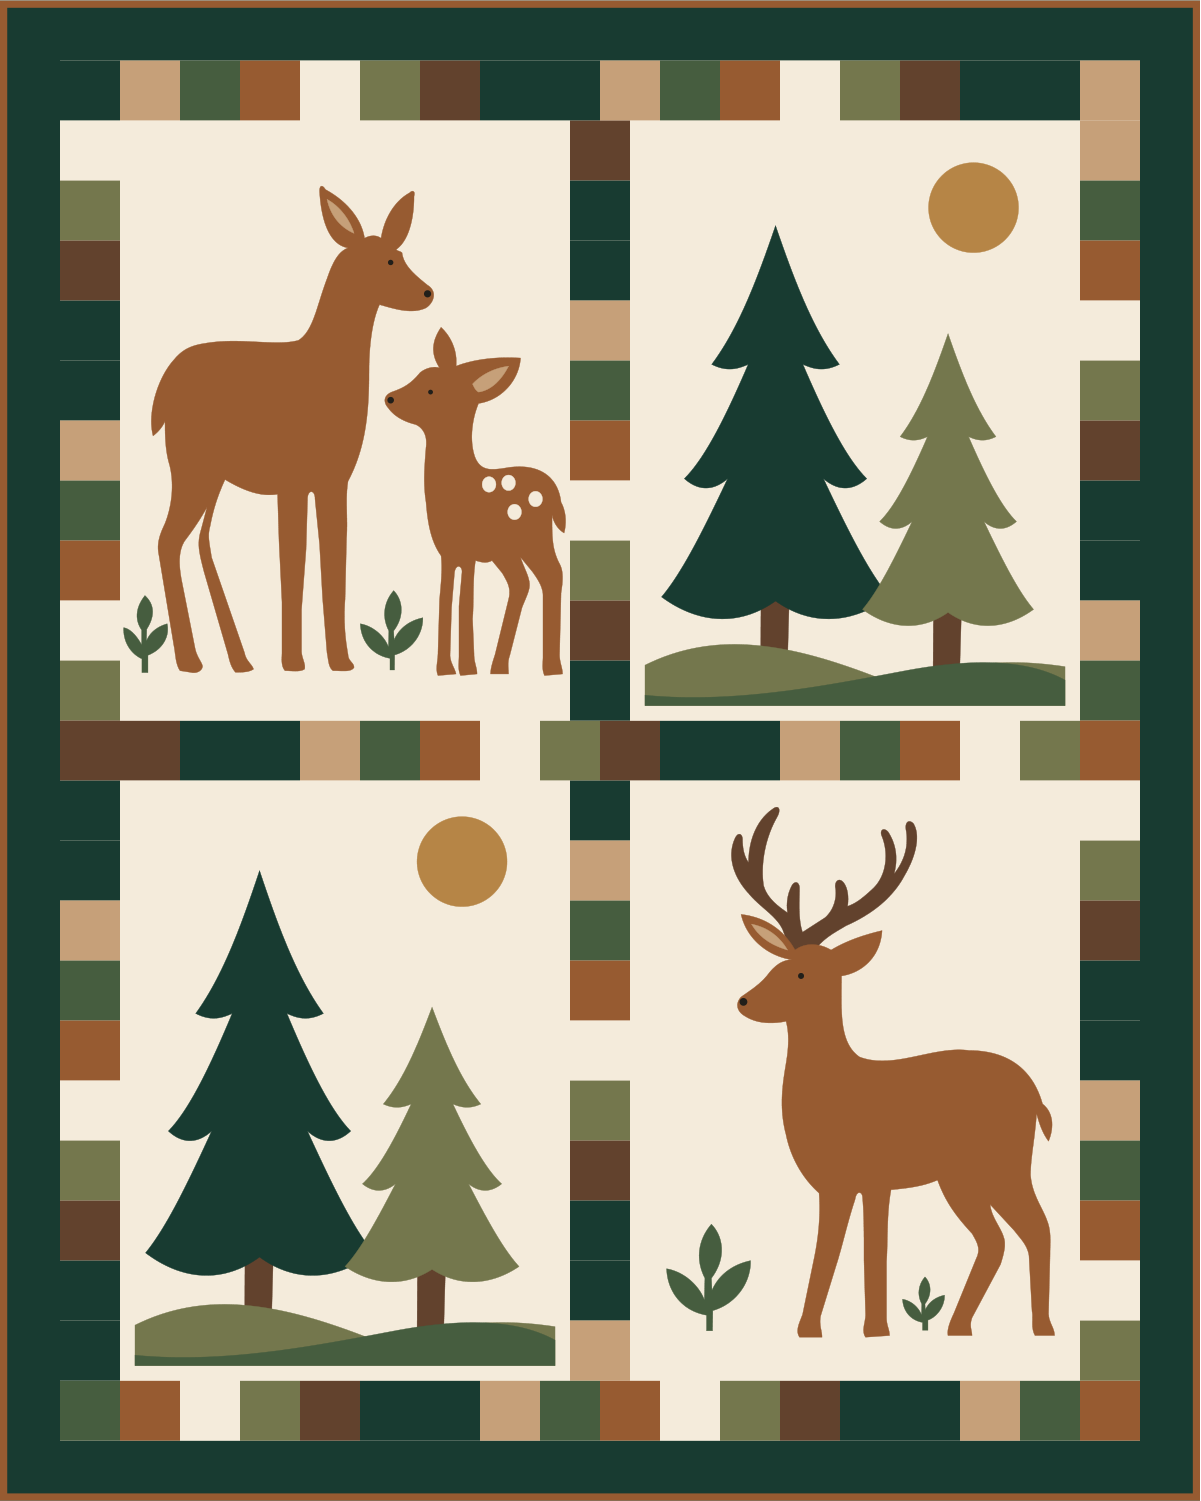
The finished quilt measures 40 × 50 inches. Each of the four appliqué panes finishes at 15 × 20 inches, which gives the deer enough room not to look crammed in and crowded. This is a good size for everyday use and it doesn't look like an oversized wall quilt.
The layout is:
- Top left: doe and fawn
- Top right: two fir trees with rolling ground and a golden sun or moon
- Bottom left: a second two-tree woodland scene
- Bottom right: buck with simplified antlers
The internal patchwork sashing brings the four-pane center to 32 × 42 inches finished. The patchwork frame increases that to 36 × 46 inches, and the final deep forest border brings the quilt to its finished 40 × 50-inch size.
I like the four separate scenes here because they give the quilt a story while keeping a clear woodland theme, but you aren't looking at the same deer repeatedly. The doe and fawn are the sweeter, softer side of the design, the buck balances them diagonally, and the two tree panes give your eye somewhere to rest.
If you'd rather make a quilt with one deer scene as the main focal point, use my single deer baby quilt pattern instead. This pattern has more templates and features a more detailed four-pane woodland family layout.
Cutting Guide
All of the pieced cutting dimensions below include a 1/4-inch seam allowance.
Background panes
Cut 4 warm ivory rectangles at 16 × 21 inches. That gives you a little working room while you position and fuse the appliqué. After the motifs are finished, trim each pane to 15 1/2 × 20 1/2 inches, keeping the design centered.
If you prefer to work directly on the final unfinished pane size, you can cut each background at 15 1/2 × 20 1/2 inches from the beginning. I prefer the extra trimming room.
Patchwork squares
Cut 114 squares at 2 1/2 × 2 1/2 inches. Each square finishes at 2 inches.
The planned color distribution is:
- 29 deep forest
- 15 bark tan
- 14 pine green
- 14 chestnut
- 14 warm ivory
- 14 moss
- 14 walnut brown
You don't have to copy that distribution square by square. Keep the dark forest green as the dominant color, then scatter the browns, moss, ivory and plaid prints so you don't end up with several nearly identical fabrics clumped together.
Internal sashing
- Make 2 vertical sashings, each 10 squares long. Each finished strip is 2 inches wide and the unfinished strip measures 2 1/2 × 20 1/2 inches.
- Make 1 horizontal sashing, 16 squares long. The unfinished strip measures 32 1/2 × 2 1/2 inches.
Patchwork frame
- Make 2 side frames, each 21 squares long. Each unfinished strip measures 2 1/2 × 42 1/2 inches.
- Make 2 top and bottom frames, each 18 squares long. Each unfinished strip measures 36 1/2 × 2 1/2 inches.
Deep forest outer border
- Cut 2 side borders at 2 1/2 × 46 1/2 inches.
- Cut 2 top and bottom borders at 2 1/2 × 40 1/2 inches.
Piece the long border strips first if your usable fabric width isn't long enough for a single cut.
Binding
Cut 6 strips at 2 1/2 inches wide from fabric with at least 40 inches of usable width. Join them diagonally. That gives you about 225 inches before finishing tails, which is plenty for the quilt's 180-inch perimeter.
Backing and batting
Prepare backing and batting at least 48 × 58 inches. For standard-width backing fabric, about 2 3/4 yards gives you enough to piece the back and trim it to size.
Printable Appliqué Templates for the Woodland Deer Family Quilt Pattern
The downloadable pattern includes both normal placement maps and reversed tracing templates. Use the normal maps to position the fabric pieces on the quilt and the reversed versions when you're tracing onto fusible web.
The solid template lines are the actual cutting lines. There is no appliqué seam allowance added because this pattern is drafted for raw-edge fusible appliqué.
Print your template file at Actual Size or 100%. Turn off Fit, Shrink, Scale to Fit and any automatic borderless enlargement. Check the 1-inch calibration square before you tape together a large template. The first print page also includes a 4-inch check line as a second scale check.
The tiled templates use a 10 × 6-inch printable window with a 1/2-inch overlap. Match the repeated lines and registration marks inside that overlap rather than butting the paper edges together. Assemble each row from left to right, then work from the top row downward.
Keep the normal and reversed sets separate. It sounds obvious, but once a stack of tiled pages is spread across the table they can look remarkably similar.
Trace the reversed outline onto the paper side of your fusible web. Fuse it to the wrong side of the chosen fabric according to the fusible manufacturer's directions, let it cool, and cut directly on the solid line. When the fabric is turned right side up, the motif will face the same direction as the normal placement map.
The eye and nose dots on the placement maps are embroidery locations. They are not separate fabric templates.
Doe and Fawn Appliqué Panel
The top-left pane is the part I'd arrange first. If the spacing between the doe and fawn looks right, the rest of the quilt falls into place easily.
The doe uses:
- D01: doe body
- D02: inner ear
- D03: optional chest accent
The fawn uses:
- F01: fawn body
- F02: inner ear
- F03: optional chest accent
- F04 through F07: four ivory spots
The four spot templates are the standard arrangement used in the pattern. If you want a more heavily spotted fawn, you can cut and add a few extra spots in the same simple size and shape before fusing. Some of the finished examples on this page use extra spots. I like to use odd numbers whenever possible.
The two simple ground leaf clusters are L01 and L02.
Lay D01 and F01 on the pane before removing any fusible backing. Position the fawn beside the doe without letting their bodies overlap. Check the feet against the finished-pane boundary and make sure the space between the animals still looks open.
Fuse the main bodies first. Add the inner ears and fawn spots after the bodies are secure. The four included spots are intentionally large enough to handle easily. If you add extras, keep them simple and similarly sized rather than turning them into a scatter of tiny dots. Vary the spot sizes slightly and stagger their placement for a more natural look.
D03 and F03 are optional chest accents. The finished example leaves them off. I'd skip them if you're using a nicely textured chestnut fabric because the cleaner silhouette suits this quilt. If your deer fabric is very flat or dark, the bark-tan accents can give the neck and chest a little more definition.
Add L01 and L02 close to ground level after the deer are positioned. They're accents, not a second scene. Keep them low and let the doe and fawn stay in charge of the pane.
Finish the faces with small embroidered eyes and noses in dark thread. I wouldn't add buttons or beads here. The simple stitched marks fit the appliqué better and avoid adding hard little pieces to a nursery quilt.
Evergreen Tree Panels
The two evergreen panes are intentionally simpler than the animal panes. Each one uses two tree silhouettes, two trunks, two rolling ground pieces and one golden circle.
Top-right pane
- T01 and T02: tree trunks
- T03: large deep forest tree
- T04: smaller moss tree
- T05: golden sun or moon
- T06: rear rolling ground
- T07: front rolling ground
Bottom-left pane
- W01 and W02: tree trunks
- W03: large deep forest tree
- W04: smaller moss tree
- W05: golden sun or moon
- W06: rear rolling ground
- W07: front rolling ground
Start with the trunks. Their upper ends disappear beneath the tree silhouettes, and their lower ends disappear beneath the rolling ground, so don't shorten them because part of the piece won't show.
Place the large tree next, then the smaller tree. Add the golden circle according to the placement map.
Finish the scene with the rear ground strip and then the front ground strip. Those two pieces overlap on purpose.
Don't add extra little trees, rocks or shrubs just because there's room. The plain ivory background is doing useful work. These two panels separate the deer scenes and keep the finished quilt from becoming too busy.
If woodland designs are what brought you here, you'll find more animal and forest ideas on my woodland baby quilt patterns page.
Buck Appliqué Panel
The bottom-right pane uses the buck body as one large silhouette, with the antlers applied separately behind it.
You need:
- B01: buck body
- B02: inner ear
- B03: optional chest accent
- B04: joined antler piece
- L03 and L04: ground leaf clusters
Place B04 first. The base of the antlers extends beneath the head, so the body must cover that join.
Dry-position B04 and B01 together before fusing either one. Check the clearance above the antler tips and the spacing below the hooves. Once you're happy with the position, fuse the antlers first and then place B01 over their base.
Add B02 to the ear. B03 is optional, just like the doe and fawn chest pieces. The finished example leaves it off for the cleaner silhouette.
Position L03 and L04 near the ground after the buck is in place. Don't let the leaves creep up into his legs. The legs need to stay easy to read from across the room.
Embroider the eye and nose after the raw edges are secured.
Assemble the Four-Pane Quilt
Finish all four appliqué panes before you start joining the quilt top. It's much easier to correct a slightly crooked motif or trim a pane square while everything is still separate.
Prepare the templates. Print at 100%, verify the calibration marks, tape the tiled sections together and trace the reversed appliqué pieces onto fusible web.
Fuse and cut. Fuse the traced web to the wrong side of each fabric according to the product instructions. Let it cool before cutting precisely on the solid outline.
Mark the pane boundaries. On each 16 × 21-inch working background, lightly mark a centered 15 × 20-inch finished rectangle. That leaves about 1/2 inch outside the finished boundary on each side before the final trim.
Arrange one complete pane at a time. Use the normal placement map to position every piece before fusing. Check the deer feet, antler clearance, tree trunks and overlapping ground strips. Once everything looks right, fuse the pane and secure the raw edges.
Trim the panes. Trim every finished appliqué pane to 15 1/2 × 20 1/2 inches. Each should have 1/4 inch outside the finished 15 × 20-inch pane boundary for piecing.
Build the internal patchwork strips. Sew two 10-square vertical sashings and one 16-square horizontal sashing with consistent 1/4-inch seams.
Make the top row. Sew the doe-and-fawn pane to one vertical sashing, then add the top-right tree pane. The unfinished row should measure 32 1/2 × 20 1/2 inches.
Make the bottom row. Join the bottom-left tree pane, second vertical sashing and buck pane in the same way. Check that the row also measures 32 1/2 × 20 1/2 inches unfinished.
Join the two rows. Sew the 16-square horizontal sashing between them. The complete four-pane center should measure 32 1/2 × 42 1/2 inches unfinished.
Add the patchwork frame. Sew on the two 21-square side frames first. Add the two 18-square top and bottom frames next. The unit should now measure 36 1/2 × 46 1/2 inches unfinished.
Add the outer border. Sew the deep forest side borders on first, followed by the top and bottom borders. The completed quilt top should measure about 40 1/2 × 50 1/2 inches unfinished.
Measure the center of the quilt before cutting or attaching long borders. If your piecing is a little different from the calculated measurement, use the actual quilt-top measurement rather than stretching a border strip to make a number work.
Quilting, Binding and Finishing
Layer the finished top with batting and backing, baste it using your preferred method and quilt the three layers together.
You can keep the quilting simple. Gentle meandering, leaves, loose curves or another low-density design works well because the appliqué already supplies plenty of visual detail. I wouldn't quilt heavily through the deer faces or the narrow antlers.
Once the quilting is finished, square the quilt carefully without trimming into the planned edge seam allowance.
Join the 2 1/2-inch binding strips diagonally, press the joins and attach the binding with a 1/4-inch seam. Finish the second edge by machine or hand, whichever you prefer. The binding covers the quilt edge and does not add to the planned 40 × 50-inch finished size.
The 40 × 50-inch measurement is the designed finished dimension. Quilting and laundering can reduce the final measurement slightly.
A note about the word “crib quilt”: this size works beautifully for a nursery quilt, floor quilt, supervised awake-time use or later toddler use, but don't place a loose quilt in an infant sleep space. The U.S. Consumer Product Safety Commission recommends keeping a baby's sleep space bare except for a fitted sheet. You can read the current guidance at CPSC Safe Sleep.
This pattern was digitally drafted and checked for scale, template placement, tiling and construction math. It has not been physically sewn or test-appliquéd from the published instructions, so make a small fabric-and-fusible sample first if you're unsure how your chosen fusible or edge stitch will behave around narrow areas such as the buck antlers.
Download the Woodland Deer Quilt Pattern Files
If you want everything in one place, use the complete package. It contains the updated printable PDFs, SVG files, placement maps and source files for the finalized v1.3 deer geometry.
Complete Woodland Deer Quilt Pattern Package
Download the Complete Pattern Package ZIP
The complete ZIP is the one to save if you're making the quilt. It includes the US Letter and A4 tiled print files, full-size normal and reversed masters, true-size SVGs, placement maps and the supporting source files.
The separate guide PDF is handy if you want the quilt plan, fabric information, cutting list, template inventory and assembly instructions without opening the entire package.
Print only the paper size you use. There is no reason to print both the Letter and A4 template sets.
If you're still deciding which quilt you want to make, you can browse more designs on my baby quilt patterns and ideas page or start with one of the projects on my easy baby quilt patterns page.
When you click on links to various merchants on this site and make a purchase, this may result in this site earning a commission. This does not affect the price you pay.

UBGI Gold Standard 2026
Reviewed under the site's
editorial checklist.
Photos, decorating ideas, party setups and reader submissions are shared for inspiration unless a page is specifically presented as a pattern, tutorial, reference guide or step-by-step project. Follow the instructions, measurements, safety guidance and manufacturer directions provided for the particular project or product.
About Jan | Contact | Baby Nursery Ideas (Blog) | Site Map | Privacy Policy | Disclosure Policy | Disclaimer | Affiliate Disclosure | Earnings Disclosure | Facebook | Pinterest
I am a participant in the Amazon Services LLC Associates Program, an affiliate advertising program designed to provide a means for us to earn fees by linking to Amazon. As an Amazon Associate I earn from qualifying purchases.
Copyright © 2006-2026. All Rights Reserved.