Pumpkin Pregnancy Announcement Ideas with Cute Printable Carving Stencils
By Jan Bay
A pumpkin pregnancy announcement can be really cute when the message is simple enough to read in one glance and the pumpkin still looks like part of the fall scene. These ideas focus on cute, easy carvings, printable stencils and photo setups that help you turn a real pumpkin into a clear baby announcement without making the design harder than it needs to be.
Explore More Baby Crafts and Fall Ideas
Jump to Pumpkin Pregnancy Announcement Ideas
Easy Pumpkin Pregnancy Announcement Carving Ideas
Printable Pumpkin Pregnancy Announcement Stencils
Cute Pumpkin Baby Announcement Ideas
No-Carve Pumpkin Pregnancy Announcement Ideas
Pumpkin Pregnancy Announcement Ideas That Are Easy to Carve
The easiest announcement pumpkins have one advantage: you can understand the message before you notice the carving details. A short phrase, large lettering and plenty of open pumpkin around the design will photograph much better than a crowded sentence.
Start with a medium or large pumpkin that has a broad, fairly smooth face. Set it where you expect to photograph it, then look at the pumpkin from several feet away. That gives you a better idea of how much space the message can occupy without wrapping too far around the sides.
Cute Easy Pumpkin Carving Ideas for a Baby Announcement
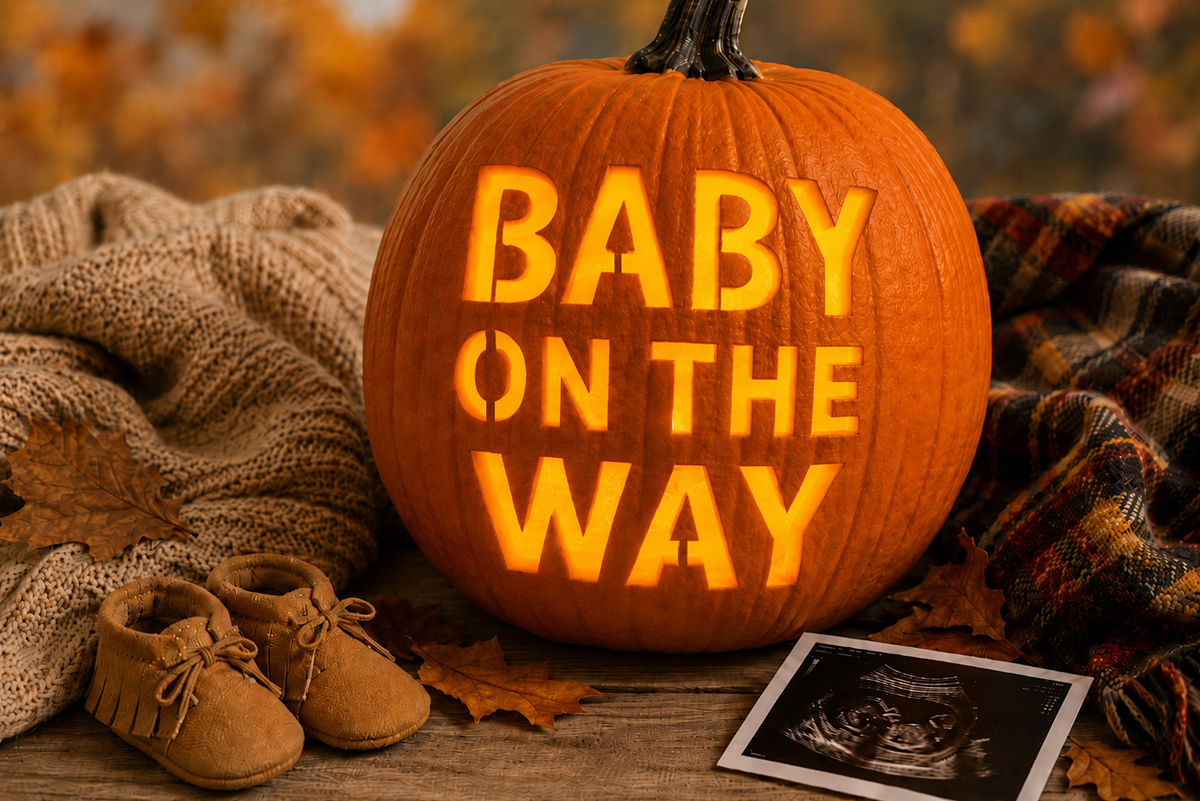
BABY ON THE WAY is my first choice when you want the pumpkin to tell the whole story by itself. Stack the words in three lines with BABY as the largest word. Keep the other two lines shorter and centered beneath it.
OH BABY! is even easier to carve. The short wording leaves room for a small heart, star or simple pair of baby footprints underneath. It is a good choice for a smaller pumpkin or a photo that will include other announcement details.
BABY [SURNAME] makes the photograph more personal without requiring a long message. Put BABY on the first line and the family name beneath it. If the surname is long, use a wider pumpkin rather than making the letters narrow.
BABY ARRIVING SOON works well when you want a simple announcement that does not depend on a specific due month. Stack the words in three lines so BABY gets the most space and the message stays easy to read on the pumpkin.
OUR LITTLE PUMPKIN is a cute choice when the seasonal wording matters as much as the announcement. I would reserve this one for a larger pumpkin because the phrase needs more room. Another option is to carve LITTLE PUMPKIN on the main pumpkin and place a much smaller uncarved pumpkin beside it.
BABY MAKES THREE works nicely for a first baby when the wording fits the family. You can also adapt the number for your own announcement rather than forcing a phrase that does not match your family.
Do not feel that every inch of the pumpkin needs decoration. Empty space around the letters helps separate the announcement from ordinary jack-o'-lantern carving and makes the message easier to read in a photograph.
Choose the message before you choose the pumpkin
It is tempting to buy the prettiest pumpkin first and work out the lettering later. Reverse that order when you can. A short message such as OH BABY can fit a round pumpkin, while OUR LITTLE PUMPKIN needs a wider carving area.
Write your chosen phrase on a sheet of paper in roughly the shape you want it to appear. If the design looks cramped on paper, it will feel even tighter on a curved pumpkin.
For the cleanest announcement, give the important word the most space. BABY, a surname or the arrival month should not compete with several decorative shapes around it.
Printable Pumpkin Pregnancy Announcement Stencils
You do not need an elaborate illustration to make a useful pumpkin stencil. These printable layouts are designed for transfer to a real pumpkin. Before carving enclosed letter centers, add the small bridges explained in the instructions below.
Before printing, measure the usable front area of your pumpkin from side to side. Your finished template should fit inside that area with at least an inch or two of uncarved pumpkin around the message. If the design reaches around the curve, reduce it slightly or divide it into fewer lines.
What You Need for a Carved Pumpkin Pregnancy Announcement
- 1 medium or large real pumpkin with a broad, fairly smooth front
- One of the paper stencil layouts on this page
- Printer paper and a printer
- Scissors
- Removable tape
- Washable marker or pumpkin stencil transfer tool
- Pumpkin scoop or large spoon
- Pumpkin carving saw or other pumpkin carving tool for adult use
- Paper towels or a clean cloth
- Battery-operated light or glow stick if you want the finished carving illuminated
You do not need several specialty tools for the lettering. The paper template, a clear transfer line and a carving tool you can control are more useful than a complicated carving kit with pieces you may never use.
Stencil 1: Baby on the Way
Open the Printable BABY ON THE WAY Pumpkin Stencil
Full-size 8.5 × 11 inch printable stencil opens in a new tab.
Make BABY the widest line. The smaller middle line keeps the design compact enough for a pumpkin while still reading naturally from top to bottom.
Stencil 2: Oh Baby!
Open the Printable OH BABY Pumpkin Stencil
Full-size 8.5 × 11 inch printable stencil opens in a new tab.
This is the simplest template on the page and a good place to start if pumpkin carving is not something you do often. Enlarge the lettering until the phrase fills most of the smooth front surface.
Stencil 3: Baby Arriving Soon
Open the Printable BABY ARRIVING SOON Pumpkin Stencil
Full-size 8.5 × 11 inch printable stencil opens in a new tab.
Stencil 4: Our Little Pumpkin
Open the Printable OUR LITTLE PUMPKIN Stencil
Full-size 8.5 × 11 inch printable stencil opens in a new tab.
This phrase needs more width than the others. If the lettering begins to wrap around the pumpkin, use a wider pumpkin or make LITTLE PUMPKIN the only carved wording and add the rest of the announcement elsewhere in the photo.
How to Make the Carved Pumpkin Pregnancy Announcement
- Set the pumpkin upright and choose the broadest, smoothest section for the announcement message.
- Measure that usable area from side to side. Print the chosen stencil at a size that leaves some uncarved pumpkin around the wording.
- Have an adult open the pumpkin and remove the seeds and loose pulp with a pumpkin scoop or large spoon.
- Wash and dry the outside of the pumpkin. Trim the excess paper from around the stencil, then make several small cuts in the blank outer margin so the paper can overlap slightly as it follows the curve.
- Center the stencil on the pumpkin and secure it with small pieces of removable tape.
- Trace the outlines with a washable marker or transfer the outlines with a pumpkin stencil tool. If you will cut completely through letters such as A, B, D, O, P or R, mark the small bridges that must remain uncut so the enclosed centers stay attached.
- Remove the paper and tape. Check the spelling, spacing and alignment before making the first cut. Look at the pumpkin from several feet away as well as close up.
- Have an adult carve the smaller enclosed areas first, then work through the larger openings. Keep the marked bridges intact.
- Remove loose pumpkin pieces and wipe away visible transfer marks. Take a test photograph before making any final adjustments to the lettering.
- If you want the carving to glow, place a battery-operated light or glow stick inside the pumpkin rather than an open-flame candle. Then turn the pumpkin toward the camera and check that every word remains readable.
For the bridges you marked in Step 6, aim for about 1/4 inch of uncut pumpkin. That gives the enclosed centers more support than a narrow tab and makes the bridge easier to preserve while carving.
Another option is to scrape away only the orange outer skin inside the letters instead of cutting all the way through. That method lets you use ordinary block letters without worrying about enclosed centers dropping out. A light placed inside the pumpkin will give the scraped lettering a gentler glow.
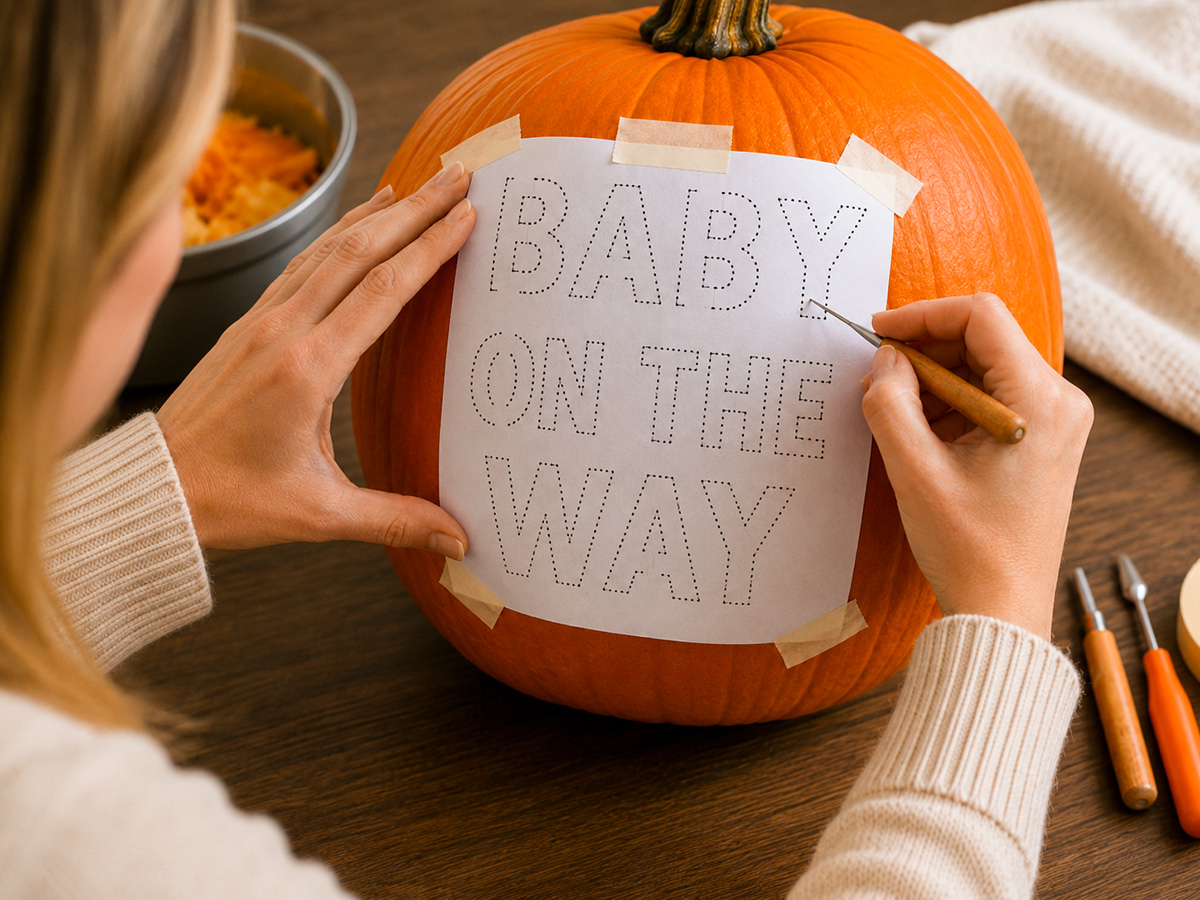
On a curved pumpkin, the outermost letters can look narrower when viewed through the camera. If that happens, move the design toward the flatter center of the pumpkin rather than extending the wording farther around the sides.
Cute Pumpkin Baby Announcement Ideas
A carved message does not have to carry every detail of the announcement. Sometimes the pumpkin looks better when it says only BABY or OH BABY and the rest of the story comes from the arrangement around it.
Use one large pumpkin and one tiny pumpkin
Place a small pumpkin beside the carved announcement pumpkin to suggest the new addition without adding another line of text. Keep the little pumpkin plain. The size difference already makes the idea clear, and extra lettering can make the setup look busy.
Make the baby's due month the feature
Instead of a long sentence, carve BABY above the arrival month. A two line design such as BABY / APRIL is readable from farther away than a full due date and gives you room for larger letters.
If you want to show the exact due date, add it on a separate card or another element in the photograph rather than squeezing a long string of numbers into the pumpkin.
Add a small carved heart
A heart is one of the few extra shapes I would add beside announcement lettering. Keep it simple and place it below the wording or between two short lines. The heart should support the message rather than become the largest part of the design.
Create a family pumpkin grouping
Use one pumpkin for each family member and add a smaller pumpkin to represent the baby. The announcement pumpkin can sit in the center with BABY ON THE WAY carved into it.
This arrangement can work especially well when you want the photograph to tell the story without showing people. It also gives you an announcement photo that can be shared before you are ready for maternity portraits.
Use the pumpkin as the Halloween announcement
If you want the finished photo to feel more like Halloween than general fall, use a darker setting and illuminate the carved message from inside. Keep the surrounding decorations simple enough that the pregnancy announcement remains the first thing the eye finds.
You can find more seasonal ways to reveal the news on the Halloween baby announcement ideas page.
Let Little Pumpkin become the theme
OUR LITTLE PUMPKIN can carry beyond the announcement itself. If you later use the same theme for a shower, the carved pumpkin photograph can become part of the invitation table, welcome display or keepsake area.
The Little Pumpkin baby shower ideas page has more ways to continue that theme without having to repeat the exact announcement setup.
No-Carve Pumpkin Pregnancy Announcement Ideas
You can still use the pumpkin theme if you would rather not cut the pumpkin at all. A no-carve announcement is especially useful when you want to prepare the setup before the day you plan to photograph it.
Trace the stencil and paint the letters
Use the same printable layouts above, but transfer the outline and fill the letters with acrylic craft paint instead of cutting them out. Black lettering gives the clearest contrast on a traditional orange pumpkin. White lettering can also work, but check it through your camera before committing to the entire design.
Let each coat dry before touching up the edges. Keep the lettering broad rather than trying to imitate fine calligraphy on the curved surface.
Use a paint marker for a short message
A paint marker is practical for OH BABY, BABY [SURNAME] or a due month. Test it on the back of the pumpkin first. Pumpkin surfaces vary, and some markers need more than one pass to look solid.
Use the pumpkin as the background instead of the sign
You do not have to write directly on the pumpkin. Place one large pumpkin behind a simple announcement card, ultrasound photograph or pair of baby shoes. Add one or two smaller pumpkins nearby and let their shapes supply the fall theme.
Keep important paper items away from moisture on the ground. A small stand, crate or dry cloth can raise an ultrasound photograph or announcement card without making the setup look overly arranged.
Create a painted Little Pumpkin design
Paint LITTLE PUMPKIN in large block letters and add a small heart beneath it. This gives you the look of a custom announcement pumpkin without having to solve the enclosed letter shapes that come with full cutout carving.
If you are deciding between carving and painting, think about the finished photograph first. A glowing carved design is dramatic after sunset. Painted lettering is easier to read in daylight and does not require an interior light.
Pumpkin Pregnancy Announcement Photo Ideas
The carving can be perfect and still disappear in the photograph if the camera is too far away or the background is doing too much. Plan the picture at the same time you plan the pumpkin.
Take the clear announcement photo first
Begin with a straightforward photograph of the pumpkin facing the camera. Make sure every word is visible and no letter bends around the side. Once you have that shot, try the more decorative angles.
A useful test is to look at the image as a small thumbnail on your phone. If you can still read BABY, the surname or the arrival month, the lettering is doing its job.
Photograph an unlit pumpkin in open daylight
For painted pumpkins and unlit carvings, choose bright indirect daylight. Turn the carved or painted face toward the light rather than placing the brightest light behind it.
Try a photograph from pumpkin height instead of standing over the display. A lower camera position keeps the pumpkin round and makes the lettering easier to see.
Photograph a glowing pumpkin at dusk
You do not need complete darkness to photograph a glowing carving. Dusk lets the letters shine while the pumpkin and surrounding fall setting are still visible.
Take several photographs as the light changes. A design that is too faint in daylight can suddenly become very clear a few minutes later.
Include yourselves without hiding the pumpkin
If the announcement will include the parents, place the pumpkin slightly in front rather than holding it against clothing where part of the message can disappear. Another simple setup is to sit behind the pumpkin with the carving centered between you.
You can also photograph your hands on either side of the pumpkin, which keeps the message large in the frame while still making the announcement personal.
Take both horizontal and vertical photographs
A horizontal image is useful for albums, framed prints and website sharing. A vertical version gives you more flexibility for phones and social sharing. Take both while the pumpkin, lighting and setup are already in place.
If you want pregnancy portraits as part of the same session, the fall maternity photo shoot ideas page has additional outdoor and seasonal setups that can coordinate with the pumpkin announcement without simply repeating it.
Tips for Carving a Readable Announcement Pumpkin
A pregnancy announcement pumpkin is different from a typical jack-o'-lantern. You are not trying to make the most detailed carving. You are trying to make words survive a curved surface, uneven pumpkin flesh, changing light and a camera.
Choose a pumpkin with a usable front
Turn each pumpkin slowly before buying it. Look for a broad section with shallow ribs and enough uninterrupted space for the message. A beautiful pumpkin with deep grooves can be difficult to letter because parts of the words disappear into the valleys.
Set the pumpkin upright before marking the center. Some pumpkins naturally lean to one side, so the visual center may not be exactly where you expect it.
Make the letters larger than you think you need
Fine lettering can look attractive on paper and disappear completely when photographed. Use wide block shapes with generous spaces between letters.
If you have room for decorative flourishes or larger lettering but not both, choose the larger lettering.
Transfer the whole design before carving anything
Do not start cutting after tracing only the first word. Transfer every letter and then step away from the pumpkin.
Check spelling, spacing and alignment. Look specifically at the first and last letters of each line because those are the ones most likely to slip around the curve.
Carve small enclosed areas before large outer shapes
Complete the more delicate interior cuts while the surrounding pumpkin wall still supports them. Work slowly around narrow bridges and stop if the pumpkin begins to flex.
You can also use the shallow scrape method for small lettering and save full cutout carving for BABY or another large word.
Do a camera test before you finish
After the first major word is carved, take a quick photograph from the distance you expect to use for the final announcement. Do not judge readability only while standing directly over the pumpkin.
If a letter looks closed up in the photograph, widen the opening slightly. If two letters run together, enlarge the space between them before moving on.
Keep pumpkin carving an adult job
Sharp carving tools should be handled by an adult. Children can help scoop the pumpkin or trace a design, but the cutting itself should remain with an adult. The U.S. Consumer Product Safety Commission also recommends battery-operated lights or glow sticks instead of an open flame inside carved pumpkins. You can read the CPSC Halloween safety guidance before carving and lighting your display.
Photograph the pumpkin while the carving still looks clean
If the announcement photograph matters more than displaying the pumpkin for several nights, schedule the carving close to the photo session. Fresh cut edges give the lettering cleaner definition.
Once you have the finished pumpkin in place, wipe away loose pieces and any visible marker lines around the design. Then take the clear announcement photographs before moving the pumpkin into a more elaborate display.
Frequently Asked Questions About Pumpkin Pregnancy Announcements
What should I carve on a pumpkin for a pregnancy announcement?
Short phrases are the easiest to read. BABY ON THE WAY, OH BABY, BABY [SURNAME] and BABY ARRIVING SOON all work well because they can be arranged in large block lettering without covering the entire pumpkin.
What is the easiest pumpkin pregnancy announcement stencil?
OH BABY is the simplest of the templates on this page because it uses only two short words. BABY ON THE WAY is also beginner friendly when the words are stacked in three lines and the letters are kept large.
How do I keep the middle of letters from falling out?
If you cut all the way through letters such as A, B, D, O, P or R, leave small sections uncut so the enclosed centers remain attached to the pumpkin. Another option is to scrape away the outer skin inside the letters rather than cutting completely through them.
Can I make a pumpkin pregnancy announcement without carving?
Yes. Transfer one of the stencil layouts and paint the lettering, write a short message with a paint marker or use an undecorated pumpkin beside an announcement card or ultrasound photograph.
How can I make carved words easier to read in photos?
Use large block lettering, leave generous space between letters and keep the message on the flatter front portion of the pumpkin. Take a test photograph from several feet away before you finish carving. If the message is clear when the image is viewed small, it should also read well in the finished announcement.
Should I photograph a carved pregnancy announcement pumpkin during the day or at night?
Either can work. Daylight is useful when the pumpkin itself and the surrounding fall setting are important. Dusk is especially effective when you want the carved letters to glow while the pumpkin remains visible in the photograph.
Can I use a real candle inside the announcement pumpkin?
A battery-operated light is the safer choice and is recommended by the U.S. Consumer Product Safety Commission for jack-o'-lanterns. It also makes photography easier because you can reposition the pumpkin without dealing with an open flame.
What size pumpkin is best for a pregnancy announcement?
Choose by usable carving space rather than diameter alone. A medium or large pumpkin with a broad, relatively smooth front gives you more room for readable lettering than a deeply ribbed pumpkin of the same overall size.
Make the Announcement Look Like Yours
The most memorable pumpkin pregnancy announcements do not need the longest wording or the most complicated carving. Pick the detail that matters to your announcement, whether that is the word BABY, your family name, the arrival month or the Little Pumpkin theme, and give it enough room to be seen.
Print the design, hold it against the pumpkin and look at it from across the room before you pick up a carving tool. If you can understand the announcement immediately, you are ready to transfer it. If you have to study it, simplify it.
That little test can save a lot of careful carving and gives you what the finished pumpkin really needs: a message that still makes sense when somebody sees the photograph for the very first time.
When you click on links to various merchants on this site and make a purchase, this may result in this site earning a commission. This does not affect the price you pay.

UBGI Gold Standard 2026
Reviewed under the site's
editorial checklist.
Photos, decorating ideas, party setups and reader submissions are shared for inspiration unless a page is specifically presented as a pattern, tutorial, reference guide or step-by-step project. Follow the instructions, measurements, safety guidance and manufacturer directions provided for the particular project or product.
About Jan | Contact | Baby Nursery Ideas (Blog) | Site Map | Privacy Policy | Disclosure Policy | Disclaimer | Affiliate Disclosure | Earnings Disclosure | Facebook | Pinterest
I am a participant in the Amazon Services LLC Associates Program, an affiliate advertising program designed to provide a means for us to earn fees by linking to Amazon. As an Amazon Associate I earn from qualifying purchases.
Copyright © 2006-2026. All Rights Reserved.