Free Granny Square Christmas Tree Ornament Crochet Pattern
By Jan Bay
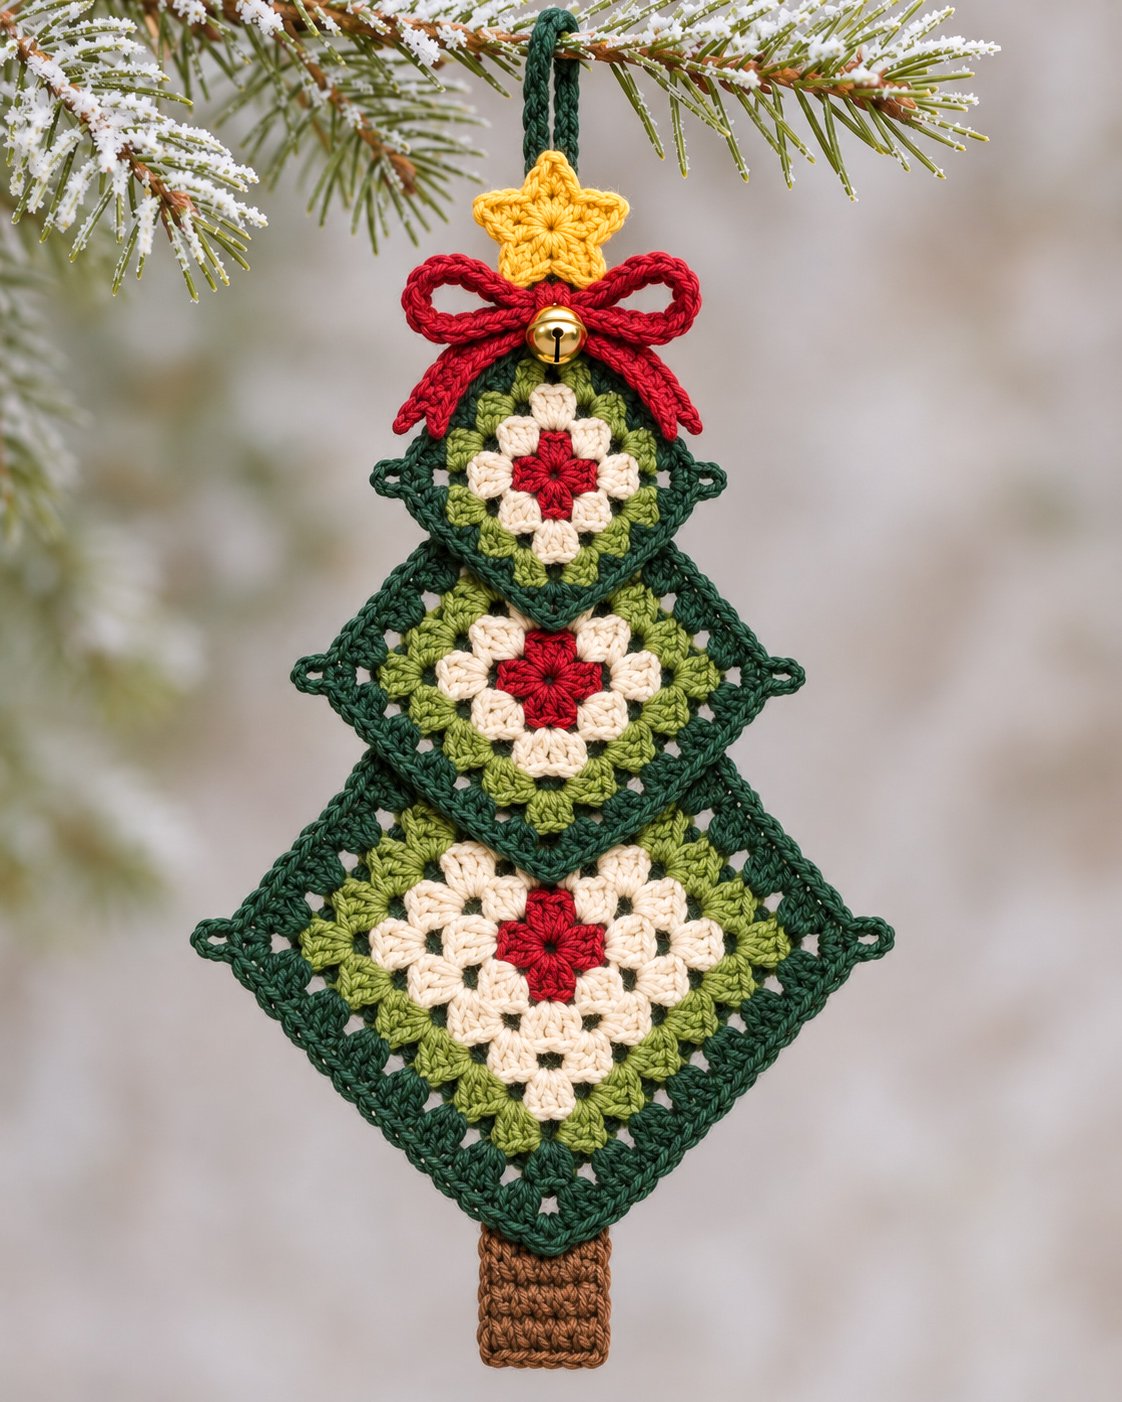
This free granny square Christmas tree ornament pattern is to me, three layers of old fashioned holiday love. Each little tree has three colorful granny squares layered to make a little Christmas tree. Each square features a red crocheted cluster center, cream flower petals, olive-green granny stitches and a deep evergreen border. A crocheted gold star, red bow, little bell and brown trunk finish the ornament, making it a pretty handmade decoration for your Christmas tree.
Explore More Free Christmas Crochet Patterns
Free Crochet Christmas Ornament Patterns
Free Christmas Granny Square Patterns
Christmas Tree Granny Square Pattern
See Supplies for This Project Here.
Yarn and Supplies for Your Granny Square Christmas Tree Ornament
You won't need much yarn for this little tree. Small amounts of six colors will do, so it's a nice project for using up leftover cotton yarn.
I'd keep the yarn weight the same for every color. Mixing thick and thin yarn can make the three squares grow unevenly, and we want those layers to sit neatly together.
Materials
- Sport-weight (#2) cotton yarn in cranberry red, warm cream, olive green, dark evergreen, golden yellow and medium brown
- 2.5 mm crochet hook, or the size needed to match the gauge below
- Yarn needle with a blunt tip
- Small scissors
- Four removable stitch markers
- One 10 to 12 mm gold jingle bell
- Strong matching sewing thread and a needle small enough to pass through the bell's attachment loop
- Rustproof pins and a flat blocking surface
- Measuring tape
As a generous allowance, have about 40 yards of dark evergreen, 20 yards of olive green, 15 yards of cream, 10 yards of red, 10 yards of brown and 5 yards of yellow available. You probably won't use all of it, but that gives you enough for the pieces, joins and finishing.
What You'll Crochet
- One small four-round granny square
- One medium five-round granny square
- One large six-round granny square
- Three matching shaped branch borders, one on each square
- One folded brown trunk
- One five-point yellow star
- One red cord for the bow
- One dark-green hanging loop
The gold bell is the only separate ornament finding. All the other decorative pieces are made with yarn and a crochet hook.
A note about the bell: This ornament is meant for Christmas tree display, not as a baby toy. A small bell or loose decoration could be a choking hazard. Hang the finished ornament where babies and young children can't reach it.
Finished Size and Crochet Gauge
The finished ornament is expected to measure approximately 8 to 9 inches tall, including the star and exposed trunk but excluding the hanging loop. The widest branch tips should span about 4 to 4 1/2 inches.
Those measurements are estimates based on the stitch layout and gauge. Your yarn, hook and tension will affect the final size.
Granny Square Size Checkpoints
With sport-weight cotton yarn and a 2.5 mm hook, aim for these approximate measurements before adding the shaped edging:
- Small square, after Round 4: about 2 inches across one straight side
- Medium square, after Round 5: about 2 1/2 inches across one straight side
- Large square, after Round 6: about 3 inches across one straight side
Measure from one outer corner to the next along a straight side, not diagonally from point to point.
The completed squares will be turned so their corners point up, down, left and right. That's what gives the ornament its familiar Christmas tree shape.
Gauge Check Before Continuing
Make the first four rounds of the small square and measure it before adding the edging.
If your square is more than 2 1/4 inches across, try a smaller hook. If it's less than 1 3/4 inches, try a slightly larger hook.
Don't change hooks between the three squares. They need the same stitch size so the graduated tiers look like a matched set.
Important: If you want to use worsted-weight yarn instead, you can follow the same stitch counts, but you'll make a noticeably larger and heavier tree.
Crochet Stitches and Abbreviations
This pattern uses US crochet terms. The granny squares are made from ordinary three-double-crochet groups, so you won't have to learn a complicated new stitch.
- ch: Chain
- sl st: Slip stitch
- sc: Single crochet
- hdc: Half double crochet
- dc: Double crochet
- st: Stitch
- sp: Space
- rnd: Round
- RS: Right side
- WS: Wrong side
- BLO: Back loop only
- rep: Repeat
You can find the standard US stitch names in the Craft Yarn Council's crochet abbreviation guide.
How the Granny Clusters Work
One granny cluster is simply 3 dc worked into the same space.
At each corner, you'll work:
(3 dc, ch 2, 3 dc) in the same corner space.
Along each side, you'll work one group of 3 dc into each ch-1 space, with ch 1 between groups.
The beginning ch 3 counts as the first dc of the opening granny group. Any beginning ch 1, joining slip stitch or turning chain that isn't specifically called a stitch does not count toward a stitch total.
You'll close each granny round with a slip stitch into the third chain of the beginning ch 3. Don't turn the work between granny rounds. Keep the same side facing you so the flower centers look alike.
Special Branch-Notch Stitch
The shallow notch beside each left and right branch tip uses three stitches worked across three existing double crochet stitches:
Sc in the first dc, sl st in the second dc, sc in the third dc.
The slip stitch is shorter than the two single crochets beside it. That makes a small dip without skipping stitches or pulling the edge tightly together.
We'll use this little detail four times around each square's edging, once on either side of the left and right branch points.
Free Granny Square Christmas Tree Ornament Pattern
We'll make all three squares the same way through Round 4. Then we'll add one more round to the medium square and two more rounds to the large square.
That keeps the little red flower and the cream petals exactly the same on every tier. Only the green sections grow larger.
Round 1: Red Flower Center
Use cranberry red yarn.
- Ch 4 and join with a sl st in the first chain to form a ring.
- Ch 3. This counts as your first dc.
- Work 2 dc into the ring, then ch 2.
- Work (3 dc, ch 2) into the ring three more times.
- Join with a sl st into the third chain of the beginning ch 3.
- Fasten off, leaving a tail for weaving in.
Round 1 count: Four groups of 3 dc, four ch-2 spaces, 12 dc total.
You'll have four little red granny clusters arranged around the center. These form the red flower without using embroidery or a separate appliqué.
Round 2: Cream Flower Petals
Use warm cream yarn.
- Join the cream yarn with a sl st in any red ch-2 corner space.
- Ch 3, then work 2 dc, ch 2 and 3 dc into that same corner space.
- Ch 1.
- Work (3 dc, ch 2, 3 dc) into the next red corner space.
- Ch 1.
- Repeat Steps 4 and 5 in each of the two remaining red corner spaces.
- Join with a sl st into the third chain of the beginning ch 3.
- Fasten off.
Round 2 count: Eight groups of 3 dc, four ch-2 corners, four ch-1 side spaces, 24 dc total.
The eight cream granny clusters sit around the red center like little flower petals. Keep the ch-2 corner spaces open. Don't pull them closed.
Round 3: Olive-Green Granny Clusters
Use olive-green yarn.
- Join olive-green yarn in any cream ch-2 corner space.
- Ch 3, then work 2 dc, ch 2 and 3 dc into that corner space.
- Ch 1.
- Work 3 dc into the next ch-1 side space.
- Ch 1.
- Work (3 dc, ch 2, 3 dc) in the next ch-2 corner space.
- Ch 1, work 3 dc into the next ch-1 side space, then ch 1.
- Repeat Steps 6 and 7 twice more, working around the remaining two corners and side spaces.
- Join to the third chain of the beginning ch 3.
- Fasten off.
Round 3 count: Twelve groups of 3 dc, four ch-2 corners, eight ch-1 side spaces, 36 dc total.
Take a look at the square now. You should see the red flower in the middle, eight cream granny clusters around it and olive-green clusters beginning to frame the flower.
Round 4: Dark Evergreen Granny Square Border
Use dark evergreen yarn.
- Join the evergreen yarn in any olive-green ch-2 corner space.
- Ch 3, then work 2 dc, ch 2 and 3 dc into the same corner space.
- Ch 1.
- Work 3 dc into the next ch-1 space, then ch 1.
- Work 3 dc into the following ch-1 space, then ch 1.
- Work (3 dc, ch 2, 3 dc) in the next corner space.
- Ch 1, then work 3 dc in each of the next two ch-1 spaces, placing ch 1 after each group.
- Repeat Steps 6 and 7 twice more to complete the other two corners and sides.
- Join to the third chain of the beginning ch 3.
- Fasten off.
Round 4 count: Sixteen groups of 3 dc, four ch-2 corners, twelve ch-1 side spaces, 48 dc total.
Small Square Checkpoint
Your first square is now complete except for its shaped edging. It has four rounds and should measure approximately 2 inches across one straight side before the edging is added.
Set it aside. This will become the top tier of the Christmas tree.
Round 5: Make the Medium Square
Start a second square and repeat Rounds 1 through 4 exactly as written, using the same colors.
Then add Round 5 in dark evergreen.
- Join evergreen yarn in any Round 4 ch-2 corner space.
- Ch 3, then work 2 dc, ch 2 and 3 dc into that same corner space.
- Ch 1.
- Work 3 dc in each of the next three ch-1 side spaces, placing ch 1 after each group.
- Work (3 dc, ch 2, 3 dc) in the next corner space.
- Ch 1, then work 3 dc in each of the next three ch-1 side spaces, placing ch 1 after each group.
- Repeat Steps 5 and 6 twice more around the remaining two corners and sides.
- Join to the third chain of the beginning ch 3.
- Fasten off.
Round 5 count: Twenty groups of 3 dc, four ch-2 corners, sixteen ch-1 side spaces, 60 dc total.
Medium square checkpoint: Approximately 2 1/2 inches across a straight side before edging.
This square becomes the middle tier.
Round 6: Make the Large Square
Start the third square. Repeat Rounds 1 through 5 exactly as written, using the same colors.
Then work Round 6 in dark evergreen.
- Join evergreen yarn in any Round 5 ch-2 corner space.
- Ch 3, then work 2 dc, ch 2 and 3 dc into that same corner space.
- Ch 1.
- Work 3 dc in each of the next four ch-1 side spaces, placing ch 1 after each group.
- Work (3 dc, ch 2, 3 dc) in the next corner space.
- Ch 1, then work 3 dc in each of the next four ch-1 side spaces, placing ch 1 after each group.
- Repeat Steps 5 and 6 twice more around the remaining two corners and sides.
- Join to the third chain of the beginning ch 3.
- Fasten off.
Round 6 count: Twenty-four groups of 3 dc, four ch-2 corners, twenty ch-1 side spaces, 72 dc total.
Large square checkpoint: Approximately 3 inches across one straight side before edging.
That's all three granny squares finished. Each has the same red flower, cream petals and olive-green surround. The extra evergreen rounds make the three different sizes.
Before Adding the Branch Edging
Lay the three squares flat with their right sides facing up. Make sure each square has four clear corners and straight sides.
Don't stretch one square to make it fit another. The small, medium and large sizes should come from the extra rounds, not from pulling the fabric.
Weave in the color-change tails on the wrong side, passing each tail through several stitches and reversing direction before trimming. Leave the working fabric flat rather than tightening the tails around the flower.
Crochet the Pointed Christmas Tree Branch Edging
Here's how we'll turn the ordinary granny-square outlines into the little Christmas tree branches shown in the finished ornament.
We're keeping the four original corners. The change is in the final edging: the left and right corners get a slightly longer chain loop, and the granny groups next to them get a tiny dip.
The idea is to keep the square shape easy to recognize while giving the finished tree a more interesting branch outline.
Mark the Four Corners
- Place one granny square in front of you with the right side facing up.
- Turn the square so it looks like a diamond, with one corner pointing straight up.
- Mark that corner as TOP.
- Moving clockwise, mark the remaining corners RIGHT, BOTTOM and LEFT.
- Keep this orientation for the edging and final assembly.
Edging Instructions for All Three Squares
Use dark evergreen yarn.
- Join the yarn with a sl st in the ch-2 space at the marked TOP corner.
- Ch 1. Work (sc, ch 2, sc) into that same corner space. The beginning ch 1 does not count as a stitch.
- Work toward the RIGHT corner. Put 1 sc into each dc and 1 sc into each ch-1 space until you reach the final three-dc granny group before the RIGHT corner.
- Across those final three dc, work sc in the first dc, sl st in the second dc and sc in the third dc. This forms the first shallow branch notch.
- In the RIGHT corner's ch-2 space, work (sc, ch 4, sc). Do not tighten the ch-4 loop.
- In the first three-dc group after the RIGHT corner, work sc, sl st, sc across its three dc.
- Continue toward the BOTTOM corner with 1 sc in every remaining dc and every ch-1 space.
- In the BOTTOM corner's ch-2 space, work (sc, ch 2, sc).
- Work toward the LEFT corner, putting 1 sc in every dc and ch-1 space until you reach the final three-dc group before the LEFT corner.
- Across that group, work sc, sl st, sc.
- In the LEFT corner's ch-2 space, work (sc, ch 4, sc).
- Across the first three-dc group after the LEFT corner, work sc, sl st, sc.
- Continue back toward the TOP corner with 1 sc in every remaining dc and ch-1 space.
- Join with a sl st into the first sc of the edging round.
- Fasten off, leaving a 12-inch tail if you'll use it for assembly, or weave it in if you'll join the tiers with a separate strand.
Branch Edging Stitch Counts
- Small square: 64 sc, 4 shaping sl st, two ch-2 corner loops and two ch-4 branch loops
- Medium square: 80 sc, 4 shaping sl st, two ch-2 corner loops and two ch-4 branch loops
- Large square: 96 sc, 4 shaping sl st, two ch-2 corner loops and two ch-4 branch loops
The joining slip stitch is not included in those totals.
On each square, you should be able to find exactly four shortened stitch positions: one on each side of the RIGHT and LEFT branch corners.
Check the Branch Shape
Lay the square flat again. The top and bottom corners should still form ordinary diamond points. The two side corners should project a little farther outward, with a small dip beside each branch tip.
If one of the corners pulls inward sharply, check that you worked both single crochets into the corner space and didn't pull the four-chain loop tight.
If the edge starts to ruffle, check for extra single crochets. Each double crochet should receive only one edging stitch, and each ch-1 side space should receive one single crochet.
If the stitch count is correct but the whole edge curls inward or the square starts to cup, your edging stitches may be too tight. Fix that before assembling the tree. Undo the edging and work it again with a more relaxed single crochet. If needed, use a hook 0.25 mm larger for the edging only. Keep the same stitch counts.
Lay the square flat before continuing. You should see four clear diamond corners, with the left and right branch tips extending outward and a shallow notch beside each tip. The middle of the square should lie flat without being stretched.
Repeat this edging on all three squares. Keep the same TOP, RIGHT, BOTTOM and LEFT orientation on every tier.
At this point, you should have three finished granny-square diamonds with matching flower centers and graduated evergreen branch outlines.
Assemble the Granny Square Christmas Tree
Now we'll put the three squares together. Don't sew the entire edges closed. We want the three layers to stay separate so you can see each little branch tier.
The smallest square goes at the top, the medium square sits behind it and the largest square goes at the bottom.
Step 1: Arrange the Three Squares
- Lay the large square on a flat surface with its right side facing up and one corner pointing straight up.
- Place the medium square over it, also with its right side facing up and its top corner pointing upward.
- Center the medium square horizontally over the large square.
- Move the medium square upward until its lower diamond point rests approximately 1/2 inch above the center of the large square's red flower.
- Place the small square over the medium square, again with its right side facing up.
- Center the small square horizontally. Move it upward until its lower diamond point rests approximately 1/2 inch above the center of the medium square's red flower.
- Check that all three top and bottom points fall on the same imaginary vertical line.
You should now see three distinct evergreen branch levels. The red and cream flower on each tier should remain visible, even though the squares overlap.
Adjust the overlap slightly if one of the flowers gets covered. The goal is to show the red center and most of the cream petals on all three tiers.
Step 2: Join the Large and Medium Squares
Cut a fresh 24-inch length of dark evergreen yarn and thread it onto your yarn needle.
Use this strand for both attachment points between the large and medium squares. After completing the three sewing passes at the left crossing, carry the yarn beneath existing stitch bars on the wrong side of the large square until you reach the right crossing. Don't pull a long, loose strand across an open granny space.
Make the three sewing passes at the right crossing, then secure and weave in the yarn as directed below. Keep both joins relaxed so the squares don't gather.
- Keep the medium square centered over the large square in the position chosen in Step 1.
- Find the place on the left where the medium square's lower-left evergreen border crosses the large square's upper-left evergreen border.
- Place a removable stitch marker through the two border layers at that crossing.
- Find the matching crossing on the right and mark it the same way.
- Check that the two marked points are level. The flower centers should remain lined up vertically.
- At the left marker, insert the yarn needle from the wrong side of the large square. Pass it through a solid stitch of the large square's evergreen border and a solid stitch of the medium square's evergreen border.
- Return the needle through both border layers. Repeat until you have made three small sewing passes through the same attachment area.
- After making the three sewing passes at the left crossing, pass the needle beneath two nearby stitch bars on the wrong side to hold the attachment. Do not cut the yarn or pull the borders together.
- Carry the sewing yarn toward the right crossing by passing the needle beneath existing stitch bars on the wrong side of the large square. Keep the yarn relaxed and avoid leaving a long, loose strand across an open granny space.
- At the right marker, make three small sewing passes through solid evergreen border stitches of both squares, just as you did on the left.
- Remove both markers. Secure the sewing yarn beneath several wrong-side stitch bars, reverse direction once, and weave in the remaining tail.
The two attachments should sit where the evergreen borders naturally overlap. If a crossing falls in a chain space, move the sewing point to the nearest pair of solid border stitches without changing the position of the squares.
Lift the medium square gently. Its lower point should remain centered, and its side branches should stay free rather than being sewn flat against the large square.
Only the two crossing points are joined. Leave the remaining edges separate so the three-tier tree keeps its layered appearance.
Step 3: Attach the Small Square
Cut a second 24-inch length of dark evergreen yarn and thread your needle. Use this strand for both attachment points between the small and medium squares.
After securing the left crossing with three sewing passes, carry the yarn beneath stitch bars on the wrong side of the medium square to reach the right crossing. Complete the three passes on the right, then secure and weave in the yarn ends. The two joins should hold the squares together without gathering the borders.
- Place the small square over the medium square in the position chosen in Step 1.
- Check that its bottom point sits approximately 1/2 inch above the center of the medium square's red flower.
- Find the left crossing where the small square's lower-left evergreen border passes over the medium square's upper-left evergreen border.
- Mark that crossing through both border layers.
- Find and mark the matching crossing on the right.
- Check that both markers are level and the three flower centers remain on the same vertical line.
- At the left marker, sew through solid evergreen border stitches of both squares, making three small passes through the same attachment area.
- Repeat at the right crossing, keeping the sewing tension even.
- Remove both markers. Secure the yarn on the wrong side of the medium square and weave in the ends.
- Lift the assembled tree by the top corner and check that all three tiers hang straight.
You should now have four concealed joining points altogether: two between the large and medium squares and two between the medium and small squares.
Keep the outer branch corners free. Their little chain loops and shallow notches should remain visible on both sides of the tree.
You'll now have a connected Christmas tree made from three graduated granny squares.
Step 4: Check the Layered Shape
Pick up the tree carefully by the upper corner of the small square.
Check these four things:
- The three red flower centers form a straight vertical line.
- Both sides of each tier project outward evenly.
- The green border of the upper tier does not cover the center of the tier beneath it.
- The middle and lower tiers hang without twisting sideways.
If a tier twists, check whether its two sewing points are placed evenly. Move the uneven attachment rather than pulling the yarn tighter.
For a little extra support, you can add one small concealed stitch at the upper corner of the middle square where it sits behind the small square. Do the same for the large square if needed. Keep those stitches hidden beneath the overlapping layer.
Don't sew the side edges together. The separate corners and small gaps between layers give the ornament its dimensional look.
Set the assembled tree aside while you make the trunk and decorations.
Crochet the Star, Bow, Trunk and Hanging Loop
We have the tree shape finished. Now let's add those little details that make it look like a Christmas ornament.
We'll make the brown trunk first, followed by the yellow star, red bow and hanging loop. Leave the gold bell until the bow is attached so you can center it neatly.
Part A: Crochet the Brown Tree Trunk
Use medium-brown yarn and the 2.5 mm hook.
The trunk is a small rectangle folded in half to give it a little thickness. That looks more like the finished example than a single loose chain hanging from the bottom.
Trunk Instructions
- Foundation: Ch 7.
- Row 1: Sc in the second chain from the hook and in each remaining chain. (6 sc)
- Row 2: Ch 1, turn. Sc in each of the 6 stitches. (6 sc)
- Rows 3 through 14: Repeat Row 2, keeping 6 sc in every row.
- Fasten off, leaving an approximately 12-inch sewing tail.
Trunk checkpoint: The rectangle has 14 rows of 6 sc, or 84 sc altogether. It should be approximately twice as long as the finished folded trunk.
Fold the Trunk
- Lay the rectangle flat with its two short ends at the top and bottom.
- Fold it crosswise between Rows 7 and 8 so Row 1 meets Row 14.
- Keep the folded bottom edge neat and the two short ends aligned at the top.
- Use the sewing tail to whipstitch the left and right side edges together.
- Leave the top edge open for attaching the trunk to the tree.
You should now have one small double-thickness trunk with seven rows showing on the front.
Attach the Trunk
- Turn the assembled Christmas tree over.
- Center the open top of the folded trunk behind the BOTTOM point of the large granny square.
- Overlap the trunk behind the square by approximately 1/4 inch.
- Use the brown sewing tail to sew through both trunk layers and several solid evergreen stitches behind the square's lower point.
- Secure the trunk at the left, center and right of its upper edge.
- Weave in the tail on the back.
Turn the tree right side up. The brown trunk should extend straight down from the middle of the lowest diamond point.
If it tilts, undo the uneven side attachment and recenter it before moving on.
Part B: Crochet the Five-Point Yellow Star
Use golden-yellow yarn.
We'll make a little five-point star to sit above the top square. It will be crocheted as its own piece and sewn on, so you don't need to alter the granny-square pattern.
Make two matching star pieces so the topper has a finished front and back.
Star Instructions: Make Two
Each star has a five-space center ring. You'll work one symmetrical point into each space.
- Round 1: Make a magic ring. Ch 1. Work (sc, ch 1) into the ring five times. Pull the ring closed and join with a sl st into the first sc. (5 sc and 5 ch-1 spaces)
- Point 1: Sl st into the first ch-1 space. In that same space, work sc, hdc and dc.
- Ch 3. Sl st into the first chain of that ch-3, which is the third chain from the hook. This makes the pointed tip.
- Still working into the same ch-1 space as Point 1, work dc, hdc and sc.
- Points 2 through 5: In each remaining ch-1 space, work (sc, hdc, dc, ch 3, sl st into the first chain of that ch-3, dc, hdc, sc).
- After completing the fifth point, join with a sl st into the first sc of Point 1.
- Fasten off and weave in the tail.
- Make a second identical star, leaving a 15-inch tail for joining and attaching the two pieces.
Star count: Each star has 5 center sc, 5 center ch-1 spaces and 5 points. Each point contains 2 sc, 2 hdc, 2 dc and one ch-3 pointed tip.
Each star face therefore contains 30 worked stitches around the center, plus the five chain tips. Check that all five points are complete before joining the two star pieces.
Each star should have five separate, recognizable points. Arrange them flat and gently shape the points if they curl.
Join and Attach the Star
- Place the two stars together with their wrong sides touching and all five points aligned.
- Use golden-yellow yarn to stitch around their outer edges, leaving the points clearly defined.
- Do not stuff the star.
- Hold the finished star over the top point of the small granny square, with one star point facing straight up.
- Position it so its lower point overlaps the top of the square slightly.
- Sew the star to the upper corner of the small square through its lower center and lower point.
- Secure and weave in the yarn tail.
The star should sit upright above the first tier, not hang loosely from a single stitch.
Part C: Crochet the Red Bow
Use cranberry-red yarn.
For the bow, we'll crochet a narrow cord and tie it into two loops. It's a simpler way to get the rounded red loops and hanging tails shown in the finished ornament.
Bow Cord
- Ch 70 with red yarn.
- Beginning in the second chain from the hook, work 1 sl st into each remaining chain. (69 sl st)
- Fasten off, leaving an 8-inch sewing tail.
- Lay the finished cord flat without stretching it.
Bow cord checkpoint: Your cord should bend into two open loops without twisting into a tight spiral. A gentle curve is fine. If it curls sharply or the loops won't stay open, remake the foundation chain a little more loosely. You can use a slightly larger hook for the starting chain, then return to your original hook for the 69 slip stitches. Don't add extra chains or pull the finished cord to make it longer.
Shape and Attach the Bow
- Fold the cord into two matching loops, leaving a tail hanging down on each side.
- Tie a small, firm knot at the center to hold the loops.
- Adjust the loops so they are approximately the same size.
- Position the knot immediately below the crocheted star and above the red flower on the small granny square.
- Use the sewing tail to stitch the bow's center knot securely to the upper part of the small square.
- Catch the inner base of each loop with one small securing stitch so the loops remain open and symmetrical.
- Arrange the two loose bow tails diagonally downward over the upper green branch edges.
- Weave in the sewing tail on the wrong side.
The bow should frame the top of the tree without covering the whole red flower center.
Part D: Add the Gold Jingle Bell
- Thread a sewing needle with strong matching thread.
- Position the gold bell directly over the center knot of the red bow.
- Pass the thread through the bell's attachment loop and through solid crochet stitches beneath the bow knot.
- Repeat the attachment several times so the bell cannot slip out of place.
- Secure the thread at the back of the top square.
- Trim the thread ends neatly.
The bell should hang directly below the star, centered between the bow loops. Check that it isn't pulling one loop lower than the other.
If you're making an ornament for a setting where small metal decorations aren't appropriate, you can leave the bell off. The crocheted star and bow will still finish the tree nicely.
Part E: Make the Dark-Green Hanging Loop
Use dark evergreen yarn.
- Leave an 8-inch starting tail, then ch 28.
- Without twisting the chain, join with a sl st into the first chain to form a loop.
- Fasten off, leaving an 8-inch ending tail. You now have two sewing tails at the base of the loop.
- Turn the ornament over.
- Place the joined end of the loop behind the TOP corner of the small granny square, directly below the crocheted star.
- Thread the starting tail onto a yarn needle. Sew it through solid stitches on the left side of the small square's upper corner, passing through the attachment area three times.
- Thread the ending tail onto the yarn needle. Sew it through solid stitches on the right side of the same corner, making another three passes.
- Keep the loop centered and avoid pulling the two sides of the upper corner together.
- Weave both tails securely into the wrong side of the small square, reversing direction before trimming.
Lift the ornament by the hanging loop. The weight should be carried by the top granny square, not by the yellow star or red bow.
If the loop leans to one side, reposition its base so it sits directly over the center line of the three flower motifs.
Finish and Display Your Crochet Christmas Tree Ornament
We're almost finished. Before you hang your little tree, check the branches, flower centers and decorations one last time.
Final Finishing Checklist
- Check that all three granny squares are centered and pointing in the same direction.
- Make sure the red flower centers are visible on all three tiers.
- Check the left and right branch loops for symmetry.
- Flatten any curled edges gently with your fingers.
- Check the four main attachment points between the squares.
- Make sure the folded brown trunk hangs straight.
- Check that the star, bow, bell and hanging loop are attached firmly.
- Remove every temporary stitch marker and blocking pin.
- Weave in any remaining yarn tails and trim them close to the fabric without cutting the working stitches.
Shape the Granny-Square Branches
If the borders need a little help holding their shape, lightly dampen the crocheted squares and arrange the tree on a flat, covered surface.
Gently shape the two outward branch corners of each tier. Keep the little notches beside them visible.
Pin the edges in place if needed, without stretching the squares out of proportion. Allow the ornament to dry completely before removing the pins.
Keep the metal bell dry. Avoid pressing a hot iron directly against the crochet, yarn or decorative pieces.
Make the Ornament in Different Christmas Colors
I like the classic red, cream and green combination for this project because the little flowers show up so clearly against the evergreen borders.
You can change the colors without changing the pattern:
- Classic Christmas: Red centers, cream petals, olive-green surrounds and evergreen borders
- Snowy Christmas: Blue centers, ivory petals, pale-blue surrounds and navy borders
- Red Christmas: Red centers, cream petals, olive-green surrounds and cranberry borders
- Lavender Christmas: Purple centers, cream petals, pale-lavender surrounds and deep-purple borders
Use exactly the same stitch counts, number of rounds, branch edging and assembly method for every color combination.
Only the yarn colors change. That's how you'll keep the three tiers, the flower centers and the finished tree shape consistent.
Where to Use Your Finished Ornament
Hang your granny-square Christmas tree on a Christmas tree branch, add it to a handmade holiday gift or use it as a little decoration on a wrapped package.
You could also make several in coordinating colors for a handmade Christmas garland. Just keep the size and spacing consistent so they hang evenly.
If you enjoy making Christmas granny squares, take a look at my free Christmas granny square patterns for more designs to try.
And that's your finished little tree. Three colorful granny squares, a few decorative touches and a very pretty handmade Christmas ornament.
Granny Square Christmas Tree Ornament FAQs
Is this a traditional granny square crochet pattern?
Yes. Each tier starts with the familiar groups of three double crochet stitches and chain spaces. The squares get extra rounds to make the three different sizes, then the final edging adds the Christmas tree branch points.
How many granny squares do I need for one ornament?
You'll need three: one small square with four granny rounds, one medium square with five rounds and one large square with six rounds. Each square also gets its own shaped border.
Why do the branch corners have different chain lengths?
The top and bottom points use ch-2 corners, while the left and right branch tips use ch-4 corners. The longer side loops make the branches project outward. Shorter stitches immediately beside those corners create a shallow notch.
Can I use acrylic yarn instead of cotton?
Yes. Choose a similar yarn weight and check the finished size of your four-round square. Acrylic may drape differently from cotton, so you may need to adjust your hook size to keep the branches from becoming too loose.
How do I stop the three granny-square tiers from twisting?
Use two sewing points between each pair of overlapping squares, one on the lower-left side and one on the lower-right side. Keep the attachments level and the three flower centers lined up vertically.
Will the back of the ornament show the same colors?
Yes. The red, cream, olive and evergreen stitches go all the way through each granny square, so the same color pattern is visible from the back. The reverse stitch texture will look a little different from the front, but there are no one-sided embroidered flower pieces.
Can I make a smaller granny square Christmas tree ornament?
Yes. Finer yarn and a smaller hook will make a smaller ornament without changing the granny-square stitch counts. Keep the three squares in the same four-round, five-round and six-round sequence.
Do I have to add the bell?
No. The bell is a decorative extra. You can leave it off and keep the crocheted star, bow and hanging loop. That also makes the ornament lighter.
When you click on links to various merchants on this site and make a purchase, this may result in this site earning a commission. This does not affect the price you pay.

UBGI Gold Standard 2026
Reviewed under the site's
editorial checklist.
Photos, decorating ideas, party setups and reader submissions are shared for inspiration unless a page is specifically presented as a pattern, tutorial, reference guide or step-by-step project. Follow the instructions, measurements, safety guidance and manufacturer directions provided for the particular project or product.
About Jan | Contact | Baby Nursery Ideas (Blog) | Site Map | Privacy Policy | Disclosure Policy | Disclaimer | Affiliate Disclosure | Earnings Disclosure | Facebook | Pinterest
I am a participant in the Amazon Services LLC Associates Program, an affiliate advertising program designed to provide a means for us to earn fees by linking to Amazon. As an Amazon Associate I earn from qualifying purchases.
Copyright © 2006-2026. All Rights Reserved.