Free Quilted Reindeer Baby Bib Pattern with Printable PDF
By Jan Bay
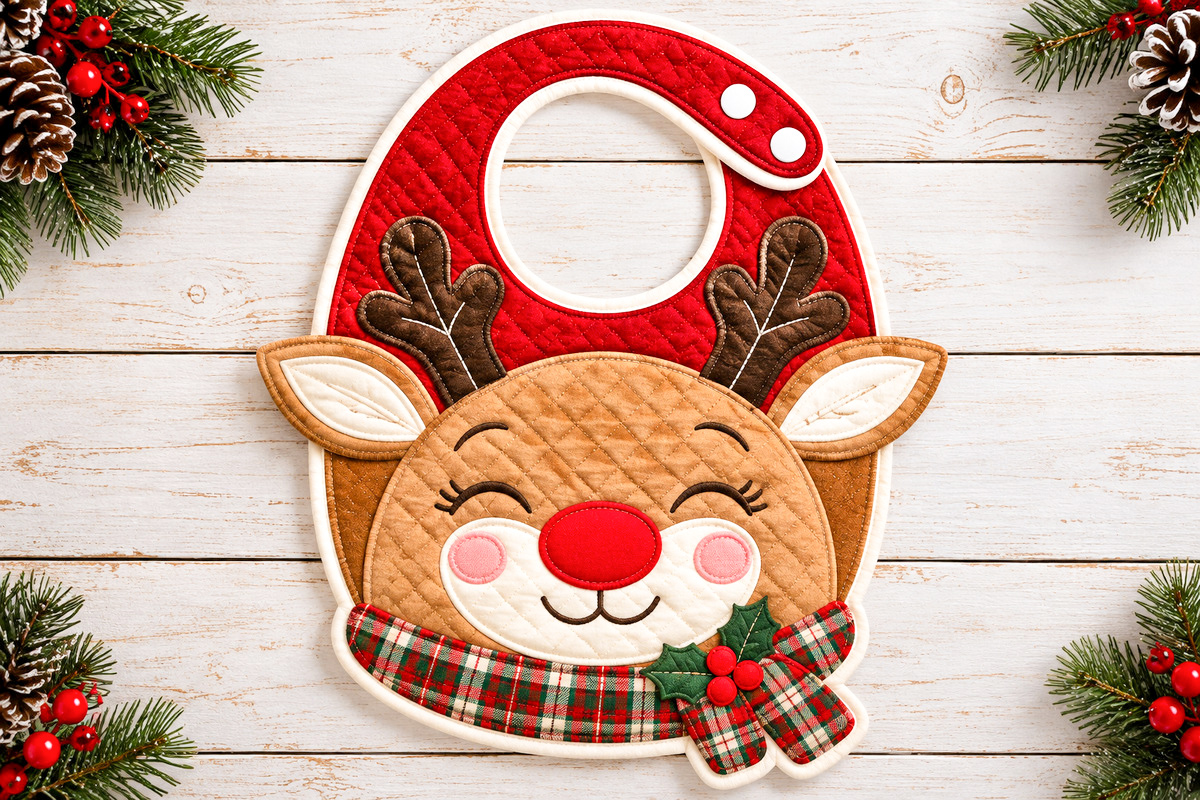
This free quilted reindeer baby bib pattern features a red-nosed reindeer with festive applique details that will look adorable in photos as well as serve a practical purpose at mealtime. I've included a free 36-page printable sewing pattern with full-size templates, appliqué shapes, fabric cutting instructions and step-by-step directions for making the bib.
Explore More Free Baby Sewing and Quilt Patterns
See Supplies for This Project Here.
On This Page
Sewing and Quilting Instructions
Download the Free Printable PDF
Finished Reindeer Bib Size
I wanted this little reindeer to have enough room to catch the usual mealtime accidents, not just look cute in a Christmas picture. That's why the bib has a wider, longer body, with the ears extending beyond the sides as decorative details.
Here are the drafted measurements for the finished design:
Main bib body width: 9 3/4 inches, not counting the ears.
Overall body height: 11 1/4 inches.
Chest coverage: 7 1/2 inches from the bottom of the neck opening to the bottom of the bib.
Finished neck-opening width: A nominal 3 3/4 inches, measured straight across at the marked level with both snaps fastened.
Neck cutline width: 3 7/8 inches before binding. The difference is allowed for in the pattern's binding instructions.
Total width across the ears: Approximately 11 9/16 inches.
The pattern was planned around an approximate 6-to-12-month size category, but that age range hasn't been verified by fitting a sewn bib on a baby. Babies grow differently, and the width of the opening doesn't tell you the full neck circumference. Check the completed bib's fit and clearance before using it.
The printable templates are drafted at full size. You won't need to enlarge the reindeer face, ears, antlers or scarf yourself.
Materials and Supplies
I'd keep the fabric colors close to the example image. The cranberry collar, caramel face and cream muzzle give the reindeer his personality, while the plaid scarf adds the Christmas color without covering too much of his face.
Fabric and Batting
Cranberry-red quilting cotton: 1/2 yard of fabric, 42 to 44 inches wide. This is for the main bib front and the snap closure tab.
Caramel-colored quilting cotton: 1/4 yard for the reindeer head and four outer-ear fabric layers.
Cream cotton: At least 9 x 5 inches for the narrow muzzle and the two inner-ear inserts.
Dark brown cotton scraps: Enough for two antlers.
Bright red cotton scrap: One red nose and three small holly berries.
Soft pink cotton scrap: Two oval cheeks.
Dark green cotton scraps: Two holly leaves.
Christmas plaid cotton: At least 11 x 3 inches for the narrow scarf and its two short ends. Allow extra if you want the plaid lines to match where the pieces overlap.
Low-loft washable cotton batting: At least 12 x 13 inches.
Soft absorbent backing: At least 12 x 13 inches of washable cotton terry or flannel.
Cream double-fold bias binding: At least 2 yards. The drafted neckline uses soft binding with a 1/4-inch finished width.
Other Sewing Supplies
You'll also need lightweight fusible web for the flat appliqué pieces, soft interfacing for the closure tab and small reinforcement patches behind the snaps.
The closure uses two complete pairs of low-profile sew-on garment snaps, each no larger than 7 mm in diameter. Both pairs fasten together. They aren't alternate size settings.
Have your sewing machine, fabric scissors, paper scissors, pins or clips, iron, ruler, removable fabric marker, matching sewing thread, and suitable sewing needles ready.
For the face, use dark-brown embroidery floss. Light cream thread works for the delicate antler branches and holly-leaf veins.
Prewash and press the fabrics according to their care instructions before cutting. Follow the manufacturers' instructions for preparing the batting and fusible web. The fabric amounts are estimates from the drafted pattern, not amounts measured from a finished sample.
Cutting and Appliqué Pattern Pieces
The PDF includes full-size templates for the bib body and every appliqué piece. Before cutting fabric, print the templates at Actual Size or 100% and check the 1-inch calibration square.
There are three kinds of edges in this pattern, and they aren't interchangeable.
Bound edges: The main bib body, B1, is cut on its solid outline without adding a seam allowance. Cream bias binding covers the raw edge. The revised neck outline already includes the allowance for the intended finished opening.
Flat appliqué: The reindeer head, muzzle, antlers, nose, cheeks, inner-ear pieces, scarf band and holly shapes are cut on their solid template outlines. No extra seam allowance is needed. These pieces are fused in place and stitched around their edges.
Turned pieces: The outer ears, two scarf ends and closure tab have a 1/4-inch seam allowance already included. Cut on the solid outer line and sew on the inner dashed line. Leave the marked opening unsewn so you can turn each piece right side out.
Complete Fabric Cutting List
B1, Main Bib Body: Cut one cranberry cotton front, one batting layer and one absorbent backing. Use Master 02 on PDF pages 17-20.
A1-L and A1-R, Antlers: Cut one left and one right antler from dark brown cotton. Use Master 08 on pages 33-34.
A2, Reindeer Head: Cut one caramel-colored head. This is the large rounded appliqué that covers the ear roots and antler bases. Use Master 04 on pages 25-26.
A3, Cream Muzzle: Cut one narrow muzzle. Keep its original shape so the ends stop near the outer corners of the reindeer's closed eyes. Use Master 05 on pages 27-28.
A4, Red Nose: Cut one oval from red cotton. Use Master 05.
A5, Pink Cheeks: Cut two small ovals in total, one for each side of the muzzle. Use Master 05.
E1-L and E1-R, Outer Ears: Cut two fabric layers for each ear, four caramel pieces in total. The templates already include their turning allowance. Use Master 07 on pages 31-32.
E2-L and E2-R, Inner Ears: Cut one left and one right cream insert. Use Master 07.
S1, Plaid Scarf: Cut one long, gently curved plaid band. Use Master 06 on pages 29-30.
S2 and S3, Scarf Ends: Cut two layers of each end, four plaid fabric pieces in total. Use Master 06.
H1 and H2, Holly Leaves: Cut two green leaves, one of each template. Use Master 06.
H3, Holly Berries: Cut three small red circles in total. You may use three filled embroidered berry dots instead of fabric circles. Use Master 06 for their size and placement.
T1, Closure Tab: Cut two cranberry cotton layers and one piece of soft interfacing. Use Master 08.
Keep the Left and Right Pieces Straight
The left and right templates are already drawn as opposite shapes when viewed from the front of the bib. Don't mirror the entire bib or move the snap closure to the other shoulder.
If you're using paper-backed fusible web, reverse the appliqué template when tracing so the finished fabric face matches the front-view placement guide on Master 03.
Before fusing anything permanently, arrange all the pieces over the full-size placement guide. The ears and antlers tuck beneath the caramel head, the narrower muzzle sits below the eyes, and the plaid scarf follows the bottom curve of the bib.
I'd check the whole face at this point. The narrow muzzle and slim scarf are two details worth keeping exactly as drawn. If they're any wider or thicker they start to look like our reindeer needs to push back from Santa's table if you know what I mean.
How to Sew and Quilt the Reindeer Baby Bib
This quilted reindeer baby bib pattern uses fabric appliqué for the larger shapes and simple embroidery for the facial features. The finished look comes from layering those pieces in the right order rather than trying to sew the whole face as one complicated shape.
Keep the full-size placement guide, Master 03, beside your sewing machine. The smaller illustrations in the PDF are helpful for understanding the steps, but they aren't cutting patterns.
Step 1: Cut and Mark the Main Bib
Cut the cranberry front, low-loft batting and absorbent backing using the B1 template. Cut all three layers on the revised solid outline, including the curved neckline and the opening at the right shoulder.
Don't cut along the blue dashed finished-neck line. That line shows where the binding fold belongs later.
Transfer the front center, marked neckline measurement level and both snap-receiver positions to the front fabric with a removable fabric marker.
Use Master 03 to transfer the main appliqué outlines. You can use a light source or another tracing method, but don't stretch the cotton while marking it.
Set the batting and backing aside for now. Begin the appliqué work on the cranberry front.
Step 2: Make Both Reindeer Ears
Place the two E1-L caramel ear pieces right sides together. Repeat with the two E1-R pieces.
On each ear, stitch along the dashed seam line from the marked START dot to the STOP dot, using the included 1/4-inch allowance. Sew around the long outer curve and leave the marked OPEN ROOT edge unstitched. Backstitch at both ends.
Trim away excess bulk from the seam allowance. Clip the curves carefully without cutting the stitches. Turn each ear right side out through its open root, smooth the shape, press and topstitch along the sewn edge.
Fold the root seam allowances inward and close the opening. Keep the marked attachment area available for securing the ear beneath the head appliqué.
Fuse one E2 cream insert to the outward-facing side of each ear. Stitch completely around each cream insert with a small appliqué stitch.
You should now have two caramel ears with cream centers and neatly finished outside edges.
Step 3: Position and Stitch the Antlers
Place the left and right brown antlers on the cranberry bib front, following Master 03. Their lower bases should extend beneath the future head appliqué.
Fuse each antler according to the directions supplied with your fusible web. Stitch around the complete outer edge with a small zigzag or blanket stitch.
Add the delicate cream branch embroidery before covering the antler bases. Work a light central vein from the base toward the upper branch, then add short angled branch stitches in the direction shown in the approved example image.
These fine decorative veins are marked by hand. The PDF supplies the antler shapes and placement, but not individually engineered embroidery paths for every branch stitch.
Step 4: Attach the Ears and Caramel Head
Lay both finished ears in their marked positions. The cream centers should face forward, and the pointed outer edges should project beyond the sides of the bib.
Secure each ear root to the cranberry front with reinforced rows of machine stitching inside the marked attachment area. These stitches will be hidden by the caramel head. Don't catch the free outer ear edges.
Now place the B1 batting behind the decorated cranberry front and baste the two layers together. The final absorbent backing stays off until the front embroidery and other concealed attachments are finished.
Position A2 over the antler bases and ear roots. Fuse the caramel head in its marked position and stitch around the entire outer edge.
The top of the face should form a rounded curve between the ears. The lower portion should extend toward the plaid scarf without leaving an awkward gap at either side.
Step 5: Quilt the Head and Embroider the Face
Mark one set of light diagonal quilting lines across the caramel face, approximately 1/2 inch apart. Add a second crossing set to form the small diamonds seen in the finished example.
Machine quilt through the caramel head, cranberry front and batting. Keep the quilting light enough that the fabric stays soft.
Place the single cream muzzle, A3, across the lower portion of the face. Check its position against Master 03. Its ends belong near the outer corners of the closed eyes, not all the way out to the ears.
Fuse the muzzle and stitch all the way around its edge.
Transfer the two closed eyes, eyebrows, eyelashes and smiling mouth from Master 03.
Use dark-brown embroidery floss with a backstitch or stem stitch for the curved eye lines and eyebrows. Work two small straight eyelash stitches at the outer corner of each eye, making four eyelashes in total.
Keep the closed eyes on the caramel fabric above the cream muzzle.
Embroider the gentle two-curve smile on the cream muzzle with dark-brown thread. Make the mouth's small center line meet the two curved lower lines, as shown on the placement guide.
There's no need for fabric eye appliqués. The simpler embroidered eyes give the reindeer his sleepy expression without asking you to turn or stitch tiny curved fabric shapes.
Step 6: Add the Red Nose and Pink Cheeks
Place the red oval nose, A4, in the center of the face using the marked placement guide. It should sit above the smiling mouth and overlap the top of the cream muzzle.
Fuse the nose and stitch around its complete edge. Keep it flat and unstuffed.
Place one small pink A5 cheek on each side of the nose, inside the cream muzzle. Fuse and edge-stitch both ovals.
If you want a little quilting on the cream muzzle, add a few light lines without stitching through the embroidered smile or crossing the appliqué edges.
Secure the embroidery thread ends on the inside of the front-and-batting assembly, where the backing will eventually conceal them.
At this point, the face should show the same sweet expression as the example image: two closed eyes, a bright red nose, small pink cheeks, a narrow cream muzzle and a gentle embroidered smile.
Step 7: Sew the Narrow Christmas Plaid Scarf
The plaid scarf follows the lower curve of the bib. I prefer this narrow version because it shows more of the reindeer's face while still giving him that cheerful Christmas look.
Start with the two short scarf ends, S2 and S3. Place the two fabric layers for S2 right sides together. Do the same with the two layers for S3.
Stitch each pair from its marked START dot to its STOP dot, following the dashed seam line around the lower tip. Leave the top OPEN ROOT edge unstitched for turning. Backstitch at the start and finish.
Trim away excess corner bulk, turn both pieces right side out and press. Topstitch around their finished edges. Fold the root seam allowances inward and close each opening.
Position the finished scarf ends on the bib using Master 03. Their roots should overlap the main bib body, with only the short ends extending below the curved edge.
Reinforce each root with two rows of stitching through the bib front. The attachment stitches should sit beneath the area that will be covered by the long scarf band.
Now position S1, the narrow curved plaid band, across the bottom of the reindeer's face. The band should cover the reinforced scarf roots while following the lower edge of the muzzle.
Fuse S1 and stitch around its complete outer edge. Secure it to the two scarf ends wherever the pieces overlap.
Keep both short ends free of the later body binding. You'll lift them out of the stitching path when binding the curved lower edge. Don't make the ends longer or turn them into ties.
Step 8: Make the Holly Decoration
Use the H1 and H2 templates to cut two dark-green holly leaves. Position them over the scarf on the lower right side of the reindeer's face, following the placement guide.
Fuse each leaf and stitch carefully around its complete edge. The pointed corners may be easier to handle with a short machine stitch or careful hand stitching.
Use light cream thread to embroider a center vein on each leaf. Add a few short angled veins branching outward toward the leaf points.
Place the three small H3 red circles together where the leaves meet. Fuse and stitch around all three edges, or embroider three filled red dots in their marked positions.
Keep the berries flat. Skip beads, little buttons or raised decorations that could loosen during use.
Step 9: Make the Red Snap Closure Tab
Take the two cranberry T1 closure-tab pieces and the matching soft interfacing.
Apply the interfacing to one fabric layer according to the manufacturer's instructions. Place the two cranberry layers right sides together.
Stitch from START to STOP around the rounded dashed seam line. Leave the marked OPEN DIAGONAL ROOT edge unsewn for turning. Backstitch at both ends.
Trim bulky seam allowances, turn the tab right side out through its open diagonal edge and press carefully.
Transfer the two snap centers from Master 08 to the underside of the tab.
Reinforce the snap positions and attach the two stud halves using the snap manufacturer's sewing directions. Keep the snap attachment threads secured within the reinforced layers wherever possible.
Don't substitute large snaps simply because the white circles in the example photograph look larger. The drafted pattern calls for low-profile sew-on garment snaps no larger than 7 mm.
Step 10: Attach the Matching Snaps to the Bib
Find the two snap-receiver marks on the right shoulder of the cranberry bib front.
Place separate soft reinforcement patches behind those positions. Sew the two receiver halves onto the outward-facing cranberry fabric before the final backing is attached. This will allow the backing to cover the attachment threads.
Use Master 09 to check the closure-tab alignment. Lay the tab in its closed position and make sure both stud halves line up with their matching receivers without twisting the neckline.
The two snap centers are approximately 0.522 inch apart in the digital draft. Use the full-size printed marks rather than measuring them from a paper edge.
Both snap pairs are intended to fasten at the same time. They aren't two different neck-size settings.
Check the alignment before permanently attaching the tab root. The final opening should remain smooth, with no bunching or pulling around the right shoulder.
Step 11: Add the Backing and Bind the Bib
Place the absorbent B1 backing against the batting with the backing's soft side facing outward. Align the entire bib shape, including the curved neckline and shoulder opening, and baste the layers together.
You may add a little quilting to the cranberry collar if you want the texture shown in the example. Keep the stitching clear of the hardware and projecting fabric details.
Place the open diagonal root of the finished T1 tab beneath the upper lip of the right shoulder opening, following Master 09.
Fasten both snap pairs temporarily to confirm the position. Reinforce the tab root with machine stitching, keeping its raw allowance beneath the shoulder edge so the binding can enclose it.
Use cream double-fold bias binding to finish the outer bib edge and both sides of the shoulder opening. Wrap the binding around the raw fabric, batting and backing layers, keeping the folds even.
Ease the binding around the curves without pulling the bib out of shape. Fold and finish the corners of the shoulder opening neatly, enclosing the binding ends.
Bind the Neck Opening to Its Finished Measurement
The neckline has a specific allowance that you shouldn't ignore. Its cut width is 3 7/8 inches, while the intended finished width is 3 3/4 inches with both snaps fastened.
At the neck only, use the specified 1/4-inch finished-width double-fold bias binding as a sandwich around the raw fabric layers.
Insert the raw neck edge 3/16 inch into the tape, leaving a controlled 1/16-inch space between the raw edge and the tape's outer fold. The outer binding fold follows the blue dashed finished-edge line printed on the pattern.
Reduce that space gradually to zero over the final 1/4 inch of the neck curve where it reaches each side of the shoulder opening.
Baste the neck binding without stretching it. Fasten both snap pairs and lay the bib flat.
At the horizontal measurement line marked on Master 02, check the intended 3 3/4-inch distance between the inside binding folds. Adjust the binding placement to follow the dashed guide before permanently stitching it.
Sew 3/16 inch from the outer fold, catching the front binding, bib layers and back binding. This detail matters because an ordinary binding finish could make the opening smaller than planned.
When binding the lower bib edge, lift the two plaid scarf ends away from the needle. Finish the entire bib edge beneath them, then let the finished scarf ends fall back into their intended positions.
Make sure the ears and scarf ends remain firmly attached at their roots while their intended outer edges remain free.
Remove temporary basting threads and fabric-marking lines according to the product instructions.
Step 12: Inspect the Completed Reindeer Bib
Fasten both snap pairs and lay the bib flat without stretching it. Measure the neck opening between the finished binding folds at the marked level. The target is 3 3/4 inches.
Check that the right shoulder closes smoothly without puckering or pulling.
Examine the roots of both ears, the two scarf ends, the snap attachments, the holly berries and every appliqué edge. Nothing should be loose or partially detached.
Look for rough hardware, exposed raw edges, loose embroidery threads or missed stitches. Correct any defects before considering the bib for use.
Remove all pins and needles. Wash the finished bib according to the care requirements of its materials, dry it completely and inspect the stitching and fasteners again.
The fabric, batting and binding may affect the finished dimensions. The digital pattern provides the drafted geometry, but the actual completed item needs its own measurement, fit and workmanship checks.
Download the Free Quilted Reindeer Baby Bib Pattern PDF
If you're ready to make this little red-nosed reindeer, I've put the full-size sewing templates and complete construction instructions together in one printable PDF. You won't need to enlarge tiny pattern pieces or draw the shape of the face yourself.
The 36-page pattern includes the full bib outline, caramel head, antlers, ears, narrow cream muzzle, embroidered face placement, red nose, cheeks, plaid scarf, holly decoration and snap closure.
Free Red-Nosed Reindeer Baby Bib Sewing Pattern
Format: Printable PDF, 36 pages
Paper: US Letter, 8 1/2 x 11 inches
Main bib size: 9 3/4 inches wide by 11 1/4 inches high
Includes: Full-size tiled sewing templates, appliqué cutting pieces, embroidery placement guides, fabric cutting list, sewing instructions and snap closure guide.
Download the Free Reindeer Bib Pattern PDF
Print at Actual Size / 100%. Check the 1-inch calibration square before cutting fabric. Digitally drafted and checked, but not physically sew-tested.
I'd save the PDF before starting. That way, you'll have all the pieces and instructions together, whether you want to print the entire booklet or just the template pages.
Pages 1-12 explain the materials, cutting, printing, construction and finishing. Pages 13-36 contain the full-size pattern masters.
Keep the illustrated assembly guide handy while working. It shows how the ears and antlers sit behind the caramel head and how the plaid scarf follows the lower curve.
How to Print and Assemble the PDF Pattern
The printable reindeer bib pattern uses US Letter paper. Some pieces are larger than one sheet, so the PDF divides them into numbered pages that you tape together before cutting.
Step 1: Check the Print Scale
Print PDF page 5 first. Select US Letter paper in portrait orientation and choose Actual Size or 100% in your printer settings.
Turn off Fit to Page, Shrink to Fit, booklet printing and any option that puts several PDF pages on one sheet.
Measure the 1-inch calibration square with a ruler in both directions. It must measure exactly 1 inch by 1 inch.
If the square isn't the right size, correct the printer settings before printing the pattern pieces. Don't try to compensate by cutting a little extra fabric later.
Step 2: Print the Pattern Masters
Use the template page map on PDF page 6 to select the pieces you need.
Pages 13-16: Master 01, full-size assembly reference.
Pages 17-20: Master 02, main bib body cutting outline.
Pages 21-24: Master 03, facial embroidery and appliqué placement guide.
Pages 25-26: Master 04, caramel reindeer head.
Pages 27-28: Master 05, cream muzzle, red nose and pink cheeks.
Pages 29-30: Master 06, plaid scarf, scarf ends, holly leaves and berries.
Pages 31-32: Master 07, outer ears and cream ear inserts.
Pages 33-34: Master 08, closure tab and antlers.
Pages 35-36: Master 09, closed shoulder and snap alignment guide.
Step 3: Join the Printed Tiles
Each tile has a printed frame measuring 7 1/2 x 9 1/2 inches. Adjacent tiles repeat 1/2 inch of the artwork so their edges can overlap.
Start with the upper-left tile, labeled R1C1. Place R1C2 to its right. For a four-page master, place R2C1 and R2C2 beneath the first row.
Trim the white margin from the incoming sheet at its printed frame edge. Overlap that sheet with the one already in place by 1/2 inch.
Match the repeated registration crosshairs and pattern lines before taping the pages together. Don't simply butt the paper frames against each other.
Assemble one master at a time, keeping the pieces from different masters separate.
Step 4: Check the Assembled Templates
Once the main body template is assembled, check the drafted overall body width of 9 3/4 inches and height of 11 1/4 inches.
Solid black lines on cutting sheets identify the cutting outlines. Inset dashed lines show where turned pieces are sewn. Pale dashed outlines on placement sheets are registration guides, not cutting lines.
The blue dashed neckline shows the intended finished binding fold. The START, STOP and OPEN ROOT marks tell you where to stitch and where to leave turning openings.
Keep the snap circles and registration crosshairs as marks only. Don't cut holes at those positions.
Before tracing fabric, check that all the tiled lines meet smoothly. The large head, body, scarf and placement guide need to stay at the same print scale.
Pattern Notes and Bib Care
Keep the Character Details Flat and Secure
The reindeer gets plenty of character from the fabric colors, diamond quilting and embroidery. There's no need to add plastic eyes, beads, pom-poms or stuffed decorations.
I'd keep the red nose flat, use embroidered eyes and make the holly berries from securely stitched fabric circles or embroidery.
The ears and scarf ends are turned fabric pieces with reinforced attachment roots. They should remain firmly attached to the bib, without becoming loose straps or ties.
Check all appliqué stitching carefully, especially the small holly details and the corners of the antlers.
Check the Neck Opening and Closure
The intended finished neck-opening width is 3 3/4 inches at the pattern's marked horizontal measurement level, with both snaps fastened.
That's a drafted measurement, not a guarantee of fit. Check the finished opening, neckline circumference, comfort and clearance for the individual baby before using the bib.
Both snap pairs should fasten without pulling the fabric out of shape. Check that they remain firmly attached and that no hardware edge is rough or exposed.
Washing and Care
Choose washable cotton fabrics and batting with compatible care instructions. Follow the most restrictive instructions among the materials used.
After laundering, inspect the appliqué edges, embroidery, ear attachments, scarf ends and snaps. Stop using the bib if fabric tears, an attachment loosens or a fastener becomes damaged.
Supervised Feeding Use Only
This bib is intended for supervised feeding use. Remove it before sleep, and don't leave a baby unattended while wearing it.
The U.S. Consumer Product Safety Commission's safe-sleep guidance explains why a baby's sleep area should be kept free of loose and soft items.
About This Original Sewing Pattern
This reindeer bib design was developed with full-size digital cutting templates and a checked assembly layout. The printable PDF includes all the main shapes and construction details needed to follow the drafted pattern.
The pattern has not been physically sew-tested, fitted on a baby, tested for snap retention or put through a laundering trial. The measurements are nominal drafted dimensions, and normal fabric and sewing differences can change the finished result.
If you're making one, follow the printed cutting and placement guides rather than tracing the example photograph. The templates were drawn to work together as a set.
And keep that narrow cream muzzle and slim plaid scarf. They're little details, but they give this reindeer his distinctive expression without making the fabric appliqué unnecessarily complicated.
When you click on links to various merchants on this site and make a purchase, this may result in this site earning a commission. This does not affect the price you pay.

UBGI Gold Standard 2026
Reviewed under the site's
editorial checklist.
Photos, decorating ideas, party setups and reader submissions are shared for inspiration unless a page is specifically presented as a pattern, tutorial, reference guide or step-by-step project. Follow the instructions, measurements, safety guidance and manufacturer directions provided for the particular project or product.
About Jan | Contact | Baby Nursery Ideas (Blog) | Site Map | Privacy Policy | Disclosure Policy | Disclaimer | Affiliate Disclosure | Earnings Disclosure | Facebook | Pinterest
I am a participant in the Amazon Services LLC Associates Program, an affiliate advertising program designed to provide a means for us to earn fees by linking to Amazon. As an Amazon Associate I earn from qualifying purchases.
Copyright © 2006-2026. All Rights Reserved.