Free Crochet Witch Hat Pattern for Newborns, Kids & Adults
By Jan Bay
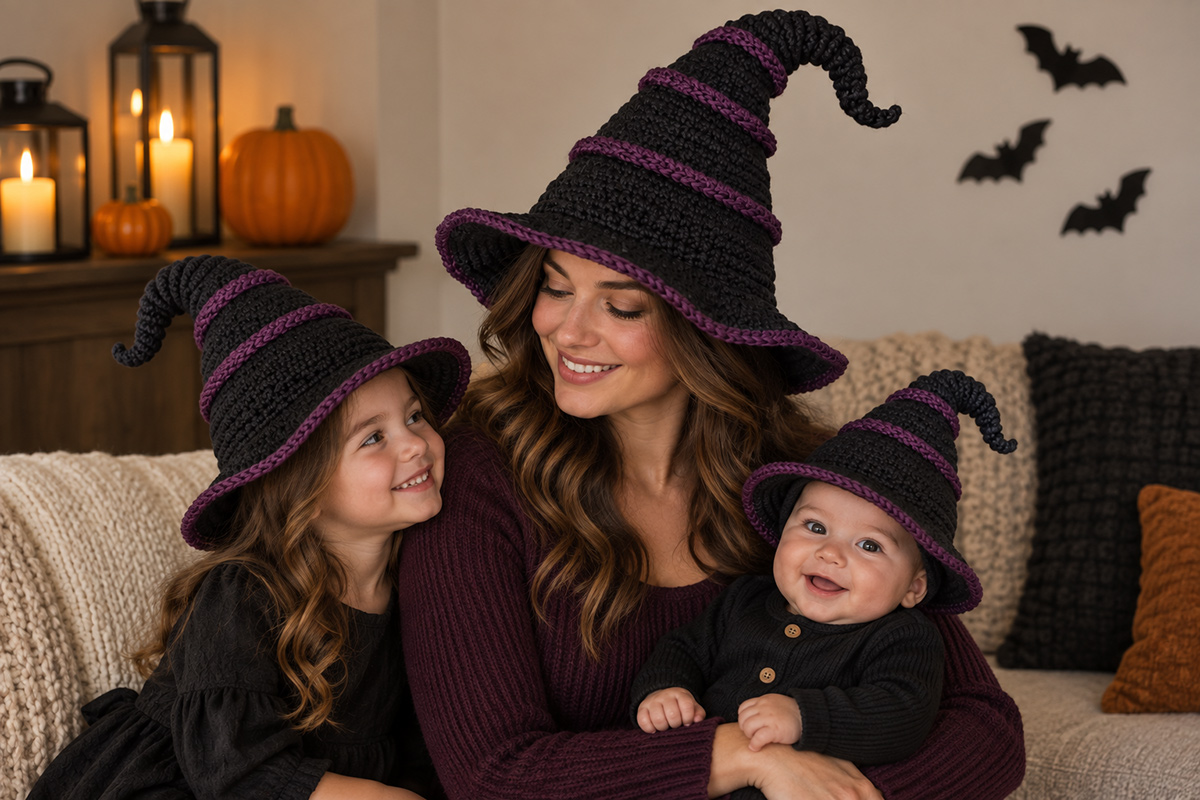
This free crochet witch hat pattern includes newborn, baby, toddler, child and adult sizes, all made with the same tall crooked crown, softly curled tip and wide brim. The pictured hats use charcoal black with raised plum bands and a plum-edged brim. The smaller hats use two crown bands while the adult uses three, so the decoration stays in proportion as the hat gets larger.
Explore More Free Crochet Baby Patterns
Free Baby Crochet Hat Patterns
Supplies for This Crochet Witch Hat
Jump to the Crochet Witch Hat Pattern
Crochet Witch Hat Size Chart
I would measure the head before choosing a size, especially for the newborn and baby hats. Age labels are useful starting points, but the actual head measurement is what matters. The Craft Yarn Council lists baby head circumference at 14 to 16 inches, toddler at 16 to 18 inches, child at 18 to 20 inches and adult women's sizing at 21 to 23 inches. You can see the full Craft Yarn Council head circumference chart.
The lower crown measurements below are calculated from a gauge of 14 single crochet stitches per 4 inches. They are meant to sit close to the head without squeezing it. These are calculated pattern measurements rather than measurements taken from a physically test-crocheted sample, so check your gauge and compare the finished lower crown with the wearer's actual head measurement before beginning the brim.
| Size | Lower Crown | Crown Length Before Curling | Brim Width |
|---|---|---|---|
| Newborn | About 13 3/4 in. | About 8 in. | About 1 3/4 in. |
| Baby | About 15 1/2 in. | About 9 1/2 in. | About 2 in. |
| Toddler | About 17 1/8 in. | About 11 in. | About 2 1/4 in. |
| Child | About 18 7/8 in. | About 12 1/2 in. | About 2 1/2 in. |
| Adult | About 22 1/4 in. | About 15 in. | About 3 in. |
The crown length is measured along the crochet fabric before the narrow tip is folded into its curl. The finished hat will look shorter once that tip is shaped.
Materials for This Free Crochet Witch Hat Pattern
Yarn: Medium weight #4 yarn. The pictured hats use charcoal black as Color A for the crown and brim and deep plum purple as Color B for the raised bands and final brim round. I would use a smooth yarn with enough body to hold the tall crown. A very fuzzy or drapey yarn can make the point collapse more than you want.
Approximate Color A allowance: Newborn 110 yards; Baby 140 yards; Toddler 175 yards; Child 220 yards; Adult 320 yards.
Approximate Color B allowance: Newborn 20 yards; Baby 20 yards; Toddler 25 yards; Child 30 yards; Adult 40 yards.
Those yarn amounts include a little working room and are calculated allowances rather than physically measured consumption from completed samples. Yarn construction, gauge and how tightly you crochet can change the amount you use.
Hook: 5 mm H-8 crochet hook, or the size you need to meet gauge.
Also needed: locking stitch marker, several removable markers or short pieces of scrap yarn, tapestry needle, scissors and flexible measuring tape.
You don't need wire, pipe cleaners or a stiff insert to make the tip curl. I would leave all of those out, particularly on the newborn and baby sizes. The curl is shaped and sewn in place with yarn.
Gauge and Construction Notes
Gauge: 14 single crochet stitches = 4 inches and 16 single crochet rounds = 4 inches.
Check gauge in continuous rounds rather than in turned rows. Ch 32, taking care not to twist the chain, and sl st into the first chain to form a ring. Ch 1, work 1 sc in each chain around [32], then continue in continuous rounds without joining until the tube is 20 rounds tall. Lay the tube flat without stretching it and measure across one layer of crochet. Fourteen stitches should measure 4 inches horizontally and 16 rounds should measure 4 inches vertically.
This pattern uses standard U.S. crochet terms.
Abbreviations: ch = chain; sc = single crochet; inc = work 2 sc in the same stitch; sl st = slip stitch; st = stitch; sts = stitches; rnd = round.
The crown is worked from the tip downward in continuous rounds. Do not join the rounds. Move your stitch marker into the first stitch of each new round.
The narrow top section gives us enough fabric to make the crooked curled point. After that, the cone widens in a very regular sequence: one increase round followed by three even rounds. Every increase round adds exactly 6 stitches.
Round 1: Make a magic ring. Work 6 sc into the ring. [6]
Round 2: Inc in each stitch around. [12]
Now work the number of plain 12-stitch tip rounds listed for your size before beginning the cone increases:
Newborn: 6 even rounds.
Baby: 8 even rounds.
Toddler: 10 even rounds.
Child: 12 even rounds.
Adult: 14 even rounds.
Once the tip section is complete, work the following increase blocks in order. Each block includes one increase round followed by three even rounds. Place the contrast-band markers as you reach the applicable blocks so the exact stitch positions are saved while you work.
Increase Block 1: (Sc in next st, inc in next st) 6 times. [18] Work 3 even rounds of 18 sc.
Increase Block 2: (Sc in next 2 sts, inc in next st) 6 times. [24] As you work this increase round, place a separate scrap-yarn marker in the first stitch you make. On the first even round of 24 sc, place a guide marker in stitch 9. On the second even round, place another guide marker in stitch 17. On the third even round, place a final guide marker in stitch 1.
Increase Block 3: (Sc in next 3 sts, inc in next st) 6 times. [30] Work 3 even rounds of 30 sc.
Increase Block 4: (Sc in next 4 sts, inc in next st) 6 times. [36] As you work this increase round, place a separate scrap-yarn marker in the first stitch you make. On the first even round of 36 sc, place a guide marker in stitch 13. On the second even round, place another guide marker in stitch 25. On the third even round, place a final guide marker in stitch 1.
Increase Block 5: (Sc in next 5 sts, inc in next st) 6 times. [42] Work 3 even rounds of 42 sc.
Increase Block 6: (Sc in next 6 sts, inc in next st) 6 times. [48] For the adult size only, place a separate scrap-yarn marker in the first stitch you make on this increase round. On the first even round of 48 sc, place a guide marker in stitch 17. On the second even round, place another guide marker in stitch 33. On the third even round, place a final guide marker in stitch 1. For all other sizes, simply work the 3 even rounds of 48 sc.
Increase Block 7: (Sc in next 7 sts, inc in next st) 6 times. [54] Work 3 even rounds of 54 sc.
Increase Block 8: (Sc in next 8 sts, inc in next st) 6 times. [60] Work 3 even rounds of 60 sc.
Increase Block 9: (Sc in next 9 sts, inc in next st) 6 times. [66] Work 3 even rounds of 66 sc.
Increase Block 10: (Sc in next 10 sts, inc in next st) 6 times. [72] Work 3 even rounds of 72 sc.
Increase Block 11: (Sc in next 11 sts, inc in next st) 6 times. [78] Work 3 even rounds of 78 sc.
Keep the saved band-start and guide markers in the fabric while your normal round marker continues to move with the working round. Newborn, baby, toddler and child sizes should have two band-start markers, at Blocks 2 and 4. The adult size should have three, at Blocks 2, 4 and 6.
Newborn Crochet Witch Hat Pattern
For the newborn size, work Rounds 1 and 2, then work 6 plain rounds of 12 sc for the narrow tip.
Complete Increase Blocks 1 through 6, including the 3 even rounds written in Block 6, then stop. You should have 48 stitches around the lower edge of the crown.
At the stated gauge, that gives an expected lower crown circumference of about 13 3/4 inches and a crown length of about 8 inches before the tip is curled.
Use the two saved contrast-band positions at Blocks 2 and 4. Two raised bands are enough on this small crown and match the newborn-sized version of the design.
Continue directly to the brim instructions below. Do not fasten off Color A.
Baby Crochet Witch Hat Pattern
For the baby size, work Rounds 1 and 2, then work 8 plain rounds of 12 sc for the tip.
Complete Increase Blocks 1 through 7, including the 3 even rounds written in Block 7, then stop. You should have 54 stitches around the lower crown.
At gauge, the expected lower crown circumference is about 15 1/2 inches and the crown measures about 9 1/2 inches along the fabric before curling the tip.
Use the two saved contrast-band positions at Blocks 2 and 4 for the baby size.
Continue to the brim without fastening off.
Kids Crochet Witch Hat Pattern
I would keep two children's sizes rather than trying to make one hat cover everything from a toddler to an older child. The difference in head circumference is large enough to matter.
Toddler: Work Rounds 1 and 2, then 10 plain rounds of 12 sc. Complete Increase Blocks 1 through 8, including the 3 even rounds written in Block 8, then stop. [60 sts]
The expected lower crown circumference is about 17 1/8 inches, with about 11 inches of crown length before curling. Use the two saved contrast-band positions at Blocks 2 and 4.
Child: Work Rounds 1 and 2, then 12 plain rounds of 12 sc. Complete Increase Blocks 1 through 9, including the 3 even rounds written in Block 9, then stop. [66 sts]
The expected lower crown circumference is about 18 7/8 inches, with about 12 1/2 inches of crown length before curling. Use the two saved contrast-band positions at Blocks 2 and 4.
Continue directly to the brim for the size you're making.
Adult Crochet Witch Hat Pattern
The adult version gets the longest tip and the widest brim, so this is where the crooked shape becomes much more noticeable.
Work Rounds 1 and 2, then work 14 plain rounds of 12 sc.
Complete Increase Blocks 1 through 11, including the 3 even rounds written in Block 11, then stop. [78 sts]
At the stated gauge, the lower crown is expected to measure about 22 1/4 inches around and the crown about 15 inches along the fabric before the tip is curled.
The adult hat adds a third raised contrast band at Block 6, so its band positions are Blocks 2, 4 and 6. The larger crown has room for that extra band without crowding the black background.
If you're making this for someone with a larger head, measure before starting the brim. Don't assume "adult" means one size fits everyone. A change in hook size or yarn can also move that 22 1/4-inch measurement enough to matter.
How to Crochet the Brim and Curled Witch Hat Tip
The brim continues directly from the lower crown in Color A. Keep working in continuous rounds and move your stitch marker as before.
Each brim round adds 6 stitches. The increases stay evenly spaced, which lets the brim spread outward instead of turning into another section of the crown.
Newborn Brim Round 1: (Sc in next 7 sts, inc in next st) 6 times. [54]
Baby Brim Round 1: (Sc in next 8 sts, inc in next st) 6 times. [60]
Toddler Brim Round 1: (Sc in next 9 sts, inc in next st) 6 times. [66]
Child Brim Round 1: (Sc in next 10 sts, inc in next st) 6 times. [72]
Adult Brim Round 1: (Sc in next 12 sts, inc in next st) 6 times. [84]
For every following brim round, add one more single crochet before each increase. For example, if your first round was (sc 8, inc) around, the next is (sc 9, inc), then (sc 10, inc), and so on. Every completed round adds exactly 6 stitches.
Work the following total number of brim rounds. The final Color B round is included in these totals:
Newborn: 7 brim rounds, ending with 90 sts.
Baby: 8 brim rounds, ending with 102 sts.
Toddler: 9 brim rounds, ending with 114 sts.
Child: 10 brim rounds, ending with 126 sts.
Adult: 12 brim rounds, ending with 150 sts.
Work every brim round except the last in Color A. Change to Color B only for the final listed round:
Newborn final round: (Sc in next 13 sts, inc in next st) 6 times. [90]
Baby final round: (Sc in next 15 sts, inc in next st) 6 times. [102]
Toddler final round: (Sc in next 17 sts, inc in next st) 6 times. [114]
Child final round: (Sc in next 19 sts, inc in next st) 6 times. [126]
Adult final round: (Sc in next 23 sts, inc in next st) 6 times. [150]
At the end of the Color B round, sl st loosely into the next stitch and fasten off.
The brim should spread out with a little natural movement at the edge. I would not add a ruffle. The slightly uneven wave that comes from the crochet fabric is enough for this hat.
Make the curled tip: Fold the narrow 12-stitch section sideways rather than straight down the front of the crown. Bend it into a soft hook or C shape.
For the newborn and baby sizes, make one gentle bend and use Color A with a tapestry needle to tack the inside of the curve to itself. Keep the curl shallow.
For the toddler and child hats, curve the point farther back and use two small hidden tacks through the inside layers of the narrow tube.
For the adult hat, bend roughly the upper 3 inches into the curl. Tack the inside of the bend once, then secure the tip against the side of the narrow section with a second small stitch. Don't pull those stitches so tightly that the curl puckers.
No wire is needed. The point doesn't have to stand like sculpture. A little softness is part of the look.
Add the raised contrast bands: Work the bands from the outside, or right side, of the hat with Color B held on the inside. Insert the hook from the outside through the crochet fabric, catch Color B on the inside and pull a loop to the front. Each band makes one complete turn around the crown while moving downward by three crochet rounds. That slight slope gives the plum bands the spiral look shown in the finished hats.
Start at the saved band-start marker for Increase Block 2. With Color B, pull up a loop and surface sl st through neighboring stitch spaces, following a smooth diagonal from the starting marker to the stitch-9 guide, then to the stitch-17 guide, and finally to the stitch-1 guide on the third even round. This makes one complete turn around the crown while the band moves downward by three crochet rounds.
Keep the surface slip stitches loose enough that they do not pinch the crown. Fasten off and weave the ends to the inside.
Repeat the same method for the band beginning at Increase Block 4, following its stitch-13, stitch-25 and final stitch-1 guide markers.
Adult size only: Work the third band from the Increase Block 6 starting marker, following its stitch-17, stitch-33 and final stitch-1 guide markers in the same way.
Do not worry about forcing an exact number of surface slip stitches between the markers. The marked points control the placement and angle. Work through neighboring stitch spaces to keep the line smooth, and work every raised band in the same direction around the crown.
Finishing the Crochet Witch Hat
Remove the normal round marker, all saved band markers and any temporary guide markers. Check the surface-crochet bands with your fingers and make sure none of them feel tight enough to pull the crown out of shape.
Set the hat on a flat surface and shape the brim with your hands. It should lie mostly outward with a soft wave rather than a hard ruffle. If one area cups sharply upward, check that you didn't miss an increase in the brim.
Look at the crown from the front before weaving in the yarn used to tack the curled tip. I prefer the curl tipped slightly to one side. If you want to change the angle, undo and reposition the tack now. Once the curl is where you want it, make sure the tacking stitches are secure and weave every remaining yarn end securely to the inside.
If your yarn can be wet blocked, lightly shape the brim and let it dry according to the yarn manufacturer's care instructions. Don't stretch the lower crown larger while blocking.
For a newborn or baby, keep the finished hat plain apart from the crocheted bands. Skip beads, charms, bells, buttons and anything else that could work loose. This is a costume or photo hat for awake, supervised wear. Remove it before naps or bedtime.
If you want another baby-sized Halloween hat without the tall crown, my free crochet pumpkin baby hat pattern is a much more compact project. You can also browse the free Halloween crochet patterns for ghosts, bats, pumpkins and other seasonal projects.
Crochet Witch Hat Pattern FAQ
Is this crochet witch hat beginner friendly?
I would call it an advanced-beginner pattern rather than a first crochet project. The stitches themselves are simple. The part that needs attention is keeping count through the crown increase blocks and brim rounds.
Why is the witch hat worked in single crochet?
Single crochet gives the crown more body than a looser, taller stitch. That matters on a witch hat because there is a lot of fabric above the head. The point is supposed to bend, but I don't want the whole crown collapsing at the brim.
Can I leave off the raised bands?
Yes. The hat will still fit because the bands are decorative surface crochet rather than structural stitches. It will look much plainer, though. The curled point and raised bands are the two details that give this version its particular look.
What should I do if my head measurement falls between sizes?
Check your stitch gauge first. If you're already matching gauge, compare the actual head measurement with the finished lower-crown measurement rather than choosing only by age. The fabric has some stretch, but I would not try to force a hat that is several inches too small.
Why doesn't the pattern use wire in the curled point?
The narrow crocheted tip can be shaped with a couple of hidden yarn tacks, so wire isn't necessary. Leaving it out also keeps the newborn and baby versions simpler.
Can I make the brim narrower?
Yes. Stop the brim one or two rounds early, but still work the final completed round in Color B if you want the contrast edge. Each omitted round reduces the brim width by roughly 1/4 inch at the stated gauge.
Can a newborn wear this witch hat?
The newborn size is intended for brief, awake and supervised costume or photo use. Make sure it fits without covering the baby's eyes or face, and remove the hat before the baby sleeps.
For more baby and child hat projects, browse my free baby crochet hat patterns. The full free baby crochet patterns collection includes blankets, toys, seasonal projects and more.
When you click on links to various merchants on this site and make a purchase, this may result in this site earning a commission. This does not affect the price you pay.

UBGI Gold Standard 2026
Reviewed under the site's
editorial checklist.
Photos, decorating ideas, party setups and reader submissions are shared for inspiration unless a page is specifically presented as a pattern, tutorial, reference guide or step-by-step project. Follow the instructions, measurements, safety guidance and manufacturer directions provided for the particular project or product.
About Jan | Contact | Baby Nursery Ideas (Blog) | Site Map | Privacy Policy | Disclosure Policy | Disclaimer | Affiliate Disclosure | Earnings Disclosure | Facebook | Pinterest
I am a participant in the Amazon Services LLC Associates Program, an affiliate advertising program designed to provide a means for us to earn fees by linking to Amazon. As an Amazon Associate I earn from qualifying purchases.
Copyright © 2006-2026. All Rights Reserved.