Free Crochet Snowman Hat Pattern for Babies
By Jan Bay
This free crochet snowman hat pattern turns a simple baby beanie into a frosty little snowman with an embroidered face, carrot-orange nose and cozy winter colors. It's a fun project for Christmas pictures, handmade baby gifts or making chilly outings a little more cheerful. Tip: A snowman hat might be an easier sell to little ones than a plain old beanie! The snowman details are cute, but the shape stays simple and the little facial decorations are sewn down securely without loose, dangling pieces.
Explore More Free Crochet Baby and Snowman Patterns
Free Baby Crochet Hat Patterns
Free Crochet Snowman Patterns Collection
See Supplies for This Project Here.
Jump to the Snowman Hat Pattern
Two Snowman Hats From One Crochet Pattern
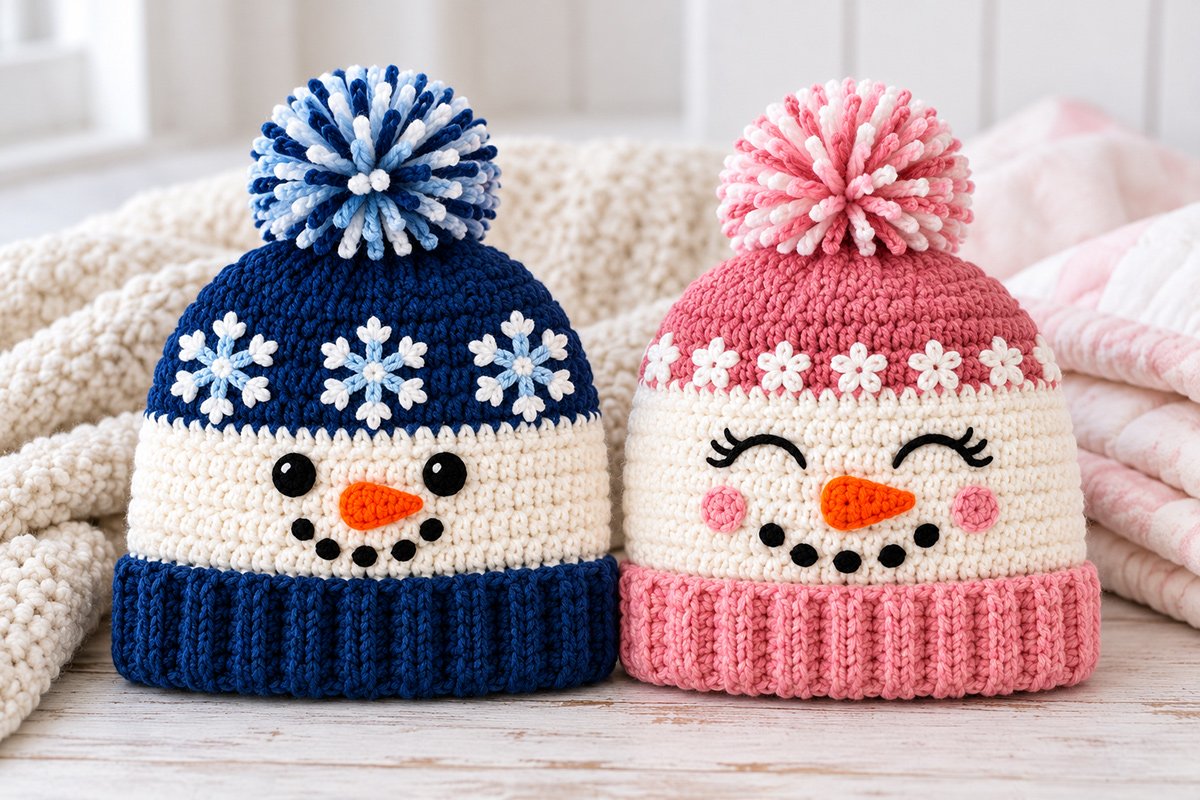
We've got two little snowmen to choose from here, and I couldn't resist designing them as a matching pair! The blue hat has a deep navy crown with three pretty snowflakes showing across the front, while the pink version trades those snowflakes for tiny white flowers and a sweet, sleepy-eyed face.
Both hats start with exactly the same basic beanie. You won't need to learn a second construction method to make the other one. Just change your yarn colors and follow the finishing instructions for the version you want.
The navy snowflake hat is a good choice if you'd like a more traditional winter look. The pink floral version is especially cute for Christmas pictures, but neither design has to be put away when Christmas is over. They're snowmen, after all. They're appropriate from December 1st until spring. Winter gives us plenty of opportunities to wear them!
I'd make the hat itself first and save all the little facial details for last. It's much easier to get the eyes and carrot nose in the right place once you can see the finished shape. And don't crowd the face with decorations. A snowman doesn't need much to look cheerful. For the pink version, those little white flowers around the crown are plenty. No need to add a whole bouquet!
You'll find the complete basic crochet snowman hat pattern below, followed by separate instructions for the blue snowflake and pink floral finishes.
Yarn and Supplies for the Snowman Hats
Soft, washable worsted-weight yarn is a good choice for these hats. You'll want yarn that gives you neat stitches without making the hat stiff. The face is ivory on both versions, so you can use the same skein for two hats if you're making a pair.
Basic Hat Supplies
- Medium-weight (#4) soft, washable yarn
- Ivory yarn for the snowman face
- 5 mm (H/8) crochet hook, or the size needed to obtain gauge
- 3.5 mm (E/4) crochet hook for the small crocheted facial pieces
- Yarn needle and embroidery needle suitable for yarn
- Scissors
- Locking stitch marker
- Tape measure
- Optional pom-pom maker
Blue Snowflake Hat Colors
- Deep navy for the crown and ribbed cuff
- Ivory for the face and parts of the snowflakes
- Icy blue for snowflake embroidery and pom-pom
- White for the pom-pom and snowflake tips
- Black yarn for the eyes and smile
- Orange yarn for the carrot nose
Pink Floral Hat Colors
- Rose pink for the crown and cuff
- Ivory for the face and white flower embroidery
- Light pink for the cheeks and pom-pom
- White for the pom-pom
- Black yarn for the embroidered eyes and mouth
- Orange yarn for the carrot nose
For either version, have one full skein of ivory and one full skein of the main hat color available, plus smaller amounts for the decorations. The amount used depends on the size and yarn, especially if you make a generous pom-pom.
Use yarn decorations rather than buttons or plastic eyes. The pom-pom and any small crocheted facial pieces must be stitched down securely, and the finished hat should be checked regularly for loose yarn or attachments.
Snowman Baby Hat Sizes and Crochet Gauge
These instructions include four baby sizes. The age labels are a starting point, not a substitute for measuring the baby's head. If you're making the hat as a gift, it helps to ask for the head measurement before choosing a size.
| Size | Calculated Body Circumference | Expected Height |
|---|---|---|
| 0–3 months | 13 in. | 6 1/4 in. |
| 3–6 months | 15 in. | 6 1/2 in. |
| 6–12 months | 16 in. | 7 in. |
| 12–24 months | 18 in. | 7 1/2 in. |
The circumference measurements are calculated from the ivory hat body at the stated gauge. The ribbed cuff may draw in slightly, so the actual opening needs to be checked separately. Hat height is measured from the top of the crown to the bottom of the cuff, without the pom-pom. All measurements are expected values until the hat is physically made and measured.
Gauge
Working gauge: 16 half double crochet stitches and 12 rounds = 4 inches (10 cm) with the 5 mm hook.
The ribbed cuff is expected to add approximately 1 1/2 to 1 3/4 inches to the hat height. Make a small sample of the ribbing before beginning if your double crochet stitches tend to be unusually tall or short.
Check your gauge before starting. At 16 stitches per 4 inches, the four body stitch counts give calculated circumferences of 13, 15, 16 and 18 inches. If your gauge changes, those measurements change too. The ribbed opening should stretch comfortably over the intended wearer's head without squeezing or slipping down over the eyes.
Stitch Abbreviations (US Terms)
- ch = chain
- sl st = slip stitch
- sc = single crochet
- hdc = half double crochet
- dc = double crochet
- FPdc = front post double crochet
- BPdc = back post double crochet
- sc2tog = single crochet two stitches together
- st(s) = stitch(es)
- rnd = round
- RS = right side
Pattern note: The hat is worked in joined rounds. Chain 1 at the beginning of a half double crochet round or chain 2 at the beginning of a double crochet round. Neither beginning chain counts as a stitch. Join in the first actual stitch of the round unless otherwise stated.
Numbers in parentheses at the end of instructions are stitch totals. You'll use the same stitch count through the straight sections and the cuff once the crown increases are finished.
Free Crochet Snowman Hat Pattern Instructions
Ready to start? Pick your hat color first. Use deep navy for the snowflake hat or rose pink for the floral version. We'll crochet the crown, add the ivory face and finish with a ribbed cuff. Both versions follow these same instructions.
Part 1: Start the Crown
Using your 5 mm hook and the main crown color, make a magic ring.
Round 1: Work 8 hdc into the ring. Pull the ring closed and join with a sl st in the first hdc. (8 sts)
Round 2: Ch 1. Work 2 hdc in every stitch around. Join. (16 sts)
Round 3: Ch 1. *Hdc in next stitch, 2 hdc in next stitch.* Repeat from * to * around. Join. (24 sts)
Round 4: Ch 1. *Hdc in next 2 stitches, 2 hdc in next stitch.* Repeat around. Join. (32 sts)
Round 5: Ch 1. *Hdc in next 3 stitches, 2 hdc in next stitch.* Repeat around. Join. (40 sts)
Round 6: Ch 1. *Hdc in next 4 stitches, 2 hdc in next stitch.* Repeat around. Join. (48 sts)
Stop and count your stitches. You should have 48. The crown should form a circular shape without rippling badly around the edges.
Part 2: Finish the Crown for Your Baby Hat Size
Choose the size you're making and follow only those instructions. The smaller hat needs fewer increases, while the larger sizes need a wider crown.
Size 0–3 Months
Round 7: Ch 1. *Hdc in next 11 stitches, 2 hdc in next stitch.* Repeat 4 times. Join. (52 sts)
Rounds 8–9: Ch 1, hdc in each stitch around and join. Repeat for both rounds. (52 sts each round)
You now have 9 crown rounds and 52 stitches. Stop increasing.
Size 3–6 Months
Round 7: Ch 1. *Hdc in next 5 stitches, 2 hdc in next stitch.* Repeat around. Join. (56 sts)
Round 8: Ch 1. *Hdc in next 13 stitches, 2 hdc in next stitch.* Repeat 4 times. Join. (60 sts)
Rounds 9–10: Ch 1, hdc in each stitch around and join. Repeat for both rounds. (60 sts each round)
You now have 10 crown rounds and 60 stitches. Stop increasing.
Size 6–12 Months
Round 7: Ch 1. *Hdc in next 5 stitches, 2 hdc in next stitch.* Repeat around. Join. (56 sts)
Round 8: Ch 1. *Hdc in next 6 stitches, 2 hdc in next stitch.* Repeat around. Join. (64 sts)
Rounds 9–11: Ch 1, hdc in each stitch around and join. Repeat for all three rounds. (64 sts each round)
You now have 11 crown rounds and 64 stitches. Stop increasing.
Size 12–24 Months
Round 7: Ch 1. *Hdc in next 5 stitches, 2 hdc in next stitch.* Repeat around. Join. (56 sts)
Round 8: Ch 1. *Hdc in next 6 stitches, 2 hdc in next stitch.* Repeat around. Join. (64 sts)
Round 9: Ch 1. *Hdc in next 7 stitches, 2 hdc in next stitch.* Repeat around. Join. (72 sts)
Rounds 10–12: Ch 1, hdc in each stitch around and join. Repeat for all three rounds. (72 sts each round)
You now have 12 crown rounds and 72 stitches. Stop increasing.
Part 3: Change to Ivory for the Snowman Face
Here's where our snowman starts taking shape! Both versions have a plain ivory face below the colored crown, with no extra stripe separating the two sections.
On the final yarn-over of the last hdc in your final crown round, pull through with ivory instead of the crown color. Join the round as usual. Keep the colored yarn tail on the inside of the hat.
Working in ivory, ch 1 and make 1 hdc in every stitch around. Join each round and continue without increasing.
- 0–3 months: Work 5 ivory rounds, maintaining 52 stitches.
- 3–6 months: Work 5 ivory rounds, maintaining 60 stitches.
- 6–12 months: Work 5 ivory rounds, maintaining 64 stitches.
- 12–24 months: Work 6 ivory rounds, maintaining 72 stitches.
You'll have a broad ivory section beneath the colored crown. Don't embroider the face yet. Leave that until the cuff is finished, so you can center the eyes and nose exactly where you want them.
Checkpoint: Your total half double crochet round count, including the crown and face, should be 14 (15, 16, 18) rounds for the four sizes.
Part 4: Crochet the Ribbed Hat Cuff
Change to deep navy for the snowflake version or rose pink for the floral version. Use the new color on the final yarn-over of the last ivory stitch, then join.
We're making a ribbed cuff using alternating front-post and back-post double crochet stitches. It gives the bottom of the hat the raised vertical ridges shown in the finished design.
Cuff Round 1: Ch 2. Work 1 dc in every stitch around. Join with a sl st in the first dc. (52, 60, 64, 72 sts)
Cuff Round 2: Ch 2. *FPdc around the post of the next dc, BPdc around the post of the following dc.* Repeat around. Join in the top of the first FPdc. (52, 60, 64, 72 sts)
Cuff Round 3: Ch 2. Work FPdc around each FPdc from the previous round and BPdc around each BPdc. Join. (52, 60, 64, 72 sts)
Cuff Round 4: Repeat Cuff Round 3. Join. (52, 60, 64, 72 sts)
Fasten off, leaving enough yarn to weave securely into the inside of the ribbing.
Don't pull the cuff stitches tight as you work. The bottom edge needs enough stretch to slip over the baby's head without squeezing.
Check the Finished Basic Beanie
Lay the hat flat, without stretching it. Measure from the top of the crown down to the bottom of the cuff. The expected heights are approximately 6 1/4, 6 1/2, 7 and 7 1/2 inches, depending on size and gauge.
Check the circumference too. Measure the flat width, then double it. Compare that number with the intended head measurement, allowing for the stretch of your particular yarn.
If the hat is noticeably taller or shorter than expected, check your round gauge and cuff height before adding the decorations. An extra round or a different hook can change the fit more than you might think.
Once you're happy with the basic beanie, it's time to give your snowman a face and a little frosty personality.
Blue Snowflake Snowman Hat
For the blue version, we're keeping the deep navy cuff and crown, with a row of simple icy-blue and white snowflakes just above the snowman's face. No flowers, no little heart shapes between the snowflakes and no narrow contrasting stripe. The snowflakes are enough decoration on their own.
Embroider the Snowflakes
Use icy-blue and white yarn with your yarn needle. The snowflakes are embroidered directly onto the navy crown, so you won't have any separate motifs to sew on.
Place a marker at the center front of the hat. The middle snowflake should sit directly above the carrot nose. Mark five additional positions around the crown, spacing them as evenly as possible.
For the four hat sizes, space the six snowflake centers approximately 8–9, 10, 10–11 or 12 stitches apart around the circumference.
Work each snowflake across the lower 3 to 4 rounds of the navy crown, keeping its center roughly 2 rounds above the ivory section.
- Bring icy-blue yarn up through the middle of the first snowflake position.
- Make one short vertical straight stitch across the center.
- Add two diagonal straight stitches crossing at the same center point, creating six evenly spaced arms.
- With white yarn, add one short stitch at the outer tip of each icy-blue arm and one short diagonal branch on either side of that tip, making three small white marks per arm. Add a tiny white satin-stitched dot over the center where the six arms meet. Keep every stitch flat against the crown, with no loose loops or heart-shaped filler stitches.
- Repeat the same motif at the other marked positions.
- Secure the yarn tails on the inside, weaving them through several stitches without pulling the crown out of shape.
The finished snowflakes should look like small six-armed winter motifs, not large crocheted appliques. Keep the stitches flat against the hat. You don't need to fill the spaces between them with anything else.
Crochet the Black Eyes
Use black yarn and the 3.5 mm hook.
Make 2:
Make a magic ring. Work 8 sc into the ring. Pull the center firmly closed, join with a sl st in the first sc and fasten off, leaving a sewing tail.
Make the second eye the same way.
Using white yarn, add one tiny embroidered highlight near the upper edge of each eye. Secure the white ends on the back of the eye before attaching it to the hat.
Position the eyes on the upper half of the ivory face, one on either side of the front-center marker. Keep them level and approximately 8 stitches apart, center to center, for the smaller sizes, or about 10 stitches apart for the larger sizes.
Sew around the full outer edge of each eye, catching the ivory stitches underneath. The entire edge should lie flat without loose loops.
Make the Orange Carrot Nose
Use orange yarn and the 3.5 mm hook. The nose is a little tapered piece crocheted flat, with a wider end and a narrower tip.
Row 1: Ch 6. Sc in the second chain from the hook and in each remaining chain. Ch 1, turn. (5 sc)
Row 2: Sc2tog over the first 2 stitches, sc in each remaining stitch. Ch 1, turn. (4 sc)
Row 3: Sc2tog over the first 2 stitches, sc in each remaining stitch. Ch 1, turn. (3 sc)
Row 4: Sc2tog over the first 2 stitches, sc in the remaining stitch. Ch 1, turn. (2 sc)
Row 5: Sc2tog over the final 2 stitches. (1 sc)
Fasten off, leaving a long sewing tail.
Lay the nose sideways beneath the eyes, with the broader end near the middle of the face and the tapered tip pointing toward the wearer's left (your right when looking directly at the front of the hat). This gives the carrot its little sideways shape without turning the whole smile sideways too.
Pin or temporarily hold the nose in position. Sew around the entire outside edge with small, close stitches, including the tip. Keep it slightly raised by the texture of the crochet, but don't leave the tip loose.
For the smallest hat, check the nose against the available face space before sewing. It should leave room for the mouth below it and should not overlap the eyes.
Embroider the Snowman's Coal-Dot Smile
Use black yarn and your yarn needle.
Make five small embroidered coal dots below the nose, matching the finished blue snowman hat. Place the center dot lowest, one dot on each side slightly higher, and the two outer dots higher again to form a shallow U-shaped smile.
Make each dot with several closely packed black satin stitches, using shorter stitches around the edges and slightly longer stitches through the middle to create a filled, rounded spot approximately 1/4 inch (6 mm) wide. Work directly into the ivory hat fabric rather than making separate crocheted pieces. Secure the yarn on the inside without leaving loose loops.
Keep the smile centered beneath the carrot nose. Both sides should turn upward gently, with no crooked tail or extra sideways extension.
Take a look before fastening the black yarn. If one dot is sitting too high, it's easier to move it now than after you've woven in the ends.
Make the Blue and White Pom-Pom
Use icy blue, white and a little deep navy yarn to make the mixed-color pom-pom shown in the finished example.
Make a full, round pom-pom, approximately 2 to 2 1/2 inches wide for the smaller hats or about 2 1/2 to 3 inches for the larger sizes.
Wrap the strands evenly, bind the center tightly with a separate strong length of matching yarn and trim the pom-pom into a rounded shape.
Don't trim off the long center ties. Use them to sew the pom-pom securely through the top of the hat, making several passes through the crown stitches. Tie the ends inside and weave them through the fabric.
Pull gently on the finished pom-pom to check that it is firmly attached. If the strands or attachment move, secure them again before the hat is worn.
And that's our blue snowflake snowman! The navy cuff frames his cheerful little face, while the embroidered snowflakes give the crown its own winter look.
Pink Floral Snowman Hat
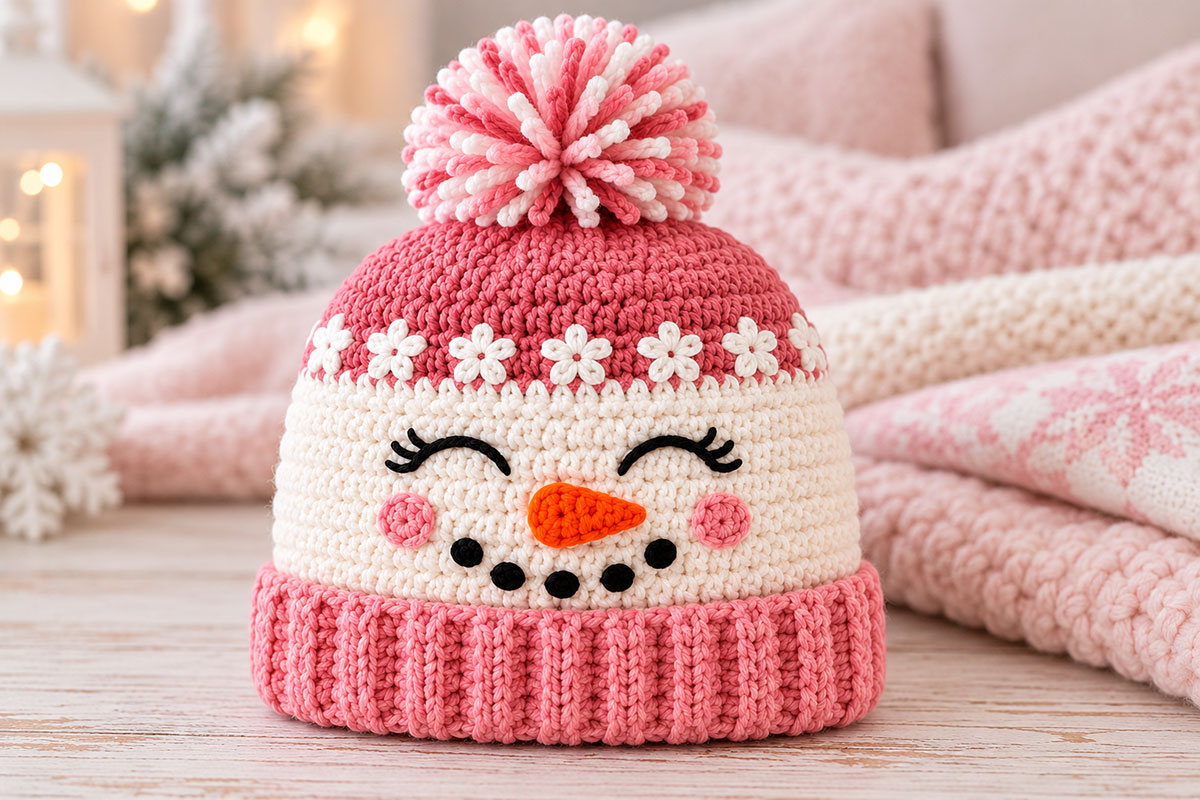
Now for our little pink snowman! She has the same ivory face and carrot nose as the blue version, but her pink crown, sleepy eyes and tiny white flowers give her a very different look.
The flowers sit in a narrow band just above the ivory face. They're embroidered right onto the pink crochet rather than made as separate pieces. That's less sewing for you, and there won't be little flowers sticking out from the hat.
Embroider the White Flowers
Use ivory or white yarn and a yarn needle.
Begin by finding the center front of the pink crown, directly above the position where the carrot nose will go.
Mark evenly spaced positions around the lower part of the crown. The flowers should sit just above the ivory face, with their centers approximately 1 to 2 pink rounds above the color change.
Plan approximately 12 flowers for the 0–3 month size, 14 for 3–6 months, 16 for 6–12 months and 18 for 12–24 months. Space their centers about 4 to 5 stitches apart, adjusting slightly around the back so the band looks even. Keep the flowers small enough that their petals don't crowd one another.
Make each flower as follows:
- Bring white yarn through the center of the marked flower position.
- Make six small, rounded white petals radiating evenly from the center. Form each petal with two or three short satin stitches placed closely side by side, keeping the stitches slightly longer through the middle of the petal and shorter at its edges.
- Arrange the six petals around the center without overlapping them. Keep the embroidery low against the pink crochet rather than leaving open loops.
- Add one tiny rose-pink stitch at the center of the flower to match the finished design.
- Secure the yarn ends on the inside of the crown and repeat at the remaining marked positions.
The flowers should be small, soft and evenly spaced. You don't need an extra border or a contrasting stripe. Just the little white flowers against the pink crown.
Embroider the Sleepy Eyes
Use black yarn and a yarn needle.
Mark two positions on the upper half of the ivory face. Space the centers approximately 8 stitches apart on the smaller sizes or 10 stitches apart on the larger sizes.
Each eye is a gently curved embroidered line. Start near the inside corner of the eye and use two or three short backstitches to form a shallow downward-facing arc.
At the outer corner, add three short eyelash stitches pointing slightly outward. Make the second eye as a mirror image of the first.
Keep the eyelashes short. We want the sleepy little expression from the finished design, not long loops hanging away from the hat.
Make the Pink Cheeks
Using light pink yarn and the 3.5 mm hook, make two small cheek circles.
For each cheek, make a magic ring and work 6 sc into the ring. Pull the center closed, join and fasten off with a sewing tail.
Place one cheek beneath the outside corner of each eye, roughly level with the carrot nose. Sew around the entire edge of each circle so it lies flat against the ivory crochet.
Try to keep the cheeks the same distance from the nose. A tiny difference is fine, but they should look like a matching pair.
Add the Carrot Nose
Make one orange carrot nose using the five-row nose instructions in the blue version above.
Position it between the eyes, with the broader end toward the center of the face and the tapered tip pointing toward the wearer's left (your right when looking directly at the front of the hat).
Sew the entire outside edge securely to the ivory section. Keep the nose clear of the eyes and cheeks.
Embroider the Coal-Dot Smile
Use black yarn and your yarn needle.
Work five small, separate embroidered dots beneath the nose. Place one at the bottom center, one on either side slightly higher, and the final two a little higher again to form a gentle U-shaped smile. Keep the dots evenly spaced and centered beneath the carrot nose.
Fill each dot with several closely packed black satin stitches, using shorter stitches at the edges and slightly longer stitches through the middle to create a small, rounded coal spot approximately 1/4 inch (6 mm) wide. Keep the five dots separate, with a little ivory showing between them. Secure the yarn on the inside without leaving loose loops.
She doesn't need a big grin. A small, cheerful smile goes beautifully with those sleepy eyes.
Make the Pink and White Pom-Pom
Use rose pink, light pink and white yarn. Make a full, rounded pom-pom, approximately 2 to 2 1/2 inches wide for the smaller hats or 2 1/2 to 3 inches for the larger sizes.
Wrap the colors together so they're mixed throughout the pom-pom. Tie the center very tightly with a separate length of matching yarn and trim into a rounded shape.
Use the long center ties to sew the pom-pom through the crown several times. Secure the ties inside the hat and weave the ends into the fabric.
Give the pom-pom a gentle tug to check the attachment. If it shifts or any strands begin pulling out, secure it again before use.
That's our pink floral snowman finished! The sweet little eyelashes and flower band are what set her apart from the blue snowflake version, even though both hats begin with the same crochet pattern.
Finishing Your Crochet Snowman Hat
Before you call your snowman finished, turn the hat inside out and check the ends of all those little decorations. The eyes, cheeks, nose and embroidered details should be firmly secured without leaving loose loops or yarn tails that can be pulled through to the outside.
Check the Decorations
- Make sure both crocheted eyes on the blue hat are sewn down around their entire edges.
- Check that neither end of the orange carrot nose can be lifted away from the hat.
- Check the pink cheek circles and embroidered flowers for loose stitches.
- Check the snowflakes and smile embroidery for yarn loops that could snag.
- Make sure the pom-pom is tightly bound and attached to the crown.
- Weave the remaining yarn tails securely into the inside of the crochet fabric.
- Remove every temporary stitch marker or positioning pin, and check the inside for any loose ends or unfinished attachments.
If any decoration feels loose, don't leave it that way. Take a minute to sew it down again.
Check the Fit
Put the hat on the intended wearer while the baby is awake and supervised, or compare the measurements against a well-fitting hat.
The cuff should rest comfortably around the head without leaving a deep mark, and the lower edge should stay clear of the eyes. The crown should have enough room for the head without bunching into a large lump under the pom-pom.
If the hat is too tight, check whether your gauge is smaller than the pattern gauge. Moving to a larger hook or making the next size may solve the problem, but don't force a tight hat to stretch.
Baby Hat Safety
These snowman hats are intended for awake, supervised wear during chilly outdoor outings or holiday pictures. They're not sleep hats.
The American Academy of Pediatrics advises against putting hats on babies indoors after the first hours following birth, except when medically appropriate, because overheating increases sleep-related risks. You can read its baby safe-sleep guidance here.
Never leave a baby sleeping in one of these hats. Remove it before naps or bedtime, and take it off indoors when it isn't needed.
Be especially careful with pom-poms and small appliques. No attachment is permanently guaranteed to stay secure. Inspect the hat before each use, and stop using it if the decorations or yarn strands become loose.
Making a Matching Pair
If you're making both hats, you can use the same ivory yarn for the faces and the same orange yarn for the little carrot noses. Then give each one its own colors and personality.
The blue snowflake hat is a little more traditional. The pink floral version has a softer, sweeter look. Put them side by side and you've got two snowmen that belong together without looking exactly alike.
For more winter and holiday projects, take a look at my free crochet snowman pattern. And if you'd like to make another little hat, there are plenty of ideas on the free baby crochet hat patterns page.
Enjoy making your little snowman hats. Whether you choose the snowflakes or the flowers, it's those small finishing touches that make each one special.
When you click on links to various merchants on this site and make a purchase, this may result in this site earning a commission. This does not affect the price you pay.

UBGI Gold Standard 2026
Reviewed under the site's
editorial checklist.
Photos, decorating ideas, party setups and reader submissions are shared for inspiration unless a page is specifically presented as a pattern, tutorial, reference guide or step-by-step project. Follow the instructions, measurements, safety guidance and manufacturer directions provided for the particular project or product.
About Jan | Contact | Baby Nursery Ideas (Blog) | Site Map | Privacy Policy | Disclosure Policy | Disclaimer | Affiliate Disclosure | Earnings Disclosure | Facebook | Pinterest
I am a participant in the Amazon Services LLC Associates Program, an affiliate advertising program designed to provide a means for us to earn fees by linking to Amazon. As an Amazon Associate I earn from qualifying purchases.
Copyright © 2006-2026. All Rights Reserved.