Free Crochet Poinsettia Granny Square Pattern
By Jan Bay
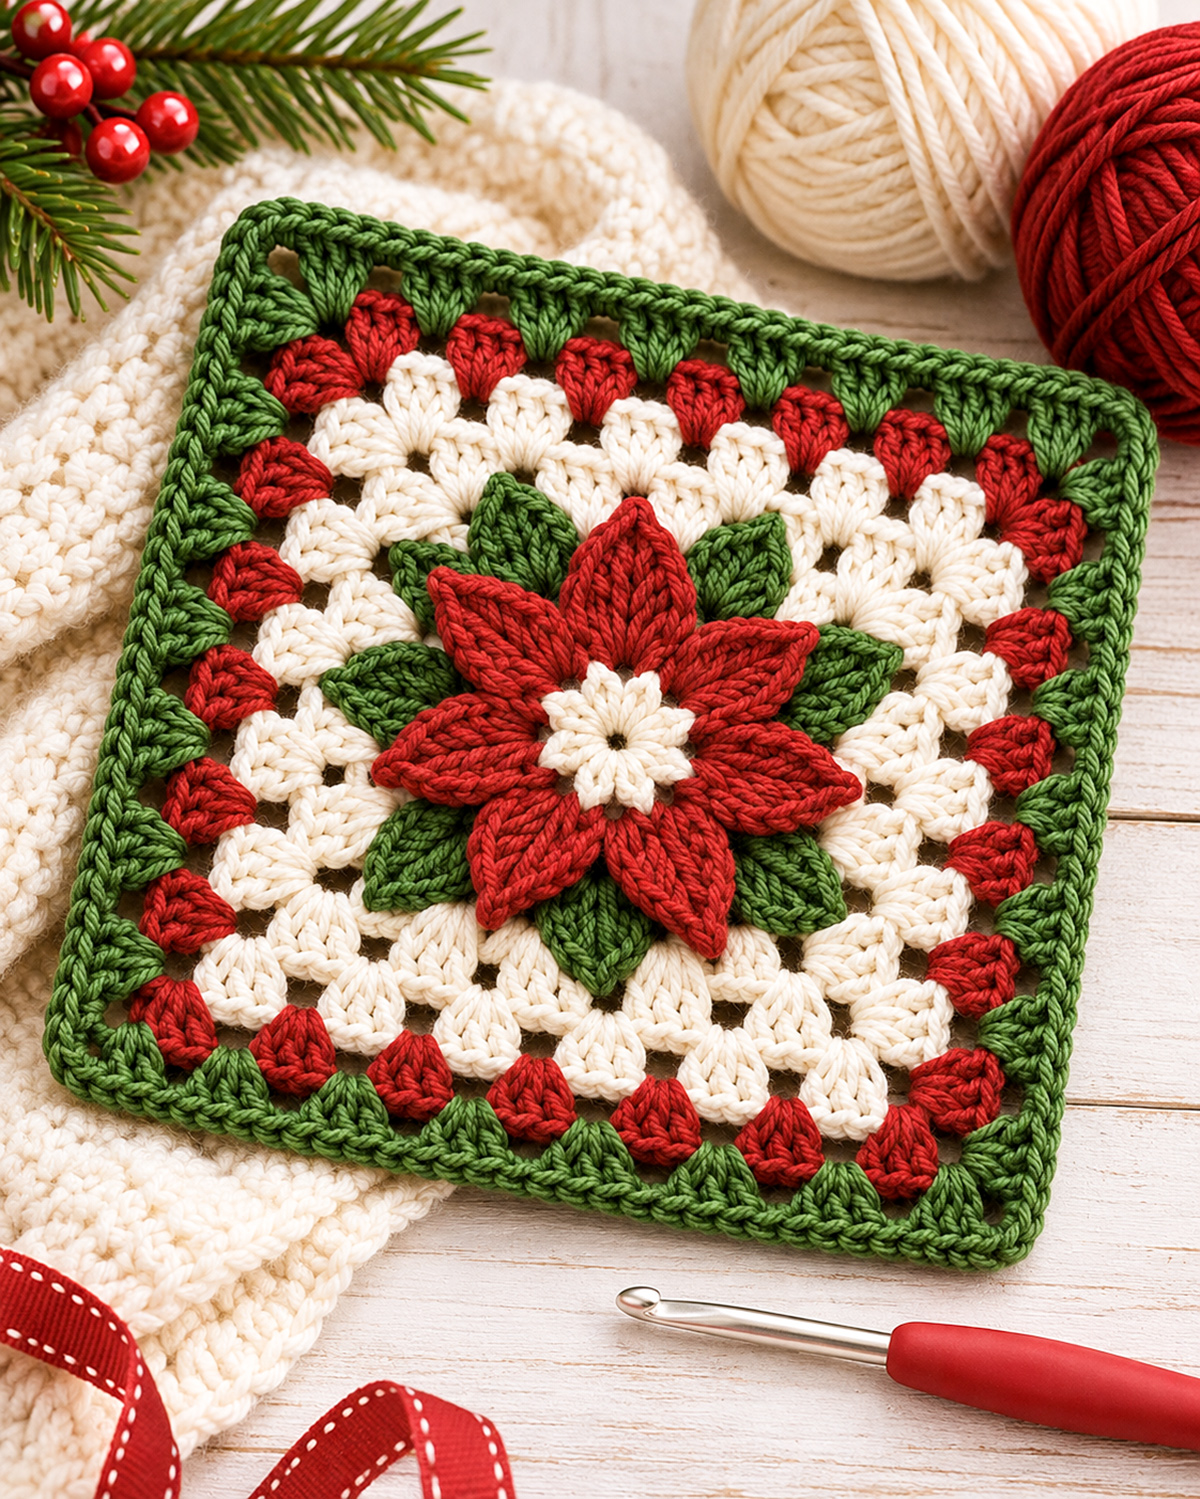
This free crochet poinsettia granny square pattern features a favorite Christmas flower of mine with eight rich red petals, green leaves, a little cream flower center and traditional granny stitches that frame the Christmas flower. The poinsettia is worked right into the square instead of using an applique that was made separately and sewn on after the foundation block was made. I love the combination of bright red, evergreen and warm ivory, especially for Christmas blankets, decorative pillows and other handmade holiday projects.
Explore More Free Christmas Crochet Patterns
Free Christmas Granny Square Patterns
Christmas Granny Square Blanket Pattern
See Supplies for This Project Here.
Jump to a Section
Poinsettia Granny Square Finished Size and Skill Level
This poinsettia granny square is made from the center outward. The little ivory flower sits in the middle, eight red petals spread around it, and pointed green leaves peek out from behind. The ivory granny stitches and Christmas-colored border are worked around that same center.
Expected finished size: Approximately 10 to 12 inches square using medium-weight #4 yarn and a 5 mm hook. This is a planning estimate, not a measurement from a finished sample. Your actual size will depend on your yarn, hook and tension.
Skill level: Intermediate. You'll need to know how to crochet in joined rounds, work around both sides of a foundation chain, use front and back loops, and make regular granny clusters.
Construction: One connected crochet square. The petals and leaves are crocheted directly into reserved loops in the center foundation. They aren't made separately and sewn onto a completed square.
Petal and leaf count: Eight red petals, eight green leaves and one small ivory center flower.
Gauge: Not yet established from a completed crochet sample. The example image shows the intended design, but the exact petal shape, overlap and finished measurements have not been verified by crocheting the block. Make one complete square before starting a larger project, and compare the flower's proportions, leaf placement and border with the example image. Once you're happy with the result, use the same yarn, hook and tension for every matching square.
Important size note: This is a larger decorative square than the eight-inch base used for some of my Christmas appliqué blanket projects. Don't assume they'll join at the same size without measuring them first.
The stitch-count checkpoints below will help you confirm that you're following the construction correctly, even before you know your finished measurements.
Yarn and Materials for the Poinsettia Granny Square
I'd keep the yarn smooth and use the same weight for all three colors. A fuzzy or heavily textured yarn can hide the stitches that give the flower its shape.
Yarn Colors
- Christmas red: Eight pointed poinsettia petals and the red decorative border.
- Deep evergreen: Eight pointed leaves, the outer granny round and the final edging.
- Warm ivory: The small center flower, foundation and granny-square background.
For planning, allow approximately 100 to 140 yards of ivory, 40 to 75 yards of red and 35 to 60 yards of evergreen yarn. These are generous working estimates, not measured yarn consumption. Actual amounts will need to be checked against a finished sample.
Tools and Supplies
- 5 mm (H/8) crochet hook
- Medium-weight #4 yarn in all three colors
- Yarn needle for weaving in ends
- Scissors
- Removable stitch markers
- Measuring tape
- Blocking mat and rustproof pins, if needed
You'll have several yarn ends because each petal and leaf is started directly in its own attachment loop. That's part of this construction. Those ends are woven into the back of the existing crochet work, rather than used to sew separate appliqués in place.
Crochet Stitches and Abbreviations
This pattern uses US crochet terminology.
- ch: Chain
- sc: Single crochet
- hdc: Half double crochet
- dc: Double crochet
- tr: Treble crochet
- sl st: Slip stitch
- st / sts: Stitch / stitches
- sp: Space
- rnd: Round
- FLO: Front loop only
- BLO: Back loop only
- RS: Right side
- WS: Wrong side
Special Stitches and Techniques
Single crochet increase: Work 2 sc into the same stitch.
Granny group: Work 3 dc into the indicated chain space.
Corner group: Work (3 dc, ch 2, 3 dc) into the same corner space.
First corner of a round: Chain 3 to count as the first dc, then work 2 dc, ch 2 and 3 dc in that same corner space.
Working around a foundation chain: Crochet along one side of a chain, then rotate the work and crochet into the remaining loops along its opposite side. Don't turn the work as you would for ordinary rows. The foundation chain forms the middle of the petal or leaf.
Reserved front loops: When an earlier round is worked through the back loops only, the unused front loops remain available for attaching the flower details.
For a reference to standard US crochet terms, see the Craft Yarn Council's Crochet Abbreviations Master List.
Pattern Notes and Construction
Before you begin, take a look at how this square is put together. The center is a little different from an ordinary granny square because we're saving loops for the flower.
We'll make an ivory circular foundation first. Three rounds of stitches give us three different attachment levels:
- Round 1 front loops: The raised ivory center flower.
- Round 2 front loops: Eight red poinsettia petals.
- Round 3 front loops: Eight green leaves.
The green leaves will be worked before the red petals so the red layer can sit in front. All of these parts remain connected to the original foundation.
Next, we'll use the eight chain arches from Round 4 to turn the circular foundation into a four-corner granny square. The ivory background grows around the flower, followed by one red granny round, one green granny round and a final green edging.
Right Side and Wrong Side
Keep the right side of the circular foundation facing you when attaching the flower details. The right side is the face that will be visible on the finished square. The free front loops should face toward you.
For the individual petals and leaves, keep the more defined stitch face toward the front of the flower. Their foundation chains run from the center toward the pointed ends.
The petals are intended to have a little dimension. Don't flatten them underneath the background stitches.
Color Changes
Fasten off the ivory foundation after Round 4. Work the ivory flower center, green leaves and red petals using separate yarn joins.
Rejoin ivory for the square background and continue through Round 10. Change to red for Round 11, then evergreen for Rounds 12 and 13.
At each change, fasten off the previous color and join the new yarn in the specified space. Weave in the ends on the wrong side.
Construction Checkpoints
- Round 1: 8 sc
- Round 2: 16 sc
- Round 3: 24 sc
- Round 4: 8 chain arches
- Flower center: 8 ivory lobes
- Red petal layer: 8 pointed petals
- Green leaf layer: 8 pointed leaves
- Round 12: 40 granny groups and 4 corners
- Round 13: 168 sc around the final edge
If your counts don't match, correct that round before continuing. The outer rounds depend on those numbers, and an extra cluster will change how the corners line up.
Free Crochet Poinsettia Granny Square Pattern: Complete Instructions
Start with ivory yarn and your 5 mm hook. Keep a stitch marker nearby because we'll need to find the unused front loops again after the foundation is finished.
Part 1: Crochet the Circular Foundation
Round 1: Make a magic ring. Work 8 sc into the ring. Pull the ring closed and join with a sl st to the first sc. (8 sc)
Round 2: Ch 1. Working in the back loop only of each stitch, make 2 sc in every stitch around. Begin in the same stitch where the previous round was joined. Join with a sl st to the first sc. (16 sc)
The eight unused front loops from Round 1 are reserved for the ivory flower center.
Round 3: Ch 1. Working in the back loops only, repeat (sc in next stitch, 2 sc in following stitch) 8 times. Join with a sl st to the first sc. (24 sc)
The sixteen unused front loops from Round 2 are reserved for the red petals.
Round 4: Ch 1. Working into the back loops only of Round 3, repeat the following sequence 8 times: sc in the next stitch, ch 3, skip the next 2 stitches. Join with a sl st to the first sc of this round.
Round 4 count: 8 sc and 8 chain-3 arches.
Fasten off ivory.
Mark the Petal and Leaf Positions
With the right side facing you, locate the sixteen unused front loops from Round 2.
Number them 1 through 16, beginning at the original first stitch of that round. Mark loops 1, 3, 5, 7, 9, 11, 13 and 15. These eight positions will hold the red petals.
Next, locate the twenty-four unused front loops from Round 3. Number them 1 through 24, beginning at that round's first stitch. Mark loops 3, 6, 9, 12, 15, 18, 21 and 24. These eight positions will hold the green leaves.
Keep the unused front loops of Round 1 available for the little ivory flower in the middle.
Checkpoint: You should have eight red attachment positions, eight green attachment positions and eight front loops reserved for the cream center. The eight Round 4 arches remain free for the square background.
Part 2: Make the Small Ivory Flower Center
Use ivory yarn. Keep the right side of the foundation facing you.
Join ivory with a slip stitch into the first unused front loop from Round 1.
Center lobe 1: Ch 2, work 2 hdc into the same front loop, ch 2, then sl st into that same loop.
Center lobes 2 through 8: Repeat the following sequence 7 times: Sl st into the next unused front loop of Round 1, ch 2, work 2 hdc into that same front loop, ch 2, then sl st into that same loop.
Count: Seven additional lobes plus the first lobe give you 8 ivory lobes, with 16 hdc altogether.
After completing the eighth lobe, fasten off and weave the yarn ends into the back of the center.
Center checkpoint: You should have eight small ivory lobes containing 16 hdc altogether. The center should be raised slightly above the circular foundation.
Keep this flower fairly compact. It needs to remain visible after the red petals are added, but it shouldn't spread across their bases.
Part 3: Crochet the Eight Green Leaves
Now we'll make the green leaves. These are worked directly into the reserved front loops of Round 3, behind the position of the red flower.
Each leaf is made around a short foundation chain. Work the following instructions eight times, using one of the marked Round 3 attachment loops for each leaf.
Green Leaf: Make 8
Step 1: With evergreen yarn, make a slip stitch into the first marked front loop of Round 3. Ch 8.
Step 2, first side: Beginning in the second chain from your hook, work:
- 1 sc in the first chain
- 1 hdc in the next chain
- 1 dc in each of the next 3 chains
- 1 hdc in the next chain
- 1 sc in the last chain
You now have 7 stitches along the first side of the foundation chain.
Sl st into the same Round 3 front loop where the leaf began.
Step 3, opposite side: Without turning, rotate the leaf so you can work back along the unused side of its foundation chain, beginning with the chain nearest the base.
- 1 sc in the first available chain loop
- 1 hdc in the next chain
- 1 dc in each of the next 3 chains
- 1 hdc in the next chain
- 1 sc in the final available chain
At the pointed tip, make 1 sl st into the chain you skipped when you began working in the second chain from the hook. Do not add another shaping stitch. Fasten off.
Weave the finishing yarn tail along the wrong side of the leaf toward its base, then secure the tail within the existing crochet stitches.
Leaf count: 7 stitches on each side of the foundation chain, making 14 main shaping stitches per leaf, excluding the attachment and finishing slip stitches.
Repeat at the remaining marked Round 3 positions until you have eight leaves.
Green Leaf Checkpoint
You should now see eight pointed green leaves spreading outward from the center. Their narrow bases are connected to the ivory foundation, and their pointed ends remain free.
Make sure every leaf has the same stitch sequence. If one is noticeably shorter or wider, check its foundation chain and the three dc stitches along each side.
Don't sew the leaves down. Their raised appearance is part of the design.
Part 4: Crochet the Eight Red Poinsettia Petals
The red petals use the same general construction as the leaves, but they're longer and fuller. They'll sit over the green layer, with their pointed ends facing outward.
Use Christmas red yarn and the eight marked front loops from Round 2.
Red Poinsettia Petal: Make 8
Step 1: Join red yarn with a slip stitch into the first marked front loop of Round 2. Ch 10.
Step 2, first side: Beginning in the second chain from the hook, work:
- 1 sc in the first chain
- 1 hdc in the next chain
- 1 dc in the next chain
- 1 tr in each of the next 3 chains
- 1 dc in the next chain
- 1 hdc in the next chain
- 1 sc in the last chain
You now have 9 shaping stitches along the first side of the petal.
Sl st into the same Round 2 front loop where the petal began.
Step 3, opposite side: Without turning, rotate the petal so the unused side of the original foundation chain is accessible. Begin at the chain nearest the base and work toward the tip.
- 1 sc in the first available chain loop
- 1 hdc in the next chain
- 1 dc in the next chain
- 1 tr in each of the next 3 chains
- 1 dc in the next chain
- 1 hdc in the next chain
- 1 sc in the final available chain
At the pointed tip, make 1 sl st into the chain you skipped when you began working in the second chain from the hook. Do not add another shaping stitch. Fasten off.
Weave the finishing yarn tail down the wrong side of the petal and secure it into the existing crochet stitches near the base.
Petal count: 9 shaping stitches along each side of the foundation chain, giving 18 main shaping stitches per petal, excluding attachment and finishing slip stitches.
The foundation chain runs through the middle of the petal. The taller treble stitches give the sides more fullness, while the shorter stitches narrow the petal toward its base and tip.
Repeat for All Eight Petals
Work one petal into each marked Round 2 front loop:
- Petal 1: Loop 1
- Petal 2: Loop 3
- Petal 3: Loop 5
- Petal 4: Loop 7
- Petal 5: Loop 9
- Petal 6: Loop 11
- Petal 7: Loop 13
- Petal 8: Loop 15
Spread the petals evenly around the ivory center. Keep the green leaves underneath and let their pointed ends show between the red petals.
Red petal checkpoint: There should be exactly eight petals. Each contains 18 main shaping stitches, and each is connected directly to the circular foundation.
From the front, check that the flower looks balanced. The ivory center should remain visible, the red petals should point outward, and the green leaves should show between the red petals rather than covering them.
If a petal is twisted, check that you worked up the opposite side of its original foundation chain rather than into the stitches from the first side.
Do not pull the petals flat against the center. A little natural overlap is expected, but it shouldn't be necessary to force the petals into position.
Part 5: Turn the Flower Foundation Into a Granny Square
Now we're ready for the ivory background. The eight chain-3 arches from Round 4 will give us four corners and four ordinary side spaces.
Keep the red petals and green leaves toward the front. Work into the foundation arches behind them.
Round 5: Establish the Four Corners
Join ivory yarn into any Round 4 chain-3 arch. That arch will become the first corner.
Ch 3 (counts as the first dc), then work 2 dc, ch 2 and 3 dc into that same arch. Ch 1.
In the next chain-3 arch, work 3 dc, ch 1.
In the next arch, work (3 dc, ch 2, 3 dc), ch 1.
In the next arch, work 3 dc, ch 1.
Continue alternating a corner group and an ordinary granny group in the remaining four arches. After the eighth arch, join with a slip stitch to the top of the beginning chain-3.
Round 5 count: 12 granny groups, 36 dc, eight chain-1 spaces and four chain-2 corners.
You'll now have a small four-corner square behind the poinsettia.
How the Remaining Granny Rounds Work
At the start of each following round, slip stitch across the next two dc and into the first corner chain-2 space. At that first corner work (ch 3, 2 dc, ch 2, 3 dc), then ch 1.
Work 3 dc into every chain-1 space along the following side, placing ch 1 after each group.
At the next corner work (3 dc, ch 2, 3 dc), then ch 1. Continue around the square in the same way until all four corners and all four sides have been worked.
Join each round with a slip stitch into the top of its beginning chain-3. Don't work into the joining slip stitch when starting the next round.
Round 6: Ivory
Follow the granny-round method above. Work one granny group into each of the 2 chain-1 spaces along every side. Make a full corner group in each of the four corners.
Round 6 count: 16 granny groups, 48 dc and four chain-2 corners.
Round 7: Ivory
Follow the same corner method. Work one granny group into each of the 3 chain-1 spaces along every side, with ch 1 between adjacent groups and corners.
Round 7 count: 20 granny groups, 60 dc and four chain-2 corners.
Round 8: Ivory
Work the four corner groups as established. Place one granny group into each of the 4 chain-1 spaces along every side, with ch 1 between adjacent groups and corners.
Round 8 count: 24 granny groups, 72 dc and four chain-2 corners.
Shape checkpoint: The square should have four recognizable corners and even sides. The flower should sit inside the developing ivory background, rather than stretching or pulling the corners inward.
Round 9: Ivory
Continue the granny-square construction. Work one granny group into each of the 5 chain-1 spaces along every side. Work the usual corner group in each chain-2 corner space, with ch 1 between adjacent groups and corners.
Round 9 count: 28 granny groups, 84 dc and four chain-2 corners.
Round 10: Final Ivory Round
Repeat the same construction, placing one granny group into each of the 6 chain-1 spaces along every side, with ch 1 between adjacent groups and corners.
Round 10 count: 32 granny groups, 96 dc and four chain-2 corners.
Fasten off ivory and weave in the yarn ends on the wrong side.
The cream background is now complete. The next two rounds will form the Christmas-colored frame.
Part 6: Crochet the Red Decorative Border
The red border is made with ordinary granny groups. The little spaces between those groups will let the green edging show around them.
Round 11: Christmas Red
Join red yarn into any corner chain-2 space.
Work (ch 3, 2 dc, ch 2, 3 dc) into that first corner, then ch 1.
Work (3 dc, ch 1) into each of the 7 chain-1 spaces along the next side.
In the next corner work (3 dc, ch 2, 3 dc), then ch 1.
Repeat around the square, filling all seven side spaces on each side and working a complete corner group in every corner.
Join with a slip stitch to the top of the beginning chain-3.
Round 11 count: 36 granny groups, 108 dc and four chain-2 corners.
Fasten off red.
Part 7: Crochet the Evergreen Outer Border
Round 12: Evergreen
Join evergreen yarn in any corner chain-2 space.
Work (ch 3, 2 dc, ch 2, 3 dc) into the first corner, then ch 1.
Work (3 dc, ch 1) into each of the 8 chain-1 spaces along the next side.
At the next corner work (3 dc, ch 2, 3 dc), then ch 1.
Continue around the square, working every side space and corner in the same manner.
Join with a slip stitch to the top of the beginning chain-3.
Round 12 count: 40 granny groups, 120 dc and four chain-2 corners.
Do not fasten off. Continue with Round 13 using evergreen yarn.
Round 13: Final Green Edging
Ch 1. Work 1 sc into the top of the beginning chain-3 from Round 12, where the previous round was joined. This counts as the first sc of the edging.
Continue around the square as follows:
- Work 1 sc into each of the remaining 119 dc stitches. Do not work another sc into the beginning chain-3.
- Work 1 sc into each of the 36 chain-1 spaces.
- Work 3 sc into each of the four chain-2 corner spaces.
Do not add an extra stitch into the joining slip stitch.
Join with a slip stitch to the first sc and fasten off.
Final edging count: 120 sc worked into the dc stitches, 36 sc worked into the side chain-1 spaces and 12 sc worked into the four corners. Total: 168 sc.
Weave in the final yarn end on the wrong side.
Your square should now have an ivory center and background, eight red poinsettia petals with green leaves behind them, a red granny round and a green outside border.
Finishing and Blocking Your Poinsettia Granny Square
Before blocking the square, check the flower and border separately. You want the granny background to lie flat while the red petals keep their raised shape.
Check the Flower
- Count all eight red petals and eight green leaves.
- Check that the small ivory flower is visible in the middle.
- Make sure the petals and leaves are attached at their bases, with their ends woven in securely.
- Arrange the green leaf tips between the red petals.
- Check that no long yarn tails are visible from the front.
If a petal is folded underneath another one, gently lift and reposition it. Don't force all the petals flat. The flower is supposed to have some texture.
Check the Granny Square
Lay the square on a flat surface and measure across the center from one outside edge to the opposite edge. Turn the square a quarter turn and measure again.
The two measurements should be close. If one side is noticeably longer, check the granny groups and corners before trying to correct the shape with blocking.
Count the four corner spaces and check the final edging. The last green round should contain 168 sc.
Block the Square
Follow the care directions for your chosen yarn. If the fiber can be damp-blocked, lightly dampen the granny background and lay the square flat on a blocking mat.
Pin the four corners into a square shape, keeping the sides straight. Adjust the ivory clusters gently without stretching the openings.
Keep the center flower raised while the background dries. Don't pin the red petal tips flat or stretch the green leaves into longer shapes.
Let the square dry completely. Remove all blocking pins and temporary stitch markers, check that every yarn end is secured, and make sure the corners lie flat before joining the square to another block.
Before Making a Whole Blanket
Make one complete sample first. Check the finished size, the red petal proportions, the green leaf placement and the thickness of the flower center.
Compare it directly with the finished example image. The flower should have eight recognizable red points, visible green leaves, a small ivory center and enough surrounding cream background to separate the flower from the border.
If the center flower is much larger than intended, or the red petals hide all the green leaves, the finished sample needs a construction review before you repeat it. Changing the outer granny rounds won't correct a flower that's the wrong size.
For a blanket, make sure every block finishes at the same measurement. Use the same hook, yarn weight and blocking dimensions throughout the project.
Christmas Projects Using Poinsettia Granny Squares
Once you've made one poinsettia square, you'll have a better idea of how you'd like to use it. The flower is detailed enough to stand on its own, so you don't need to surround it with a lot of other decorations.
Christmas Granny Square Blanket
Make several matching poinsettia blocks and arrange them with plain ivory, red or evergreen squares. I'd leave a few plain squares between the flowers so the poinsettias remain easy to see.
Before deciding how many squares to make, measure your finished block. If you're mixing different patterns, the square sizes and edge stitch counts must be made compatible before joining.
For a different Christmas blanket construction, see my free Christmas granny square blanket pattern. That project uses a separate eight-inch square base and sewn-on appliqués, so it isn't automatically interchangeable with this larger integrated poinsettia design.
Christmas Pillow Front
A single large poinsettia square could become the center of a decorative pillow. Add plain granny rounds around it until the front reaches your chosen pillow-cover dimensions, then make a compatible backing.
Keep the flower on the front of the pillow and leave the raised petals unobstructed.
Christmas Wall Hanging
Another idea is to hang the square as a small Christmas decoration. The red flower, cream background and evergreen edging provide plenty of color without extra ornaments or embellishments.
Use a suitable hanging method and keep the project away from areas where loose yarn details might be pulled.
Mix With Other Christmas Granny Squares
If you enjoy making different holiday blocks, visit my free Christmas granny square pattern collection.
You'll find trees, snowflakes, Santa, gingerbread and other Christmas designs. Check the finished sizes before combining them with this poinsettia square.
And if you want a flower that can be used separately as an ornament or appliqué, I also have a free crochet poinsettia pattern with a different construction.
Poinsettia Granny Square Frequently Asked Questions
Is the poinsettia sewn onto the granny square?
No. In this pattern, the red petals and green leaves are crocheted directly into reserved front loops in the circular foundation. You don't crochet a separate completed flower and sew it onto a finished granny square.
Why are the early rounds worked through the back loops?
Working through the back loops leaves the front loops available for the flower details. The center flower, red petals and green leaves each have their own attachment level.
Why do the petals have separate yarn ends?
Each petal is started directly in its own attachment loop. After making the pointed shape, you fasten off and weave in the end. That doesn't make it a sewn-on appliqué because the petal was crocheted into the foundation itself.
Can I make the poinsettia granny square with cotton yarn?
Yes. Choose a smooth cotton or cotton-blend yarn in a suitable weight. Cotton may give the petals a different amount of structure than acrylic or wool, so make one square and check its shape before starting a larger project.
How big will the finished granny square be?
The expected size is approximately 10 to 12 inches with medium-weight #4 yarn and a 5 mm hook. That measurement is an estimate. Your finished sample will determine the actual size.
Can I make a baby blanket with these squares?
You can use the motif for a decorative baby keepsake blanket, provided all the crocheted details and yarn ends are secure. Because this design has raised petals and leaves, it is better suited to decorative use than an infant sleep blanket. Keep blankets and other loose items out of an infant's sleep space.
Do I have to use red, green and ivory?
No. You can change the colors without changing the stitch counts. Keep enough contrast between the flower, leaves and background so the poinsettia doesn't disappear into the granny stitches.
The important part is getting the flower and square construction right. Once your first finished block matches the intended design, you can repeat it with confidence for the rest of your Christmas project.
When you click on links to various merchants on this site and make a purchase, this may result in this site earning a commission. This does not affect the price you pay.

UBGI Gold Standard 2026
Reviewed under the site's
editorial checklist.
Photos, decorating ideas, party setups and reader submissions are shared for inspiration unless a page is specifically presented as a pattern, tutorial, reference guide or step-by-step project. Follow the instructions, measurements, safety guidance and manufacturer directions provided for the particular project or product.
About Jan | Contact | Baby Nursery Ideas (Blog) | Site Map | Privacy Policy | Disclosure Policy | Disclaimer | Affiliate Disclosure | Earnings Disclosure | Facebook | Pinterest
I am a participant in the Amazon Services LLC Associates Program, an affiliate advertising program designed to provide a means for us to earn fees by linking to Amazon. As an Amazon Associate I earn from qualifying purchases.
Copyright © 2006-2026. All Rights Reserved.