Free Crochet Poinsettia Pattern: Ornament, Appliqué & Granny Square
By Jan Bay
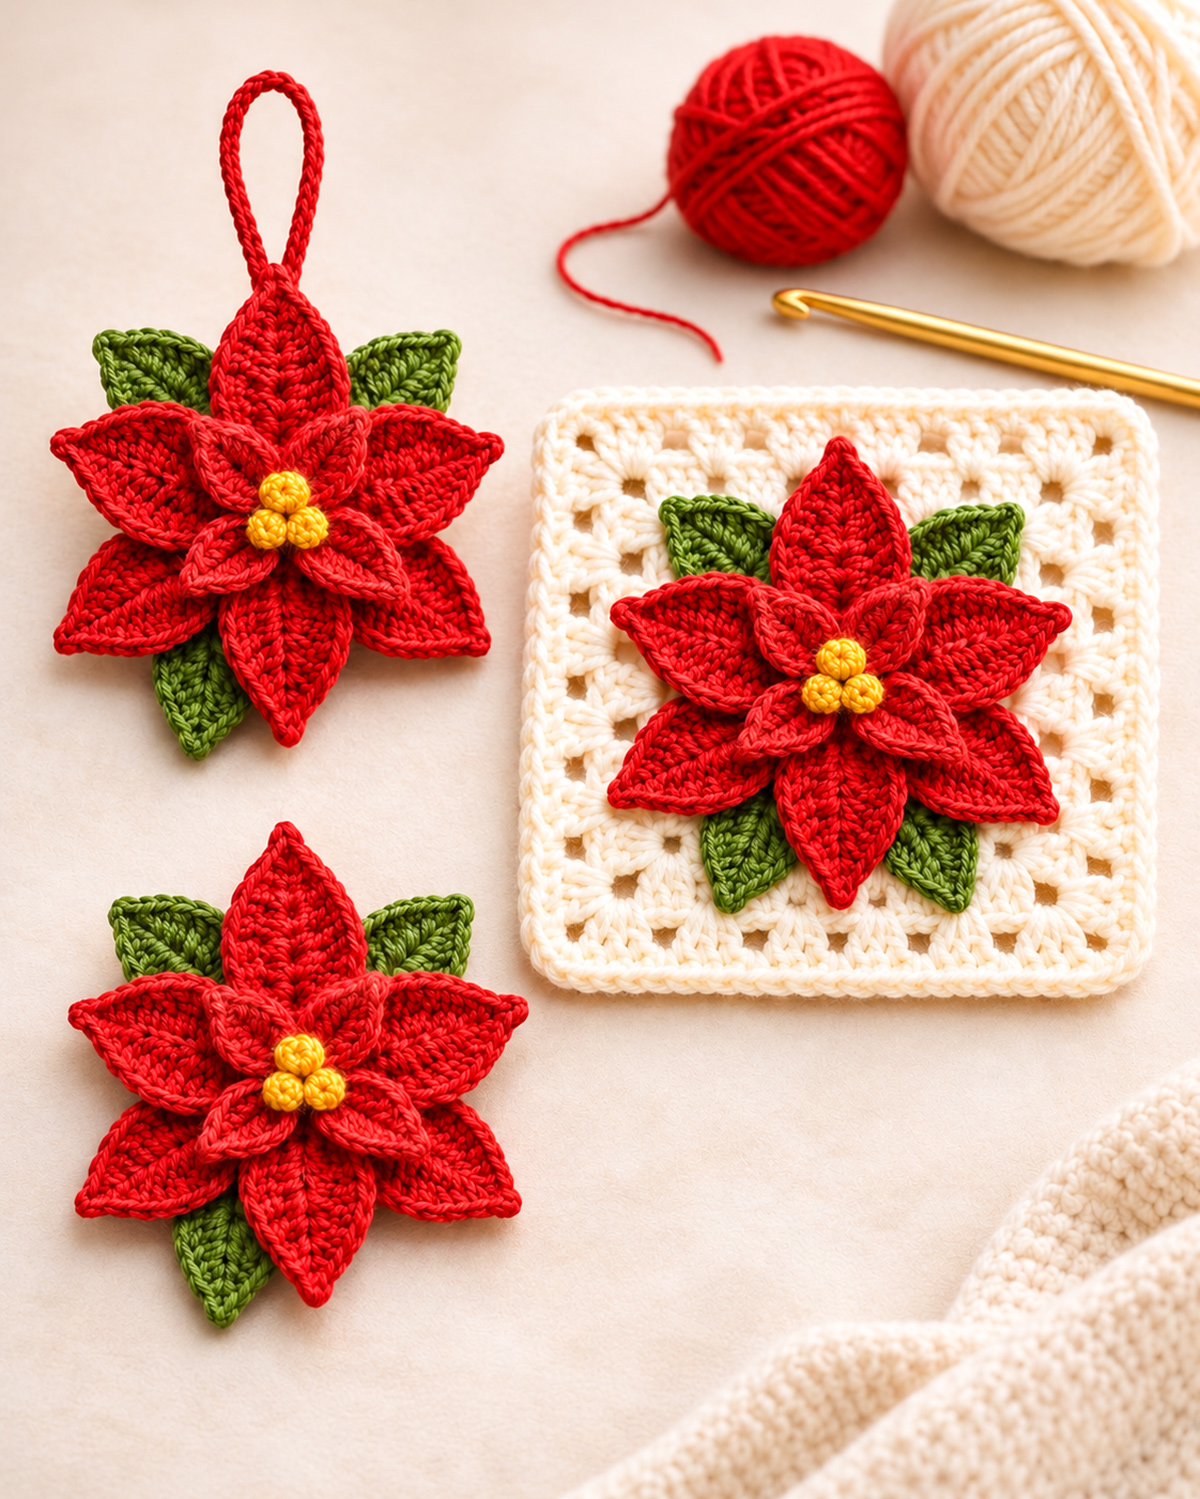
This free crochet poinsettia pattern lets you make one Christmas flower three different ways. Add a hanging loop for a tree ornament, use the flower as an appliqué on a handmade gift, or attach it to a granny square for a Christmas blanket. The red petals, green leaves and little yellow center give each version its familiar poinsettia look. I'll show you how to crochet the flower first, then tell you how to finish it for the project you have in mind.
Explore More Christmas Crochet Patterns
Free Christmas Crochet Patterns
Christmas Crochet Ornament Patterns
Free Christmas Crochet Appliqué Patterns
See Supplies for This Project Here.
Jump to the Crochet Poinsettia Pattern
- Materials and Supplies
- Stitches and Abbreviations
- Crochet the Poinsettia Petals
- Crochet the Green Leaves
- Make the Yellow Flower Center
- Assemble the Poinsettia
- Make the Christmas Ornament
- Make the Poinsettia Appliqué
- Crochet the Poinsettia Granny Square
- Tips and Troubleshooting
- Frequently Asked Questions
Materials for the Free Crochet Poinsettia Pattern
Start with the flower. Once it's finished, you can decide whether to add a hanging loop, sew it onto another project, or place it in the center of a granny square. You won't have to learn a different flower pattern for each one.
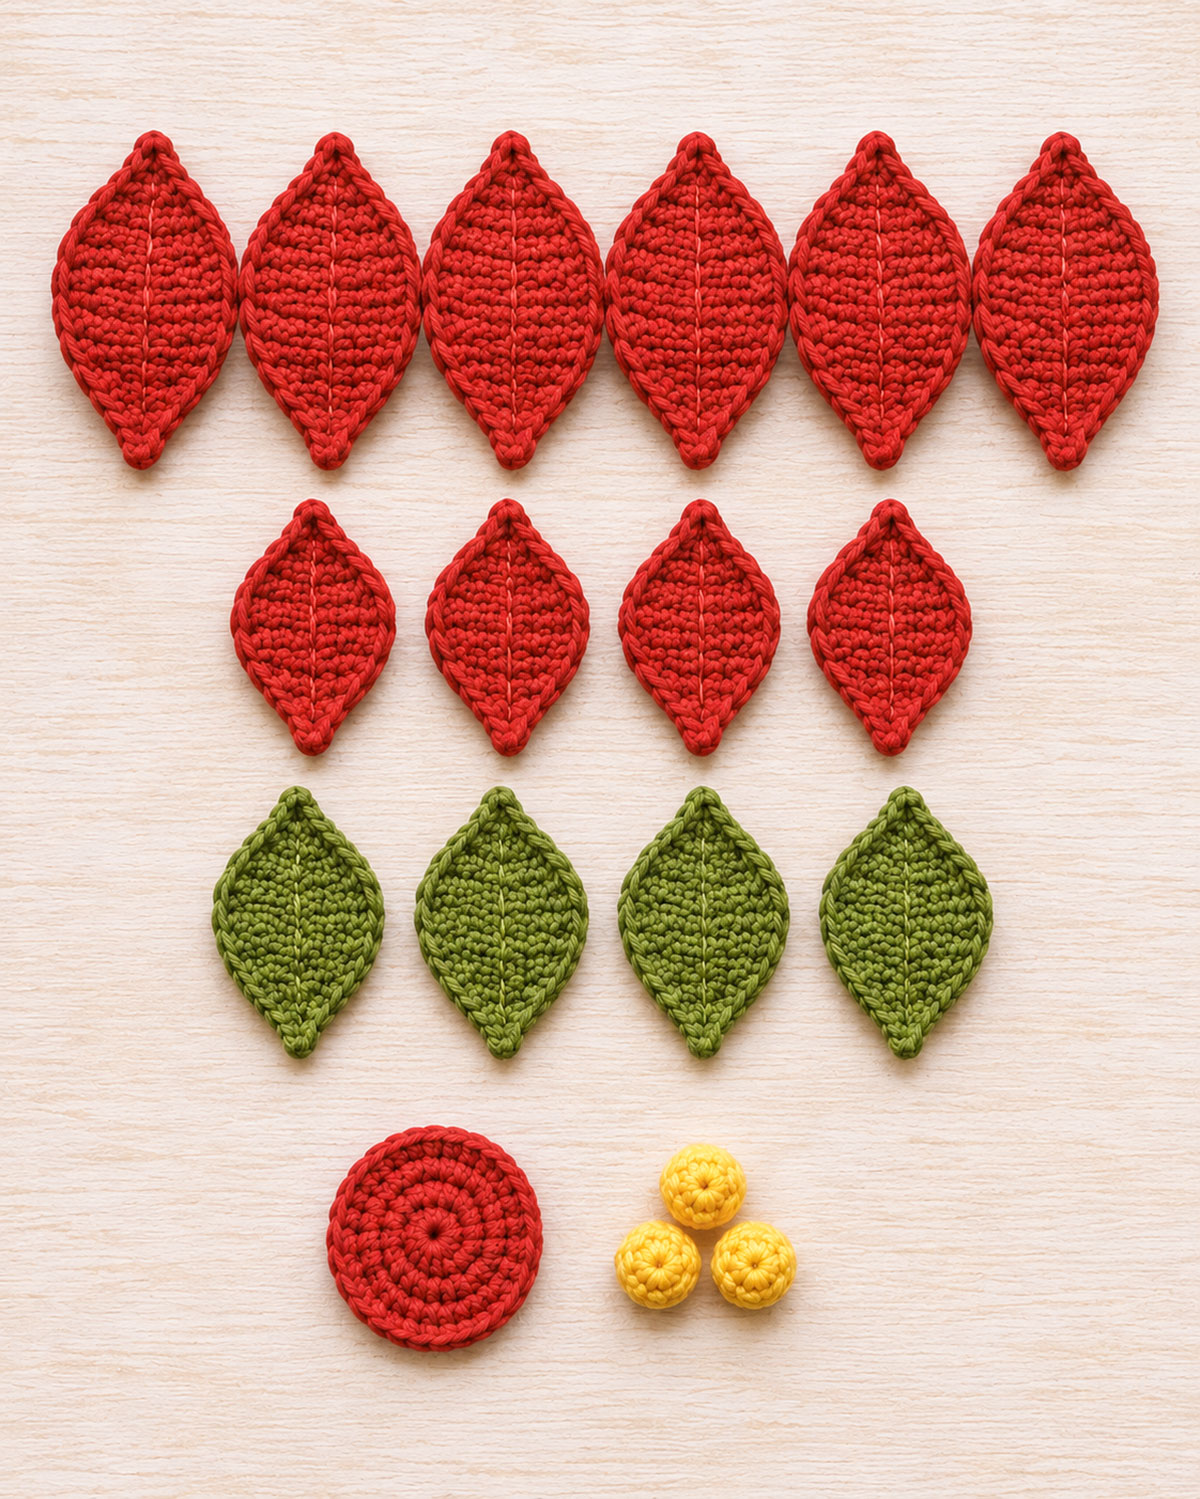
The poinsettia has six larger red petals underneath four smaller ones. Four green leaves peek out from behind, and three little yellow crocheted balls sit in the middle. Everything is made with yarn, including the raised center.
Yarn and Supplies
- DK-weight cotton or cotton-blend yarn in Christmas red
- DK-weight yarn in leaf green
- A small amount of golden-yellow yarn
- DK-weight ivory yarn for the 6-inch standalone granny square
- Medium-weight #4 ivory yarn and deep-evergreen yarn for the optional 8-inch Christmas blanket square
- 3.25 mm (D/3) crochet hook for the flower
- 3.75 mm (F/5) crochet hook for the standalone granny square
- 5 mm (H/8) crochet hook for the optional Christmas blanket square
- Yarn needle
- Stitch markers
- Scissors
- Measuring tape
- Blocking mat and rustproof pins, if needed
Allow approximately 45 to 60 yards of red, 12 to 18 yards of green, and 3 to 5 yards of yellow per flower. For the smaller 6-inch granny square, allow another 35 to 50 yards of DK-weight ivory yarn. The larger 8-inch blanket version uses medium-weight #4 ivory and deep-evergreen yarn, so its yardage will differ. These are planning estimates rather than measured yarn usage. If you're making all three flower versions, multiply the flower quantities by three.
I would use a smooth cotton-blend yarn that holds the shape of the pointed petals. A very fuzzy yarn would hide some of the stitch detail, especially around the smaller petals in the center.
Finished Size and Gauge
The expected finished flower measures approximately 4 to 4 3/4 inches across its widest red petals. The green leaves may extend slightly beyond the red flower at the diagonal points. The standalone granny square is designed to measure approximately 6 inches. The optional Christmas blanket version is designed to measure approximately 8 inches, including its evergreen outer round. Both sizes are estimates until checked against a finished crochet sample.
For the flower, aim for approximately 24 single crochet stitches and 28 single crochet rows over 4 inches using the smaller hook. That's about 6 stitches and 7 rows per inch. Check your own gauge because the pointed petals won't look quite right if they're much wider or longer than planned.
At the stated row gauge, the 12 shaping rows of a large petal calculate to approximately 1.71 inches before edging. The eight shaping rows of a smaller petal calculate to approximately 1.14 inches before edging. The pointed edging adds some length, and your actual finished measurements will depend on your tension and how the pieces are shaped. Measure your first completed petals before making the remaining copies. The granny square has its own gauge because it's made with a larger hook and double crochet clusters.
Before making all ten petals: Crochet one large petal, add its edging, and measure it. If it's much longer than 2 inches, try a smaller hook. If it's shorter than 1 1/2 inches, try a slightly larger hook. Use the same hook for every petal and leaf so the layers fit together.
Pieces Needed for One Poinsettia
- 6 large red petals
- 4 small red petals
- 4 green leaves
- 1 red circular backing
- 3 small yellow crocheted balls
That's 18 crocheted pieces for one complete flower. The ornament also needs a hanging loop. The granny-square version needs one ivory square. If you're following the example image and making all three projects, you'll crochet three complete flowers.
Crochet Stitches and Abbreviations
This pattern uses US crochet terms. The petals are worked back and forth in rows, while the backing, flower centers and granny square are worked in rounds.
- ch = chain
- sc = single crochet
- dc = double crochet
- sl st = slip stitch
- st or sts = stitch or stitches
- sc2tog = single crochet two stitches together
- inc = work 2 sc in the same stitch
- RS = right side
- WS = wrong side
- rnd = round
- sp = space
How to make sc2tog: Insert the hook into the next stitch and pull up a loop. Insert the hook into the following stitch and pull up another loop. Yarn over and pull through all three loops on the hook. You've turned two stitches into one.
Turning chains: Chain 1 at the beginning of each single crochet row. Turn your work and make the first stitch in the first stitch of the previous row. The turning chain doesn't count as a stitch.
Right side and wrong side: For each petal and leaf, the right side is the face looking toward you immediately after you finish its final shaping row. Mark that face with a removable stitch marker before adding the edging. Work the embroidered center vein on this marked side. The opposite face is the wrong side.
Magic ring: Make an adjustable loop, work the stated number of stitches into the loop, and pull the yarn tail to close the center. If you prefer not to use a magic ring, chain 2 and work the stitches into the second chain from the hook.
If you need a reminder about a stitch, the Craft Yarn Council's crochet abbreviation list is a useful reference for US pattern terms.
Keep a stitch marker handy. Even though the petals are small, it's easier to correct a missed increase immediately than to discover it after you've made six of them.
How to Crochet the Poinsettia Petals
Let's make the red petals first. You'll crochet six large ones for the bottom layer and four smaller ones for the top. Both sizes have pointed ends, but the shorter petals leave enough of the larger ones showing underneath.
Don't sew anything together yet. It's easier to arrange all ten petals once they're finished.
Large Outer Petals: Make 6
Use red yarn and the 3.25 mm hook. Each petal is made from its narrow base toward its pointed tip.
Foundation: Chain 3.
Row 1: Sc in the second chain from the hook and in the next chain. (2 sc)
Row 2: Ch 1, turn. Work 2 sc in each stitch. (4 sc)
Row 3: Ch 1, turn. Work 2 sc in the first stitch, sc in each of the next 2 stitches, and 2 sc in the last stitch. (6 sc)
Row 4: Ch 1, turn. Sc in each stitch across. (6 sc)
Row 5: Ch 1, turn. Work 2 sc in the first stitch, sc in each of the next 4 stitches, and 2 sc in the last stitch. (8 sc)
Row 6: Ch 1, turn. Sc in each stitch across. (8 sc)
Row 7: Ch 1, turn. Sc in each stitch across. (8 sc)
Row 8: Ch 1, turn. Sc2tog, sc in each of the next 4 stitches, sc2tog. (6 sc)
Row 9: Ch 1, turn. Sc in each stitch across. (6 sc)
Row 10: Ch 1, turn. Sc2tog, sc in each of the next 2 stitches, sc2tog. (4 sc)
Row 11: Ch 1, turn. Sc2tog twice. (2 sc)
Row 12: Ch 1, turn. Sc2tog. (1 sc)
Fasten off, leaving a short tail to weave in. The longer point is the outer end of the petal. The two stitches from Row 1 form its narrow attachment base.
Add the Raised Edge to Each Large Petal
With the right side facing you, join red yarn at one corner of the Row 1 base.
Work 1 sc into the end of each of the 12 rows along the first side. At the pointed tip, work (sc, ch 1, sc) into the single stitch of Row 12. Continue down the opposite edge, working 1 sc into the end of each of the 12 rows. Work 1 sc into each of the 2 foundation-chain loops along the base. Join with a sl st to the first edging sc and fasten off.
Edging count: 28 sc plus 1 chain at the tip. The joining slip stitch doesn't count as a stitch.
The little chain at the tip gives the petal a pointed finish rather than a rounded end. Keep the edging stitches even. If the sides pull inward, loosen your tension slightly instead of adding extra stitches.
Make the Center Vein
Thread a yarn needle with red yarn. On the right side of the petal, make a line of small backstitches along its middle, starting just above Row 1 and stopping below the pointed tip. Aim for roughly one stitch per row, following the center between the two middle stitches on the even-numbered rows.
Don't pull this line tight. It should sit just above the petal and give it a little definition without making the petal curl into a tube. Weave the ends into the back.
Repeat the entire large-petal pattern until you have six matching pieces.
Large Petal Checkpoint
Your stitch counts from Rows 1 through 12 should be:
2, 4, 6, 6, 8, 8, 8, 6, 6, 4, 2, 1.
Each large petal contains 61 single crochet stitches in its shaping rows, plus 28 edging stitches and the pointed chain. The six petals should be close to the same size. Check that they're flat enough to overlap and that each tip points outward.
Small Inner Petals: Make 4
Use the same red yarn and 3.25 mm hook. These petals are shorter and a little narrower. They'll sit above the larger petals, with their pointed ends facing outward.
Foundation: Chain 3.
Row 1: Sc in the second chain from the hook and the next chain. (2 sc)
Row 2: Ch 1, turn. Work 2 sc in each stitch. (4 sc)
Row 3: Ch 1, turn. Work 2 sc in the first stitch, sc in each of the next 2 stitches, and 2 sc in the last stitch. (6 sc)
Row 4: Ch 1, turn. Sc across. (6 sc)
Row 5: Ch 1, turn. Sc across. (6 sc)
Row 6: Ch 1, turn. Sc2tog, sc in each of the next 2 stitches, sc2tog. (4 sc)
Row 7: Ch 1, turn. Sc2tog twice. (2 sc)
Row 8: Ch 1, turn. Sc2tog. (1 sc)
Fasten off. Work the same pointed edging used for the larger petals, but place only one edging sc in each of the 8 row ends along each side.
Small-petal edging count: 8 sc down one side, 2 sc at the pointed tip with ch 1 between them, 8 sc down the other side, and 2 sc along the foundation base. That's 20 sc plus the pointed chain.
Add a short red backstitched center vein from Row 2 toward Row 7, stopping below the tip. Keep it loose enough for the petal to lie flat.
Repeat until you have four matching small petals.
Small Petal Checkpoint
The eight shaping rows should contain:
2, 4, 6, 6, 6, 4, 2, 1 stitches.
That's 31 shaping stitches and 20 edging stitches per small petal. You should now have six large petals and four small ones. Count them before moving on. It's easy to mistake an overlapping pair for one petal after the flower is assembled.
If you'd like the petals to hold a neat shape, lay them right side up and gently shape the points with your fingers. Light blocking may help if the yarn allows it, but don't stretch the tips into long, thin points. The pictured flower has fairly full petals.
Crochet the Four Green Poinsettia Leaves
The green leaves are nearly as important as the red petals. They give the flower its Christmas colors, but they shouldn't cover the red layer or stick out like long stems.
Make four pointed leaves. They'll be tucked beneath the flower at four diagonal positions, with only part of each leaf showing from the front.
Green Leaf: Make 4
Use green DK-weight yarn and the 3.25 mm hook.
Foundation: Chain 3.
Row 1: Sc in the second chain from the hook and the next chain. (2 sc)
Row 2: Ch 1, turn. Work 2 sc in each stitch. (4 sc)
Row 3: Ch 1, turn. Work 2 sc in the first stitch, sc in each of the next 2 stitches, and 2 sc in the last stitch. (6 sc)
Row 4: Ch 1, turn. Sc across. (6 sc)
Row 5: Ch 1, turn. Sc across. (6 sc)
Row 6: Ch 1, turn. Sc across. (6 sc)
Row 7: Ch 1, turn. Sc2tog, sc in each of the next 2 stitches, sc2tog. (4 sc)
Row 8: Ch 1, turn. Sc across. (4 sc)
Row 9: Ch 1, turn. Sc2tog twice. (2 sc)
Row 10: Ch 1, turn. Sc2tog. (1 sc)
Fasten off and weave in the yarn tail at the pointed tip. The sewing tail will be left at the narrow base when you finish the edging.
Edge the Leaves
Join green yarn at one corner of the Row 1 base, with the right side facing you.
Work one sc into each of the 10 row ends along the first side. At the pointed tip, work (sc, ch 1, sc) into the stitch of Row 10. Work one sc into each of the 10 row ends along the other side, then one sc into each of the two foundation-chain loops along the base. Join with a sl st to the first edging sc. Fasten off, leaving a 12-inch sewing tail at the narrow base of the leaf.
Leaf edging count: 24 sc and 1 pointed chain.
Add a short green backstitched vein along the middle of each leaf, beginning just above Row 1 and stopping below the tip. Weave in the vein yarn ends, but keep the longer attachment tail.
Leaf Checkpoint
The row counts should be:
2, 4, 6, 6, 6, 6, 4, 4, 2, 1.
Each green leaf has 41 shaping stitches and 24 edging stitches. At the suggested gauge, expect each leaf to measure roughly 1 1/2 inches long after edging.
Lay the leaves behind a few of your larger red petals. You should see the green points between the red ones. If the leaves disappear completely, move their bases slightly farther outward during assembly. Keep their pointed ends visible, but don't make a separate green ring around the entire flower.
Make the Three Yellow Poinsettia Center Balls
Instead of using beads or a flat yellow circle, we're making three little crocheted balls. They'll sit close together in the center and stand slightly above the red petals.
Use golden-yellow yarn and the 3.25 mm hook. Keep your stitches firm so the centers stay rounded.
Small Yellow Ball: Make 3
Round 1: Make a magic ring. Work 6 sc into the ring. Pull the ring closed. Do not join. (6 sc)
Round 2: Working in continuous rounds, sc in each of the next 6 stitches. (6 sc)
Round 3: Sc2tog three times. (3 sc)
Fasten off, leaving a 10-inch sewing tail. Use a small portion of the starting yarn tail to fill the center of the ball if it needs a little more shape. Don't overfill it.
Thread the sewing tail through the front loops of the three remaining stitches and pull gently to close the opening. Keep the long tail for attaching the ball to the flower.
Make two more balls the same way.
Arrange the Three Centers
Place the balls in a small triangle, with one at the top and two directly below it. Their sides should touch, but they shouldn't be stacked on top of one another.
The three balls should cover the center where the red petal bases meet. If they look more like three yellow pom-poms than small rounded crochet stitches, check that you haven't added an extra increase round.
Each ball has 6 stitches in Round 1, 6 in Round 2 and 3 after the decreases in Round 3. There are no beads, plastic eyes or separate decorative pieces to add.
Set the yellow balls aside until the red petals and green leaves have been assembled.
Assemble the Crochet Poinsettia Flower
Now we can put the flower together. I'd arrange all the pieces before picking up the yarn needle. The pointed ends need to spread around the center, and the smaller petals need to sit above the larger ones rather than disappearing underneath.
Step 1: Crochet the Red Backing
Use red yarn and the 3.25 mm hook.
Round 1: Make a magic ring and work 6 sc into the ring. Pull closed and join with a sl st to the first sc. (6 sc)
Round 2: Ch 1. Work 2 sc in each of the 6 stitches, beginning in the same stitch where you joined. Join with a sl st to the first sc. (12 sc)
Round 3: Ch 1. Repeat (sc in the next stitch, 2 sc in the following stitch) 6 times, beginning in the joining stitch. Join to the first sc. (18 sc)
Round 4: Ch 1. Beginning in the same stitch where you joined the previous round, repeat (sc in each of the next 2 stitches, 2 sc in the following stitch) 6 times. Join with a sl st to the first sc. Do not work into the turning chain or the joining slip stitch. (24 sc)
Fasten off and weave in the starting tail. Keep the backing flat, with the right side facing up.
The circle has four rounds with stitch counts of 6, 12, 18 and 24. It should be large enough to hold the narrow bases of all six outer petals without showing around the edge of the finished flower.
Step 2: Mark the Outer Petal Positions
Count the 24 stitches in the final backing round. Mark the first stitch at the top of the circle as Stitch 1, then number the remaining stitches clockwise through Stitch 24.
Keep the red backing right side up. Arrange the six large petals with their embroidered right sides facing up and their narrow Row 1 bases against the outer round of the backing. The pointed tips should face away from the center. Check that every embroidered center vein remains visible before securing the bases.
Sew the bases to these stitch pairs:
- Petal 1: Stitches 1 and 2
- Petal 2: Stitches 5 and 6
- Petal 3: Stitches 9 and 10
- Petal 4: Stitches 13 and 14
- Petal 5: Stitches 17 and 18
- Petal 6: Stitches 21 and 22
Use red yarn to make several small sewing stitches through the base of each petal and the corresponding backing stitches. Work from the front toward the back, keeping the sewing yarn underneath the petals where possible.
Spread the six petals evenly around the backing. The outer tips should form a six-pointed flower, with a little overlap along the sides.
Don't sew the pointed ends down. The raised edges and overlapping petals are part of the design.
Step 3: Attach the Four Green Leaves
Turn the flower face down, keeping the top petal pointing upward. Keep the original stitch numbers assigned when the backing was right side up. Those numbers now run counterclockwise when viewed from the back, so do not renumber the stitches.
Place the four green leaves against the back of the red backing, with their embroidered right sides facing down toward the table. This keeps their center veins facing the finished front when the flower is turned right side up again. Position the narrow Row 1 bases against the backing and aim the pointed tips diagonally into the gaps between the outer red petals.
Using the green sewing tails, attach the Row 1 base of each leaf to the back of Round 4 at the following stitch pairs:
- Leaf 1: Stitches 3 and 4
- Leaf 2: Stitches 11 and 12
- Leaf 3: Stitches 15 and 16
- Leaf 4: Stitches 23 and 24
These four positions sit in gaps between the six outer petal bases. They aren't spaced exactly 90 degrees apart because the backing has six petal positions, but they give the leaves a balanced arrangement. With the top red petal pointing upward, you'll have two green leaves angled toward the upper corners and two toward the lower corners. Sew through the backing without pulling the red petals out of position.
Turn the flower right side up. Adjust the leaves so their tips show in four places between the red petals. If a leaf is hidden, angle it a little farther into the gap before tightening the final sewing stitches.
Step 4: Add the Four Smaller Petals
Turn the flower right side up before adding the four smaller petals. Place them on top of the larger red layer with their embroidered right sides facing upward. Keep their narrow bases close to the middle of the flower, leaving their pointed ends free. Check that all four center veins are visible before sewing the bases to the backing.
On the 12-stitch second round of the red backing, attach the small petal bases to the following stitch pairs:
- Small petal 1: Stitches 1 and 2
- Small petal 2: Stitches 4 and 5
- Small petal 3: Stitches 7 and 8
- Small petal 4: Stitches 10 and 11
These are the stitches from Round 2, not the numbered stitches on the outer 24-stitch round. You may need to lift the larger petals to reach them.
Arrange the four inner petals in an overlapping cross around the flower center. Each one should point outward between or across the larger petals, not directly cover all six large tips.
Secure the bottom two rows of each small petal to the backing. Leave the rest of the petal free so it can sit above the bottom layer.
Step 5: Sew on the Three Yellow Balls
Bring the three yellow balls together in the center of the flower. Place one above two others, forming a close triangle.
Use each ball's sewing tail to attach its closed underside to the middle of the red backing. Pass the needle through the ball's base and several stitches of the backing, then repeat until it sits firmly in place.
Keep the yellow balls close enough to cover the small petal bases. Avoid sewing through the raised outer portions of the small petals, since that would flatten the center layer.
Weave all remaining yarn tails into the back of the flower. Check that none of the yellow balls can be pulled away with a gentle tug.
Step 6: Check the Finished Flower Against the Example
Lay the poinsettia right side up on a flat surface. You should be able to identify six larger red petals underneath, four shorter red petals above, four green leaves underneath the red layer, and three raised yellow center balls.
The red petals should spread outward without exposing much of the circular backing. The green leaves should peek out between the red points. Turn the flower slightly if you need to adjust the overlap, then add a few small stitches at the bases to hold the arrangement.
Don't add a fifth leaf, another flower layer or extra center balls. The finished design uses exactly ten red petals, four leaves and three yellow centers. Remove every stitch marker and check that all sewing tails are secured and woven in. Give each yellow center ball, green leaf and red petal a gentle tug to check its attachment.
Your poinsettia flower is now complete. You can use it as an appliqué just as it is, or continue with one of the two other finishing options below.
Turn Your Crochet Poinsettia into a Christmas Ornament
For the ornament, all you need is a hanging loop. The flower itself stays exactly the same, including the four green leaves and the three raised yellow centers.
I'd use a crocheted red loop instead of ribbon. It matches the petals and doesn't introduce another color or material into the design.
Crochet the Hanging Loop
Use red yarn and the 3.25 mm hook.
Row 1: Chain 49.
Row 2: Sl st in the second chain from the hook and in each of the remaining 47 chains. (48 sl sts)
Before fastening off, fold the cord in half and hold both ends against the back of the flower's circular backing, directly behind the top red petal. The rounded end of the loop should extend approximately 1 1/2 to 2 inches above the petal tip, as shown in the example image. If your cord is too short or too long, adjust the number of chains and matching slip stitches before fastening off.
Fasten off, leaving a 12-inch sewing tail. Fold the finished cord in half again, placing both ends together for attachment to the backing. Keep the cord flat and untwisted.
Attach the Loop
Turn the finished poinsettia face down. Locate the large red petal at the top of the flower.
Place both ends of the folded cord on the back of the circular red backing, directly below the base of that petal. The rounded end of the loop should extend above the petal point.
Using the sewing tail and yarn needle, stitch through both cord ends and several stitches of the red backing. Make at least four passes through the joined ends, then weave the yarn tail through neighboring backing stitches.
Keep the attachment on the backing rather than fastening it to the pointed petal alone. That way, the weight of the flower hangs from its center instead of pulling on one petal.
Ornament checkpoint: Hold the finished ornament by its loop. The poinsettia should hang upright, with the yellow centers facing forward. If the flower twists, move the loop slightly toward the true top center of the backing before securing it again.
You can hang this ornament on a Christmas tree, a decorative hook, or a holiday garland. Keep the finished piece away from direct heat, open flames and any place where a baby could pull on it.
If you're making several handmade Christmas decorations, take a look at the free crochet candy cane ornament pattern for another project that uses traditional red and white Christmas colors.
Make a Crochet Poinsettia Appliqué
The appliqué uses the same flower without the hanging loop. Its layered petals make it a pretty addition to a Christmas wall hanging, gift bag, decorative pillow or fabric holiday decoration.
Before attaching it, decide how much of the flower you want to stand away from the background. I'd keep the raised center and small red petals free, but secure the main flower firmly enough that the larger petals won't catch when the piece is handled.
Attach the Flower to Fabric or Crochet
Step 1: Lay the finished flower on your chosen project with the yellow center facing up. Position the four green leaves so they're visible and the red petals spread evenly.
Step 2: Thread a yarn needle with approximately 24 inches of matching red yarn. If you're attaching the flower to tightly woven fabric, use a suitable sewing needle and matching sewing thread instead.
Step 3: Begin on the underside of the project. Bring the needle through the fabric and the edge of the flower's red circular backing. Make a small stitch through the backing, then return the needle through the fabric.
Step 4: Continue around the circular backing, placing about 8 to 12 small securing stitches around its perimeter. Keep the stitches underneath the petals whenever possible.
Step 5: Lift each large petal gently and check its attachment. If the project will be handled often, add one small tack stitch underneath each large petal approximately halfway between the base and tip. The stitches should hold the petals in place without flattening the raised edges.
Step 6: Check the four leaves. If a pointed leaf can lift or fold backward, add a small green securing stitch near its base. Leave the leaf tips visible.
Step 7: Secure the sewing yarn on the reverse side and weave or bury the tail according to the fabric or crochet background you're using.
Where I'd Use the Appliqué
I like the idea of putting one poinsettia in the center of a plain Christmas wall hanging, or using two on opposite corners of a decorative holiday pillow. The flower already has plenty of detail, so you don't need to surround it with more flowers or extra trim.
For a gift bag, I'd position the flower near the top, leaving room below for a gift tag. On a crochet project, attach it to a fairly firm background so the weight of the flower doesn't pull the fabric out of shape.
Keep this dimensional appliqué on decorative projects rather than items a baby might sleep with, wear unattended or put in their mouth. The raised yellow centers and loose petal edges aren't suited to that kind of use.
Free Crochet Poinsettia Granny Square Pattern
Now let's put our poinsettia into a granny square. This version uses a cream-colored background, which gives the red petals and green leaves plenty of contrast.
You'll crochet an ordinary openwork granny square first, then sew the finished flower onto its center. I prefer doing it this way for this design because the ten petals keep their shape, and you can make the square larger if you're matching it to other Christmas blanket blocks.
Materials for the Granny Square
Use DK-weight ivory yarn and a 3.75 mm hook. You'll also need one complete poinsettia flower made from the instructions above, without the hanging loop.
Finished size: The standalone poinsettia granny square is designed to measure approximately 6 inches, using DK-weight yarn and a 3.75 mm hook. Your actual measurement will depend on your yarn and tension. If you're adding this flower to my Christmas granny square blanket, you'll need the larger 8-inch version explained below so it matches the other blocks.
Round 1: Make the Center Ring
Chain 4 and join with a sl st to the first chain to form a ring.
Chain 3. The beginning chain 3 counts as your first double crochet.
Work 2 dc into the ring, ch 2.
Work (3 dc into the ring, ch 2) three more times.
Join with a sl st to the top of the beginning chain 3.
Round 1 count: Four groups of 3 dc, for a total of 12 dc, with four ch-2 corner spaces.
Round 2: Build the Four Corners
Sl st into each of the next 2 dc, then sl st into the first ch-2 corner space.
Chain 3, work 2 dc into the same corner space, ch 2, then work 3 more dc into that same corner space. This completes the first corner.
Chain 1.
In the next ch-2 corner space, work (3 dc, ch 2, 3 dc). Chain 1.
Repeat the same corner group and ch 1 in each of the remaining two corner spaces.
Join with a sl st to the top of the beginning chain 3.
Round 2 count: Eight groups of 3 dc, for 24 dc total, four ch-2 corner spaces and four ch-1 side spaces.
Round 3: Add the First Side Groups
Sl st across the next 2 dc and into the first ch-2 corner space.
Chain 3, work 2 dc in the same corner, ch 2, then 3 dc in that corner. Chain 1.
Work 3 dc in the next ch-1 side space. Chain 1.
In the next ch-2 corner, work (3 dc, ch 2, 3 dc). Chain 1.
Work 3 dc in the next ch-1 side space. Chain 1.
Repeat that last corner-and-side sequence around the remaining two sides of the square.
Join to the beginning chain 3.
Round 3 count: Twelve groups of 3 dc, for 36 dc total, four ch-2 corner spaces and eight ch-1 side spaces.
Round 4: Continue the Granny Square
Sl st across the next 2 dc and into the first ch-2 corner space.
Chain 3, work 2 dc into the corner, ch 2, then 3 dc into the same corner.
Chain 1. Work 3 dc into the first ch-1 side space. Chain 1. Work 3 dc into the second ch-1 side space. Chain 1.
In the next corner, work (3 dc, ch 2, 3 dc).
Continue around the square, placing one group of 3 dc in each ch-1 side space, with ch 1 between groups and before each corner. Work (3 dc, ch 2, 3 dc) in every corner.
After the last side group and ch 1, join to the beginning chain 3.
Round 4 count: Sixteen groups of 3 dc, for 48 dc total, four ch-2 corner spaces and twelve ch-1 side spaces.
Round 5: Widen the Square
Sl st across the next 2 dc and into the first corner space.
Work the first corner as before: ch 3, 2 dc, ch 2, 3 dc in the same corner.
Chain 1. Work 3 dc in each of the next three ch-1 side spaces, making ch 1 between each group. Chain 1 after the third group.
Work (3 dc, ch 2, 3 dc) in the next corner.
Repeat that sequence around the remaining sides, working three separate side groups between every pair of corners, with ch 1 separating the groups and corners.
Join to the beginning chain 3.
Round 5 count: Twenty groups of 3 dc, for 60 dc total, four ch-2 corner spaces and sixteen ch-1 side spaces.
Round 6: Complete the Ivory Granny Square
Sl st across the next 2 dc and into the first corner space.
Work the first corner: ch 3, 2 dc, ch 2, 3 dc.
Chain 1. Work 3 dc in each of the next four ch-1 side spaces, making ch 1 between the groups. Chain 1 after the fourth side group.
Work (3 dc, ch 2, 3 dc) in the next corner.
Repeat around the remaining three sides, working four separate 3-dc groups between each pair of corners. Keep one chain between neighboring groups and corners.
Join to the beginning chain 3. Fasten off and weave in the ivory yarn ends.
Round 6 count: Twenty-four groups of 3 dc, for 72 dc total, four ch-2 corner spaces and twenty ch-1 side spaces.
Check the Granny Square Stitch Counts
Before attaching your flower, compare your completed rounds with these counts:
- Round 1: 12 dc, 4 groups
- Round 2: 24 dc, 8 groups
- Round 3: 36 dc, 12 groups
- Round 4: 48 dc, 16 groups
- Round 5: 60 dc, 20 groups
- Round 6: 72 dc, 24 groups
Every round should have four ch-2 corners. Beginning with Round 2, each new round adds one more 3-dc side group between the corner groups on each side.
Lay the square flat and measure from one outside edge to the opposite outside edge. Aim for approximately 6 inches. If you're combining this block with other Christmas granny squares, matching their actual finished size matters more than matching the estimated measurement here.
Attach the Poinsettia to the Granny Square
Choose your square before sewing: If you're making the standalone 6-inch poinsettia square, follow Steps 1 through 8 below now. If you're making the optional 8-inch Christmas blanket square, leave the flower unattached for the moment. Complete the seventh round with the evergreen yarn in the section below, check the finished square's measurement, then return here and follow Steps 1 through 8. Attach the flower only once, after your chosen square is complete.
Step 1: Lay the completed granny square flat with its right side facing up. Find its center by folding it gently in half vertically and horizontally, then opening it again.
Step 2: Place the completed crochet poinsettia in the middle. Arrange it with a large red petal pointing toward the top edge of the square and the green leaves extending toward the diagonal areas.
Step 3: Check the spacing before sewing. The flower should sit within the square's edges, with ivory crochet showing around it. Don't allow the pointed red petals to overlap the outside border.
Step 4: Thread a yarn needle with approximately 24 inches of red yarn. Working from the underside of the square, bring the needle through an ivory stitch near the center and through the underside of the flower's circular red backing.
Step 5: Make 8 to 12 small securing stitches around the perimeter of the red backing, catching the ivory stitches below it. Spread the stitches evenly around the circle. Avoid pulling so tightly that the ivory square puckers.
Step 6: Check the six large outer petals. Add a small securing stitch under each one about halfway from its base to its point if the square will be used in a decorative throw or another item that will be handled. Keep the petal tips and their raised edges free.
Step 7: Check all four green leaves. Their bases should already be attached to the red backing. Add a small stitch beneath any leaf that twists out of position, keeping the pointed end visible.
Step 8: Secure the sewing yarn on the wrong side of the square and weave in its tail.
Place the square flat again. It should have four clearly defined ivory corners and one dimensional poinsettia in the center. The outer red petals should still be separate enough to show their layered shape.
Using the Square in a Christmas Blanket
If you're adding this poinsettia to my Christmas granny square blanket, don't use the smaller six-round DK square as it is. That blanket uses medium-weight #4 yarn, a 5 mm hook, and seven granny rounds, with the last round worked in deep evergreen.
Here's how to make the poinsettia block match. Keep the flower itself exactly as written above. For the background square, use medium-weight #4 ivory yarn and a 5 mm hook. Follow Granny Square Rounds 1 through 6 without changing the stitch counts. After Round 6, fasten off the ivory yarn.
Round 7: Add the Evergreen Blanket Edging
Join medium-weight #4 deep-evergreen yarn in any ch-2 corner space, using the 5 mm hook.
Chain 3, work 2 dc into the same corner, ch 2, then work 3 more dc into that corner. Chain 1.
Work 3 dc into each of the next five ch-1 side spaces, making ch 1 after each group.
In the next ch-2 corner space, work (3 dc, ch 2, 3 dc). Chain 1.
Repeat around the remaining sides, working five separate 3-dc groups between every pair of corners, with ch 1 between neighboring groups and corners.
Join with a sl st to the top of the beginning chain 3. Fasten off and weave in the ends.
Round 7 checkpoint: You should have 28 groups of 3 dc, for 84 dc total, four ch-2 corner spaces and 24 ch-1 side spaces. Each outside edge has seven granny groups, counting the two corner groups.
The expected finished measurement is approximately 8 inches square after blocking. Measure your block against the other squares in the blanket before sewing on the flower. If it doesn't match, adjust your hook size and make another square rather than stretching one block to fit.
Once the seven-round square measures correctly, return to the eight flower-attachment steps above and sew the completed poinsettia to the ivory center. Keep the raised petals and green leaves away from the evergreen border. Attach the flower only once. When assembling the blanket, join the finished squares through their evergreen edges, not through the flower.
I'd use this dimensional poinsettia block in a decorative Christmas throw or wall hanging rather than a blanket intended for a baby's sleep space. The flower has several raised layers, and the three yellow center balls need to remain securely attached.
Before deciding how many squares to make, lay several designs beside one another. A poinsettia looks especially nice between simpler Christmas squares because its raised petals already have plenty of texture.
You can also use one poinsettia granny square as a decorative wall piece or include it in a holiday pillow front. Because the center is dimensional, I'd reserve this version for decorative projects rather than infant bedding.
For more Christmas granny square designs, visit the Christmas granny square blanket pattern collection when you're ready to plan a group of matching blocks.
Crochet Poinsettia Pattern Tips and Troubleshooting
A layered flower takes a little more arranging than a flat appliqué. Most problems are easy to correct before the pieces are sewn down permanently.
My Red Petals Are Curling
First, check the stitch counts. The widest part of a large petal should have eight stitches, while a smaller petal has six.
If the counts are correct but the petals curl tightly, the edging may be too firm. Try loosening the edging tension and laying the petal flat with your fingers. Gentle blocking may also help, depending on the yarn.
A little lift at the edges is fine. The picture shows layered petals, not a perfectly flat flower.
The Flower Looks Round Instead of Pointed
Check the final decrease rows. Each red petal ends with one sc at its tip, followed by a pointed edging made with (sc, ch 1, sc) in that final stitch.
If you worked several stitches into the last shaping row, the point may become rounded. Undo the edging at the tip and correct it before making more petals.
I Can't See All Four Green Leaves
Before sewing them down, spread the leaves around the back of the flower. The green points need to appear between the red petals, not directly behind their middle sections.
If the leaves still disappear, move their bases slightly outward while keeping them attached to the backing. You don't need to crochet longer leaves.
The Yellow Balls Look Too Flat
Check that you worked three rounds for each center: 6 sc, 6 sc and then 3 sc after the decreases.
Use a small amount of the starting yarn tail inside the ball if it needs more shape. Pull the closing tail through the remaining three stitches and secure it before sewing the center onto the flower.
The Backing Circle Shows Between the Petals
Make sure the large petal bases are attached to the correct six pairs of stitches in Round 4. Adjust their angles so the lower edges overlap slightly near the center.
If a small amount of red backing remains visible, the four smaller petals and yellow centers should cover much of it once attached. Don't add another backing round just to hide a gap.
My Granny Square Is Too Small
Measure the square before sewing on the flower. If you're making one decorative block, you can add another granny round using the established corner and side-group pattern.
If you're making a blanket, measure the other blocks first. Adding another round to only one square may leave it larger than its neighbors. You can also make a new sample with a slightly larger hook if your stitches are unusually tight.
The Ivory Square Bunches Under the Flower
Loosen the sewing stitches around the circular backing. The flower needs to be attached firmly, but the ivory square shouldn't be pulled inward.
Spread the fastening stitches around the backing rather than putting all of them in one small area. Work through nearby ivory stitches, not just a single chain space.
Final Construction Checklist
- Six large red petals, each with 12 shaping rows
- Four small red petals, each with 8 shaping rows
- Four green leaves, each with 10 shaping rows
- One red backing with 6, 12, 18 and 24 stitches in its four rounds
- Three yellow center balls, each with 6, 6 and 3 stitches across three rounds
- One secure hanging loop for the ornament version
- One six-round ivory granny square for the standalone version
- For the optional Christmas blanket version, one seven-round granny square with six ivory rounds and a deep-evergreen outer round
For a first sample, compare the finished flower against the example image before making additional copies. Check its overall diameter, the amount of green showing between the red petals, and whether the inner petals sit above the outer layer.
These instructions are a calculated pattern draft. The measurements and assembly details should be checked on a physical sample before relying on them for a finished blanket or a larger batch of ornaments.
Frequently Asked Questions About the Crochet Poinsettia Pattern
Why Is the Poinsettia Sewn Onto the Granny Square?
The flower has ten individually shaped petals and four separate green leaves. Sewing it onto a completed square lets those pieces keep their pointed outlines. It also makes the same flower pattern useful for ornaments and appliqués without changing the construction.
Can I Use a Different Yarn Weight?
Yes, but the finished size will change. A heavier yarn will generally make a larger flower, while a finer yarn will make a smaller one. Start with one large petal and check its measurements before crocheting the remaining nine. If you're making a blanket, work a granny square sample with the same yarn you intend to use for the other blocks.
Can I Replace the Yellow Crocheted Balls with Beads?
You could change the center for an adult decorative project, but it wouldn't match this pattern's finished design. The three raised yellow crocheted balls are an identifying detail, so I'd keep them. They're also a better choice than adding small hard beads to a yarn flower, although the completed decoration still belongs out of a baby's reach.
Can the Finished Poinsettia Be Washed?
Follow the care instructions for the yarn and for whatever you've attached the flower to. A decorative piece made with washable yarn may be cleaned gently, but the raised petals and center balls need to be handled carefully. Reshape the flower while damp and let it dry flat if the yarn's care instructions permit that.
Can I Use These Squares in a Christmas Blanket?
Yes, for a decorative Christmas throw. If you're using the poinsettia with my Christmas granny square blanket patterns, make the 8-inch version with the evergreen outer round. Check that all the finished blocks measure the same size, then join them through their evergreen edges. The flower's raised center and layered petals add thickness, so consider how the blanket will be used before making a large number of blocks.
If you only need a quick Christmas decoration, make the ornament and stop there. If you've got leftover red and green yarn, the appliqué is another way to use the flower without crocheting a whole square.
When you click on links to various merchants on this site and make a purchase, this may result in this site earning a commission. This does not affect the price you pay.

UBGI Gold Standard 2026
Reviewed under the site's
editorial checklist.
Photos, decorating ideas, party setups and reader submissions are shared for inspiration unless a page is specifically presented as a pattern, tutorial, reference guide or step-by-step project. Follow the instructions, measurements, safety guidance and manufacturer directions provided for the particular project or product.
About Jan | Contact | Baby Nursery Ideas (Blog) | Site Map | Privacy Policy | Disclosure Policy | Disclaimer | Affiliate Disclosure | Earnings Disclosure | Facebook | Pinterest
I am a participant in the Amazon Services LLC Associates Program, an affiliate advertising program designed to provide a means for us to earn fees by linking to Amazon. As an Amazon Associate I earn from qualifying purchases.
Copyright © 2006-2026. All Rights Reserved.