Free Crochet Lamb Applique Pattern with Bobble Stitch Wool
By Jan Bay
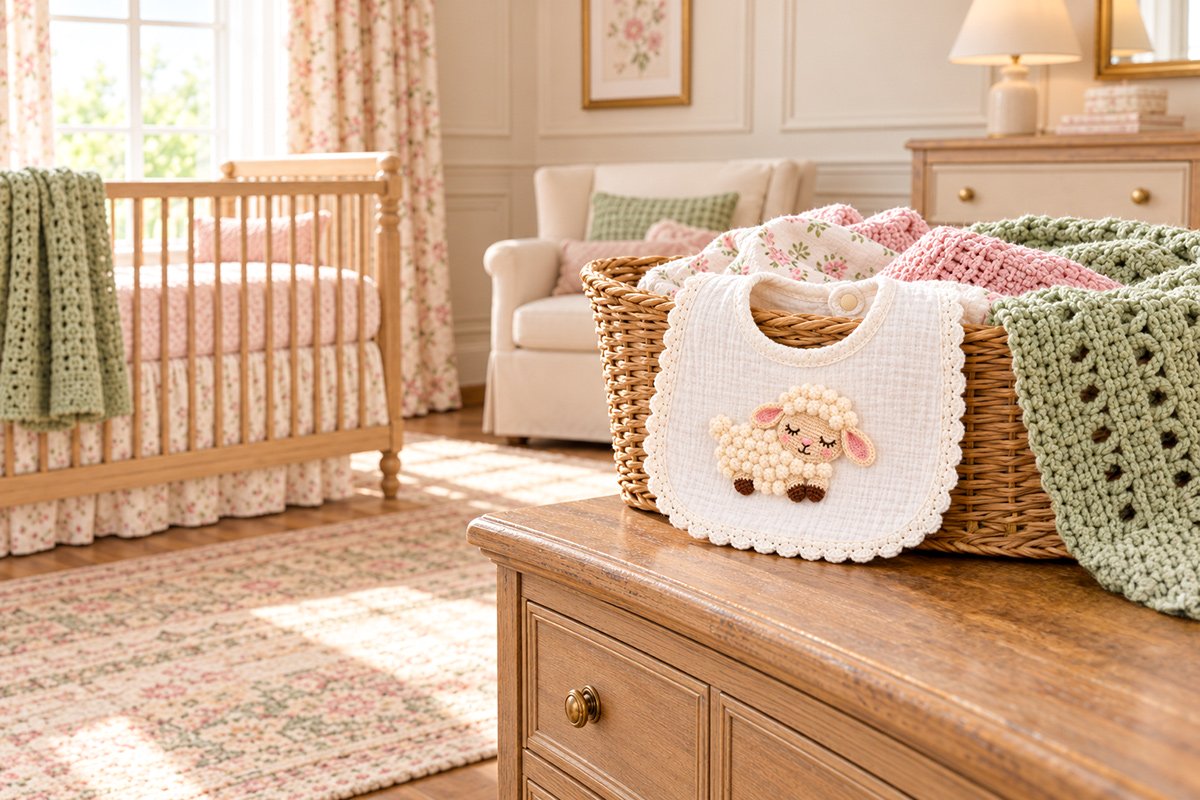
This free crochet lamb applique pattern features a sleepy baby sheep with soft bobble stitch wool, floppy pink-lined ears, a curled tail and tiny hooves tucked against its body. The lamb is made from flat crocheted pieces with raised wool texture and an embroidered face, making it a sweet decoration for handmade baby blankets, nursery projects and baby shower gifts.
Explore More Free Crochet Baby Patterns
Crochet Animal Applique Patterns
See Supplies for This Project Here.
Jump to a Section
The trick with this little lamb is keeping the wool fluffy without making it look so bulky that it's not cute anymore. We're using real crochet bobble stitches, with several strands of yarn running vertically through each raised stitch. The body stays flat underneath, and the little hooves tuck into the wool rather than dangling below it.
For the bib-size version, I'd choose smooth cotton yarn rather than chenille or fuzzy novelty yarn. You want to see the crochet stitches, especially around the face and ears. Besides, a small appliqué is much easier to sew neatly onto a bib or baby blanket when the yarn isn't too thick.
Materials and Finished Size
Finished size: At the stated gauge, the crocheted body alone is expected to measure approximately 2 3/4 inches wide and 1 3/4 to 2 inches high. The complete lamb will be larger once the head, ears, tail and hooves are attached. Final assembled measurements have not yet been confirmed by a physically crocheted sample. Measure the completed applique before attaching it to a bib or other baby project.
Skill level: Intermediate beginner. You'll need to know basic stitches, simple increases and decreases, and how to make a bobble stitch.
Materials:
- Fine or sport-weight cotton yarn, weight 2, in ivory for the woolly body, crown and tail
- Small amount of light tan cotton yarn for the face, ears and upper hooves
- Small amount of dusty pink cotton yarn for the inside of the ears
- Small amount of dark brown cotton yarn for the hoof tips
- Black embroidery floss for the closed eyes, eyelashes and smile
- Pink embroidery floss for the nose and cheeks
- 2.5 mm crochet hook, or the size needed to match gauge
- Yarn needle and embroidery needle
- Small scissors
- Stitch marker
- Tape measure
- Rustproof pins for positioning the pieces
Gauge: Aim for approximately 8 single crochet stitches and 10 rows per inch, measured on a plain single crochet swatch. The bobble rows can behave differently from plain crochet, so check the width of the body as you work.
Construction: Nine separate crocheted pieces make up the lamb: one body, one face, one woolly crown, two ears, three hooves and one tail. Everything is crocheted flat and sewn together. No stuffing is needed.
If you're making the lamb for a bib, measure the available space before you start. The head and ears add to the body's width, so check the complete layout before sewing. If your bib is small, use finer cotton yarn and a smaller hook to reduce the size of every piece proportionally. A lamb that looks just right on a blanket can take up too much room on a little bib.
Stitches and Abbreviations
This pattern uses US crochet terminology. The beginning chain 1 on turning rows does not count as a stitch. Work the body, face, crown, hooves and tail in turning rows. Work the ears in continuous rounds without joining between rounds unless instructed otherwise. Place a removable stitch marker in the first stitch of each ear round and move it up as you work. Join only where the pattern tells you to finish the ears.
- ch: Chain
- sc: Single crochet
- dc: Double crochet
- sl st: Slip stitch
- sc2tog: Single crochet two stitches together
- inc: Work two single crochets in the same stitch
- MR: Magic ring
- B: Four-double-crochet bobble stitch
- RS: Right side, the finished front
- WS: Wrong side, the back
Making the Four-Double-Crochet Bobble
This stitch gives the lamb its woolly texture. Each bobble is made from four partially completed double crochets worked into the same stitch.
Step 1: Yarn over, insert your hook into the next stitch and pull up a loop. Yarn over and pull through the first two loops. Leave the remaining loops on your hook.
Step 2: Repeat that partially completed double crochet three more times in the same stitch. You'll have five loops on your hook.
Step 3: Yarn over and pull through all five loops. You've completed one bobble, and it counts as one stitch.
Don't add an extra chain after closing the bobble. Work directly into the next stitch as instructed.
Important: Work the bobble rows on the wrong side of the body. The bobbles will push toward the right side, making the raised wool visible on the finished lamb.
You want short, plump stitches with clearly defined strands, not loose loops that resemble tiny flowers. Keep the yarn tension even as you work the four partial double crochets.
Each row below tells you the total number of stitches. A bobble replaces one single crochet stitch, so it doesn't increase the stitch count.
Free Crochet Lamb Applique Pattern: Bobble Stitch Body
Start with ivory yarn. The body is worked in turning rows from the lower edge toward the upper edge. It widens gradually through the middle and narrows again toward the top.
On the bobble rows, work one single crochet in every stitch not specifically named as a bobble. Count positions from the beginning of the row you're currently working.
Body Instructions
Foundation: Ch 17.
Row 1 (RS): Sc in the second chain from the hook and in each remaining chain. Ch 1, turn. (16 sc)
Row 2 (WS): Work 16 stitches, making a bobble in stitches 3, 7, 11 and 14. Work sc in every other stitch. Ch 1, turn. (16 stitches, including 4 bobbles)
Row 3: Work 2 sc in the first stitch, sc in the next 14 stitches, and 2 sc in the last stitch. Ch 1, turn. (18 sc)
Row 4 (WS): Work 18 stitches, making a bobble in stitches 4, 8, 12 and 16. Sc in all remaining positions. Ch 1, turn. (18 stitches, including 4 bobbles)
Row 5: Work 2 sc in the first stitch, sc in the next 16 stitches, and 2 sc in the last stitch. Ch 1, turn. (20 sc)
Row 6 (WS): Work 20 stitches, making a bobble in stitches 3, 7, 11, 15 and 19. Sc in all remaining positions. Ch 1, turn. (20 stitches, including 5 bobbles)
Row 7: Work 2 sc in the first stitch, sc in the next 18 stitches, and 2 sc in the last stitch. Ch 1, turn. (22 sc)
Row 8 (WS): Work 22 stitches, making a bobble in stitches 4, 8, 12, 16 and 20. Sc in all remaining positions. Ch 1, turn. (22 stitches, including 5 bobbles)
Row 9: Sc in each stitch across. Ch 1, turn. (22 sc)
Row 10 (WS): Work 22 stitches, making a bobble in stitches 3, 7, 11, 15 and 19. Sc in all remaining positions. Ch 1, turn. (22 stitches, including 5 bobbles)
Row 11: Sc in each stitch across. Ch 1, turn. (22 sc)
Row 12 (WS): Work 22 stitches, making a bobble in stitches 4, 8, 12, 16 and 20. Sc in all remaining positions. Ch 1, turn. (22 stitches, including 5 bobbles)
Row 13: Sc2tog over the first two stitches, sc in the next 18 stitches, and sc2tog over the last two stitches. Ch 1, turn. (20 sc)
Row 14 (WS): Work 20 stitches, making a bobble in stitches 3, 7, 11, 15 and 19. Sc in all remaining positions. Ch 1, turn. (20 stitches, including 5 bobbles)
Row 15: Sc2tog over the first two stitches, sc in the next 16 stitches, and sc2tog over the last two stitches. Ch 1, turn. (18 sc)
Row 16 (WS): Work 18 stitches, making a bobble in stitches 4, 8, 12 and 16. Sc in all remaining positions. Ch 1, turn. (18 stitches, including 4 bobbles)
Row 17: Sc2tog over the first two stitches, sc in the next 14 stitches, and sc2tog over the last two stitches. Ch 1, turn. (16 sc)
Row 18 (WS): Work 16 stitches, making a bobble in stitches 3, 7, 11 and 14. Sc in all remaining positions. Fasten off, leaving a long tail for assembly. (16 stitches, including 4 bobbles)
Check the Body Shape
You should now have a gently rounded horizontal body with 18 rows and 41 raised bobbles. The widest section contains 22 stitches.
At the target gauge, the widest section should measure approximately 2 3/4 inches across. The height is expected to be around 2 inches, although bobble tension can change that slightly.
Turn the body right side up and smooth it gently with your fingers. The bobbles should sit toward the front, while the back remains fairly flat.
Don't pull the bobbles apart or fluff them into separate petals. Their job is to suggest little tufts of wool, and the ordinary crochet stitches between them should still be visible.
Set the body aside while you make the face.
Make the Face and Ears
The face is a separate flat oval worked in turning rows. This gives the lamb the softly shaped face and horizontal crochet stitches shown in the finished example, with a smooth surface for embroidering the sleepy expression.
Use light tan yarn and keep your stitches firm and even. The face widens through its lower rows, remains wider across the middle, and narrows toward the top. It stays completely flat without stuffing.
Crochet the Face
Begin at the lower edge of the face with light tan yarn. Work in turning rows.
Foundation: Ch 6.
Row 1 (RS): Sc in the second chain from the hook and in each remaining chain. Ch 1, turn. (5 sc)
Row 2: Work 2 sc in the first stitch, sc in the next 3 stitches, and 2 sc in the last stitch. Ch 1, turn. (7 sc)
Row 3: Work 2 sc in the first stitch, sc in the next 5 stitches, and 2 sc in the last stitch. Ch 1, turn. (9 sc)
Row 4: Work 2 sc in the first stitch, sc in the next 7 stitches, and 2 sc in the last stitch. Ch 1, turn. (11 sc)
Row 5: Sc in each stitch across. Ch 1, turn. (11 sc)
Row 6: Sc in each stitch across. Ch 1, turn. (11 sc)
Row 7: Sc in each stitch across. Ch 1, turn. (11 sc)
Row 8: Sc in each stitch across. Ch 1, turn. (11 sc)
Row 9: Sc2tog over the first 2 stitches, sc in the next 7 stitches, and sc2tog over the last 2 stitches. Ch 1, turn. (9 sc)
Row 10: Sc2tog over the first 2 stitches, sc in the next 5 stitches, and sc2tog over the last 2 stitches. Ch 1, turn. (7 sc)
Row 11: Sc2tog over the first 2 stitches, sc in the next 3 stitches, and sc2tog over the last 2 stitches. Fasten off, leaving an 18-inch sewing tail. (5 sc)
Face checkpoint: The completed piece has 11 rows, with 5 stitches at the lower and upper edges and 11 stitches across its widest section. At the stated plain single crochet gauge, expect approximately 1 3/8 inches across and 1 1/10 inches high before shaping. These measurements are calculated, not physically tested.
Gently smooth the edges into a softly rounded horizontal oval. Do not pull the narrow ends into points. The woolly crown will cover part of the upper edge, while the embroidered features occupy the broad middle section.
Embroider the Sleepy Face
Embroider the features before attaching the head to the body. It's much easier to work on the flat face than to reach around the woolly body afterward.
Eyes: Using black embroidery floss, make two gently curved closed eyes across the upper-middle part of the face. Leave approximately 1/3 inch between the inner ends of the eyes. Add two or three short downward eyelashes to each eye.
Nose: Using pink embroidery floss, make a tiny upside-down triangular nose just below the center of the face. Fill it with several short satin stitches.
Mouth: With black embroidery floss, bring one short stitch down from the point of the nose. Add two small curved stitches at the bottom to make a relaxed little smile.
Cheeks: Add two small patches of pink embroidery beside the mouth, beneath the outer ends of the eyes. Keep them low and subtle.
Secure every embroidery end on the back of the face. Don't leave long loops or loose threads behind the stitching.
Crochet the Woolly Crown
The little cap of wool is what gives the lamb its rounded forehead. Work it separately in ivory, then place it over the upper edge of the tan face.
Foundation: Leave an 18-inch beginning tail for attaching the crown to the face, then ch 11.
Row 1 (RS): Sc in the second chain from the hook and across. Ch 1, turn. (10 sc)
Row 2 (WS): Work 10 stitches, making a bobble in stitches 2, 5 and 8. Sc in the other positions. Ch 1, turn. (10 stitches, including 3 bobbles)
Row 3: Work 2 sc in the first stitch, sc in the next 8 stitches, and 2 sc in the final stitch. Ch 1, turn. (12 sc)
Row 4 (WS): Work 12 stitches, making a bobble in stitches 2, 5, 8 and 11. Sc in the other positions. Ch 1, turn. (12 stitches, including 4 bobbles)
Row 5: Sc2tog over the first 2 stitches, sc in the next 8 stitches, and sc2tog over the last 2 stitches. Ch 1, turn. (10 sc)
Row 6 (WS): Work 10 stitches, making a bobble in stitches 2, 4, 7 and 9. Sc in the other positions. Fasten off and weave the finishing end into the back of the crown. Use the long beginning tail to attach the foundation edge and sides to the face. (10 stitches, including 4 bobbles)
You should have a shallow, softly shaped crown with 11 bobbles. It has 10 stitches across its foundation and upper edge, with a wider 12-stitch middle section. Place the foundation edge across the upper forehead, allowing the raised woolly rows to extend above the face and form a rounded crown. Keep both embroidered eyes visible.
The crown should overlap the upper part of the tan oval but leave both embroidered eyes completely visible.
Lay the crown over the upper portion of the face temporarily to check its position, keeping the raised bobbles facing outward and both embroidered eyes visible. Do not sew it down yet. Set the crown aside until Step 3 of assembly, when the ears will be attached first.
Crochet the Pink-Lined Ears
Make two matching ears. Their finished positions will be different, which gives the lamb the slightly lopsided, sleepy look shown in the example.
With dusty pink yarn:
Round 1: Ch 7. Sc in the second chain from the hook and in the next 4 chains. Work 3 sc in the last chain. Continue along the opposite side of the foundation chain, working sc in the next 4 chain loops and 2 sc in the remaining end loop. (14 sc)
Round 2: Sc in the next 5 stitches, work 2 sc in each of the next 2 stitches, sc in the next 5 stitches, and work 2 sc in each of the final 2 stitches. (18 sc)
Change to light tan:
Round 3: Work 1 sc in each stitch around. (18 sc)
Join with a slip stitch and fasten off, leaving a sewing tail.
Make the second ear exactly the same way.
Both ears should be flat, softly oval and slightly pointed-looking at their narrow ends once positioned. The pink centers should remain visible inside the tan edging.
Place one ear on the upper-left side of the head, angling it almost horizontally over the woolly body. Place the second ear on the right side, angling it outward and downward.
Check the ear angles now, but leave both ears unattached until Step 3 of assembly. Their inner ends will be sewn to the back of the face before the woolly crown is secured. The outer portions will be stitched down when the finished applique is attached to its bib or blanket.
Keep the ear tips visible, but don't leave them unsecured on anything intended for a baby to wear or handle.
Make the Hooves and Tail
We're keeping the hooves short and rounded. No long dangling legs. The tan upper sections will disappear partly beneath the wool, leaving just the little dark brown hoof tips peeking out.
Make Three Little Hooves
Each hoof begins with a short tan section and finishes with a wider, rounded brown tip.
Using light tan yarn:
Foundation: Leave a 12-inch beginning tail for assembly, then ch 5.
Row 1: Sc in the second chain from the hook and in each remaining chain. Ch 1, turn. (4 sc)
Row 2: Sc across. Ch 1, turn. (4 sc)
Row 3: Sc across. Change to dark brown in the final stitch. Ch 1, turn. (4 sc)
Row 4: Work 2 sc in the first stitch, sc in the next 2 stitches, and 2 sc in the last stitch. Ch 1, turn. (6 sc)
Row 5: Sc across. Ch 1, turn. (6 sc)
Row 6: Sc2tog, sc in the next 2 stitches, and sc2tog. Fasten off and weave the brown finishing tail securely into the back of the hoof. Keep the long tan beginning tail for sewing the hoof to the body. (4 sc)
Make three matching hooves.
Each finished piece should have a narrow tan attachment section and a dark brown rounded end. The brown section is slightly wider in the middle and narrower at its tip.
Don't stuff the hooves. They're meant to sit flat, with the tan tops tucked behind the lamb's wool.
Crochet the Curled Woolly Tail
The tail is a short ivory tuft at the upper-left end of the body. It shouldn't look like a long animal tail or a loose pompom.
With ivory yarn:
Foundation: Leave a 12-inch beginning tail for attachment, then ch 5.
Row 1 (RS): Sc in the second chain from the hook and across. Ch 1, turn. (4 sc)
Row 2 (WS): Sc in the first stitch, make a bobble in each of the next 2 stitches, then sc in the last stitch. Ch 1, turn. (4 stitches, including 2 bobbles)
Row 3: Sc across. Ch 1, turn. (4 sc)
Row 4 (WS): Sc in the first stitch, make a bobble in the next stitch, then sc in the last 2 stitches. Ch 1, turn. (4 stitches, including 1 bobble)
Row 5: Sc across. Fasten off and weave the finishing end securely into the back of the tail. Use the long beginning tail at the foundation edge when attaching the tuft to the body. (4 sc)
Fold the tail gently into a shallow curve, keeping its three bobbles facing outward. The foundation end will be hidden behind the lamb's body.
That's all the tail needs. Keep it short.
Assembly and Finishing
Lay all nine crocheted pieces on a flat surface before sewing anything together. The lamb should look wide and woolly, with its head resting over the upper-right portion of the body.
Arrange the pieces with the raised bobbles facing up. Take a minute to check the proportions. The face should be large enough to show its sleepy expression without covering most of the body.
Step 1: Position the Hooves
Place the body right side up, with the 16-stitch foundation edge at the bottom and the final row at the top.
Position the three hooves along the lower edge of the body, keeping their tan sections mostly hidden behind the wool.
With the finished front facing you, use the 16-stitch foundation edge as your guide. Position the tan attachment edge of the first hoof behind body stitches 1 through 4, the second behind stitches 7 through 10, and the third behind stitches 13 through 16, counting from left to right.
Pin all three hooves before sewing. The brown tips are wider than their tan attachment sections, so angle the outer tips slightly outward if needed. The second and third hooves should appear as a pair on the right side, with their brown ends sitting beside each other rather than overlapping. Adjust their angles before fastening them permanently.
Allow approximately 1/4 to 3/8 inch of each dark brown tip to show below the wool. Most of the tan upper section should remain hidden.
Pin the three pieces in place. Turn the body over carefully and sew the tan sections firmly to the back of the body. Add hidden tacking stitches near the brown ends to prevent them from swinging freely.
Step 2: Attach the Tail
Position the short ivory tail behind the upper-left side of the body, with its bobbles curving upward and outward.
Let the tuft project approximately 1/4 to 3/8 inch beyond the body edge. Sew its foundation end to the back of the body.
Use additional hidden stitches to secure the curved portion. The little bobbles should remain visible, but the tail itself should not be loose.
Step 3: Complete the Head
Check that the embroidered eyes, nose, cheeks and smile are secure on the flat tan face.
Place the narrow inner end of each ear behind the upper sides of the tan face, keeping the pink centers facing forward. Sew the inner attachment ends securely to the back of the face with small stitches. Angle the left ear outward, almost horizontally above the body, and the right ear outward and downward beside the face. Leave the outer portions flat and unattached until the completed applique is sewn to its bib or blanket.
Position the woolly crown across the top of the head, overlapping the upper edge of the face. Keep the eyes completely uncovered.
Using the crown's long beginning yarn tail, sew its narrower foundation edge across the upper portion of the tan face, covering the inner ear attachment areas. Continue along both side edges with small, hidden stitches through the flat crochet stitches. Keep the embroidered eyes visible and avoid sewing through the raised bobble tops. Add a few hidden anchoring stitches beneath the upper bobbles if needed to keep the crown flat against the face.
Turn the completed head over and check all joining stitches. The entire head should remain flat, with no stuffing or pockets between the pieces.
Step 4: Attach the Head to the Body
Position the head over the upper-right portion of the woolly body. Allow the lower-left edge of the face to overlap the body's bobbles slightly.
The head should extend beyond the upper-right outline of the body, with the woolly crown sitting above the body rather than disappearing into it.
Pin the head in place and check the overall silhouette. You should still see a broad expanse of wool on the left, the curled tail at the rear, and all three brown hoof tips along the lower edge.
Sew the overlapping lower-left portion of the face securely to the woolly body with small, hidden stitches. Follow the complete edge wherever the head overlaps the body. Leave the projecting portion of the face flat, without pulling it backward to reach the wool. When attaching the finished lamb to a bib or blanket, stitch around this free outer edge as well so the entire head lies securely against the fabric.
Don't pull the stitches so tightly that the face puckers. Smooth the tan crochet gently as you work.
Step 5: Secure the Embroidery and Raised Pieces
Remove every temporary pin and stitch marker after the pieces are securely joined. Turn the lamb over and weave each yarn tail through several stitches on the back, changing direction before trimming. Check the embroidery ends and all nine crocheted pieces before attaching the applique to its final project.
Check the ears, tail, crown and hooves individually. Nothing should pull loose with a gentle tug.
The bobbles are part of the crocheted fabric, so they don't need to be sewn on separately. Check for loose or unusually long loops before attaching the lamb to its final project. Secure a slightly loose loop from the back with matching yarn. If a bobble is badly distorted, remake the affected section rather than cutting an exposed loop.
Step 6: Shape the Finished Lamb
Lay the completed appliqué flat on a clean towel and gently arrange the ears and tail.
If the body curls, lightly dampen the back and pin it into its intended shape on a towel or blocking mat. Let it dry completely, then remove every blocking pin before attaching the lamb to another project.
Don't flatten the raised wool with a hot iron. You'll lose the texture that gives the little lamb its character.
The finished lamb should have a fairly flat back, a softly textured front, one rounded sleepy face, two pink-lined ears, a curled tail and three little brown hooves tucked beneath the wool.
Using Your Crochet Lamb Applique on Baby Projects
The smaller size gives you several ways to use this lamb without making a separate pattern for every project. I'd start with a plain white cotton bib. The little face and ivory wool look especially pretty against white, dusty pink or soft sage green fabric.
Adding the Lamb to a Baby Bib
Place the completed lamb on the front of the bib, centered below the neckline with enough room around the edges for a neat finish. Move it around before sewing until the little ears and tail have room to show.
I'd keep the lamb well below the neck opening rather than crowding the upper edge. The extra texture belongs on the front of the bib, away from the baby's chin.
Use matching cotton thread or yarn and small, closely spaced stitches to attach the body securely. Sew around the outer edge, then add hidden stitches beneath the face and any other areas that might lift away from the fabric.
Secure both ears and the tail along their lengths. Check the three hooves, too. They should lie against the bib rather than hang free.
If the bib is lined, attach the appliqué before joining the front and back layers whenever possible. That keeps the attachment stitches hidden inside the finished bib.
Adding the Lamb to a Baby Blanket
For a blanket, you can place a single lamb near one corner or repeat several across a larger plain section. Leave room around each appliqué so the woolly outline remains recognizable.
If you're combining it with other little animals, take a look at my free crochet animal applique patterns. There are plenty of woodland and nursery animals that can share the same blanket without requiring a completely different color scheme.
Use small stitches around the complete outline and tack down all projecting pieces. A blanket that will be handled or washed needs a firmer attachment than a decorative wall hanging.
Keeping the Bobble Stitches Looking Like Wool
The wool should look like rows of actual crochet, not clusters of separate round flowers. Each bobble is one stitch with several vertical strands gathered at the top.
If your bobbles look too large or loose, try working the four partial double crochets with slightly firmer tension. Don't automatically add more stitches to make the body fluffier. The pattern already contains 41 body bobbles, which is plenty for a little lamb this size.
If you prefer a slightly flatter appliqué for clothing, you can use a finer cotton yarn and smaller hook while keeping the same stitch counts. Make a small sample first because the face, ears and hooves will shrink along with the body.
Baby Safety and Care
Use embroidered facial features only. Skip beads, buttons, plastic eyes and detachable decorations. Sew every component securely, especially the ears, hooves and tail, and inspect the stitching after washing.
If you're adding the lamb to a baby blanket, keep that blanket out of an infant's sleep area. Use it for supervised activities or as a decoration, not as loose bedding in a crib or bassinet.
A decorative appliqué bib should be worn only during supervised use. Remove the bib before naps and nighttime sleep. The American Academy of Pediatrics' baby drooling guidance also advises removing bibs before sleep.
Use the care instructions for your chosen cotton yarn and bib fabric. Gentle washing, careful reshaping and thorough drying will help preserve the bobble texture.
If you're making a baby shower gift, the finished lamb can become a matching accent on a bib, burp cloth or blanket. You can pair it with more ideas from my crochet baby shower gifts collection.
A tiny lamb on a pretty bib and a coordinating blanket make a sweet little gift without having to fill a basket with extras.
When you click on links to various merchants on this site and make a purchase, this may result in this site earning a commission. This does not affect the price you pay.

UBGI Gold Standard 2026
Reviewed under the site's
editorial checklist.
Photos, decorating ideas, party setups and reader submissions are shared for inspiration unless a page is specifically presented as a pattern, tutorial, reference guide or step-by-step project. Follow the instructions, measurements, safety guidance and manufacturer directions provided for the particular project or product.
About Jan | Contact | Baby Nursery Ideas (Blog) | Site Map | Privacy Policy | Disclosure Policy | Disclaimer | Affiliate Disclosure | Earnings Disclosure | Facebook | Pinterest
I am a participant in the Amazon Services LLC Associates Program, an affiliate advertising program designed to provide a means for us to earn fees by linking to Amazon. As an Amazon Associate I earn from qualifying purchases.
Copyright © 2006-2026. All Rights Reserved.