Free Crochet Elf Baby Rattle Pattern with Wooden Ring
By Jan Bay
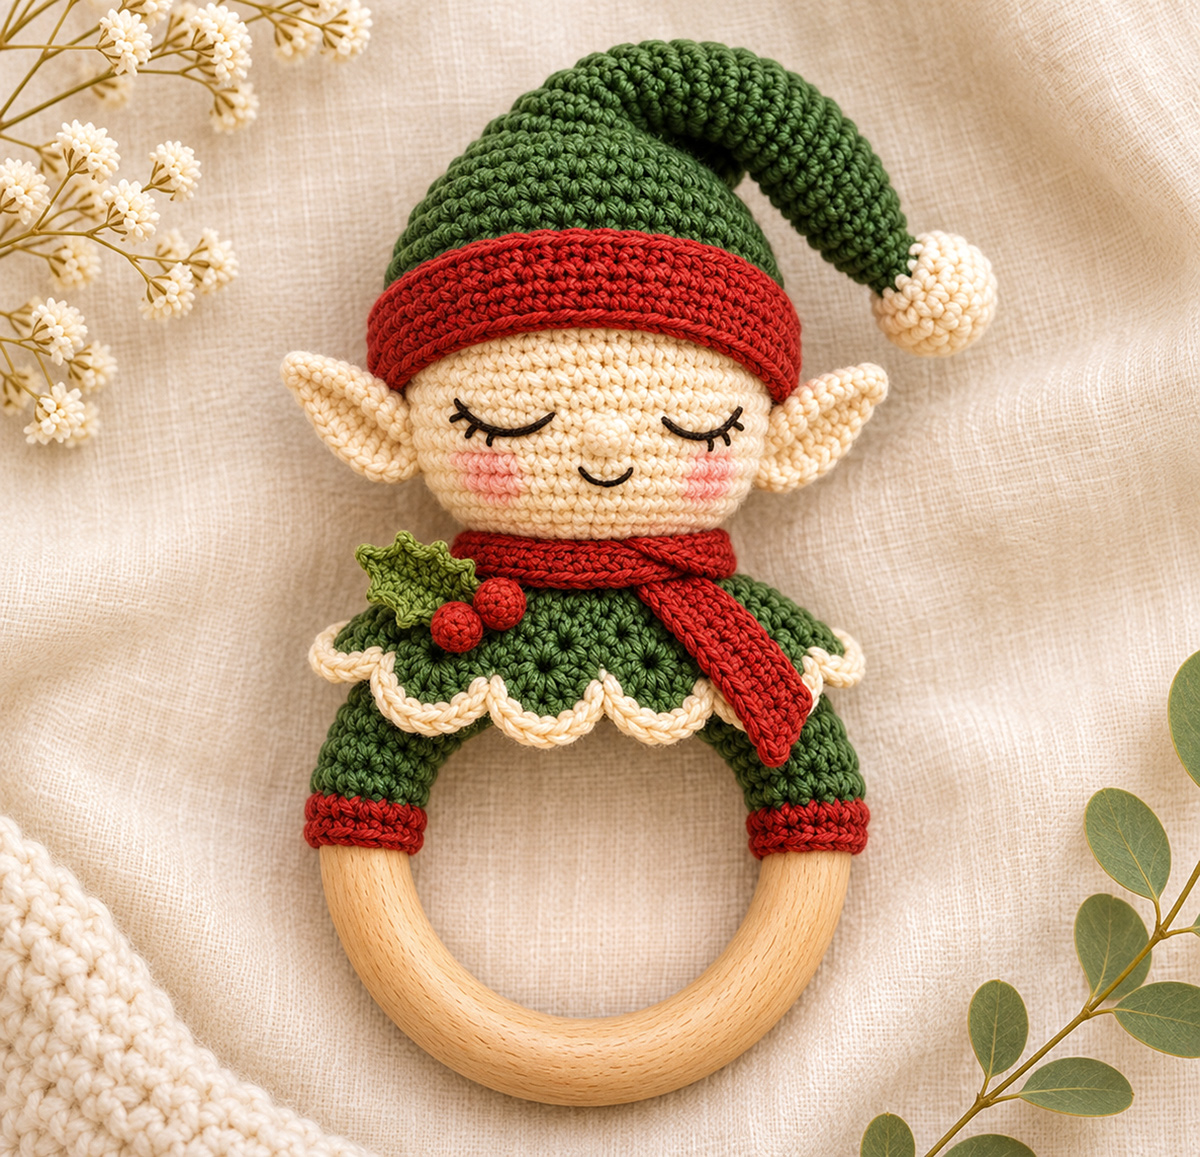
This free crochet elf baby rattle pattern makes the sweetest little Christmas companion for our sleepy elf lovey dolls! With his long, floppy green hat, pointed ears, embroidered sleepy eyes and tiny scalloped tunic, this little elf looks like a miniature version of his larger lovey doll friend. The natural wooden ring gives the design its traditional rattle shape, while cranberry-red accents and a little holly decoration add Christmas charm. I'll show you how to crochet the pieces, assemble the elf and add an enclosed rattle insert to make a matching handmade holiday gift.
Explore More Free Crochet Christmas and Baby Patterns
Crochet Elf Lovey Doll Pattern
Free Christmas Crochet Patterns
See Supplies for This Project Here.
Jump to:
- Materials and Supplies
- Finished Size and Gauge
- Stitches and Abbreviations
- Crochet the Elf Head and Face
- Make the Long Curved Elf Hat
- Crochet the Pointed Ears
- Make the Scalloped Elf Tunic
- Crochet the Scarf and Holly Accent
- Cover the Wooden Rattle Ring
- Assembly and Finishing
- Frequently Asked Questions
Materials for This Free Crochet Elf Baby Rattle Pattern
Let's start with the yarn. I'd stay with the traditional Christmas colors for this little elf because they tie him right back to our larger elf doll. Forest green, cranberry red and warm cream are really all you need for most of him. A little pink and black yarn will take care of that sleepy face.
Choose a smooth cotton yarn that shows the stitches clearly. Avoid fuzzy or loosely spun yarn that sheds fibers. You'll want fairly tight stitches, especially around the head and the little rattle insert.
- DK-weight cotton yarn in forest green, approximately 45 yards
- DK-weight cotton yarn in cranberry red, approximately 25 yards
- DK-weight cotton yarn in warm cream, approximately 30 yards
- Small amounts of leaf green, pink and black cotton yarn
- 2.75 mm crochet hook, or the size needed for the required gauge
- One smooth, unfinished wooden ring, approximately 80 mm outside diameter and 12 mm thick
- One commercially sealed rattle insert, approximately 18–20 mm, if making the enclosed sound component
- Polyester fiberfill
- Yarn needle with a blunt tip
- Stitch markers
- Scissors
- Measuring tape
- Small sewing clips or removable stitch markers for assembly
The yardages are estimates, so I'd have a little extra of each main color available. You'll also need a wooden ring without rough edges, splinters, cracks, paint or loose coatings.
About the rattle insert: Don't use loose beads, dried beans, rice or bells inside the head. The instructions below use a sealed insert enclosed in its own crocheted pouch. That extra covering is a construction precaution, not proof that the finished rattle meets infant toy requirements.
A note about baby use: This is an original crochet pattern that hasn't been physically tested or certified for infant play. Rattles are subject to specific federal requirements, including mechanical and dimensional testing. Before making or distributing a rattle intended for infant use, review the U.S. Consumer Product Safety Commission's rattle requirements. Sewing the parts securely doesn't replace those tests. Until the complete design has been evaluated, keep it as a decorative gift out of an infant's reach.
Finished Size and Gauge
With the materials above, the elf is expected to measure about 7.5 to 9 inches tall, including the curved hat and wooden ring. The exact height depends on how far you bend the hat tip. The little head should measure approximately 2.6 inches across before adding the ears.
- Skill level: Intermediate
- Working gauge: 26 single crochet stitches and 30 rounds = 4 inches (10 cm)
- Head: Approximately 2.6 inches (6.6 cm) in diameter, excluding ears
- Wooden ring: 3.15 inches (80 mm) outside diameter
- Overall height: Approximately 7.5–9 inches (19–23 cm)
- Construction: Mostly continuous rounds, with turned rows for the ears, scarf and ring coverings
These are calculated measurements, not measurements taken from a finished sample. Make a small gauge swatch before you start. If your stitches are much larger, the hat may become too wide and the little coverings won't fit the wooden ring the way they're supposed to.
For a quick gauge check, crochet a square of at least 30 single crochet stitches and 34 rows. Measure the center 4 inches without stretching the fabric. Adjust your hook until you're close to the stated gauge.
Wooden-ring checkpoint: Eleven single crochet stitches should measure approximately 4.23 cm across. That allows a little extra width for joining the covering around a wooden ring with a 12 mm cross-section. Check the actual fit before making both coverings, since different wooden rings may need a small adjustment.
I'd keep the fabric dense rather than trying to make this one larger. The proportions in the example depend on a compact face, a wide folded hat band and a little tunic that flares just above the wooden ring.
Stitches and Abbreviations
This pattern uses US crochet terms.
- ch: Chain
- sc: Single crochet
- hdc: Half double crochet
- dc: Double crochet
- sl st: Slip stitch
- st/sts: Stitch/stitches
- inc: Work 2 single crochet stitches into the same stitch
- inv dec: Invisible single crochet decrease over the next 2 stitches
- MR: Magic ring
- BLO: Back loop only
- FO: Fasten off
Numbers in parentheses at the end of a round show how many stitches you should have when that round is finished. Instructions between asterisks are repeated the stated number of times.
Work continuous rounds unless the instructions tell you to join or turn. Move your stitch marker at the end of every round. The chain used to turn a flat piece doesn't count as a stitch.
For the stuffed parts, work through both loops. Use invisible decreases on the outside of the work so the shaping looks smooth.
Crochet the Elf Head and Embroidered Face
We'll make the head first because it gives us the size for everything else. The elf has a rounded cream face with little closed eyes, rosy cheeks and a tiny smile. I wouldn't change those features. They're what make him look so much like the matching elf doll.
The head is worked from the top down in continuous rounds. We'll leave the ears off until the face is finished, so it's easier to position everything evenly.
Cream Elf Head
With cream yarn and a 2.75 mm hook:
Round 1: Make a magic ring and work 6 sc into it. (6)
Round 2: Inc in each stitch around. (12)
Round 3: *1 sc, inc*; repeat 6 times. (18)
Round 4: *2 sc, inc*; repeat 6 times. (24)
Round 5: *3 sc, inc*; repeat 6 times. (30)
Round 6: *4 sc, inc*; repeat 6 times. (36)
Round 7: *5 sc, inc*; repeat 6 times. (42)
Round 8: *6 sc, inc*; repeat 6 times. (48)
Round 9: *7 sc, inc*; repeat 6 times. (54)
Rounds 10–18: Sc in each stitch around. (54 each round)
Round 19: *7 sc, inv dec*; repeat 6 times. (48)
Round 20: *6 sc, inv dec*; repeat 6 times. (42)
Stop here for a moment. The head should be rounded, with a fairly wide middle and a gentle curve beginning underneath. Don't stuff it completely yet. It's much easier to embroider the face while you can still reach the inside.
Embroider the Sleepy Elf Face
Choose the front of the head and mark its center between Rounds 15 and 16. The eyes should sit evenly on either side of that center, with plenty of room for the pointed ears.
- Using black yarn, embroider the left closed eye as a shallow curved line spanning about 7 stitches. Place its two ends near Round 14 and let the middle of the curve dip toward Round 16.
- Make the right eye the same size and height, mirroring the first one. Leave approximately 6 stitches between the nearest ends of the eyes.
- Add two or three short eyelashes at the outer corner of each eye. Angle them slightly downward and outward.
- Using pink yarn, embroider a small rounded cheek beneath each eye, around Rounds 17–18. Use closely placed satin stitches or several short surface stitches to fill each patch.
- With black yarn, embroider a small upward-curved smile centered around Round 19. Keep it approximately 4 stitches wide.
There's no need for a separate nose. The little smile and sleeping eyes give this elf all the expression he needs.
Keep the embroidery flat against the head. Secure the thread ends inside, where they won't show or be easily pulled free.
Optional Enclosed Rattle Insert Pouch
If you're including a sealed sound insert, crochet a separate pouch for it. The pouch is intended to contain the insert inside the larger stuffed head.
Using cream cotton yarn:
Round 1: MR, 6 sc. (6)
Round 2: Inc around. (12)
Round 3: *1 sc, inc*; repeat 6 times. (18)
Rounds 4–7: Sc around. (18)
Check the pouch against the sealed insert. It should fit without forcing the stitches apart. The calculated circumference at this gauge is approximately 6.9 cm, suitable as a starting point for an insert around 18–20 mm in diameter. Check the actual capsule dimensions, including its length, before closing.
Place the sealed insert inside.
Round 8: *1 sc, inv dec*; repeat 6 times. (12)
Round 9: Inv dec around. (6)
FO, leaving a yarn tail. Thread it through the front loops of the remaining 6 stitches and pull the opening closed. Weave the tail through the pouch several times and trim it.
Don't add loose filling to the sound insert itself, and don't substitute a handmade container filled with beads or other loose objects.
Finish the Head
Return to the cream head.
Round 21: *5 sc, inv dec*; repeat 6 times. (36)
Round 22: *4 sc, inv dec*; repeat 6 times. (30)
Add a little fiberfill around the upper and side portions of the head. If you're using the enclosed sound insert, position its pouch in the center and surround it with fiberfill. Keep the stuffing even so the face stays rounded.
Round 23: *3 sc, inv dec*; repeat 6 times. (24)
FO after Round 23, leaving the 24-stitch neck opening unclosed. Do not work additional decrease rounds. We'll use these 24 stitches to attach the tunic.
Make the Inner Neck Lining
We need a small crocheted disk to keep the stuffing and enclosed rattle insert inside the head without closing the neck stitches needed for assembly.
With cream yarn:
Round 1: MR, 6 sc. (6)
Round 2: Inc around. (12)
Round 3: *1 sc, inc*; repeat 6 times. (18)
Round 4: *2 sc, inc*; repeat 6 times. (24)
FO, leaving a long sewing tail.
Finish adding fiberfill to the head, keeping the filling even around the enclosed rattle insert if you're using one.
Place the crocheted disk against the stuffing inside the neck opening. Match the disk's 24 outer stitches to the 24 stitches of Head Round 23.
Using the disk's sewing tail, sew its outer edge to the back loops of Head Round 23, matching one stitch to one stitch around the entire opening. Leave the front loops of the head's final round available for attaching the tunic.
Secure the sewing tail inside the head. Check that the lining lies flat, the head keeps its rounded shape and no stuffing is exposed.
Head checkpoint: The widest part should contain 54 stitches. At the stated gauge, that gives a calculated circumference of about 20.8 cm and a diameter of approximately 6.6 cm before allowing for the exact stuffed shape.
Check that both eyes are level and that the cheeks don't disappear underneath the sides of the face. The wooden ring and hat will add plenty of detail later, so keep this little face simple.
Make the Long Curved Elf Hat
Now for my favorite part of the design! The elf's long green hat bends over to one side and ends in a small cream pom-pom. The wide red band sits low across his forehead, just above those embroidered eyes.
We'll crochet the band first, then work upward into the green crown. The long upper section gets its curved shape during finishing. No wire is used.
Red Hat Band
With cranberry-red yarn, ch 60. Join with a sl st to the first chain, taking care not to twist the foundation chain.
Round 1: Work 1 sc into each chain. Do not join at the end of this round. Continue in a spiral. (60)
Rounds 2–5: Sc around. (60 each round)
Change to forest-green yarn during the final stitch of Round 5. Do not fasten off the green working yarn.
The band should measure approximately 1.7 cm tall at the stated round gauge. Its purpose is to sit over the upper portion of the head, not to cover the eyes.
Green Tapered Hat Crown
Begin counting the green rounds separately. Continue directly from the red band.
Green Rounds 1–2: Sc around. (60 each round)
Green Round 3: *8 sc, inv dec*; repeat 6 times. (54)
Green Rounds 4–5: Sc around. (54 each round)
Green Round 6: *7 sc, inv dec*; repeat 6 times. (48)
Green Rounds 7–8: Sc around. (48 each round)
Green Round 9: *6 sc, inv dec*; repeat 6 times. (42)
Green Rounds 10–11: Sc around. (42 each round)
Green Round 12: *5 sc, inv dec*; repeat 6 times. (36)
Green Rounds 13–14: Sc around. (36 each round)
Green Round 15: *4 sc, inv dec*; repeat 6 times. (30)
Green Rounds 16–17: Sc around. (30 each round)
Green Round 18: *3 sc, inv dec*; repeat 6 times. (24)
Green Rounds 19–20: Sc around. (24 each round)
Green Round 21: *2 sc, inv dec*; repeat 6 times. (18)
Green Rounds 22–23: Sc around. (18 each round)
Green Round 24: *7 sc, inv dec*; repeat twice. (16)
Green Rounds 25–26: Sc around. (16 each round)
Green Round 27: *6 sc, inv dec*; repeat twice. (14)
Green Round 28: Sc around. (14)
Green Round 29: *5 sc, inv dec*; repeat twice. (12)
Green Round 30: Sc around. (12)
Green Round 31: *4 sc, inv dec*; repeat twice. (10)
Green Round 32: *3 sc, inv dec*; repeat twice. (8)
Green Round 33: Inv dec 4 times. (4)
FO, leaving a long tail. Close the last 4 stitches by threading the tail through their front loops and pulling them together.
Shape the Curved Hat Tip
The lower green section should be wide enough to sit comfortably on top of the cream head. The tip should be long and narrow enough to bend naturally.
Before sewing the hat onto the head, add a small amount of fiberfill to the wider lower green crown. Keep the upper part, beginning around Green Round 20, almost empty so it can bend without looking stiff.
- Lay the hat flat with the red band at the bottom.
- Arrange the upper green section so its tip bends toward the right when you look at the elf from the front.
- Fold the upper section gently around Green Rounds 23–29 to form the first curve, then guide the narrower tip toward the viewer's right.
- With a matching green yarn tail, make two or three small securing stitches along the inside of the bend. Catch stitches on the inner surfaces of the curve, drawing them slightly closer together.
- Adjust the tension a little at a time. The goal is a rounded bend, not a sharp crease.
- Secure the yarn inside the hat.
Hat checkpoint: The lower part should still look like a tapered cone. The upper section should curve to the side, with the tip hanging down rather than sticking straight up.
The photographed bend is an intended shaping target, not a physically verified result. If the first sample bends too sharply, release the shaping stitches and spread them over more rounds. If it stays too upright, remove a little stuffing from the upper section and reposition the tucks.
Cream Pom-Pom
Instead of a loose yarn pom-pom, we'll crochet a small rounded piece for the hat tip.
With cream yarn:
Round 1: MR, 6 sc. (6)
Round 2: Inc around. (12)
Rounds 3–4: Sc around. (12 each round)
Round 5: Inv dec around. (6)
FO, leaving a long sewing tail. Add a tiny amount of fiberfill, close the opening and sew the pom-pom directly onto the closed green hat tip. Stitch around the entire base several times and weave the tail well into the hat.
The finished pom-pom should look like a little rounded cream knot at the end of the curved hat. Don't make it oversized.
Attach the Hat to the Head
Position the red band across the upper portion of the cream head, approximately over Head Rounds 9–11. Check the finished face before pinning.
The red band should frame the forehead without covering the eyelashes. Center the hat over the face, then sew the lower red edge to the cream head using small, closely spaced stitches around the full circumference.
There are 60 stitches around the hat band and 54 around the widest portion of the head. Distribute the few extra hat stitches evenly as you sew. Don't try to force a one-to-one stitch match.
After attaching the brim, adjust the bend again. Viewed from the front, the hat should sweep to the right as it does in the example image.
Crochet the Pointed Elf Ears
Those little pointed ears are another feature I wouldn't skip. They extend past the sides of the face and make this look like an elf even before the hat and scarf are in place.
Make two identical ears with cream yarn. Each ear is worked from its narrow point toward the wider base.
Ear Pattern: Make Two
Row 1: Ch 2. Work 2 sc into the second chain from the hook. (2)
Row 2: Ch 1, turn. Inc in each stitch. (4)
Row 3: Ch 1, turn. Sc across. (4)
Row 4: Ch 1, turn. Inc, 2 sc, inc. (6)
Row 5: Ch 1, turn. Sc across. (6)
Row 6: Ch 1, turn. Inc, 4 sc, inc. (8)
Rows 7–8: Ch 1, turn. Sc across. (8 each row)
FO, leaving a long tail for sewing.
At the stated gauge, each ear will extend approximately 2.5–3 cm before its base is folded and attached.
Shape and Attach the Ears
- Lay an ear flat with the narrow point facing outward.
- Pinch the center of the eight-stitch base together so the bottom of the ear has a shallow fold.
- Make several stitches through the pinched base to hold the fold.
- Repeat with the second ear.
- Position one ear on each side of the head, with the base spanning approximately Head Rounds 13–17.
- Angle the pointed tips slightly upward and outward.
- Sew each folded base firmly into the side of the head, catching the full width of its attachment area.
- Use a few small stitches near the lower edge to prevent the ears from tipping forward.
Check the elf from the front before securing the final tails. The ears should look balanced, and the red hat band should sit just above their upper edges.
If you want the small inner-ear crease from the example, use cream yarn to embroider one short line from the base toward the pointed tip. Pull it just enough to form a shallow ridge. Keep the thread ends hidden inside the head.
That's the face and hat finished. With the tunic and wooden ring added, the whole elf will begin to look like the example.
Make the Scalloped Green Elf Tunic
The little green tunic is what makes our elf rattle look like a miniature version of the larger doll. Instead of a plain collar around the neck, we'll give him a flared tunic with a scalloped cream border.
It's a small piece, but it does quite a bit of work. It fills the space between the head and wooden ring, hides part of the ring attachment and gives us a place to secure the red scarf and holly decoration.
We'll crochet the tunic as a short, open tube that widens toward the bottom. It doesn't need to be stuffed.
Green Tunic Body
With forest-green yarn, ch 24. Join with a sl st to the first chain, making sure the chain isn't twisted.
Round 1: Work 1 sc into each chain. Continue in a spiral. (24)
Round 2: Sc around. (24)
Round 3: *3 sc, inc*; repeat 6 times. (30)
Round 4: Sc around. (30)
Round 5: *4 sc, inc*; repeat 6 times. (36)
Round 6: *5 sc, inc*; repeat 6 times. (42)
Round 7: *6 sc, inc*; repeat 6 times. (48)
Round 8: *7 sc, inc*; repeat 6 times. (54)
Round 9: Sc around. (54)
Stop here and check the shape. The upper opening should be much narrower than the lower edge. At the stated gauge, the lower edge has a calculated circumference of approximately 20.8 cm before adding the scallops.
Don't pull the lower edge inward. We want it to spread gently over the top of the wooden ring.
Scalloped Tunic Hem
Keep working with forest-green yarn.
Round 10: *1 sc in the next stitch, skip 2 stitches, 5 dc in the next stitch, skip 2 stitches*; repeat 9 times. (9 scallops, 54 stitches worked)
Each repeat uses 6 stitches from the previous round and produces 6 stitches in the new round. That gives us exactly nine scallops around the tunic.
Sl st to the first sc of the round and fasten off the green yarn.
Cream Scalloped Edging
Join cream yarn at the first scallop.
Work 1 loose sl st into each stitch along the completed scalloped edge, including the single crochet stitch between each group of five double crochets. (54 sl sts)
Join with a sl st to the beginning of the cream edging and fasten off.
Keep these slip stitches relaxed. If you pull them too tightly, they'll flatten the scallops, and we want that pretty little wavy edge to show.
Tunic checkpoint: You should have nine green scallops edged in cream. The tunic should flare outward rather than hanging straight down like a narrow tube.
If the scallops curl underneath, check that you haven't tightened the cream edging. If the fabric cups upward, recheck your stitch counts in Rounds 5–9 before continuing.
Attach the Tunic to the Head
Place the green tunic beneath the cream head, with the narrow 24-stitch opening against the head's finished 24-stitch neck edge.
The inner neck lining already contains the stuffing. The unused front loops of Head Round 23 are now available for the tunic attachment, giving us a matching 24-stitch join without sewing through the stuffed part of the head.
- Center the tunic beneath the head, with the scalloped edge facing downward.
- Align the 24 stitches of the tunic's upper edge with the 24 available front loops of Head Round 23.
- Thread a yarn needle with approximately 18 inches (46 cm) of forest-green yarn.
- Beginning at the back of the neck, sew through one tunic-edge stitch and the corresponding available front loop of the head. Continue around, matching all 24 stitches one to one.
- Complete the seam at the starting point and secure the sewing yarn. Make a second pass through the joined edges if the seam needs reinforcement.
- Check that the head sits centered above the tunic and that the join doesn't pull the cream face downward.
- Leave the lower tunic open. Don't stuff it or sew its scalloped edge closed.
Now check the elf from the front. The cream face should sit above the green tunic, with enough room between them for a narrow red scarf.
Don't attach the lower tunic to the wooden ring yet. We'll do that after making the ring coverings and hidden attachment strap.
Crochet the Red Scarf and Holly Accent
The red scarf gives the elf a little movement without adding another large piece. In the example, it wraps around the neck and hangs diagonally across the green tunic, ending near the right-hand ring covering.
We'll make the scarf in two connected-looking sections: a narrow neckband and a flat hanging tail. Both will be sewn down during assembly so there isn't a loose length of yarn swinging around.
Red Scarf Neckband
We'll make the red neckband as a flat strip and close it around the finished neck. That way, it fits beneath the head without having to stretch over the wider face.
With cranberry-red yarn:
Row 1: Ch 28. Sc in the second chain from the hook and in each remaining chain. (27)
Row 2: Ch 1, turn. Sc across. (27)
FO, leaving a long sewing tail.
The strip should measure approximately 10.4 cm long at the stated stitch gauge. Wrap it around the neck, directly over the head-to-tunic seam, with the two short ends meeting at the back.
Allow the ends to overlap slightly. Sew the overlapping ends together, then stitch the upper and lower edges of the band to the underlying crochet fabric around the full neck.
Keep the band level and snug without pulling the cream face downward. The scarf tail will attach beneath the front-right portion of this band.
If your actual neck measurement differs, adjust the strip by adding or removing complete stitches before sewing. It should wrap comfortably around the neck with a small overlap at the back.
Diagonal Scarf Tail
With cranberry-red yarn:
Row 1: Ch 6. Sc in the second chain from the hook and in each remaining chain. (5)
Rows 2–16: Ch 1, turn. Sc across. (5 each row)
After Row 16, work a loose sl st around the outside edge of the scarf tail to give it a neat finish. At the four corners, work 2 sl sts into the same corner space so the edging doesn't pull.
FO, leaving a long tail for sewing.
At the stated gauge, the scarf tail is expected to measure approximately 5.3 cm long before allowing for the finishing edge.
Position the Scarf
- Place the upper end of the scarf tail beneath the front-right portion of the red neckband.
- Angle the strip downward across the green tunic toward the viewer's right, as shown in the finished example.
- Sew the top five stitches securely beneath the neckband.
- Leave the remainder of the scarf tail unattached until the wooden ring and its coverings have been assembled.
- Lay the loose tail against the tunic temporarily. We'll secure its long edges and lower end during final assembly, once the right-hand red cuff is in place.
The scarf should eventually look as though it drapes naturally, but its full length will be secured after the wooden ring is attached. That lets us position the lower end correctly without stretching the scarf or pulling the tunic out of shape.
I'd keep the scarf plain. There's already plenty going on with the hat, ears and scalloped tunic.
Small Green Holly Leaf
The example has one little green leaf on the viewer's left side of the tunic, with two red berries beside it. We'll use a second shade of green so it doesn't disappear against the tunic.
With leaf-green yarn, ch 7.
First side: Sc in the second chain from the hook, hdc in the next chain and dc in the next chain.
Ch 2, then sl st into the second chain from the hook to make a small pointed lobe.
Continue along the foundation chain with 1 hdc in the next chain and 1 sc in the next chain.
Ch 2, then sl st into the second chain from the hook to make another pointed lobe.
Leaf tip: In the final foundation chain, work (1 sc, ch 2, 1 sc). The ch-2 space forms the pointed tip of the leaf.
Opposite side: Turn the work to crochet along the unused loops on the opposite side of the foundation chain.
Work 1 sc in the next foundation chain.
Ch 2, then sl st into the second chain from the hook to make a pointed lobe.
Work 1 hdc in the next foundation chain and 1 dc in the next foundation chain.
Ch 2, then sl st into the second chain from the hook to make another pointed lobe.
Work 1 hdc in the next foundation chain and 1 sc in the final foundation chain.
Sl st to the first sc and fasten off, leaving a long sewing tail.
Stitch checkpoint: The leaf contains 12 body stitches, four small pointed lobes and one ch-2 tip. The decorative chains do not count toward the 12 body stitches.
Flatten the leaf and gently shape its pointed tip and four smaller lobes with your fingers. If you want a little extra definition, embroider a short green center vein along its length.
Red Holly Berries: Make Two
With cranberry-red yarn:
Round 1: MR, 6 sc. (6)
Round 2: Sc around. (6)
Round 3: Inv dec 3 times. (3)
FO, leaving a long tail. Close the opening and use the beginning yarn tail inside the berry to give it a slightly rounded shape. Don't add loose beads or other filling.
Make a second berry the same way.
The berries are very small, so check that they're round and compact rather than elongated.
Attach the Holly Decoration
- Place the green leaf on the viewer's left side of the tunic, just below the red scarf neckband.
- Angle the pointed end slightly upward and outward.
- Sew the entire leaf down, catching stitches around its outer edge.
- Place the two red berries together at the inner end of the leaf.
- Use the sewing tails to stitch through each berry and the underlying tunic repeatedly, attaching the full base rather than only one point.
- Weave all tails into the tunic.
Decoration checkpoint: The leaf should remain visible against the green tunic, and the berries should sit close together near the neck. Nothing should dangle below the scalloped edge.
These raised decorations are part of the approved appearance, but sewn attachment alone doesn't establish whether they can withstand the mechanical tests required for infant toys. The finished design remains a decorative project until properly evaluated.
Cover the Wooden Rattle Ring
We're ready for the wooden ring! I like the way the natural wood looks against the green and red crochet. It gives the little elf a nice contrast without adding another color or decoration.
In our example, the bottom of the ring stays uncovered. Two green crocheted sections come down from beneath the elf's tunic, with red cuffs where the yarn meets the exposed wood.
We'll make those coverings separately and sew them around the ring. Then we'll add a hidden attachment strap at the top.
Green Ring Coverings with Red Cuffs: Make Two
With forest-green yarn:
Row 1: Ch 12. Sc in the second chain from the hook and in each remaining chain. (11)
Rows 2–9: Ch 1, turn. Sc across. (11 each row)
During the final yarn-over of the last stitch in Row 9, change to cranberry-red yarn. Cut the green yarn, leaving a 12-inch (30 cm) sewing tail. We'll use this green tail to close the green portion of the covering around the wooden ring.
Rows 10–12: Ch 1, turn. Sc across. (11 each row)
FO, leaving a long red sewing tail.
Make a second covering exactly the same way.
Each covering is a small rectangle with nine green rows and three red rows. The eleven-stitch width wraps around the thickness of the wooden ring, while the twelve-row length runs along the ring.
At the stated gauge, each rectangle should measure approximately 4.23 cm across and 4 cm long before sewing.
Check the Ring Coverings Before Sewing
Before sewing either ring covering, use a measuring tape to mark a 3.1 cm space centered at the 12 o'clock position on the wooden ring. This space is reserved for the eight-stitch-wide green attachment strap that we'll crochet below.
Measure approximately 1.55 cm along the ring's centerline to each side of the top center and place a temporary marker at each point. The gap between these markers will remain uncovered by the decorative ring coverings.
Use the markers to position the two coverings as directed below. When you crochet the attachment strap, check its actual width against the reserved space before final assembly.
Position the first green-and-red covering on the upper-left curve, with its green end immediately beside the left marker and its red cuff extending down the left side of the wooden ring.
Position the second covering on the upper-right curve as a mirror image, with its green end immediately beside the right marker and its red cuff extending down the right side.
Pin both coverings before sewing. Check that the marked center gap remains uncovered, that the two red cuffs finish at approximately the same height, and that the lower portion of the wooden ring remains exposed.
Now remove the temporary placement markers and sew the coverings as directed below. The center gap will remain available for the hidden attachment strap during final assembly.
The two long edges should meet on the underside of the wooden ring without leaving a large gap or making a bulky overlap.
If the covering is too narrow to meet underneath the wood, add one stitch to the starting chain and every row. If there's too much overlap, subtract one stitch from the starting chain and every row.
Check the first covering before making changes to both. Wooden rings aren't all exactly the same thickness, even when their outside diameters match.
Attach the Two Ring Coverings
- Place the first covering along the upper-left curve of the wooden ring, with the green end at the top and red cuff below.
- Wrap the rectangle around the thickness of the wood.
- Bring the two long edges together along the underside of the wooden ring. Use the red sewing tail to join the edges of the three red rows, beginning at the lower cuff and working toward the green section.
- Secure the red tail inside the seam. Use the reserved green sewing tail to join the edges of the nine green rows, working from the color-change point toward the upper end of the covering.
- Keep the seam snug against the wood without pulling the fabric into a ridge. Secure the green tail within the finished seam.
- Secure the beginning and ending yarn tails within the crocheted seam.
- Repeat on the upper-right curve, positioning the second covering as a mirror image of the first.
- Check the ring from the front. The two red cuffs should finish at approximately the same height.
The green sections should lead upward toward the tunic, and the red cuffs should form a neat border before the exposed wooden ring begins.
Leave the lower portion of the wood uncovered, as shown in the finished example.
Hidden Wooden-Ring Attachment Strap
The head and tunic need more than a few stitches at the scalloped edge to stay connected to the ring. We'll add a hidden green strap around the top of the wood, underneath the tunic.
With forest-green yarn:
Row 1: Ch 9. Sc in the second chain from the hook and in each remaining chain. (8)
Rows 2–20: Ch 1, turn. Sc across. (8 each row)
FO, leaving a long sewing tail.
The strap is expected to measure approximately 3.1 cm wide and 6.7 cm long at the stated gauge.
Wrap the middle of this strap around the wooden ring at the 12 o'clock position, between the two decorative coverings. Bring its short ends upward inside the green tunic.
The strap should fit around the wood with enough length remaining to overlap the inside of the tunic at both the front and back.
If your ring has a different cross-section, adjust the strap length before sewing. It must wrap around the top of the wood without stretching and still leave enough fabric for substantial sewn attachments inside the tunic.
Don't close the strap into a separate loop before putting it around the ring. Its ends will be sewn directly to the tunic during assembly.
Assemble and Finish the Crochet Elf Baby Rattle
All the little pieces are ready, so now we can put everything together. I would take a few minutes to arrange them before making the final stitches. The position of the ears, the scarf and the two red cuffs makes a big difference in how closely the finished rattle matches our example.
Step 1: Check the Finished Head
Lay the completed elf head on a flat surface with the face looking toward you.
Make sure:
- The eyes are centered beneath the red hat band.
- The cream ears extend evenly from both sides.
- The hat bends toward the viewer's right.
- The cream pom-pom is attached at the end of the hat.
- The embroidered cheeks and smile remain visible.
- The lower edge of the red hat band sits securely against the head.
If the hat has shifted or the ears aren't level, make those corrections now. They're much harder to adjust once the wooden ring is attached.
Step 2: Connect the Tunic to the Wooden Ring
Stand the wooden ring upright with the two green coverings at the top.
Place the elf head and attached tunic over the ring. The green scalloped edge should fall across the upper portion of the ring, with the cream border visible in front.
- Position the hidden attachment strap around the top center of the wooden ring, underneath the tunic.
- Bring the strap's front end up inside the front of the tunic, against its upper three or four rounds.
- Bring the other end up inside the back of the tunic.
- Pin both ends in place, allowing the strap to wrap snugly around the wood without pulling the tunic out of shape.
- Using matching green yarn, sew the entire overlapping area of the front strap end to the inside of the tunic. Work through several rows and columns of stitches.
- Repeat with the back strap end. Make a second sewing pass across each attachment area.
- Check that the wooden ring remains centered directly beneath the elf's head.
Next, use green yarn to stitch the lower sides of the tunic to the upper portions of the two green ring coverings.
Work through several stitches on each side. Leave the cream-edged scallops free to show across the front, but attach the underlying green fabric so it doesn't slide around the ring.
The hidden strap carries the central attachment, while the side stitches hold the tunic in position. Neither construction detail should be visible from the front.
Attachment checkpoint: Hold the project upright by the wooden ring and gently support the head with your other hand. The head should remain centered, the strap should lie flat, and the tunic should not pull upward or twist. This is a fit check, not a substitute for mechanical product testing.
Step 3: Arrange the Red Scarf
The scarf tail should begin beneath the neckband and angle down toward the viewer's right.
Now that the wooden ring and both coverings are attached, arrange the scarf tail diagonally across the front of the green tunic toward the viewer's right.
Position the scarf's lower end just above the right-hand red cuff. To reproduce the gently narrowed tip in the example, fold the two bottom corners of Row 16 under toward the center on the wrong side of the scarf, approximately one stitch width on each side. Keep the folds small so the end forms a soft, rounded point rather than a sharp triangle.
Secure the folded corners with a few small stitches of cranberry-red yarn. Check that the scarf lies flat against the green ring covering without pulling the tunic or distorting the scarf's diagonal position.
Using cranberry-red yarn, sew the scarf tail down along both long edges with small hidden stitches approximately every two rows. Catch the underlying green tunic or green ring covering as needed.
Sew the folded lower end firmly against the green ring covering, directly above the red cuff. Stitch through both folded corners and the underlying green fabric so the rounded tip stays in place. Secure the sewing yarn and weave its tail into the covered section.
Remove any temporary marker used to hold the scarf in position. Check that the entire scarf tail remains attached and that the lower end cannot hang freely.
The bottom of the scarf should finish a little above the right red cuff, just as it does in our example.
Keep the tail flat against the other crochet pieces. You shouldn't be able to lift it away as a long loose strip.
Step 4: Check the Holly Decoration
Position the holly leaf and berries on the viewer's left, opposite the hanging scarf tail on the right.
They should add a little color without covering the cream scalloped border.
Inspect the stitching around each decoration. If a part is loose, repair its attachment. If a piece cannot be attached firmly without distorting the design, leave it off a decorative sample rather than relying on a single thread to hold it.
Step 5: Final Finishing
- Weave in every remaining yarn tail, working through several directions inside the crocheted fabric.
- Check the hat's cream pom-pom attachment.
- Check the full length of the red scarf and its lower attachment.
- Inspect the ears and the attachment seams beneath them.
- Inspect the seams of both wooden-ring coverings.
- Check the hidden ring strap at its front and back attachment points.
- Make sure no stuffing is visible between stitches.
- Check the wooden ring for splinters, rough spots, cracks or damaged surfaces.
- Remove all temporary stitch markers, sewing clips and pins used during assembly.
- Inspect the head for openings that could expose the enclosed rattle insert.
- Shape the hat, tunic and ears gently with your fingers.
Don't add glue, wire, plastic eyes, dangling ribbons or extra beads to finish the design.
Compare Your Finished Elf with the Example
Before you put your supplies away, place the finished elf on a plain background and look at him from the front.
Here's what the finished project should have:
- A rounded cream head with sleepy black embroidered eyes and a small smile
- Pink embroidered cheeks beneath the eyes
- Two pointed cream ears extending outward
- A wide cranberry-red hat band
- A long forest-green hat bending toward the right
- A little cream pom-pom at the hat tip
- A green flared tunic with nine cream-edged scallops
- A red neckband and diagonal scarf tail
- One holly leaf with two red berries on the viewer's left side
- Two green wooden-ring coverings finished with red cuffs
- A natural wooden ring with its lower half left uncovered
The face should look peaceful rather than surprised, and the head should remain the main feature. The scarf, holly and scalloped edging are smaller accents.
If your finished hat looks too straight, adjust the hidden shaping stitches rather than changing the entire hat pattern. If the tunic covers too much of the ring opening, check that it hasn't slipped downward from its attachment points.
The measurements and stitch counts in this pattern are calculated, and the curved hat and complete assembly haven't been verified by a physical test sample. Before treating the instructions as a finalized pattern, crochet a complete example and check the head proportions, hat curve, ear placement, scarf length, ring fit and attachment methods against the finished reference image.
Crochet Elf Baby Rattle Pattern FAQs
Can I make the elf without a rattle insert?
Yes. Leave out the sound insert and its little pouch, and stuff the cream head evenly with fiberfill. You'll have a decorative elf on a wooden ring rather than a working rattle. It won't make a shaking sound, but the finished appearance can remain the same.
Can I use a different size wooden ring?
You can, but you'll need to check the coverings and hidden attachment strap before assembly. A thicker ring needs wider coverings, and a ring with a different outside diameter may need longer or shorter coverings along its upper curve. I'd choose the wooden ring first, then adjust those pieces to fit it.
Why does the hat have such a long upper section?
That extra length is what gives the hat its curved shape. A short cone would make the elf look quite different from the one in the example. Leave most of the narrow tip unstuffed so it can bend, then secure the curve with concealed stitches.
Can I make a matching girl elf rattle?
Yes. You could use the same head, ears, hat and wooden-ring construction, then change the clothing details to coordinate with the larger girl elf doll. I would keep the sleepy embroidered face and pointed ears so the two rattles still look like companions.
Is a handmade crochet rattle suitable for infant play?
That can't be determined from the pattern or finished appearance alone. The complete product, including its wooden ring, enclosed sound insert, yarn, decorative pieces and attachment seams, would need appropriate evaluation against applicable rattle and toy requirements. This pattern hasn't undergone those tests and shouldn't be represented as a verified infant toy.
What if my finished elf doesn't match the example exactly?
Check your gauge first. A looser gauge will make the head, ears and hat larger, and it can change how the tunic sits on the ring. Next, check the hat curve and the position of the ears. Those details have a big effect on the elf's expression. Use the measurements and checkpoints throughout the pattern before changing any stitch counts.
I love the idea of making this little fellow to coordinate with the larger Christmas elf doll. The matching green hat, sleepy face and red scarf make the two designs look as though they belong together, while the little wooden ring gives this one a personality all his own.
When you click on links to various merchants on this site and make a purchase, this may result in this site earning a commission. This does not affect the price you pay.

UBGI Gold Standard 2026
Reviewed under the site's
editorial checklist.
Photos, decorating ideas, party setups and reader submissions are shared for inspiration unless a page is specifically presented as a pattern, tutorial, reference guide or step-by-step project. Follow the instructions, measurements, safety guidance and manufacturer directions provided for the particular project or product.
About Jan | Contact | Baby Nursery Ideas (Blog) | Site Map | Privacy Policy | Disclosure Policy | Disclaimer | Affiliate Disclosure | Earnings Disclosure | Facebook | Pinterest
I am a participant in the Amazon Services LLC Associates Program, an affiliate advertising program designed to provide a means for us to earn fees by linking to Amazon. As an Amazon Associate I earn from qualifying purchases.
Copyright © 2006-2026. All Rights Reserved.