Free Crochet Christmas Holly Baby Headband Pattern
By Jan Bay
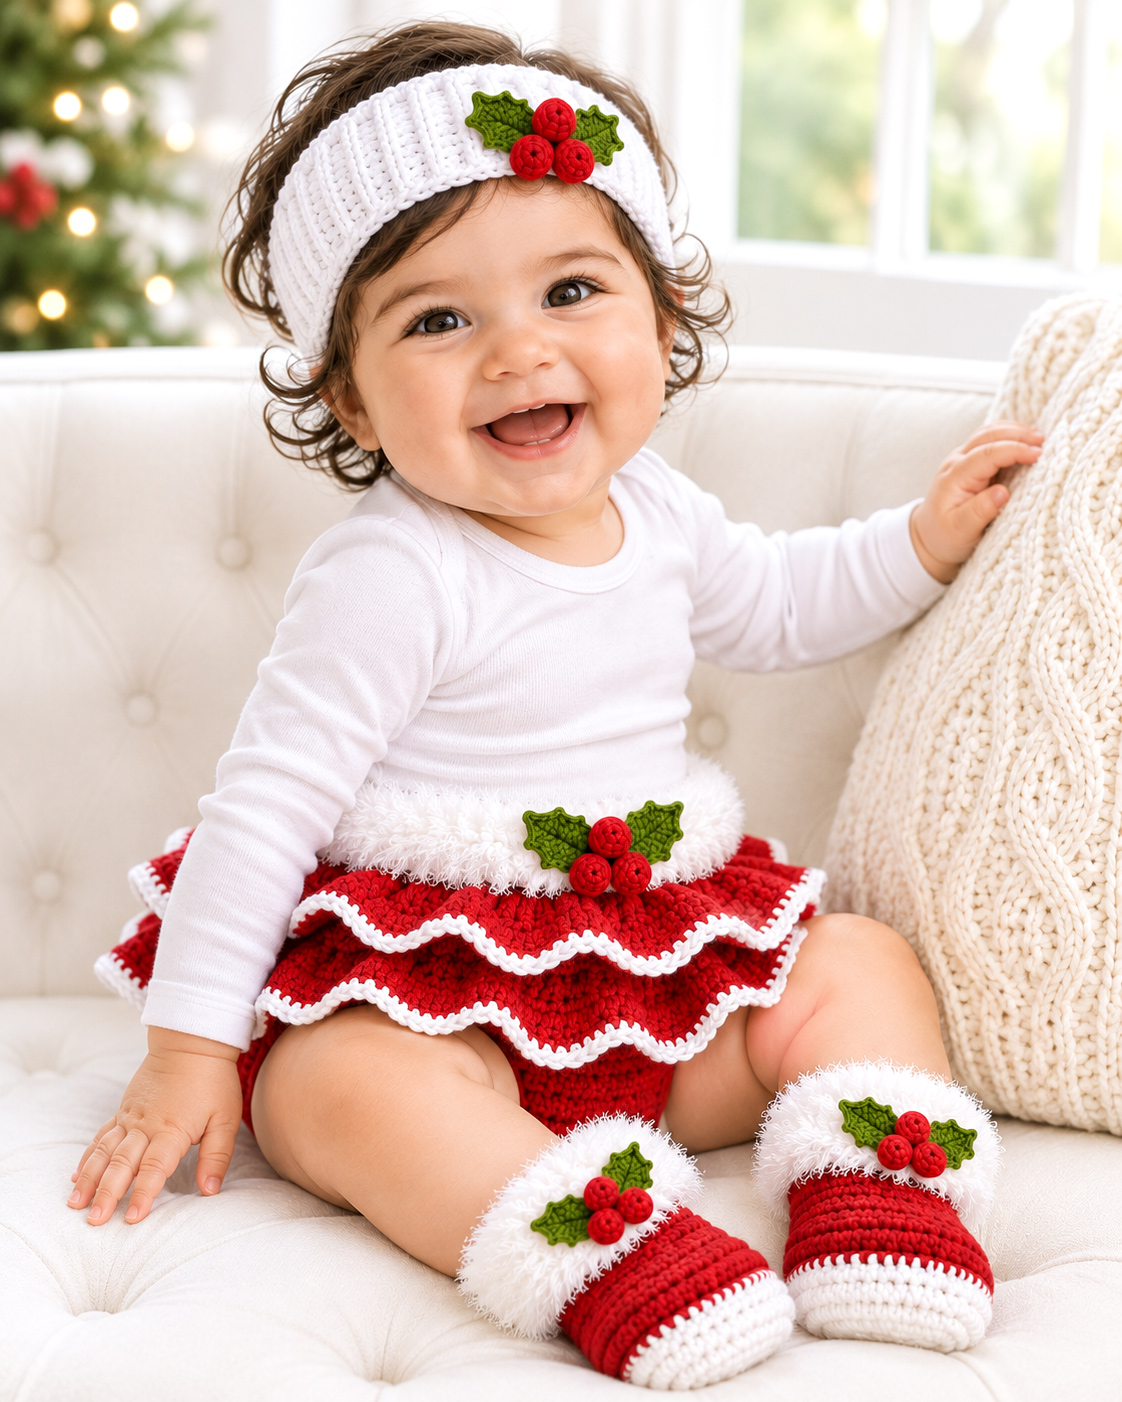
This free crochet Christmas holly baby headband pattern features a wide white ribbed band with two little green holly leaves and three red berries arranged in a triangle. I placed the holly to one side and left off the big Christmas bow because the matching tutu and Santa booties already have plenty of detail. The raised white ribs and little holly cluster tie the whole Christmas outfit together. You'll find three baby sizes, plus a flat embroidered berry option for supervised holiday photos.Explore More Free Crochet Baby Patterns
Free Christmas Crochet Patterns
Matching Christmas Tutu Diaper Cover
See Supplies for This Project Here.
The raised holly berries shown are for the decorative display version of this headband. For a baby wearing the headband during supervised awake time, use the flat embroidered berries in the pattern instead. Remove the headband before sleep.
Jump to a Section
- Headband Sizes and Measurements
- Yarn, Hooks and Supplies
- Gauge, Pattern Notes and Abbreviations
- 0–3 Months Headband Pattern
- 3–6 Months Headband Pattern
- 6–12 Months Headband Pattern
- Joining the Ribbed Headband
- Crochet the Miniature Holly Leaves
- Crochet Holly Berries or Flat Embroidery
- Position and Attach the Holly
- Finishing and Baby Fit Check
- Frequently Asked Questions
Free Crochet Christmas Holly Baby Headband Pattern Sizes
We'll make the wide white band first, then add the little holly decoration. The band is worked in short rows so the crochet ribs run from the top edge to the bottom edge. That gives it the raised texture shown in the example image.
There are three sizes. Before choosing one, measure around the baby's head where the headband will sit, just above the eyebrows and around the back of the head.
| Size | Expected Relaxed Circumference | Band Width |
|---|---|---|
| 0–3 months | 12.8 in. (32.5 cm) | 1 3/4 in. (4.4 cm) |
| 3–6 months | 14.4 in. (36.6 cm) | 2 in. (5.1 cm) |
| 6–12 months | 16 in. (40.6 cm) | 2 1/4 in. (5.7 cm) |
These are calculated measurements based on the gauge below, not measurements from a finished test sample. The seam can reduce the circumference a little, and your yarn may stretch differently.
I wouldn't choose a tight size just to keep the headband in place. It should rest gently against the head without leaving marks, sliding over the eyes, or needing a strong stretch to fit.
Skill level: Confident beginner to intermediate. The ribbed band is simple. The tiny pointed holly leaves, shaped berries, and careful assembly take a little more attention.
Important: Baby headbands are accessories for directly supervised, awake use only. Remove the headband before naps, bedtime, or any time the baby isn't being watched. Never leave it on a sleeping baby.
Yarn, Hooks and Supplies for the Christmas Holly Headband
I'd use a smooth, bright-white yarn for the band so the crochet ribs are easy to see. The green leaves and red berries are worked in finer yarn, which keeps the decoration from taking over the whole headband.
- Medium-weight #4 yarn in bright white for the ribbed band. Have approximately 60–80 yards available as a generous purchase allowance.
- Sport-weight #2 yarn in holly green, approximately 5–10 yards.
- Sport-weight #2 yarn in Christmas red, approximately 5–10 yards for the decorative berries or embroidery.
- 4.5 mm crochet hook for the white band, or the hook needed to obtain gauge.
- 2.5 mm crochet hook for the holly leaves and raised berries.
- Yarn needle.
- Measuring tape.
- Stitch markers.
- Scissors.
These yarn amounts are planning allowances rather than measured consumption. You may use less, especially for the smallest size.
Look for smooth yarn without loose fibers, beads, sequins, or stiff metallic threads. You don't need any elastic cord, ribbon ties, buttons, or plastic decorations.
If you're unsure which yarn weight you have, the Craft Yarn Council's yarn weight reference explains the numbered yarn categories.
Headband Gauge, Pattern Notes and Crochet Abbreviations
Gauge: 16 sc stitches and 20 rows = 4 inches (10 cm) in back-loop-only single crochet, measured with the fabric relaxed.
Row gauge matters quite a bit here. The number of short ribbed rows determines the headband's circumference, while the number of stitches in each row determines its width.
Before starting, make a small back-loop single crochet swatch using the white yarn and your chosen hook. You can begin with ch 17, work 16 sc in the first row, then continue in back-loop-only single crochet for at least 24 rows.
Measure across the stitches and along the ribbed rows without stretching the fabric. The target is 16 stitches across 4 inches and 20 rows along 4 inches. If your swatch is too large, try a smaller hook. If it's too small, try a larger hook.
Once you've checked the gauge, you're ready to start the actual headband.
US Crochet Abbreviations
- ch = chain
- sc = single crochet
- sc2tog = single crochet two stitches together
- hdc = half double crochet
- dc = double crochet
- sl st = slip stitch
- BLO = back loop only
- st/sts = stitch/stitches
- RS = right side
- WS = wrong side
How the Ribbed Band Is Worked
You'll crochet a long rectangle in short rows. Every row has the same number of stitches, so there are no increases or decreases in the white band.
After the first row, insert your hook under the back loop of each stitch. That's the loop farther from you when you're looking down at the top of the stitches on the row you're working into.
Ch 1 and turn after each completed row except the final row. The turning chain does not count as a stitch. Work the first sc into the first stitch, not into the turning chain.
Keep your tension even. The back-loop stitches form raised ribs that will run vertically around the finished headband.
When the rectangle reaches the required row count, we'll join the two short ends into a circle. There's no separate crochet edging, so both long edges remain plain white.
0–3 Months: Crochet the White Ribbed Headband
With bright-white medium-weight yarn and your 4.5 mm hook, ch 8.
Row 1: Sc in the second chain from the hook and in each remaining chain. (7 sc)
Ch 1 and turn.
Row 2: Working in BLO, sc in each of the 7 stitches. (7 sc)
Ch 1 and turn.
Rows 3–64: Repeat Row 2. Work 7 BLO sc in every row, making 64 rows altogether.
Ch 1 and turn after every row except Row 64.
After Row 64, fasten off with an 18-inch yarn tail for joining.
Checkpoint: Count 64 complete rows. Every row should contain 7 sc. At gauge, the rectangle should measure approximately 12.8 inches long and 1 3/4 inches wide before sewing.
Lay the rectangle flat and check that both short ends are the same width. Don't join it until you've checked the length around the baby's measured head.
3–6 Months: Crochet the White Ribbed Headband
With bright-white medium-weight yarn and your 4.5 mm hook, ch 9.
Row 1: Sc in the second chain from the hook and in each remaining chain. (8 sc)
Ch 1 and turn.
Row 2: Working in BLO, sc in each of the 8 stitches. (8 sc)
Ch 1 and turn.
Rows 3–72: Repeat Row 2. Work 8 BLO sc in every row, making 72 rows altogether.
Ch 1 and turn after every row except Row 72.
After Row 72, fasten off with an 18-inch yarn tail for joining.
Checkpoint: You should have 72 complete rows with 8 sc in every row. The calculated rectangle measures approximately 14.4 inches long and 2 inches wide before sewing.
Both short ends should match. Check the relaxed length and comfortable stretch before joining.
6–12 Months: Crochet the White Ribbed Headband
With bright-white medium-weight yarn and your 4.5 mm hook, ch 10.
Row 1: Sc in the second chain from the hook and in each remaining chain. (9 sc)
Ch 1 and turn.
Row 2: Working in BLO, sc in each of the 9 stitches. (9 sc)
Ch 1 and turn.
Rows 3–80: Repeat Row 2. Work 9 BLO sc in every row, making 80 rows altogether.
Ch 1 and turn after every row except Row 80.
After Row 80, fasten off with an 18-inch yarn tail for joining.
Checkpoint: You should have 80 complete rows, each containing 9 sc. At gauge, the rectangle measures approximately 16 inches long and 2 1/4 inches wide before joining.
Check the relaxed length against the baby's head measurement. The ribbed fabric should stretch gently, but it shouldn't need a hard pull to fit.
Join the Ribbed Headband Without Twisting It
Now we'll turn the rectangle into a stretchy circle. This is a short seam, but it matters. We want the ribs to continue around the band without a bulky lump at the back.
- Lay the finished rectangle flat with its ribs running across the short width.
- Bring the two short ends together without twisting the strip.
- Place the right sides together so the sewing seam will be inside when the headband is turned right side out.
- Match the 7 (8, 9) stitches at the two short ends, working from one long edge toward the other.
- Thread the retained 18-inch white yarn tail onto a yarn needle.
- Sew the ends together with small, even stitches, catching one corresponding stitch position on each short end. Work through all 7 (8, 9) matched positions.
- Do not overlap the ends or pull the sewing yarn so tightly that the seam becomes stiff.
- Secure the tail by weaving through several stitches on the inside, reversing direction before trimming.
- Turn the band right side out.
Checkpoint: You now have one continuous white ribbed circle. The seam is at the back, the two long edges are even, and the ribs run from the top edge to the bottom edge all the way around.
Lay the headband flat, then gently stretch it by hand. The seam should move with the crochet instead of pulling the band into a tight point.
If the relaxed circumference isn't suitable for the baby's head, adjust the rectangle before sewing permanently. At the stated row gauge, adding two complete rib rows increases its length by approximately 0.4 inch (1 cm), while removing two rows reduces it by the same amount.
For any size adjustment, keep every row at the original stitch count. Only the number of ribbed rows should change. Make sure the finished band stays comfortable and doesn't slip over the eyes.
There's no need to add a separate white border. I want the texture to be the main feature.
Crochet the Miniature Green Holly Leaves
We'll make two little pointed leaves for the front of the headband. They're worked in one short round around a foundation chain, with small picots along the edges.
These leaves are deliberately smaller than a full-size Christmas ornament appliqué. The white headband should still show clearly around them.
Holly Leaf: Make Two
With green sport-weight yarn and your 2.5 mm hook, ch 7.
- Sc in the second chain from the hook.
- Hdc in the next chain.
- Dc in the next chain. Ch 2 and sl st into the second chain from the hook to make another small holly point.
- Hdc in the next chain. Ch 2 and sl st into the second chain from the hook to make a small picot point.
- Sc in the next foundation chain.
- In the last foundation chain, work 1 sc, ch 2, sl st into the second chain from the hook, and 1 more sc in that same foundation chain.
- Rotate your work so you can crochet along the opposite side of the foundation chain.
- Sc in the underside loop of the foundation chain immediately beside the rounded end.
- Hdc in the underside loop of the next chain. Ch 2 and sl st into the second chain from the hook to form another point.
- Dc in the underside loop of the next chain. Ch 2 and sl st into the second chain from the hook to make another small holly point.
- Hdc in the underside loop of the next chain.
- Sc in the underside loop of the final chain, opposite the first sc you made.
- Join with a sl st to the first sc.
Stitch count: 12 main stitches around the leaf, not counting the picot chains or their slip stitches.
Fasten off, leaving approximately 10 inches of green yarn for sewing.
Add the holly leaf veins: Before sewing the leaves onto the headband, thread a yarn needle with a short length of green sport-weight yarn. On the front of each leaf, make three or four small running stitches along the foundation-chain center to form a raised center vein. Add two short diagonal stitches on either side, running from the center toward the outer edges. Keep the stitches close to the leaf surface without pulling the crochet out of shape. Secure the yarn on the back of the leaf by weaving through several stitches and reversing direction. Repeat on the second leaf.
Check the Leaf Shape
Lay both leaves on a flat surface. Each should have a narrow starting end, a fuller pointed end, and small points along the sides.
Gently shape the leaves with your fingers. Don't pull the picot points so hard that they become long loops.
Both leaves should be the same size and shape. If one is noticeably larger, check the hook size and stitch counts before attaching either leaf.
When we sew them onto the headband, the narrow ends will overlap behind the berries. The wider pointed ends will spread toward the left and right.
If you'd like another holly project, my crochet holly leaf pattern with berries shows a larger decorative version. For this headband, use the miniature leaves above.
Crochet Three Holly Berries or Make Flat Embroidered Berries
The example image has three little raised red berries, with one above the other two. They're cute against the white ribs, but they're small separate pieces.
For a decorative display headband, you can crochet the raised berries. If the headband will be worn by a baby during supervised photos, skip those separate raised pieces and embroider three flat red circles instead.
Raised Crochet Berries: Decorative Display Version Only
With red sport-weight yarn and your 2.5 mm hook, make three matching berries.
Work in continuous spiral rounds. Do not join the rounds or add beginning chains. Place a stitch marker in the first stitch of each round.
Round 1: Make a magic ring and work 6 sc into the ring. Pull the ring closed. (6 sc)
Round 2: Work 2 sc in each stitch around. (12 sc)
Round 3: Sc in each stitch around. (12 sc)
Round 4: Sc2tog 6 times. (6 sc)
Fasten off, leaving a 10-inch red tail for sewing.
Thread the tail through the front loops of the six remaining stitches. Pull gently to close the opening and shape the berry into a small rounded dome.
Do not add stuffing, beads, or any other filling.
Secure the starting yarn tail inside the berry. Keep the finishing tail for attachment.
Repeat until you have three berries.
Berry checkpoint: All three should be approximately the same size, with closed openings and no loose loops.
Flat Embroidered Berries for Supervised Baby Wear
For the wearable version, embroider the berries after you've attached the two green holly leaves to the band.
- Thread a yarn needle with red sport-weight yarn.
- Mark three small berry positions where the green leaf bases overlap.
- Place one mark above the other two, making a little triangle.
- Part the white crochet ribs gently to locate firm stitches beneath the decoration.
- Outline the first berry with a few short red stitches, making a circle approximately 1/4 inch (6 mm) across.
- Fill the circle with short, closely spaced satin stitches. Keep the stitches flat against the headband.
- Repeat for the other two berries, keeping them similar in size.
- Secure the red yarn on the inside of the headband by weaving through several stitches and reversing direction before trimming.
Don't pull the embroidery so tight that it gathers the white band. The fabric should still stretch gently beneath the decoration.
Checkpoint: You should have three flat red circles, with one above the other two. No berry should form a loose loop or a dangling piece.
Position and Attach the Holly on the White Headband
I like this little holly cluster off to one side rather than sitting in the middle of the forehead. It keeps the band simple, and the green leaves show up nicely against the white crochet ribs.
We'll place the decoration toward the baby's left side, just above the left temple. That's the position shown in the example image.
Find the Front and Left Side
- Lay the completed white headband flat with the seam at the back.
- Mark the point directly opposite the seam. That's the center front.
- Move the decoration slightly toward the baby's left side of the headband. Remember that baby's left appears on your right when you're looking directly at her face.
- For the smallest size, start approximately 1/2 inch (1.3 cm) to the left of center front. For the two larger sizes, start approximately 3/4 inch (1.9 cm) to the left.
- Place the two green leaves with their narrow ends overlapping at that spot.
These placement measurements are starting points. Check the finished arrangement on the actual headband before sewing it down.
Attach the Two Green Leaves
- Point one leaf toward the upper left and the other toward the upper right, forming a shallow V.
- Overlap their narrow ends beneath the future berry cluster.
- Thread one green sewing tail onto a yarn needle.
- Sew through the center and outer edges of the first leaf, catching the firm white crochet stitches underneath.
- Secure the pointed tip so it lies flat rather than sticking outward.
- Repeat with the second leaf.
- Weave the green tails into the inside of the headband, reversing direction before trimming.
Keep both leaf tips comfortably within the width of the white band where possible. The greenery should decorate the headband, not hang down across the baby's eyes.
Add the Three Red Berries
For the decorative display version, arrange the three raised crochet berries over the overlapping leaf bases.
Place one berry at the top center. Place the other two directly beneath it, side by side.
Use each berry's red sewing tail to stitch around its entire base, making several passes through the berry and the firm crochet stitches of the white band.
Secure every tail on the inside of the band. Don't leave hanging threads or loose berry loops.
For the supervised baby-wear version, use the flat embroidered circles from the previous section instead.
Final holly checkpoint: The decoration should have two green leaves and exactly three red berries. One berry sits above the other two, and the entire cluster is positioned slightly left of the forehead center.
Check the inside of the headband too. You shouldn't feel a hard lump from the yarn tails or find any loose threads.
Finish the Christmas Holly Baby Headband
We're almost done. The white ribs and little holly cluster should do all the work here, so I wouldn't add another edging or any extra decorations.
Final Finishing Steps
- Check the back seam and make sure all matched stitches are sewn securely.
- Weave in any remaining yarn ends on the inside of the band.
- Inspect both holly leaves and all three berries or embroidered circles.
- Remove any stitch markers.
- Lay the headband flat and gently straighten the ribs.
- Check that both long white edges are even.
- Try a gentle stretch by hand. The band should stretch and return without the seam pulling apart.
If you need to reshape the band, lightly dampen the smooth white crochet and lay it flat to dry. Don't stretch it wider or longer while it's drying. Avoid ironing the holly decoration.
Check the Fit Before Wearing
Measure the finished headband after joining. The starting circumference is only an estimate, so use the actual piece to judge the fit.
Place it on the baby's head only during directly supervised awake time. The band should sit above the eyebrows, with the holly decoration away from the eyes.
If the band presses tightly against the head, leaves marks, slips down over the face, or feels too loose to stay in place, remove it and adjust the size before using it again.
Don't leave a headband on a sleeping baby, even during a short nap. Remove it whenever the baby isn't being directly watched.
Check the green leaves and embroidery before every use. Small raised crochet berries can detach, so the raised-berry version is for decorative display rather than baby wear.
Make the Matching Christmas Outfit
The headband was designed to coordinate with my Christmas crochet tutu diaper cover pattern and Santa baby booties pattern.
Each piece uses white, Christmas red, green holly leaves and three berries. The tutu has two red ruffle tiers, and the booties have fluffy white cuffs. Together they make the outfit shown in the example image.
The white long-sleeve top, tutu and booties aren't included in these headband instructions. Use their separate patterns for the other crochet pieces.
For this headband, I'd stop with the holly. No bow needed.
I experimented with including the bow in the design but it looked too heavy to me. You can do the same and decide for yourself if you like it better or not.Finished Headband Checklist
- One wide white ribbed band, joined into a circle
- Even ribbing from top edge to bottom edge
- One secure back seam
- Two miniature green holly leaves
- Three red berries arranged one above two
- Holly positioned toward baby's left side
- No ribbon ties, elastic cords, buttons, or plastic decorations
- All yarn ends secured and trimmed
The expected sizes and appearance are based on the written construction and gauge. A physically crocheted sample is still needed to verify the final dimensions, stretch and exact match to the example image.
Frequently Asked Questions About the Christmas Holly Baby Headband
Can I make the headband larger than 6–12 months?
Yes. Keep the same width if you like it, and add more back-loop single crochet rows before joining. At the stated gauge, two extra rows add approximately 0.4 inch (1 cm) to the rectangle's length. Measure the actual piece and check the stretch instead of relying on row count alone.
Can I use ivory instead of bright-white yarn?
You can, but bright white is the color used for the featured headband. It also matches the white trim on the Christmas tutu and Santa baby booties. Ivory will give the set a warmer look.
Why isn't my ribbed headband stretching very much?
Check that you're working every row after Row 1 through the back loops only. Also check your hook size and gauge. Tight stitches or a stiff yarn can reduce the stretch, even when the stitch count is correct.
Can I leave off the raised crochet berries?
Yes. For supervised baby wear, use three small flat embroidered red circles instead. Keep one above the other two, with the green leaves spread outward behind them.
How should I wash the crochet headband?
Follow the care instructions for the yarns you've used. I'd handle the holly decoration gently and reshape the white ribs while the headband dries flat. Check that the leaves and embroidery are still firmly attached before the headband is worn again.
Can a baby sleep while wearing the headband?
No. Remove the headband before naps and bedtime. Headbands can slip out of position, and small decorations may loosen. Use this accessory only when the baby is awake and directly supervised.
When you click on links to various merchants on this site and make a purchase, this may result in this site earning a commission. This does not affect the price you pay.

UBGI Gold Standard 2026
Reviewed under the site's
editorial checklist.
Photos, decorating ideas, party setups and reader submissions are shared for inspiration unless a page is specifically presented as a pattern, tutorial, reference guide or step-by-step project. Follow the instructions, measurements, safety guidance and manufacturer directions provided for the particular project or product.
About Jan | Contact | Baby Nursery Ideas (Blog) | Site Map | Privacy Policy | Disclosure Policy | Disclaimer | Affiliate Disclosure | Earnings Disclosure | Facebook | Pinterest
I am a participant in the Amazon Services LLC Associates Program, an affiliate advertising program designed to provide a means for us to earn fees by linking to Amazon. As an Amazon Associate I earn from qualifying purchases.
Copyright © 2006-2026. All Rights Reserved.