Free Crochet Christmas Garland Pattern with Stockings, Candy Canes & Mittens
By Jan Bay
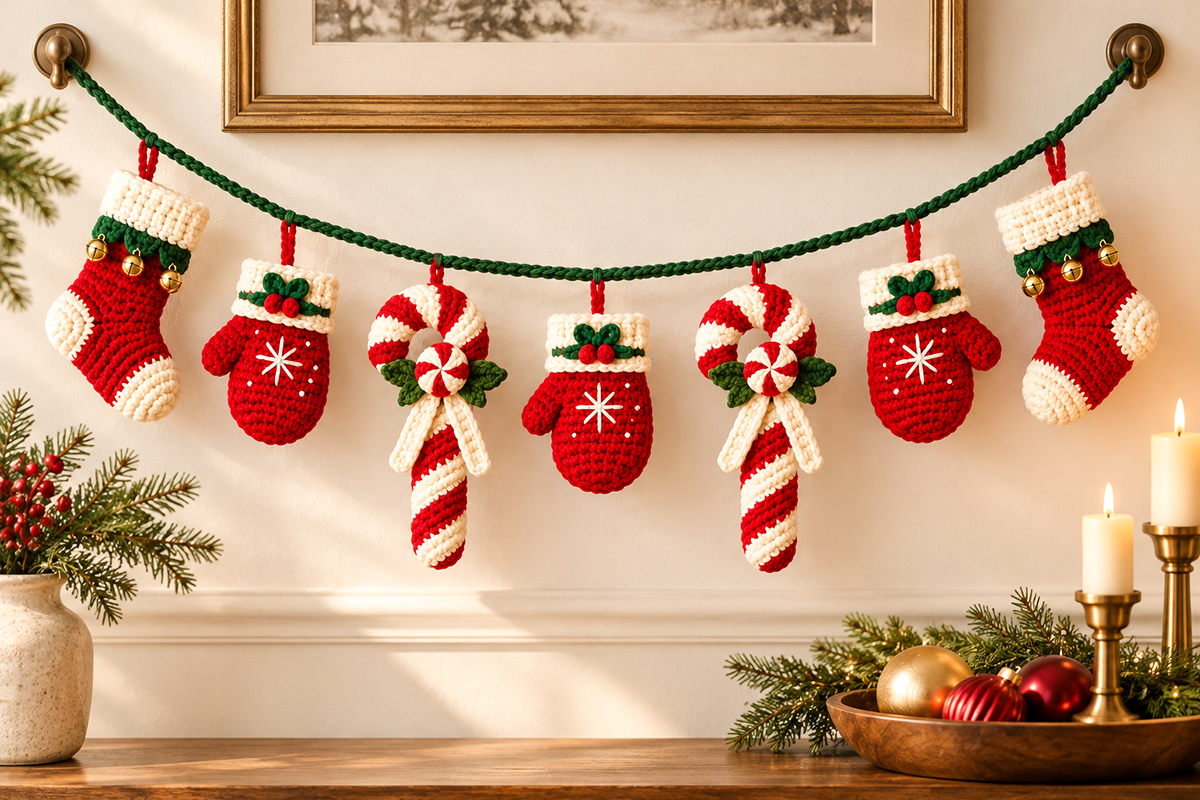
I've been working on these little Christmas ornament designs one at a time, and I thought it would be fun to bring them together in a garland to decorate the den, a hallway or anywhere in the house that needs a little jazzing up for baby's first Christmas. This free crochet Christmas garland pattern combines our red mini stockings with gold bells, peppermint candy canes and little holly-trimmed mittens. I provide patterns for each of the ornaments in this arrangement, and I'll show you how to make the connecting cord, arrange the different sizes, space everything evenly and attach the ornaments so they hang facing forward.
Explore More Free Christmas Crochet Patterns
Crochet Christmas Stocking Ornament Pattern
Free Crochet Candy Cane Ornament Pattern
Free Crochet Christmas Mitten Ornament Pattern
See Supplies for This Project Here.
Jump to a Section
- Pattern Details and Finished Size
- Materials and Supplies
- Stitches and Abbreviations
- Make the Stockings, Candy Canes and Mittens
- Plan the Garland Layout and Spacing
- Crochet the Evergreen Garland Cord
- Make and Reinforce the Hanging Loops
- Attach the Seven Crochet Ornaments
- Hang and Finish the Garland
- Adjust the Garland for Different Spaces
- Troubleshooting and Helpful Tips
- Frequently Asked Questions
Free Crochet Christmas Garland Pattern: Size and Construction
We're making one garland with seven hanging ornaments. Two stockings go at the ends, three little mittens fill the shorter spaces, and the two candy canes hang between them. All three ornament patterns are already available on the site, so we can spend our time here on the connecting cord and getting everything arranged properly.
The finished example uses a dark evergreen cord with short red connections above the ornaments. I'd keep the cord fairly plain. The stockings already have their gold bells, the candy canes have peppermint decorations, and the mittens have their little holly cuffs. There's no need to crochet additional decorations for the cord.
- Skill level: Advanced beginner for making the garland cord and assembling the ornaments. The individual candy cane pattern is intermediate.
- Terminology: US crochet terms.
- Ornaments: Seven total: two stockings, three individual mittens and two candy canes.
- Expected finished cord length: 88 inches before making the end loops.
- Usable garland length: Approximately 80 inches between the two reinforced hanging-loop bases.
- Attachment spacing: 10 inches between neighboring ornament positions, measured along the cord.
- Stocking height: Approximately 3 3/4 to 4 1/4 inches, excluding its hanging loop.
- Mitten height: Approximately 2 3/4 to 3 inches, excluding its hanging loop.
- Candy cane height: Approximately 7 to 8 1/2 inches, excluding its hanging loop.
These are expected measurements taken from the individual pattern plans and the garland layout. The complete garland hasn't been physically crocheted and hung from these instructions, so the actual drape and finished measurements will depend on your yarn, tension and hanging distance.
I'd finish one of each ornament first and lay them side by side. The candy cane should be noticeably longer. That's intentional. If you make all seven ornaments with the same yarn weight and the hooks specified in their separate patterns, you'll have a much better starting point for a balanced arrangement.
Decorative use only: This garland contains long yarn cords and small gold bells. It's a Christmas decoration, not a baby toy. Keep it completely out of children's reach and away from cribs, bassinets, changing areas, other infant sleep spaces, candles and heat sources. If you're decorating for baby's first Christmas, choose an adult area where the garland cannot be pulled down.
Materials and Supplies
Most of the supplies are the same ones used for our three ornament patterns. Christmas red, warm ivory and evergreen make up nearly everything. You'll also need brighter red for the mitten berries and six small gold bells for the stockings.
Yarn and Ornament Supplies
- Christmas red, category 4 worsted weight: For the stockings, mittens, candy canes and seven short hanging connectors.
- Warm ivory or cream, category 4 worsted weight: For the cuffs, stocking heels and toes, candy cane stripes and decorations, and embroidered mitten stars.
- Dark evergreen, category 4 worsted weight: For the garland cord and the green details on the ornaments.
- Brighter cherry-red yarn: A small amount for the mitten holly berries, if you'd like them to stand out from the red bodies.
- Six gold jingle bells: Three approximately 8 to 10 mm bells for each stocking, as specified in the stocking pattern.
- Small amount of polyester fiberfill: For the ornaments that require filling.
The ornament pages give their own estimated yarn quantities. For the connecting garland alone, I'd have approximately 75 to 100 additional yards of evergreen available for the three braided strands and approximately 10 to 20 yards of red for the short connectors and sewing. These are planning allowances, not quantities measured from a completed garland.
Hooks and Other Tools
- 4 mm (G/6) crochet hook as a starting size for the green cord and red connectors.
- 3.25 mm (D/3) hook for the mittens, following their separate pattern.
- 3.5 mm (E/4) hook for the stockings and candy canes, following their separate patterns.
- Blunt yarn needle for joining and weaving in ends.
- Suitable sewing needle and coordinating sewing thread for the stocking bells.
- Flexible measuring tape, preferably at least 120 inches long, or a shorter tape used section by section.
- Seven removable stitch markers or short pieces of contrasting yarn for the ornament positions.
- Extra removable markers or clips for temporarily holding the braided cord.
- Scissors.
- Two suitable, securely installed wall or mantel hanging points for the finished decoration.
You won't need glue or additional manufactured decorations for the garland cord. The gold bells are already part of the stocking design, not something we're attaching to the connecting strand.
If you're using leftover yarn, check that you have enough evergreen before starting the long cord. I'd rather have a little extra than discover halfway through the third strand that the color is gone.
Stitches and Crochet Abbreviations
The garland itself uses only chains and slip stitches. You'll crochet three long chains, braid them into one green cord, and make seven short red connectors. The individual ornament pages contain their own stitch instructions.
- ch: Chain.
- sl st: Slip stitch.
- st/sts: Stitch/stitches.
- rep: Repeat.
Starting chains: Make each chain with even tension. Don't pull the yarn so tightly that you can barely insert your hook into the stitches. The long green chains need enough flexibility to braid without forming hard bends.
Slip stitches: Insert your hook through the indicated stitch, yarn over and pull through the stitch and the loop already on your hook. Each slip stitch completes one stitch.
Measurements: Measure the finished braid without stretching it. For the red connectors, count the foundation chains and the reinforcing slip stitches as written. Their short starting chains do not count as additional stitches after the reinforcing row has been completed.
If you need a reminder about standard crochet abbreviations, the Craft Yarn Council crochet abbreviations reference is a useful place to check.
Make the Stockings, Candy Canes and Mittens
You'll need seven finished ornaments before attaching anything to the garland. I'd make the three different designs first, check their sizes, and then make the additional pieces needed for the arrangement.
Use the original patterns below. Each one includes its own supplies, stitch counts, shaping and finishing instructions. There's no need to change any of their working rounds to make this garland.
Make Two Crochet Christmas Stockings
Follow the free crochet Christmas stocking ornament pattern to make two matching stockings.
Each stocking has a red body, ivory cuff, ivory heel and toe, three green scalloped points and one little gold bell attached to each point. Make the reinforced red hanging loop at the upper back exactly as directed in the stocking pattern.
Before setting the stockings aside, check the following:
- Each stocking has exactly three green points and three gold bells.
- Both ivory heels and toes are shaped alike.
- Both upper cuffs are approximately the same depth.
- The red hanging loops are secured to the cuff fabric, not just the outer edging.
- The bells are attached individually and won't be used to support the stocking's weight.
In the finished garland, one stocking hangs at each end with its toe pointing toward the center, as shown in the example.
Before attaching the green scallops and bells, lay the two stockings side by side with their toes pointing toward each other. Choose the front of each stocking so the green scallops and all three bells will face forward. Complete those decorations on the chosen fronts, then attach the reinforced red hanging loops at the opposite upper backs, following the stocking pattern.
If you've already finished both stockings with their decorations facing the same direction, check their positions before attaching them to the garland. Simply turning one stocking around may hide its bells.
Make Two Peppermint Crochet Candy Canes
Use our free crochet candy cane ornament pattern for the two longer decorations.
These are the dimensional candy canes, not the flat appliqué version. Each one has red-and-ivory spiral stripes, a peppermint-swirl center, two green leaves and two crocheted ribbon tails.
Complete the cream hanging loop at the upper crook. Don't shorten the candy cane or remove the ribbon tails to make it match the mitten height. The longer shape is part of the arrangement.
Checkpoint: Hang each candy cane by its existing loop before attaching it to the garland. The striped stem should point down, the peppermint should face forward, and the two ribbon tails should remain visible. Check that the two candy canes are close in finished length.
Make Three Individual Christmas Mittens
Follow the free crochet Christmas mitten ornament pattern, using the single-mitten variation rather than the matching pair connected by one twisted cord.
Make three separate mittens. Each gets a red body, outward-pointing thumb, folded ivory cuff, narrow green band, two-loop green bow, two red berries, and an ivory eight-spoke embroidered star with four little dots.
Make the individual hanging loop described in the mitten pattern. Leave off the long red-and-ivory cord used to connect a pair of mittens.
Lay the three finished mittens beside one another. Check that the thumbs, cuffs and stars are about the same size. You can rotate the finished mittens to choose their hanging directions, but make sure the bows and embroidered stars still face forward.
Check All Seven Before Starting the Cord
Put the ornaments on a table in this order:
Stocking, mitten, candy cane, mitten, candy cane, mitten, stocking.
Make sure you have two stocking loops, two candy cane loops and three mitten loops. Each loop must already be attached securely to its ornament.
The stockings and mittens will be shorter than the candy canes. That's what the finished example shows. I'd leave the proportions alone instead of trying to make everything end at the same height.
If the pieces vary noticeably within the same design, compare their gauge and construction counts with their original patterns before joining them to the cord.
Plan the Garland Layout and Spacing
I'd plan the order before tying anything to the cord. The candy canes are much longer than the little mittens, and that difference matters when you're hanging the garland above furniture or along a wall.
We're using seven marked attachment points along an 80-inch usable section of cord, with 10 inches between neighboring points. That leaves a 10-inch margin at either end, measured from the bases of the hanging loops.
Mark the Seven Positions
Once the evergreen cord is finished and its end loops are secured, lay it flat without stretching it. Start measuring at the base of the left hanging loop, not at the outermost end of the loop.
| Position | Ornament | Distance from Left Loop Base |
|---|---|---|
| 1 | Stocking | 10 inches |
| 2 | Mitten | 20 inches |
| 3 | Candy cane | 30 inches |
| 4 | Mitten | 40 inches |
| 5 | Candy cane | 50 inches |
| 6 | Mitten | 60 inches |
| 7 | Stocking | 70 inches |
Use removable markers at those seven positions. Don't attach the ornaments yet.
Spacing check: The first ornament is 10 inches from the left loop base. Six spaces of 10 inches place the last ornament at 70 inches. The remaining 10 inches lead to the right loop base. That's an 80-inch usable section, with no extra space missing from the calculation.
Allow for the Longer Candy Canes
Measure downward from your planned hanging cord to the lowest point of a candy cane, including its red connector and original hanging loop. Then add extra clearance before choosing where to mount the garland.
Don't assume that 10 inches along the cord gives you 10 inches of horizontal space once the cord is draped. The hanging distance between ornaments changes with the curve of the garland.
It's fine if the candy canes hang lower than the mittens. They should. Just keep them from touching the furniture, getting caught on the stocking bells or dragging against anything underneath.
Crochet the Evergreen Garland Cord
We'll make three long green chains and braid them together. A plain single chain would be quicker, but I prefer the fuller look of the braid for these dimensional ornaments. It also gives us several strands of crochet to sew through when attaching the little red connectors.
Use the dark evergreen worsted-weight yarn and the 4 mm hook as a starting point. Keep the same yarn and hook for all three chains.
Part A: Crochet Three Long Chain Strands
Make 3 separate green chains.
- Leave a starting yarn tail approximately 12 inches long and make a slip knot.
- Ch until the relaxed chain measures approximately 110 inches. Measure it on a flat surface without stretching it.
- Fasten off, leaving approximately 12 inches of yarn at the finishing end.
- Make two more chains the same length, using the same hook and similar tension.
The 110-inch length is a starting allowance, not the final garland measurement. Braiding brings the chains together and shortens the finished length. The amount depends on your yarn and how tightly you braid, so we'll use the finished measurement rather than promising one exact foundation-chain count.
If you prefer to count your chains, mark every 50 chains as you work. Record the first strand's count and aim for the same count in the remaining two strands. Check the actual lengths too, because different tension can change how long the chains become.
Part B: Braid the Three Chains
- Lay the three chains side by side with their starting ends together.
- Use a temporary piece of green yarn to tie the three starting ends together. Keep the long yarn tails available for securing the finished cord.
- Hold or temporarily secure this end so the chains stay aligned.
- Spread the three chains apart. Bring the right chain over the middle chain. Then bring the left chain over the new middle chain.
- Continue alternating right over middle and left over middle, keeping the braid even.
- Every 12 inches or so, stop and smooth the braid. It should bend without forming hard twists or gathering into a tight rope.
- Continue until the braided section reaches at least 88 inches when laid flat without being stretched.
If your starting strands are too short to make an 88-inch braid, they need to be lengthened before the cord is finished. Don't pull the braid tight just to reach the target length.
If extra chain remains after you reach the planned length, temporarily secure the braid at the 88-inch mark. Undo the unused chain stitches from the finishing ends until all three strands meet neatly at that point. Fasten off each strand again, leaving yarn tails for securing the end. Don't simply cut across loose chains, because they can unravel.
Part C: Secure Both Ends of the Braid
- Thread one available green yarn tail through your yarn needle.
- Pass it through several stitches of all three chain strands near the end of the braid.
- Work back through the same area in the opposite direction, catching the separate strands together without pulling them into a knot.
- Repeat with a second tail and secure the remaining yarn ends through the braided fabric.
- Secure the opposite end in the same way.
The braided cord should now measure approximately 88 inches from end to end, before forming the two hanging loops. It should have an even thickness without loose strands sticking out.
Checkpoint: Hold the braid at two points several inches apart. The three green chains should remain together. If a section loosens or twists apart, unbraid that section and work it again before attaching the ornaments.
The braided cord is finished, but don't trim every tail flush yet. We can use the remaining ends when making the hanging loops.
Make and Reinforce the Garland Hanging Loops
We'll use the finished green braid itself for the two end loops. That keeps the hanging points the same color and thickness as the rest of the cord, without adding a different kind of handle at each end.
Make the Left Hanging Loop
- Lay the finished 88-inch cord flat.
- Measure 4 inches inward from the left end and place a removable marker.
- Curve that 4-inch end section into a loop, bringing its free tip back to the marker.
- Using an 18-inch length of evergreen yarn and your yarn needle, sew the free tip to the main braided cord at the marker.
- Pass the needle through several stitches of the free end and several stitches of the main braid. Make at least four securing passes, approaching from different directions.
- Secure the sewing yarn and weave the remaining tails through the underside of the braid.
The loop should be rounded and large enough to pass over the hanging point you plan to use. The four inches are measured along the cord before bending, not across the finished loop.
Make the Right Hanging Loop
Repeat the same steps at the other end, using another four-inch section of braided cord.
Both loops should be attached in the same manner, with the joining stitches hidden on the underside of the garland.
Check the Finished Length
We started with an 88-inch cord. The left loop uses four inches and the right loop uses another four inches.
88 inches minus 8 inches = 80 inches of usable cord between the two loop bases.
Lay the garland flat again and measure between those bases. It should be close to 80 inches. If the loops are noticeably different or the cord was stretched during measuring, correct that before placing the ornament markers.
Give each loop a firm hand check by holding the main braid in one hand and gently pulling on the loop with the other. The sewing should stay in place without opening. This is an attachment check, not proof of a measured load rating.
Use hanging points that are intended to support decorations and are installed according to their manufacturer's instructions. Don't rely on tape, loose trim or decorative hardware that isn't securely mounted.
Attach the Seven Crochet Christmas Ornaments
The finished example has a short red connection above each ornament. We'll make seven little crocheted strips and use them to join the ornament hanging loops to the green braid.
Don't sew through a bell, green leaf, peppermint or mitten bow. Each ornament already has a reinforced hanging loop, and that's where the connector belongs.
Part A: Crochet Seven Red Connectors
Make 7 in Christmas red.
Foundation: Leave a 12-inch starting yarn tail. Ch 13.
Reinforcing row: Starting in the second chain from the hook, work 1 sl st in each chain across. (12 sl sts)
Fasten off, leaving another 12-inch yarn tail at the opposite end.
You should now have a short red crocheted strip with a yarn tail at each end. Make six more strips exactly the same way.
The starting chain and slip-stitch row make the connector firmer than a loose chain alone. Fold each strip in half to check that the ends meet evenly. The folded part will pass through the ornament's existing hanging loop, while the two free ends will attach around the evergreen cord.
Connector checkpoint: Each strip has 13 foundation chains, 12 reinforcing slip stitches and two sewing tails. All seven strips should have approximately the same finished length.
Part B: Fit the First Stocking Connector
- Lay the first stocking face up, with its bells facing you and its red hanging loop at the top.
- Fold one red connector at its midpoint, bringing the two free ends together.
- Pass the folded midpoint through the stocking's existing reinforced red hanging loop.
- Bring the two free ends upward toward the green garland cord. The stocking should now hang below the connector, supported by its original loop.
- Place the two free connector ends on opposite sides of the green braid at the first marked attachment point, 10 inches from the left hanging-loop base.
- Bring both connector ends around the braid and together beneath it. Keep the connector untwisted.
- Using the two red sewing tails, sew the free ends together and through stitches belonging to all three green braid strands. Make several securing passes without pulling the green cord into a knot.
- Weave the red sewing tails through nearby connector stitches and the underside of the braid, reversing direction before trimming.
Lift the braid gently. The stocking should hang from its original loop and short red connector without pulling on the bells or green scallops.
I'd leave the red connector a little loose until I'm happy with the stocking's direction. Then I'd finish the securing stitches. That gives you a chance to face the bells forward before everything is fixed in place.
Part C: Attach the Remaining Six Ornaments
Use the same method for every ornament. Fold a red connector through the ornament's original hanging loop, bring its two ends around the green braid, and sew the ends together through the braid at the marked position.
- Position 1, 10 inches: Left stocking. Its ivory toe should point inward toward the right, with all three gold bells facing forward.
- Position 2, 20 inches: First mitten. Keep its holly bow and ivory star facing forward, with the thumb pointing toward the left.
- Position 3, 30 inches: First peppermint candy cane. Pass the red connector through the cream hanging loop at the top of the crook. Keep the peppermint center, leaves and ribbon tails facing forward.
- Position 4, 40 inches: Center mitten. Check that its star faces forward and its thumb remains visible to the side.
- Position 5, 50 inches: Second peppermint candy cane. Arrange its peppermint and ribbon tails to face the same direction as those on the first candy cane.
- Position 6, 60 inches: Third mitten. Its thumb should point outward to the right, with its holly bow and ivory star facing forward.
- Position 7, 70 inches: Right stocking. Its ivory toe should point inward toward the left, with all three gold bells visible from the front.
Before sewing each connector permanently, hold the garland up by its main cord and let that ornament hang naturally. If it turns toward the wall, rotate the red connector around the braid until the decorated front faces outward.
Then finish the securing stitches through all three green braid strands.
Part D: Check the Complete Arrangement
All seven ornaments should now be attached in the correct order, with six spaces between them. The two stockings belong at the ends, the two candy canes are the longer pieces, and three mittens sit between and beside them.
Hold the garland by its two end loops. Check that the red connectors don't slide along the green braid and that the ornaments can hang freely without rubbing against their neighbors.
I'd rather adjust one attachment now than discover after hanging the garland that a mitten has turned around and hidden its embroidered star.
Hang and Finish Your Crochet Christmas Garland
Now you can see the whole arrangement instead of seven separate ornaments on the table. The stockings frame the ends, the mittens bring the smaller details up between them, and the candy canes hang lower with their peppermint decorations visible.
Choose Where the Garland Will Hang
A den wall, hallway or mantel area can make a nice place for the finished piece. Pick a position where the complete garland can hang without touching furniture, catching on doors or being pulled down by a child.
I'd keep it away from candles, fireplaces in use and other heat sources. The approved example is a decorating reference, not a placement guide for clearance around flames.
For baby's first Christmas, use the garland only as an adult-controlled decoration in an area completely out of a child's reach. Never fasten it to a crib, bassinet, infant sleep area or anything a child could pull toward themselves.
The stockings contain small gold bells. The U.S. Consumer Product Safety Commission's information on small parts explains the hazards associated with small detachable components in children's products. This garland is intended for decoration only, not for handling or play.
Hang the Two End Loops
- Check that both hanging points are securely installed and appropriate for the wall or mantel.
- Place the left green end loop over the first hanging point.
- Support the garland while bringing the right loop to the second hanging point. Don't drag the ornaments across furniture.
- Release the weight gradually and let the cord settle into a shallow curve.
- Stand back and check that the center of the cord falls where you intended.
- Look at the lowest candy cane. It must have enough clearance beneath it, even after the cord settles.
- Check that both end loops stay securely in position and neither attachment seam is separating.
The hanging-point distance controls the curve. A wider distance makes the cord hang flatter. Bringing the points closer together gives the cord a deeper dip. Those distances must be chosen to suit the actual finished garland, not forced to match one photograph.
Don't stretch the green braid tightly between the hanging points. The finished design is meant to drape naturally.
Make the Final Adjustments
Look at the entire row from a few feet away.
- The two stockings should frame the arrangement, with their ivory toes pointing inward toward the center and their gold bells facing forward.
- The three mittens should show their holly cuffs and embroidered stars.
- Both peppermint candy canes should show their green leaves and ivory ribbon tails.
- All seven red connectors should be attached without sliding along the green braid.
- The green braid should remain evenly plaited without loose chain strands.
- Neither hanging loop should pull apart under the garland's weight.
- The ornaments should hang freely, without tangling with neighboring decorations.
Remove any remaining stitch markers, temporary clips and positioning yarn. Weave in loose ends and trim them neatly. Inspect all six stocking bells and their individual attachments once more.
The garland hasn't been physically load-tested, so the hanging checks here are practical inspection steps rather than a guarantee of any particular weight capacity.
That's the complete arrangement. I'd leave the connecting cord without extra decorations. The seven ornaments have enough going on already.
Adjust the Crochet Garland for Different Spaces
Not every wall or mantel has room for seven ornaments. You can make a shorter version without changing the stocking, mitten or candy cane patterns. Just adjust the number of ornaments and the connecting cord before you start crocheting that long green braid.
Make a Shorter Five-Ornament Garland
If you want something smaller for a hallway or a narrow wall, I'd use two stockings, two mittens and one candy cane.
Arrange them like this:
Stocking, mitten, candy cane, mitten, stocking.
Make the braided cord approximately 62 inches long before forming the end loops. Use four inches at each end for those loops, leaving approximately 54 inches of usable cord.
Mark the five ornament positions at 9, 18, 27, 36 and 45 inches from the left hanging-loop base.
That gives you four spaces of 9 inches, with 9 inches left at either end. Make five red connectors rather than seven.
For this shorter version, start with three evergreen crochet chains approximately 80 inches long each. Braid them together using the same method as the seven-ornament garland.
Measure the relaxed braid before securing its ends. You need approximately 62 inches of finished braid before forming the two four-inch hanging loops. The 80-inch starting lengths are estimates, so adjust them if your braid finishes shorter or longer.
Make a Longer Nine-Ornament Garland
For a longer wall, you can add one more stocking and one more mitten. That gives you three stockings, four mittens and two candy canes.
One arrangement would be:
Stocking, mitten, candy cane, mitten, stocking, mitten, candy cane, mitten, stocking.
For ten-inch spacing and ten-inch end margins, make the finished braided cord approximately 108 inches before forming its end loops. After using four inches at each end, the usable section will measure approximately 100 inches.
Mark nine attachment positions at 10, 20, 30, 40, 50, 60, 70, 80 and 90 inches from the left loop base. Make nine red connectors.
For this longer version, start with three green chains approximately 135 inches long each instead of the 110-inch starting chains used for the seven-ornament garland. That's a planning allowance, not a guaranteed finished length. Braid the strands and measure the finished section without stretching it. You need approximately 108 inches of braid before forming the two four-inch hanging loops.
If the braid is too short, adjust the chain lengths before securing the ends. You'll also need more yarn for the additional ornaments, which will add weight. Check the hanging points and available clearance before deciding where to display it.
Keep the Ornament Designs Consistent
There's no need to invent new decorations for either variation. Use the same red stockings with green scallops, the same peppermint candy canes, and the same holly-trimmed mittens.
You can choose a different color combination if you like, but I'd keep the yarn weight consistent within each ornament design. Changing yarn thickness or hook size can change the finished proportions.
Always measure the completed braided cord and mark the ornament positions before sewing the connectors in place.
Troubleshooting and Helpful Tips
My Braided Cord Is Shorter Than Planned
Measure the finished braid while it's lying flat, without stretching it. The seven-ornament version needs approximately 88 inches before the hanging loops are formed.
If the braid is too short, don't try to stretch it to the correct measurement. Undo the finishing ends and add more length to the crocheted strands, or remake them longer if necessary. Then braid and measure again before making the hanging loops.
The Three Green Chains Keep Twisting
Check that the chains are lying straight before braiding them. If one chain has twisted around itself, undo that section of the braid and smooth the strand before continuing.
You want a visible three-strand braid, not a tightly twisted knot of green yarn. Keep your braiding tension even all the way across.
The Red Connectors Slide Along the Cord
Check that you sewed through all three strands of the green braid at the marked attachment point. Sewing only around the outside of the braid can leave the connector free to slide.
Remove the loose stitches and sew the connector again, catching the individual chain strands without gathering them. Reinforce the join before weaving in the sewing tails.
One of the Mittens Keeps Turning Backward
Hang the mitten by its red connector and check where the original hanging loop meets the connector. Sometimes the connector has been twisted before the ends were sewn to the green cord.
Release that connection, straighten it and rotate the mitten until the green bow and ivory star face forward. Then reattach the connector without a twist.
Don't turn the decorated cuff around separately or sew through the embroidered star to hold the mitten in place.
The Candy Canes Hang Much Lower Than the Mittens
They should hang lower. The original candy cane pattern makes a noticeably longer ornament than the single mitten pattern.
If the candy canes are touching the furniture beneath the garland, move the complete garland higher or choose a display area with more room. Don't shorten the candy cane pattern without accounting for its shaped crook, striped body and decorations.
The Garland Dips Too Far in the Middle
Check the distance between your hanging points. The closer those points are together, the farther the cord can dip when its weight settles.
Try a wider position for the hanging points if the surface and mounting hardware allow it. Support the ornaments while adjusting the cord. Don't pull the braid tight or put additional tension on its sewn end loops.
The Stocking Bells Catch on Other Decorations
Make sure the two stockings remain at the ends of the seven-ornament arrangement, with their toes pointing inward toward each other. Keep the bells facing forward and clear of neighboring ornaments.
Let the bells hang freely below the green scallops. If the garland is too crowded when displayed, move the hanging points to give the cord a flatter curve or make a wider-spaced version.
Never use the bells as attachment points or tie them to the green cord.
One Ornament Hangs Crooked
Check the original ornament hanging loop first. It should be secured at the top or upper back of the ornament, following that ornament's pattern.
Next, check the red connector. It should be folded evenly and attached at the marked point on the braid. If one free end was sewn higher or tighter than the other, the ornament may lean.
Correct the connector before changing the original ornament.
Frequently Asked Questions
Do I Have to Make All Seven Ornaments Before Crocheting the Garland Cord?
No. You can make the evergreen braid first if you already know which arrangement you want. I'd still make at least one of each ornament before choosing the final hanging position. That way you can see how far the candy canes hang below the mittens and stockings.
Don't attach the red connectors permanently until you have the finished ornaments ready to arrange.
Can I Leave the Gold Bells Off the Stockings?
Yes. The stocking pattern includes a version without the bells. You can keep the ivory cuff, heel and toe, and all three green scalloped points.
That changes one detail from the finished garland example, but you won't need to change the connecting cord or the stocking's hanging loop.
Can I Use Cotton Yarn Instead of Acrylic?
Yes, provided you check the gauge and the instructions for each ornament. Cotton can make a firmer crochet fabric and may stretch differently from acrylic.
I'd use the same yarn type for all three green cord strands so they braid evenly. Mixing noticeably different thicknesses in the main braid can make one strand stand out or pull against the others.
Can I Hang This Garland on a Christmas Tree?
You can use it as a tree decoration if the tree and its supports can accommodate the length and weight of the garland without pulling branches out of position.
Keep the small bells and long cord completely out of children's reach. Don't drape it where someone could pull on an exposed section, and keep it away from candles or other heat sources.
How Should I Store the Finished Garland?
I'd leave the ornaments attached rather than undoing seven red connectors every January.
Lay the garland on a clean surface and arrange the green braid in broad, loose curves. Keep the candy canes flat enough that their crooks and ribbon tails aren't crushed. Tuck tissue between the stockings so their bells don't catch the crochet fabric.
Store everything in a roomy box where the yarn won't be compressed beneath heavier decorations. The complete garland hasn't been physically wash-tested, so follow the care instructions for your yarn and use gentle spot cleaning if necessary.
Is This Garland Suitable for a Baby's Nursery?
It's a decorative keepsake for adults to display, not something made for a baby to touch or play with. The long cord, small bells and hanging ornaments make it unsuitable for a crib, bassinet, infant sleep area or any place a baby or toddler can reach.
For baby's first Christmas, I'd hang it in an adult area of the house, such as a hallway or den, completely out of children's reach.
When you click on links to various merchants on this site and make a purchase, this may result in this site earning a commission. This does not affect the price you pay.

UBGI Gold Standard 2026
Reviewed under the site's
editorial checklist.
Photos, decorating ideas, party setups and reader submissions are shared for inspiration unless a page is specifically presented as a pattern, tutorial, reference guide or step-by-step project. Follow the instructions, measurements, safety guidance and manufacturer directions provided for the particular project or product.
About Jan | Contact | Baby Nursery Ideas (Blog) | Site Map | Privacy Policy | Disclosure Policy | Disclaimer | Affiliate Disclosure | Earnings Disclosure | Facebook | Pinterest
I am a participant in the Amazon Services LLC Associates Program, an affiliate advertising program designed to provide a means for us to earn fees by linking to Amazon. As an Amazon Associate I earn from qualifying purchases.
Copyright © 2006-2026. All Rights Reserved.