Free Felt Penguin Ornament Pattern with Printable PDF Templates
By Jan Bay
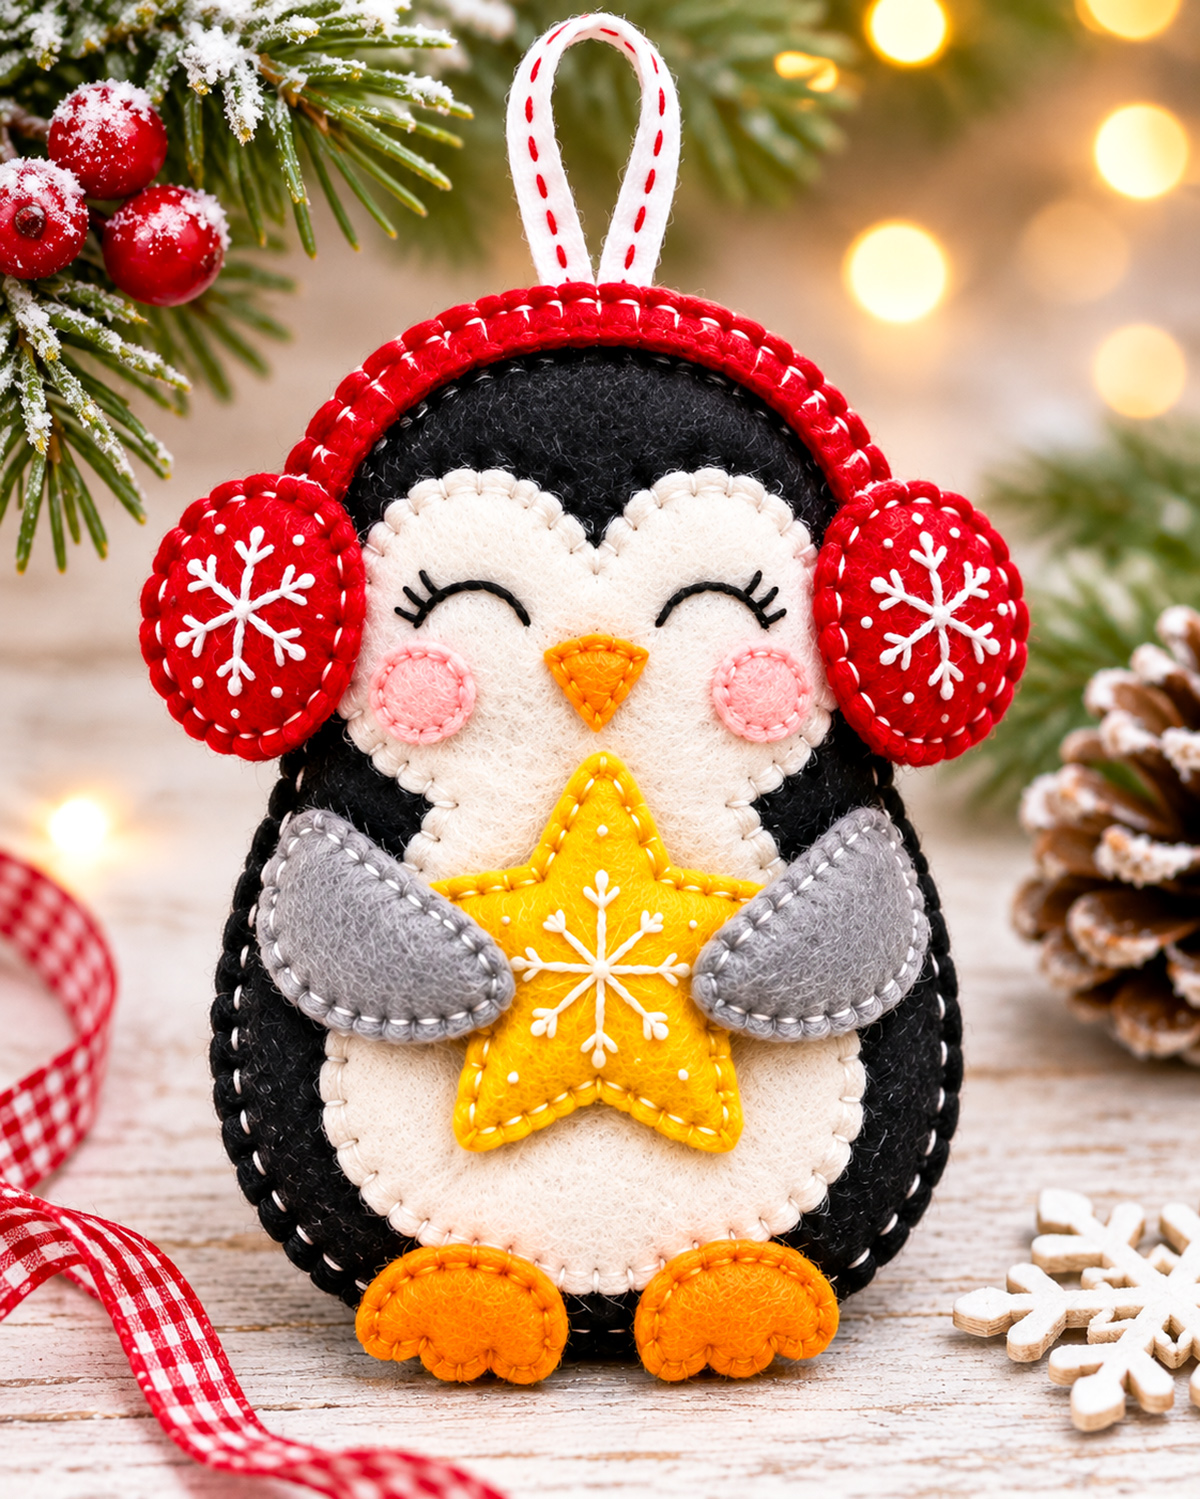
This free felt penguin ornament pattern makes a perky little Christmas decoration with bright red earmuffs, embroidered snowflakes, rosy cheeks and a gold color star held between two tiny flippers. I'll show you how to cut the felt pieces, sew the details and put your penguin together using the free printable PDF templates. It's a fun project for anyone who enjoys hand sewing, and the finished penguin makes a lovely handmade Christmas gift or keepsake.
Explore More Felt Crafts and Christmas Ornaments
Free Felt Crafts and Sewing Ideas
See Supplies for This Project Here.
On This Page
- Finished Size and Skill Level
- Materials and Supplies
- Free Printable Felt Penguin Pattern PDF
- Cutting the Felt Pieces
- Sewing the Penguin's Face
- Making the Snowflake Earmuffs
- Making the Star and Flippers
- Assembling the Penguin Ornament
- Finishing and Adding the Hanging Loop
- Helpful Sewing Tips
- Frequently Asked Questions
Finished Size and Skill Level
The finished penguin is expected to measure about 6 3/8 inches tall, not counting the hanging loop. From one earmuff to the other, it'll measure approximately 5 1/2 inches wide. The little white loop adds about another 1 3/4 inches at the top.
I'd call this an advanced beginner project. The shapes aren't difficult to cut, and you won't need a sewing machine. Most of the work involves putting the layers together neatly and keeping the embroidery stitches small.
If you've made a simple felt ornament before, you should be able to follow this pattern. If this is your first one, give yourself extra time for the face and snowflakes. Those are the details worth taking slowly.
- Finished size: Approximately 6 3/8 inches tall by 5 1/2 inches wide, excluding the hanging loop.
- Thickness: Approximately 1/2 inch, depending on stuffing.
- Skill level: Advanced beginner to intermediate.
- Construction: Hand sewing and felt appliqué.
- Seam allowance: None to add. Cut directly on the template outlines and sew approximately 1/8 inch inside the edges.
- Printable pattern: Eight US Letter pages, including full-size cutting templates and an assembly map.
Use wool-blend or good-quality craft felt that holds its shape. Very thin felt can stretch around the stuffing, especially at the feet and earmuffs.
Materials and Supplies for the Felt Penguin Ornament
You won't need much of any one color, but I'd gather all the felt and embroidery floss before cutting. The same colors repeat throughout the ornament, and it looks nicer when the thread matches the felt.
Felt and Filling
- Black felt: two 9-by-12-inch sheets, or one larger piece that holds both body shapes.
- Cream or warm white felt: one 9-by-12-inch sheet for the face, belly and hanging strip.
- Cranberry red felt: one 9-by-12-inch sheet for the earmuffs and curved headband.
- Golden yellow felt: one 9-by-12-inch sheet for the star.
- Light gray felt: one 4-by-6-inch piece for the flippers.
- Orange felt: one 4-by-6-inch piece for the feet and beak.
- Pale pink felt: two small scraps for the cheeks.
- A small handful of polyester fiberfill.
- A tiny amount of fiberfill or thin batting for the earmuffs, star, flippers and feet.
Thread and Sewing Tools
- Six-strand embroidery floss in black, cream, red, pink, gray, orange, golden yellow and white.
- Embroidery or hand-sewing needles.
- Sharp embroidery scissors and paper scissors.
- Fine pins or sewing clips.
- Washable fabric marker or another felt-marking method you've tested on a scrap.
- Printed penguin templates.
- Ruler for checking the printed scale.
- Optional: a small amount of fabric glue to hold pieces temporarily while stitching.
For most blanket stitching, use two strands of embroidery floss. The eyes and snowflakes look best with two strands as well. Use one strand for tiny stitches you don't want to show, and three strands if you want the red running stitches on the hanging loop to stand out.
Don't use loose beads, buttons or bells for the face. The embroidered eyes and felt cheeks already give the penguin plenty of personality.
Free Printable Felt Penguin Ornament Pattern PDF
The free printable pattern includes all the shapes needed to make the penguin shown above. You'll get the body, heart-shaped face and belly, curved earmuff band, round ear covers, star, flippers, feet, cheeks, beak and hanging strip.
Download the Free Felt Penguin Ornament Pattern PDF
The printable pattern contains eight US Letter pages:
- Finished penguin example and printing instructions.
- Full-size assembly and placement map.
- Black front and back body cutting template.
- Heart-shaped cream face and belly template with embroidery guides.
- Curved red headband and four oval earmuff templates.
- Golden star and mirrored gray flipper templates.
- Scalloped orange feet, pink cheeks, beak and hanging strip templates.
- Complete cutting checklist and assembly order.
How to Print the Templates
Choose Actual Size or 100% in your printer settings. Don't select Fit to Page or Shrink to Fit. The cutting pages include a 1-inch test square so you can check the scale with a ruler.
Measure the test square before cutting your felt. It should be exactly 1 inch wide and 1 inch tall. If it's smaller or larger, correct the printer setting and print again.
You can print the pages in black and white. The solid outlines are cutting lines, while the lighter marks show where the eyes, cheeks, beak and star belong. Those lighter marks are not extra pieces to cut.
Cut out the paper templates with paper scissors. Keep them flat and save the placement map until you've finished sewing. It'll help you check the position of the smaller pieces as you work.
Cutting the Felt Pieces
Before you start cutting, spread the printed pattern pieces on your felt and check that everything fits. The black body is the largest piece, so cut those two shapes first. Keep the rest of your felt nearby for the smaller pieces.
The pattern has 22 felt pieces in all. That sounds like quite a few, but several are simply matching front and back pieces for the same little decoration.
Complete Felt Cutting List
- A. Black body: Cut 2 identical pieces.
- B. Cream face and belly: Cut 1 continuous piece.
- C. Red earmuff headband: Cut 1 curved piece.
- D1-D4. Red earmuff ovals: Cut 4, two embroidered fronts and two plain backs.
- E1-E2. Golden star: Cut 2 identical pieces.
- F LEFT and F RIGHT. Gray flippers: Cut 2 matching pieces for the left flipper and 2 matching pieces for the right flipper, making 4 pieces altogether.
- G1-G4. Orange feet: Cut 4, making 2 matching pairs.
- H1-H2. Pink cheeks: Cut 2 circles.
- I. Orange beak: Cut 1 small triangular piece.
- J. Cream hanging strip: Cut 1 strip measuring 4 1/2 inches long by 3/8 inch wide.
Cut directly along the solid template outlines. You don't need to add seam allowances because the pieces are joined with stitches worked close to their edges.
Check the Shapes Before Sewing
Lay one black body piece flat with its rounded head at the top. Center the cream face and belly over it. The two rounded forehead sections should sit beneath the top of the head, and the lower belly should leave a narrow black border along the bottom.
Put the golden star in the middle of the belly, then lay the gray flippers over its left and right sides. The orange feet belong along the lower edge, while the red earmuffs sit on either side of the head.
Compare your arrangement with the full-size placement map in the PDF. Don't sew anything yet. You're simply checking that the pieces look right together.
Checkpoint: The white face should have two rounded forehead lobes with a shallow dip between them. It should narrow slightly below the cheeks and widen again around the belly. Don't cut the face and belly into separate pieces.
If a cut piece looks uneven, put its paper template back on top and trim only the area that needs correcting. Small differences in the felt edges are normal, but the two black body pieces need to match closely so the outer seam will be neat.
Sewing the Penguin's Face
Let's start with the expression. The closed eyes, little pink cheeks and golden beak give this penguin its sleepy Christmas look. They're small details, so I'd work on them while the front is still flat.
Step 1: Attach the White Face and Belly
- Lay one black body piece on your work surface. This is the front of the ornament.
- Position the cream face-and-belly piece on top, matching the full-size placement map.
- Position the highest points of the two cream forehead lobes approximately 1 inch below the top of the black body. Follow the full-size placement map to keep the shallow center dip and lower belly correctly aligned.
- Check that the lower belly leaves roughly 1/4 to 3/8 inch of black felt showing along the bottom.
- Pin the cream felt in place, working from the center outward.
- Thread your needle with two strands of cream embroidery floss.
- Blanket stitch around the entire cream shape, placing the stitches approximately 1/8 inch apart and working about 1/8 inch inside the cut edge.
- At the shallow dip between the two forehead lobes, use smaller stitches so the inward curve stays neat.
- Fasten the thread on the wrong side of the black body front.
The cream felt should lie flat without puckering. If you see a wrinkle forming, adjust your pins before you stitch around that section.
Step 2: Embroider the Closed Eyes
Transfer the two curved eye guides from the printed face template. Each eye is approximately 3/4 inch wide, with the outer end angled slightly upward.
- Thread your needle with two strands of black embroidery floss.
- Begin at the inside end of the left eye.
- Follow the curved guide using short backstitches approximately 1/8 inch long.
- Keep the curve smooth rather than pulling the thread tight.
- Add three short eyelash stitches near the outer corner of the eye.
- Repeat for the right eye, reversing the direction so the two eyes mirror each other.
- Fasten the floss on the wrong side.
Checkpoint: Both eyes should form gentle downward-facing arcs with the eyelash tips pointing outward. Check that they sit at the same height before fastening the second one.
Step 3: Add the Pink Cheeks
- Place one pink circle below and slightly outside each eye, using the printed cheek guides.
- Each circle measures approximately 1/2 inch across.
- Thread your needle with two strands of pale pink embroidery floss.
- Sew around each circle with small blanket stitches or close whipstitches.
- Keep the stitching evenly spaced so the little circles stay round.
- Fasten the thread on the wrong side.
The cheeks should sit below the outer halves of the eyes, with enough cream felt between them for the beak.
Step 4: Sew the Golden Beak
- Place the small orange-gold beak in the center of the face, between the cheeks and just below the eyes.
- Position the wider curved edge at the top and the point facing downward.
- Use two strands of matching orange or golden embroidery floss.
- Stitch around the beak with small, even stitches, keeping its pointed bottom clearly defined.
- Fasten the thread behind the body front.
The beak should remain a separate little triangle. Don't join it to the star below. A small space between the two makes the face easier to recognize.
Set the finished front aside for a moment. The expression is complete, and now we can add those bright red earmuffs.
Making the Red Snowflake Earmuffs
The earmuffs are one of my favorite details in this design. They're bright enough to stand out against the black felt, and the white snowflakes make them look like tiny winter accessories.
Each earmuff uses two matching red ovals with just a little filling between them. The curved red headband is a separate piece that goes across the top of the penguin's head.
Step 1: Attach the Red Headband
- Take the curved red headband piece marked C.
- Position it across the top of the black body front, following the crown shown on the placement map.
- The highest point of the headband should follow the top curve of the penguin's head.
- Let the lower ends curve down toward the left and right earmuff positions.
- Pin the headband in place without stretching it.
- Use two strands of red embroidery floss to stitch along its upper and lower edges.
- Work small stitches around both curves so the band sits flat.
- Fasten the thread on the wrong side of the black body front.
If you'd like the headband stitches to look more like the example, add a row of short cream running stitches along the middle of the red band. Keep them evenly spaced and stop where the earmuffs will cover the ends.
Step 2: Embroider the Snowflakes
Choose two of your four red earmuff ovals for the fronts. Leave the other two plain.
- Mark the center of each front oval with a removable fabric marker.
- Thread your needle with two strands of white embroidery floss.
- Stitch three straight lines crossing at the center, making six evenly spaced snowflake arms.
- Keep the ends of the arms approximately 1/8 inch from the felt edge.
- Add two short branching stitches near the outer end of each arm.
- Make the branches point back toward the snowflake's center.
- Add tiny white dots between a few of the arms if you want the little scattered snow details shown in the example.
- Repeat the same arrangement on the second earmuff front.
Checkpoint: Each snowflake should have six main arms. You don't need twelve separate long lines. Three lines crossing at the center give you all six arms.
Step 3: Sew the Earmuff Ovals
- Place one embroidered red oval over one plain red oval, matching their edges.
- Thread your needle with two strands of red embroidery floss.
- Blanket stitch around the joined ovals, leaving a small opening approximately 1/2 inch wide.
- Add a very small amount of polyester filling through the opening.
- Spread the filling evenly so the earmuff looks rounded but not bulky.
- Finish stitching the opening closed.
- Repeat for the second earmuff.
You want the earmuffs to look gently padded. Don't pack them firmly. Too much filling will make the edges curl and can hide the snowflake embroidery.
Step 4: Attach the Earmuffs to the Head
- Place one finished earmuff on each side of the penguin's face.
- Center them approximately 1 7/8 to 2 inches below the highest point of the black body.
- Let each earmuff extend beyond the side of the black body, as shown on the placement map.
- Make sure each earmuff covers the corresponding end of the curved red headband.
- Pin both in place and compare their height.
- Use red floss to secure each earmuff to the body front with small stitches through its back layer.
- Work several attachment stitches where the earmuff overlaps the headband.
- Fasten the thread behind the black body front.
Check that the two earmuffs sit evenly and that neither one covers an eye or pink cheek. The snowflake designs should face straight forward.
Making the Golden Star and Gray Flippers
The penguin holds a golden star against its belly, with two little gray flippers resting over the sides. I would make the star first and attach it before adding the flippers. That way, the star stays in place even if the flippers move a little while you're sewing.
Step 1: Embroider the Star
- Take the golden star front marked E1.
- Find the center of the star, using the printable embroidery guide.
- Thread your needle with two strands of white embroidery floss.
- Make three straight lines crossing at the center, forming six snowflake arms.
- Keep the ends of the arms inside the star's center area so they don't disappear into the outer seam.
- Add two short branches near the end of each arm.
- Stitch several tiny white dots around the snowflake to match the scattered details in the finished example.
- Fasten your thread on the back of the star front.
Keep the white design centered. The gold felt should still show clearly around the snowflake.
Step 2: Assemble the Stuffed Star
- Place the embroidered star front over the plain golden star back, with both outer edges aligned.
- Thread your needle with two strands of matching golden floss.
- Begin blanket stitching around the star, working approximately 1/8 inch inside the cut edge.
- At each inward corner, make a smaller stitch so the V shape stays defined.
- Continue around the star, leaving an opening approximately 3/4 inch wide.
- Add a thin layer of fiberfill or a little polyester batting.
- Push the filling gently toward each of the five points with the blunt end of a suitable sewing tool.
- Keep the star fairly flat, with just enough filling to round its surface slightly.
- Close the opening with matching blanket stitches.
Checkpoint: Count five clear points and five inward corners. If the star begins to look round, remove some filling and smooth the points before finishing the seam.
Step 3: Attach the Star to the Belly
- Place the completed star over the middle of the cream belly.
- Position the star's upper point approximately 2 5/8 inches below the top of the black body, centered beneath the beak as shown on the printed assembly map.
- Keep the star centered beneath the beak, leaving a little cream felt visible between them.
- Check that the lower points remain comfortably above the orange feet.
- Pin the star in place.
- With golden floss, make several small securing stitches through the star's back layer and the cream belly.
- Place the stitches near the outer points where they will be less noticeable.
- Check that the star doesn't swing away from the belly before fastening off.
Don't rely on the gray flippers to hold the star in position. The star needs its own attachment stitches.
Step 4: Sew the Gray Flippers
The pattern gives you two pairs of gray flipper pieces. The shapes are mirrored, so check the labels before pairing them.
- Cut two matching gray pieces using the template marked F LEFT. Place them together to make the left flipper.
- Cut two matching gray pieces using the template marked F RIGHT. Place them together to make the right flipper.
- Place each matching pair together, with their edges aligned.
- Thread your needle with two strands of gray embroidery floss.
- Blanket stitch around the first pair, leaving a short opening.
- Insert a very thin layer of filling or batting if you want the gently rounded flippers shown in the example.
- Close the opening and fasten off.
- Repeat for the other flipper.
You should now have two separate padded gray pieces. Check that they look like mirror images when placed on the penguin.
Step 5: Position and Attach the Flippers
- Place the left flipper across the left edge of the golden star.
- Its broader end should rest toward the penguin's outer body, with the narrower tip pointing inward.
- Place the right flipper in the matching position on the opposite side.
- Angle both flippers slightly downward toward the middle of the star.
- Leave the center of the star and most of its white snowflake embroidery visible.
- Pin the flippers in place.
- Use small gray or matching hidden stitches to secure the broad outer portion of each flipper to the body front.
- Make two or three small stitches near each inner tip to secure it over the edge of the star.
- Keep the visible gray blanket stitching facing outward.
- Fasten your thread behind the body front.
Checkpoint: The flippers should appear to wrap around the star without covering the snowflake at its center. Both flippers need to be attached securely, but they shouldn't pull the star out of shape.
Once the star and flippers are attached, the front of your penguin should look nearly complete. Only the feet, hanging loop and outer body seam remain.
Assembling the Felt Penguin Ornament
Now we can put the remaining pieces together. Most of the detailed sewing is finished, so take a moment to check the front against the finished example before closing the body.
Step 1: Sew the Orange Feet
The orange feet have small rounded toe shapes along their edges. Each foot is made from two matching felt pieces.
- Pair G1 with G2 for the left foot.
- Pair G3 with G4 for the right foot.
- Thread your needle with two strands of orange embroidery floss.
- Blanket stitch around the first pair, using shorter stitches around the small toe curves.
- Leave a small opening approximately 3/8 inch wide.
- Insert a tiny amount of filling. The foot should be gently raised rather than firmly stuffed.
- Close the opening and fasten off.
- Repeat for the second foot.
Check that the two feet are similar in size. They don't need to be perfectly identical, but their bottoms should sit at about the same level.
Step 2: Attach the Feet
- Lay the completed penguin front flat.
- Position the two orange feet along the lower edge of the black body, following the placement map.
- Let their bottoms extend just slightly below the black body.
- Keep a small black space between the feet so they don't look like one long piece.
- Pin each foot in place.
- Use orange floss to secure the back layer of each foot to the black body front.
- Keep the attachment stitches behind the raised front of each foot wherever possible.
- Check both feet before fastening off.
The feet should appear to rest in front of the black body, not disappear underneath it.
Step 3: Prepare the Hanging Loop
The example ornament has a cream felt loop with little red stitches running along it. It's a simple detail, but it ties in nicely with the red earmuffs.
- Take the cream felt hanging strip marked J, measuring 4 1/2 inches long by 3/8 inch wide.
- Thread your needle with two or three strands of red embroidery floss.
- Work a row of short running stitches along the center of the strip.
- Keep the stitches approximately 1/4 inch apart.
- Fasten the thread on the back of the strip.
- Fold the strip into a loop with its stitched side facing outward.
- Adjust the loop so approximately 1 3/4 inches will show above the penguin's head, leaving the loose ends inside the body for secure stitching.
- Overlap the two loose ends and pin them together.
Check the loop against the finished body. It should look balanced above the head without being much wider than the space between the earmuffs.
Step 4: Secure the Loop to the Back
- Take the remaining plain black body piece.
- Lay it with the inside facing up.
- Center the overlapped ends of the folded hanging loop at the top of the head.
- Place approximately 3/8 inch of the loop ends inside the body outline.
- Make several tight backstitches through both ends of the loop and the black felt.
- Work a second short row of stitches across the ends to reinforce the attachment.
- Fasten the thread securely on the inside.
- Gently pull the hanging loop to check that it stays attached.
The loop should extend upward beyond the black body. Keep its loose ends inside so they won't show after the front and back are joined.
Step 5: Join the Black Body Pieces
- Place the completed penguin front over the plain black back, with the decorated side facing outward.
- Match the two black body edges carefully.
- Check that the hanging loop remains centered between them.
- Pin or clip the layers together, taking care not to crush the star or earmuffs.
- Thread your needle with two strands of black embroidery floss.
- Begin blanket stitching around the outside, about 1/8 inch inside the cut edge.
- Keep the stitches approximately 1/8 inch apart.
- Stitch around the crown, making sure you don't catch the visible part of the hanging loop.
- Continue along the sides and around the lower body, working carefully near the attached feet.
- Leave an opening approximately 2 inches long along one lower side of the body.
Because felt doesn't fray, there's no need to turn the ornament inside out. The visible blanket stitching forms part of the finished look.
Step 6: Add the Body Filling
- Take small amounts of polyester fiberfill and gently separate the fibers with your fingers.
- Insert the filling through the opening along the lower side.
- Push a little filling toward the head and shoulders first.
- Add enough to give the body a rounded shape without stretching the edges.
- Smooth the filling around the belly and lower body.
- Compare both sides to make sure the penguin isn't leaning or bulging unevenly.
- Close the remaining side opening with matching black blanket stitches.
- Fasten the floss securely and hide the end inside the body.
Final assembly checkpoint: The body should be gently padded, the white face should lie flat, and the star should remain centered between the two gray flippers. The earmuffs should sit evenly on the head, with the orange feet showing below the belly.
Finishing the Felt Penguin Christmas Ornament
Once the body is closed, give the penguin a final look from top to bottom. You shouldn't need to do much more sewing, but a few little adjustments can make the finished ornament look neater.
Final Finishing Checklist
- Check the black blanket stitching around the body and close any gaps.
- Make sure the cream face and belly are attached along their entire outer edge.
- Check that the earmuffs are secure and that the snowflakes face forward.
- Gently shape the star's five points with your fingers.
- Check the stitches holding the gray flippers over the star.
- Make sure both orange feet remain firmly attached.
- Inspect the hanging loop and its attachment stitches.
- Trim any visible loose thread ends close to the felt.
- Remove any remaining fabric-marker lines according to the marker's instructions.
- Gently smooth the body into its rounded shape.
Hang the penguin from its loop and check the balance. If it tilts noticeably to one side, check the loop's position and the distribution of filling before making any adjustments.
I'd keep this ornament just as it is, without adding bells, beads or dangling decorations. The earmuffs and star already give it plenty of Christmas detail.
Using and Storing Your Ornament
This is a decorative Christmas ornament, not a baby toy. Keep it and its hanging loop out of reach of babies and young children, and don't place it in a crib, bassinet or other infant sleep space.
Store the penguin flat in a clean, dry box after Christmas. If you'd like to protect the embroidery, place a sheet of tissue paper over the front before putting other decorations nearby.
For another little handmade Christmas character, take a look at my felt mouse with book ornament pattern. Both would make lovely additions to a handmade ornament collection.
Helpful Tips for Sewing Felt Ornaments
There are a few things I'd pay attention to with this pattern, especially if you're still getting used to hand sewing felt.
Keep Your Stitches Small
Small, even blanket stitches are easier to fit around the penguin's curves. Around the body, aim for stitches approximately 1/8 inch apart. On the little cheeks, beak and narrow star points, make them smaller when needed.
If you're new to blanket stitch or backstitch, DMC's step-by-step embroidery stitch guide includes illustrated instructions for both.
Don't Overstuff the Pieces
The ornament should look rounded without becoming bulky. I'd use most of the filling in the black body and just a little in the star, earmuffs, flippers and feet.
Too much stuffing makes the smaller pieces difficult to control. You can always add a little more before closing a seam, but removing it after everything is sewn is much harder.
Keep the Snowflakes Away from the Edges
Embroider the snowflakes before joining the two layers of the earmuffs or star. Keep the outer ends of the embroidery far enough inside the cutting edge that the blanket stitching won't cover them.
Use the printed placement guides to keep the snowflakes centered. The tiny branches don't have to match perfectly, but the six main arms should be easy to see.
Use the Placement Map as You Work
The printed placement map shows how the pieces are meant to overlap. Check it before attaching the headband, star and flippers. Those three areas affect the finished appearance more than the small differences you might get when cutting the felt.
If the flippers cover too much of the star, move them slightly outward before securing them. If the earmuffs sit too low, move them up before stitching. It's much easier to correct their position while they're still pinned.
Check the Pattern Scale
The cutting templates are drawn at actual size. If you want a smaller or larger ornament, print every template page at the same percentage, including the placement map.
Remember that resizing also changes the tiny pieces and embroidery guides. Making the ornament smaller can make the eyes, cheeks and snowflakes harder to sew. For a first attempt, I'd use the original size.
The dimensions in this pattern are calculated from the printable templates. The final measurements and stuffed thickness may vary a little with your felt, stitching and amount of filling. A sewn sample is still needed to verify an exact finished measurement.
Felt Penguin Ornament Pattern FAQ
Can I make this felt penguin ornament without stuffing?
Yes. You can make a flatter version by leaving the main body unstuffed and using very little filling in the star and earmuffs. The shape will stay much the same, but the ornament won't have the rounded appearance shown in the finished example.
Can I use fabric glue instead of sewing?
You can use a tiny amount of fabric glue to hold appliqué pieces in place while you work, but I'd still sew the pieces together. The star, flippers, feet and hanging loop need secure stitching, particularly if the ornament will be handled each Christmas.
Do I need a sewing machine for this pattern?
No. The entire penguin can be made by hand. In fact, I'd choose hand sewing for the small curved pieces and snowflake details because they're easier to control with a needle and embroidery floss.
Can I change the earmuff colors?
Of course. Cranberry red gives the penguin a classic Christmas look, but dark green or dusty rose could be pretty too. I'd keep the white snowflakes so the embroidery stands out against the darker felt.
What should I do if the felt pieces don't line up?
First, check that your PDF was printed at 100% and that the 1-inch test square measures correctly. Then check that you've paired the correct mirrored flipper pieces and matching body shapes. Small cutting differences can be trimmed, but don't stretch the felt to force the pieces together.
Can this ornament be given to a baby?
It's intended as a decorative keepsake, not a toy. You can give it as a Christmas keepsake for the parents to display and save, but keep it out of a baby's reach. The hanging loop, stuffing and sewn decorations aren't intended for infant play.
How should I clean the finished ornament?
I'd start with a gentle dusting or a soft, dry cloth. For a small mark, test a little water on an inconspicuous area first and blot carefully. Avoid soaking the ornament, especially if you've used wool-blend felt or a fabric marker that needs special removal instructions.
If you'd like more projects to make with leftover felt, browse my felt crafts and sewing ideas for more handmade decorations and gifts.
When you click on links to various merchants on this site and make a purchase, this may result in this site earning a commission. This does not affect the price you pay.

UBGI Gold Standard 2026
Reviewed under the site's
editorial checklist.
Photos, decorating ideas, party setups and reader submissions are shared for inspiration unless a page is specifically presented as a pattern, tutorial, reference guide or step-by-step project. Follow the instructions, measurements, safety guidance and manufacturer directions provided for the particular project or product.
About Jan | Contact | Baby Nursery Ideas (Blog) | Site Map | Privacy Policy | Disclosure Policy | Disclaimer | Affiliate Disclosure | Earnings Disclosure | Facebook | Pinterest
I am a participant in the Amazon Services LLC Associates Program, an affiliate advertising program designed to provide a means for us to earn fees by linking to Amazon. As an Amazon Associate I earn from qualifying purchases.
Copyright © 2006-2026. All Rights Reserved.