Free Crochet Star Baby Blanket Cocoon Pattern
By Jan Bay
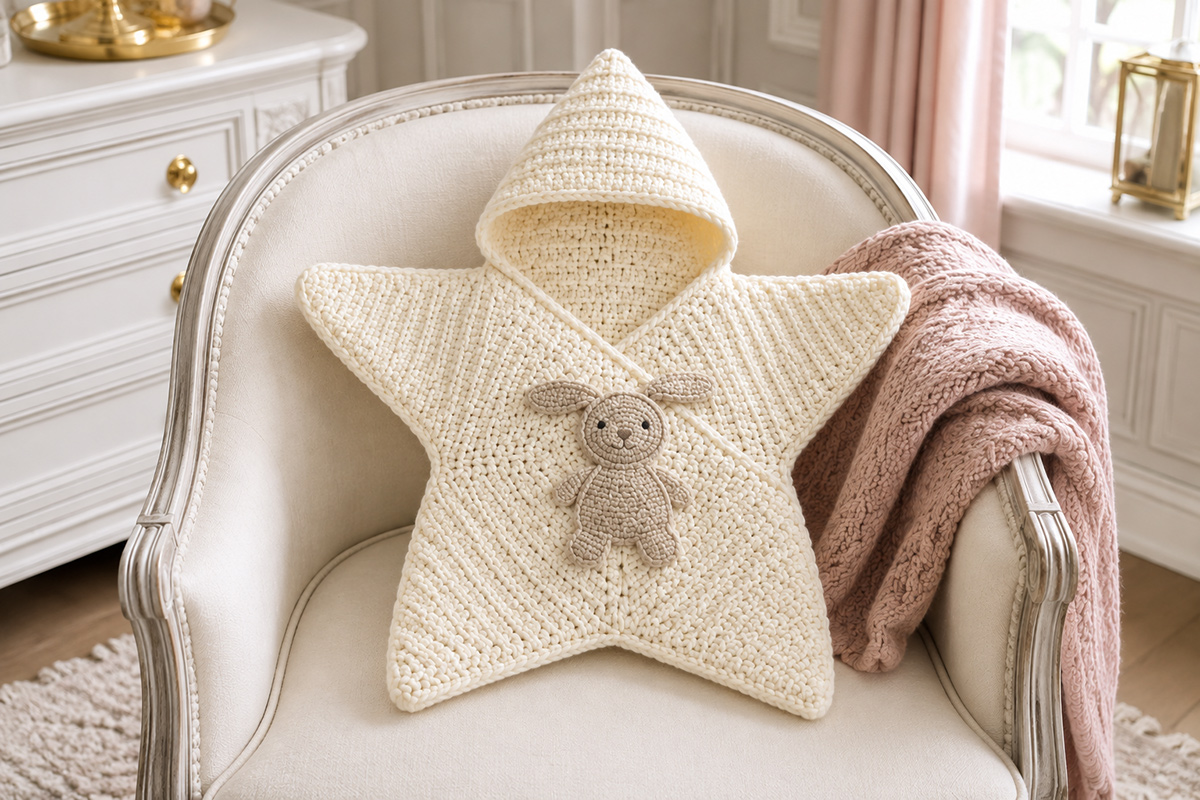
This free crochet star baby blanket cocoon pattern makes a hooded five point star with roomy points for the arms and legs and a generous overlapping back flap that makes it easier to place baby inside without buttons or other small closures. The finished cocoon is designed for supervised cuddles and photos, and the front can be personalized with one of my flat crochet appliques made from original patterns on this site.
Explore More Free Crochet Baby Patterns
Baby Blanket Patterns and Guide
Crochet Supplies for This Star Baby Blanket
Jump to the Crochet Star Baby Cocoon Pattern
Supplies for the Crochet Star Baby Blanket Cocoon Pattern
I’m keeping the yarn and hardware simple for this one. The star shape, pointed hood, front crossover flap and overlapping back opening already give the cocoon plenty of detail, so you don’t need buttons, snaps, ties or have to deal with a pile of embellishments.
For the five point star baby blanket cocoon:
- Estimated 1,200 to 1,500 yards of soft worsted weight #4 yarn for the main cocoon
- 5.5 mm (I-9) crochet hook, or the hook size needed to match gauge
- Yarn needle with a blunt tip for joining and weaving in ends
- Several locking stitch markers
- Scissors
- Flexible measuring tape
Skill level: Intermediate. The stitches themselves are basic, but the shaped star, hood lining, crossover flap and overlapping access opening require careful counting and assembly.
A smooth, washable worsted weight yarn makes the most sense here. I’d skip fuzzy, eyelash or heavily textured yarn because the shape and joins are easier to see and work when the stitches stay clearly defined. The finished cocoon also needs to remain soft enough to fold and overlap instead of becoming stiff.
If you want to add one of the flat crochet appliques to the front, you’ll also need small amounts of the appropriate yarn colors and black embroidery floss for any stitched facial features. Keep most of the applique flat and sew it securely around its edges. In the example, the tip of one bunny ear is left loose so it drifts over the front flap. That little bit of dimension gives the applique more personality without adding a separate embellishment. I would leave off buttons, beads, plastic safety eyes and other small added pieces.
You can make the whole cocoon in one color, which really shows off the five point silhouette, or use a contrasting color only for the edging and applique. I prefer keeping the cocoon itself fairly simple and letting the applique provide the extra personality. You can get a surprising amount of decorative mileage out of those small crocheted appliques.
Finished Size and Gauge
The measurements below are calculated from the stated gauge and stitch counts, so treat them as expected finished measurements rather than exact dimensions. Check your actual piece as you work to avoid surprises later on. Yarn, hook size and your own tension can change the finished size more than you might expect.
Expected finished measurements:
- About 25 inches from the tip of the hood to the lowest leg points
- About 26 to 27 inches from one arm point to the other
- Hood lining about 8 1/4 inches wide at the base and 7 1/2 inches deep
- Back access flap about 10 inches wide and 10 inches long
I would use the measurements rather than an age label when deciding whether the size is right. Babies vary too much for a simple age range to tell you whether the finished cocoon will have the roomy proportions intended by the pattern. A generous fit also gives baby room to move and can extend how long the cocoon remains useful. Babies grow quickly, and as much fun as this is to make, you want to get as much use out of the finished piece as possible.
Gauge: 13 double crochet stitches and 7 rows = approximately 4 inches before assembly.
After Round 6 of the star panel, the distance from the center to the tip of one point should be close to 3 1/2 inches. If yours is noticeably larger or smaller, change hook size before making both full panels.
Stitch Abbreviations
Pattern terms: This pattern uses US crochet terminology.
- ch = chain
- dc = double crochet
- dc2tog = double crochet 2 stitches together
- sc = single crochet
- sl st = slip stitch
- st or sts = stitch or stitches
Beginning chains: The beginning ch 3 in Round 1 counts as the first dc. The beginning ch 1 in Round 2 and the beginning ch 2 used in later rounds and rows do not count as stitches unless the instructions specifically say otherwise. When Row 1 of the hood lining or back access flap says to dc in the 4th ch from the hook, the three skipped chains do not count as a stitch.
Peak shell: Work 2 dc, ch 2, 2 dc in the indicated stitch or ch 2 space. Each peak shell forms the tip of one of the five star points.
The valleys are just as important as the points. Once the star shape is established, two stitches are skipped between adjoining points on each new round. That little bit of negative space is what keeps the five points sharp instead of letting the piece turn into a circle.
Crochet Star Baby Blanket Cocoon Pattern
You’ll make two matching five point star panels. One becomes the front and one becomes the back. The upper point of the back panel becomes the foundation for the hood, while the upper point of the front panel folds down to become the crossover flap you see across the chest.
Make both star panels exactly the same size before you start joining anything.
Star Panel, make 2
Round 1: Ch 4 and join with a sl st to form a ring. Ch 3, which counts as the first dc. Work 9 dc into the ring. Join with a sl st to the top of the beginning ch 3. You should have 10 dc.
Round 2: Ch 1, which does not count as a stitch. Work a peak shell in the same st as the join, then skip the next st. Repeat around: peak shell in the next st, skip the next st. Join with a sl st to the first dc of the first peak shell. You should have five peak shells, 20 dc total and five ch 2 peak spaces.
Round 3: Sl st into the next dc of the first peak shell. Ch 2, which does not count as a stitch. Dc in the same st. Work a peak shell in the next ch 2 space. Dc in the next dc. Skip the next 2 sts. Repeat around the remaining four points: dc in the next st, peak shell in the next ch 2 space, dc in the next st, skip the next 2 sts. Join with a sl st to the first dc. You should have 30 dc total.
Before continuing, check the valleys in Round 3. Each two stitch valley skip should pass over the last dc of one Round 2 peak shell and the first dc of the next peak shell. If that is not what you see, stop and recount before making the star larger.
From Round 4 through Round 24, begin each round by slip stitching into the next dc and making a ch 2 that does not count as a stitch. Work the first dc of the round in the same dc you just slip stitched into, and put a locking stitch marker in that first dc. That marked dc is the first dc included in the side count given for that round. At the end of the round, join with a sl st to that marked first dc, then move the marker when you begin the next round.
Round 4: Sl st into the next dc. Ch 2. Work 2 dc up the first side, peak shell, 2 dc down the second side, skip 2 sts. Repeat around all five points. Join with a sl st to the marked first dc. 40 dc.
Round 5: Sl st into the next dc. Ch 2. Work 3 dc up the first side, peak shell, 3 dc down the second side, skip 2 sts. Repeat around all five points. Join with a sl st to the marked first dc. 50 dc.
Round 6: Sl st into the next dc. Ch 2. Work 4 dc, peak shell, 4 dc, skip 2 sts. Repeat around all five points. Join with a sl st to the marked first dc. 60 dc.
Round 7: Sl st into the next dc. Ch 2. Work 5 dc, peak shell, 5 dc, skip 2 sts. Repeat around all five points. Join with a sl st to the marked first dc. 70 dc.
Round 8: Sl st into the next dc. Ch 2. Work 6 dc, peak shell, 6 dc, skip 2 sts. Repeat around all five points. Join with a sl st to the marked first dc. 80 dc.
Round 9: Sl st into the next dc. Ch 2. Work 7 dc, peak shell, 7 dc, skip 2 sts. Repeat around all five points. Join with a sl st to the marked first dc. 90 dc.
Round 10: Sl st into the next dc. Ch 2. Work 8 dc, peak shell, 8 dc, skip 2 sts. Repeat around all five points. Join with a sl st to the marked first dc. 100 dc.
Round 11: Sl st into the next dc. Ch 2. Work 9 dc, peak shell, 9 dc, skip 2 sts. Repeat around all five points. Join with a sl st to the marked first dc. 110 dc.
Round 12: Sl st into the next dc. Ch 2. Work 10 dc, peak shell, 10 dc, skip 2 sts. Repeat around all five points. Join with a sl st to the marked first dc. 120 dc.
Round 13: Sl st into the next dc. Ch 2. Work 11 dc, peak shell, 11 dc, skip 2 sts. Repeat around all five points. Join with a sl st to the marked first dc. 130 dc.
Round 14: Sl st into the next dc. Ch 2. Work 12 dc, peak shell, 12 dc, skip 2 sts. Repeat around all five points. Join with a sl st to the marked first dc. 140 dc.
Round 15: Sl st into the next dc. Ch 2. Work 13 dc, peak shell, 13 dc, skip 2 sts. Repeat around all five points. Join with a sl st to the marked first dc. 150 dc.
Round 16: Sl st into the next dc. Ch 2. Work 14 dc, peak shell, 14 dc, skip 2 sts. Repeat around all five points. Join with a sl st to the marked first dc. 160 dc.
Round 17: Sl st into the next dc. Ch 2. Work 15 dc, peak shell, 15 dc, skip 2 sts. Repeat around all five points. Join with a sl st to the marked first dc. 170 dc.
Round 18: Sl st into the next dc. Ch 2. Work 16 dc, peak shell, 16 dc, skip 2 sts. Repeat around all five points. Join with a sl st to the marked first dc. 180 dc.
Round 19: Sl st into the next dc. Ch 2. Work 17 dc, peak shell, 17 dc, skip 2 sts. Repeat around all five points. Join with a sl st to the marked first dc. 190 dc.
Round 20: Sl st into the next dc. Ch 2. Work 18 dc, peak shell, 18 dc, skip 2 sts. Repeat around all five points. Join with a sl st to the marked first dc. 200 dc.
Round 21: Sl st into the next dc. Ch 2. Work 19 dc, peak shell, 19 dc, skip 2 sts. Repeat around all five points. Join with a sl st to the marked first dc. 210 dc.
Round 22: Sl st into the next dc. Ch 2. Work 20 dc, peak shell, 20 dc, skip 2 sts. Repeat around all five points. Join with a sl st to the marked first dc. 220 dc.
Round 23: Sl st into the next dc. Ch 2. Work 21 dc, peak shell, 21 dc, skip 2 sts. Repeat around all five points. Join with a sl st to the marked first dc. 230 dc.
Round 24: Sl st into the next dc. Ch 2. Work 22 dc, peak shell, 22 dc, skip 2 sts. Repeat around all five points. Join with a sl st to the marked first dc. 240 dc.
Fasten off after Round 24. Make the second star panel through the same 24 rounds. If your Round 6 measurement was noticeably different from the gauge checkpoint, change hook size rather than adding or removing rounds to compensate for the finished size. This pattern uses two matching 24 round star panels.
Lay both finished stars flat and identify the points before you go any farther. Matching the points of the stars is important. The upper point is the hood area. The two side points are for the arms. The two lower points are for the legs.
Crochet the Pointed Hood
The hood needs a little more structure than simply putting the upper star point behind the baby’s head. I’d line that back point with a second triangle. Once the two triangles are joined along their sloping edges, you have a shallow hood pocket with an open base for the head and neck.
Hood lining, make 1:
Row 1: Ch 30. Dc in the 4th ch from the hook and in each ch across. You should have 27 dc. Turn.
Row 2: Ch 2, which does not count as a stitch. Dc2tog over the first 2 sts. Dc in each st across until 2 sts remain. Dc2tog over the last 2 sts. 25 dc. Turn.
Rows 3 through 13: Repeat Row 2, decreasing one stitch at each end of every row. Your stitch counts will be 23, 21, 19, 17, 15, 13, 11, 9, 7, 5 and finally 3 dc.
Fasten off, leaving a long tail for joining one side of the hood lining.
Place the hood lining over the upper point of the back star panel with wrong sides together. Match the three stitch tip of the lining to the tip of the star point and center the lining evenly over the point. Let the two lower corners fall naturally along the sloping sides of the star point. The lining is intentionally smaller than the full star point, so do not stretch the lower corners all the way to the valleys.
Use locking stitch markers to hold the tip and both lower corners in place, checking that the hood lining lies flat and is centered before sewing. Use the long yarn tail and a loose whipstitch to join the first sloping side from the tip to the lower corner. Fasten that yarn securely. Cut a separate length of matching yarn and join the second sloping side from the tip to the other lower corner. The hood sides are made from row ends while the star point sides are made from individual stitches, so do not force a one for one stitch match. Distribute the joining stitches evenly so neither piece puckers. Fasten off securely, leave the wide base completely open, then remove the three temporary stitch markers.
That open base becomes the hood opening. The point should sit behind the head rather than pulling forward over the face.
Join matching yarn at one lower corner of the open hood base. Ch 1, then work 1 sc in each of the 27 base stitches to the opposite lower corner. Keep the stitches relaxed. If the edge starts drawing inward, go up one hook size just for this edging. Fasten off and weave in the ends.
Make the Front Crossover Flap
You do not need to crochet another large piece for the front flap. The upper point of the front star panel becomes the flap.
Lay the front star panel right side up with the upper point at 12 o’clock. Fold that point down across the center of the star. Angle it slightly toward one side instead of bringing the tip straight down the middle. That gives the front the wrapped look shown in the example rather than making it look like just another plain flat five point star blanket.
The folded point should cover the upper chest and part of the center body area, but it should not reach the neck closely or come anywhere near the face.
Once you like the position, use matching yarn to tack about 5 inches of the lower sloping edge of the flap securely to the front panel. I would sew this section rather than add a closure. Leave the upper and opposite sloping edges free so the flap can be lifted when you’re placing baby into the cocoon.
Join matching yarn at one end of the free outer edge of the flap. Ch 1, work 1 sc in each edge stitch to the other end, then fasten off and weave in the ends. That gives it a neat finished edge without adding bulk.
Do not add buttons, snaps, beads, ties or cords to hold this flap in place. The sewn section is permanent, and the rest simply overlaps.
Make the Overlapping Back Opening
The front flap gives you one way into the cocoon, but I also want the back access flap to open generously. It makes much more sense than trying to work a baby through one small neck opening.
The flap is anchored to the back panel and wraps across an opening along one side of the cocoon rather than cutting a slit through the center of the star. That keeps the main back panel intact while giving you a wide section that can open when you’re placing baby inside.
Back access flap, make 1:
Row 1: Ch 36. Dc in the 4th ch from the hook and in each ch across. 33 dc. Turn.
Rows 2 through 18: Ch 2, which does not count as a stitch. Dc in each st across. Turn. Keep 33 dc in every row.
Fasten off. The flap should measure close to 10 inches wide and 10 inches long at the stated gauge.
Join matching yarn at one corner of the flap. Ch 1 and work sc evenly around all four edges, putting 2 sc in each corner so the edging lies flat. Join with a sl st to the first sc, fasten off and weave in the ends.
Before joining the front and back panels, lay them together with wrong sides facing and the hood point at the top. Looking at the cocoon from the back, use the right side for the opening. Find the valley between the right arm point and right leg point. Measure about 5 inches along the outside edge in each direction from that valley and place a locking stitch marker at each end. The marked 10 inch section is the part of the side seam you will leave open.
With the panels still aligned, lay the back access flap over that opening from the back. Move the flap until its free edge crosses the opening and overlaps the front panel by at least 3 inches. Use additional locking stitch markers to mark where the fixed edge of the flap needs to sit on the back panel.
Separate the two star panels. Sew only that fixed edge of the flap securely to the back panel along the position you just marked. Leave the other three edges free. Remove the temporary flap placement markers, but leave the two markers that identify the ends of the side opening until the main seam is complete.
There is no button or snap on the free edge. The flap simply wraps across the opening and overlaps the front by at least 3 inches, giving you a wide opening without having to work around buttons or other closures.
Assembly and Finishing
Before sewing the front and back together, you should have two prepared star panels: the front star panel with the crossover flap already secured, and the back star panel with the hood lining and back access flap already attached. The applique is a separate optional piece. Put the two prepared star panels on top of each other and check every point before joining them. The arm points should match, the leg points should match and the valleys should meet without stretching one panel to fit the other.
Place the front and back panels with wrong sides together. Keep the two upper points separate. The back upper point already has the hood lining attached, and the front upper point is your crossover flap.
I prefer a loose whipstitch for the main seam because it stays softer than a heavy raised crochet seam. Use the main yarn and take evenly spaced stitches through both layers without pulling the seam tight.
Looking at the cocoon from the front, begin at the right shoulder valley, which is the valley immediately beside the hood. Sew around the right arm point, through the valley between the right arm and right leg, around the right leg point, through the bottom valley and around the left leg point.
Continue toward the left arm until you reach the first locking stitch marker for the access opening. Stop there. Leave the entire marked 10 inch section unsewn. Resume at the second marker, sew around the remainder of the left arm point and finish at the left shoulder valley beside the hood. Fasten off securely and leave a tail long enough to weave in.
Do not sew the front upper point to the back upper point. Those two sections have different jobs. The back point forms the hood, while the front point folds across the chest.
Fold the back access flap across the unsewn opening and check that it overlaps the front panel by at least 3 inches without pulling either star panel out of shape.
Weave every yarn tail back through several stitches and trim it closely. Remove every remaining locking stitch marker. Run your fingers around all of the seams before you call it finished. You should not feel knots, loose loops or hard lumps inside the cocoon.
At this point you should be able to see the whole idea clearly: two roomy arm points, two roomy leg points, a pointed hood at the top, the crossover flap in front and the larger envelope opening at the back.
That is what separates this project from a plain, flat baby blanket. It still has the soft blanket feel and five point star shape, but the layered construction turns the star into a cocoon for supervised cuddles and photos.
Add a Crochet Applique
The crocheted applique on the front is optional, but I like the look of one flat motif better than adding flowers, buttons or several little decorations. The star shape is already doing plenty. I’ve tested plenty of flat crocheted appliques and raised flower embellishments, and in my experience the flat appliques hold up better after washing.
If you want the applique to repeat the cocoon shape, my free crochet star pattern makes a flat five-point motif that can be sewn securely to the front.
The bunny shown in the example can be made with my crochet bunny applique pattern. You can also look through the crochet animal applique patterns if you want a different woodland or safari animal on the front.
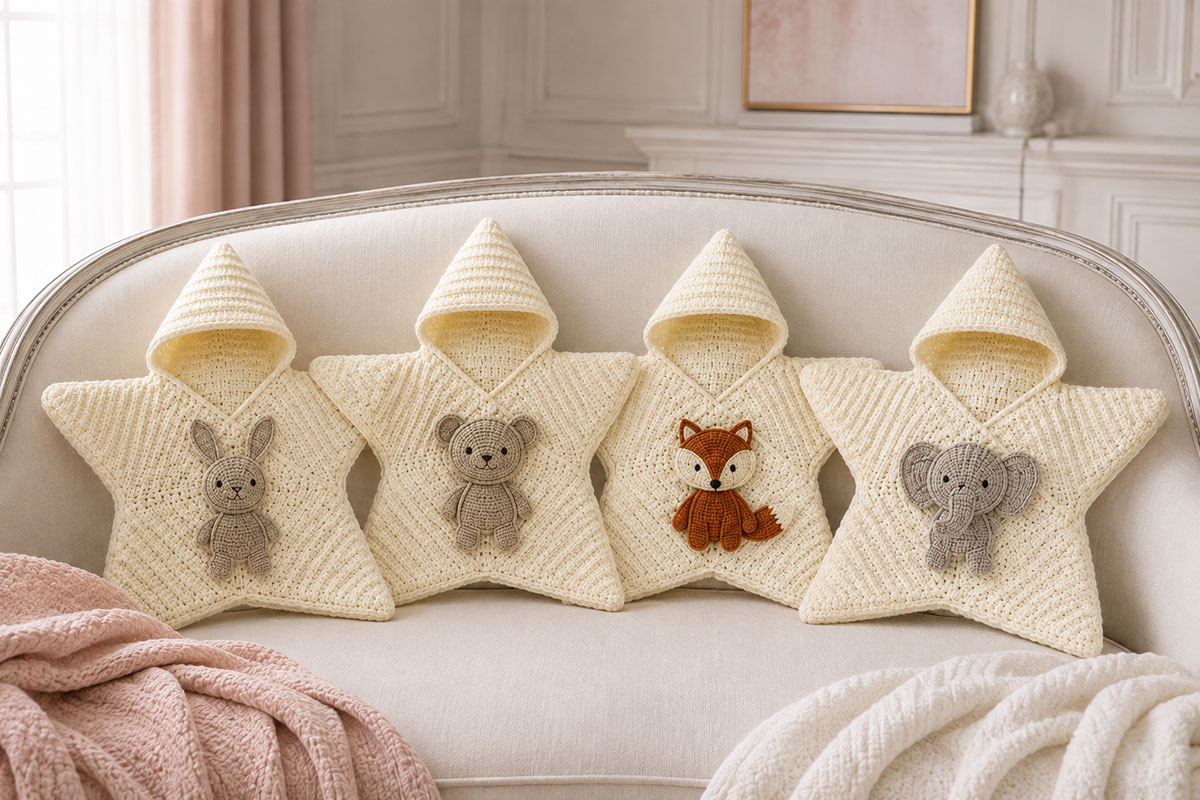
Keep most of whichever applique you choose flat and securely sewn to the cocoon. If you want the same little bit of dimension as the bunny in the example, you can leave just the tip of one ear free while stitching the rest of the ear and the applique securely in place. Do not leave long yarn loops or a large loose section that could pull away from the front.
If the applique has a face, embroider the features with black embroidery floss. I would use small open eyes made with satin stitches and simple stitched facial details. Skip plastic safety eyes and buttons completely.
Put the applique low enough on the front crossover flap that it stays well away from the baby’s face. There’s no reason to crowd the neckline just to squeeze in another decoration.
Baby Cocoon Use and Safety
Keep the hood and front flap away from the baby’s nose and mouth at all times. The face and airway should stay completely uncovered.
Do not place a baby wearing or wrapped in this cocoon into a crib, bassinet, play yard, car seat, swing or other baby equipment. Never use the points, flap or hood to lift or carry a baby.
If baby falls asleep while you are using the cocoon, remove it and move baby to an appropriate sleep space. The U.S. Consumer Product Safety Commission recommends a firm, flat infant sleep surface with only a fitted sheet and says blankets and other soft items should be kept out of the sleep space. You can read the current CPSC safe sleep guidance before using any handmade blanket or cocoon around a baby.
Check the cocoon before every use. Repair loose yarn, opened seams or any part of the applique that has come loose from its intended stitching. If you deliberately left the tip of one bunny ear free, make sure the rest of that ear remains firmly anchored and that no loose yarn loop has developed. Keep the front and back openings easy to reach so the cocoon can be opened quickly without undoing hardware.
That is also why I would keep this pattern button free. The overlapping fabric does the job without adding small closures that the design simply does not need.
When you click on links to various merchants on this site and make a purchase, this may result in this site earning a commission. This does not affect the price you pay.

UBGI Gold Standard 2026
Reviewed under the site's
editorial checklist.
Photos, decorating ideas, party setups and reader submissions are shared for inspiration unless a page is specifically presented as a pattern, tutorial, reference guide or step-by-step project. Follow the instructions, measurements, safety guidance and manufacturer directions provided for the particular project or product.
About Jan | Contact | Baby Nursery Ideas (Blog) | Site Map | Privacy Policy | Disclosure Policy | Disclaimer | Affiliate Disclosure | Earnings Disclosure | Facebook | Pinterest
I am a participant in the Amazon Services LLC Associates Program, an affiliate advertising program designed to provide a means for us to earn fees by linking to Amazon. As an Amazon Associate I earn from qualifying purchases.
Copyright © 2006-2026. All Rights Reserved.