Free Crochet Girl Elf Lovey Doll Pattern
By Jan Bay
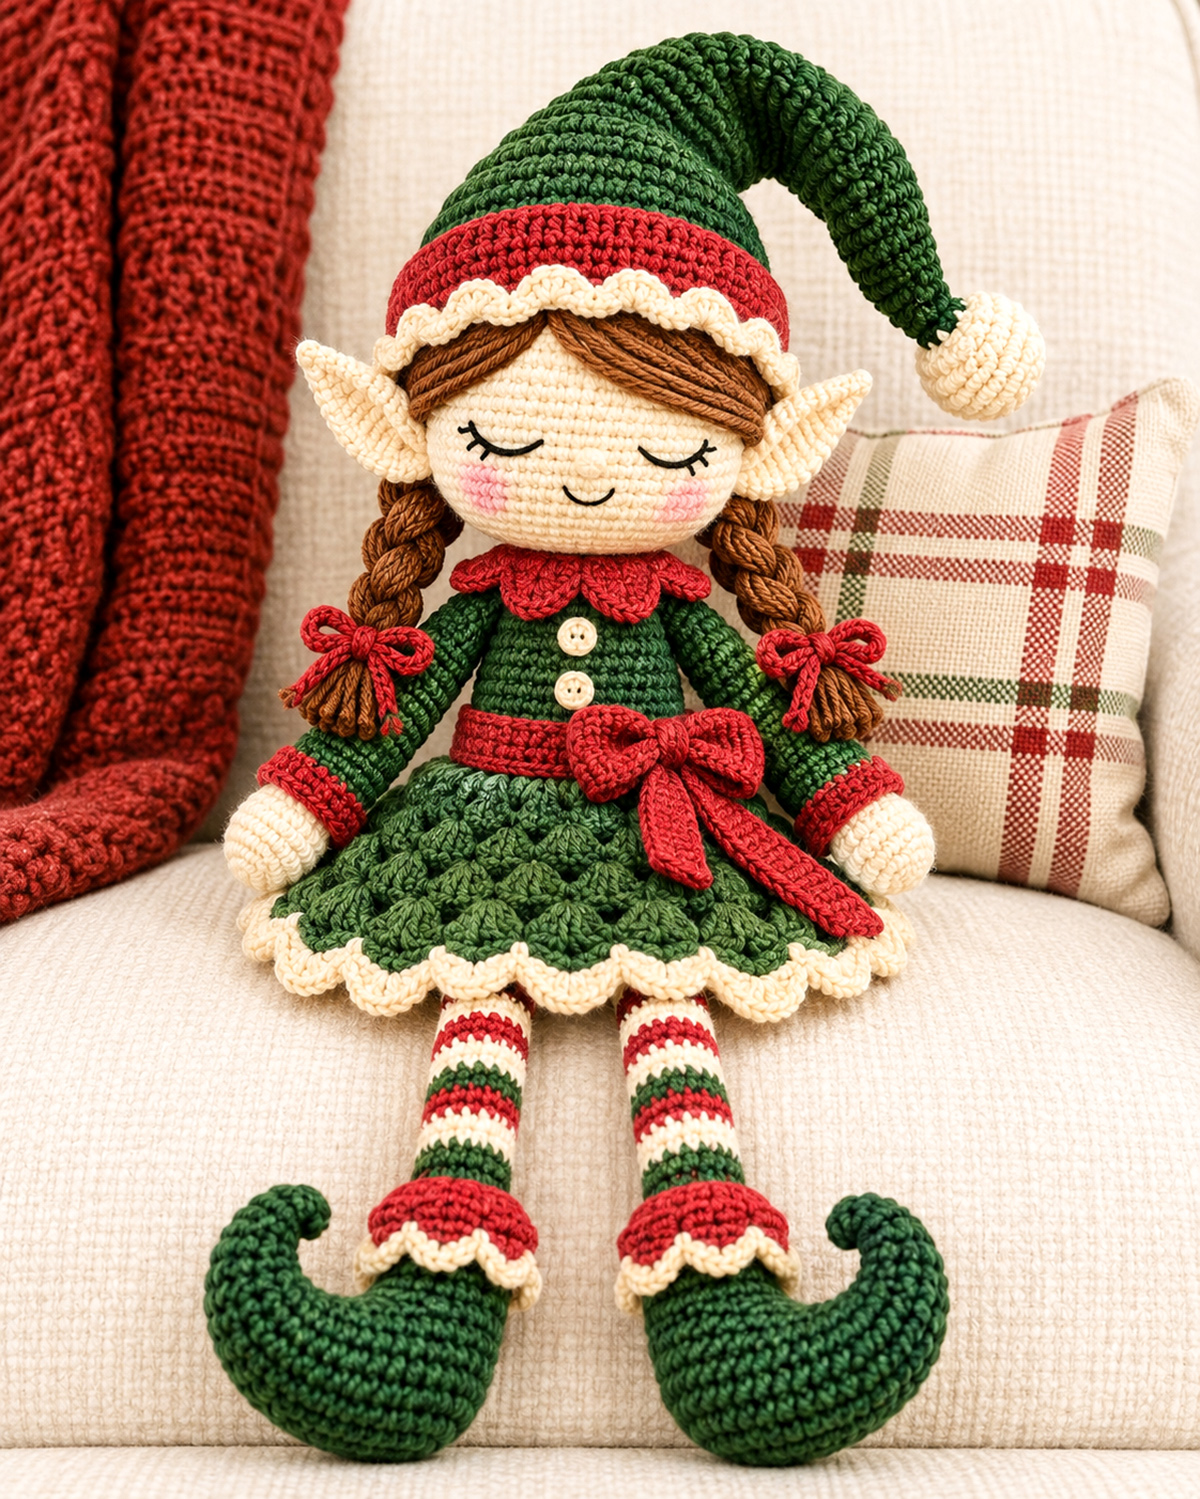
That little boy elf looked a bit lonely sitting on the sofa, and I kept picturing a girl elf beside him. And here she is! She has his same pointed ears, long striped legs, and a pair of those wonderfully curly toed elf shoes, but I've given her brown hair braids, dressed her in a holly green dress with a flared skirt, scalloped ivory trim, and a red Christmas bow at her waist. She's a cutey and I think the pair will look right at home together.
Explore More Free Christmas Crochet Patterns
Free Crochet Boy Elf Lovey Pattern
Free Christmas Crochet Patterns
Crochet Nutcracker Lovey Pattern
See Supplies for This Project Here.
Jump to a Section
Crochet Girl Elf Lovey Doll Pattern: Finished Size and Details
This little girl elf is made to sit beside the boy elf, with her long striped legs hanging over the edge of a shelf or chair. Her head and body have enough stuffing to hold their shape, but her arms and legs stay floppy.
The finished doll is expected to measure approximately 17 to 19 inches from the top of her folded hat to the bottoms of her shoes when her legs hang down. The flared dress should measure approximately 5¾ to 6¼ inches across when gently spread into a circle. Its final green round has a calculated circumference of about 19¼ inches before the ivory edging.
Her head should measure about 3¾ to 4 inches across, her striped legs about 4½ to 5 inches long before they disappear beneath the dress, and each finished curved shoe approximately 2½ to 3 inches across after shaping.
Skill level: Intermediate. The basic stitches are straightforward, but the curled shoes, shaped hat, embroidered features, and assembly require some experience.
The example image is a design mockup, not a photograph of a test-crocheted doll. The pattern uses raised bobble stitches for the skirt, which may look less densely textured than the picture. The curled shoes are shaped with stuffing and concealed stitches, so their final curves may vary slightly. All finished measurements are estimates, not measurements taken from a completed sample. A gauge swatch will help keep the doll's proportions consistent.
Construction overview: You'll crochet the head, add the embroidered face, make the hair and hat, crochet the stuffed body and flared dress, and then make the arms, legs and curled shoes. The separate pieces are sewn together at the end.
I'd keep the same Christmas green, red and ivory colors as the boy elf. The brown braids and full skirt give her a personality of her own without losing that matching-pair look.
Materials and Supplies
Yarn: Medium-weight #4 worsted yarn, preferably the same yarn line for all four main colors.
- Forest green: approximately 220 to 250 yards for the hat, dress, sleeves and shoes.
- Christmas red: approximately 90 to 110 yards for the hatband, cuffs, collar, bows, sash and stockings.
- Warm ivory or cream: approximately 130 to 150 yards for the head, hands, ears, leg stripes, hat trim and pom-pom.
- Chestnut brown: approximately 60 yards for the hair, bangs and braids.
- Small lengths of black embroidery thread or fine yarn for the eyes and smile.
- Small length of muted pink yarn or embroidery floss for the cheeks.
- A little brown embroidery floss for the button centers, if desired.
These are estimated yarn allowances, with extra included for shaping and finishing. Actual use will vary with your tension and the yarn you choose.
Other supplies:
- 3.5 mm crochet hook, US E/4, or the size needed for gauge.
- Polyester fiberfill stuffing.
- Yarn needle with a blunt tip.
- Stitch markers.
- Small scissors.
- Measuring tape.
- Straight pins or removable stitch markers for positioning pieces before sewing.
- Optional: a smaller embroidery needle for the facial details.
You'll also want a little patience for the curled shoes. They're what make the two elves look like they belong together, and I wouldn't leave them out.
Stitch Abbreviations, Gauge and Pattern Notes
This pattern uses US crochet terminology.
- ch: Chain
- sc: Single crochet
- hdc: Half double crochet
- dc: Double crochet
- sl st: Slip stitch
- inc: Work 2 single crochet stitches into the same stitch
- dec: Invisible single crochet decrease over the next 2 stitches
- BLO: Back loop only
- FLO: Front loop only
- RS: Right side of the work
- MR: Magic ring
- FO: Fasten off
- st/sts: Stitch or stitches
Gauge: Aim for 20 single crochet stitches and 22 rounds over 4 inches, measured on a firm, unstuffed swatch worked in the round.
Use a smaller hook if your stitches are loose enough for stuffing to show through. Don't pull the stitches so tightly that they become difficult to work.
Working in rounds: Unless otherwise stated, crochet in continuous spiral rounds. Do not join with a slip stitch or chain at the beginning of each new round. Place a marker in the first stitch of every round.
Working in rows: Chain 1 and turn at the beginning of each new row. The turning chain does not count as a stitch.
Color changes: Make each color change during the final yarn-over of the stitch before the new color begins. Cut the old yarn and secure its end inside the work unless the instructions tell you otherwise.
Bobble stitch: Yarn over, insert the hook into the next stitch, pull up a loop, yarn over and pull through 2 loops. Repeat this partial double crochet 5 times in the same stitch. You should have 6 loops on the hook. Yarn over and pull through all 6 loops. Push the bobble toward the outside of the dress. One bobble counts as one completed stitch.
Stuffing: Stuff the head and body firmly enough to hold their shape. Use much less stuffing in the arms, legs and curled ends of the shoes. The hat should remain unstuffed apart from its little pom-pom.
Reading the counts: The number in parentheses at the end of each round is the total number of stitches you should have. Check it before moving on.
If you don't have a magic ring that closes securely, begin with 2 chains and work the required starting stitches into the second chain from the hook. Close the center opening tightly.
Crochet the Girl Elf's Head and Embroidered Face
We'll start with her round little face. The head is worked from the crown downward, with an open 12-stitch neck edge for attaching it to the body.
Head, make 1 with ivory yarn.
Round 1: Work 6 sc into a magic ring. (6)
Round 2: Inc in every stitch. (12)
Round 3: [1 sc, inc] repeat 6 times. (18)
Round 4: [2 sc, inc] repeat 6 times. (24)
Round 5: [3 sc, inc] repeat 6 times. (30)
Round 6: [4 sc, inc] repeat 6 times. (36)
Round 7: [5 sc, inc] repeat 6 times. (42)
Round 8: [6 sc, inc] repeat 6 times. (48)
Round 9: [7 sc, inc] repeat 6 times. (54)
Round 10: [8 sc, inc] repeat 6 times. (60)
Rounds 11–16: Sc in every stitch. (60 each round)
Round 17: [8 sc, dec] repeat 6 times. (54)
Round 18: [7 sc, dec] repeat 6 times. (48)
Round 19: [6 sc, dec] repeat 6 times. (42)
Round 20: [5 sc, dec] repeat 6 times. (36)
Round 21: [4 sc, dec] repeat 6 times. (30)
Round 22: [3 sc, dec] repeat 6 times. (24)
Round 23: [2 sc, dec] repeat 6 times. (18)
Round 24: [1 sc, dec] repeat 6 times. (12)
FO, leaving a long ivory sewing tail. Do not close the opening. The 12 remaining stitches will be used to join the head to the neck.
Checkpoint: Your head should be round with a slightly narrower lower face. At the stated gauge, expect a height of approximately 4 to 4½ inches and a width close to 4 inches.
Embroider the sleeping eyes
Choose the front center of the head and mark it with a removable stitch marker.
Position the two eyes over Rounds 13–15, keeping approximately 5 visible stitches between their inner ends.
For each eye, use black embroidery thread or fine black yarn to make a curved line approximately 6 stitches wide. Start at the outside corner, pass through the center of the curve, and finish at the inner corner. Make the middle of the line sit one round lower than the ends.
Go over the curve once more if you want a fuller embroidered line. Add 3 very short downward lashes at the outside corner of each eye.
Keep the eyes level with each other. The expression should look sleepy and happy, just like the boy elf's.
Make the nose, smile and rosy cheeks
With ivory yarn, add 2 or 3 small horizontal embroidery stitches centered between the eyes, approximately at Round 16. This gives the nose a slight raised shape without adding a separate piece.
With black embroidery thread, make a small upward-curving smile centered across Rounds 17–18. Use 3 short stitches rather than pulling one long strand tightly across the face.
For the cheeks, use muted pink embroidery floss to place 4 or 5 short, parallel stitches on each side, just below the outside half of the eyes. Keep the blush within an area approximately ½ inch across.
I wouldn't add any extra facial features. Her little smile, sleepy eyes and pink cheeks are plenty.
Finish stuffing the head
Stuff the head evenly, adding small pieces of fiberfill around the cheeks and sides. Keep the face rounded and smooth rather than overfilling it.
Leave the 12-stitch lower opening accessible for attaching the neck.
Face checkpoint: Before adding the hair, make sure both eyes are the same height, the smile is centered, and no embroidery knots or loose ends can be seen on the outside.
Crochet the Braids, Pointed Ears and Curled Elf Hat
Her brown braids and oversized pointed ears are what make her look different from the boy elf. We're going to give her a fitted brown hair cap, two little side-swept sections over her forehead, and a braid on each side.
Brown hair cap
Make 1 with chestnut-brown yarn.
Round 1: Work 6 sc into a magic ring. (6)
Round 2: Inc in every stitch. (12)
Round 3: [1 sc, inc] repeat 6 times. (18)
Round 4: [2 sc, inc] repeat 6 times. (24)
Round 5: [3 sc, inc] repeat 6 times. (30)
Round 6: [4 sc, inc] repeat 6 times. (36)
Round 7: [5 sc, inc] repeat 6 times. (42)
Round 8: [6 sc, inc] repeat 6 times. (48)
Round 9: [7 sc, inc] repeat 6 times. (54)
Round 10: [8 sc, inc] repeat 6 times. (60)
Rounds 11–12: Sc in every stitch. (60 each round)
FO, leaving a long tail.
Place the cap over the top of the ivory head. Its lower front edge should sit above the embroidered eyes, leaving the face uncovered.
Sew the cap to the head around its lower edge with small stitches in matching brown yarn. Leave the upper crown smooth. The Christmas hat will cover much of it.
Side-swept bangs, make 2
Use brown yarn and work back and forth in rows.
Foundation: Ch 3.
Row 1: Sc in the second chain from the hook and the next chain. (2)
Row 2: Ch 1, turn. Inc in the first stitch, sc in the next stitch. (3)
Row 3: Ch 1, turn. Sc in each stitch. (3)
Row 4: Ch 1, turn. Inc in the first stitch, sc in the next 2 stitches. (4)
Row 5: Ch 1, turn. Sc in each stitch. (4)
Row 6: Ch 1, turn. Inc in the first stitch, sc in the next 3 stitches. (5)
Row 7: Ch 1, turn. Sc in each stitch. (5)
Row 8: Ch 1, turn. Inc in the first stitch, sc in the next 4 stitches. (6)
Rows 9–10: Ch 1, turn. Sc in each stitch. (6 each row)
FO, leaving a sewing tail on each piece.
Lay the two pieces across the front of the hair cap, with their narrow starting ends meeting near the center of the forehead and their wider ends pointing toward the temples.
Flip one piece over so the two sections mirror each other. Angle both pieces slightly downward toward the ears.
Sew around their edges, keeping the center part visible. If you want the raised strands shown in the example image, use brown yarn to make 3 or 4 long surface stitches along each side-swept section, following the direction of the hair.
The hat brim should overlap the top of the bangs but shouldn't hide them completely.
Crocheted brown braids
Make 6 narrow hair cords, 3 for each braid.
With brown yarn, leave an 8-inch starting tail and ch 20.
Sl st into the second chain from the hook and into each remaining chain. (19 sl sts)
FO, leaving an 8-inch finishing tail. You now have a sewing tail at each end.
Measure your first finished cord before making the other five. Aim for approximately 2¾ to 3¼ inches before braiding. If it is shorter than 2¾ inches, remake it with ch 22 and work 21 sl sts. If necessary, use ch 24 and work 23 sl sts. Once you have the right length, make all six cords exactly alike. The braided section should finish close to 2 inches long.
Lay 3 cords together with their upper ends even. Sew the three upper ends together securely.
Braid the cords by crossing the outside right cord over the middle cord, then the outside left cord over the new middle cord. Repeat until the braid is approximately 2 inches long.
Secure the lower ends together with several stitches. Tuck all loose ends into the braid rather than leaving dangling strands.
Repeat for the second braid.
Sew the top of one braid to each side of the hair cap near Round 12, approximately behind where the pointed ears will sit.
Let the braids hang beside the cheeks. They should reach just below the lower edge of the head.
Small red bows for the braids, make 2
With red yarn, ch 7.
Row 1: Sc in the second chain from the hook and in each remaining chain. (6)
Rows 2–3: Ch 1, turn. Sc in each stitch. (6 each row)
FO, leaving a long tail.
Pinch the little rectangle together at its center to form two bow loops. Wrap the sewing tail around the center 3 times and secure it on the back.
Sew one bow across the lower end of each braid. Stitch through the center and both sides of the bow so that the loops cannot pull loose.
If you want the look of ribbon ends, add two very short red embroidered lines beneath each bow instead of leaving long loose yarn tails.
Pointed elf ears, make 2
Use ivory yarn. The ears are worked in flat rows, beginning at the wide base and narrowing toward the point.
Foundation: Ch 9.
Row 1: Sc in the second chain from the hook and in each remaining chain. (8)
Row 2: Ch 1, turn. Dec, sc in the next 4 stitches, dec. (6)
Row 3: Ch 1, turn. Sc in each stitch. (6)
Row 4: Ch 1, turn. Dec, sc in the next 2 stitches, dec. (4)
Row 5: Ch 1, turn. Sc in each stitch. (4)
Row 6: Ch 1, turn. Dec twice. (2)
Row 7: Ch 1, turn. Dec. (1)
FO, leaving an 18-inch sewing tail at the pointed tip.
Each ear should form a flat triangle, about 1½ inches wide at the base with a point extending outward.
Thread the sewing tail through your yarn needle. Bring it down along the wrong-side edge of the ear to the wide foundation edge, passing through the edge stitches as you go. Don't pull the yarn tightly or draw the ear into a curve.
With the face toward you, position one ear on each side of the head. Place the wide foundation edge vertically against Head Rounds 11–19, with the narrow tip pointing away from the face.
Spread the eight foundation stitches evenly along that nine-round attachment area. Sew the full foundation edge to the head, using small stitches and keeping the ear base flat. Don't gather the ear or pull the head stitches together.
Take another small securing stitch near the lower edge so the ear points outward instead of folding forward.
Use a few tiny ivory or pale-pink embroidery stitches to suggest the inner ear crease. Don't add beads or separate decorations.
Check that the two ears sit at the same height before securing the final yarn tails.
Long green elf hat with red brim
This is the big floppy hat from the example image. It has a snug red band, an ivory scalloped edge, a long forest-green point that curls to one side, and a cream pom-pom.
We'll work from the brim upward. The hat is made in one continuous piece.
With red yarn: Ch 60 and join with a sl st to form a ring, taking care not to twist the chain.
Round 1: Ch 1, sc in each chain around. Begin marking the first sc and continue in spiral rounds from here. (60)
Rounds 2–4: Sc in each stitch. (60 each round)
Change to forest green.
Rounds 5–7: Sc in each stitch. (60 each round)
Round 8: [8 sc, dec] repeat 6 times. (54)
Rounds 9–10: Sc in each stitch. (54 each round)
Round 11: [7 sc, dec] repeat 6 times. (48)
Rounds 12–13: Sc in each stitch. (48 each round)
Round 14: [6 sc, dec] repeat 6 times. (42)
Rounds 15–16: Sc in each stitch. (42 each round)
Round 17: [5 sc, dec] repeat 6 times. (36)
Rounds 18–19: Sc in each stitch. (36 each round)
Round 20: [4 sc, dec] repeat 6 times. (30)
Rounds 21–22: Sc in each stitch. (30 each round)
Round 23: [3 sc, dec] repeat 6 times. (24)
Rounds 24–25: Sc in each stitch. (24 each round)
Round 26: [2 sc, dec] repeat 6 times. (18)
Rounds 27–29: Sc in each stitch. (18 each round)
Round 30: [1 sc, dec] repeat 6 times. (12)
Rounds 31–34: Sc in each stitch. (12 each round)
Round 35: Dec 6 times. (6)
Rounds 36–39: Sc in each stitch. (6 each round)
FO. Thread the tail through the front loops of the final 6 stitches and pull the opening closed.
Hat checkpoint: Before bending it, the hat should form a long, narrow tapered shape, approximately 6½ to 7 inches from its brim to the tip. The red band should sit above the eyes and fit around the brown hair cap without pressing into the head.
Ivory scalloped edge for the hat
Turn the hat upside down so you can work around the original foundation chain at the lower edge of the red brim.
Join ivory yarn into one foundation-chain space. There are 60 spaces around the edge.
Edging round: Repeat the following sequence 10 times: skip the next 2 foundation-chain spaces, work 5 dc into the next space, skip the next 2 spaces, and sl st into the next space.
That gives you 10 ivory scallops around the brim.
FO and weave in the ends.
Try the hat on the head. The scallops should sit above the sleeping eyes and across the upper part of the brown bangs.
Cream pom-pom for the hat
Make 1 with ivory yarn.
Round 1: Work 6 sc into a magic ring. (6)
Round 2: Inc in every stitch. (12)
Round 3: [1 sc, inc] repeat 6 times. (18)
Rounds 4–5: Sc in every stitch. (18 each round)
Round 6: [1 sc, dec] repeat 6 times. (12)
Stuff lightly.
Round 7: Dec 6 times. (6)
FO, leaving a long tail. Close the remaining opening and sew the pom-pom firmly to the very tip of the hat.
Shape the curled hat
Put the hat on the head and let the narrow green section fall toward the viewer's right, which is the doll's left. This matches the curled hat in the example image.
Make a gentle bend in the section between approximately Rounds 26–34. You want a curved, hanging point, not a sharp fold.
If the yarn doesn't hold that curve on its own, use a matching green yarn tail to take 2 or 3 small stitches through the inside of the bend. Catch neighboring rounds on the inner side of the curve without stitching through the outside face of the hat.
Keep the final 6-stitch tip free to hang with its cream pom-pom.
Do not add wire, pipe cleaners or other rigid supports.
Once the shape looks right, sew the red brim to the brown hair cap at the back and both sides. Add a few small front stitches, keeping the ivory scallops visible.
Hat shaping checkpoint: Set the doll's head upright. The hat should curve toward one side without pulling the red brim off the forehead. If it springs straight again, add one more concealed shaping stitch at the inside bend. If the tip becomes too stiff or sharply folded, remove a shaping stitch and let more fabric hang freely.
Crochet the Body and Flared Green Dress
Her dress has a fitted green top and a full skirt that spreads out over her long legs. I like the raised stitch texture in the skirt because it gives the dress a little more character without making the whole doll stiff.
The body is crocheted from the bottom up. We'll leave a row of front loops at the waist so the skirt can be added without sewing on a separate dress.
Stuffed body
Make 1 with forest-green yarn.
Round 1: Work 6 sc into a magic ring. (6)
Round 2: Inc in every stitch. (12)
Round 3: [1 sc, inc] repeat 6 times. (18)
Round 4: [2 sc, inc] repeat 6 times. (24)
Round 5: [3 sc, inc] repeat 6 times. (30)
Round 6: [4 sc, inc] repeat 6 times. (36)
Round 7: Sc in every stitch. (36)
Round 8: [10 sc, dec] repeat 3 times. (33)
Round 9: [9 sc, dec] repeat 3 times. (30)
Round 10: Working in BLO, sc in every stitch. (30)
Important: Round 10 leaves the front loops of Round 9 unused. These are the loops we'll use to attach the skirt. Do not sew over them or pull them closed.
Rounds 11–13: Sc in every stitch. (30 each round)
Round 14: [4 sc, inc] repeat 6 times. (36)
Rounds 15–18: Sc in every stitch. (36 each round)
Round 19: [4 sc, dec] repeat 6 times. (30)
Round 20: [3 sc, dec] repeat 6 times. (24)
Round 21: [2 sc, dec] repeat 6 times. (18)
Round 22: [1 sc, dec] repeat 6 times. (12)
Rounds 23–24: Sc in every stitch. (12 each round)
FO, leaving a long sewing tail. Keep the 12-stitch neck opening accessible.
Stuff the lower body and chest evenly, using smaller pieces of fiberfill near the neck.
Body checkpoint: Your torso should be approximately 4 to 4½ inches tall. The lower body has a rounded hip section, the waist is narrower, and the upper chest widens slightly before tapering to the neck.
Count the unused front loops around the waist. There must be 30. The skirt will attach to these loops.
Flared textured skirt
Turn the body so the neck points upward and the lower hip section points downward.
Find the 30 unused front loops left along Body Round 9. With the right side of the body facing you, join green yarn into one of these loops at the back.
We'll work the skirt downward toward the hem.
Skirt Round 1: Sc in each of the 30 free front loops. (30)
Round 2: [4 sc, inc] repeat 6 times. (36)
Round 3: [5 sc, inc] repeat 6 times. (42)
Round 4: [6 sc, inc] repeat 6 times. (48)
Round 5: [Sc in the next 3 stitches, bobble in the next stitch] repeat 12 times. (48)
Round 6: Sc in every stitch. (48)
Round 7: [3 sc, inc] repeat 12 times. (60)
Round 8: [Sc in the next 5 stitches, bobble in the next stitch] repeat 10 times. (60)
Round 9: Sc in every stitch. (60)
Round 10: [4 sc, inc] repeat 12 times. (72)
Round 11: [Sc in the next 5 stitches, bobble in the next stitch] repeat 12 times. (72)
Round 12: Sc in every stitch. (72)
Round 13: [5 sc, inc] repeat 12 times. (84)
Round 14: [Sc in the next 5 stitches, bobble in the next stitch] repeat 14 times. (84)
Round 15: Sc in every stitch. (84)
Round 16: [6 sc, inc] repeat 12 times. (96)
Round 17: [Sc in the next 5 stitches, bobble in the next stitch] repeat 16 times. (96)
Round 18: Sc in every stitch. (96)
Do not fasten off until you check the skirt.
Skirt checkpoint: You should have 96 stitches around the lower edge. The fabric should flare outward from the 30-stitch waist and have raised bobbles spaced across 5 textured rounds.
At the stated gauge, the skirt is expected to measure about 3 to 3½ inches from the waist to the untrimmed lower edge. Spread the skirt gently into a circle and check the width across its lower edge. Aim for approximately 6 inches before adding the scallops.
Set the body upright and gently spread the skirt. It should stand away from the lower body instead of hugging it tightly.
If the bobbles are showing on the inside, push them outward with your finger before continuing.
If your skirt curls upward, check your gauge and recount the increases. Don't add random stitches to the final round, because the ivory edging needs exactly 96 foundation stitches.
Ivory scalloped dress hem
Fasten off the green yarn and join ivory at the back of the skirt, into the next stitch.
Edging round: Repeat the following sequence 16 times: skip the next 2 stitches, work 5 dc into the next stitch, skip the next 2 stitches, and sl st into the next stitch.
You should finish with 16 ivory scallops evenly spaced around the hem.
FO and weave in the yarn ends.
Don't stretch the scallops as you finish them. They should make a neat little ruffle that follows the curve of the green skirt.
Red petal collar
The red collar sits just below her face and forms a row of rounded petals across the upper chest.
With red yarn, ch 12 and join with a sl st, taking care not to twist the chain.
Round 1: Ch 1 and sc in each chain around. Join with a sl st to the first sc. (12)
Round 2: Repeat the following sequence 4 times: sl st into the next stitch, work 3 dc into the next stitch, sl st into the next stitch.
FO, leaving a long sewing tail.
The collar has 4 rounded petals. The center opening will fit around the 12-stitch neck.
Place the collar around the body's 12-stitch neck opening before attaching the head. The collar's 12-stitch center opening should fit around the neck without stretching. Arrange the petals and sew the collar in place, then attach the head as described in the assembly instructions.
Sew the inner edge of the collar to the top of the green shoulders, arranging 2 petals toward the front and the others around the sides and back.
Keep the petals just below the chin and above the two cream buttons.
Two cream crocheted buttons
Make 2 with ivory yarn.
Round 1: Work 6 sc into a magic ring. (6)
Pull the center closed, join with a sl st and FO, leaving a sewing tail.
Each little circle should measure approximately ⅜ to ½ inch across, depending on your gauge.
Position the buttons vertically on the front of the green bodice, centered between the collar and the waistband.
Sew each button down through every outer stitch, passing through the body fabric several times so no edge can be lifted.
If you'd like a buttonhole effect, embroider 2 tiny brown stitches across the center of each cream circle.
These are crocheted decorations, not working buttons. Don't add plastic buttons or bead centers.
Red waistband
With red yarn, ch 31.
Row 1: Sc in the second chain from the hook and in each remaining chain. (30)
Row 2: Ch 1, turn. Sc in each stitch. (30)
FO, leaving a long sewing tail.
Wrap the red band around the narrow waist, directly above the beginning of the green skirt. Its ends should meet at the back.
Sew the ends together and stitch the band securely to the body around the waist.
If your finished band is too short to meet at the back without stretching the body, make a replacement band with enough foundation stitches to fit your actual waist circumference. Keep the same 2-row width.
Large red waist bow
The large bow sits slightly to the doll's left side from the viewer's perspective, as shown in the example image. It has a gathered center and two hanging tails.
Bow center, make 1 with red yarn.
Ch 11.
Row 1: Sc in the second chain from the hook and across. (10)
Rows 2–4: Ch 1, turn. Sc in each stitch. (10 each row)
FO, leaving a long tail.
Pinch the rectangular piece together at its center to form the two loops of the bow. Wrap the yarn tail around the middle 4 or 5 times and secure it at the back.
Hanging Ribbon Tails, Make 1 Short and 1 Long
The waist bow has two different-length tails, just like the one in the example image. Both tails begin with four stitches and taper to a single stitch at the lower end.
Short ribbon tail:
With red yarn, ch 5.
Row 1: Sc in the second chain from the hook and across. (4)
Rows 2–6: Ch 1, turn. Sc in each stitch. (4 each row)
Row 7: Ch 1, turn. Dec twice. (2)
Row 8: Ch 1, turn. Dec. (1)
FO, leaving a long sewing tail.
Long ribbon tail:
With red yarn, ch 5.
Row 1: Sc in the second chain from the hook and across. (4)
Rows 2–13: Ch 1, turn. Sc in each stitch. (4 each row)
Row 14: Ch 1, turn. Dec twice. (2)
Row 15: Ch 1, turn. Dec. (1)
FO, leaving a long sewing tail.
At the stated gauge, the short tail should measure approximately 1½ inches and the long tail approximately 2¾ inches. Both should have matching widths and gently tapered ends.
Sew both tails behind the gathered bow center. Position the short tail toward the middle of the dress, ending around the upper half of the skirt. Angle the longer tail toward the viewer's right, which is the doll's left, so its tapered end reaches close to the ivory hem without covering the scallops.
Position the assembled bow on the waistband, slightly off center, with the tails lying across the front of the skirt.
Sew the bow firmly to the band and attach the lower portions of the tails to the dress with small matching stitches. The tails should lie flat rather than hanging loosely.
Dress checkpoint: You should now have a fitted green bodice, 2 ivory buttons, a red petal collar, a red waistband and a textured green skirt with an ivory ruffle. The red bow should sit at the waist without pulling the skirt out of shape.
Crochet the Arms, Red Cuffs and Ivory Hands
We'll make both arms the same way, starting at the little ivory hands and working upward through the red cuffs and green sleeves.
Keep the stuffing light. I want her arms to hang naturally at her sides instead of sticking straight out.
Make 2.
Round 1: With ivory yarn, work 6 sc into a magic ring. (6)
Round 2: [1 sc, inc] repeat 3 times. (9)
Rounds 3–4: Sc in every stitch. (9 each round)
Round 5: [1 sc, dec] repeat 3 times. (6)
Stuff the little hand lightly before continuing.
Change to red yarn.
Round 6: Inc in every stitch. (12)
Round 7: Sc in every stitch. (12)
Change to green yarn.
Round 8: Working in BLO, sc in every stitch. (12)
Rounds 9–17: Sc in every stitch. (12 each round)
Round 18: [4 sc, dec] repeat twice. (10)
Rounds 19–20: Sc in every stitch. (10 each round)
Do not fasten off after Round 20. Keep the green working yarn attached.
Add a little stuffing through the lower half of the green sleeve. Leave the top several rounds nearly empty so the shoulder can fold naturally.
Flatten the open upper end so the 10 stitches form 2 layers of 5 stitches each.
With the working yarn still attached, crochet 5 sc across the flattened opening, passing through both layers. (5 closing sc)
FO, leaving a 12-inch sewing tail for attaching the shoulder to the body.
Repeat for the second arm.
Scalloped Red Sleeve Cuffs, Make 2
Look at the red cuff on each finished arm. You'll find 12 unused front loops from Arm Round 7, where the green sleeve was worked in the back loops only.
With the cream hand pointing downward, join red yarn into one of those free loops.
Edging round: [Sl st in the next loop, 3 hdc in the next loop, sl st in the next loop] repeat 4 times.
You'll have 4 small red scallops around the wrist, using all 12 available loops.
FO and weave in the ends securely. Repeat on the second arm.
The red scallops should sit just above the ivory hands, giving both sleeves the little ruffled finish shown in the example image.
Where the arms belong
Position each arm on the upper sides of the green torso, with the closed shoulder seam resting across approximately Body Rounds 17–19.
The cream hands should hang below the waist, close to the upper part of the flared skirt.
Pin both arms temporarily before sewing. Make sure they are the same length and hang at matching angles.
Sew each flattened shoulder securely to the body with several passes of green yarn. Catch both edges of the arm seam, not just the center.
Weave the remaining ends inside the body.
Arm checkpoint: Each completed arm should be approximately 3½ to 4 inches long. The red cuffs should show clearly between the green sleeves and cream hands.
Crochet the Long Striped Legs and Oversized Curled Elf Shoes
Now for those shoes. They're a big part of what makes the girl elf look like a companion to our boy elf.
Instead of making ordinary little boots, we're going to crochet each shoe as a tapered stuffed tube. The narrow toe curls upward, the rounded middle forms the foot, and the narrow upper opening joins to the striped leg.
The two shoes use the same stitch counts, but we'll turn their curled tips in opposite directions when we finish them.
Green curled elf shoes, make 2
Begin at the narrow tip of the toe and work toward the ankle.
With forest-green yarn:
Round 1: Work 6 sc into a magic ring. (6)
Rounds 2–4: Sc in every stitch. (6 each round)
Round 5: [2 sc, inc] repeat twice. (8)
Rounds 6–7: Sc in every stitch. (8 each round)
Round 8: [3 sc, inc] repeat twice. (10)
Rounds 9–10: Sc in every stitch. (10 each round)
Round 11: [4 sc, inc] repeat twice. (12)
Round 12: [2 sc, inc] repeat 4 times. (16)
Round 13: [3 sc, inc] repeat 4 times. (20)
Rounds 14–19: Sc in every stitch. (20 each round)
Round 20: [3 sc, dec] repeat 4 times. (16)
Round 21: [2 sc, dec] repeat 4 times. (12)
Rounds 22–23: Sc in every stitch. (12 each round)
FO, leaving the 12-stitch opening unclosed.
The shoe should now be a long tapered tube, narrow at the original toe tip, wider through the foot, and narrower again at the ankle opening.
Stuff and curve the shoes
Put a very small amount of stuffing into Rounds 1–10. The narrow toe must be able to bend without becoming bulky.
Add more stuffing through approximately Rounds 12–19 to give the main foot its rounded shape. Stuff the ankle opening lightly.
Hold the wider section horizontally. Curl the narrow toe upward into a hook shape, bending mainly around Rounds 8–12.
With a green yarn needle and matching yarn, take 2 or 3 concealed stitches through the inside of the bend. Catch the fabric near Rounds 8–10 and the neighboring inside surface around Rounds 13–15 to help hold the curled shape.
Do not pull those stitches so tightly that the toe collapses. The curve should be rounded.
Now turn the narrower ankle end upward, bending near Rounds 19–21. Use one or two small concealed stitches on the inside of that bend if needed.
The shoe should now have a rounded lower foot, an upward-curled toe, and an ankle opening pointing toward the leg.
Repeat for the second shoe, making the curled toe point in the opposite direction.
Shoe checkpoint: Set both shoes on a table with the ankle openings pointing up. The doll's left shoe should curl toward her left side and the right shoe toward her right side.
The outer tips should be higher than the middle of the shoe, with no stuffing visible between stitches.
Shaping note: The exact curve depends on stuffing density and yarn firmness. If the tip doesn't stay curved, remove a little stuffing from the narrow section and add another concealed securing stitch. If the curl looks pinched, loosen that stitch and reshape it. This is the main detail to verify on a crocheted sample before treating the pattern as fully tested.
Striped elf legs, make 2
We'll crochet each leg directly into the open ankle of its green shoe.
Each shoe opening has 12 stitches. Join ivory yarn into the back loop of the first stitch of Shoe Round 23.
Work Leg Round 1 through the back loops only. This leaves the front loops of Shoe Round 23 free for the red shoe cuff later.
Round 1: With ivory, sc in BLO of all 12 stitches around the shoe opening. (12)
Round 2: Sc in every stitch. (12)
Change to red.
Rounds 3–4: Sc in every stitch. (12 each round)
Change to green.
Rounds 5–6: Sc in every stitch. (12 each round)
Change to ivory.
Rounds 7–8: Sc in every stitch. (12 each round)
Change to red.
Rounds 9–10: Sc in every stitch. (12 each round)
Change to green.
Rounds 11–12: Sc in every stitch. (12 each round)
Change to ivory.
Rounds 13–14: Sc in every stitch. (12 each round)
Change to red.
Rounds 15–16: Sc in every stitch. (12 each round)
Change to green.
Rounds 17–18: Sc in every stitch. (12 each round)
Change to ivory.
Rounds 19–20: Sc in every stitch. (12 each round)
Change to red.
Rounds 21–22: Sc in every stitch. (12 each round)
Change to green.
Rounds 23–28: Sc in every stitch. (12 each round)
Do not fasten off after Round 28. Keep the green working yarn attached.
The striped portion should show 4 ivory bands, 4 red bands and 4 green bands, each 2 rounds high, followed by 4 additional green rounds that will be hidden beneath the skirt.
Lightly stuff the lower part of the leg. Gradually reduce the amount of stuffing as you approach the upper end.
Don't pack the leg firmly. The doll needs to sit with her legs hanging down.
Flatten the open top so the 12 stitches form 2 layers of 6 stitches.
With the working yarn still attached, crochet 6 sc across the flattened opening, passing through both layers. (6 closing sc)
FO, leaving a 12-inch sewing tail for attaching the leg to the body.
Repeat for the second leg.
Leg checkpoint: Each leg should measure approximately 5 inches from the top of the shoe opening to its closed upper end. The striped sections of both legs should match.
Red ruffled shoe cuffs, make 2
Look at the top of each green shoe, where the ivory stocking begins. You'll see the 12 unused front loops from Shoe Round 23.
Join red yarn into one of those loops.
Round 1: Sc into each of the 12 free front loops. (12)
Round 2: [1 hdc, 2 hdc in the next stitch] repeat 6 times. (18)
Change to ivory.
Round 3: Repeat the following sequence 6 times: sl st in the next stitch, work 3 hdc into the next stitch, sl st in the next stitch.
FO and weave in the ends.
The red cuff should flare over the green shoe with 6 little ivory-edged scallops.
Repeat on the second shoe.
The ruffle should sit around the lower end of the striped stocking, just above the rounded green foot.
Attach the legs beneath the skirt
Lift the green skirt so you can see the underside of the stuffed body.
Find the flat 6-stitch upper seam of each leg.
Position the two legs on opposite sides of the lower body, around Body Rounds 5–7. Leave approximately 4 to 6 body stitches between their inner attachment edges.
Point the legs toward the front so they can hang down when the doll is seated.
Sew the complete 6-stitch upper seam of each leg to the body with green yarn. Make a second pass through the seam for reinforcement.
Lower the skirt and check the position of both legs.
They should emerge from beneath the skirt evenly, with the striped stockings visible and the curled shoe tips pointing outward.
Set the doll on the edge of a table and let the legs hang. If one shoe turns inward, rotate that leg slightly at its attachment before securing the final stitches.
Finished leg checkpoint: Both legs should hang at approximately the same length, the skirt should cover their attachment points, and the curled toes should resemble a matching left-and-right pair rather than two identical shoes pointing in the same direction.
Assemble and Finish the Crochet Girl Elf Lovey Doll
Now we can put her together. Before sewing the final pieces in place, arrange everything so she looks like the girl elf in our example image.
I'd set her upright on a chair or table for this part. It's much easier to see whether the head, arms and legs are lined up when she's sitting in her finished position.
Step 1: Check the body and legs
Make sure the two striped legs are attached firmly beneath the skirt.
Lower the skirt and spread it evenly around the body. The ivory scallops should form a neat, continuous border.
Both legs should extend from underneath the dress, with no attachment seams visible from the front.
Check the shoe tips. One must curl toward the doll's left and the other toward her right.
Step 2: Attach the arms
If you haven't already attached them, position the flattened upper seams of the arms at Body Rounds 17–19.
Make sure the ivory hands hang near the upper part of the skirt and the red cuffs sit at matching heights.
Stitch across each shoulder seam and then make a few more stitches through the front and back edges of the join.
The arms should move a little but should not pull away from the body when gently handled.
Step 3: Check the Red Petal Collar
The red collar should already be sewn around the body's 12-stitch neck opening, as instructed in the dress section.
Check that all four petals are arranged evenly, with two showing prominently at the front. The collar should sit against the green shoulders without pulling the neck stitches inward.
Make sure the upper 12-stitch neck opening remains free and accessible for attaching the head in the next step.
Step 4: Attach the head
Bring the ivory head and green body together, matching their two 12-stitch openings.
Center the embroidered face over the front of the bodice and make sure the eyes are level.
Using the long ivory tail from the head, sew each of the 12 head stitches to its matching body stitch around the neck.
Before closing the last few stitches, add a small amount of stuffing inside the neck if needed to fill the joint.
Go around the neck seam a second time with the sewing tail, catching the stitches firmly but without pulling the head downward.
For a little more support, make several small vertical reinforcement stitches between the lowest head rounds and the upper green neck rounds. Hide these beneath the red collar.
Weave the remaining yarn end well inside the stuffed body.
Set the doll upright and check the head. It should face forward without leaning noticeably to either side.
If the head tips forward, reinforce the back of the neck seam with additional stitches. If it tips backward, reinforce the front.
Step 5: Check the braids and hat
Arrange one brown braid on each side of the face, just behind the pointed ears.
Both braids should reach approximately the same height.
Check the red bows at their lower ends. Sew them down again if any loop is loose.
Position the green hat so the red band and ivory scallops frame the brown bangs.
The long green section should curve toward the viewer's right, which is the doll's left, ending in the cream pom-pom. Keep the bend rounded and the ivory scalloped brim above the embroidered eyes.
If necessary, add another concealed stitch to secure the hat near the back of the hair cap.
Step 6: Finish the dress details
Check that the two cream crocheted buttons sit in a straight line down the front of the green bodice.
Position the large red waist bow slightly to the viewer's right, which is the doll's left.
Arrange the two red tails across the front of the dress, with one hanging a little closer to the middle.
Sew the tails flat against the skirt so they keep their position.
Gently spread the ivory hem scallops and push any flattened bobbles outward.
Step 7: Final finishing
Check the whole doll from the front, back and both sides.
Remove every temporary straight pin and stitch marker. Look for loose yarn ends, gaps in the stuffing, uneven arms, twisted leg stripes, or decorations that aren't fully attached.
Secure and weave in every remaining yarn end. Trim ends only after they have been woven through several stitches and are no longer exposed.
Give the dress a final gentle adjustment and arrange the curled shoes so their tips point outward.
And there she is. A girl elf with her own little dress and braids, but still very much a companion to our sleepy boy elf.
Final measurement and construction checklist
- Finished doll measures approximately 17–19 inches tall, including the folded hat, subject to gauge and shaping.
- Head measures approximately 3¾–4 inches across.
- Red hatband fits around the hair cap without covering the eyes.
- Both ears are pointed outward and sewn securely at the base.
- Both braids are the same length and their bows are firmly attached.
- Green skirt has 96 stitches in its final round before the edging.
- Ivory skirt edging has 16 scallops.
- Red waistband is fitted evenly around the waist.
- Both cream buttons are securely sewn to the bodice.
- Striped legs have matching color sequences and lengths.
- Left and right shoes curve outward in opposite directions.
- No stuffing, loose threads, or exposed attachment seams are visible.
If anything looks uneven, correct it before calling the doll finished. The little finishing details make a big difference in a project with this many parts.
Baby Gift and Safety Notes
Although this project is called a lovey doll, it's a stuffed Christmas character with long legs, braids, bows and several sewn-on details. I'd treat the finished girl elf as a decorative keepsake unless it has been properly evaluated for the age of the child who will receive it.
For babies: Keep the doll out of cribs, bassinets and other infant sleep spaces. The American Academy of Pediatrics' safe sleep guidance recommends keeping stuffed toys and other soft items out of an infant's sleep area.
For young children: Check every seam and decoration carefully. This pattern uses embroidered eyes and crocheted details rather than plastic safety eyes, but that alone does not establish that the finished doll is appropriate for children under 3.
Pay particular attention to the braids, bows, pom-pom, crocheted buttons and decorative ribbon tails. They must be firmly sewn down, with no loose loops or long free strands that could become entangled or detach.
Do not add beads, bells, wire, pipe cleaners, removable buttons or other small accessories.
Stuffing and seams: Keep the stitches close enough that fiberfill cannot escape. Check the head, neck, arm attachments, leg attachments and curled shoe tips for openings.
Care: Use the yarn manufacturer's washing instructions as a starting point. Because the hat, curled shoes and attached decorations have not been physically tested through washing, spot cleaning is the conservative choice until a finished sample has been tested.
This written pattern has been calculated, but a completed doll has not yet been physically tested for durability, child use, or compliance with toy requirements. Those checks should be completed before presenting it as a toy for a young child.
Frequently Asked Questions About the Girl Elf Lovey Doll
Is this a blanket lovey or a stuffed crochet doll?
It's a stuffed doll-style lovey with a floppy body and long dangling legs. There isn't a blanket attached. She is designed to look like a companion to the boy elf crochet lovey, with matching sleepy eyes, pointed ears, Christmas colors and oversized curled shoes.
Can I make her with the same yarn as the boy elf?
Yes, and that's what I'd choose for a matching pair. Using the same yarn weight and similar tension will help the two dolls look as though they belong together. You can still make her dress, braids and hat details different without changing the overall proportions.
What if my elf's shoes won't stay curled?
First, check the stuffing. Too much filling in the narrow toe can make it straighten out. Remove a little stuffing and bend the toe upward again. Add concealed securing stitches on the inside of the curve until it holds the shape you want. Don't use wire to hold the curve.
Can I make the dress in red instead of green?
You can. A red dress with a green waistband and ivory scallops would still look Christmasy. The stitch counts won't change if you're only changing colors. For the companion shown in the example image, though, I'd stay with the forest-green dress.
Can I make the doll smaller?
A smaller hook and finer yarn will reduce the finished size while generally preserving the proportions, provided you maintain a firm fabric and consistent gauge. You'll need to adjust your stuffing amounts too. The measurements in this pattern apply only to the specified yarn and gauge.
Can I use plastic safety eyes instead of embroidery?
I would keep the embroidered sleepy eyes. They're part of what makes her match the boy elf, and they avoid adding separate plastic eye components. Embroidered eyes do not, by themselves, make a handmade doll suitable for infants or toddlers.
Has the pattern been test-crocheted?
Not yet. The stitch counts and expected dimensions have been calculated from the design, but the complete doll has not been physically made from these instructions. The curled shoes, hat drape, final dress width and assembled height are the main details to check on a finished sample.
Can I make a matching boy-and-girl Christmas elf set?
Yes. That's the idea behind this design. Make the girl with her green dress, braids and red bows, and pair her with the boy's green tunic and long floppy hat. Their matching sleepy faces, striped legs and curled shoes will give you a coordinated Christmas pair, while their different outfits keep each character interesting.
When you click on links to various merchants on this site and make a purchase, this may result in this site earning a commission. This does not affect the price you pay.

UBGI Gold Standard 2026
Reviewed under the site's
editorial checklist.
Photos, decorating ideas, party setups and reader submissions are shared for inspiration unless a page is specifically presented as a pattern, tutorial, reference guide or step-by-step project. Follow the instructions, measurements, safety guidance and manufacturer directions provided for the particular project or product.
About Jan | Contact | Baby Nursery Ideas (Blog) | Site Map | Privacy Policy | Disclosure Policy | Disclaimer | Affiliate Disclosure | Earnings Disclosure | Facebook | Pinterest
I am a participant in the Amazon Services LLC Associates Program, an affiliate advertising program designed to provide a means for us to earn fees by linking to Amazon. As an Amazon Associate I earn from qualifying purchases.
Copyright © 2006-2026. All Rights Reserved.