Free Christmas Cat Quilt Pattern with Patchwork Trees and Gifts
By Jan Bay
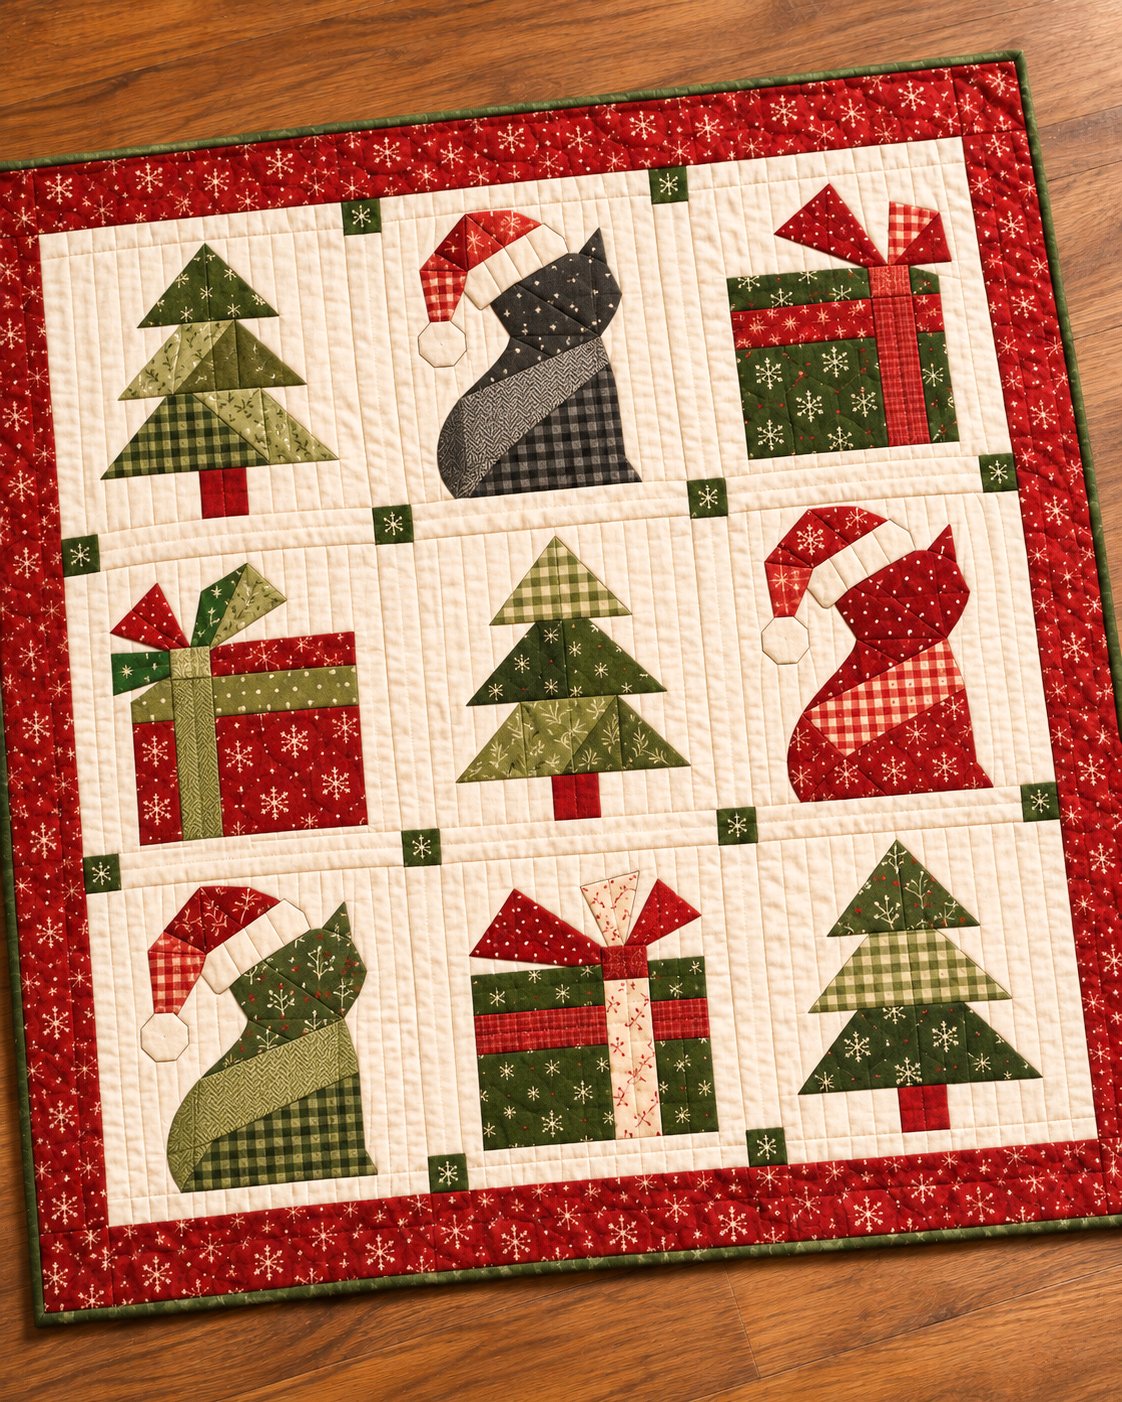
This free Christmas cat quilt pattern makes a cuddly quilt just the right size for sweet snuggles with baby while enjoying the lights on the tree. The layout features three patchwork cats wearing pieced Santa hats, three Christmas trees and three wrapped gifts in a nine-block design. The gifts are decorated with off-center ribbons and bows, the cats are made from different fabrics making this another nice stash buster pattern, and each tree is made with simple patchwork shapes. Traditional Christmas reds, greens, charcoal and cream give the quilt a cozy holiday look without a lot of unnecessary complications.
Explore More Free Christmas Quilt Patterns
Free Christmas Quilt Patterns Collection
Christmas Tree Irish Chain Quilt Pattern
See Supplies for This Project Here.
Jump to a Section
- Quilt Size and Design Overview
- Fabric and Supplies
- Fabric Cutting Instructions
- Make the Patchwork Cat Blocks
- Make the Christmas Tree Blocks
- Make the Gift Blocks and Bows
- Assemble the Nine-Block Quilt Top
- Borders, Quilting and Binding
- Download the Free Pattern and Templates
- Frequently Asked Questions
If you're making this quilt for a baby, enjoy it as a keepsake, for display or during supervised activities. Keep quilts and other loose bedding out of a baby's sleep space, as recommended by the American Academy of Pediatrics.
Christmas Cat Quilt Pattern: Size and Design Overview
We're going to make this quilt from nine large blocks, with three designs that repeat across the quilt. Each block finishes at 16 inches square, so there's plenty of room for the cats, trees and presents without working with a lot of tiny fabric pieces.
The cats wear patchwork Santa hats, and their bodies are made from five fitted fabric patches sewn together before the finished shapes are attached to the background. The trees have three tiers made from separate triangular patches. Even the gifts have pieced wrapping paper and ribbons that sit off to one side instead of running straight down the middle.
Here's the finished quilt size and how the pieces fit together.
- Finished quilt: Approximately 62 x 62 inches.
- Finished blocks: 16 x 16 inches each.
- Unfinished blocks: 16 1/2 x 16 1/2 inches each.
- Number of blocks: 9 total.
- Cat blocks: 3.
- Christmas tree blocks: 3.
- Wrapped gift blocks: 3.
- Sashing: Cream, 1 1/2 inches finished, with green cornerstones.
- Outer border: Red Christmas print, 4 inches finished.
- Binding: Dark green.
- Seam allowance: 1/4 inch throughout all patchwork sewing.
The Nine-Block Quilt Layout
Arrange the blocks in this exact order. Every row contains one tree, one cat and one gift, but their positions change from row to row.
| Tree | Cat | Gift |
| Gift | Tree | Cat |
| Cat | Gift | Tree |
How the Patchwork Is Made
Rather than trying to sew every little angled shape directly into the cream background, we'll make the decorative pieces separately and attach them to the blocks with machine appliqué.
The cats begin as real patchwork fabric panels. The Christmas tree sections are pieced before their triangular shapes are cut. The gift boxes are made from nine rectangular patches each, including the ribbons.
Lightweight fusible web holds the finished shapes in position while you sew around their edges. You still get visible patchwork seams, but the assembly is a good deal easier.
The full-size templates distinguish the two types of fabric pieces. The shaped patches that need to be sewn together have their 1/4-inch seam allowances included in the bold cutting outlines. Dashed lines show where those seams are sewn. Plain appliqué pieces, including the hat brims, pom-poms and tree trunks, are cut directly on their solid outlines without adding allowances.
A note about the finished look: The block arrangement and fabric colors follow the example image. The printable pattern uses calculated cutting shapes and fixed seam lines to reproduce the design. The example image is a design mockup rather than a photograph of a physically sewn quilt. The instructions have been checked digitally but have not been physically test-sewn.
Fabric and Supplies for the Christmas Cat Quilt
I'd start by choosing the fabrics for the cats. Black and charcoal prints look good next to traditional Christmas reds and greens, and a little plaid or gingham adds more of that pieced patchwork look.
You don't need a separate fabric for every section. Repeating a few prints across the trees, cats and gifts will help the blocks look like they belong in the same quilt.
Fabric Requirements
- Cream background and sashing: 3 1/4 yards of quilting cotton with at least 40 inches of usable width.
- Red Christmas print for the outer border: 1 yard.
- Dark green for binding and cornerstones: 3/4 yard.
- Cat patchwork: 9 fat quarters, using charcoal and gray, red, and green fabric combinations. Allow three fat quarters for each cat.
- Christmas tree patchwork: 6 assorted green fat quarters, including darker greens, olive prints and checks.
- Gift boxes and ribbons: 6 fat quarters in red, green and contrasting ribbon fabrics.
- Santa hats and bows: 3 red fat quarters in coordinating prints, plus 1/4 yard of cream fabric for the hat brims, pom-poms and cream gift details.
- Backing: 4 1/4 yards of quilting cotton with at least 40 inches of usable width, for a pieced 70 x 70-inch backing.
- Batting: At least 70 x 70 inches, or more if your quilting setup requires it.
- Lightweight sewable fusible web: Approximately 4 yards if using a 17-inch-wide product.
The pattern allows 24 fat quarters for the assorted patchwork fabrics, along with the separate cream allowance. You can reuse leftover pieces between the cats, trees and gifts, but check each full-size cutting template before deciding that a smaller scrap will be large enough.
These quantities allow for the printed pattern shapes and a little extra room for cutting. Directional prints or fussy cutting may take more fabric.
Other Supplies
- Sewing machine with straight stitch and blanket stitch or narrow zigzag.
- Rotary cutter, quilting ruler and cutting mat.
- Sharp fabric scissors for the shaped appliqué pieces.
- Iron and pressing surface.
- Matching sewing thread and quilting thread.
- Temporary fabric marking pen or pencil.
- Quilting pins or clips.
- Optional lightweight tear-away stabilizer for appliqué stitching.
- Printed full-size cat, tree and gift templates.
Choose a lightweight fusible web rather than a heavy adhesive. The cats and trees already have seams inside their shapes, and the lighter web helps keep the finished blocks from getting too stiff.
If you haven't used fusible appliqué before, Quilting Daily's Quiltmaking Fundamentals includes instructions for applying fusible shapes and finishing their edges with machine stitching.
Before You Begin
Press the fabrics before cutting and check that your machine sews a true 1/4-inch seam. That little measurement matters once we join nine blocks and all the sashing.
Print the templates at 100% size. Measure the one-inch calibration grid before you tape the pages together. If that measurement isn't right, correct the printer settings before cutting fabric.
All fabric measurements in this pattern are in inches.
Cut the Background, Sashing, Borders and Patchwork Pieces
Let's cut the cream backgrounds and quilt assembly pieces first. Then we'll use the full-size paper templates to cut the shaped patches for the cats, trees and gift bows.
The important thing is to keep the paper labels with the fabric pieces. Several of the shapes look similar until you start sewing them together.
Cream Background Fabric
From the cream quilting cotton, cut:
- 9 background squares: 16 1/2 x 16 1/2 inches.
- 24 sashing strips: 2 x 16 1/2 inches.
With at least 40 inches of usable fabric width, cut five 16 1/2-inch-wide bands across the fabric. Subcut two background squares from four bands and one square from the fifth.
Cut twelve 2-inch-wide strips across the remaining cream fabric. Subcut each strip into two 16 1/2-inch sashing pieces.
Keep all nine background squares at 16 1/2 inches until the appliqué is finished. Don't trim them smaller to compensate for stitching or pressing.
Green Cornerstones and Binding
- 16 green cornerstones: 2 x 2 inches.
- 8 green binding strips: 2 1/2 inches wide by the usable fabric width.
One 2-inch-wide strip across the green fabric provides enough fabric for all sixteen cornerstones. Cut the eight binding strips from the remaining fabric.
Red Outer Border
Cut six strips measuring 4 1/2 inches wide across the red Christmas-print fabric. We'll join and subcut them into the border lengths after the quilt center is assembled.
Backing and Batting
- Backing: Cut two lengths, each 74 inches long, from fabric with at least 40 inches of usable width.
- Batting: Cut at least 70 x 70 inches.
The backing pieces will be joined and trimmed to 70 x 70 inches before quilting.
Cut the Five Patchwork Pieces for Each Cat
Each cat body uses the same five labeled fabric shapes. The fabric prints change, but the templates and sewing order stay the same.
- C1: Lower body, 3 pieces total. Allow a scrap at least 10 x 6 1/2 inches for each.
- C2: Diagonal center band, 3 pieces total. Allow 9 x 7 1/2 inches for each.
- C3: Upper body and neck, 3 pieces total. Allow 8 1/2 x 7 1/2 inches for each.
- C4: Head panel, 3 pieces total. Allow 6 1/2 x 6 inches for each.
- C5: Upper head and ear panel, 3 pieces total. Allow 5 3/4 x 6 1/2 inches for each.
These scrap sizes are the minimum fabric rectangles needed to contain the printed cutting shapes. They are not rectangles you sew together. Cut the actual C1 through C5 outlines from the full-size templates.
The bold outside lines already include the sewing allowance. Transfer the dashed seam lines and their endpoints to the right side of the fabric before joining the patches.
Cut the Patchwork Santa Hats
For each of the three hats, cut these pieces from coordinating Christmas fabrics:
- H1: Red hanging cap section. Allow a 4 1/2 x 3 1/4-inch fabric scrap.
- H2: Red center cap section. Allow a 5 1/4 x 4-inch scrap.
- H3: Red upper cap section. Allow a 4 1/4 x 4-inch scrap.
- HB: Cream hat brim. Allow a 5 3/4 x 4 1/4-inch scrap.
- HP: Cream pom-pom. Allow a 2 1/4 x 2 1/4-inch scrap.
Cut three of each shape. H1, H2 and H3 have seam allowances for their patchwork joins. HB and HP are plain appliqué pieces and have no extra seam allowance.
Cut the Christmas Tree Patchwork
Each tree has eight shaped green patches and one red trunk. Cut three complete sets.
- Top tier: T11 and T12, two green patches. Allow a 4 1/2 x 5 1/4-inch scrap for each.
- Middle tier: T21 and T23 each need a scrap at least 6 x 5 1/2 inches. T22 needs 4 x 5 1/2 inches.
- Lower tier: T31 and T33 each need a scrap at least 7 x 5 1/2 inches. T32 needs 4 3/4 x 5 1/4 inches.
- Tree trunk: TT, one red rectangle per tree. Allow a scrap at least 2 1/4 x 2 1/4 inches.
Use the full-size shapes rather than cutting ordinary triangles from these scrap measurements. The tree patches have precisely placed diagonal seams that meet at the tier points.
The red trunk TT is a plain appliqué rectangle. Cut it without adding another seam allowance.
Prepare the Gift Fabrics and Bows
Each gift starts with nine rectangular fabric patches. The cutting sizes for those rectangles are given in the gift block section below, where the left-offset and right-offset ribbons have separate tables.
The three gifts also have different bow patterns:
- Gift A: Bow pieces A1, A2, A3 and A4, plus knot AK.
- Gift B: Bow pieces B1, B2, B3 and B4, plus knot BK.
- Gift C: Bow pieces GC1, GC2, GC3 and GC4, plus knot CK.
Cut one of each labeled bow piece from the corresponding full-size template. Some bow pieces have seam allowances because they will be sewn together. Others are plain appliqué pieces. Follow the bold cutting lines and dashed seam lines printed on each template.
One more piece is labeled GB. That's the 10 x 9-inch gift-box trimming template. Use it after sewing the nine rectangular patches together. It isn't an extra fabric piece.
Check the Cutting Before Sewing
You'll need nine cream blocks, twenty-four sashing strips, sixteen green cornerstones, three sets of cat patches and hats, three complete trees, and three sets of gift-box pieces and bows.
All patchwork joins use a 1/4-inch seam. The plain appliqué shapes are cut directly on their final outlines. Keeping those two cutting methods separate will save a good deal of frustration when you start assembling the blocks.
Make the Three Patchwork Cat Quilt Blocks
We're going to make three cats using the same five-piece pattern. One will be charcoal and gray, one red, and one green. Each cat gets a Santa hat with three different red fabric patches.
The shapes may look a little unusual when they're cut apart, but they fit together along the marked sewing lines. Keep your numbered paper templates handy and check the cat placement map as you go.
Step 1. Cut and Label the Five Cat Patches
Cut one each of C1, C2, C3, C4 and C5 for the first cat. Use the bold outside lines on the full-size cutting templates. Those lines already include the 1/4-inch seam allowance.
Mark the dashed seam boundaries and endpoints on the right side of each fabric patch. Don't trim the outside allowances away yet.
Use these fabric combinations:
- Charcoal cat: Charcoal check C1, gray herringbone C2, dark charcoal C3, and two coordinating charcoal prints for C4 and C5.
- Red cat: Red snowflake C1, red and cream gingham C2, dark red C3, and two red prints for C4 and C5.
- Green cat: Olive check C1, olive herringbone C2, dark green C3, and two green prints for C4 and C5.
The three cats face right. There's no need to reverse the patterns or change the outline from one block to another.
Step 2. Sew the Five Cat Body Patches
- Lay C4 and C5 right sides up beside each other in the arrangement shown on the CAT placement map.
- Turn the two patches right sides together, matching the marked endpoints of their shared diagonal seam. Sew along the dashed seam line with a 1/4-inch allowance. Press the seam open.
- Join the completed C4/C5 head unit to C3 along their matching lower diagonal edge. Match the outer seam endpoints and the point where the first seam crosses. Sew and press open.
- Add the diagonal C2 band to the lower edge of the C3/C4/C5 unit. Match the marked endpoints instead of trying to align the extended corners of the raw fabric pieces. Sew and press open.
- Join C1 to the lower edge of C2, again matching the dashed seam endpoints. Sew continuously across the seam and press open.
- Lay the finished patchwork body over the full-size CAT map. Check the complete cat outline, including the ear and head areas that will partly sit beneath the Santa hat.
- Trim away only the unused outer seam allowance along the final cat silhouette. Leave the sewn internal allowances intact.
The C2 band crosses the cat diagonally between the upper body and lower section. Its two edges have different angles, so don't replace it with an ordinary straight strip.
Cat body checkpoint: The trimmed silhouette is approximately 9.56 inches wide and 12.15 inches high. Its bottom edge lies at the 14 3/4-inch mark on the finished block map. Check that the head, neck, band and lower body form one continuous shape with no gaps where the patches join.
Step 3. Piece the Three-Fabric Santa Hat
Use three different red Christmas fabrics for each hat. A red gingham, a small holiday print and a deeper red print give the cap its patchwork look.
- Cut H1, H2 and H3 using their individual full-size templates. Transfer the dashed seam lines and endpoints.
- Place H2 and H3 right sides together along their shared seam. Match the marked endpoints and stitch with a 1/4-inch seam allowance. Press open.
- Join H1 to the lower edge of the H2/H3 unit. Match the ends and the point where the first seam crosses. Sew and press open.
- Check the completed cap against the full-size outline on the CAT map.
- Trim the unused outer allowances back to the finished red hat outline.
The red cap should measure approximately 7 inches across and 5.05 inches high at its widest points. Don't square it up. The bent shape and hanging end are part of the design.
Step 4. Cut the Cream Brim and Pom-Pom
Cut one HB hat brim and one HP pom-pom for each cat. These are plain raw-edge appliqué pieces without seam allowances.
The brim has an angled shape that crosses the cat's forehead. The pom-pom is a flat eight-sided fabric shape, not a stuffed ball.
- HB brim: Approximately 5.55 inches wide by 4 inches high at its outside bounds.
- HP pom-pom: Approximately 1.9 x 1.9 inches.
Use the actual template outlines for cutting rather than trying to make ordinary rectangles from these measurements.
Step 5. Position and Fuse the Cat
- Place a 16 1/2-inch cream background square right side up on your work surface.
- Mark the finished 16-inch block area, beginning 1/4 inch inside each raw edge.
- Put the assembled CAT placement map beneath or beside the square so you can transfer the motif position accurately.
- Apply lightweight sewable fusible web to the back of the completed cat body. A narrow web frame around the outside, with small interior tabs, is enough to hold the larger shape.
- Position the cat body on the cream background as shown on the map, with its face pointing right. Fuse according to the web manufacturer's directions.
- Place the red patchwork cap over the upper part of the head. Its lower-right section covers part of the left ear.
- Position the cream brim over the cap and head, keeping its upward slope toward the right.
- Add the cream pom-pom to the hanging end of the hat. On the finished block map, its center is at x = 3.9 inches and y = 7 inches.
- Fuse the hat, brim and pom-pom in place.
Make certain the pom-pom overlaps the red hat tip slightly. We don't want a strip of cream background showing between the two pieces.
Step 6. Stitch and Finish the Cat Block
- Choose a small machine blanket stitch or narrow zigzag. Use matching thread and adjust the stitch on a scrap before sewing the block.
- Stitch around the exposed cat outline, catching both the appliqué edge and cream background.
- Stitch the exposed edges of the red hat cap.
- Secure the cream brim, followed by the pom-pom.
- Don't stitch around the part of the cat's ear hidden beneath the hat. Those covered edges do not need separate exposed-edge stitching.
- Secure the thread ends and remove any temporary stabilizer according to its instructions.
- Press gently from the wrong side using a pressing cloth.
Finished block checkpoint: The cream square must remain 16 1/2 x 16 1/2 inches. Keep the appliqué outside the surrounding 1/4-inch seam allowance.
Repeat with the red and green fabrics until you have three completed cat blocks. All three cats should have five visible body patches, three-piece red hats, cream angled brims and cream pom-poms.
Make the Patchwork Christmas Tree Quilt Blocks
Each Christmas tree is made from three separate triangular tiers and a red trunk. The fun comes from mixing the greens. Checks, sprig prints and darker fabrics can all go in the same tree without looking too busy.
We'll sew the patches inside each tier first. Then we'll attach the completed triangles to the cream background, working from the trunk upward.
Step 1. Piece the Top Tree Tier
- Cut T11 and T12 from two coordinating green fabrics using the full-size cutting templates.
- Mark the dashed seam lines and their endpoints.
- Place the pieces right sides together along their shared diagonal edge, matching the marked points at the apex and base.
- Sew with a 1/4-inch seam allowance and press the seam open.
- Trim the unused outer allowances along the completed triangle outline.
The finished top triangle should measure 6.8 inches wide by 4 inches high. It has one visible internal seam running from the top point to the base.
Step 2. Piece the Middle Tree Tier
- Cut T21, T22 and T23 from three green fabrics.
- Join T21 to T22 along their marked apex-to-base seam.
- Press the seam open.
- Join T23 to the remaining edge of the first two patches, matching the apex and base seam marks.
- Stitch through the previous seam allowance where the patches meet at the point.
- Press open and trim the completed outside outline.
The middle triangle measures 9 inches wide by 4.15 inches high. It has three patchwork sections meeting at the upper point.
Step 3. Piece the Lower Tree Tier
- Cut T31, T32 and T33 using three coordinating green prints.
- Join T31 to T32 along their shared marked seam.
- Press open, then add T33 along the remaining matching seam.
- Match the apex and lower seam endpoints carefully.
- Press and trim the outside allowances to the finished triangle outline.
The lower triangle measures 11 inches across and 4.15 inches high. It's the widest part of the tree.
Don't cut off the upper point before joining the pieces. That point helps you line up the patchwork seams.
Step 4. Cut the Red Trunk
Cut one red TT trunk from its full-size appliqué template. It measures 1.9 inches wide by 2.1 inches high, with no added seam allowance.
Keep the longer measurement vertical. Cut three trunks in all.
Step 5. Arrange the Tree on the Cream Background
Lay one 16 1/2-inch cream square right side up. The printed TREE map measures the finished 16-inch block area, so its coordinates begin 1/4 inch inside the background's raw edges.
Place the pieces in the following order:
- Red trunk: Center it from x = 7.05 to 8.95 inches, with the top at y = 12.9 and the bottom at y = 15 inches.
- Lower triangle: Place its apex at x = 8, y = 9.15. The lower corners are at (2.5, 13.3) and (13.5, 13.3). It overlaps the top 0.4 inch of the trunk.
- Middle triangle: Place its apex at (8, 5.25). The lower corners are (3.5, 9.4) and (12.5, 9.4). The lower edge overlaps the top of the bottom tier by 1/4 inch.
- Top triangle: Place its apex at (8, 1.5). Its lower corners are (4.6, 5.5) and (11.4, 5.5). It overlaps the middle tier by 1/4 inch.
These measurements are taken from the finished block's upper-left corner, not the raw fabric edge. You can also use the assembled full-size TREE map to transfer the positions.
Step 6. Fuse and Stitch the Tree Pieces
- Apply lightweight sewable fusible web to the backs of the finished tree tiers and trunk.
- Fuse the red trunk first.
- Add the lower triangle, covering the upper portion of the trunk.
- Place the middle triangle, keeping the small overlap shown on the placement map.
- Add the top triangle last.
- Check that all three upper points line up on the center of the block.
- Stitch around the exposed edges with a narrow zigzag or machine blanket stitch.
- Press the block from the wrong side using a pressing cloth.
The three tiers should read as one Christmas tree, not three separate triangles. Those little overlaps are what give it a complete shape.
Step 7. Make the Other Two Trees
Repeat the same construction for the other two trees. The dimensions and shapes stay the same, but you can change the green fabric placement:
- Tree 1: Dark green top, mixed olive middle and checked lower tier.
- Tree 2: Olive checked top, dark green middle and lighter mixed greens below.
- Tree 3: Dark green top, olive checked middle and darker mixed green lower tier.
Tree block checkpoint: Each cream background remains 16 1/2 inches square. Each tree has three pieced triangular tiers and a red trunk, with all raw appliqué edges secured.
Sew the Patchwork Christmas Gift Blocks and Off-Center Bows
These gift blocks look more complicated than they are. Each present starts as nine rectangular patches sewn into a single box. The ribbons become part of those seams, so there's no need to appliqué thin strips over the gift.
We'll move the vertical ribbon to the right on two presents and to the left on the third. Then we'll make the bows from pointed fabric pieces.
Gift Block Measurements
All three finished gift boxes measure 10 inches wide by 9 inches tall.
Before appliquéing them to the cream squares, each pieced box should measure 10 1/2 x 9 1/2 inches, including seam allowances.
Each box contains three fabric rows:
- Upper wrapping paper row: 2 inches finished high.
- Horizontal ribbon row: 1 inch finished high.
- Lower wrapping paper row: 6 inches finished high.
Step 1. Cut the Pieces for a Left-Offset Ribbon
Use this cutting arrangement for the red gift with the green ribbon, which will go in the middle-left quilt block.
| Row | Left Piece | Ribbon | Right Piece |
|---|---|---|---|
| Top | 3 x 2 1/2 | 1 3/4 x 2 1/2 | 6 3/4 x 2 1/2 |
| Middle | 3 x 1 1/2 | 1 3/4 x 1 1/2 | 6 3/4 x 1 1/2 |
| Bottom | 3 x 6 1/2 | 1 3/4 x 6 1/2 | 6 3/4 x 6 1/2 |
Use green fabric for the three vertical ribbon pieces. In the middle row, use a contrasting green fabric for the two outside pieces to make the horizontal ribbon.
Use red wrapping paper fabric for the outside pieces in the top and bottom rows.
Step 2. Cut the Pieces for a Right-Offset Ribbon
The green gifts in the top-right and bottom-center blocks use the same row heights, but the column widths are reversed.
| Row | Left Piece | Ribbon | Right Piece |
|---|---|---|---|
| Top | 6 3/4 x 2 1/2 | 1 3/4 x 2 1/2 | 3 x 2 1/2 |
| Middle | 6 3/4 x 1 1/2 | 1 3/4 x 1 1/2 | 3 x 1 1/2 |
| Bottom | 6 3/4 x 6 1/2 | 1 3/4 x 6 1/2 | 3 x 6 1/2 |
For the top-right gift, use green wrapping paper and red ribbon fabrics.
For the bottom-center gift, use green wrapping paper, a cream print for the vertical ribbon and a red fabric for the horizontal ribbon.
Step 3. Piece the Nine-Patch Gift Boxes
Follow these steps for each gift:
- Arrange the nine fabric pieces in their three rows and three columns.
- Sew the left and middle pieces of the first row together using a 1/4-inch seam.
- Add the right piece. Press the seams in the top row away from the vertical ribbon column.
- Repeat with the second and third rows. Press the middle row toward the vertical ribbon column and the bottom row away from it. This helps the matching ribbon seams nest when you join the rows.
- Check each completed row. It should measure 10 1/2 inches across.
- Arrange the three completed rows in order, keeping the horizontal ribbon in the middle.
- Sew the top and middle rows together. Match the vertical ribbon seams so the ribbon runs straight from top to bottom.
- Add the lower row and match the ribbon seams again.
- Press the completed gift box.
Gift box checkpoint: The pieced box should measure exactly 10 1/2 inches wide and 9 1/2 inches high, including seam allowances.
The horizontal ribbon is above the middle of the box, and the vertical ribbon is off-center. That's the look we're after.
Step 4. Make the Three Different Patchwork Gift Bows
We have three presents, and each one gets a different bow. The ribbons are already sewn into the gift boxes, so all that's left is to make the pointed fabric wings and their small center knots.
Use the separate GIFT A, GIFT B and GIFT C placement maps. Don't flip one bow pattern over and use it for all three. Their shapes are deliberately different.
Gift A: Red Patchwork Bow
Gift A is the green present in the upper-right block. It has a red ribbon toward the right side of the box.
- Cut A1, A2, A3 and A4 from coordinating red fabrics. Cut the AK knot from a red print.
- Transfer the dashed seam lines to A1 through A4.
- Join A1 to A2 along their shared diagonal seam, matching the marked endpoints. Press open.
- Trim the unused outside allowances to make the completed left bow wing.
- Join A3 to A4 along their shared sloping seam. Press open and trim their combined outside outline.
- Keep the two finished bow wings and AK knot together until you're ready to place them on the background.
Gift B: Red and Green Patchwork Bow
Gift B is the red present in the middle-left block. Its green ribbon sits toward the left.
- Cut B1 and B2 from red prints, B3 from dark green and B4 from lighter olive-green fabric.
- Cut the BK knot from fabric matching the olive ribbon.
- Join B1 to B2 along their shared diagonal seam. Press and trim the outside allowance.
- Join B3 to B4 along their marked seam, matching the points carefully.
- Press and trim the completed green wing to its finished outline.
The longer green wing points upward and to the right. Keep that orientation when placing it on the background.
Gift C: Red and Cream Patchwork Bow
Gift C is the green present in the bottom-center block, with the cream vertical ribbon toward the right.
- Cut GC1 and GC2 from coordinating red fabrics.
- Join them along their shared diagonal seam, matching the marked endpoints.
- Press open and trim the completed outside wing shape.
- Cut GC3 from cream fabric with a small red print.
- Cut GC4 from a contrasting red fabric.
- Cut CK from red fabric for the center knot.
GC3 and GC4 are plain appliqué shapes and don't need to be sewn to each other before they're positioned. Use their solid cutting outlines without adding seam allowances.
Step 5. Position the Bows and Gift Boxes
All three gift boxes use the same finished 10 x 9-inch outside shape. Their ribbons and bow positions are what make them different.
- Trim 1/4 inch from each of the four outside edges of each pieced gift box. Check the finished appliqué size against the GB template. It should measure exactly 10 x 9 inches.
- Place a 16 1/2-inch cream square right side up.
- Mark the finished 16-inch block area, beginning 1/4 inch inside the raw fabric edges.
- Use the correct GIFT A, B or C placement map to position the bow wings first.
- Apply lightweight fusible web to their backs and arrange them with their lower tips extending just below the top of the gift box position.
- Fuse the bow wings, leaving the lower 0.10 inch of the roots where the gift box will cover them.
- Apply lightweight fusible web to the wrong-side perimeter of the completed gift box.
- Place the box on the background with its left edge at x = 3 inches, right edge at x = 13 inches, top at y = 5.25 inches and bottom at y = 14.25 inches on the finished block map.
- Fuse the gift box over the lower bow tips. Check that the vertical ribbon lines up with the bow's center knot position.
Remember to add 1/4 inch to these map positions when measuring from the raw edges of the cream background square.
Step 6. Add the Knots and Stitch the Gifts
- Gift A: Place AK at x = 9.25 to 10.5 inches, y = 4.95 to 6.2 inches. It covers the red bow roots and lines up with the right-offset red ribbon.
- Gift B: Place BK at x = 5.5 to 6.75 inches, y = 4.95 to 6.2 inches. It covers the bow roots above the left-offset green ribbon.
- Gift C: Place CK at x = 9.25 to 10.5 inches, y = 4.95 to 6.2 inches. Its red fabric makes a small contrast against the cream ribbon.
- Fuse each knot in place according to the fusible manufacturer's directions.
- Stitch around the exposed bow-wing edges, center knots and outside edges of the gift boxes using a narrow zigzag or machine blanket stitch.
- Leave the hidden bow-root edges covered by the boxes unstitched.
- Secure loose thread ends and press each block from the wrong side.
The horizontal and vertical ribbons are already sewn patchwork seams inside the boxes. There's no need to stitch fake ribbon outlines over them.
Gift block checkpoint: You should have three cream background blocks measuring 16 1/2 inches square. Each contains one 10 x 9-inch gift box, a nine-patch ribbon arrangement, a separate pointed bow and a small center knot.
Gift A and Gift C have right-offset vertical ribbons. Gift B has a left-offset ribbon. All three bows sit above their ribbons and stay within the finished block area.
Assemble the Nine-Block Christmas Cat Quilt Top
Now that the nine picture blocks are finished, we can put the quilt together. Lay everything out before sewing so the trees, cats and gifts stay in the right positions.
Step 1. Arrange All Nine Blocks
Place the blocks in three rows:
- Row 1: Christmas Tree | Charcoal Cat | Green Gift with Red Ribbon
- Row 2: Red Gift with Green Ribbon | Christmas Tree | Red Cat
- Row 3: Green Cat | Green Gift with Cream Ribbon | Christmas Tree
All the cats face right, and the cream backgrounds form the same nine-block arrangement shown in the example image.
Don't join the blocks directly to each other. We'll use cream sashing between them, around the outside of the block grid, and green cornerstones at the intersections.
Step 2. Make the Three Rows of Blocks
For each row, gather four cream sashing strips measuring 2 x 16 1/2 inches.
Arrange the pieces in this order:
Sashing | Block | Sashing | Block | Sashing | Block | Sashing
- Place the first sashing strip right sides together with the left edge of the first block.
- Sew with a 1/4-inch seam.
- Open and press the seam toward the sashing.
- Add the next sashing strip to the right edge of the block.
- Continue adding the second block, another sashing strip, the third block and the final sashing strip.
- Press the complete row and check its measurements.
Each completed block row should measure 54 1/2 inches wide by 16 1/2 inches high, including seam allowances.
Repeat this process for the other two rows. You'll use twelve cream sashing strips in this step.
Step 3. Make Four Horizontal Sashing Rows
Each horizontal sashing row contains three long cream strips and four little green cornerstones.
Arrange the pieces in this order:
Green Square | Cream Sashing | Green Square | Cream Sashing | Green Square | Cream Sashing | Green Square
- Gather four green 2 x 2-inch squares and three cream 2 x 16 1/2-inch strips.
- Sew the pieces together in the order shown above using 1/4-inch seams.
- Press the seams toward the cream sashing segments.
- Check the finished row measurement.
The horizontal sashing row should measure 54 1/2 inches long by 2 inches high, including seam allowances.
Make four identical rows. This uses the remaining twelve cream sashing strips and all sixteen green cornerstones.
Step 4. Join the Quilt Center
Lay the pieces out in this order:
- Horizontal sashing row.
- Quilt block row 1.
- Horizontal sashing row.
- Quilt block row 2.
- Horizontal sashing row.
- Quilt block row 3.
- Final horizontal sashing row.
Join the first horizontal sashing row to the top of block row 1, right sides together. Use a 1/4-inch seam and match the cornerstone seams to the vertical sashing seams in the block row.
Continue joining the remaining rows in order. Pin the intersections before sewing so the green cornerstones line up with the cream sashing.
Press each seam before adding the next row.
Quilt center checkpoint: The assembled quilt center should measure 54 1/2 x 54 1/2 inches unfinished. It will measure 54 x 54 inches after the outer border seams are sewn.
Before adding the border, spread the quilt center flat and check the arrangement one more time. Each row should contain one cat, one tree and one gift.
Add the Christmas Border, Quilt the Layers and Finish the Binding
We're almost finished with the quilt top. The red Christmas border frames all nine blocks, and the dark green binding gives the outside edge a neat finish.
Step 1. Piece the Red Border Strips
We'll use the six 4 1/2-inch-wide red border strips that you cut earlier. Because they're shorter than the finished border lengths, we'll join them before attaching them to the quilt.
This cutting plan assumes at least 40 inches of usable fabric width.
- Number the six red strips from 1 through 6.
- From strips 1, 2, 3 and 4, cut one 31 1/2-inch length from each. Save the remaining pieces, which should be at least 8 1/2 inches long.
- Join one saved 8 1/2-inch piece to strip 5 with a straight 1/4-inch seam. Press open, then cut two lengths measuring 23 1/2 inches each.
- Repeat with strip 6 and a second 8 1/2-inch leftover piece. Cut two more 23 1/2-inch lengths.
- For each top and bottom border, join two 31 1/2-inch pieces end to end. After the joining seam, each border measures 62 1/2 inches long.
- For each side border, join two 23 1/2-inch pieces and one remaining 8 1/2-inch leftover piece. After the two joining seams, each border measures 54 1/2 inches long.
- Press all joining seams open.
You should now have two side borders measuring 4 1/2 x 54 1/2 inches and two top and bottom borders measuring 4 1/2 x 62 1/2 inches.
Check the quilt center before attaching the borders. It should measure 54 1/2 inches unfinished in both directions. Correct any seam measurement errors rather than stretching the border to fit.
Step 2. Sew the Outer Border
- Pin one 54 1/2-inch red border strip to the left side of the quilt center, right sides together.
- Sew using a 1/4-inch seam and press toward the red border.
- Repeat on the right side.
- The quilt should now measure 62 1/2 inches across, including the unfinished side edges.
- Pin a 62 1/2-inch red border strip to the top edge.
- Sew and press.
- Repeat with the final red border strip along the bottom.
- Press the entire quilt top.
The completed quilt top should measure 62 1/2 x 62 1/2 inches before quilting and binding. The pattern's nominal finished design size is 62 x 62 inches. Binding wraps around the outer edge rather than removing a full 1/4 inch from each side, so the actual outside measurement may remain close to 62 1/2 inches, depending on quilting take-up and washing. Don't trim the quilt smaller just to make it measure exactly 62 inches.
Step 3. Prepare the Quilt Backing
Cut two backing lengths measuring 74 inches each, using fabric with at least 40 inches of usable width after removing the selvages.
- Remove the selvages from the edges that will be joined.
- Place the two backing pieces right sides together along their 74-inch edges.
- Sew using a 1/2-inch seam allowance.
- Press the seam open.
- Square and trim the joined backing to 70 x 70 inches.
Cut the batting to at least 70 x 70 inches, or larger if required by your quilting setup. This gives the batting and backing approximately 3 3/4 inches of extra width beyond each side of the 62 1/2-inch quilt top.
Step 4. Layer and Baste the Quilt
- Spread the backing fabric on a clean, flat surface with its wrong side facing up.
- Smooth it out and secure the edges temporarily.
- Place the batting over the backing.
- Lay the quilt top over the batting with its right side facing up.
- Smooth all three layers from the center toward the edges.
- Baste with quilting pins or another suitable quilting basting method.
Keep the backing and batting extending beyond the quilt top while quilting. Trim them after the quilting is complete.
Step 5. Quilt the Three Layers
The example quilt uses close, straight quilting lines that run vertically through the blocks. We can keep that same simple approach.
- Attach a walking foot if you have one.
- Mark or use a guide for straight vertical quilting lines approximately 3/4 inch apart, as specified in the printable pattern.
- Start near the center of the quilt and work outward.
- Quilt through the cream backgrounds, patchwork motifs, sashing and border.
- Reposition the quilt as needed to keep the fabric flat.
- Continue until the entire quilt is quilted.
Check the batting manufacturer's maximum quilting distance before you begin. The suggested 3/4- to 1-inch spacing is close quilting, so you don't need a separate complicated quilting design.
Once the stitching is finished, remove the basting materials and trim the batting and backing even with the quilt top.
Step 6. Prepare the Dark Green Binding
- Take the eight green binding strips measuring 2 1/2 inches wide.
- Join them end to end using diagonal seams.
- Trim the joining seam allowances to 1/4 inch and press open.
- Fold the complete binding strip in half lengthwise, wrong sides together.
- Press along the fold.
Eight strips provide approximately 302 1/2 inches of binding when cut from fabric with 40 inches of usable width and joined diagonally. This is enough to cover the quilt's approximately 250-inch raw-edge perimeter, with extra length for joining the binding ends.
Step 7. Attach the Binding
- Begin along one side of the quilt, away from a corner, leaving approximately 10 inches of loose binding at the beginning.
- Place the binding against the front of the quilt, aligning its raw edges with the quilt's raw edge.
- Sew with a 1/4-inch seam, stopping 1/4 inch before the first corner.
- Backstitch and remove the quilt from the machine.
- Fold the binding upward at a 45-degree angle, then fold it downward so its raw edge aligns with the next quilt edge.
- Begin sewing the next side, forming a mitered corner.
- Continue around all four sides, stopping with approximately 10 to 12 inches of the binding seam left open near your starting point.
- Overlap the loose binding ends by exactly the width of the unfolded binding strip, 2 1/2 inches. Cut away any extra length.
- Open the binding ends and join them right sides together on a diagonal, checking that the strip lies flat and isn't twisted.
- Trim the joining seam to 1/4 inch, press it open and refold the binding.
- Sew the remaining open section to the quilt front.
- Fold the binding over the edge to the back of the quilt. Form neat miters at the corners.
- Stitch the folded edge to the backing by hand or machine, covering the original binding seam.
Give the finished quilt one last press according to the fabrics and batting you've used.
The red border, little green cornerstones and dark green binding should frame the nine patchwork pictures without adding more decorations. That's plenty.
Download the Free Christmas Cat Quilt Pattern and Full-Size Templates
Ready to start your Christmas cat quilt? I've separated the sewing instructions from the full-size paper templates. You can print the pattern booklet for the cutting and assembly directions, then print the template sheets as you need them.
Download 1: Complete Christmas Cat Quilt Pattern
This 25-page PDF includes the materials, cutting charts, nine-block quilt layout, detailed patchwork instructions, appliqué assembly, measurements, borders, quilting and binding.
Download the Free Christmas Cat Quilt Pattern PDF
Download 2: Full-Size Cat, Tree and Gift Templates
This 76-page PDF includes 35 labeled cutting shapes and five full-size placement maps: one cat map, one Christmas tree map, and three different gift maps with their own bow arrangements.
Download the Full-Size Christmas Cat Quilt Templates PDF
How to Print and Assemble the Templates
- Open the template PDF and choose Actual Size or 100% in the print settings.
- Turn off Fit to Page, Shrink to Fit and automatic scaling.
- Print on standard US Letter paper, measuring 8 1/2 x 11 inches.
- Measure the one-inch calibration square on the first page. Both sides must measure exactly one inch.
- Print the placement map you need. Each full-size 16 x 16-inch block map uses six sheets arranged in three columns and two rows.
- Arrange the top row as R1 C1, R1 C2 and R1 C3. Place R2 C1, R2 C2 and R2 C3 directly below them.
- Trim to the printed tile rectangles, each 5 1/3 inches wide by 8 inches high.
- Butt the matching paper edges together without overlapping them. Align the printed grid lines and registration marks, then tape the sheets together.
- Measure the assembled map. It should be exactly 16 x 16 inches.
The full-size placement maps are on these pages of the template PDF:
- CAT: Pages 2-7.
- TREE: Pages 8-13.
- GIFT A: Pages 14-19.
- GIFT B: Pages 20-25.
- GIFT C: Pages 26-31.
The individual cutting templates are on pages 32-76. You'll find the complete template page index on page 25 of the instruction booklet.
Cutting lines and sewing lines: For a shaped patch that will be sewn to another patch, cut along the bold outer line. The 1/4-inch seam allowance is already included. The dashed line marks the finished seam boundary.
For plain appliqué shapes, such as the cream hat brim, pom-pom, red tree trunk and individual decorative pieces without pieced joins, cut directly along the solid outline without adding an allowance.
All templates show the front of the finished quilt. Trace them onto the right side of the fabric with the paper template face up. If you prefer to trace directly onto the release paper of fusible web, turn the paper template over first so the finished appliqué faces the correct direction.
The CAT and TREE maps are used three times each with different fabrics. Use the separate GIFT A, B and C maps once each because their bows are not interchangeable.
Keep the written instructions nearby as you cut. The paper templates give you the exact shapes, while the pattern booklet explains the sewing order and where each completed piece belongs.
Christmas Cat Quilt Pattern Questions
Can I make the cats from leftover quilting fabrics?
Yes. The cats are made from five separate patchwork shapes, so you can use different prints for the head, body and diagonal band. Check the minimum fabric sizes listed for C1 through C5 before cutting. The lower body pieces need larger scraps, while the Santa hats are a good place to use smaller bits of red Christmas fabric.
Can I make one of the cats face the other direction?
You can. Reverse the cat body and hat templates before cutting the fabric if you want a cat facing left. Keep the original orientation for all three cats if you want the quilt to match the example image.
Can I use the individual blocks for smaller projects?
Yes. Each picture block finishes at 16 inches square, so you can use a single cat, tree or gift block as the center of a pillow front or a small wall hanging. Add the borders and backing needed for the project you're making.
Does the quilt need hand appliqué?
No. This pattern uses machine appliqué with lightweight fusible web and a narrow blanket stitch or zigzag around the fabric shapes. The patchwork fabric sections are sewn together on a sewing machine before the shaped pieces are attached.
If you'd like another holiday sewing project after this one, take a look at the free Christmas quilt patterns collection for more patchwork designs.
When you click on links to various merchants on this site and make a purchase, this may result in this site earning a commission. This does not affect the price you pay.

UBGI Gold Standard 2026
Reviewed under the site's
editorial checklist.
Photos, decorating ideas, party setups and reader submissions are shared for inspiration unless a page is specifically presented as a pattern, tutorial, reference guide or step-by-step project. Follow the instructions, measurements, safety guidance and manufacturer directions provided for the particular project or product.
About Jan | Contact | Baby Nursery Ideas (Blog) | Site Map | Privacy Policy | Disclosure Policy | Disclaimer | Affiliate Disclosure | Earnings Disclosure | Facebook | Pinterest
I am a participant in the Amazon Services LLC Associates Program, an affiliate advertising program designed to provide a means for us to earn fees by linking to Amazon. As an Amazon Associate I earn from qualifying purchases.
Copyright © 2006-2026. All Rights Reserved.