Free Blue and White Irish Chain Quilt Pattern
By Jan Bay
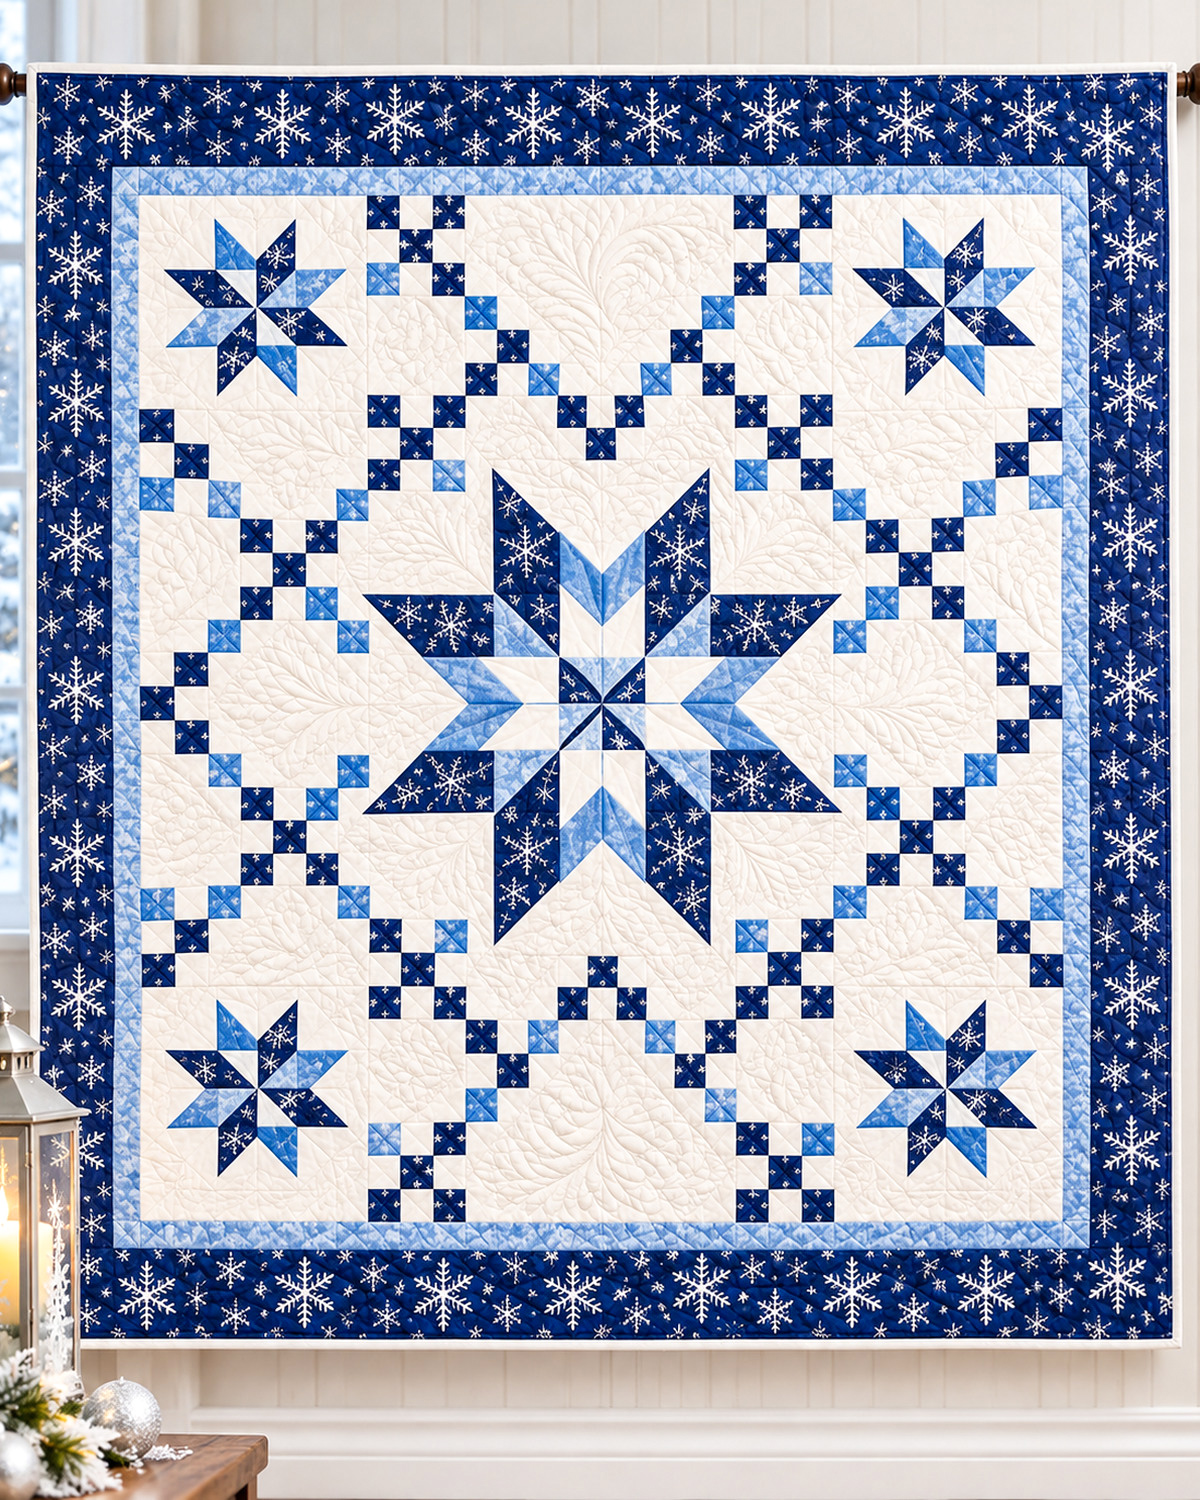
This free blue and white Irish Chain Quilt Pattern combines navy, icy blue, and creamy white patchwork in an icy design you can enjoy long after Christmas is over. A large eight-point star takes center stage, with four smaller stars tucked into the corners and diagonal chains of blue squares forming pretty diamond shapes around them. The stars are pieced from fabric rather than appliquéd, and the navy snowflake border gives the finished 67-inch quilt just enough Christmas charm without making it look out of place in January.
Explore More Free Christmas Quilt Patterns
Christmas Tree Irish Chain Quilt Pattern
See Supplies for This Project Here.
Jump to a Section
- Finished Quilt Size and Design
- Fabric Requirements and Supplies
- Complete Fabric Cutting Instructions
- Make the Large Pieced Center Star
- Sew the Four Corner Stars
- Make the Blue and White Irish Chain Squares
- Assemble the Quilt Top in Three Bands
- Borders, Quilting, and Binding
- Download the Free Quilt Pattern PDF
- Frequently Asked Questions
Free Irish Chain Quilt Pattern: Finished Size and Design
This blue and white Irish chain quilt finishes at approximately 67 inches square. The large center star measures 28 inches, so it's the first thing you'll notice. Four smaller stars sit near the corners, with navy and icy blue squares making the diagonal chains between them.
I especially like the way the white background gives the stars room to stand out. The chain pattern is pretty without covering every inch of the quilt, and the snowflake border gives it a winter look that works well after Christmas.
Finished Quilt Measurements
- Complete quilt: 67 x 67 inches
- Patchwork center: 56 x 56 inches
- Large center star block: 28 x 28 inches
- Center pinwheel: 5 x 5 inches finished
- Four layered chevron arms: 5 x 11 1/2 inches finished each
- Four long-point corner modules: 11 1/2 x 11 1/2 inches finished each
- Four corner star blocks: 14 x 14 inches each
- Star inside each corner block: 12 x 12 inches
- Individual Irish chain squares: 2 x 2 inches finished
- Narrow icy blue border: 1 inch finished
- Wide navy border: 4 1/2 inches finished
The large star has several layers of blue patchwork and little white wedges pointing inward. Those details matter because they give the center star a different appearance from the simpler corner stars.
Everything is sewn from individual fabric pieces. There are no appliqué stars, printed star panels, or special decorative stitches needed to make the star shapes.
How the Quilt Is Put Together
You'll make the four small stars first, then the larger center star. The Irish chains are sewn from individual 2 1/2-inch fabric squares, which finish at 2 inches after sewing.
Once those pieces are ready, the quilt goes together in three horizontal bands:
- Upper band with two corner stars and the top chain section
- Middle band with the large center star and two side chain sections
- Lower band with the remaining corner stars and bottom chain section
That's an easier way to assemble this particular quilt than trying to treat it as dozens of identical nine-patch blocks.
This is an intermediate quilting project. The Irish chain squares and smaller corner stars are straightforward, but the large center star takes more care. You'll work with mirrored template pieces, angled seams, half-square triangles, and a small pinwheel where eight fabric triangles meet. I'd make one complete sample chevron arm before cutting and sewing all four.
Fabric Requirements and Supplies
I'd keep the fabric choices fairly simple. Navy provides the dark contrast, icy blue brings out the different layers of the center star, and creamy white makes the whole quilt look bright.
A small snowflake print is lovely for the navy border. For the smaller patchwork pieces, choose prints that won't hide the seams or make the star points difficult to see.
Fabric Requirements for a 67-Inch Quilt
| Fabric | Amount |
|---|---|
| Navy snowflake print | 2 1/2 yards |
| Icy blue cotton | 1 1/4 yards |
| Creamy white cotton | 3 3/4 yards |
| Backing fabric | 4 1/2 yards |
| Batting | At least 76 x 76 inches |
These amounts assume about 40 inches of usable fabric width after the selvages are removed. They include some cutting allowance, but not extra fabric for matching large printed motifs or unusual shrinkage.
The white fabric allowance includes the binding. The backing amount assumes two pieces of standard-width fabric joined together.
Other Quilting Supplies
- Sewing machine with a 1/4-inch patchwork foot
- Rotary cutter, cutting mat, and quilting rulers
- Fabric scissors
- Iron and ironing board
- Matching sewing thread
- Straight pins or quilting clips
- Removable fabric marker
- Paper and printer for the full-size templates
- Quilting needles and supplies for basting
If you'd like a refresher before cutting your fabric, the American Quilter's Society beginner quilting lessons cover rotary cutting, fabric preparation, and sewing accurate quarter-inch seams.
Check Your Seam Allowance First
Before cutting everything, sew three 2 1/2-inch squares together in a row using a 1/4-inch seam. The completed row should measure 6 1/2 inches long and 2 1/2 inches high.
If it doesn't, adjust your seam allowance and sew another sample. Even a small difference adds up when you're joining fourteen or more squares in one row.
I'd also make one sample half-square triangle before cutting all the star pieces. That gives you a chance to check your trimming method and see whether your fabric presses nicely.
Pattern note: The measurements are calculated and checked, but the quilt has not been physically test-sewn. Check the sample units and each finished section before continuing.
Complete Fabric Cutting Instructions
Let's get the cutting organized before sewing. This quilt has plenty of little chain squares, but the center star needs its own group of fabric pieces. I'd keep those separate from everything else and label them as they're cut.
All measurements are in inches and include a 1/4-inch seam allowance unless marked finished. WOF means approximately 40 inches of usable fabric width.
The cutting chart below matches the 37-page printable pattern. There are 64 completed half-square triangles and 92 individual fabric pieces in the large center block. The four smaller stars now use pieced navy and icy blue pinwheel centers.
Cut the Navy Fabric
- 80 squares measuring 2 1/2 x 2 1/2 inches
- 6 squares measuring 4 1/2 x 4 1/2 inches
- 2 squares measuring 3 1/2 x 3 1/2 inches for the pinwheel
- 16 squares measuring 4 x 4 inches for the smaller corner stars
- 8 rectangles measuring 4 x 5 inches for the elongated star points
- 8 strips measuring 5 inches x WOF for the outer border
Of the eighty small navy squares, seventy-two belong in the Irish chain field and eight go into the large center block's chain-setting corners.
Pair four of the 4 1/2-inch navy squares with white fabric for the large point tips. Pair the remaining two with icy blue for the angled bridges. The two 3 1/2-inch navy squares pair with icy blue to make the central pinwheel.
Keep the eight navy 4 x 5-inch rectangles together. These extend the star points beyond the ordinary half-square triangles and are an important part of the approved design.
Cut the Icy Blue Fabric
- 24 squares measuring 2 1/2 x 2 1/2 inches for the Irish chains
- 2 squares measuring 4 1/2 x 4 1/2 inches for the angled bridge HSTs
- 2 squares measuring 3 1/2 x 3 1/2 inches for the center pinwheel
- 12 squares measuring 4 x 4 inches for the corner-star HSTs
- 8 rough rectangles measuring 4 x 7 1/2 inches for the B chevron templates
- 8 strips measuring 1 1/2 inches x WOF for the inner border
The B chevron pieces are cut from the rough rectangles using the full-size templates on PDF page 22. You'll need four left pieces and four right pieces.
Don't sew the 4 x 7 1/2-inch rectangles directly into the quilt. They're cutting blanks, not finished patchwork shapes.
Cut the Creamy White Fabric
- 300 squares measuring 2 1/2 x 2 1/2 inches
- 4 squares measuring 4 1/2 x 4 1/2 inches for the navy-and-white point HSTs
- 20 squares measuring 4 x 4 inches for the corner-star HSTs
- 16 squares measuring 3 1/2 x 3 1/2 inches for the small-star corners
- 8 rough rectangles measuring 4 x 7 1/2 inches for the A outer-arm templates
- 8 rough rectangles measuring 4 x 6 1/2 inches for the C inner-wedge templates
- 4 rectangles measuring 1 1/2 x 2 1/2 inches for the chain-setting margins
- 4 rectangles measuring 5 1/2 x 7 1/2 inches for the chain-setting backgrounds
- 4 strips measuring 1 1/2 x 7 1/2 inches, labeled E7
- 4 strips measuring 1 1/2 x 8 1/2 inches, labeled E8
- 8 strips measuring 1 1/2 x 12 1/2 inches for the small-star side frames
- 8 strips measuring 1 1/2 x 14 1/2 inches for the small-star top and bottom frames
- 8 strips measuring 2 1/2 inches x WOF for double-fold binding
Of the 300 small white squares, 296 go into the four Irish chain sections and four belong to the center block's setting corners.
The A and C pieces must be cut from the printable templates. Make four left and four right pieces of each shape. The A pieces form the outer white background, while the C pieces form the smaller white V-shaped wedges inside the star.
Keep the E7 and E8 strips separate. You'll use them to enlarge the four chain-setting corner units before adding the long navy star points.
Make the 64 Half-Square Triangles
Half-square triangles, or HSTs, are squares made by joining two fabric triangles along a diagonal seam.
We'll use the two-at-a-time method. Start with the oversized squares listed below and trim the finished units to their exact measurements.
| Fabric Pair | Starting Squares | HSTs | Trim Size |
|---|---|---|---|
| Navy + white | 4 pairs at 4 1/2 inches | 8 | 4 inches |
| Navy + icy blue | 2 pairs at 4 1/2 inches | 4 | 4 inches |
| Navy + icy blue | 2 pairs at 3 1/2 inches | 4 | 3 inches |
| Navy + white | 12 pairs at 4 inches | 24 | 3 1/2 inches |
| Icy blue + white | 8 pairs at 4 inches | 16 | 3 1/2 inches |
| Navy + icy blue | 4 pairs at 4 inches | 8 | 3 1/2 inches |
Sew and Trim the Half-Square Triangles
- Draw a diagonal line from corner to corner on the wrong side of each lighter fabric square.
- Place it right sides together with the matching darker square.
- Align all four raw edges.
- Sew 1/4 inch from each side of the marked diagonal.
- Cut directly along the marked diagonal to separate the two units.
- Open the triangles and press toward navy, or toward icy blue for icy-blue-and-white pairs.
- Place your ruler's 45-degree marking directly over the sewn seam.
- Trim two edges, rotate the unit, and trim the remaining edges to the required unfinished size.
- Check that the diagonal seam meets both corners of the trimmed square.
You'll have sixteen HSTs for the large center block and forty-eight for the four smaller stars. That's 64 completed HST units altogether.
Each corner star uses six navy-and-white HSTs, four icy-blue-and-white HSTs, and two navy-and-icy-blue HSTs. Keep the three groups separate so the points face the correct directions.
Measurement checkpoint: Check the 4-inch, 3-inch, and 3 1/2-inch unfinished HST sizes separately before sewing them into the star sections.
Cut the Center-Star Chevron Templates
The center star uses three different template shapes to make the layered blue chevrons and white V wedges.
- Print PDF page 21 for the A outer white pieces.
- Print PDF page 22 for the B icy blue chevrons.
- Print PDF page 33 for the C inner white wedges.
- Choose Actual Size or 100% in your printer settings.
- Measure the one-inch calibration squares before cutting fabric.
- Cut four A-L and four A-R pieces from the white A blanks.
- Cut four B-L and four B-R pieces from the icy blue B blanks.
- Cut four C-L and four C-R pieces from the white C blanks.
- Transfer all marked seam intersections, midpoints, and grainline markings.
The L and R pieces are mirrored. Keep them labeled, and don't flip a template over unless you're deliberately making the matching mirrored piece.
Each complete chevron arm uses one A-L, one B-L, one C-L, one A-R, one B-R, and one C-R piece.
Check the Complete Patchwork Piece Count
- 392 individual Irish chain and background squares
- 128 fabric pieces in the four smaller corner-star blocks, counting both triangles in each HST separately
- 92 fabric pieces in the large center-star block
- Total: 612 patchwork pieces, excluding borders, backing, and binding
The large center's 92 pieces include the pinwheel triangles, layered chevron pieces, long navy points, angled bridges, and background setting sections.
Don't cut extra half-square triangle parents if you're using the PDF's direct-cut triangle templates instead. Choose one cutting method for each group and keep the finished unit counts the same.
Before continuing: Make one sample half-arm and check that it measures 3 x 12 inches unfinished. Then make one complete chevron arm. It's worth checking those measurements before cutting and sewing all four arms.
Make the Large Pieced Center Star
Now we're ready for the part that really makes this quilt special. The large center star has a little navy-and-icy-blue pinwheel in the middle, four layered blue chevrons, white V-shaped wedges, and long navy points reaching toward the Irish chains.
Every colored shape is made from an actual fabric piece. Nothing is painted, printed to look pieced, or added as appliqué.
The complete center block finishes at 28 inches square and measures 28 1/2 inches before assembly. It contains 92 individual fabric pieces.
I'd make one chevron arm and one long-point corner module before sewing the remaining copies. The measurements are calculated, but the quilt hasn't been physically test-sewn, so these are useful checkpoints.
Step 1: Prepare the Mirrored Chevron Pieces
You'll need the full-size A, B, and C templates from the printable PDF.
- Page 21: A-L and A-R, white outer setting pieces
- Page 22: B-L and B-R, icy blue chevron pieces
- Page 33: C-L and C-R, white inner V-wedge pieces
For the complete star, cut:
- 4 A-L and 4 A-R pieces in white
- 4 B-L and 4 B-R pieces in icy blue
- 4 C-L and 4 C-R pieces in white
- Print the templates at 100% or Actual Size.
- Measure the one-inch calibration squares in both directions.
- Place the correct template on the fabric with the fabric's right side facing up.
- Cut along the solid outer line, which already includes the 1/4-inch seam allowance.
- Transfer the marked sewing intersections and midpoint ticks to the wrong side of each piece.
- Keep the left and right pieces in separate labeled groups.
The mirrored shapes aren't interchangeable. Match A-L with B-L and C-L, and A-R with B-R and C-R.
Step 2: Sew the Left Half of Each Chevron Arm
Each left half uses one A-L, one B-L, and one C-L piece.
- Place A-L and B-L right sides together along their matching angled edges.
- Match both marked sewing endpoints and the midpoint tick.
- Pin the pieces without stretching the angled edges.
- Sew along the marked seam, 1/4 inch from the cutting edge, continuing through the seam allowances to the raw ends.
- Open the pieces and press without pulling the bias edges.
- Place C-L against the remaining angled edge of B-L, right sides together.
- Match the endpoints and midpoint ticks again.
- Sew the matching angled seam and press carefully.
- Check the completed left half against the template diagram.
Half-arm checkpoint: The completed left half should measure 3 x 12 inches unfinished.
Make four matching left halves.
Step 3: Sew the Right Half and Complete Each Arm
Each right half uses one A-R, one B-R, and one C-R piece.
- Join A-R to B-R along their marked angled edges.
- Add C-R to the remaining angled edge of B-R.
- Match all sewing marks and press without stretching.
- Check that the completed right half measures 3 x 12 inches unfinished.
- Place one left half beside one right half, with their long center edges touching.
- Check that the icy blue chevron points meet at the center and the white wedges are symmetrical.
- Place the halves right sides together.
- Pin through the marked chevron intersections so the blue points will meet.
- Sew the long center seam using a 1/4-inch seam allowance.
- Open and press the arm flat.
Complete-arm checkpoint: The chevron arm should measure 5 1/2 x 12 inches unfinished. It finishes at 5 x 11 1/2 inches.
Make four identical arms.
One arm will point downward from the top of the center block. Rotate the next completed arm clockwise 90 degrees for the right side, 180 degrees for the bottom, and 270 degrees for the left.
You'll have four inward-facing chevrons surrounding the center pinwheel.
Step 4: Sew the Small Navy-and-Icy-Blue Pinwheel
The center pinwheel is made from four navy-and-icy-blue HSTs, each trimmed to 3 inches square.
You'll use the four HSTs made from the two navy and two icy blue 3 1/2-inch starting squares.
Arrange them in a 2 x 2 square with the navy triangles positioned as follows:
- Upper-left HST: navy triangle at lower left
- Upper-right HST: navy triangle at upper left
- Lower-left HST: navy triangle at lower right
- Lower-right HST: navy triangle at upper right
Compare the arrangement with the pinwheel diagram on PDF page 9. The four diagonal seams should converge at the exact middle of the block.
- Place the two upper HSTs right sides together and sew their shared edge.
- Press and check that the row measures 5 1/2 x 3 inches.
- Join the two lower HSTs in the same way.
- Place the upper and lower rows right sides together.
- Match the center seams and pin through the exact intersection of the four diagonal seams.
- Sew the rows together and press the final seam open.
- Check that the small triangles meet neatly at the center.
Pinwheel checkpoint: The completed pinwheel should measure 5 1/2 x 5 1/2 inches unfinished and will finish at 5 inches square.
The eight navy and icy blue triangular pieces are what give this center its little spinning-star appearance. Don't substitute four plain squares.
Step 5: Make Four Chain-Setting K Units
The large center block has four little chain-setting units at its outside corners. They connect the big star visually to the surrounding Irish chains.
For each K unit, gather:
- 2 navy squares cut 2 1/2 inches
- 1 white square cut 2 1/2 inches
- 1 white rectangle cut 1 1/2 x 2 1/2 inches
- 1 white rectangle cut 5 1/2 x 7 1/2 inches
- Arrange the three squares in the order navy, white, navy.
- Sew the three squares together with 1/4-inch seams.
- Press toward navy. The row measures 6 1/2 x 2 1/2 inches.
- Add the short white rectangle to the correct end of the chain row.
- The extended row should measure 7 1/2 x 2 1/2 inches.
- Attach the large white rectangle along its 7 1/2-inch edge.
- Press and check the completed unit.
K-unit checkpoint: Each setting unit should measure 7 1/2 x 7 1/2 inches unfinished.
Make the four directional arrangements:
- Upper left: chain row at the top, short white margin on the right
- Upper right: chain row at the top, short white margin on the left
- Lower left: chain row at the bottom, short white margin on the right
- Lower right: chain row at the bottom, short white margin on the left
For the two upper units, the large white rectangle sits below the chain row. For the two lower units, it sits above the chain row.
Label the pieces UL, UR, LL, and LR before continuing.
Step 6: Expand the K Units with White Setting Strips
Now we'll enlarge each K unit to make the white background for its long navy star points.
For each unit, gather:
- 1 E7 white strip measuring 1 1/2 x 7 1/2 inches
- 1 E8 white strip measuring 1 1/2 x 8 1/2 inches
- Place the K unit with its chain row facing the correct outside edge of the center block.
- Sew the E7 strip along the inner vertical edge of the K unit.
- For upper-left and lower-left units, E7 goes on the right side. For upper-right and lower-right units, E7 goes on the left side.
- Press and check that the piece now measures 8 1/2 x 7 1/2 inches.
- Attach E8 along the inner horizontal edge of that enlarged piece.
- For upper units, E8 goes along the bottom. For lower units, E8 goes along the top.
- Press and measure the completed white setting background.
Expanded-background checkpoint: Each completed background measures 8 1/2 x 8 1/2 inches unfinished.
Keep the navy chain squares at the extreme top or bottom of the background, not against the inner star.
Step 7: Make the Eight Elongated Navy Point Sections
These are the long navy sections that give the center star its more pointed appearance. Each one combines a navy-and-white half-square triangle with a solid navy rectangle.
For each point section, gather:
- 1 navy-and-white HST trimmed to 4 inches square
- 1 navy rectangle measuring 4 x 5 inches
- Lay the HST beside the navy rectangle with the 4-inch edges touching.
- Rotate the HST so the white triangle lies at the outside tip of the star point.
- Keep the navy rectangle extending inward toward the angled bridge.
- Place the pieces right sides together along their matching 4-inch edges.
- Sew using a 1/4-inch seam allowance.
- Press and measure the completed point section.
Point-section checkpoint: Each completed section measures 4 x 8 1/2 inches unfinished.
Make eight point sections. You'll use two in each long-point corner module, with one running vertically and one horizontally.
Follow the four orientation drawings on PDF page 34. The direction of the white triangle changes depending on the module's position.
Step 8: Make the Four Angled Bridge HSTs
The four navy-and-icy-blue bridge HSTs join the two long point sections inside the corner modules.
Use the four navy-and-icy-blue HSTs already trimmed to 4 inches square.
Each corner module needs one bridge. Place its navy triangle in the following position:
- Upper-left module: navy at upper right
- Upper-right module: navy at upper left
- Lower-left module: navy at lower right
- Lower-right module: navy at lower left
Keep these four bridges labeled. Their rotations are not interchangeable.
Step 9: Assemble the Four Long-Point Corner Modules
Each corner module contains one expanded K background, two elongated navy point sections, and one angled bridge HST.
The modules are mirrored so the long star points reach inward from all four corners of the center block.
Upper-left module:
- Place the 8 1/2-inch expanded background at upper left, keeping its navy chain row at the top edge.
- Place one long-point section vertically along its right side.
- Match the 8 1/2-inch edges and sew the two sections together.
- Press and check that the upper band measures 12 x 8 1/2 inches.
- Place the second long-point section horizontally beneath the background.
- Attach one 4-inch navy-and-icy-blue bridge HST at the right end of the horizontal point section.
- Check that the bridge's navy triangle is at upper right.
- Sew the horizontal point section and bridge together to form a 12 x 4-inch lower band.
- Join the upper and lower bands using a 1/4-inch seam.
- Press the completed module flat.
Upper-left checkpoint: The module measures 12 x 12 inches unfinished.
Make the other three modules as mirrored arrangements:
- Upper right: Expanded white background at upper right, vertical navy point along the left, horizontal point beneath the background, and bridge at lower left.
- Lower left: Expanded background at lower left, vertical point along the right, horizontal point above the background, and bridge at upper right.
- Lower right: Expanded background at lower right, vertical point along the left, horizontal point above the background, and bridge at upper left.
Use the matching diagrams on PDF page 34 to check the white triangle tips, navy rectangles, and bridge orientations before joining each module.
Each module finishes at 11 1/2 inches square and must measure 12 inches square before final assembly.
Make all four modules and keep their position labels attached.
Step 10: Assemble the 28-Inch Center Block in Three Bands
You'll now have all nine major center sections ready:
- 4 long-point corner modules, each 12 inches square unfinished
- 4 completed chevron arms, each 5 1/2 x 12 inches unfinished
- 1 pinwheel, measuring 5 1/2 inches square unfinished
Lay the sections out before sewing. The top and bottom chevron arms are vertical. The left and right arms are rotated horizontally so their pointed ends face the pinwheel.
Upper Center Band
- Place the upper-left long-point module on the left.
- Place a chevron arm in the middle, with its pointed end facing downward toward the pinwheel.
- Place the upper-right module on the right.
- Join the three sections along their matching 12-inch edges.
- Match the angled star sections carefully at the seams.
- Press and measure the completed band.
Upper-band checkpoint: The band measures 28 1/2 x 12 inches unfinished.
Middle Center Band
- Rotate one chevron arm so its pointed end faces right toward the pinwheel.
- Place it on the left side of the pinwheel.
- Rotate another chevron arm so its pointed end faces left toward the pinwheel.
- Place it on the right side.
- Join the left arm, pinwheel, and right arm along their matching 5 1/2-inch edges.
- Pin through the chevron tips to keep the points aligned.
- Press and measure the completed band.
Middle-band checkpoint: The band measures 28 1/2 x 5 1/2 inches unfinished.
Lower Center Band
- Place the lower-left long-point module on the left.
- Place the remaining chevron arm in the middle, with its pointed end facing upward toward the pinwheel.
- Place the lower-right module on the right.
- Join the sections along their matching 12-inch edges.
- Press and check the band's measurements.
Lower-band checkpoint: The band measures 28 1/2 x 12 inches unfinished.
Join the Three Center Bands
- Arrange the upper, middle, and lower bands in order.
- Check that the navy points extend outward and the four icy blue chevrons point toward the center.
- Place the upper band right sides together with the middle band.
- Match the seams at 11 1/2 and 16 1/2 finished inches across the block.
- Pin the chevron tips and the seams beside the pinwheel.
- Sew using a consistent 1/4-inch seam allowance.
- Press the long joining seam open.
- Add the lower band in the same way.
- Press without stretching the diagonal pieces.
- Lay the complete center block flat and check its measurements.
Final center-star checkpoint: The block measures 28 1/2 x 28 1/2 inches unfinished. It finishes at 28 x 28 inches after assembly.
The finished center should have a small pinwheel, four icy blue chevrons, four white V-shaped wedges, and long navy star points. The four chain-setting rows stay at the outside corners, ready to meet the surrounding Irish chain sections.
Construction count: This center contains 92 fabric pieces: 32 navy, 16 icy blue, and 44 white. The four long-point modules contain 60 pieces, the four chevron arms contain 24, and the pinwheel contains eight triangles.
The measurements and geometry have been mathematically checked, but this quilt has not been physically test-sewn. Make one half-arm and one full arm first, and correct any seam allowance or alignment problem before making the remaining pieces.
Sew the Four Corner Stars
The four smaller stars are made from navy, icy blue, and white half-square triangles arranged into eight pointed patchwork blades. They have little pinwheel centers rather than the plain blue squares used in an ordinary sawtooth star.
You'll make four identical 14-inch finished blocks. Each star has a 12-inch pieced center surrounded by a narrow white frame.
Pieces for Each Corner Star
- 6 navy-and-white HSTs trimmed to 3 1/2 inches square
- 4 icy-blue-and-white HSTs trimmed to 3 1/2 inches square
- 2 navy-and-icy-blue HSTs trimmed to 3 1/2 inches square
- 4 plain white squares cut 3 1/2 inches square
- 2 white strips cut 1 1/2 x 12 1/2 inches
- 2 white strips cut 1 1/2 x 14 1/2 inches
Each framed corner block contains 32 individual fabric pieces when both triangles in every HST are counted separately.
Arrange the Pieced Pinwheel Star
Lay out the sixteen square units in four rows of four, following the color placement diagram on page 8 of the printable PDF.
The four outside corners are plain white squares. Every other position contains a half-square triangle.
Use the following guide. W is a plain white square. N means navy and I means icy blue. The direction after the letter identifies which corner contains that color. The other half of the unit is white unless an asterisk appears.
          Column 1   Column 2   Column 3   Column 4

Row 1     W          I-SW       N-SE       W
Row 2     N-NE       N-SW       N-NW*      I-NW
Row 3     I-SE       I-NW*      N-NE       N-SW
Row 4     W          N-NW       I-NE       W
NW means upper left, NE means upper right, SW means lower left, and SE means lower right.
The two units marked with an asterisk are navy-and-icy-blue HSTs:
- Row 2, Column 3: navy toward the upper-left corner, icy blue in the opposite triangle
- Row 3, Column 2: icy blue toward the upper-left corner, navy in the opposite triangle
All other marked units are paired with white. Check the diagram on PDF page 8 before sewing. The placement of the central triangles creates the pinwheel effect, while the surrounding triangles form the eight outer points.
Sew the Four Rows
- Arrange the four units for Row 1 and check their colors and diagonal directions.
- Place the first two units right sides together and sew using a 1/4-inch seam allowance.
- Join the remaining two units, then sew the pairs together to complete the row.
- Repeat for Rows 2, 3, and 4, following the arrangement above.
- Press the short joining seams open to reduce bulk near the center.
- Measure every completed row.
Row checkpoint: Each row should measure 12 1/2 x 3 1/2 inches unfinished.
Join the Rows and Complete the Pinwheel
- Place Rows 1 and 2 right sides together, matching the vertical seams.
- Pin the intersections and sew the rows together.
- Repeat with Rows 3 and 4.
- Each two-row section should measure 12 1/2 x 6 1/2 inches.
- Arrange the two sections with their right sides facing up.
- Check that the navy and icy-blue triangles converge at the middle and that the white inner wedges match the PDF diagram.
- Place the sections right sides together.
- Match and pin the center seam intersection where the diagonal triangles meet.
- Sew the sections together with a 1/4-inch seam allowance.
- Press the long seam open without stretching the diagonal fabric edges.
Star checkpoint: The completed pieced star should measure 12 1/2 x 12 1/2 inches unfinished.
Look at the eight outside points before adding the frame. The navy and icy-blue sections should alternate around the star. Two icy-blue tips stop at white inner wedges, matching the approved design.
Add the White Frame
- Sew one 1 1/2 x 12 1/2-inch white strip to each side of the star.
- Press toward the white frame.
- Measure the block. It should now be 14 1/2 inches wide and 12 1/2 inches tall.
- Sew one 1 1/2 x 14 1/2-inch white strip across the top.
- Attach the matching strip across the bottom.
- Press the completed block flat, keeping the star points and seam allowances intact.
Finished corner-star checkpoint: Each framed block should measure 14 1/2 x 14 1/2 inches unfinished and finish at 14 inches square.
Make four matching blocks and label them S1, S2, S3, and S4. Install all four in the same orientation shown on PDF page 8. Do not rotate or mirror individual stars when assembling the quilt top.
The finished blocks should have eight pointed patchwork blades, a small pinwheel effect at the center, and an even white frame around each star.
Make the Blue and White Irish Chain Squares
Now we'll make the diagonal chains that surround the stars. Instead of sewing separate nine-patch blocks, we're using individual squares arranged in four large sections.
You'll need 392 squares altogether, and every one is cut 2 1/2 inches square. Once sewn into the quilt, each square finishes at 2 inches.
Count the Chain and Background Squares
- 72 navy squares
- 24 icy blue squares
- 296 creamy white squares
These are the squares for the four open patchwork sections. They do not include the extra navy and white squares already sewn into the large center star's setting corners.
You'll make four sections:
- T: the top strip, 14 squares across and 7 rows down
- L: the left strip, 7 squares across and 14 rows down
- R: the right strip, 7 squares across and 14 rows down
- B: the bottom strip, 14 squares across and 7 rows down
Each section contains 98 squares.
Read the Irish Chain Layout Maps
In the maps below, N means navy, I means icy blue, and W means white. The row numbers tell you where each row belongs in the complete quilt.
Lay out the squares before sewing them, and keep a small numbered label at the left end of each row. Don't swap a navy and an icy blue square just because both are blue. Their placement is what makes the chain pattern look right.
Section T: Top Irish Chain Strip
Make seven rows with fourteen squares in each row. The first square in each line is at the left side of the strip.
        Columns 08 through 21

01  N W N W W W W W W W W N W N
02  W N W W W W W W W W W W N W
03  I W N W W W W W W W W N W I
04  W W W I W W W W W W I W W W
05  W W W W N W W W W N W W W W
06  N W N W W I W W I W W N W N
07  W N W W W W N N W W W W N W
- Lay out Row 01 using the fourteen squares shown.
- Sew the squares together from left to right using 1/4-inch seams.
- Press the seams toward the left.
- Repeat for Rows 02 through 07, pressing even-numbered rows toward the right and odd-numbered rows toward the left.
- Each finished row should measure 28 1/2 x 2 1/2 inches.
- Join Row 01 to Row 02, nesting the seams where the squares meet.
- Add the remaining rows in order.
- Press the long joining seams and measure the completed strip.
Top-strip checkpoint: Section T should measure 28 1/2 inches wide and 14 1/2 inches tall.
Label it T and set it aside. The two navy squares next to each other near the lower middle are intentional. They help form the point of the chain arrangement around the star.
Section L: Left Irish Chain Strip
The left section has fourteen rows with seven squares in each row.
        Columns 01 through 07

08  W N W W W W W
09  I W N W W W N
10  W W W I W N W
11  W W W W N W W
12  W W W N W N W
13  W W N W W W I
14  W N W W W W W
15  W N W W W W W
16  W W N W W W I
17  W W W N W N W
18  W W W W N W W
19  W W W I W N W
20  I W N W W W N
21  W N W W W W W
- Lay out Row 08 using seven squares.
- Sew the seven squares into one row with 1/4-inch seams.
- Repeat for Rows 09 through 21.
- Each completed row should measure 14 1/2 x 2 1/2 inches.
- Press even-numbered rows toward the right and odd-numbered rows toward the left.
- Join the fourteen rows in numerical order, matching the intersections.
- Press the completed section without stretching the diagonal seams.
Left-strip checkpoint: Section L should measure 14 1/2 inches wide and 28 1/2 inches tall.
Label the top edge of the strip L-Top. That keeps the chain arrangement facing the right direction when you assemble the quilt.
Section R: Right Irish Chain Strip
The right section is the mirror image of the left section, but you'll still want to follow its own map. Don't turn the left section over and use the same arrangement.
        Columns 22 through 28

08  W W W W W N W
09  N W W W N W I
10  W N W I W W W
11  W W N W W W W
12  W N W N W W W
13  I W W W N W W
14  W W W W W N W
15  W W W W W N W
16  I W W W N W W
17  W N W N W W W
18  W W N W W W W
19  W N W I W W W
20  N W W W N W I
21  W W W W W N W
- Lay out the seven squares in Row 08.
- Sew them together with 1/4-inch seams.
- Make Rows 09 through 21 according to the map.
- Press the seams in alternating directions, just as you did for the left section.
- Join the rows in numerical order.
- Measure the completed strip before setting it aside.
Right-strip checkpoint: Section R should measure 14 1/2 x 28 1/2 inches.
Label it R, with Row 08 at the top.
Section B: Bottom Irish Chain Strip
The bottom strip is seven rows tall and fourteen squares wide, just like the top strip. The arrangement is reversed vertically, so follow this map instead of turning the top section upside down.
        Columns 08 through 21

22  W N W W W W N N W W W W N W
23  N W N W W I W W I W W N W N
24  W W W W N W W W W N W W W W
25  W W W I W W W W W W I W W W
26  I W N W W W W W W W W N W I
27  W N W W W W W W W W W W N W
28  N W N W W W W W W W W N W N
- Lay out Row 22 with fourteen squares.
- Sew the row from left to right using 1/4-inch seams.
- Repeat for Rows 23 through 28.
- Press alternating rows in opposite directions.
- Join all seven rows in order, matching the seams.
- Check the position of the icy blue squares before pressing the complete section.
Bottom-strip checkpoint: Section B should measure 28 1/2 x 14 1/2 inches.
Check All Four Chain Sections
Before sewing the quilt top together, count your completed sections:
- Top strip T: 98 squares
- Left strip L: 98 squares
- Right strip R: 98 squares
- Bottom strip B: 98 squares
- Total: 392 squares
The four sections should contain exactly 72 navy, 24 icy blue, and 296 white squares.
If a diagonal chain looks broken, compare that row to its map. One square in the wrong position can interrupt the design. It's much easier to move it now than after the large quilt sections are joined.
Keep the four sections flat and labeled until you're ready for final assembly.
Assemble the Quilt Top in Three Bands
Now we can bring all those pieces together. You've already done the detailed sewing, so the next job is to arrange the stars and chain sections in the right places.
Spread the completed pieces on a clean floor or design wall. Put the large star in the center, with two smaller stars above it and two below it. The four Irish chain sections fill the spaces between the stars.
Quilt Assembly Layout
Use this map to arrange the nine completed sections:
        UPPER BAND

   S1       T        S2
  14"      28"      14"


        MIDDLE BAND

   L        C        R
  14"      28"      14"


        LOWER BAND

   S3       B        S4
  14"      28"      14"
Assembly key:
- S1: upper-left corner star
- S2: upper-right corner star
- S3: lower-left corner star
- S4: lower-right corner star
- T: top Irish chain strip
- L: left Irish chain strip
- C: large center star
- R: right Irish chain strip
- B: bottom Irish chain strip
The finished widths in each band add up to 56 inches. Once the three bands are joined, the quilt center will measure 56 inches square, plus the outer seam allowances.
Step 1: Sew the Upper Band
- Place corner star S1 on the left, top chain strip T in the middle, and corner star S2 on the right.
- Check that the top edge of T is facing up and both stars have their points in the correct direction.
- Place S1 and T right sides together, matching the 14 1/2-inch edges.
- Pin at the ends and along the seam, then sew using a 1/4-inch seam allowance.
- Press the seam toward the corner star.
- Attach S2 to the opposite end of T.
- Press toward S2 and measure the entire band.
Upper-band checkpoint: The assembled band should measure 56 1/2 inches wide and 14 1/2 inches tall.
Step 2: Sew the Middle Band
- Place section L on the left, the large center star C in the middle, and section R on the right.
- Check that Row 08 is at the top of both side strips.
- Match the 28 1/2-inch edge of L to the left edge of the center star.
- Pin the corners, center, and chain intersections before sewing.
- Sew the two sections together with a 1/4-inch seam.
- Attach R to the right edge of the center star in the same way.
- Press the seams toward the center block where the seams will lie flat.
- Measure the complete middle band.
Middle-band checkpoint: The band should measure 56 1/2 inches wide and 28 1/2 inches tall.
Check the blue chain squares along both sides of the star. They should continue the pattern established by the center block's little chain-setting corners.
Step 3: Sew the Lower Band
- Place S3 on the left, bottom chain strip B in the middle, and S4 on the right.
- Keep Row 22 at the top of section B.
- Join S3 to B using a 1/4-inch seam.
- Add S4 to the other end.
- Press the seams toward the corner stars.
- Check the completed band's width and height.
Lower-band checkpoint: The band should measure 56 1/2 x 14 1/2 inches.
Step 4: Join the Three Bands
- Place the upper band above the middle band with their right sides facing up.
- Check that the chain squares line up across the joining edge.
- Place the bands right sides together, matching the ends and the vertical seams at 14 and 42 finished inches across the quilt.
- Pin at those points and at the chain intersections.
- Sew the full width with a 1/4-inch seam.
- Press the long joining seam open.
- Place the lower band beneath the joined sections, checking the chain arrangement again.
- Join the lower band using the same method.
- Press the completed quilt center from the wrong side, then turn it right side up and check the overall layout.
Completed patchwork checkpoint: Your quilt center should measure 56 1/2 x 56 1/2 inches, including seam allowances.
Take a good look before adding the borders. The large star should be centered, the four smaller stars should match, and the navy and icy blue squares should form the open diamond chains around the center.
If one section is too long or too short, check the seams before trying to stretch it into place. Getting the center square now will make the borders much easier to attach.
Add the Borders, Quilting, and Binding
We're ready for the borders. The icy blue strip is narrow, just enough to separate the white patchwork from the darker snowflake-print fabric. The navy border is wider and gives the whole quilt a finished winter look.
Step 1: Prepare the Inner Border
Use the eight icy blue strips cut 1 1/2 inches wide. Join two WOF strips end to end with a straight 1/4-inch seam to make each long border strip.
Press the joins open. You'll have four long strips to cut to these measurements:
- 2 side borders: 1 1/2 x 56 1/2 inches
- 2 top and bottom borders: 1 1/2 x 58 1/2 inches
- Measure the quilt center through the middle from top to bottom. The expected unfinished length is 56 1/2 inches.
- Mark the center of one 56 1/2-inch border strip and the matching center of the quilt edge.
- Pin the border to one side of the quilt, right sides together. Match the center, ends, and quarter points.
- Sew with a 1/4-inch seam allowance.
- Repeat on the opposite side.
- Press both seams toward the icy blue borders.
- Attach the two 58 1/2-inch strips across the top and bottom using the same method.
- Press and measure the quilt again.
Inner-border checkpoint: The quilt top should now measure 58 1/2 x 58 1/2 inches unfinished.
Step 2: Add the Navy Snowflake Border
Take the eight navy strips cut 5 inches wide. Join pairs end to end to make four long border strips.
Cut the assembled strips to these measurements:
- 2 side borders: 5 x 58 1/2 inches
- 2 top and bottom borders: 5 x 67 1/2 inches
- Place one 58 1/2-inch border along each side of the quilt.
- Match the center and ends of each strip to the corresponding quilt edge.
- Pin and sew using a 1/4-inch seam allowance.
- Press toward the navy fabric.
- Place the two 67 1/2-inch strips across the top and bottom.
- Pin, sew, and press the remaining seams.
- Lay the quilt top flat and check all four corners.
Final quilt-top checkpoint: The completed top should measure 67 1/2 x 67 1/2 inches before quilting and binding. The expected finished size is approximately 67 inches square.
Measure through the middle before attaching each pair of borders. If your quilt doesn't match the expected measurement, check the seams rather than pulling the border to fit.
Step 3: Prepare the Backing
You'll need a backing panel measuring approximately 76 x 76 inches.
- Cut two pieces of backing fabric measuring 40 x 76 inches each, using the full usable fabric width.
- Place the two pieces right sides together along their 76-inch edges.
- Sew with a 1/4-inch seam allowance.
- Press the seam open.
- The joined backing measures approximately 79 1/2 x 76 inches.
- Trim the backing to 76 x 76 inches.
- Press it flat and set it aside until you're ready to baste.
If you're having the quilt professionally quilted, check whether your quilter wants more backing fabric around the edges before trimming it.
Step 4: Layer and Baste the Quilt
- Spread the backing wrong side up on a clean, flat surface.
- Center the batting over the backing.
- Lay the quilt top right side up over the batting.
- Smooth the layers gently from the center outward.
- Check that the backing and batting extend beyond every edge of the quilt top.
- Baste using quilting pins, thread basting, or your preferred method.
With a 76-inch backing and batting, you'll have approximately 4 1/4 inches extending beyond each side of the unquilted top.
Step 5: Quilt the Layers
I'd keep the quilting around the star points fairly simple because the patchwork already has plenty of detail. You can outline the star pieces and add a little more decorative quilting in those larger white spaces.
Start by stabilizing the major joining seams and the inner border. Then quilt across the star sections, chain squares, and open background.
Some options that suit this quilt include:
- Stitching along the diagonal Irish chains
- Outlining the center and corner stars
- Gentle feather quilting in the white background
- Simple loops or curved quilting across the quilt
Check the batting manufacturer's recommended quilting distance before choosing the spacing between your quilting lines.
Once the quilting is complete, trim the excess batting and backing even with the quilt top. Take care not to cut into the pieced star points or their seam allowances.
Step 6: Make the Double-Fold Binding
Use the eight white fabric strips cut 2 1/2 inches wide. The white binding gives the navy snowflake border a neat finish around the outside.
- Place two binding strips right sides together at right angles, overlapping their ends.
- Sew diagonally across the overlap.
- Trim the seam allowance to 1/4 inch and press it open.
- Continue joining all eight strips into one long binding strip.
- Fold the strip in half lengthwise with wrong sides together.
- Press the entire length, keeping the raw edges aligned.
The joined binding should provide approximately 302 1/2 inches before the final trimming. The quilt perimeter is approximately 268 inches, leaving extra length for the corners and joining the binding ends.
Step 7: Attach the Binding
- Begin along one side of the quilt, away from a corner.
- Place the binding against the quilt front with the two raw edges aligned with the quilt's outer edge.
- Leave an unsewn starting tail approximately 8 inches long.
- Sew with a 1/4-inch seam allowance.
- Stop 1/4 inch before the first corner and secure the stitching.
- Fold the binding upward at a 45-degree angle, then fold it down along the next edge to form a miter.
- Continue sewing around the remaining sides, repeating the fold at each corner.
- Stop with enough unsewn space to join the two loose binding tails.
- Lay the tails flat along the quilt edge. Overlap them by the binding strip width of 2 1/2 inches and trim away the excess.
- Open the tails and join them diagonally, right sides together.
- Trim the joining seam to 1/4 inch, press it open, and refold the binding.
- Finish sewing the remaining section to the quilt front.
- Fold the binding around the edge to the back of the quilt.
- Secure it by hand or machine, making neat mitered folds at the corners.
Give the finished quilt a final check. The center star should lie flat, the chains should follow their diagonal paths, and the binding should sit evenly around the edges.
The expected finished measurement is approximately 67 x 67 inches. Quilting and washing may change the final measurement slightly.
Download the Free Blue and White Irish Chain Quilt Pattern PDF
Would you rather have the cutting charts and block diagrams beside your sewing machine? The printable pattern puts everything together in one file, including the full-size templates and the exact square-by-square Irish chain layout.
The 37-page printable pattern includes:
- Complete fabric cutting charts
- Half-square triangle instructions
- Diagrams for all four corner stars
- Corrected pinwheel corner-star construction with navy, icy blue, and white HSTs
- Full-size corner-star triangle template on page 24
- Corner-star image-to-pattern comparison on page 37
- Step-by-step instructions for the 92-piece center star
- Full-size templates for the mirrored icy blue chevrons and white V wedges
- Long navy point construction and all four corner-module diagrams
- Central pinwheel piecing and orientation instructions
- Exact Irish chain placement maps
- Three-band quilt assembly instructions
- Border, backing, quilting, and binding directions
- Full-size printable templates
- Measurement checkpoints and troubleshooting tips
Download the Free Blue and White Irish Chain Quilt Pattern PDF
How to Print the Quilt Templates
- Open the PDF and choose Print.
- Select U.S. Letter paper, measuring 8 1/2 x 11 inches.
- Choose Actual Size or 100% scaling.
- Turn off Fit to Page, Shrink to Fit, and any automatic scaling.
- Print one template page first.
- Measure the one-inch calibration square in both directions with a ruler.
- If the square doesn't measure exactly one inch, correct the printer settings before cutting fabric.
- The long white frame templates on pages 29 and 30 are tiled across two sheets. Match their printed registration crosses and tape the pages together before cutting.
The solid outer lines on the templates show where to cut. The dashed inner lines are sewing lines. Matching marks and grainline arrows help keep the fabric pieces aligned.
You can use rotary-cutting measurements for the ordinary squares and rectangles, but the center-star chevrons need their full-size templates. You'll find the A white setting pieces on PDF page 21, the B icy blue chevrons on page 22, and the C white wedges on page 33. The long-point module layout is on page 34, with additional cutting templates on page 35.
Pages 23 through 25 provide direct-cut triangle templates if you'd rather use them instead of the oversized-square HST method. Choose one method for each group so you don't cut duplicate pieces.
Keep the layout maps nearby while you sew the chain sections. There are quite a few little squares, and the chart makes it much easier to keep them in the right order.
Frequently Asked Questions
Can I make this Irish chain quilt with solid blue fabrics?
Yes. You can replace the snowflake prints with solid navy and icy blue fabric without changing the cutting instructions. The quilt will have a more traditional look, and the different shades of blue will still show off the stars and chains.
Why are the Irish chains made from individual squares instead of nine-patch blocks?
The chain squares need to fit around the large 28-inch center block and the smaller 14-inch corner blocks. Sewing them into four measured sections keeps the diagonal pattern in the right places. It also leaves those larger white background areas around the stars.
Do I need a special ruler to make the half-square triangles?
No. A regular quilting ruler with a 45-degree marking works for trimming the HSTs. You'll also find printable templates in the PDF if you'd rather cut the triangle shapes directly.
What if my quilt blocks measure a little smaller than the pattern?
Check the seam allowance before trimming anything. The pattern uses a consistent 1/4-inch seam, and even a small difference can affect the finished size. If the pieces are already sewn, check whether a seam can be corrected rather than trimming every block smaller.
Can I have this quilt professionally quilted?
Yes. You can piece the quilt top yourself and have a longarm quilter finish the quilting. Ask how much extra backing and batting your quilter needs before trimming those layers. You can also finish the binding yourself afterward if you prefer.
Can I change the border fabric without changing the quilt size?
Yes. Choose another fabric for the outer border, but keep the same cutting widths. The narrow inner border finishes at 1 inch, and the outer border finishes at 4 1/2 inches. Keeping those measurements preserves the quilt's expected 67-inch finished size.
When you click on links to various merchants on this site and make a purchase, this may result in this site earning a commission. This does not affect the price you pay.

UBGI Gold Standard 2026
Reviewed under the site's
editorial checklist.
Photos, decorating ideas, party setups and reader submissions are shared for inspiration unless a page is specifically presented as a pattern, tutorial, reference guide or step-by-step project. Follow the instructions, measurements, safety guidance and manufacturer directions provided for the particular project or product.
About Jan | Contact | Baby Nursery Ideas (Blog) | Site Map | Privacy Policy | Disclosure Policy | Disclaimer | Affiliate Disclosure | Earnings Disclosure | Facebook | Pinterest
I am a participant in the Amazon Services LLC Associates Program, an affiliate advertising program designed to provide a means for us to earn fees by linking to Amazon. As an Amazon Associate I earn from qualifying purchases.
Copyright © 2006-2026. All Rights Reserved.