Baby Handprint Santa Claus Craft With Free Printable Template
By Jan Bay
This Baby Handprint Santa Claus Craft turns one tiny handprint into Santa's beard beneath a cheerful face and bright red Christmas hat. Use the free printable template to add the finishing details, then make a framed keepsake for baby's first Christmas or a handmade card for grandparents. The baby provides the handprint, and an adult completes the Santa design.
Explore More Baby Christmas Crafts and Keepsakes
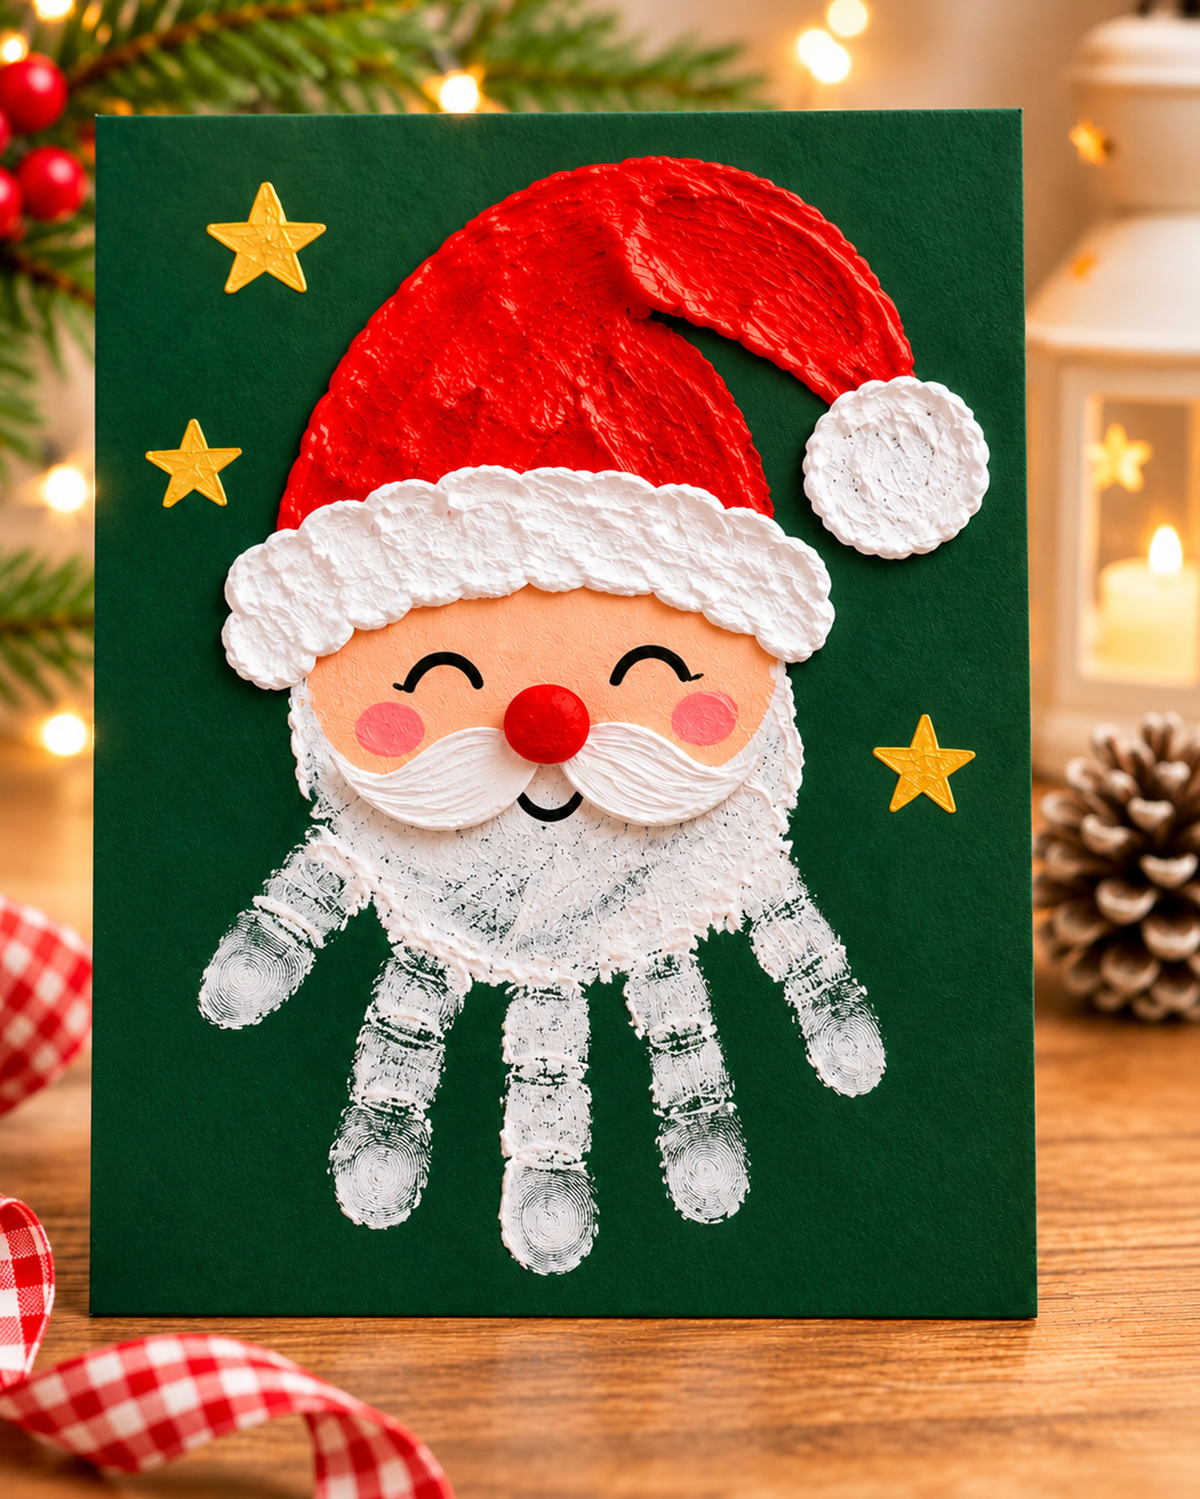
This styled example image shows the finished Santa design. Your baby's real handprint will have its own shape and paint texture, and that's exactly what makes the keepsake personal.
See Supplies for This Project Here.
Jump to a Section
Supplies for the Baby Handprint Santa Claus Craft
You won't need a big collection of craft supplies for this Santa. Start with dark green cardstock, white paint for the handprint, and a few colors for the face and hat. The handprint does the important work. Everything else turns it into Santa.
Here's what to gather:
- One sheet of dark forest-green cardstock, preferably 9 x 12 inches, to trim for an 8 x 10-inch finished print
- One extra sheet of paper for a practice handprint
- White washable finger paint specifically labeled for the child's age and intended hand contact
- A small sponge or soft brush for applying the handprint paint
- Red and peach cardstock or suitable craft paint for Santa's hat and face
- White cardstock or white craft paint for the hat trim, moustache, and pom-pom shape
- A black fine-tip marker for the eyes and smile
- Pink paint or colored paper for the cheeks
- A red paper circle or red paint for Santa's nose
- A gold paint pen for three small decorative stars
- The free Santa printable template below
- Scissors, pencil, and glue stick for the adult doing the assembly
- A soft washcloth and water for immediate hand cleanup
If you're framing the finished project, you'll also need an 8 x 10-inch frame with enough room for the paper layers. A frame with a mat or spacer is a good choice if you're using thicker paint.
I'd choose colored paper for the hat and face if you want neat edges without painting around the handprint. If you prefer the textured, painted look in the example image, use the printable pieces as tracing guides and paint those areas instead.
For the handprint, check the paint label carefully. Look for a washable finger paint intended for the baby's age and skin contact. The Art & Creative Materials Institute explains its AP certification for children's art materials, but an AP seal alone doesn't mean a product is intended for painting directly on skin. Follow the manufacturer's instructions, and don't substitute ordinary acrylic craft paint.
Keep the scissors, glue, paint containers, and paper cutouts with the adult. Baby's contribution is one quick handprint, followed by washing the hand. The decorating happens afterward.
Free Printable Santa Claus Handprint Template
I've included a free printable template so you don't have to draw Santa's hat, face, and moustache from scratch. It follows the design in the example image, with the long red hat, rounded peach face, fluffy white trim, and two curved pieces for his moustache.
Download the Free Baby Handprint Santa Claus Craft Template (PDF)
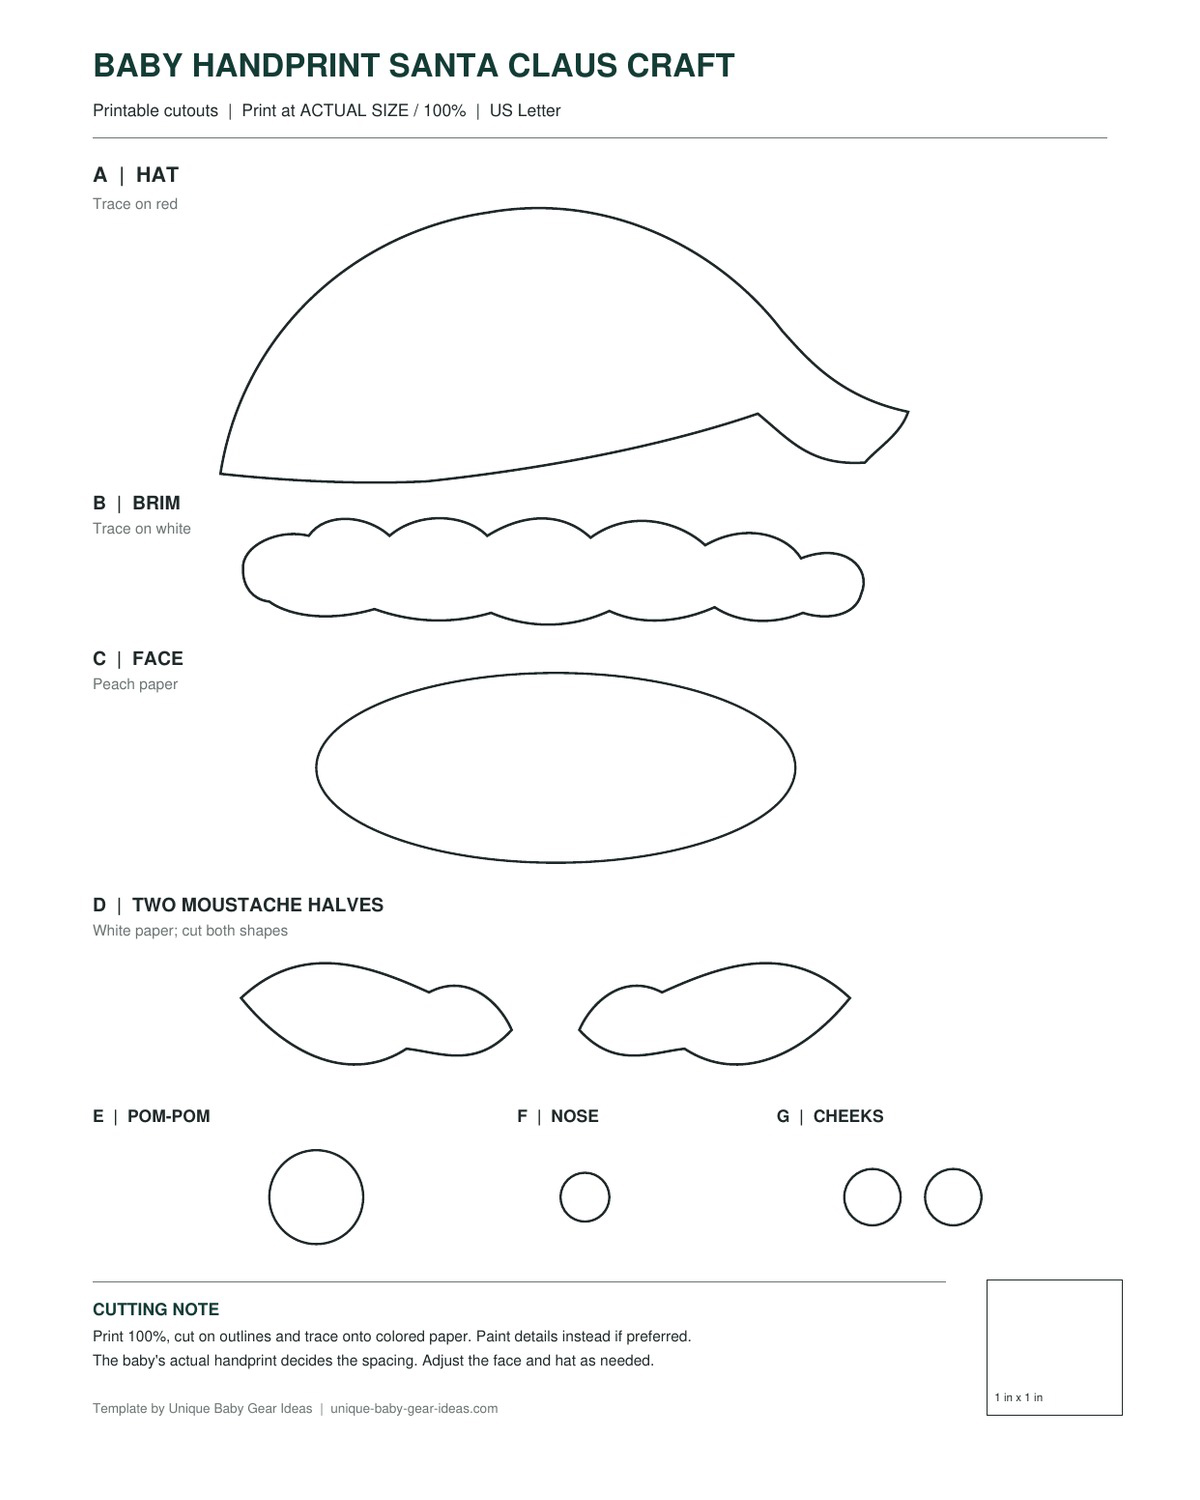
The PDF has two pages:
- Page 1: Full-size outlines for Santa's hat, brim, face, moustache, nose, cheeks, and pom-pom shape.
- Page 2: An illustrated placement guide showing how the pieces fit around the white handprint, with notes for the framed keepsake and Christmas card.
Print the first page on regular letter-size paper at 100% or Actual Size. Turn off any setting that says "Fit to Page" or "Shrink to Fit." There's a 1-inch test square near the bottom of the sheet so you can check that your printer hasn't changed the size.
The printed hat is approximately 5 inches wide, and the face is about 3 1/2 inches wide. Those are starting sizes, not measurements that every baby's hand must match.
Before cutting your colored paper, put the printed face and hat near the finished handprint. If they seem too large, reduce the printed pieces together or trim their edges a little at a time. Keep the face centered over the palm and the moustache just above the fingers.
I'd make the handprint first and fit the Santa pieces around it. Trying to make a baby's fingers fit a fixed drawing is doing things the hard way.
Two ways to use the template:
- Paper cutouts: Cut out the outlines, trace them onto colored cardstock, and glue the pieces onto your finished handprint.
- Painted Santa: Trace the shapes lightly onto the green cardstock after the handprint dries. Fill them with paint, then add the facial details.
The paper method is easier to control. The painted method gives you more of the textured handmade look shown in the finished example.
And don't worry about making both. Choose the method you prefer and use the same template either way.
Baby Handprint Santa Claus Craft: Step-by-Step Instructions
Now we're ready to make Santa. The order matters a little here. Get the white handprint onto the paper first, let it dry, and build the face and hat around it. That way, you'll know exactly where everything needs to go.
Step 1: Prepare Your Green Background
Lay your forest-green cardstock on a flat, protected surface. I would start with a 9 x 12-inch sheet and trim it after the artwork is complete. That gives you room to make small adjustments before choosing the final 8 x 10-inch area.
Keep the paper in portrait orientation. Santa's hat will be near the top, with the face underneath and the white handprint hanging down to form the beard.
If you're planning an 8 x 10-inch finished piece, leave about an inch of clear space beneath the fingertips and enough space at the top for the curved red hat.
Remember that the actual baby's handprint may be smaller than the one illustrated in the example image. Keep its real proportions. Adjust the surrounding Santa pieces instead of enlarging or reshaping the handprint.
Step 2: Make the White Baby Handprint
Have everything ready before bringing baby to the paper. Put a small amount of the appropriate washable white finger paint onto a clean sponge or soft brush. Keep a washcloth and water close by.
For an easier handprint, have one adult hold the baby comfortably while another adult handles the paint and paper.
- Use a little paint on a scrap of paper first to check that it makes an opaque white print.
- Apply a thin, even coat of the age-appropriate finger paint to the baby's palm and fingers, following the product directions.
- Position the hand so the fingers will point toward the bottom of the green cardstock.
- Gently place the palm onto the paper, then make light contact with each finger and thumb.
- Lift the hand straight away without sliding it across the paper.
- Wash and dry the baby's hand immediately.
Don't force the fingers open. If the baby is pulling away or closing a fist, stop and try another time.
Check your print: You should be able to recognize the palm and the separate fingers. A little uneven texture is fine. You don't need five perfectly straight fingers, and the thumb doesn't have to match the other side.
For the approximate layout shown in the example image, place the upper part of the palm about 3 1/2 to 4 inches below the top edge of the planned 8 x 10-inch artwork. Adjust that position for the actual hand size so there's room for the hat above and the fingertips below.
Allow the white paint to dry fully according to the product instructions before adding the paper pieces or painting around it.
Step 3: Add Santa's Peach-Colored Face
Cut out the oval face from the printable template and trace it onto peach-colored cardstock. If you're using paint instead of paper, use the same oval as a guide and fill the shape with peach craft paint after the handprint has dried.
Center the face across the upper portion of the white palm. The lower edge should overlap part of the palm, but the white fingers should remain visible beneath it.
Before gluing anything, place the red hat template above the face. Check that its white brim can cover the top edge of the oval without hiding too much of the cheeks.
If the baby's handprint is especially small, trim the face a little narrower. You want the Santa face to look connected to the beard, not like a separate circle floating above five fingers.
Once you're happy with the placement, attach the face with a thin layer of glue. If you painted the face, let that paint dry before going on.
Step 4: Make the Long Red Santa Hat
Trace the hat outline onto red cardstock and cut it out. The hat has a rounded upper section and a curved tip that hangs toward Santa's right side, as shown in the example image.
Place the hat above the peach face so its lower edge overlaps the top of the oval slightly. Check that the drooping end leaves room for the round white pom-pom shape.
Glue the hat in place.
If you're painting the hat: Trace the outline lightly in pencil, then fill it with red craft paint. Short brushstrokes can give it a slightly textured finish. Keep the curved tip recognizable rather than making the whole hat into one round red shape.
Now cut the white scalloped brim from the template. Place it horizontally across the bottom of the hat, covering the join between the red and peach pieces.
The brim should extend a little beyond the face on both sides.
Add the white pom-pom shape at the curved end of the hat. Use the printed circle as a paper cutout or paint a slightly textured white circle.
I'd skip a real fluffy pom-pom here. The white paper or painted circle keeps the finished artwork flat and easier to frame.
Step 5: Add Santa's White Moustache
The moustache is what gives this Santa his cheerful expression without covering the handprint beard.
Cut out the two white moustache pieces from the printable template. They're mirror-image shapes with curved outer ends and narrower inner ends.
- Place the left moustache half across the lower left side of the peach face.
- Place the right half across the lower right side.
- Bring the inner ends close together beneath the center of the face.
- Angle the outer ends slightly upward toward the cheeks.
- Glue them down after checking that the white fingers remain visible below.
Don't place the moustache too low. It should sit on the face just above the white palm and beard, not cover the upper ends of all five fingers.
For the painted version, trace the two shapes and fill them with white paint. A few short curved brushstrokes will give the moustache a feathered appearance. Let it dry before adding the nose.
Step 6: Finish Santa's Eyes, Nose, Cheeks, and Smile
Now give Santa his face. You only need a few details, so keep them simple.
Eyes: Use a black fine-tip marker to draw two small upward curves above the moustache. Space them evenly on either side of the center of the face. They're closed, smiling eyes, just like the ones in the example image.
Nose: Cut a small round nose from red cardstock using the printable circle, or paint a red circle in the middle of the face. Position it over the inner ends of the moustache, slightly above their center.
Cheeks: Add a pink circle on each side of the face, below the eyes and outside the moustache's inner ends. You can use pink paint or the two cheek templates.
Smile: Draw a short black curved line just below the red nose, peeking out between the moustache pieces. You only need a small bit of the smile showing.
Take a look before adding anything else. Santa should have a rounded face, two curved white moustache pieces, and a recognizable white handprint beard. If those elements look right, the expression is finished.
Step 7: Add the Gold Christmas Stars
The example design uses three small gold stars on the dark green background. They're there to finish the Christmas picture without competing with the handprint.
Use a gold paint pen to draw:
- One star in the upper left area beside Santa's hat
- One star farther down the left side
- One star to the right of Santa's face and beard
Give the stars five simple points and keep them small. They don't need to match exactly.
I'd stop at three. The red hat, peach face, and white beard already give you plenty of detail.
Painted stars are also easier to store than glued-on glitter or loose decorative pieces.
Step 8: Add the Baby's Name and Christmas Year
Before framing or turning the artwork into a card, add the baby's name and the Christmas year.
You can write them along the bottom in small letters if there's enough room, but I prefer putting the information on the back when the front is already nicely balanced.
Include:
- Baby's first name
- Age at the time of the handprint
- Christmas year
- The exact date, if you want a more complete keepsake record
Let every painted area dry completely. Then trim the paper to your planned size, keeping the Santa centered with some breathing room around the hat and fingertips.
That's your finished Santa. You can frame the original, use a smaller handprint to make a Christmas card, or make a printed copy for another gift.
Turn Your Handprint Santa Into a Framed Christmas Keepsake
If you're making this for baby's first Christmas, I'd give serious thought to framing the original handprint. It's a nice way to keep the artwork from getting bent or lost among the Christmas cards.
An 8 x 10-inch frame is a practical choice for the larger version of the craft. It leaves enough room for Santa's hat, face, and fingers without making the picture feel crowded.
How to Frame the Finished Santa
- Wait until the paint and glue are completely dry.
- Measure an 8 x 10-inch area around the finished Santa, leaving the design centered.
- Trim the cardstock carefully with a paper trimmer or scissors.
- Choose a frame with a mat or spacer if the paint or paper pieces are raised.
- Place the artwork against acid-free backing if you're planning to store it for many Christmases.
- Close the frame without pressing raised paint directly against the glass.
A light natural-wood frame would look pretty with the dark green background. White would work, too. I'd avoid a heavily decorated Christmas frame because Santa is already the centerpiece.
Keep the framed keepsake securely out of baby's reach, and don't hang it directly above the crib or changing area. It's a Christmas decoration to display and enjoy, not something for baby to handle.
For a first Christmas gift, you could add a small label with the baby's name and year underneath the artwork, inside the mat opening.
Or leave the front exactly as it is and write the information on the back.
Make a Second Copy for Grandparents
If you'd like to give this Santa to more than one grandparent, you don't have to make several handprints.
Photograph or scan the completely dry original artwork in even light, with the camera directly above it. Keep the entire design in the picture and avoid shadows across the white beard.
Print the copy on good-quality matte photo paper and place it in another frame. The original stays with you, and the gift still shows the baby's actual handprint from that Christmas.
Just label the copy as a reproduction if you're recording keepsakes. The original handprint is the irreplaceable part.
Make a Baby Handprint Santa Christmas Card
The same Santa design makes a Christmas card, and you don't need to invent a second project to do it. Just use a smaller background and fit the hat and face around the handprint.
I'd choose a folded 5 x 7-inch card. That's large enough for a smaller baby's handprint, provided the fingers and the hat can fit without being crowded.
Make the Card With a Fresh Handprint
Start with a 10 x 7-inch piece of sturdy cardstock. Fold it in half to make a 5 x 7-inch card. Keep the fold on the left.
Before applying paint, check the baby's hand against the card front without pressing it down. You need room for the entire handprint, the face, and the red hat.
If everything fits, follow these steps:
- Make a smaller white handprint on a separate piece of dark green cardstock, using the same method as the main project.
- Let the handprint dry completely.
- Reduce the printed Santa template pieces to fit around that handprint. Keep the hat, face, and moustache in the same proportions.
- Add the face, red hat, white brim, moustache, nose, eyes, and cheeks.
- Draw two or three little gold stars around Santa.
- Trim the completed artwork to fit the card front, leaving a narrow border.
- Glue it onto the folded card.
Don't shrink the actual handprint. If the baby's hand is too large for the smaller card, use the printed-copy method below instead.
Make a Card From the Original Artwork
This is the version I'd choose if you've already made the framed keepsake and don't want to repeat the handprint session.
Take a clear photograph or scan of the completed Santa. Reduce the picture to fit the front of a 5 x 7-inch folded card and print it on matte paper or cardstock.
Trim the picture, leaving a small white border, and attach it to the card front.
Inside, you could write:
Merry Christmas! A tiny handprint and a special Christmas wish, with love from [Baby's Name].
Add the Christmas year underneath.
The card version is especially nice for mailing because the printed copy lies flat. You can send several without making the baby participate in a whole afternoon of handprint crafts.
If you'd rather make a keepsake for the tree, my baby handprint Christmas ornament ideas include other ways to preserve a little handprint.
Tips for Making Baby Handprints Without a Big Mess
Getting the handprint is probably the least predictable part of the whole project. Babies don't know that you're trying to make a Christmas keepsake, and a perfectly timed open hand isn't something you can count on.
There are a few things I'd do before starting.
Get Everything Ready Before You Begin
Put the paper, paint, sponge, washcloth, and water within reach. Have a second adult help if possible.
You want to make the print, clean the baby's hand, and be finished with that part. The cutting and decorating can wait until later.
Use Less Paint Than You Think
Too much paint can fill the spaces between the fingers and turn the handprint into a white blob.
Start with a thin coating that covers the palm and fingers evenly. A scrap-paper test will tell you whether the paint gives enough coverage on the green cardstock.
For dark green paper, the white paint needs enough opacity to show the print clearly. Test the product on a scrap of the actual cardstock rather than assuming every white paint will look the same.
Don't Try to Straighten Every Finger
A baby's handprint doesn't have to look like a drawing of a hand.
If one finger leans slightly toward another or the thumb points outward, that's fine. Those little differences are part of the print.
Don't pull the fingers open or press harder to get a particular shape. If baby isn't cooperating, try again another time.
If the First Print Doesn't Work
Have an extra sheet of paper ready. If the first print smears or several fingers don't show, make another only if the baby is comfortable and you can follow the paint's directions for repeated use.
You can also take a usable white handprint made on separate paper, cut carefully around it after it dries, and attach it to the green background. That gives you more control over the placement without changing the handprint's shape.
I'd avoid painting over the entire handprint to make it look more regular. Once you start redrawing the fingers, you're losing the very thing that makes the keepsake personal.
Let the Artwork Dry Before Finishing
The white handprint needs to dry before you attach the face or moustache. Otherwise, the paper pieces can slide or pick up wet paint.
The same goes for framing. Thick paint may feel dry on the surface while still being damp underneath. Follow the product's drying instructions and allow more time if you've used heavier decorative paint.
Don't press the finished artwork between books while any paint is still damp.
Keep the Decoration Simple
The finished example uses a red hat, peach face, white beard, three gold stars, and a handful of facial details. You don't need to add cotton balls, glitter, beads, buttons, or extra decorations.
The white handprint should remain easy to recognize. That's the part you'll want to see when the keepsake comes out again next Christmas.
For other projects built around the baby's actual print, you'll find more ideas in my baby handprint crafts collection.
Baby Handprint Santa Claus Craft FAQs
Can I make a handprint Santa with a newborn?
You can make a keepsake using a newborn's hand, but don't assume ordinary craft paint is appropriate for direct skin contact. Check the product's age guidance and instructions first. If a paint product isn't specifically intended for the baby's age and use, skip the painted handprint. A contact-free print kit intended for newborns is another way to preserve the hand shape, although it won't produce the white painted print shown in this Santa design.
Why isn't my white handprint showing up clearly on green paper?
Some washable paints are more transparent than others, and dark cardstock makes that easier to see. Try the paint on a scrap of the same green paper before making the handprint. If it looks faint, choose a more opaque product that is specifically suitable for the child's age and intended hand contact. Don't use ordinary acrylic paint on the baby's skin to get a brighter result.
Can I make this craft without cutting out all the Santa pieces?
Yes. The printable shapes can be used as tracing guides instead of paper cutouts. Trace the hat and face onto the green cardstock after the handprint dries, then paint them. Add the white brim and moustache last, followed by the nose, eyes, cheeks, and stars. That gives you the painted version of the design without layers of colored paper.
What's the best way to keep the original handprint from fading or getting damaged?
Allow the paint and glue to dry completely, then store the artwork flat or frame it with acid-free backing. Keep it away from direct sunlight and damp storage areas. If the paint or paper details are raised, use a mat or spacer so the artwork doesn't press against the glass. A good scan or photograph also gives you a backup copy.
Can I use this Santa template with an older child's handprint?
Absolutely. You'll just need to fit the design around the larger print. Start with a bigger sheet of cardstock if necessary, and enlarge the face and hat together so they look balanced above the beard. Keep the actual fingers and palm the same size they were printed. The result may need a larger frame, but the construction stays the same.
Whether you frame the original or turn it into a Christmas card, be sure to add the baby's name and the year somewhere on the finished piece. Someday, that little white handprint will tell you exactly how small those fingers were at Christmas.
When you click on links to various merchants on this site and make a purchase, this may result in this site earning a commission. This does not affect the price you pay.

UBGI Gold Standard 2026
Reviewed under the site's
editorial checklist.
Photos, decorating ideas, party setups and reader submissions are shared for inspiration unless a page is specifically presented as a pattern, tutorial, reference guide or step-by-step project. Follow the instructions, measurements, safety guidance and manufacturer directions provided for the particular project or product.
About Jan | Contact | Baby Nursery Ideas (Blog) | Site Map | Privacy Policy | Disclosure Policy | Disclaimer | Affiliate Disclosure | Earnings Disclosure | Facebook | Pinterest
I am a participant in the Amazon Services LLC Associates Program, an affiliate advertising program designed to provide a means for us to earn fees by linking to Amazon. As an Amazon Associate I earn from qualifying purchases.
Copyright © 2006-2026. All Rights Reserved.