Baby Handprint Christmas Gift Wrap for Grandparents
By Jan Bay
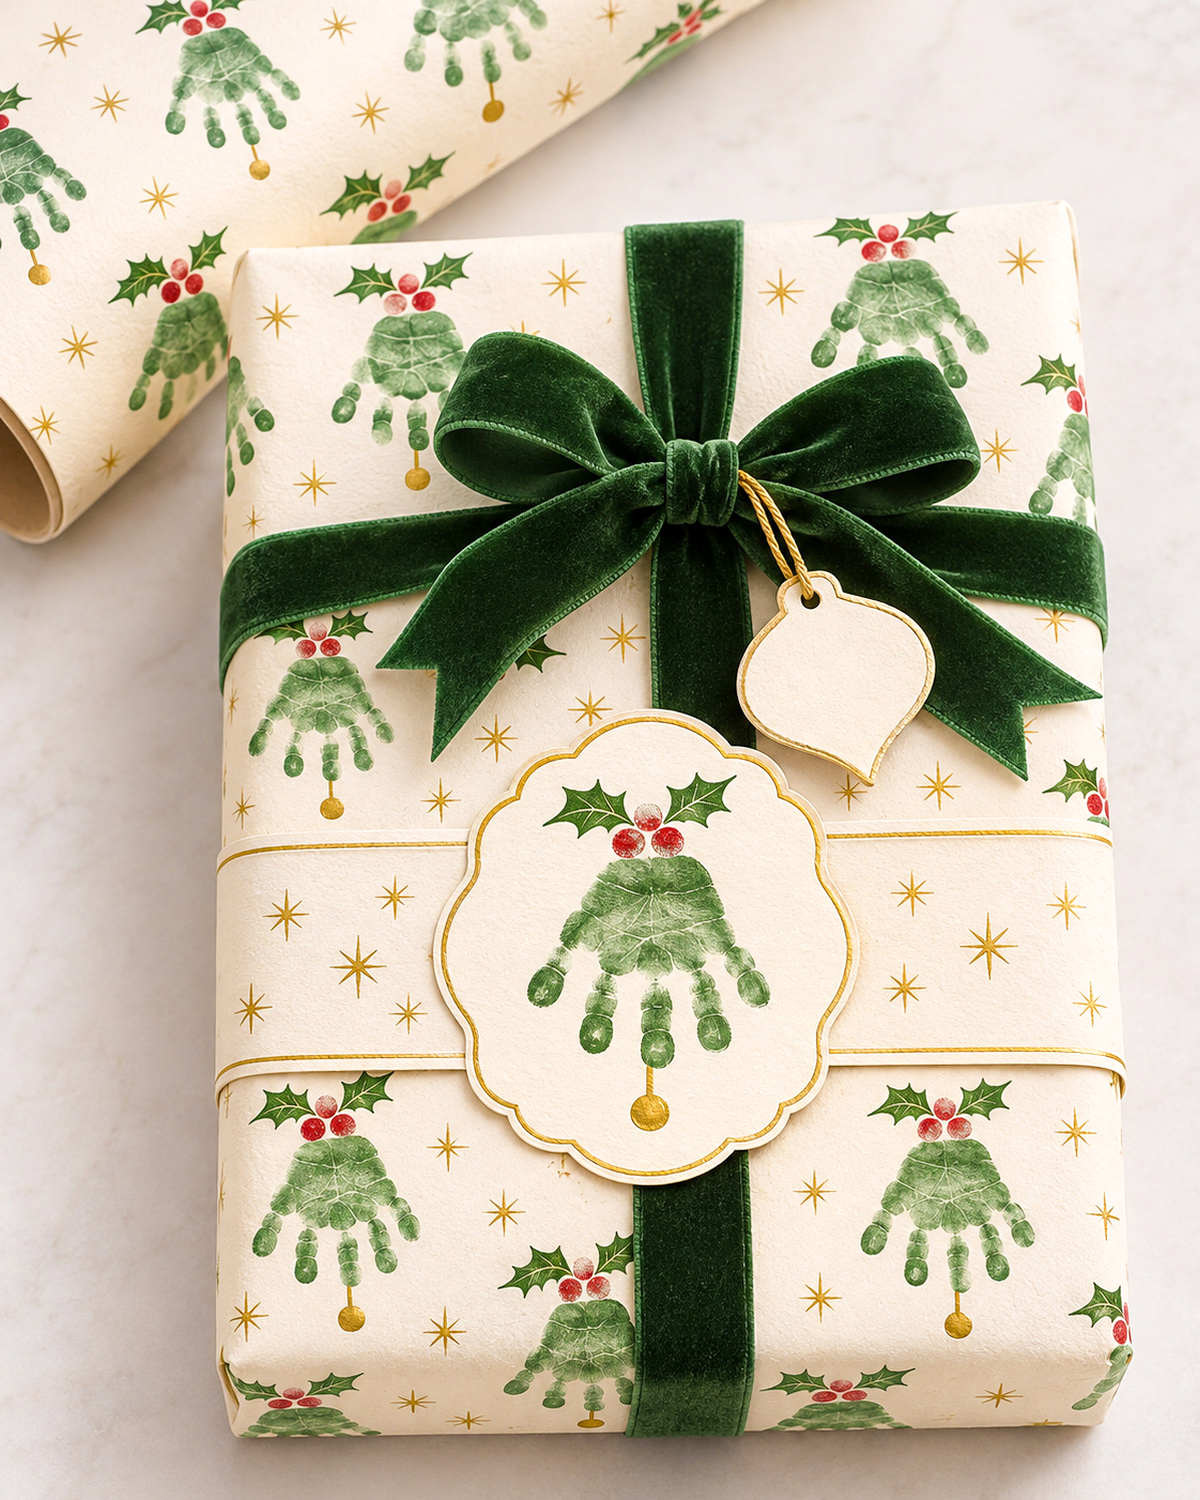
This Baby Handprint Christmas Gift Wrap turns those precious little handprints into a beautiful pattern of Christmas bells, complete with holly berries, tiny gold stars, and a matching keepsake label. I think Grandma and Grandpa might have a hard time deciding which they love more, the Christmas present or the paper it's wrapped in! It's such a personal way to wrap a gift, especially for baby's first Christmas. And while the present itself may eventually be forgotten, I wouldn't be surprised if that little handprint label finds its way into Grandma's keepsake box.
Explore More Baby Christmas Crafts and Keepsakes
Baby Christmas Crafts and Keepsakes
Baby Handprint Crafts and Gift Ideas
See Supplies for This Project Here.
Supplies for Baby Handprint Christmas Gift Wrap
You don't need a whole shopping cart of craft supplies for this project. The wrapping paper is really just baby's handprints dressed up for Christmas. The velvet ribbon and matching keepsake label make it look like something from a little specialty gift shop.
Here's what you'll need to make the wrapping paper shown in the example image:
- Ivory wrapping paper: Choose a plain, uncoated paper that will accept paint without smearing. A 24-inch-wide roll is a good starting point.
- Green handprint color: A washable product specifically labeled for the baby's age and intended skin-contact use, or a clean-touch baby print kit that keeps ink off the skin.
- Small foam brush: Only if your chosen skin-contact product's directions permit application with a brush.
- Red craft paint or marker: For the holly berries, applied by an adult after the handprints have dried.
- Dark green fine-tip marker: For drawing the little pointed holly leaves.
- Metallic gold paint pen: For the bell clappers, scattered Christmas stars, and decorative borders.
- Heavy ivory cardstock: For the matching handprint medallion, paper band, and gift tag.
- Scissors and a pencil: For cutting the paper and tracing the scalloped medallion.
- Forest-green velvet ribbon: About 3 yards of ribbon, approximately 1 to 1 1/2 inches wide, for the example gift size.
- Thin gold cord: For attaching the little ornament-shaped gift tag.
- Double-sided tape and removable adhesive dots: For wrapping the package and attaching the keepsake medallion.
- Scrap paper, a damp washcloth, and a towel: For practice prints, cleanup, and protecting your work surface.
How Much Wrapping Paper Will You Need?
For a gift box measuring about 10 inches long, 8 inches wide, and 3 inches deep, start with a sheet approximately 24 by 17 inches. Check the fit around your own box before decorating, since thicker boxes need more paper.
You'll also need a strip of ivory cardstock about 2 1/2 inches wide for the decorative band around the package. Measure around the gift and add an inch for overlap before cutting that strip.
I'd choose a medium-weight paper rather than something thin and glossy. It gives the handprints a nice painted appearance, and the gold details show up beautifully against the ivory background.
Keep the decorations simple. The handprints are supposed to be the stars of the show, and they'll have plenty of company once you add the holly and little gold accents.
How to Make Baby Handprint Christmas Gift Wrap Bells
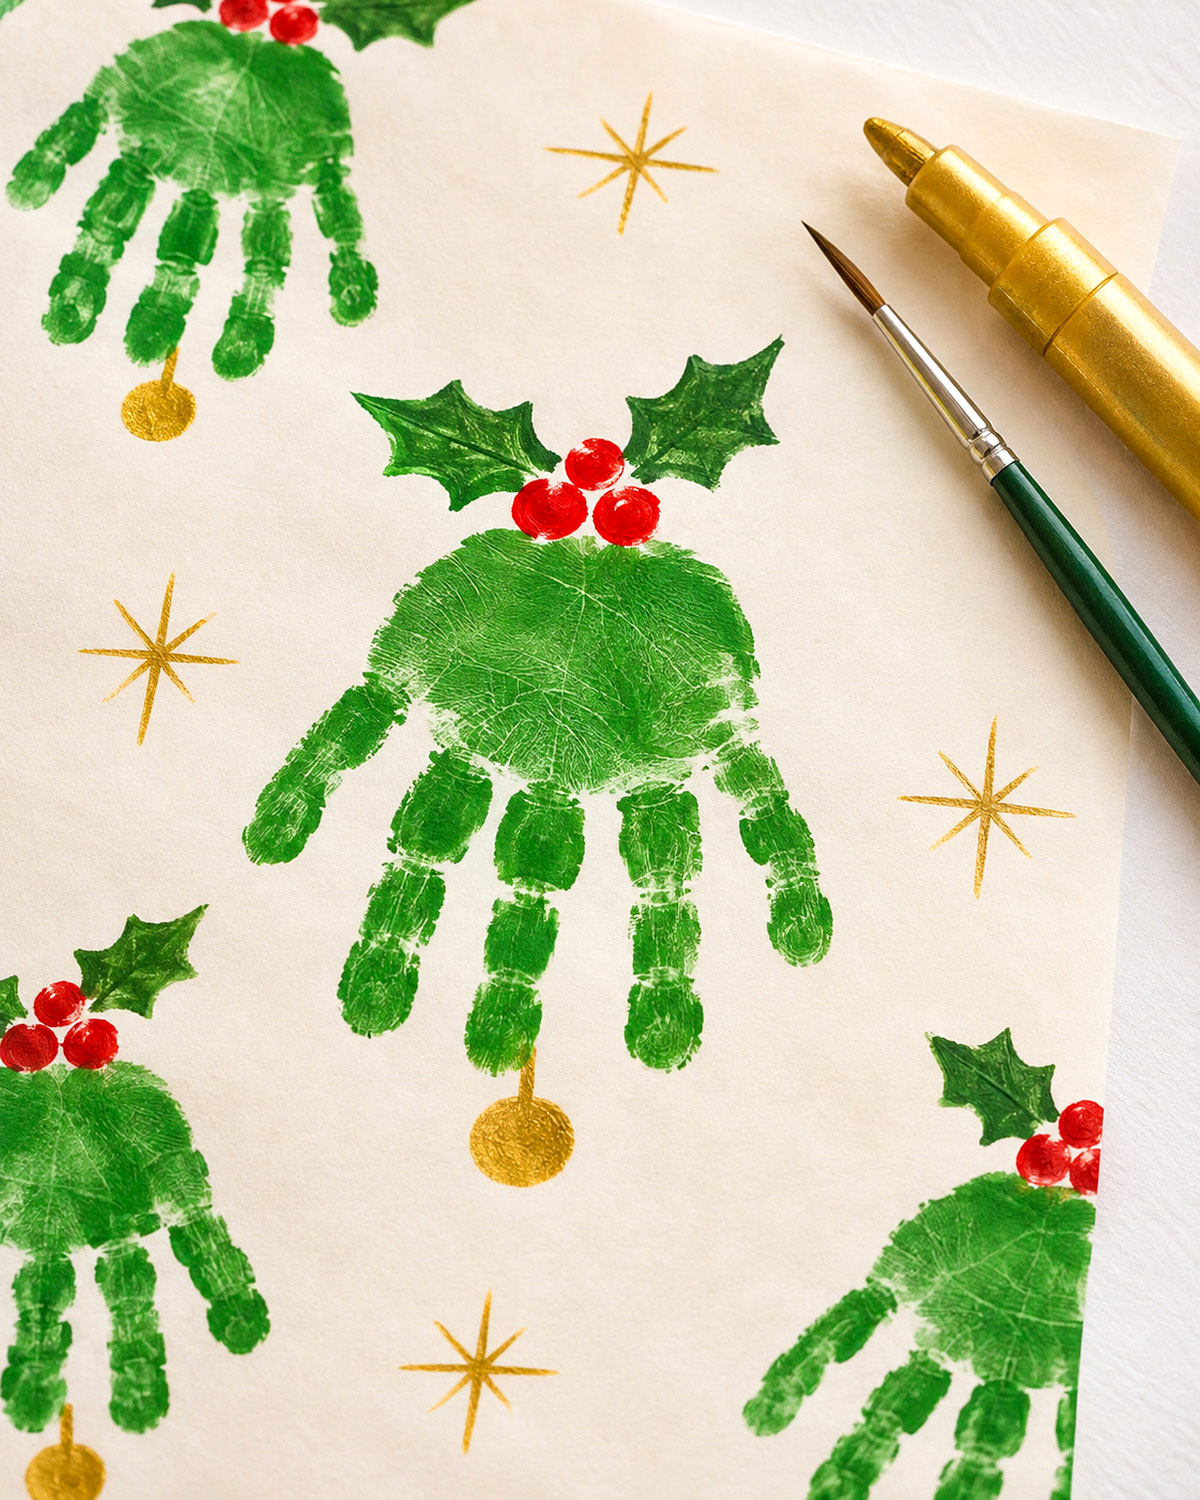
The Christmas bells are made from upside-down handprints. That means baby's palm becomes the rounded top of each bell, while those little fingers hang toward the bottom.
And yes, the thumb stays in the picture! Don't try to reshape the print to make it look like a perfectly ordinary bell. Part of the charm is being able to recognize baby's own hand.
Step 1: Get Your Paper Ready
Cut your wrapping paper to fit the gift box, leaving enough extra to fold around the ends. Spread it flat on a clean, protected table.
Before you start printing, decide roughly where the handprints will go. For the example design, arrange them in staggered rows, with every set of fingers pointing in the same direction.
Leave about 1 to 2 inches between the edges of neighboring prints, allowing more room if your baby's hand is larger. The finished paper should look like a repeating Christmas pattern rather than a crowded collection of overlapping hands.
Some prints will disappear around the sides and underneath the gift once it's wrapped. That's fine. You don't need to fill every inch.
Step 2: Make the First Handprint
I'd make the first print on a separate piece of ivory cardstock. That way, you can save it for the matching keepsake medallion before working on the larger sheet of wrapping paper.
- Choose a time when your baby is comfortable and willing to have a hand gently opened. Have another adult help if needed.
- Follow the directions for your chosen baby handprint product. If it requires direct skin contact, make sure the manufacturer specifically approves that use for your baby's age.
- If permitted by the product directions, spread a thin, even coat over the palm and fingers with a small foam brush. Don't use a thick layer.
- Bring the paper to the open hand or gently guide the hand onto paper supported by a firm, flat surface.
- Touch the palm and fingers down gently without pressing hard or sliding them sideways.
- Lift the hand straight away from the paper.
- Clean the baby's hand promptly according to the product directions.
Set that first print aside to dry. It will become the centerpiece of the gift label.
If the print is slightly crooked or one finger isn't perfect, don't worry about it. The point is to preserve the actual handprint, not to make every finger look as though it came out of a printing machine.
Step 3: Repeat the Prints Across the Wrapping Paper
For the hand-printed version, repeat the same method across the prepared wrapping sheet. Begin near one corner and work across the paper, leaving room around each print for the holly and gold details you'll add later.
A sheet for the example-sized gift might hold roughly 8 to 12 small handprints, depending on the baby's hand size and how closely you arrange them. There's no need to make that many if your baby doesn't want to cooperate.
An easier alternative: Make one good original handprint, then scan or photograph it straight from above. You can copy the image into a simple document, duplicate it into staggered rows, and have the finished pattern printed on ivory wrapping paper. Keep each copy at the original handprint size so it still represents baby's actual hand.
If your original came from a clean-touch ink kit, you can change the scanned print to green in a photo editor before printing. The decorative details can be added to the printed copies afterward.
For a large wrapping-paper sheet, a local print shop may be easier than a home printer. Ask whether the shop can print on an uncoated paper suitable for gift wrapping.
I'd choose the single-print method if the baby is very young or doesn't like having those little fingers opened repeatedly. One good handprint is plenty to make a whole sheet of personalized wrapping paper.
Step 4: Let the Handprints Dry
Before adding decorations, allow every painted print to dry completely according to the product's instructions. Keep the sheet flat and don't stack anything on top of it.
Check a small test area before handling the paper. If any color rubs onto a clean piece of scrap paper, give it more drying time.
You want the green to stay on the wrapping paper, not transfer to Grandma's hands when she opens her present!
Add Holly Berries and Gold Stars to the Handprint Bells
Now comes the decorating, and this is where those green handprints start looking like Christmas bells.
Look at the example image and you'll see that the decorations are very small compared with the handprint itself. That's what I'd aim for. A pair of holly leaves, three berries, and one gold clapper are enough to dress up each print.
Step 1: Add the Holly Leaves
At the top of each upside-down handprint, where the wrist ends, draw two small holly leaves with a dark green marker.
- Draw one pointed leaf angling toward the upper left.
- Draw a matching leaf angling toward the upper right.
- Give each leaf two or three small pointed notches along its edges.
- Fill the leaves with dark green, leaving a little room for a fine center vein if you like.
Keep the holly leaves small enough that the palm and fingers remain easy to recognize. Depending on the size of the handprint, leaves about 1/2 to 3/4 inch long will be a reasonable starting point.
Step 2: Paint Three Red Berries
Place three little red circles between the holly leaves, immediately above the green palm.
Use the end of a small brush or a fine-tip red paint marker to make the berries. Arrange them in a loose triangle, with two berries near the bottom and one just above.
Once the berries have dried, you can leave a tiny white highlight on one side of each berry if you want the glossy look shown in the example. A small untouched spot of ivory paper will do the job.
Step 3: Give Each Bell a Gold Clapper
Under the middle of the hanging fingers, draw one short vertical gold line with a small gold circle at the bottom.
For a typical baby-sized handprint, a line about 1/4 to 3/8 inch long and a circle about 1/4 inch across should look nicely proportioned. Adjust those measurements to suit the actual print.
The gold circle is the bell clapper. It gives the handprint its Christmas bell identity without covering the fingers or changing their shape.
Keep the circle separate from the fingertips, just as it appears in the finished design.
Step 4: Fill the Empty Spaces with Gold Starbursts
Draw a few small gold stars between the handprint bells. You can make each starburst with one vertical line, one horizontal line, and two short diagonal lines crossing at the center.
Vary their sizes a little. Some can be about 1/4 inch across and others closer to 1/2 inch.
I'd leave plenty of the ivory paper showing between the motifs. That little bit of breathing room is what keeps the finished wrapping paper looking pretty instead of busy.
When you're happy with the arrangement, let the red and gold details dry completely before moving on.
Make a Matching Baby Handprint Keepsake Medallion
Now, this is my favorite detail of the whole project. Instead of putting baby's handprints on wrapping paper that might get torn and thrown away, we're giving Grandma and Grandpa one special handprint they can save.
The scalloped medallion in the example image matches the wrapping paper, with the same green handprint bell, little holly leaves, red berries, and gold clapper.
It sits on a narrow ivory band across the present, just below that big green velvet bow.
Step 1: Prepare the Handprint Medallion
Bring out the original handprint you made on ivory cardstock earlier. Make sure it's completely dry before trimming.
For a small baby handprint, try a finished medallion about 4 to 4 1/2 inches across, provided the entire handprint, holly leaves, and gold clapper fit comfortably. Before cutting, check the proposed size against your gift box. If the handprint needs more room, enlarge the medallion rather than trimming or reducing the original print.
To create the scalloped shape:
- Place the cardstock on your work surface with the handprint facing upward and the fingers pointing down.
- Lightly draw a circle around the handprint, leaving enough room above the palm for holly leaves and below the fingers for the bell clapper.
- Use a small round lid or circle template to mark shallow, overlapping scallops around the outer edge.
- Cut carefully along the scalloped outline.
- Erase any remaining pencil marks.
If you have decorative scalloped-edge scissors or a large scalloped paper-cutting die, you can use those instead.
Just don't cut too close to the fingertips. I'd leave at least 1/2 inch of space around the finished design whenever the handprint size permits.
Step 2: Add the Matching Decorations
Decorate this handprint just like the ones on the wrapping paper.
- Draw two dark green holly leaves above the palm.
- Add three little red berries between the leaves.
- Draw a short gold line beneath the middle fingers and finish it with a round gold bell clapper.
- Let the decorations dry.
Now draw a narrow gold line following the scalloped edge of the medallion, approximately 1/8 inch inside the cut edge.
I'd use the same gold marker from the wrapping paper so all the decorative details match.
Step 3: Add the Keepsake Information
Turn the medallion over and write the baby's name, age, and Christmas year on the back.
You could write something as simple as:
Made with love by Emma
Baby's First Christmas 2026
Or write a personal message from the baby to Grandma and Grandpa.
Keep the front exactly as shown in our example, with the handprint and decorations taking center stage. There's no need to crowd it with lettering.
Step 4: Make the Ivory Paper Band
Cut a strip of ivory cardstock about 2 1/2 inches wide and long enough to wrap around the gift with approximately 1 inch of overlap.
If the paper isn't long enough, join two strips neatly with tape on the underside.
Draw a fine gold line near both long edges of the band, approximately 1/8 inch from each edge.
Set the band aside until the present is wrapped. You'll attach the keepsake medallion after adding the ribbon.
And remember, the medallion is meant to be saved. I'd attach it with two small removable adhesive dots behind its center, where it overlaps the ivory cardstock band. Test the adhesive on scrap cardstock first to make sure the medallion can be lifted away without tearing or damaging the paper.
Wrap Your Gift with the Finished Handprint Christmas Paper
You've made the special part. Now it's time to turn everything into the pretty Christmas package from our example.
I'd use a simple rectangular gift box for this design. You get a nice flat surface for the handprints, and the velvet ribbon looks especially pretty against the ivory paper.
Step 1: Wrap the Box
- Place the decorated wrapping paper face down on a clean table after all the paint and ink have dried.
- Center the gift box on the paper.
- Before making any folds, check which handprints will appear on the top of the gift. Adjust the box position if necessary.
- Bring the paper around the box, making a neat seam underneath.
- Secure the seam with double-sided tape.
- Fold the paper neatly at both ends and tape the folds underneath.
Try to keep at least two or three complete handprint bells visible on the top of the package. A few partial bells along the edges will make the wrapping look like a continuing pattern.
If you need to trim excess paper, do it before folding the ends. Too much paper can make the corners bulky.
Step 2: Add the Ivory Band
Wrap your prepared ivory cardstock band around the middle of the package, with the gold border lines running horizontally across the top.
Secure the overlap underneath the gift with double-sided tape.
This little band gives the keepsake medallion a place to sit and separates it visually from the handprints on the wrapping paper.
Keep the band smooth, without pulling it so tightly that the wrapping paper wrinkles.
Step 3: Tie the Green Velvet Ribbon
For the look in our finished example, use a rich forest-green velvet ribbon approximately 1 to 1 1/2 inches wide.
- Run a length of ribbon vertically around the gift, crossing the center of the top.
- Run another length horizontally around the upper portion of the gift.
- Bring the ribbons together where they cross, just above the ivory paper band.
- Secure the crossing and tie a generous bow, or attach a separately tied bow over the crossing point.
- Arrange the loops so they sit open and full.
- Trim the ribbon ends into neat angled or V-shaped cuts.
Keep the bow slightly above the center of the gift. That leaves enough room for the scalloped handprint medallion underneath.
If velvet ribbon won't hold the bow shape you want, tie the bow separately and fasten it securely around the ribbon crossing. A narrow piece of matching ribbon can hide the fastening.
There's no need to add greenery, extra ornaments, or anything else. The velvet and handprints already give the present plenty of Christmas charm.
Step 4: Attach the Keepsake Medallion
Center the finished scalloped medallion on the ivory paper band, just beneath the velvet bow.
Place two small removable adhesive dots on the back of the medallion, both within the area covered by the ivory paper band. Press it gently into place. Don't use permanent glue, since Grandma and Grandpa should be able to remove and save the original handprint.
Make sure the handprint faces the same direction as the bells on the wrapping paper, with the holly at the top and the gold clapper at the bottom.
Now you'll have that matching handprint detail from the example image, sitting right in the middle of the gift.
Step 5: Make the Little Ornament-Shaped Gift Tag
The last finishing touch is a small ivory gift tag trimmed in gold and hanging from the velvet bow.
- Cut a simple Christmas ornament shape from ivory cardstock, approximately 2 1/2 by 3 inches.
- Give it a rounded bottom, gently curved sides, and a small top where the ornament would ordinarily hang.
- Draw a thin metallic gold border around the edge.
- Punch a small hole near the top.
- Thread a short piece of gold cord through the hole.
- Tie the cord around the center of the velvet bow.
In our example, the front of the little ornament tag is left blank. You can write the recipient's name on the back or add a small message if you prefer.
And that's your finished gift!
It has the repeating baby handprint bells, tiny holly berries, scattered gold stars, ivory keepsake band, scalloped medallion, dark green velvet bow, and hanging ornament tag shown in the finished example.
I think this would be especially sweet wrapped around a framed family photograph, a small photo album, or another personalized Christmas gift for grandparents.
The wrapping becomes part of the present, which is exactly what makes this project worth the extra effort.
Baby Handprint Tips for a Pretty Result Without a Big Mess
Getting a good handprint from a baby can be the trickiest part of this whole project. The decorating and wrapping are easy enough to do whenever you have a little free time, but that tiny hand has its own ideas about cooperating!
My suggestion is to do the project in two parts. Make the original handprint when the baby is comfortable, then save the decorating and gift wrapping for later.
Choose Materials Carefully
Just because a paint says washable or non-toxic doesn't mean it's meant to be applied to a baby's skin.
Use a handprint product specifically labeled for the intended skin contact and your baby's age, following its directions. If you'd rather keep paint or ink completely off the baby's hand, choose a clean-touch baby printing kit that produces a paper impression without direct contact.
For more information, Poison Control's art-product guidance explains why reading labels and using art materials only for their intended purposes matters.
Keep all paint, pens, scissors, glue, ribbon, and other supplies out of the baby's reach. An adult should handle the decorative work.
Don't Force the Fingers Open
If your baby keeps curling those little fingers into a fist, stop and try again another time. You don't need to force the hand flat or keep repeating a print that isn't going well.
A clean-touch printing kit or a copy of one previously captured print is a perfectly good alternative.
And if the baby's hand has irritated skin, a rash, or broken areas, skip direct-contact printing rather than applying a product to those spots.
Have Cleanup Supplies Ready
Before making any direct-contact print, have a damp washcloth and a towel beside you. Wash the baby's hand promptly afterward according to the product's directions, and keep paint away from the eyes and mouth.
Don't use solvents or harsh cleaners to remove paint from skin. If irritation develops, stop using the product.
I'd also cover the table before starting. A sheet of scrap paper underneath the wrapping paper makes cleanup much easier.
Test the Paper Before Decorating the Whole Sheet
Make a small test print on a scrap of the same wrapping paper. Let it dry, then check whether the color smears, flakes, or transfers when you gently bend the paper.
If the paint cracks along the fold, try a thinner coat or a different paper. You want the finished wrapping to bend around the box without losing its decorated surface.
Test your gold marker, too. Some metallic markers bleed through thin paper or remain tacky longer than expected.
Keep the Keepsake Separate from the Wrapping
I'd make sure Grandma and Grandpa know the scalloped medallion can be removed and saved before they start opening the package.
Once Christmas is over, they can store it flat in an acid-free paper sleeve or an appropriate keepsake box. Don't laminate the original handprint if you want to preserve the option of using a different archival storage method later.
The wrapping paper itself can also be saved. A small square showing one complete handprint bell would make a lovely addition to a Christmas memory book.
One last precaution: The ribbons, cords, decorated wrapping paper, and finished gift tags are packaging and keepsakes, not baby toys. Keep them out of the baby's reach and away from the crib. Remove all packaging before giving the actual gift to a child.
Baby Handprint Christmas Gift Wrap FAQ
Can I make the wrapping paper with only one baby handprint?
Absolutely. Capture one good print on paper, scan or photograph it, and arrange copies into a repeating pattern. This may be the easiest way to make a full sheet of matching Christmas wrapping paper without asking the baby to make a dozen separate prints.
What if my baby is too young to open those little fingers?
Use a clean-touch infant print kit that keeps the marking material off the skin, or wait until you can capture the handprint comfortably. Don't force the baby's fingers open. Once you have a usable print, you can reproduce it as many times as you need for the wrapping paper.
Can I use brown kraft paper instead of ivory?
Yes, although I'd change the decorations a little. Dark green handprints and red berries look lovely on natural brown paper, but some gold markers don't show up as clearly. Test the colors first. For the finished design shown here, ivory paper gives you a closer match.
What if the handprint is too large for the scalloped medallion?
Make the medallion larger rather than shrinking the original print. It's meant to preserve the baby's actual hand size at that Christmas. You can also use a larger gift box if you want the proportions to look more like the example.
Can grandparents save the wrapping paper?
Of course! I'd suggest saving the scalloped medallion first, since it carries the original handprint and the baby's Christmas information. Then cut a section of wrapping paper with one complete decorated bell and store it flat. That way, even after the package has been opened, there's still a little piece of baby's Christmas artwork to keep.
If you'd like to turn another little handprint into something that can come out every December, have a look at my baby handprint Christmas ornament ideas.
And if Grandma decides that beautiful wrapping paper is far too precious to tear open, well, I suppose she'll just have to unwrap her present very carefully!
When you click on links to various merchants on this site and make a purchase, this may result in this site earning a commission. This does not affect the price you pay.

UBGI Gold Standard 2026
Reviewed under the site's
editorial checklist.
Photos, decorating ideas, party setups and reader submissions are shared for inspiration unless a page is specifically presented as a pattern, tutorial, reference guide or step-by-step project. Follow the instructions, measurements, safety guidance and manufacturer directions provided for the particular project or product.
About Jan | Contact | Baby Nursery Ideas (Blog) | Site Map | Privacy Policy | Disclosure Policy | Disclaimer | Affiliate Disclosure | Earnings Disclosure | Facebook | Pinterest
I am a participant in the Amazon Services LLC Associates Program, an affiliate advertising program designed to provide a means for us to earn fees by linking to Amazon. As an Amazon Associate I earn from qualifying purchases.
Copyright © 2006-2026. All Rights Reserved.