Free Snowman Quilted Baby Bib Pattern with Printable Templates
By Jan Bay
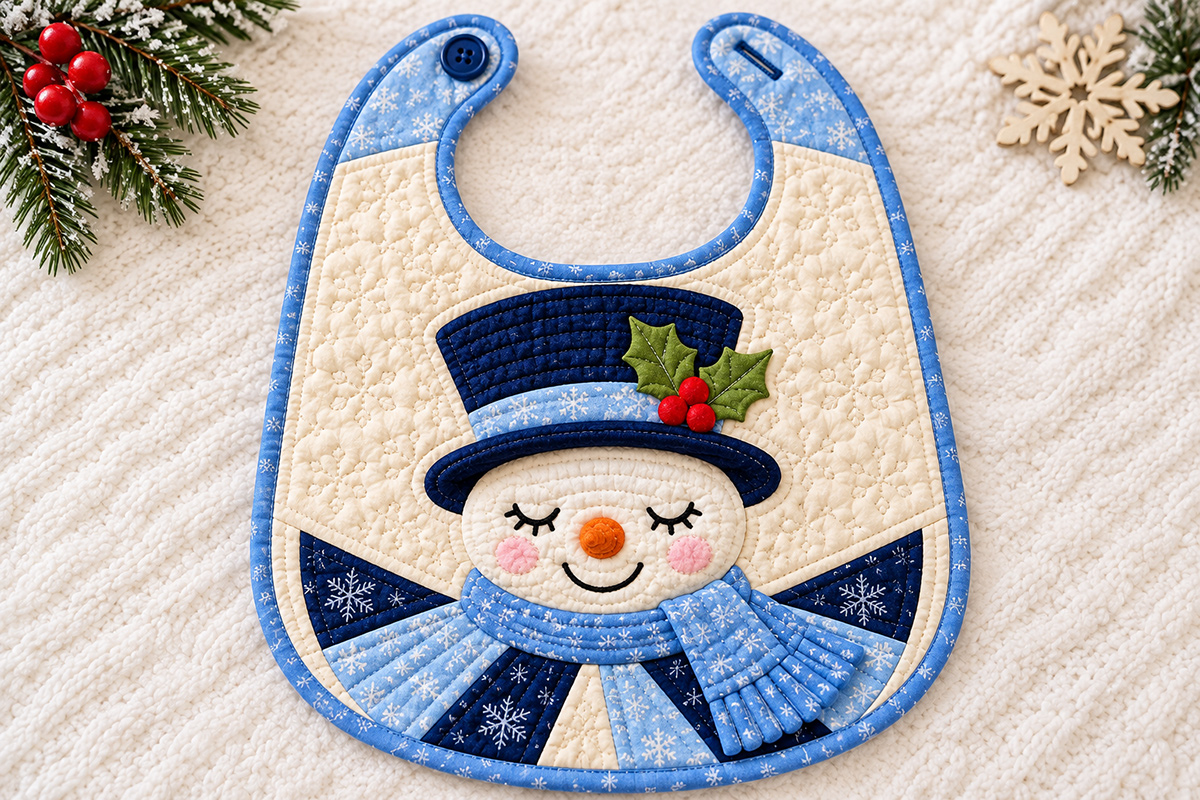
My free snowman quilted baby bib pattern is part of a set that brings together an ivory snowman with sleepy embroidered eyes, a navy top hat trimmed with holly, and a pretty blue scarf. A small pinwheel in navy, icy blue, and ivory fills the lower part of the bib without making the design too busy. I've included full-size printable sewing templates and step-by-step instructions for making the quilted appliqué bib with a generous U-shaped neckline and a button closure. The bib and matching quilt would make a precious baby shower gift.
Explore More Snowman and Baby Sewing Patterns
See Supplies for This Project Here.
Free Printable Snowman Quilted Baby Bib Pattern and Instructions
You can make this little snowman bib with ordinary quilting cotton, lightweight batting, fabric appliqué and a bit of embroidery. The pattern includes all the shaped pieces, so you won't have to guess how big to make the hat, scarf, snowman face or lower pinwheel.
I've separated the printable templates from the sewing instructions. That way, you can keep the instructions beside your machine without having to print every pattern page again.
Download the Full-Size Snowman Bib Templates (16-page PDF)
The template booklet includes the complete bib outline, separate neck straps, button placement, snowman appliqué pieces, scarf, holly, nine pinwheel wedges and embroidery guides.
Download the Complete Snowman Bib Sewing Instructions (5-page PDF)
The instructions cover cutting, appliqué, quilting, assembly, binding, the button closure and the optional snap alternative.
Want both printable files together? Download the complete pattern package below.
Download the Complete Snowman Bib Pattern Package (ZIP)
How to Print the Pattern at the Correct Size
Print the templates on US Letter paper. Choose Actual Size or 100% in your printer settings. Turn off Fit to Page, Shrink to Fit and any automatic enlargement.
Every template page has a one-inch test square. Measure both its width and height with a ruler before cutting anything. If the square doesn't measure exactly one inch in both directions, correct your printer settings and print again.
The full bib outline is divided into four pages:
A1: Upper left, including the left neck strap.
A2: Upper right, including the right neck strap.
A3: Lower left, including the left pinwheel placement.
A4: Lower right, including the remaining pinwheel and scarf placement.
Arrange A1 and A2 across the top, with A3 and A4 directly beneath them. Each page has a red trimming frame measuring 5 1/2 inches wide by 6 3/4 inches high.
Trim along those frames and join the matching edges without gaps or overlaps. Match the crosshairs before taping. The extra quarter-inch artwork outside the frames is there to help you check alignment. It isn't an extra seam allowance.
Once the four pages are joined, the entire bib outline should measure 10 3/4 inches wide by 13 inches long.
The separate appliqué templates are on pages 7 through 12. The nine pinwheel wedges are on pages 13 through 15. Page 16 contains the stitched fringe, berry and closure details.
One detail worth remembering: All appliqué templates are shown face up, exactly as the pieces appear on the finished bib. If you're tracing onto the paper backing of fusible web, reverse each shape before tracing. Don't reverse the printed placement map.
The appliqué pieces are cut on their printed outlines. No extra seam allowance is added. This is a raw-edge appliqué pattern, not a traditional pieced pinwheel block.
Materials and Fabric Supplies
I'd choose good-quality quilting cotton for this project. You want fabric that's soft enough for a bib but sturdy enough to hold the appliqué stitching and quilting.
Keep the ivory background fairly plain. The snowman already has a navy hat, green holly, red berries and a blue scarf, and the little pinwheel adds plenty of interest along the bottom.
A small white snowflake print on the blue binding would be pretty. I'd use that same fabric for the hatband and scarf if you want the colors to coordinate closely.
Fabric Requirements
Ivory cotton: One piece measuring at least 18 x 21 inches. This provides enough fabric for the 14 x 16-inch front working rectangle and the separate snowman-face appliqué.
Backing cotton: One piece measuring 14 x 16 inches. A fat quarter is sufficient.
Lightweight batting: One 14 x 16-inch piece of washable low-loft batting. You may also use approximately 12 x 12 inches of thin batting scraps for subtle relief beneath selected snowman pieces.
Navy quilting cotton: One fat quarter, approximately 18 x 21 inches. Use it for the hat crown, hat brim and five navy pinwheel wedges.
Light-blue quilting cotton: One fat quarter, approximately 18 x 21 inches. Use it for the hatband, scarf collar, two scarf tails, two neck-strap overlays and four light-blue pinwheel wedges.
Binding: At least 60 inches of prepared true-bias binding, allowing for joining and finishing. Choose light-blue snowflake-print cotton or another blue that coordinates with the scarf. The binding should cover approximately 1/4 inch on both the front and back when finished.
Small fabric scraps: Olive green for the two holly leaves and orange for the carrot nose.
Embroidery floss: Black for the eyes and smile, pink for the cheeks, red for the berries, and green for the holly veins. Ivory and matching blue thread are also useful for quilting and appliqué stitching.
Fusible web: Lightweight, sewable fusible web for holding the fabric shapes in position before stitching.
Closure: One smooth navy button measuring 1/2 inch across, plus matching thread. A suitable garment snap may be substituted if you prefer.
Reinforcement: Two lightweight interfacing patches measuring 1 x 1 inch each, one for each neck-strap closure position.
Tools You'll Need
Have your sewing machine, walking foot if available, buttonhole foot, scissors, ruler, iron, pressing cloth, fabric marker, hand-sewing needle, basting supplies and paper tape ready.
You'll also want a few fabric scraps for testing your appliqué stitch, binding and buttonhole before working on the actual bib.
Cutting List for the Snowman Appliqué
Cut one of each labeled fabric piece from the full-size templates:
Page B1: F, the ivory snowman face.
Page B2: H1, navy hat crown; H2, light-blue hatband.
Page B3: H3, navy hat brim; S1, light-blue scarf collar.
Page B4: S2, rear scarf tail; S3, front scarf tail.
Page B5: L1 and L2, olive-green holly leaves; N, orange carrot nose.
Page B6: T1 and T2, separate light-blue upper neck-strap overlays.
Pages C1 through C3: W1 through W9, the nine lower pinwheel wedges.
Page E: Embroidery and stitching guides only. These aren't additional fabric pieces.
There are 21 individual fabric appliqué pieces altogether, including the nine wedges. The red berries, pink cheeks, eyes, smile, holly veins and scarf fringe are embroidered, not separately cut fabric decorations.
Use the actual curved outlines on the templates rather than cutting rectangles to their bounding measurements. The snowman's face, for example, occupies approximately 4.22 x 2.80 inches, but its finished shape is a rounded oval rather than a rectangle.
Before you cut all your pieces, check that the fabric colors and their numbered positions agree with the master placement diagram. A couple of the pinwheel wedges look similar when they're lying on the cutting table, but they aren't interchangeable.
Snowman Baby Bib Size and Neckline Fit
The snowman bib is designed to have plenty of room across the front without looking like a little apron. The rounded bottom gives you useful coverage, while the two separate neck straps let the bib fasten behind the baby's neck.
The original design was digitally engineered to a raw outline measuring 10 3/4 inches wide by 13 inches long. The binding wraps around that outline rather than adding another quarter-inch to the outside measurements.
Pattern Measurements
Overall raw bib size: 10 3/4 inches wide by 13 inches long.
Maximum flat neckline width: Approximately 4 7/8 inches.
Neckline depth: Approximately 4 1/2 inches, measured from the highest strap tip to the deepest point of the U.
Coverage below the neckline: Approximately 8 1/2 inches.
Neck straps: Two separate curved tabs with rounded ends, each finished with binding.
Closure: A 1/2-inch button on the left tab and a matching buttonhole on the right tab, viewed from the front.
These measurements come from the digitally checked pattern. They're not measurements taken from a finished, washed bib.
Check the Neck Opening Before Cutting Your Good Fabric
I wouldn't skip a trial bib for this project. The neckline is one of those details that needs to work in real fabric, not just look right on paper.
Make a plain sample using inexpensive cotton and the same type of batting you plan to use for the finished bib. Bind the neckline and strap ends, then add a temporary closure at the printed marks.
Bring the right strap over the left behind a suitable fitting form and check the overlap. The straps should meet smoothly without being stretched, twisted or pulled tight enough to lift the front of the bib.
Measure the actual fastened neck opening with a flexible tape and compare it with a bib known to fit the intended wearer. The open U-shaped measurement isn't the same as the circumference after the bib is buttoned.
If the opening doesn't fit properly, don't try to make the fabric stretch into place. Adjust and retest the sample before cutting the decorative bib. Any change to the strap shape or closure placement needs a fresh fit check.
This is one prototype pattern size, not a pattern with a verified newborn, infant or toddler size range. Fit, comfort and fastening still need to be established with a sewn sample.
How to Sew the Snowman Quilted Baby Bib Pattern
The easiest way to put this bib together is to work from the background toward the snowman's face. Make the blue neck-strap sections and lower pinwheel first, quilt the main bib, then add the snowman's hat, face and scarf.
You'll finish by binding the entire bib and installing the button. That order keeps the decorative pieces out of your way while you're working around the neckline.
Step 1. Prepare the Main Bib Layers
Cut one 14 x 16-inch working rectangle from the ivory front fabric, one from the backing cotton and one from the low-loft batting.
Assemble the four master template pages, A1 through A4. Place the completed outline on the right side of the ivory front fabric with its vertical centerline aligned with the fabric grain.
Trace the entire bib outline with a removable fabric marker. Include both separate neck straps and the open U-shaped cutout.
Transfer the appliqué placement lines, fan wedge positions, strap-overlay boundaries, button center, buttonhole guide and snowman placement marks.
Don't cut the final bib shape yet. We're leaving extra fabric around it because quilting can draw the layers inward slightly. We'll trim to the exact outline after the background quilting is finished.
Step 2. Add the Blue Neck-Strap Sections
Find T1 and T2 on template page B6. Cut one of each from your light-blue cotton.
These pieces are different shapes, so don't cut two copies of the same one. Each is designed to match its own side of the curved neckline.
Before applying them, fuse a 1 x 1-inch lightweight interfacing patch to the wrong side of the ivory front fabric at each marked closure center. Round the patch corners so they don't create stiff, square edges inside the finished straps.
Position T1 on the left strap and T2 on the right, matching their upper and side edges to the printed outline. The lower edges should slope across the ivory fabric just as they do in the finished example.
Hold the blue pieces in place with lightweight fusible web. Stitch along the exposed lower edges using a narrow zigzag or blanket stitch.
Baste the blue fabric along the outer bib outline, staying within approximately 1/8 inch of that line. The final binding will enclose those edges.
Don't sew the two straps together. They must remain completely separate, with an open space between their tips.
Step 3. Arrange the Nine Lower Pinwheel Wedges
This is the detail that makes the snowman bib coordinate with the larger snowman quilt without turning the bib into a miniature copy of the quilt.
Our pinwheel is a fan of nine colored fabric wedges across the lower part of the bib. The ivory background shows between selected wedges, creating the alternating light and dark sections.
Cut the nine wedges from templates C1, C2 and C3:
W1: Navy.
W2: Light blue.
W3: Navy.
W4: Light blue.
W5: Navy.
W6: Light blue.
W7: Light blue.
W8: Navy.
W9: Navy.
There are five navy pieces and four light-blue pieces altogether.
The wedge templates are rotated on their printable pages to save paper. Turn each cut fabric piece until it matches its own numbered outline on the assembled master. Don't flip it over to make it fit.
Lay the wedges on the ivory front, following their numbered positions from the left side of the fan to the right. Keep the ivory background visible wherever the master shows a blank section.
Each wedge has a long curved outer edge that follows the bottom bib outline. Its shorter inner edge points toward the center beneath the snowman's face.
The inner ends stop approximately 0.22 inch short of the fan center. Don't extend all nine tips into one thick pile. That small central opening will be hidden beneath the face and scarf appliqué.
Check the entire arrangement before fusing anything. The wedges should lie flat, their edges should meet without unwanted overlap, and their outer curves should follow the marked lower bib edge.
Fuse them lightly into position. Sew around their exposed edges using a narrow zigzag or blanket stitch. Where two wedges meet, keep their edges butted together rather than stacking one over another.
Baste the outer curved edges inside the future binding line.
Leave the fan flat against the ivory front. These are appliqué wedges, not individually pieced triangles joined with quarter-inch seams.
And don't add a row of pom-poms or little snowballs above the fan. The approved design has a clean line between the ivory background and the quilted wedges.
Step 4. Make and Quilt the Main Bib Sandwich
Lay the backing fabric wrong side up. Place the batting over it, then add your decorated ivory front with the right side facing up.
Smooth the layers without stretching them and baste from the center outward.
Use a walking foot if you have one. Check your stitch tension on a scrap sandwich made from the same fabrics and batting before quilting the actual bib.
Quilt the open ivory background with a loose meandering stitch or a simple diagonal grid spaced about 1/2 inch apart. Keep the marked area where the face and hat will sit less densely quilted so it doesn't become stiff.
You can add a few tone-on-tone snowflakes in the ivory background. For each one, stitch three lines crossing at the center, then add short paired branches near the ends. Use ivory or very pale thread so these snowflakes stay subtle.
Quilt the navy and light-blue fan wedges with spaced lines running roughly parallel to their long edges. This follows the direction of the pinwheel and gives the lower section the lightly padded look shown in the example.
Keep the neck straps flexible. Avoid dense quilting near the closure marks, and leave the actual button and buttonhole areas free of decorative stitching.
Once the quilting is finished, lay the assembled master template over the quilted fabric again. Check that the outer outline and appliqué positions still match.
If the quilting has drawn the fabric inward enough that the pinwheel ends no longer reach their intended binding line, correct the placement before trimming.
Now cut through the front, batting and backing together, following the solid raw bib outline. Cut out the entire U-shaped neckline so the two strap ends are separate.
Step 5. Embroider the Snowman's Face
Find piece F on template B1 and cut one face from ivory cotton. The piece measures approximately 4.22 inches wide by 2.80 inches high across its full outline.
Transfer the two closed eyes, eyelashes, cheeks, smile and carrot-nose position from the template onto the right side of the face fabric.
Use black embroidery floss to work each curved, closed eyelid in stem stitch or split stitch. Add four short lashes along each eyelid, following the printed guides.
Embroider the curved smile beneath the nose in matching black floss. Keep the line smooth and fairly fine so it looks like a stitched expression rather than a thick black strip.
Fill each cheek lightly with pink embroidery. The two small blush areas should stay close to the sides of the smile rather than covering large portions of the face.
Cut one rounded orange nose N from template B5. Position it over the matching guide on the snowman's face, between the embroidered eyes and smile. Secure the entire edge with a narrow zigzag or blanket stitch, then add a few short curved orange embroidery lines for texture. Keep the nose flat rather than making a separate stuffed piece.
Work the facial embroidery while the face is still separate from the bib. That way, the thread ends can be secured on the back and hidden beneath the appliqué when you attach it.
Step 6. Prepare the Hat, Holly and Scarf
Cut the remaining snowman pieces from their full-size templates:
H1: One navy hat crown, approximately 4.52 x 2.64 inches across its full outline.
H2: One light-blue hatband, approximately 3.82 x 1.10 inches.
H3: One navy curved brim, approximately 5.32 x 1.44 inches.
S1: One light-blue scarf collar, approximately 4.09 x 1.41 inches.
S2: One light-blue rear scarf tail, approximately 2.61 x 1.90 inches.
S3: One light-blue front scarf tail, approximately 1.88 x 2.40 inches.
L1 and L2: One of each olive-green holly leaf. They're different shapes and should follow their individual templates.
If you want a little raised quilting like the finished example, cut thin batting insets for the face, crown, brim, scarf collar and both scarf tails.
Make each batting inset approximately 1/8 inch smaller than its fabric appliqué on every side. Trim away any padding that would sit underneath another padded piece.
Don't add extra padding beneath the hatband, carrot nose, holly, berries, neck-strap tips or pinwheel wedges. Those areas already have enough fabric layers.
Lightly baste the padded pieces together. Keep the extra loft subtle. A baby bib needs to remain pliable, especially around the neck and shoulders.
Step 7. Assemble the Snowman Appliqué
Bring out the assembled master placement map. Use its outlines for the exact position of every fabric shape.
Start with H1, the navy hat crown. Position it on the upper bib, leaving the printed clearance beneath the neckline. The crown must not extend into the U-shaped opening or interfere with the binding.
Add H2, the light-blue band, across the lower portion of the crown.
Next, position F, the embroidered ivory face. The upper part of the face should cover the lower crown and hatband junction, just as shown on the master.
Place H3, the curved navy brim, over the upper edge of the face. Its ends should sweep outward on both sides, making the hat look as though it's sitting on the snowman's head.
Don't shift the hat upward to make more room for the scarf. The position has already been planned to leave the neckline clear.
Place S2, the rear scarf tail, across the lower right area of the snowman. Add S3, the front tail, overlapping S2 in the direction shown on the master.
Then lay S1, the curved scarf collar, across the lower portion of the face. It should hide the upper ends of both scarf tails and form the soft blue wrap beneath the snowman's chin.
Position L1 and L2 on the right side of the hat, following the two different leaf outlines. Their pointed shapes should overlap slightly near the red berry placement.
Once you've checked the arrangement, lift off the loose pieces while keeping their positions marked. Attach the navy hat crown first, securing its edges before adding the blue hatband. Secure the face before placing the curved brim over its upper edge. Stitch the rear scarf tail, then the front tail, and finish with the scarf collar over both tail roots. Add the two holly leaves in their marked positions. Use a narrow zigzag or blanket stitch around every appliqué edge, including any edge that another piece will cover. That way, each layer is firmly attached before the next one goes on.
If you're using fusible web, use it mainly to hold the fabric in place. For larger shapes, keeping most of the fusible near the perimeter rather than across the entire center can help the finished appliqué stay flexible.
Now add the quilting details.
Quilt the ivory face with small, gently spaced curves, working around the embroidered eyes, cheeks, nose and smile.
Quilt the navy hat crown in horizontal lines spaced approximately 1/4 inch apart. Follow the brim's curved shape with additional curved quilting lines.
Quilt the blue scarf collar and tails with lines spaced approximately 3/8 inch apart. Keep the lines following each piece's direction, rather than running them all across the scarf in one straight path.
Use the fringe markings on template E for the ends of the scarf tails. Stitch closely spaced short lines across the last 1/2 inch of each tail to suggest fringe.
Do not cut slits into the scarf fabric, add dangling yarn or leave separate fringe strips hanging from the bib. The fringe effect comes from stitching on continuous fabric, with every outer edge secured.
Embroider the veins in each holly leaf with green floss. Work one main line from the base toward the tip, with three short branches on either side.
Finally, add the three red berries where the master shows them. Make each berry with short foundation stitches covered by dense red satin stitch, using the full-size circle guides on page E.
Don't attach separate beads, pom-poms or stuffed berry balls. The embroidered berries give the hat its red accent without adding detachable decorations.
When you're finished, the snowman should sit above the compact lower pinwheel, with his hat below the neckline and the blue scarf covering the upper ends of the fan wedges.
Lay the bib flat and compare it with the finished example before moving on. It's much easier to correct a misplaced scarf tail or hat brim now than after the entire bib is bound.
Finishing the Bib, Adding the Button and Caring for Your Project
With the snowman appliqué finished, you can concentrate on the practical parts of the bib: the binding, the neck opening and the button.
I'd keep the binding smooth and simple. The quilted fabric and little snowflake prints have enough detail already, and a neat light-blue edge will pull everything together.
Step 8. Bind the Entire Bib
The measured raw-edge perimeter of the bib is approximately 50.6 inches. Prepare at least 60 inches of true-bias binding so you have enough for joining the ends and working around the curves.
Test the binding on a scrap quilt sandwich first. When finished, it should cover about 1/4 inch on the front and about 1/4 inch on the back without pulling the layers together.
Begin along a relatively straight outer side of the bib, leaving enough free binding at the beginning for joining later.
Open one fold of the binding and sew it to the front of the bib, using approximately a 1/4-inch seam allowance at the raw edge.
Work slowly around the rounded lower corners and the two curved neck-strap tips. Ease the binding into place rather than stretching it around the curves.
Continue all the way around the inside of the U-shaped neckline. Follow the actual cut edge without bridging the space between the two separate straps.
On the inside neckline curve, make small clips into the binding seam allowance only if needed to help it lie flat. Stop each clip before the stitching line.
Fold the binding over the raw edge, turn the remaining fold under on the back and stitch it securely in place. Make sure the binding catches the backing, batting and front fabric all the way around.
Join the binding ends with a diagonal seam and finish the starting section.
Check the lower pinwheel where its wedges meet the edge. Every outer wedge end should be enclosed in the binding, with no loose or exposed raw fabric.
Check the neckline too. It should remain a deep, open U, and both free straps should still move independently.
Step 9. Sew the Button and Buttonhole
The finished example uses a navy button on the left strap and a matching buttonhole on the right strap. We're keeping that arrangement in the pattern.
Before making the permanent buttonhole, check the strap overlap using the bound trial bib. Bring the right tab over the left, align the marked closure centers and make sure the layers meet without pulling the neckline out of shape.
For a smooth button measuring 1/2 inch across, begin with a buttonhole length of approximately 5/8 inch. That's a starting measurement, not a guarantee for every button thickness.
Test the buttonhole on a scrap made from the same blue cotton, ivory cotton, interfacing, batting and backing layers as the actual strap.
Use your machine's buttonhole foot and adjust the opening to the actual button. The printed diagonal slit on the master is a guide for the center and direction of the hole, not a line that must be cut before stitching.
Check that the buttonhole stitching clears the binding and that the button passes through without excessive force.
Sew the reinforced buttonhole into the right strap, then carefully open it after the stitching is finished.
Overlap the right tab over the left in the intended fastening position. Use the finished buttonhole to confirm the button's exact center on the left tab.
Sew the button through the reinforced fabric layers with suitable thread, using repeated secure passes through its holes. Secure and bury the thread ends, and check that the button doesn't rock, pull loose or distort the fabric.
Because this is an infant accessory, the button needs particular attention. A loose button can become a choking hazard. The U.S. Consumer Product Safety Commission's Resellers Guide explains why buttons, snaps and other decorations that detach easily are a concern on children's clothing.
Optional Snap Closure
If you'd rather use a snap, you can substitute one compatible garment snap set at the same two closure centers.
Keep the lightweight reinforcement beneath both strap ends. Choose a snap appropriate for the finished fabric thickness and install it according to its manufacturer's directions.
Check the snap orientation before setting it permanently. The right strap should still overlap the left when fastened.
Don't put a decorative button over the snap. Use one fastening system or the other, and check its attachment before using the bib.
Step 10. Check the Finished Bib
Lay the bib flat and look at it from top to bottom.
The neckline should have two completely separate, rounded straps with no fabric bridge across the opening. The button should close smoothly, and the front of the bib should hang without pulling upward.
Check that the snowman's hat remains below the neckline, the scarf tails lie flat, and the lower pinwheel doesn't have any loose wedge tips.
Run your fingers along the binding to find any missed backing fabric, loose stitching or exposed edges.
Look closely at the appliqué too. Check the hat, holly, carrot nose, embroidered berries, eyes, cheeks, smile and scarf. Every decorative edge and thread end should be secured.
For a physical prototype, record the finished width, length, fastened neck opening and strap overlap. These measurements are more useful for judging actual fit than the measurements of an unsewn paper template.
Step 11. Wash and Recheck the Bib
Wash and dry the trial bib using the care method you intend for the finished project. Check the shape and dimensions again afterward.
Look for shrinking, puckering, dye transfer, fraying, loose embroidery or any change in the button or snap attachment.
The quilting should still feel flexible, and the scarf and appliqué should remain firmly attached. If the bib becomes stiff or pulls out of shape, the materials or construction need another check.
Use a bib only during supervised feeding and remove it for sleep. Stop using it if the closure or any decoration loosens.
A Few Final Notes About This Snowman Bib
The design was digitally checked against its printable pattern pieces, including the neckline, separate straps, button placement, snowman appliqué and nine lower fan wedges.
The sewing pattern hasn't yet been physically test-sewn, printed on a home printer or checked after washing. The measurements are calculated from the digital templates, so be sure to check the one-inch printing squares and make a trial bib before cutting your good fabric.
What I especially like about this little snowman is how the compact pinwheel gives him a winter-quilt look without taking over the whole bib. His face, hat and scarf can still be the center of attention.
If you're making a matching winter gift, my free snowman quilt pattern uses the same navy, icy-blue and ivory colors, with a sleepy-eyed snowman, pinwheel stars and snowflakes. The quilt is a much bigger project, but the two designs would make a pretty coordinated set.
Keep the bib's snowman face soft, the quilting fairly light and the binding neat. You don't need to add anything else to make the design feel finished.
When you click on links to various merchants on this site and make a purchase, this may result in this site earning a commission. This does not affect the price you pay.

UBGI Gold Standard 2026
Reviewed under the site's
editorial checklist.
Photos, decorating ideas, party setups and reader submissions are shared for inspiration unless a page is specifically presented as a pattern, tutorial, reference guide or step-by-step project. Follow the instructions, measurements, safety guidance and manufacturer directions provided for the particular project or product.
About Jan | Contact | Baby Nursery Ideas (Blog) | Site Map | Privacy Policy | Disclosure Policy | Disclaimer | Affiliate Disclosure | Earnings Disclosure | Facebook | Pinterest
I am a participant in the Amazon Services LLC Associates Program, an affiliate advertising program designed to provide a means for us to earn fees by linking to Amazon. As an Amazon Associate I earn from qualifying purchases.
Copyright © 2006-2026. All Rights Reserved.