Nursery Floor Plan Layout: Make the Baby's Room Feel Bigger
A nursery floor plan layout is the practical arrangement of crib, dresser, and chair so the room supports safe movement and daily care.
When window placement, natural light direction, or blind height is influencing your furniture decisions, review my nursery layout ideas based on window location to adjust your floor plan around the room’s actual window position.
Fast truth: A good nursery plan is less about “style” and more about smooth steps in the dark while moving from crib to chair, chair to dresser, dresser to diaper bin, then back again.
If you’ve ever stood in a nursery and thought, “Why does this room feel tight even though it’s not tiny?” it’s usually the walking paths. When the main path gets blocked by a chair leg, a corner of the dresser, or an open door swing, the room feels cramped. When the path is clear, the same room feels bigger.
Below is a simple, no-drama way to plan your nursery floor plan layout. You do not need special software. You do not need perfect math. You just need the room measurements, the furniture sizes, and one clear goal: make the room easy to use every day.
When the walking path is clear, the room feels bigger even before you decorate.
Think of it as a nursery room layout plan that focuses on furniture placement and how you actually move through the space.
For a more furniture-focused approach, see my nursery furniture layout guide to plan crib, dresser, and chair placement in a way that keeps the room easy to use.
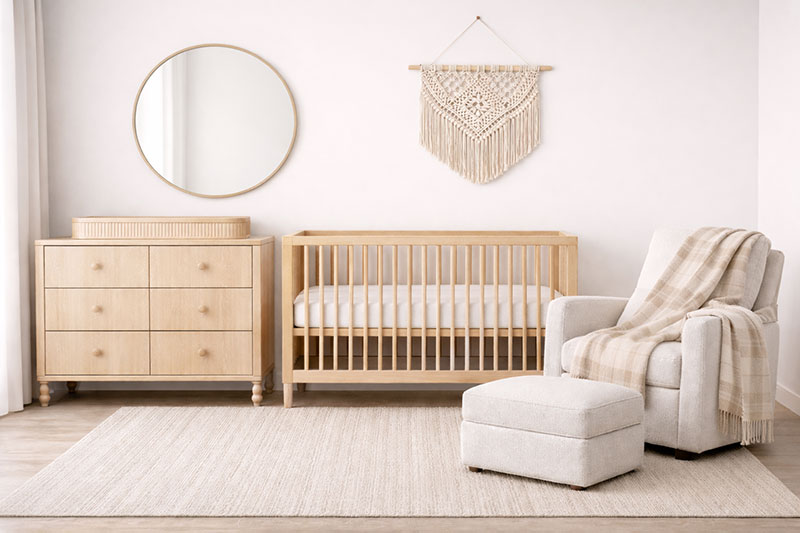
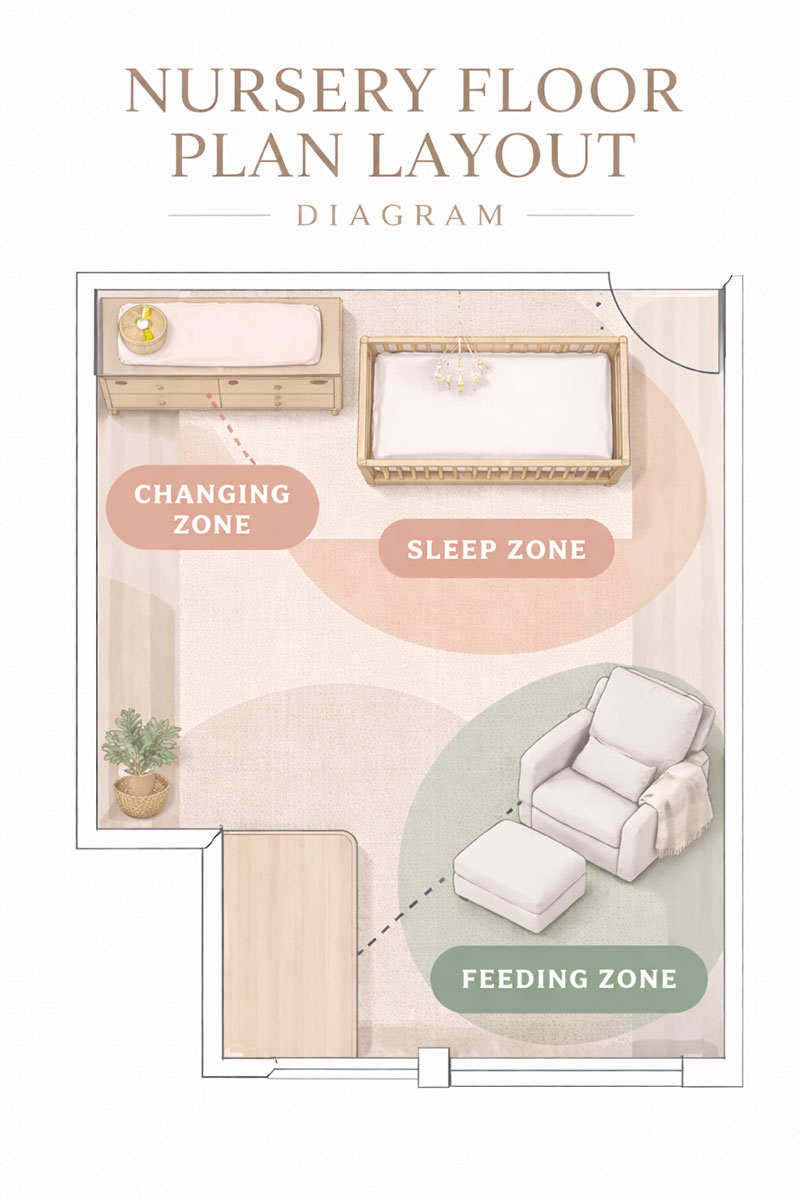
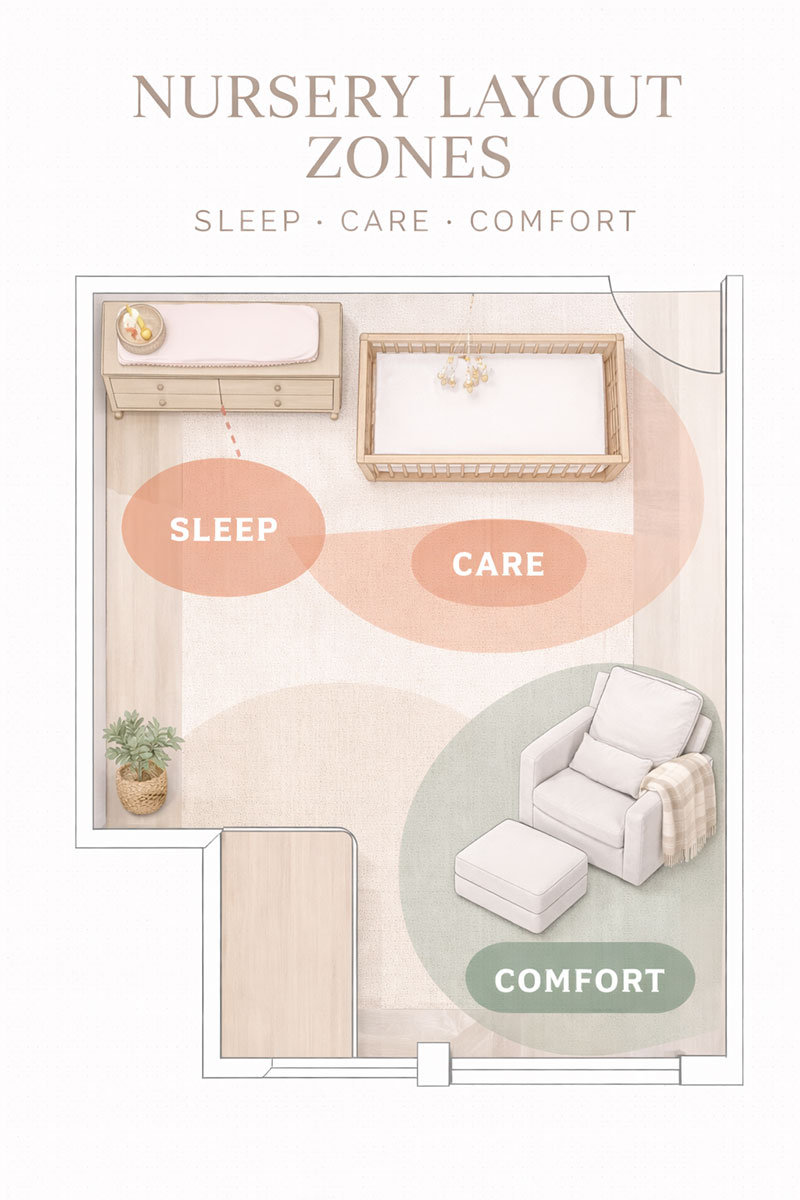
Nursery floor plan layout: the 3 zones that make the room work
When I plan a nursery, I think in three zones. This keeps the layout simple and keeps you from “randomly placing” furniture just because it fits.
- Sleep zone: crib + a small spot for swaddles/sleep sacks (nearby, not piled on the crib).
- Care zone: changing surface + dresser/storage + hamper/diaper bin (everything within one turn of your body).
- Comfort zone: chair/glider + small table + light (so feeding/soothing feels easy, not awkward).
Your whole layout goal is to connect these zones with a clear walking path. Not a fancy path. A practical path.
Quick safety note: keep cords, drapes, and reachable hazards away from the crib area, and always follow safe sleep guidance for the crib space. For general guidance on creating a safer sleep environment, see the U.S. EPA indoor air and home environment basics here: Indoor Air Quality (EPA).
The 10-minute layout method (paper version that actually works)
This is the fastest method I know that still leads to a smart layout.
- Measure the room. Write down wall-to-wall length and width. Mark doors, windows, and closet openings.
- Measure the big furniture. Crib, dresser, chair/glider. Use the real footprint, not what you “think” it is.
- Draw a quick rectangle. A simple sketch is enough. Add door swings and closet swings so you don’t block them.
- Place the crib first. Put it where it feels calm and not in the middle of traffic.
- Place the dresser/changing area second. Put it where you can reach supplies easily and not bump into the chair.
- Place the chair last. Put it where you can sit without blocking the main path.
- Check the walking path. You want one main “lane” that stays clear.
Those simple steps prevent most layout mistakes before they happen.
If you want to sketch furniture positions more visually before you commit, this nursery layout planner gives you a simple way to test crib, dresser, and chair placement against your real room measurements.
Optional tool that makes planning easier: a simple room-measuring helper you can keep in the nursery drawer.
Where the crib should NOT go (common layout traps)
Most “bad” nursery layouts happen because the crib is placed without thinking about real-life movement. Here are the traps that create clutter and stress fast:
A nursery recliner takes more clearance than it looks like on paper, so this guide to how much space you need for a nursery recliner can help you protect the walking path before the chair crowds the room.
- In the main walkway: if you have to squeeze past the crib to reach the dresser or closet, the room will feel tight.
- Too close to window cords: even a pretty window treatment can create a hazard if cords are reachable.
- Right behind the door swing: it feels okay until you’re carrying a baby and the door hits the crib corner area.
- Next to “junk landing zones”: if the crib is beside the drop zone (bags, laundry, boxes), it will look messy fast.
If you’re stuck, move the crib 6–12 inches at a time on paper and re-check the walking path. Small shifts make a big difference.
My simplest spacing rules (so the room feels open)
You do not need perfect “designer” spacing. You just need functional spacing that prevents constant bumping and bottlenecks.
- Main walkway: keep one clear path you can walk without turning sideways, ideally about 24–30 inches wide so you can move comfortably, even while carrying the baby.
- Chair clearance: make sure the chair can rock or glide without hitting the dresser or wall, since most gliders need roughly 6–12 inches of space behind them to move freely.
- Dresser access: drawers should open fully without hitting a bed, crib, or chair leg, and most standard drawers need about 18–24 inches of clear space in front to open comfortably.
- Closet access: don’t block closet doors with the chair—this is the #1 “why is this room annoying?” mistake.
Quick spacing cheat sheet:
- Main walking path stays clear.
- Drawers open fully without hitting furniture.
- Chair can rock or glide freely.
- Closet doors open without obstruction.
Night check test: Walk the room in your mind with the lights off. Can you move from crib to chair to dresser without turning sideways or bumping into anything?
A nursery can be small and still feel peaceful when the layout works with your movement instead of against it.
Practical check: If you can’t open the drawers smoothly with one hand, the layout will irritate you every day.
Two easy floor plan “starter layouts” you can copy
If you want a fast starting point, try one of these and adjust from there.
Starter Layout A: “Crib + Dresser on one wall”
- Crib on the longest wall (not under a window if cords are nearby).
- Dresser/changing area on the same wall or the wall across, so your care zone stays tight.
- Chair in a corner that doesn’t block the main path or closet.
Starter Layout B: “Crib opposite dresser”
- Crib on one wall.
- Dresser/changing area directly across, leaving a simple lane between them.
- Chair near the crib but angled so it doesn’t cut through the lane.
Both layouts work because they protect the walking path. You can decorate after the layout works.
A recliner needs its own clearance plan, so this nursery recliner placement guide can help you choose a corner that keeps the walkway open.
For a more specific example that focuses on arranging those two main pieces together, see this nursery layout with crib and dresser guide.
Optional comfort upgrade: a chair add-on that can make long feeds feel less tense.
Small nursery? Do this first (it changes everything)
In a small nursery, the best “space saver” is not a tiny crib or a tiny chair. It’s removing extra furniture that creates bottlenecks.
Smart layouts depend on smart storage choices, so review nursery storage ideas for small rooms to see how vertical shelving, wall bins, and closet systems reduce floor congestion without shrinking your main furniture pieces.
- Choose one main storage piece: a dresser that holds baby clothes AND changing supplies is usually the simplest.
- Use vertical storage: shelves or wall storage keep the floor clear and make the room feel open.
- Keep the center open: an open center makes the room feel bigger even if the walls are close.
If your room is long and narrow, this page helps: long narrow nursery layout.
If you are planning one room for two babies, these twin nursery room layout ideas can help you fit two cribs, protect the walking path, and keep the nursery feeling open instead of crowded.
For a room with four similar walls and a centered feel, these square nursery layout ideas show how to balance the crib, dresser, and chair without wasting valuable floor space.
If your room is closer to a square shape, this one helps: nursery layout for 10×10 room.
If your room is a bit larger and more flexible than a compact square nursery, this 12x12 room nursery layout shows how to fit the crib, dresser, and chair with better spacing and easier walking paths.
How to make the room feel calm (even before décor)
This is the part people don’t expect: layout creates calm faster than paint color does.
- Hide the clutter: put the hamper where it’s easy to use but not the first thing you see.
- Give the chair a “landing spot”: a tiny table so you’re not balancing bottles, burp cloths, or your phone.
- Keep supplies close: the care zone should not require crossing the room.
Once the room feels easy to use, then décor choices feel fun instead of stressful.
Common questions parents ask while planning
Do I have to put the crib in the “best-looking” spot?
No. Put the crib where it supports the walking path and feels calm. A functional layout photographs better than a cramped one.
Should the chair go close to the crib?
Usually yes, but only if it doesn’t block the closet or the main walkway. The chair needs clearance to move.
What if the nursery is also an office or guest room?
Then the nursery needs one “baby wall” that stays consistent. Keep the baby zones tight, and keep the shared room zones separate.
Optional finishing touch: a simple organizing item that keeps the care zone from exploding into clutter.
When you click on links to various merchants on this site and make a purchase, this may result in this site earning a commission. This does not affect the price you pay.
UBGI Gold Standard 2026
Verified for performance, SEO,
and accessibility compliance.
Photos, decorating ideas, party setups, and reader submissions are shared for inspiration only and are not intended as step-by-step decorating, construction, or DIY instructions.
About Jan | Contact | Baby Room Ideas (Blog) | Site Map | Privacy Policy | Disclosure Policy | Disclaimer | Affiliate Disclosure | Earnings Disclosure | Facebook | Pinterest
I am a participant in the Amazon Services LLC Associates Program, an affiliate advertising program designed to provide a means for us to earn fees by linking to Amazon.
Copyright © 2006-2026. All Rights Reserved.