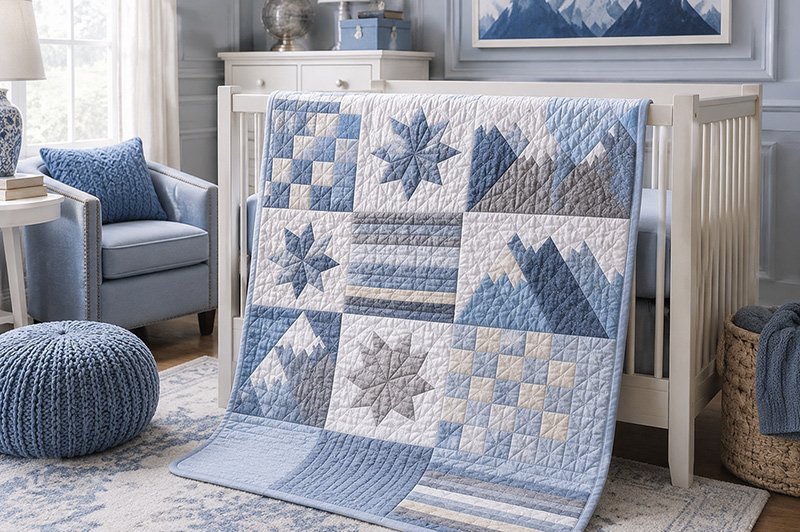
Mountain Patchwork Crib Quilt Pattern
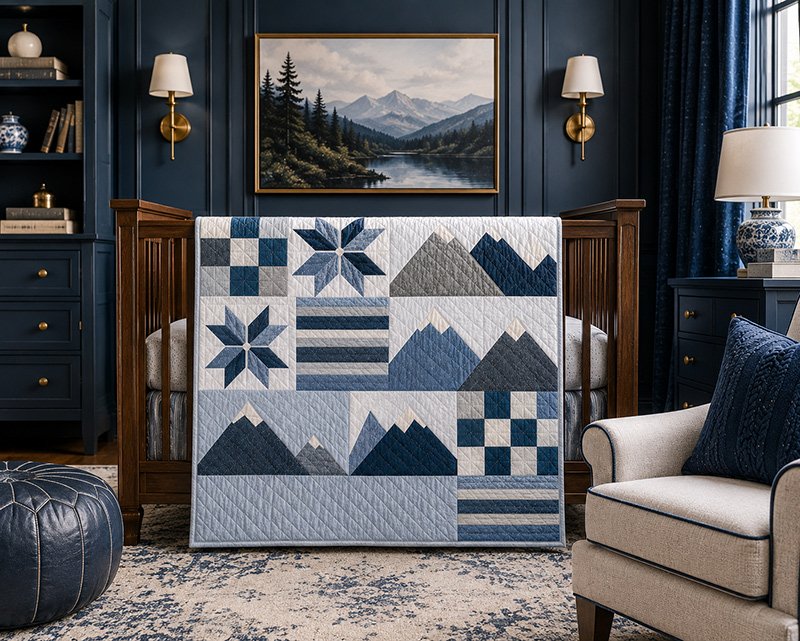
This mountain patchwork crib quilt pattern combines snowy mountain blocks, easy patchwork, and cool blue nursery colors into a modern baby quilt design that looks far more complicated than it really is. The mix of mountain peaks, snowflake-inspired blocks, checkerboard sections, and clean strip piecing gives the quilt a custom designer look while still being realistic for confident beginners to finish at home.
More Baby Quilt Patterns to Make
Helpful Quilting Supplies
A large self-healing cutting mat, quilting ruler set, rotary cutter, and low-loft cotton batting make this mountain patchwork crib quilt pattern much easier to piece accurately.
See quilting tools and crib quilt supplies for this project here
Mountain Patchwork Crib Quilt Pattern Measurements
Crib quilts can look balanced on a sewing table, then suddenly seem too short or visually crowded once they’re folded over actual crib rails. Mountain layouts are especially sensitive to proportion because the eye naturally follows the tallest peak first.
Finished quilt size: 38 x 52 inches
Finished block size: 12 x 12 inches
Block layout: 3 blocks across by 3 blocks down
Lower panel: 14 inches tall before borders
Finished outer border width: 1 inch on all sides
Seam allowance: Quarter inch throughout entire quilt
Skill level: Confident beginner
What matters here is that smaller versions lose the layered mountain effect that makes this mountain patchwork crib quilt pattern stand out in nursery photos.
Getting the dimensions right changes the entire finished look, especially once the quilt is folded over crib rails, so this crib quilt size guide is worth checking before cutting fabric.
Exact Fabric Requirements for the Mountain Patchwork Quilt
The icy blue palette in this nursery quilt reflects daylight across the room making the crib corner lighter and brighter. Be aware that dark colored mountain fabrics may flatten the entire design and have an unwanted effect in smaller nurseries.
Main fabrics:
- 1 yard snow white quilting cotton
- 3/4 yard slate blue fabric
- 1/2 yard faded denim blue
- 1/2 yard mist gray fabric
- 1/3 yard pale cloud gray accent fabric
Additional materials:
- 40 x 54 inch low loft cotton batting
- 44 x 58 inch backing fabric
- 5 binding strips cut 2.5 inches wide
- neutral cotton quilting thread
- rotary cutter
- 24 inch acrylic ruler
- walking foot
- fabric clips or quilting pins
I believe solid fabrics work best for geometric nursery quilts because the borders of the mountain peaks stay defined. Loud prints interrupt the crisp edges of the snowy peaks that give this design its identity.
If you like themed nursery quilts, this ocean baby quilt pattern uses a different color story while keeping the same crib-sized project focus.
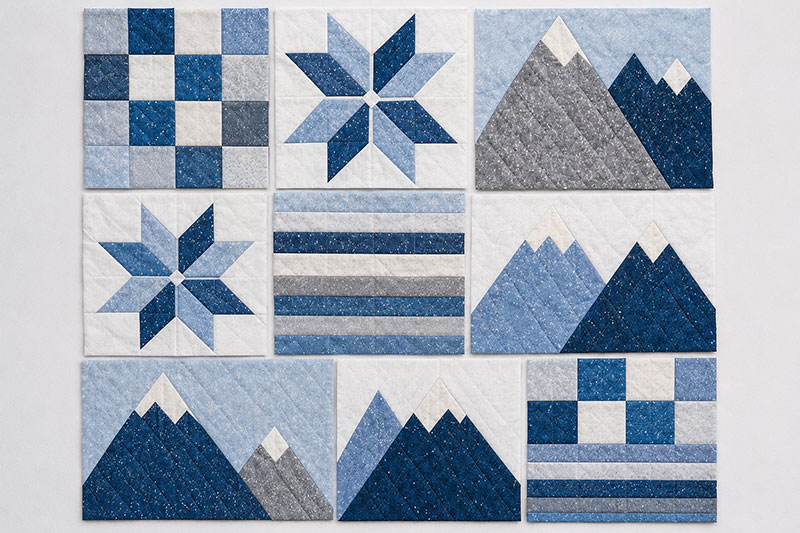
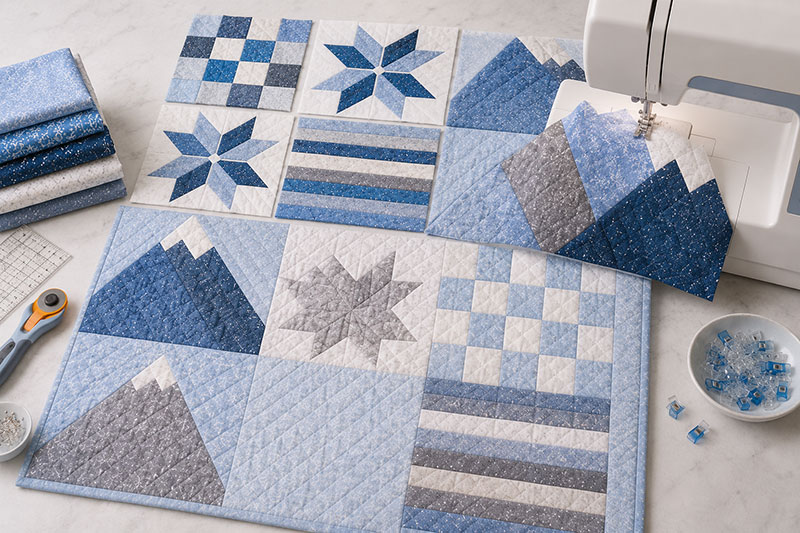
Exact Block Layout Map for the Quilt
This mountain patchwork crib quilt pattern uses several unique block styles instead of repeating identical peaks across every row. That variation is what makes the more stylized blocks stand out.
Top row blocks from left to right:
- checkerboard patch block
- snowflake star block
- single mountain peak block
Middle row blocks from left to right:
- snowflake star block
- horizontal stripe block
- double mountain peak block
Bottom row blocks from left to right:
- single mountain peak block
- snowflake star block
- checkerboard patch block
Lower border section:
- one wide pale blue quilting panel
- one striped accent section on lower right side
The stripe block through the center quietly stabilizes the entire layout. Without it, the mountain sections compete against each other visually instead of flowing naturally across the quilt front.
modern crib quilt pattern ideas
Exact Cutting Measurements for Every Piece
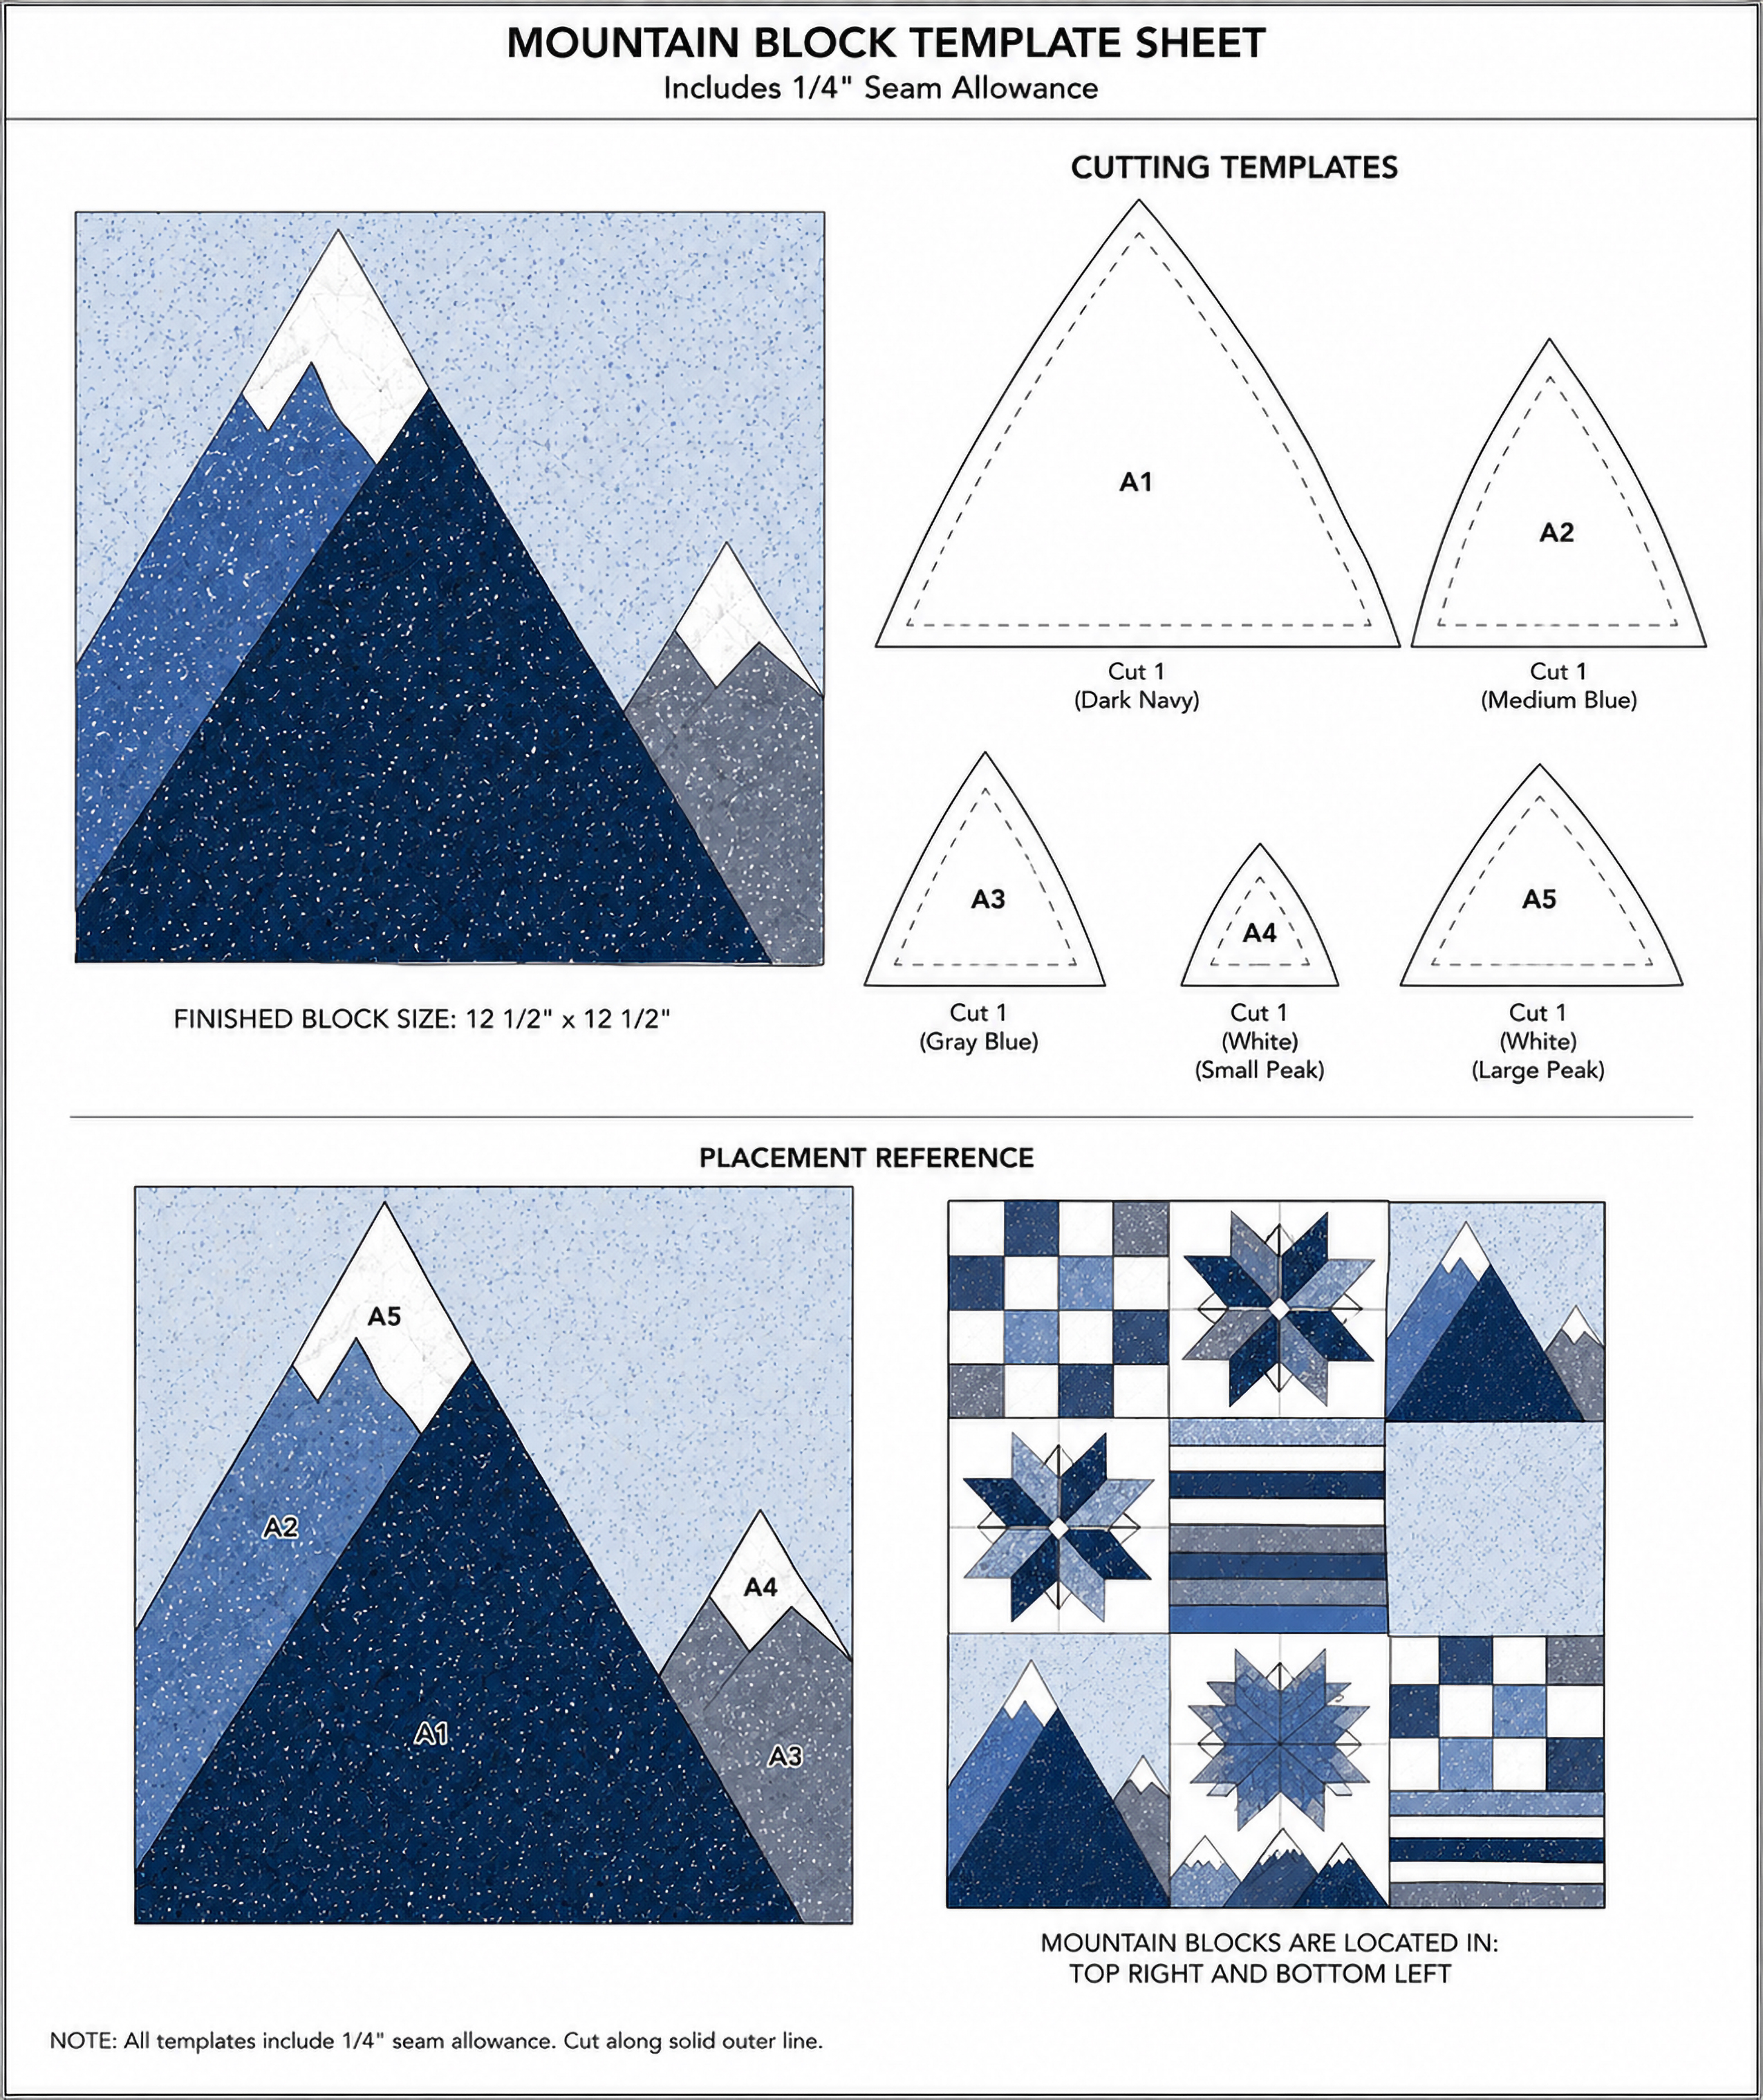
Download the full printable mountain block template sheet
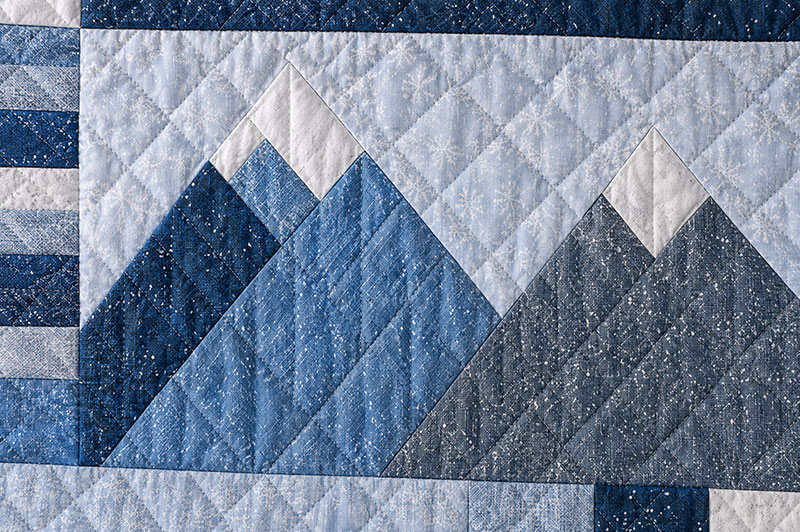
Mountain quilts depend heavily on accurate angles. Even slight cutting drift changes how the peaks line up once neighboring rows are sewn together.
Cut these exact pieces:
- For each mountain block: cut 2 squares at 13 x 13 inches, one blue and one white
- For each checkerboard block: cut sixteen 3.5 x 3.5 inch squares
- For each stripe block: cut six strips at 2.5 x 12.5 inches
- For each snowflake star block: cut 1 center square at 6.5 x 6.5 inches
- For each snowflake star block: cut 4 corner squares at 3.5 x 3.5 inches
- For each snowflake star block: cut 8 star point squares at 3.5 x 3.5 inches
- For each snowflake star block: cut 4 background rectangles at 3.5 x 6.5 inches
- For the lower panel: cut 1 pale blue section at 24.5 x 14.5 inches
- For the lower right stripe panel: cut 6 strips at 2.5 x 14.5 inches
- For outer borders: cut border strips 1.5 inches wide
- For binding: cut 5 binding strips 2.5 inches wide
Mountain block construction:
- Place one 13 inch blue square and one 13 inch white square right sides together.
- Draw a diagonal line from corner to corner.
- Sew a quarter inch seam on both sides of the drawn line.
- Cut directly on the drawn line.
- Press seams toward the darker fabric.
- Trim each mountain block to exactly 12.5 inches unfinished.
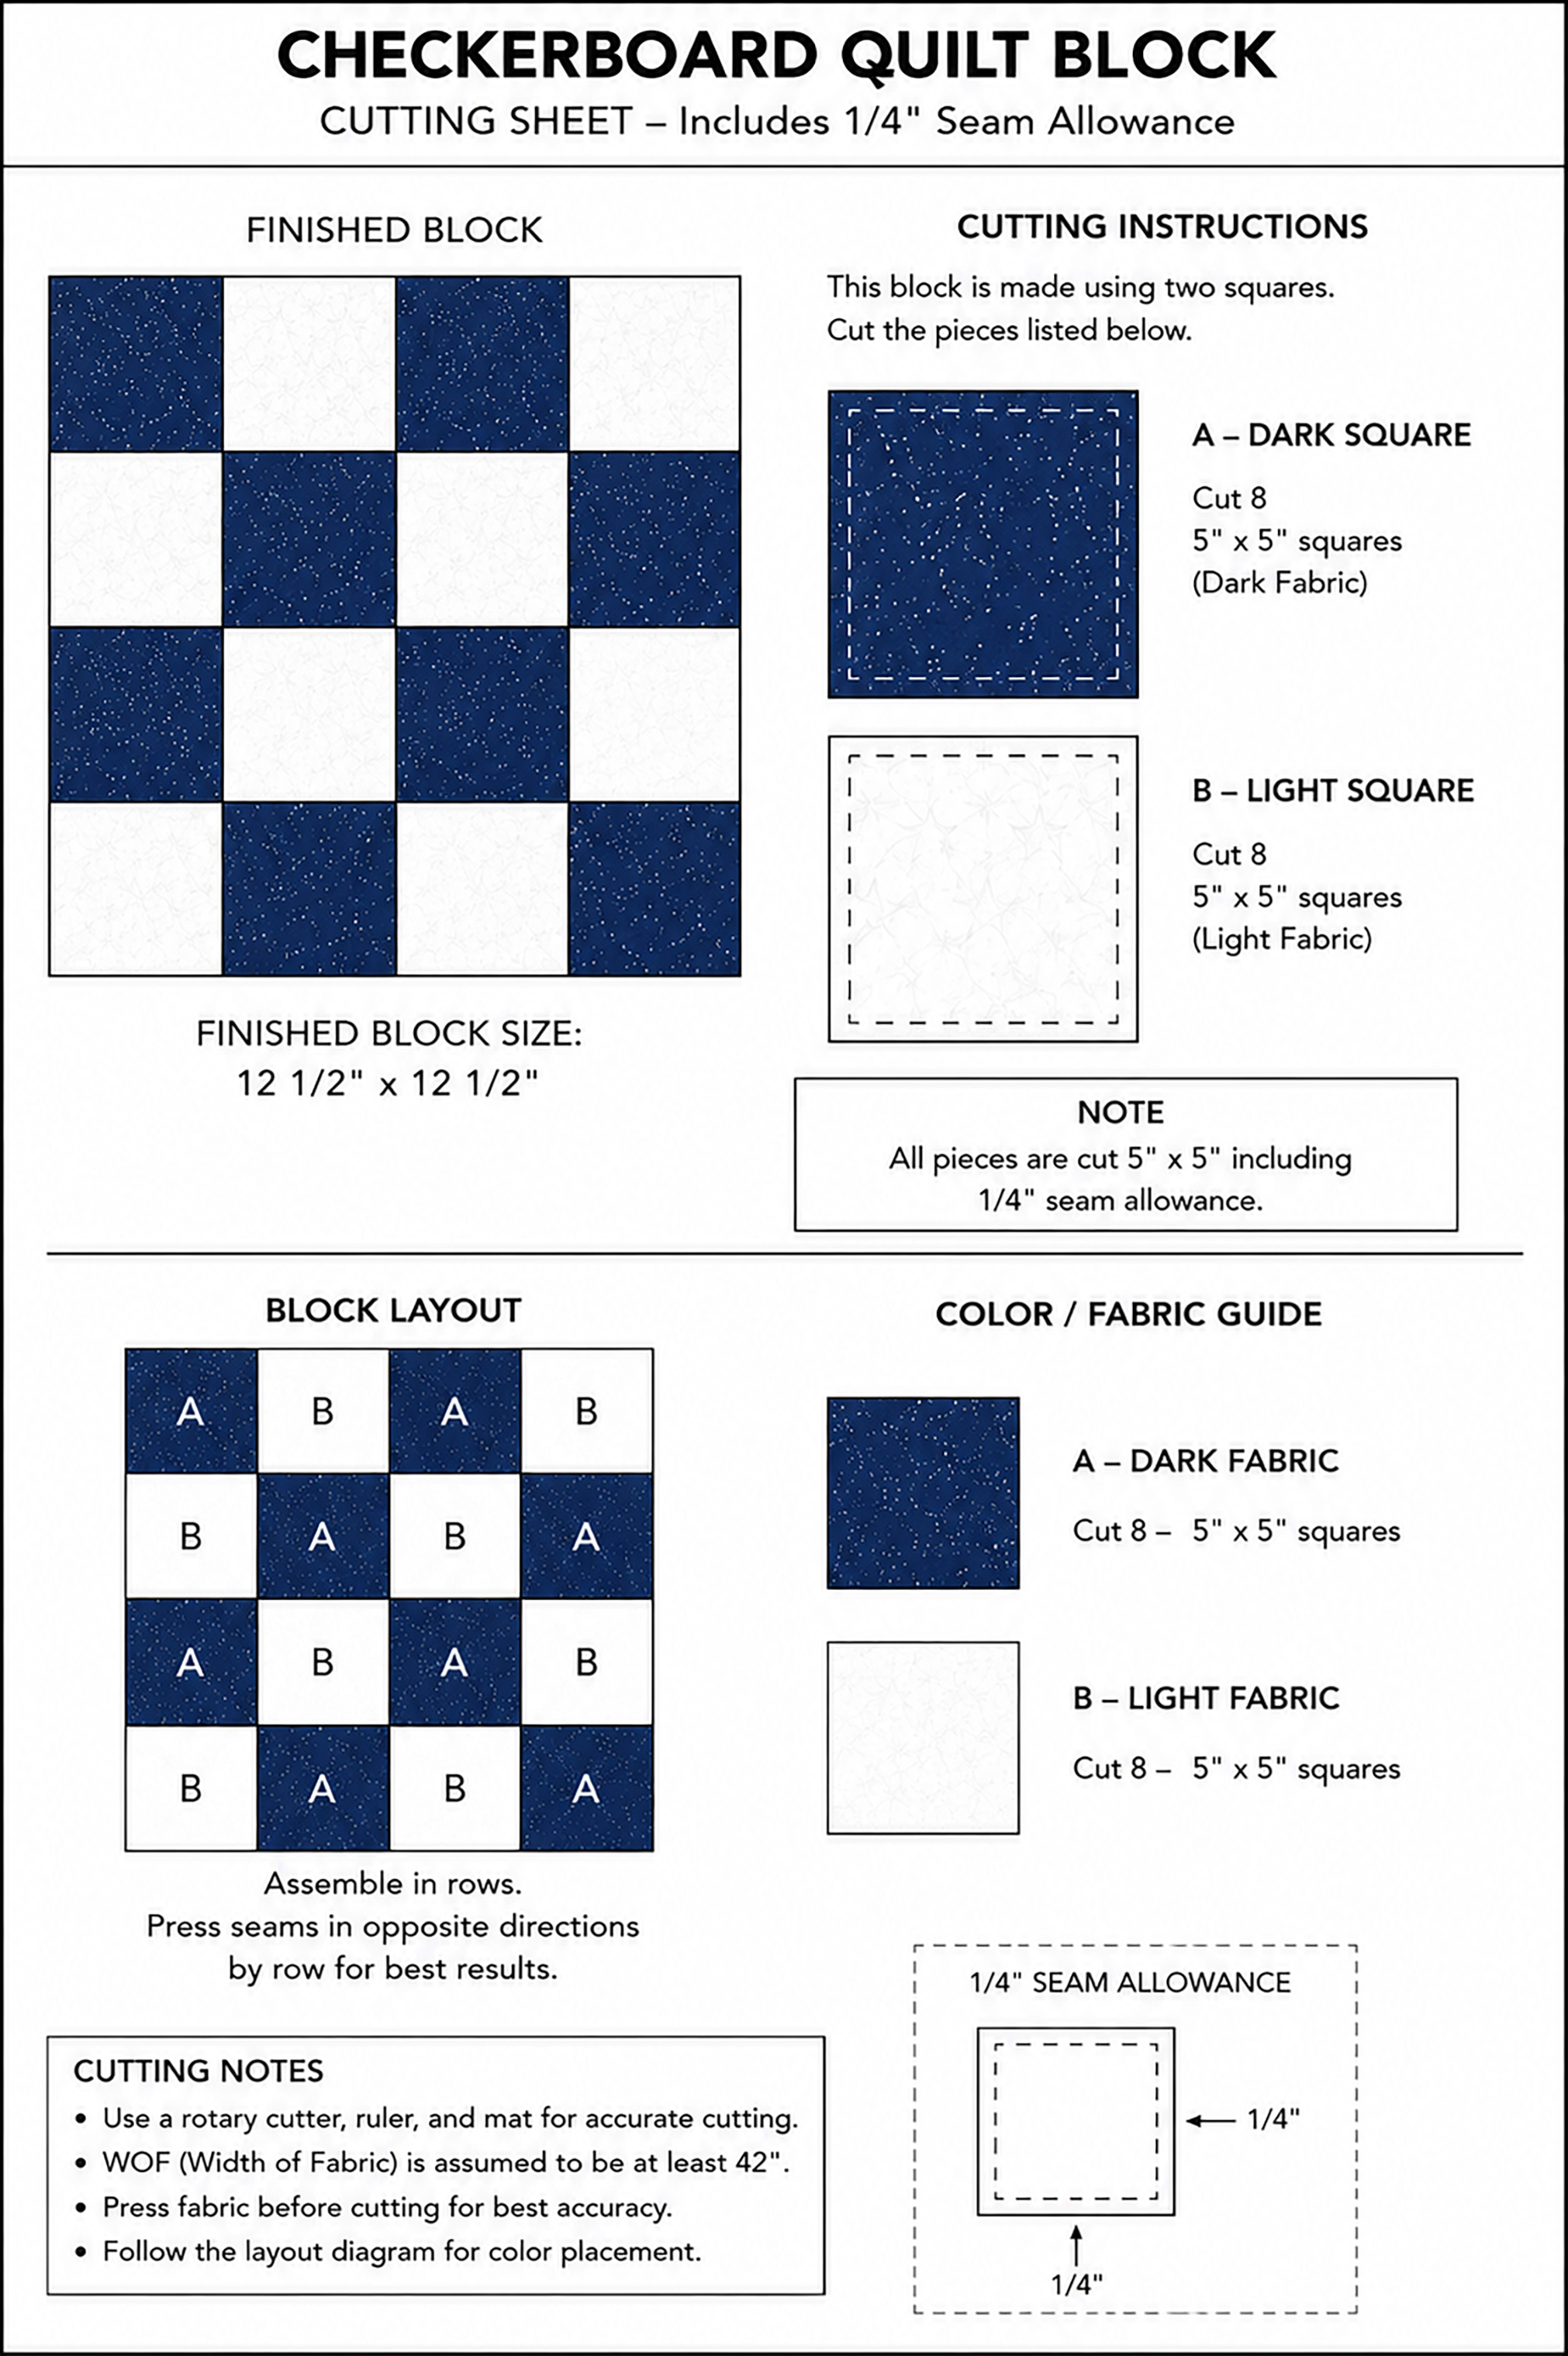
Checkerboard block construction:
Download the full printable checkerboard cutting sheet
- Arrange sixteen 3.5 inch squares into four rows of four.
- Sew the squares into rows.
- Press seams in opposite directions from row to row.
- Sew the four rows together.
- Trim the completed checkerboard block to 12.5 inches unfinished.
The tallest center peak normally reveals alignment problems first because the eye keeps returning there automatically.
How to Sew the Stripe Panel Without Warping
The stripe panel is the quiet piece that keeps the whole quilt from looking too busy. On the hero quilt, it sits near the center and repeats again near the lower right, so crooked strips are easy to spot once the quilt is hanging on the crib.
Cut each stripe section with the ruler lined up square on both ends. Sew the strips together one at a time, pressing after every seam so the panel stays flat instead of bowing in the middle.
Trim each finished stripe block to 12.5 x 12.5 inches before adding it to the quilt layout.
Download the full printable stripe panel template sheet
If you are quilting this pattern on a regular home machine, this guide on how to quilt on a sewing machine helps explain how to keep the stitching lines even across thicker quilt layers.
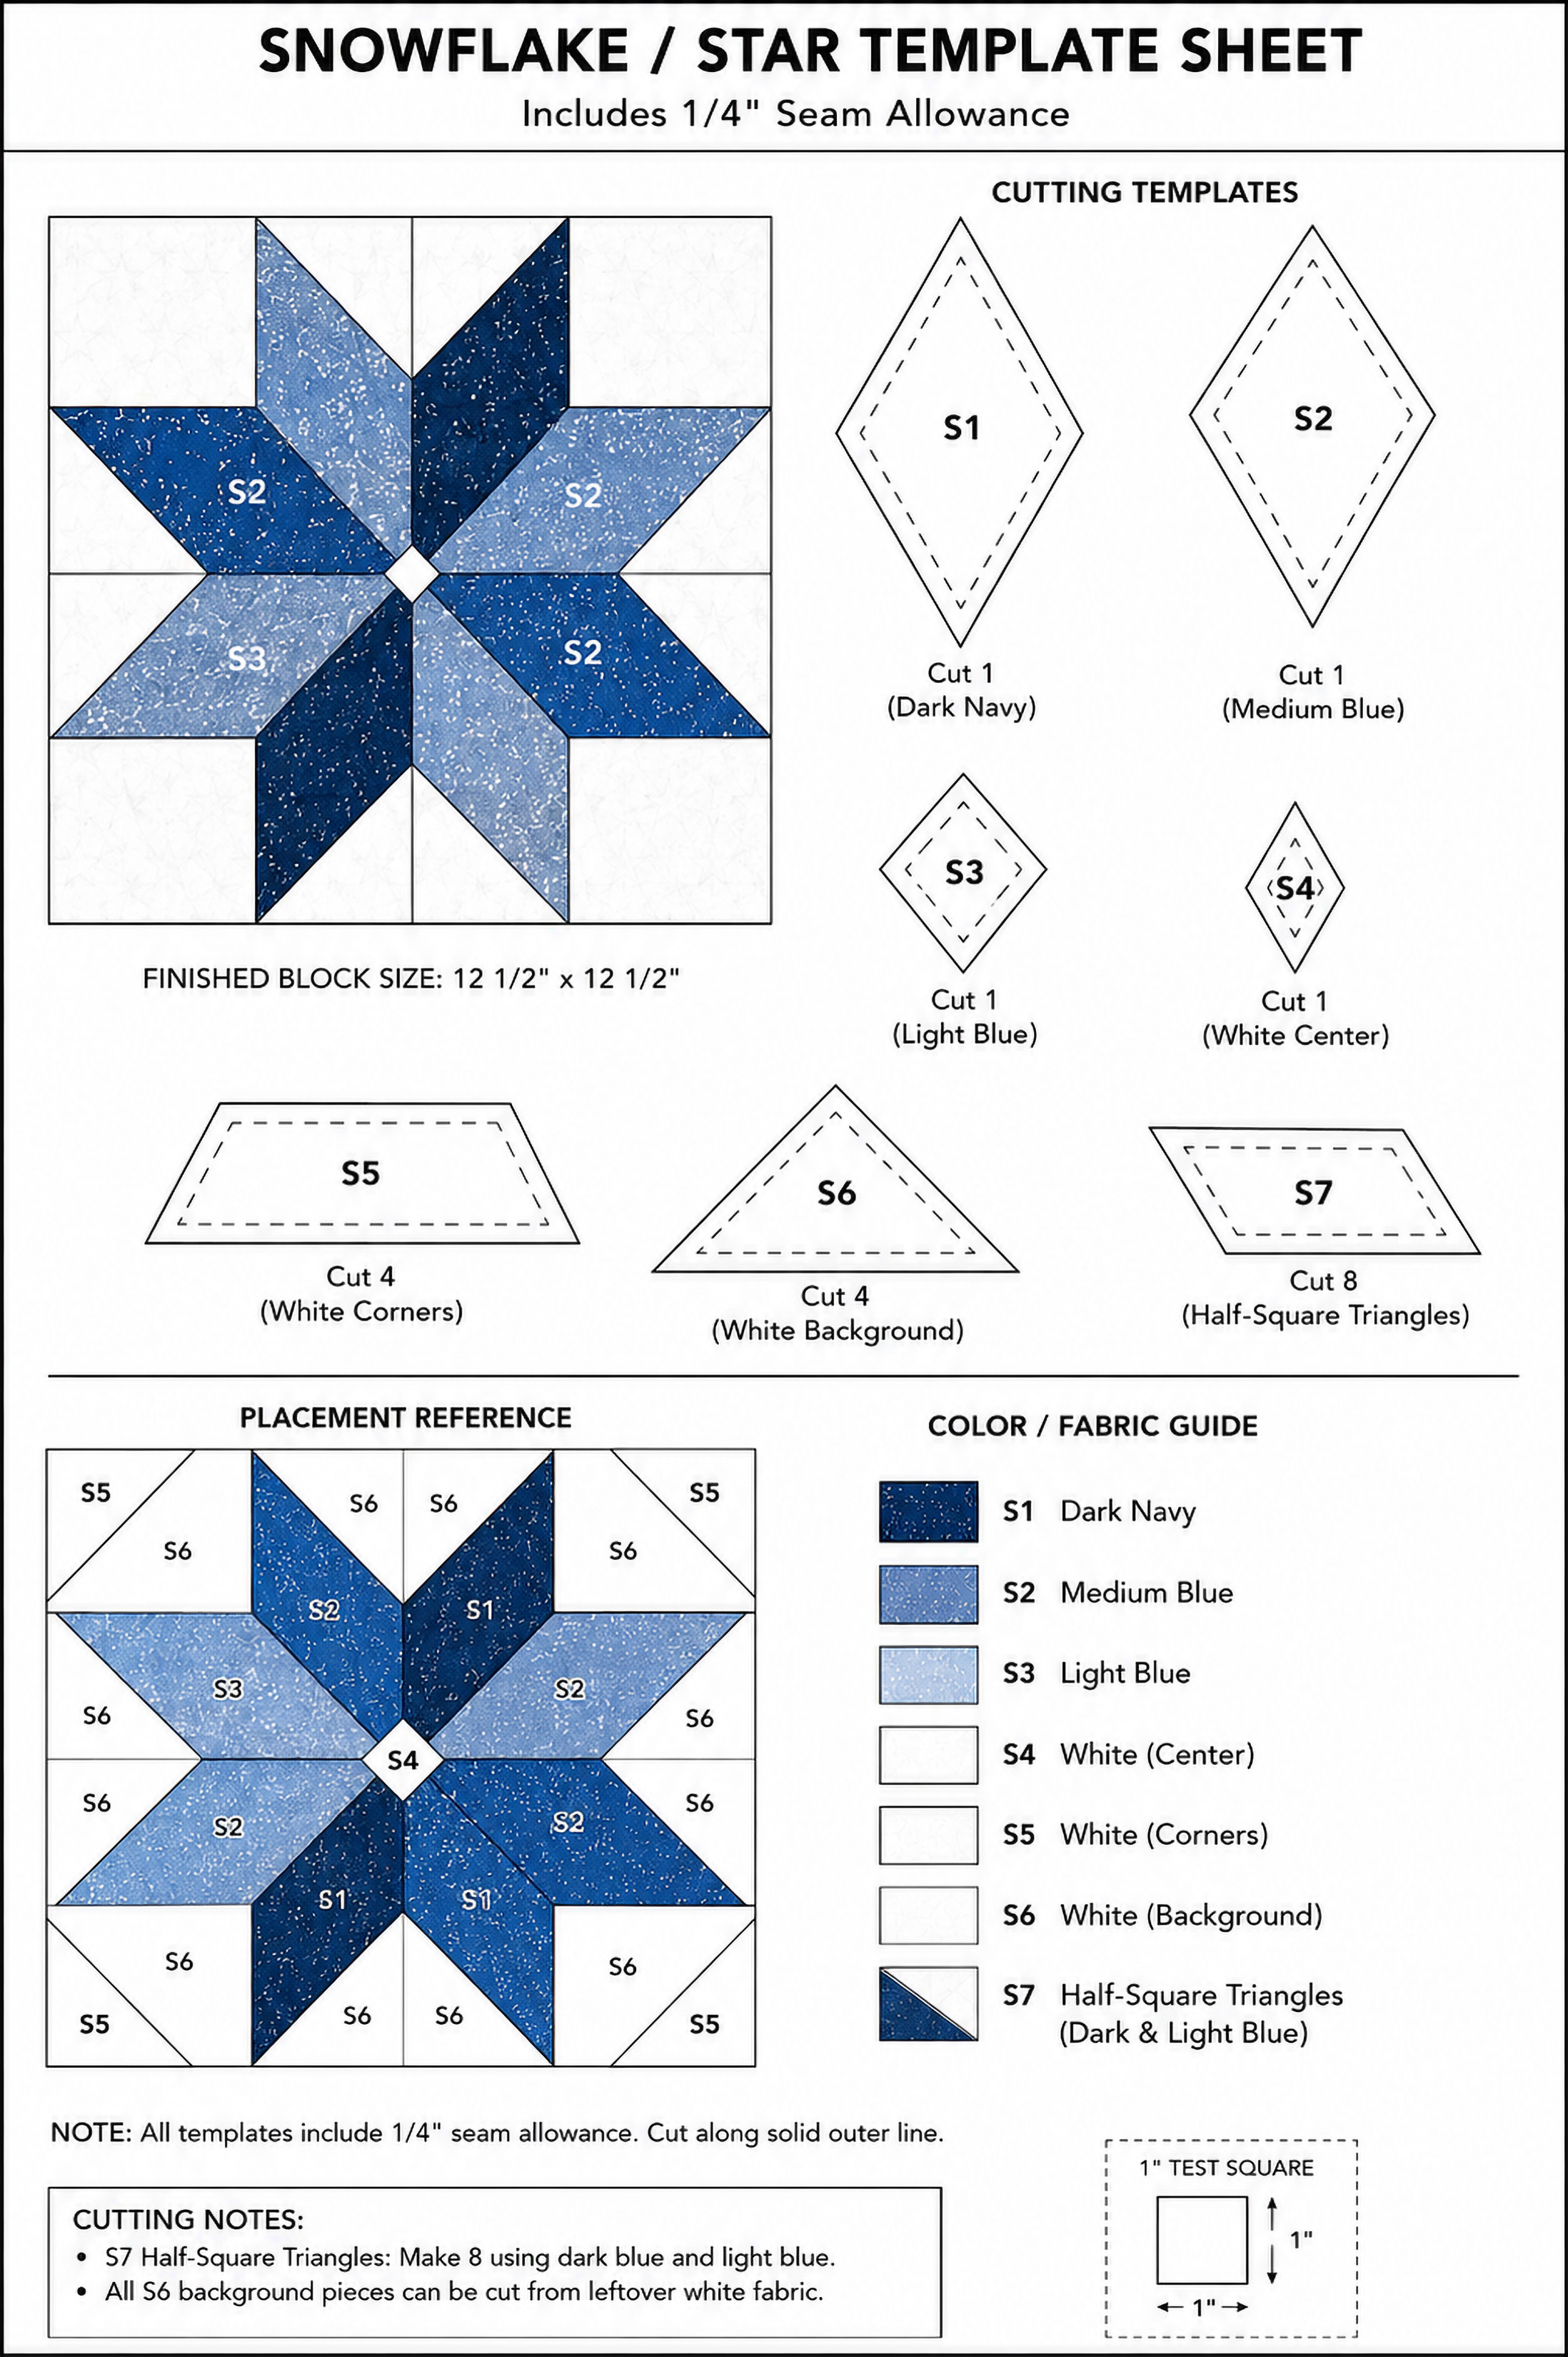
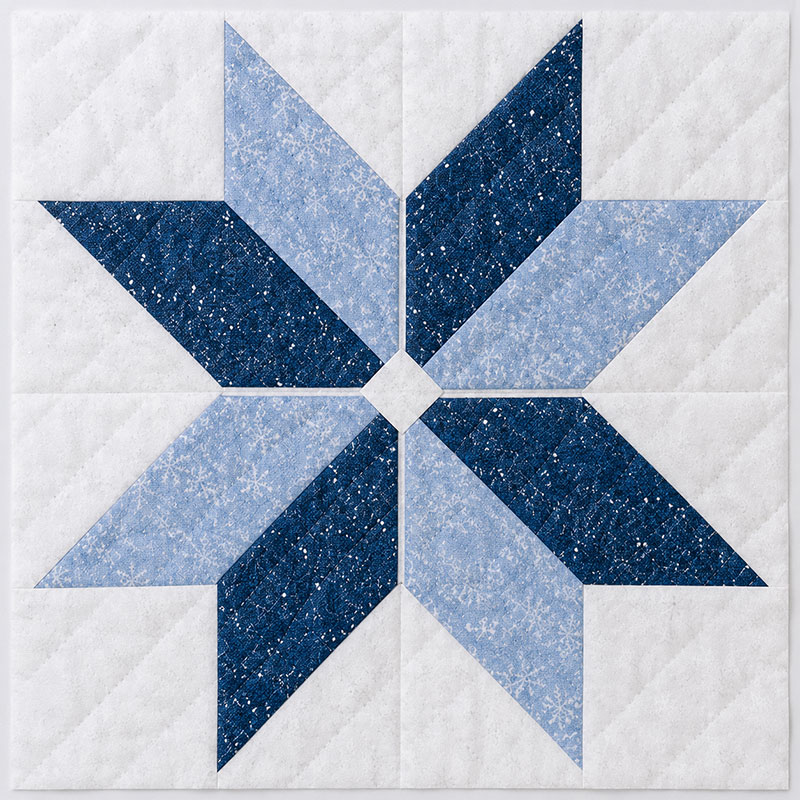
Exact Snowflake Star Block Instructions
The snowflake blocks are traditional pieced star blocks, not paper pieced blocks. That keeps the quilt approachable for beginners while still matching the appearance shown in the hero image.
Printable Snowflake Star Quilt Block Template
Download the full printable snowflake star template sheet
Cut for each snowflake star block:
- 1 center square at 6.5 x 6.5 inches
- 4 corner squares at 3.5 x 3.5 inches
- 8 star point squares at 3.5 x 3.5 inches
- 4 background rectangles at 3.5 x 6.5 inches
Assemble each snowflake star block:
- Place one star point square on the left side of a background rectangle.
- Draw a diagonal line across the star point square.
- Sew on the drawn line, trim the corner to a quarter inch seam, and press open.
- Repeat on the opposite side of the rectangle to create one flying geese star point unit.
- Make four flying geese units total.
- Sew one flying geese unit to the top of the center square.
- Sew one flying geese unit to the bottom of the center square.
- Sew the remaining two flying geese units to the left and right sides.
- Add the four corner squares.
- Trim the completed snowflake star block to 12.5 inches unfinished.
Parents often notice these star blocks first because the sharp angles break up the mountain sections and keep the quilt from blending into the vertical lines of the crib rails.
Step by Step Mountain Quilt Assembly Instructions
Lay every block on the floor before sewing full rows together. The appearance of the mountain quilt can shift very quickly once neighboring fabrics are arranged side by side.
Download the full printable quilt assembly map
Step 1: Assemble all mountain blocks completely.
Step 2: Assemble checkerboard patch blocks.
Step 3: Construct all snowflake star blocks.
Step 4: Sew stripe rectangles together to create center stripe block.
Step 5: Arrange all blocks using the exact row map above.
Before sewing the rows together, stack the cut pieces by number so the mountain shades, star points, checkerboard squares, and stripe panels stay matched to the hero quilt layout.
Download the full printable piece numbering guide
Step 6: Sew top row together from left to right.
Step 7: Press top row seams toward outer blocks.
Step 8: Sew middle row together from left to right.
Step 9: Press middle row seams toward center stripe block.
Step 10: Sew bottom row together from left to right.
Step 11: Press bottom row seams toward outer blocks.
Step 12: Sew completed rows together from top to bottom.
Step 13: Attach lower pale blue border section.
Step 14: Add striped accent panel to lower right corner.
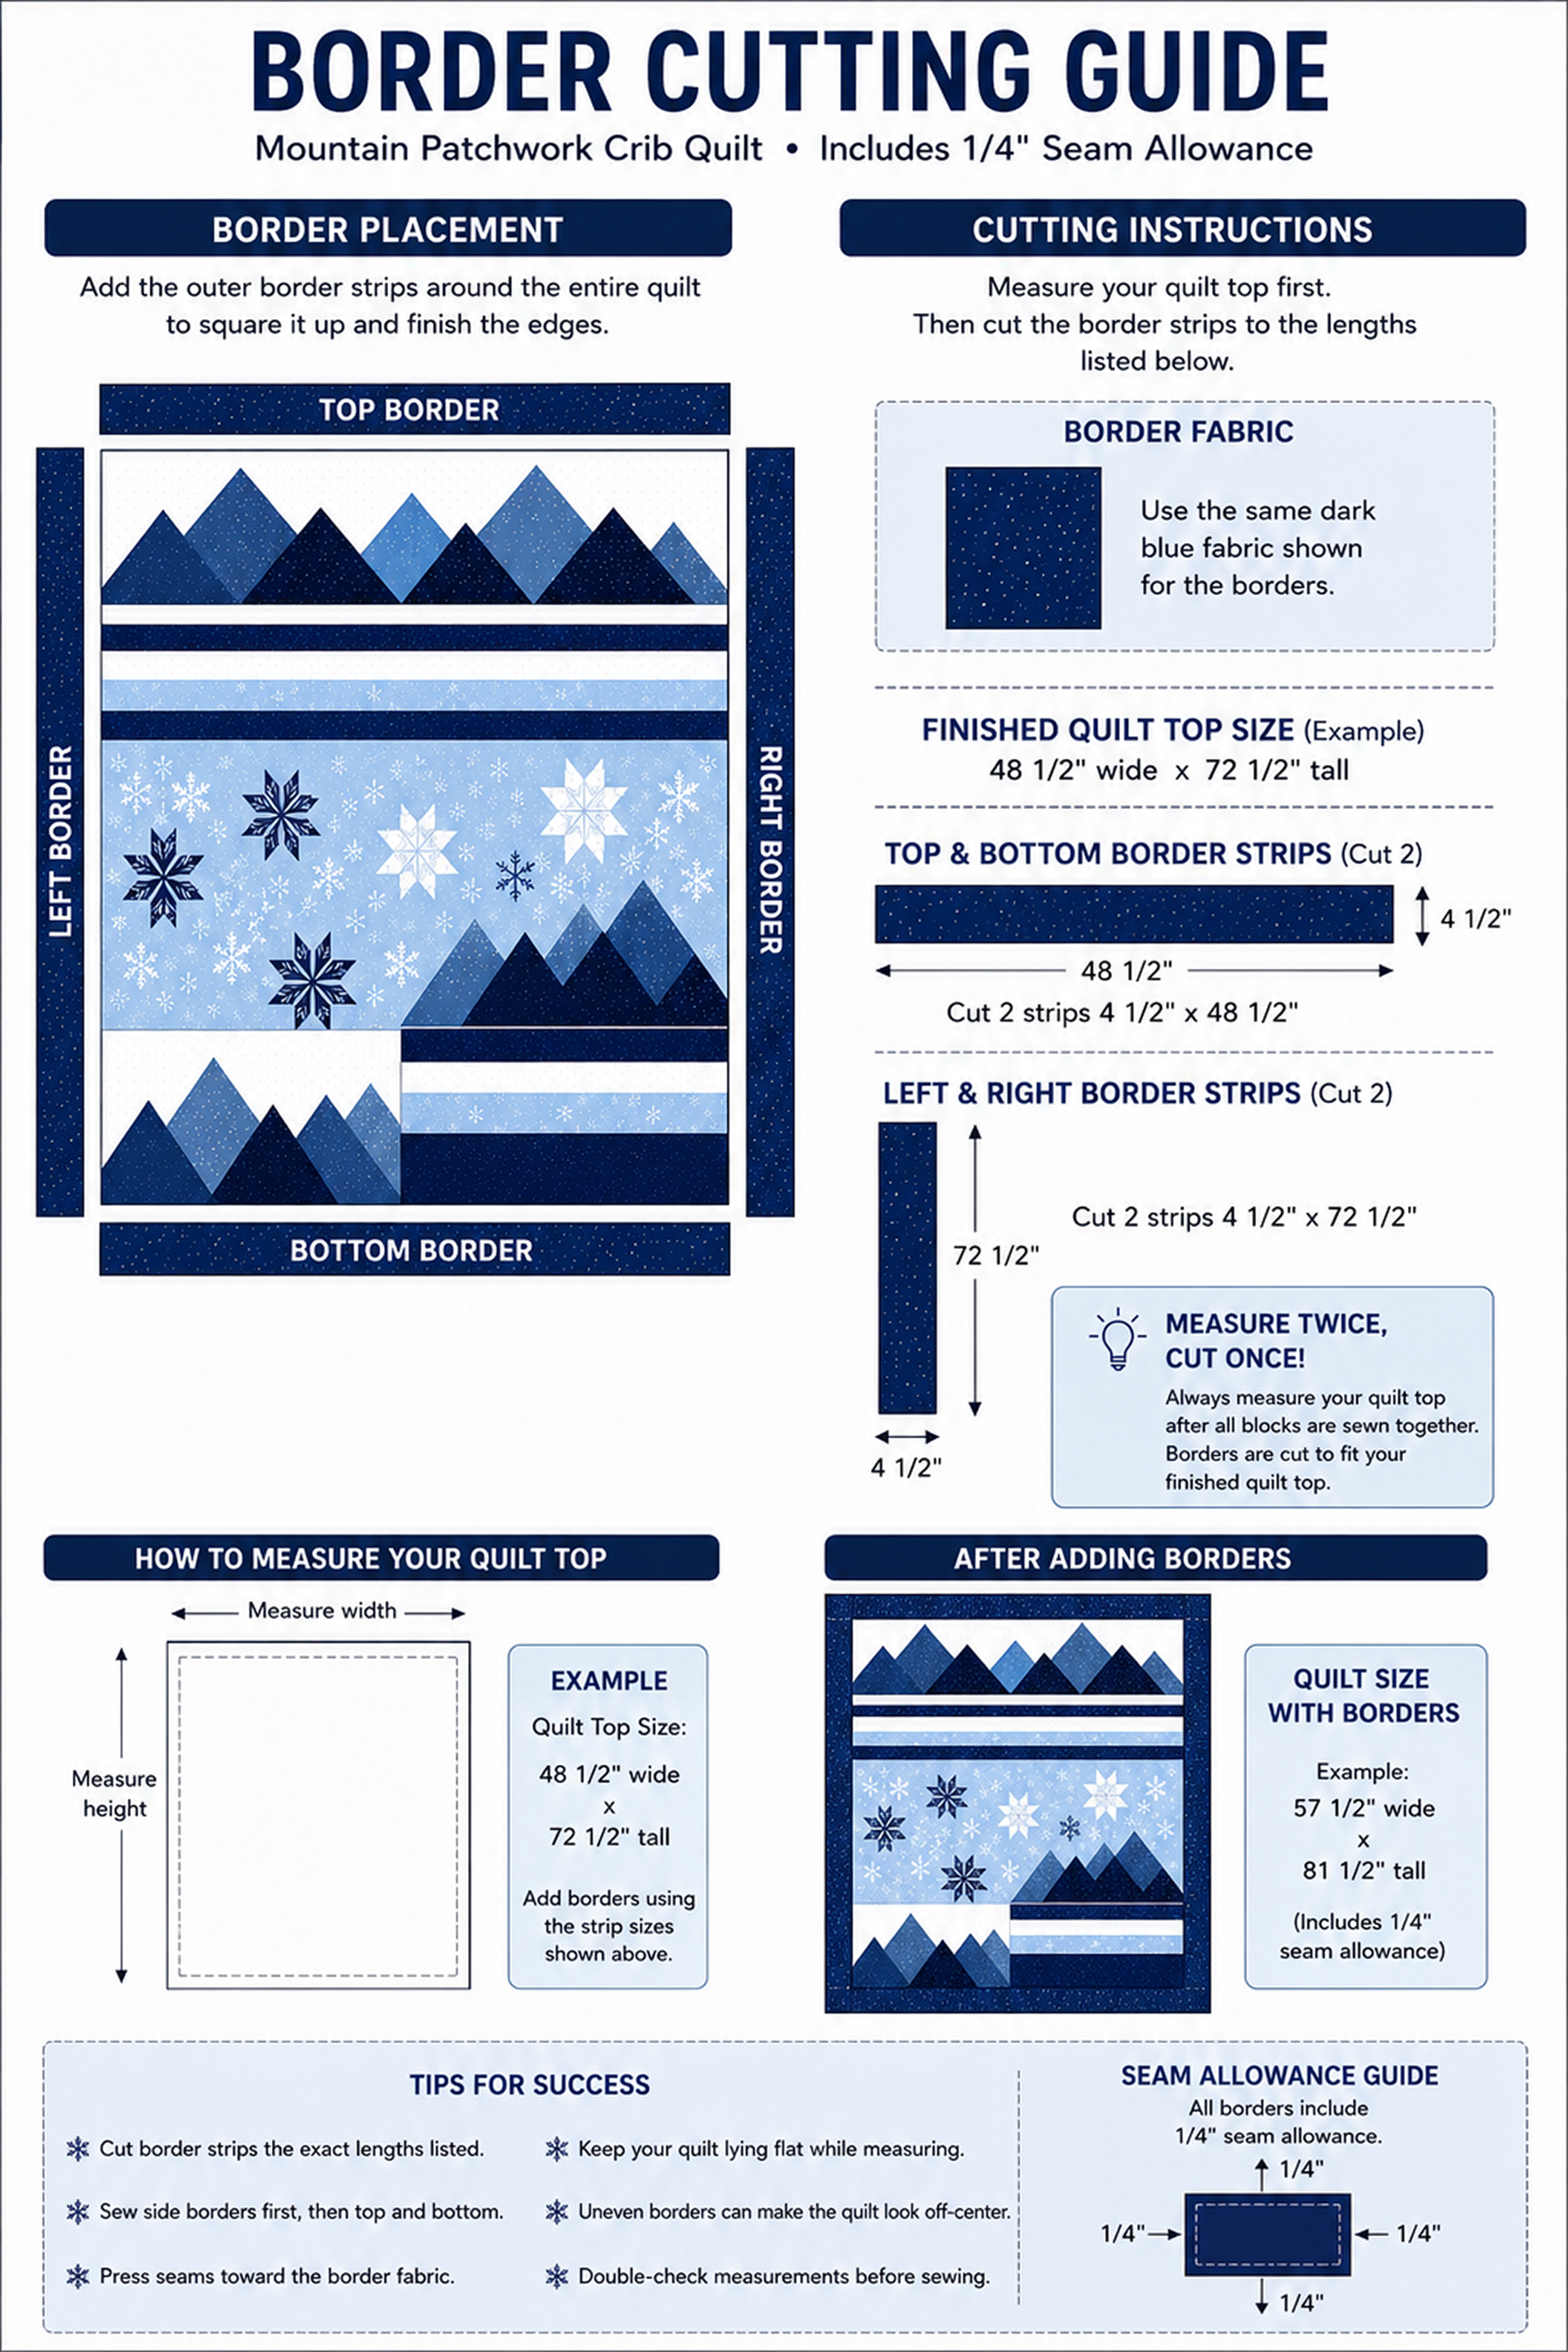
Step 15: Attach outer border strips around entire quilt.
The border strips need to stay even because they frame every mountain point, star block, checkerboard square, and stripe panel on the finished quilt.
Download the full printable border cutting guide
Step 16: Layer backing, batting, and quilt top.
Step 17: Pin layers every 4 inches.
Step 18: Quilt diagonal stitching lines spaced 1 inch apart following mountain angles.
Step 19: Quilt horizontal stitching lines through stripe section.
Step 20: Trim quilt square to exactly 38 x 52 inches.
Step 21: Attach double fold binding around perimeter.
I’ve learned the hard way that seam allowance drift changes the final appearance dramatically. A slightly wider seam near one corner can shift an entire row enough for the peaks to stop lining up correctly.
The quilting lines matter too. Straight vertical stitching fights against the angled movement built into the mountain blocks.
Beginner Quilting Mistakes That Shift Mountain Points
Mountain patchwork quilts are forgiving in some places and brutally obvious in others.
The biggest issue happens when neighboring mountain peaks drift slightly off center between rows. Even small inconsistencies become noticeable because geometric layouts naturally draw attention toward sharp angles.
Avoid these beginner mistakes:
- stretching fabric during angled seams
- using thick batting that distorts corners
- skipping ironing between rows
- cutting mountain triangles without rulers
- using busy nursery prints that hide alignment
Parents often notice these issues once the quilt gets photographed beside crib slats. Crooked angles become easier to spot in pictures than in person.
If you want another beginner-friendly project after finishing this one, these easy baby quilt patterns use many of the same straight seam techniques and simple block layouts.
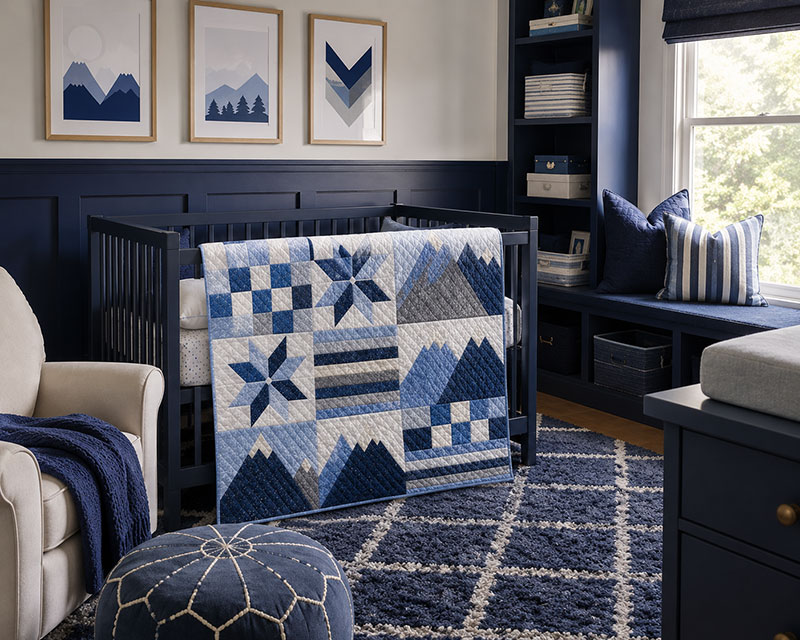
Why This Mountain Quilt Looks Custom in Real Nurseries
A lot of nursery quilts disappear once they’re placed inside finished rooms because crib rails, dressers, and wall art already create strong shapes throughout the space.
This mountain patchwork crib quilt pattern stands out because the larger mountain blocks are clear from across the room.
The horizontal stripe section also keeps the layout from becoming visually noisy. That single detail changes the entire mood of the finished nursery setup.
The completed nursery quilt pairs especially well with:
- light wood cribs
- black metal nursery lighting
- fog gray nursery walls
- snow inspired nursery artwork
- modern woodland themed rooms
If you are decorating around this quilt, these baby nursery themes show color palettes and room styles that work especially well with frosty mountain blues and geometric quilt layouts.
Printable Mountain Crib Quilt Pattern PDF
The printable version of this mountain patchwork crib quilt pattern should include:
- full cutting charts
- mountain triangle templates
- crib quilt sizing guide
- fabric placement map
- assembly diagrams
- binding instructions
- yardage calculator
Refer to the instructions carefully once the mountain rows start getting assembled.
Because crib quilts are decorative and should stay out of the crib during sleep, I also recommend reviewing the safe sleep recommendations from the U.S. Consumer Product Safety Commission before styling any baby bedding near a sleep space.
If you enjoyed this pattern and would like to make more nursery quilts like this one, these baby quilt ideas include additional modern layouts with beginner-friendly construction and crib-sized dimensions.
Frequently Asked Questions About Mountain Patchwork Crib Quilts
Is this mountain patchwork crib quilt beginner friendly?
Yes. The quilt uses straight seams and large geometric pieces that are manageable for confident beginners using a rotary cutter and quilting ruler.
What batting works best for crib quilts?
Low loft cotton batting helps the geometric blocks stay flatter and easier to align during quilting.
Can this quilt be resized for toddler beds?
Yes. Adding wider border strips and extra mountain rows can extend the layout for toddler bedding sizes.
Why do mountain quilt points sometimes look uneven?
Angle drift during cutting or inconsistent seam allowances normally causes neighboring peaks to lose alignment between rows.
Can mountain quilt patterns work in neutral nurseries?
Yes. Replacing the blue fabrics with charcoal, fog gray, ivory, or sand colored quilting cotton changes the entire look without affecting the geometric layout.
What sewing machine foot works best for this pattern?
A walking foot helps feed thicker quilt layers evenly during the final quilting stage.
When you click on links to various merchants on this site and make a purchase, this may result in this site earning a commission. This does not affect the price you pay.
UBGI Gold Standard 2026
Verified for performance, SEO,
and accessibility compliance.
Photos, decorating ideas, party setups, and reader submissions are shared for inspiration only and are not intended as step-by-step decorating, construction, or DIY instructions.
About Jan | Contact | Baby Room Ideas (Blog) | Site Map | Privacy Policy | Disclaimer | Affiliate Disclosure | Earnings Disclosure | Facebook | Pinterest
I am a participant in the Amazon Services LLC Associates Program, an affiliate advertising program designed to provide a means for us to earn fees by linking to Amazon.
Copyright © 2006-2026. All Rights Reserved.